Reading Reflection – Week 3

Before this reading, I thought anything that reacted when I touched or clicked it was automatically interactive. Crawford’s example of the refrigerator light made me reconsider that idea. I agree that a strong interactive system should do more than give one automatic response. It should understand the user’s input, process it in a meaningful way, and give a useful response. Video games support his argument because they react differently depending on a player’s choices, while a movie continues in the same way no matter what the viewer says or does. However, I think Crawford is slightly biased because his definition is very strict. Even simple interactions can still be enjoyable or helpful, especially for beginners or children.

For me, a strongly interactive system should respond quickly, provide clear feedback, and make the user feel that their choices matter. The response should also change depending on what the user does instead of repeating the same result every time. In my future sketches, I could improve interaction by using the mouse and keyboard to let users control objects, change colors, create new shapes, or remove items from an array. I could also make objects react differently depending on where the user clicks. The reading made me wonder whether a simple response can become strongly interactive if it leads to many different choices over time.

Week 3 Assignment

Overall Concept

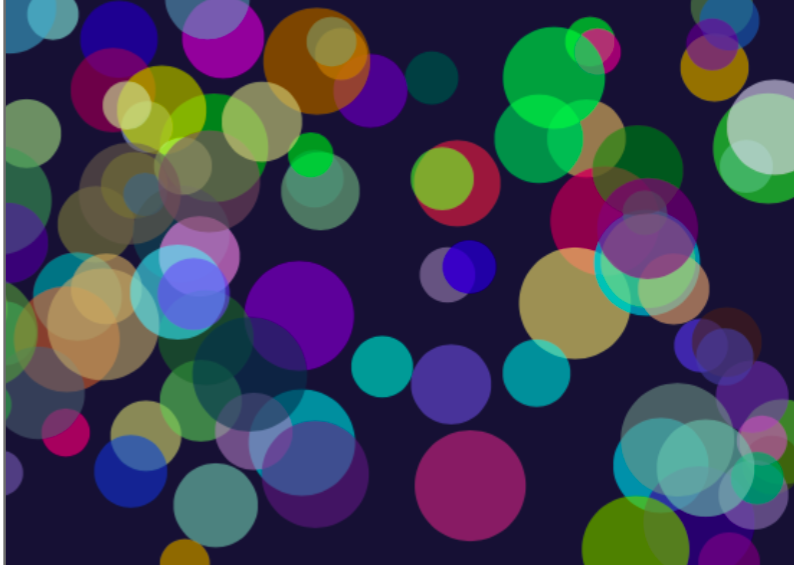
For this assignment, I wanted to create a generative artwork based on colorful bubbles floating around in a dark space. I chose bubbles because they are easy to recognize, but they can still create an interesting image when there are many of them moving together. I wanted the final artwork to feel calm, colorful, and slightly playful rather than looking like a game or a completely still picture.

Every time the sketch begins, the bubbles appear with random positions, sizes, colors, and speeds. Because these values are random, the arrangement is never exactly the same. Some bubbles are large and move slowly, while others are smaller and move more quickly. The random colors also create different combinations each time the program starts. I used a dark blue background to make the brighter colors more visible.

I used Object-Oriented Programming because every bubble needs the same basic information and actions. The Bubble class works as a template that stores each bubble’s position, speed, size, and color. It also contains methods that allow each bubble to move, bounce, and display itself. I then stored all the bubble objects inside one array and used loops to control them. This made it possible to create many bubbles without writing separate code for every one.

Sketch Code

let bubbles = [];

function setup() {
  createCanvas(600, 400);

  // create 100 bubble objects
  for (let i = 0; i < 100; i++) {

    let newBubble = new Bubble(
      random(50, 550),
      random(50, 350),
      random(-3, 3),
      random(-3, 3),
      random(30, 80),
      random(255),
      random(255),
      random(255)) ;

    bubbles.push(newBubble);
  }
}

function draw() {
  background(20, 20, 50);

  // make every bubble move, bounce, and display 
  for (let i = 0; i < 100; i++) {
    bubbles[i].move();
    bubbles[i].bounce();
    bubbles[i].display();
  }
}

class Bubble {

  constructor(x, y, xSpeed, ySpeed, bubbleSize, redValue, greenValue, blueValue) {
    this.x = x;
    this.y = y;

    this.xSpeed = xSpeed;
    this.ySpeed = ySpeed;

    this.bubbleSize = bubbleSize;

    this.redValue = redValue;
    this.greenValue = greenValue;
    this.blueValue = blueValue;
  }

  // move the bubbles
  move() {
    this.x = this.x + this.xSpeed;
    this.y = this.y + this.ySpeed;
  }

  // change direction when the bubbles reaches an edge
  bounce() {
    if ((this.x > width) || (this.x < 0)) {
      this.xSpeed = this.xSpeed * -1;
    }

    if ((this.y > height) || (this.y < 0)) {
      this.ySpeed = this.ySpeed * -1;
    }
  }

  // draw the bubbles
  display() {
    noStroke();

    fill(
      this.redValue,
      this.greenValue,
      this.blueValue,
      150
    );

    circle(this.x, this.y, this.bubbleSize);
  }
}

My main idea was to combine control with randomness. I controlled the canvas, movement, and general appearance, but then the individual colors, sizes, positions, and speeds were chosen randomly. This makes the artwork organised while still allowing each version to look different.


Embedded Sketch

Problems I Ran Into

One problem I noticed was that some bubbles moved very slowly while others moved much faster. This happened because their speeds were chosen randomly. At first, I thought something was wrong with the slower bubbles, but then I understood that they had received a speed close to zero.

Another small issue was that parts of the bubbles sometimes went outside the canvas before they bounced back. This happens because the program checks the center position of each bubble. I decided to keep it because the bubbles still return and continue moving. Chiefly, whenever I ran into a problem, I mainly went back to the Week 3 slides that cover functions, OOP & Arrays, because they explained each of these concept clearly and showed the process step by step.

Week 2 Reading Reflection

Before watching the talk, I thought randomness in art mostly meant that the artist was giving up control. The talk changed my thought because his examples showed that chance can operate within rules chosen by the artist. I found Richter’s idea of “planned” chance especially convincing. Reas’ own projects also support this because he sets limits for features such as position, size, and direction, while still allowing unexpected results. I think Reas is slightly biased toward randomness because it has been important in his own practice for many years, however, he also admits that he is skeptical of this kind of work, so his argument does not feel completely one-sided.

In my own work, I plan to use randomness for the positions or colors of repeated shapes. I would still control the canvas size, available colors, shape sizes, and the area where objects can appear. For me, the best balance would be around 25% randomness and 75% control. Total randomness might produce something confusing, while complete control could make every result predictable. A smaller amount of randomness could make each version different without losing my original idea. Therefore, the talk made me wonder how much randomness an artist should use before the artwork feels out of control.

Week 2 – Assignment (Animation, Conditionals, Loops)

My Concept
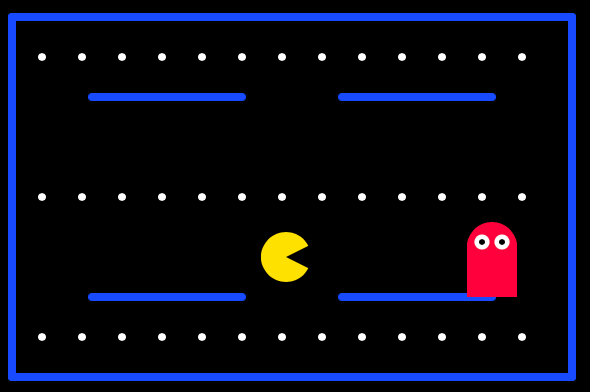
When I thought about making a good piece of art using a for loop, the first idea that came to my mind was a Pac-Man design map. Pac-Man maps contain many repeated dots, so I thought a loop would be a useful way to create something similar without drawing every dot separately. My goal was not to recreate the original game exactly. I wanted to make my own simple maze-chase artwork inspired by it. I used blue lines for the maze, repeated white dots, a yellow player, and a simple red enemy. The yellow character follows the mouse, which makes the artwork interactive.


Code Highlight
The code I am particularly proud of is the loop that creates the dots:

for (let x = 50; x <= 550; x += 40)
circle(x, 60, 8);
circle(x, 340, 8);

I am proud of this part because I did not need to write a separate circle() command for every dot. The variable x starts at 50 and increases by 40 every time the loop repeats. This places the dots across the canvas with equal spaces between them. I used another similar loop to create the row of dots in the middle:

for (let x = 50; x <= 550; x += 40)
circle(x, 200, 8);

function setup() {
  createCanvas(600, 400);
}

function draw() {
  background(0);

  // Maze walls
  stroke(0, 100, 255);
  strokeWeight(8);

  line(20, 20, 580, 20);
  line(20, 380, 580, 380);
  line(20, 20, 20, 380);
  line(580, 20, 580, 380);

  line(100, 100, 250, 100);
  line(350, 100, 500, 100);
  line(100, 300, 250, 300);
  line(350, 300, 500, 300);

  // the top and bottom dots
  noStroke();
  fill(255);

  for (let x = 50; x <= 550; x += 40) {
    circle(x, 60, 8);
    circle(x, 340, 8);
  }

  // another loop to draw dots through the middle
  for (let x = 50; x <= 550; x += 40) {
    circle(x, 200, 8);
  }

  // Player
  circle(mouseX, mouseY, 50);

  // Player's mouth
  fill(0);
  triangle(
    mouseX,
    mouseY,
    mouseX + 30,
    mouseY - 15,
    mouseX + 30,
    mouseY + 15
  );

  // The Enemy
  fill(255, 60, 80);
  circle(500, 250, 50);
  square(475, 250, 50);

  // Enemy eyes
  fill(255);
  circle(490, 245, 15);
  circle(510, 245, 15);

  fill(0);
  circle(490, 245, 6);
  circle(510, 245, 6);
}

Embedded Sketch

How Was This Made?

I first made a black background and used blue line() commands to create the outside border and the simple walls of the maze. I used for() loops to repeat the small white circles across the map. The player was made with a yellow circle() and a black triangle() for its mouth. I used mouseX and mouseY as its coordinates, allowing it to follow the mouse. I also used an “if” and “else” statement to change the player from yellow to orange when it moves from one side of the canvas to the other. The enemy was created from a red circle and square, with smaller circles for its eyes. I referred to the loop and conditional examples from our class materials, specifically from the class Power Points from Week 2. I also used the official p5.js reference to understand the basic drawing commands.


Reflection and Future Improvements

This project helped me understand why loops are useful. Drawing every dot with a separate command would take a long time, but the loop made it shorter and easier to adjust. I also learned that changing the starting position, ending condition, or increment changes how many dots appear and how far apart they are. A challenge I would like to mention is when choosing the coordinates for the maze walls and making sure the dots stayed inside the canvas. I kept the maze simple because I just wanted to use the basic techniques that we covered in class. However, in the future I would like to make the player stay inside the maze walls instead of moving anywhere on the canvas. I could also make the enemy move, add more paths, or make the dots disappear when the player touches them. Chiefly I would like to make it a more realistic and applicable game and theme 

Week 1 – Self Portrait

My Concept
My concept was to create a simple self-portrait using the shapes and colors we learned in class. My self-portrait includes a face, hair, eyes, a nose, a mouth, ears, and a blue shirt. I also added a red cap as the interactive part of the portrait. The cap follows the mouse as the user moves it around the canvas.

I kept the design simple because I am still learning how coordinates, shapes, and colors work in p5.js.


A Code Highlight
The part of my code that I am particularly proud of is the moving cap:

// Cap
fill(170, 25, 25);
ellipse(mouseX + 65, mouseY + 25, 100, 25);

// Cap moves with the mouse
noStroke();
fill(200, 40, 40);
ellipse(mouseX, mouseY, 180, 80);

I am proud of this section because it makes my portrait interactive. Instead of giving the cap a fixed position, I used “mouseX” and “mouseY”. This causes the cap to follow the horizontal and vertical position of the mouse. I added numbers to the brim’s position so it stays connected to the main part of the cap.

function setup() {
  createCanvas(500, 500);
}

function draw() {
  background(180, 220, 255);

  // Shirt/Top
  noStroke();
  fill(60, 120, 200);
  square(150, 380, 200);

  // Ears
  fill(195, 140, 100);
  ellipse(145, 270, 40, 70);
  ellipse(355, 270, 40, 70);

  // Head
  fill(195, 140, 100);
  ellipse(250, 270, 200, 240);

  // Hair
// Hair
fill(50, 30, 20);
arc(250, 220, 190, 160, PI, TWO_PI);

  // Eyes
  fill(255);
  ellipse(210, 260, 42, 28);
  ellipse(290, 260, 42, 28);

  // Pupils
  fill(40);
  circle(210, 260, 14);
  circle(290, 260, 14);

  // Nose
  stroke(110, 70, 50);
  strokeWeight(3);
  line(250, 275, 240, 310);
  line(240, 310, 255, 310);

  // Mouth
  stroke(100, 30, 30);
  strokeWeight(4);
  line(225, 330, 250, 340);
  line(250, 340, 275, 330);

  // Cap 
  noStroke();
  fill(200, 40, 40);
  ellipse(mouseX, mouseY, 180, 80);

  // Cap that moves with mouse movement
  fill(170, 25, 25);
  ellipse(mouseX + 65, mouseY + 25, 100, 25);

  //  The mouse coordinates in the console
  print(mouseX + "," + mouseY);
}


Embedded Sketch
<>

How This Was Made:
I made this project in the p5.js Web Editor. I built the portrait by combining simple shapes, including square(), circle(), ellipse(), line(), and arc(). I used fill() to give the shapes different colors. I also used stroke(), noStroke(), and strokeWeight() to control the outlines.

The code inside setup() creates the canvas once. The code inside draw() runs repeatedly, which allows the cap to update its position whenever the mouse moves. Additionally, the order of the code is important because shapes drawn later appear in front of earlier shapes.

I used the official p5.js reference pages provided in class to check how the drawing commands work. Additionally I used the course week 1 power points as it gives a clear and broad explaination of all functions and codes I had to use to complete the portrait. Chiefly, every part of the portrait was drawn directly with p5.js shapes and colors.


Reflection and Future Improvements
This project helped me understand how basic shapes can be combined to create a recognizable person. I also learned that coordinates control where each shape appears and that the order of the code affects which shapes appear in front. The most difficult part was placing the facial features and hair correctly. I had to adjust their coordinates and sizes until they fit the head. Making the cap follow the mouse also helped me understand how mouseX and mouseY can make a sketch interactive. In the future, I could improve the portrait by adding more details to the hair, clothing, and background. I could also make the eyes follow the mouse or add more movement after learning additional p5.js commands.