Final MY6!

Concept:

We originally wanted our final project to do some sort of generative artwork, but somehow we ended up doing a project completely unrelated. Our goal with this project is to raise awareness of issues happening around the world that aren’t covered enough in the media. Although there are certainly many issues that should be highlighted we chose to focus on six issues happening in six different countries. We also wanted to include ways to learn more about these issues as becoming aware, and learning more is the first step toward change.

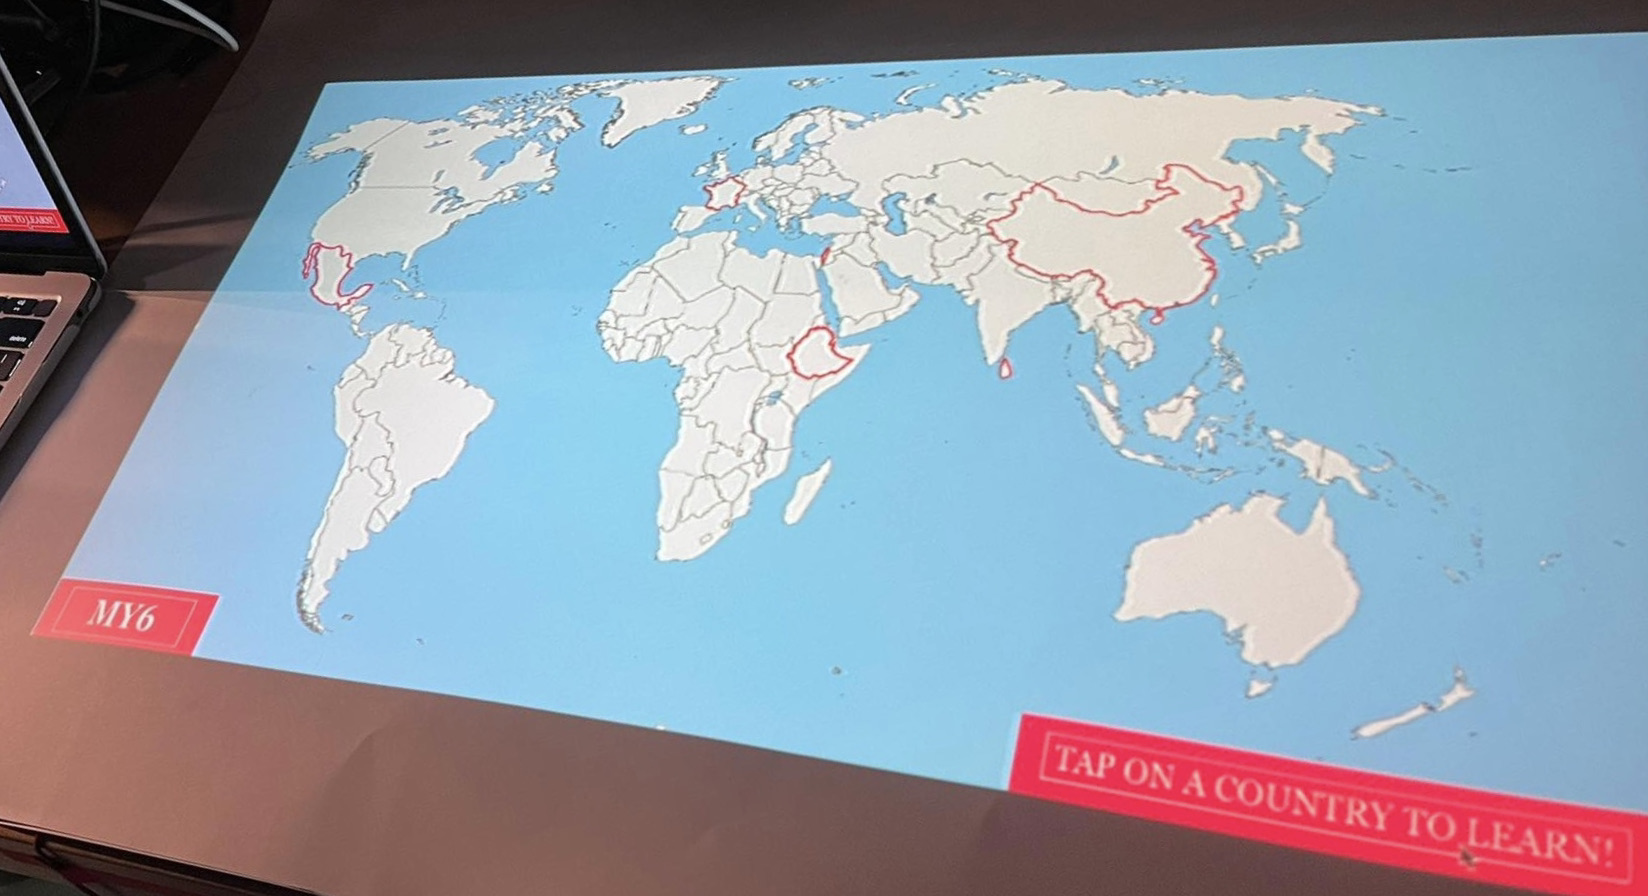
CNN has daily news coverage on issues happening around the world, they do this in a 10-minute video that is intended to be short and easily accessible. Taking inspiration from this we titled our project MY6 (Mariam + Yesenia, 6 issues) and aimed to showcase 6 issues through videos that give insight into the issues in short 2-minute videos. Although we went through many ideas on how to execute this project, including puzzles and floor tiles, in thinking about the experience of the user we landed on this:

Implementation: 

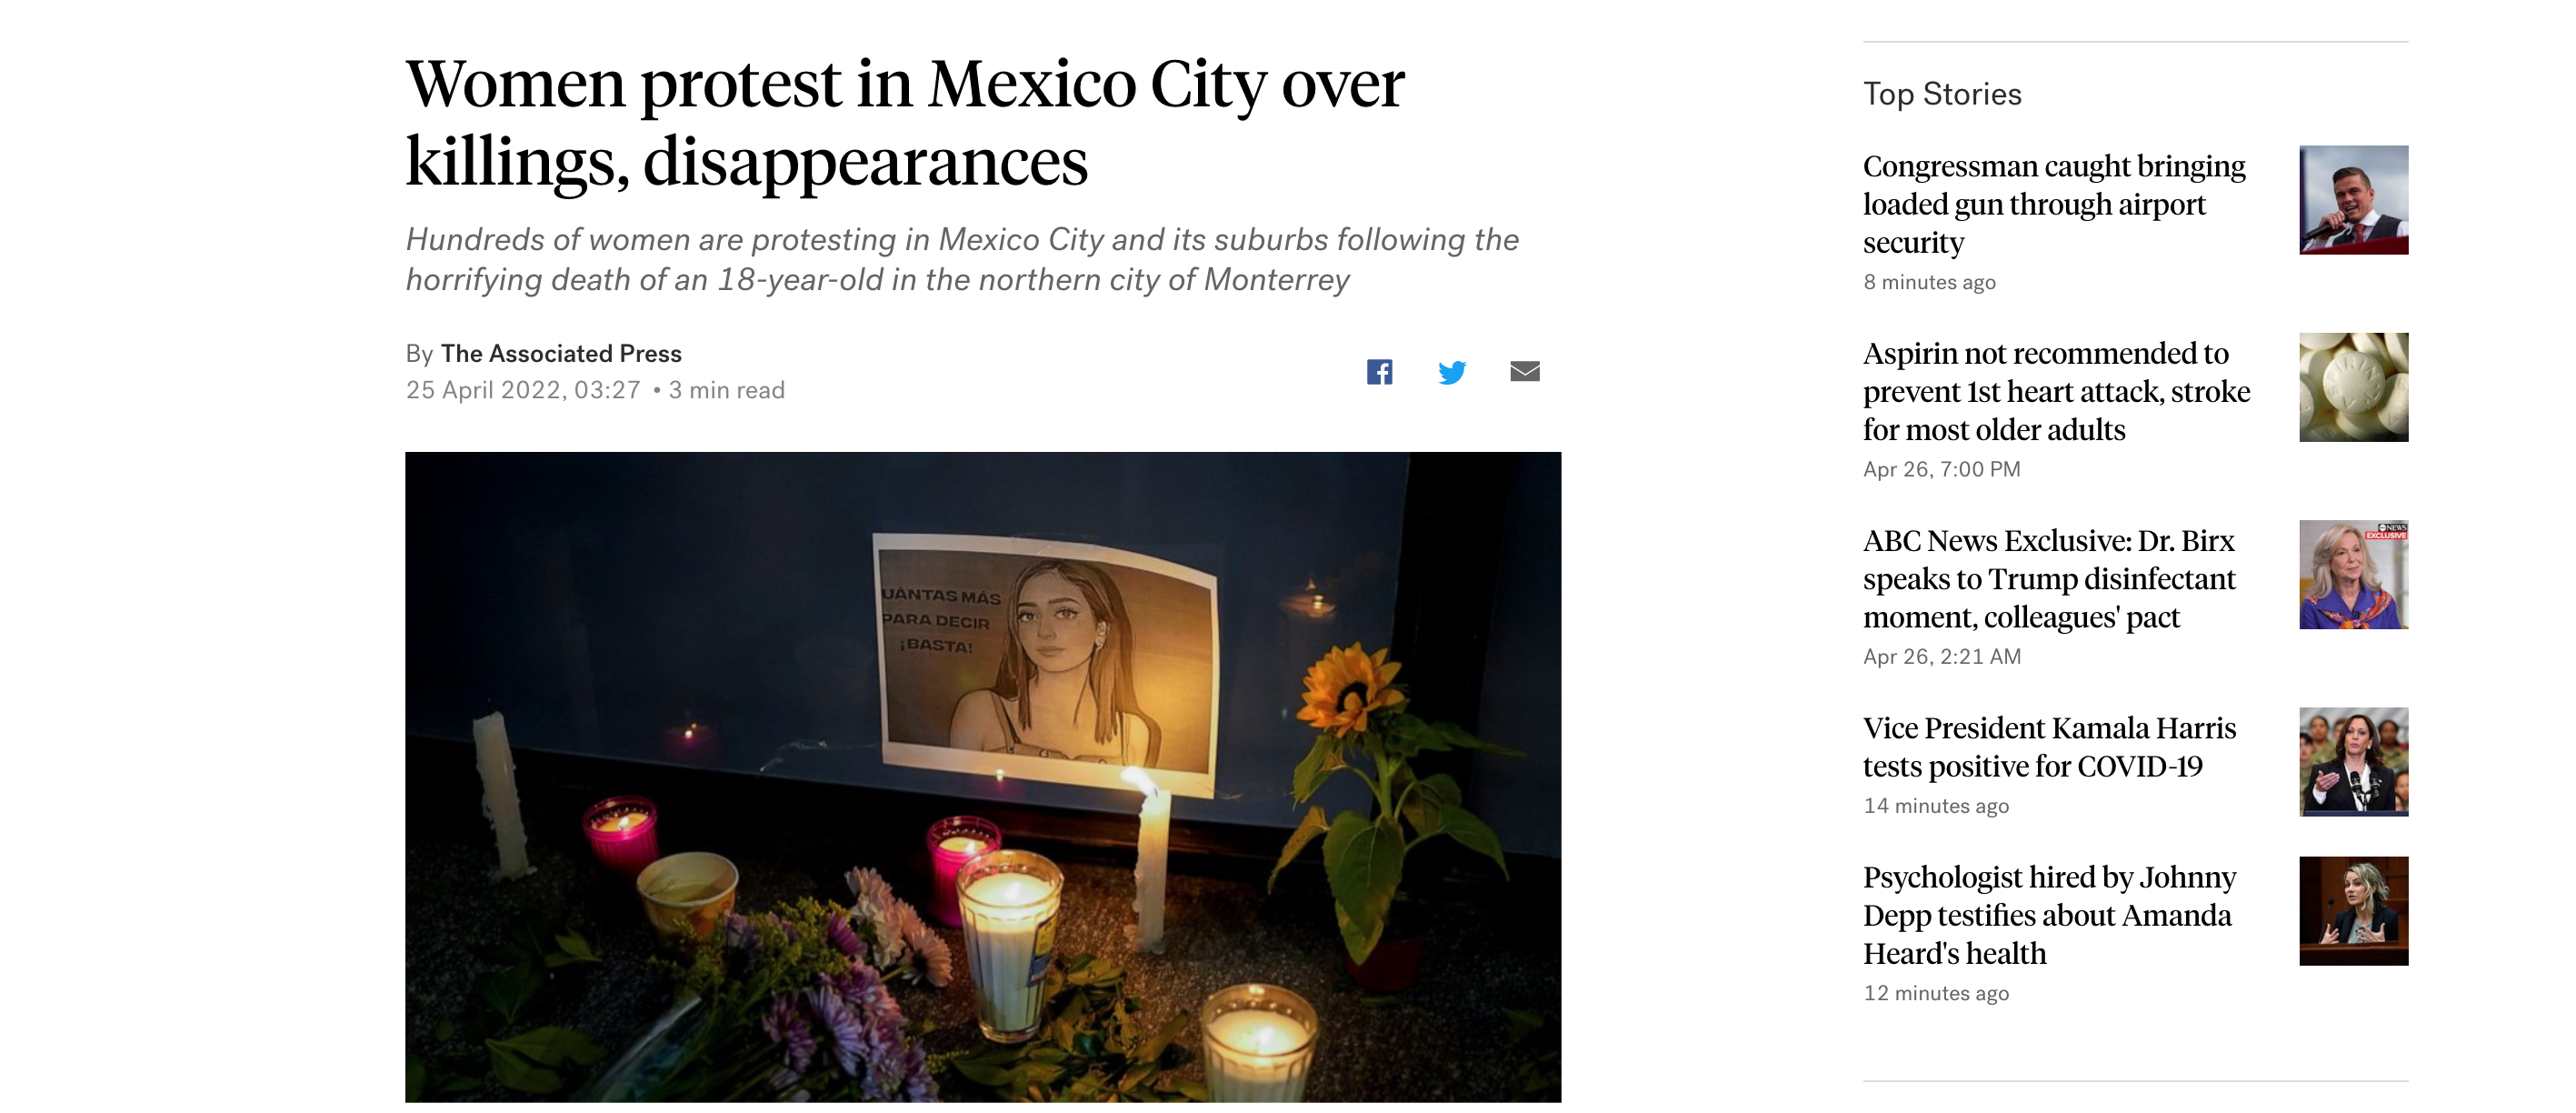
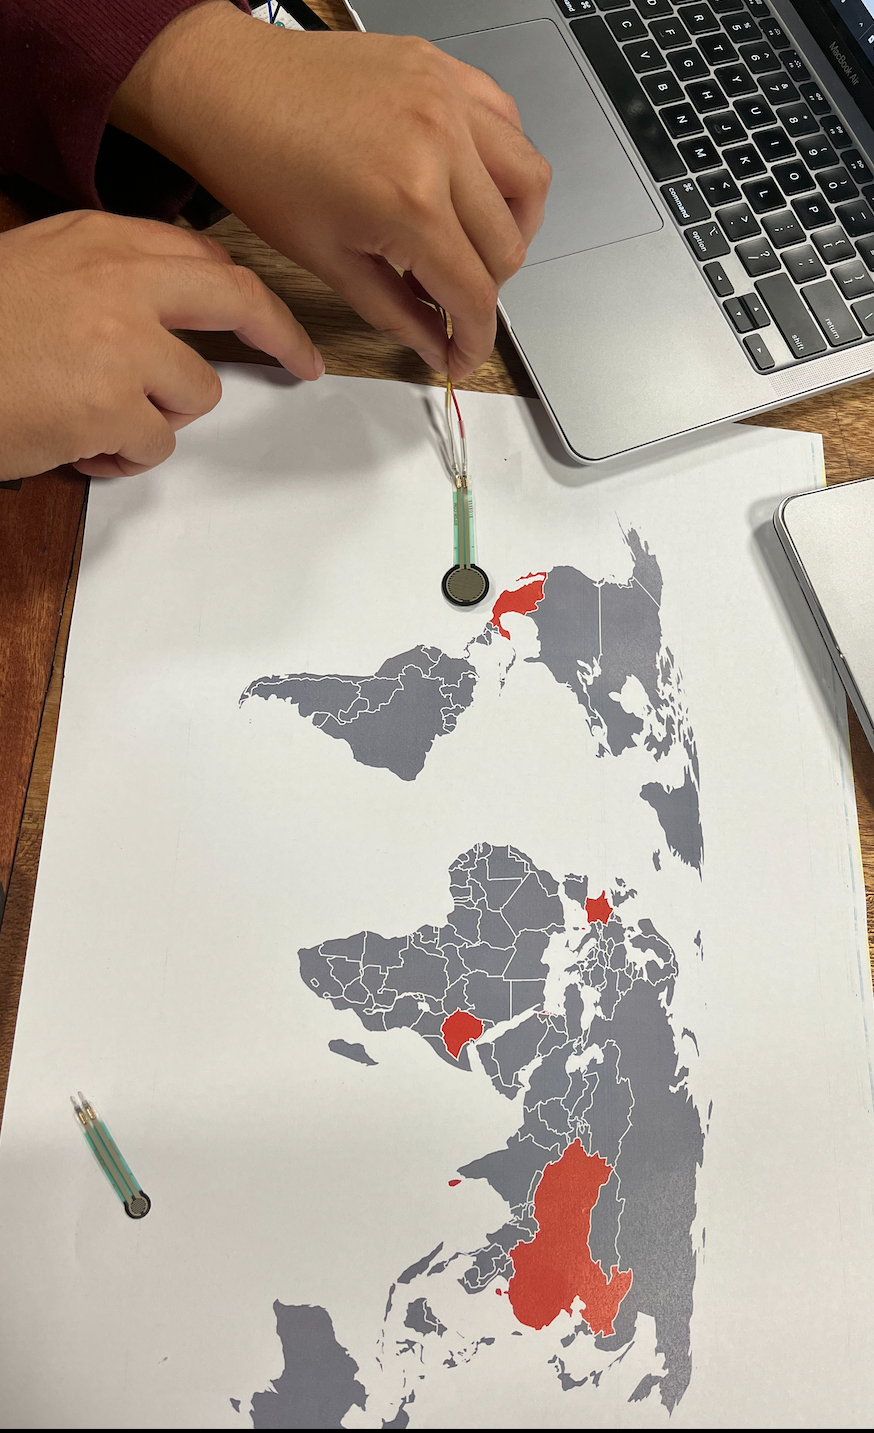
To bring this idea to life, we used a project to project a world map onto a surface that outlined the six different countries. By touching one of the six countries, a force sensor would trigger a video to play that again, summarizes the issues, after which we compiled a list of ways to learn more. With each of these videos, we wanted the people who are affected by these issues to be at the forefront of the presentation of these issues. By doing this, we hope that the lives of those affected by these issues are humanized as opposed to being numbers reported, or people affected by another issue happening in the world.

To do this we used p5js to display the videos, and Arduino to trigger the videos. For the videos we used the setup function to hide the videos unless they are triggers, and if statements in the draw function to play the videos when they are triggered, as well as statements to hide the other videos and not play them unless all other videos also aren’t playing. We also used the play function along with an else statement to stop the video after it played once to stop it from looping.

For the map that the user will interact with we used force sensors and positioned them in the same place the map would be projected, we taped them down onto a surface and then laid a sheet of white paper over it to create somewhat of a touch screen. The user can replay a video after it has been played, and also click on any video, in any order to learn about a different country.

P5JS Code

const pts = []
var size = 0.6;
let alpha = 255;
let left = 0;
let right = 0; 

let rVal0 = 0;
let rVal1 = 0;
let rVal2 = 0;
let rVal3 = 0;
let rVal4 = 0;
let rVal5 = 0;

let img1;
let vid0;
let vid1; 
let vid2; 
let vid3;
let vid4;
let vid5;

let playVid0 = false;
let playVid1 = false;
let playVid2 = false;
let playVid3 = false;
let playVid4 = false;
let playVid5 = false;

function preload () {
  imgA = loadImage("outline map.png");
  vid0 = createVideo("china.mp4");
  vid1 = createVideo("sri lanka.mp4");
  vid2 = createVideo("ethiopia.mp4");
  vid3 = createVideo("palestine.mp4");
  vid4 = createVideo("france.mp4");
  vid5 = createVideo("mexico.mp4");
}

function setup() {
  createCanvas(innerWidth, innerHeight);
  pixelDensity(5);
  textSize(18);
  setUpSerial();

  vid0.hide();
  vid0._onended = ()=> {
    playVid0 = false
}
    vid1.hide();
  vid1._onended = ()=> {
    playVid1 = false
}
  vid2.hide();
  vid2._onended = ()=> {
    playVid2 = false
}
  vid3.hide();
  vid3._onended = ()=> {
    playVid3 = false
}
  vid4.hide();
  vid4._onended = ()=> {
    playVid4 = false
}
  vid5.hide();
  vid5._onended = ()=> {
    playVid5 = false
}
}
function keyPressed() {

  if (key == " ") {
    // important to have in order to start the serial connection!!
    setUpSerial(SELECT_PORT);
  }
}
function draw() {
  image(imgA, 0, 0, innerWidth, innerHeight);
  
  fill(100);
  stroke(255);
  strokeWeight(1);

if (!serialActive) {
    text("Press Space Bar to select Serial Port", 20, 30); 
} else {
    text("Connected", 20, 30);
}

if (rVal0 == 1 && playVid0 == false && playVid1 == false && playVid2 == false && playVid3 == false && playVid4 == false && playVid5 == false) {
    print("video0");
    vid0.play();
    playVid0 = true;
}
if ( playVid0 ){
    image(vid0, 300, 120, 560, 316); 

} else {
  playVid0 = false;
}
  
if (rVal1 == 1 && playVid1 == false && playVid0 == false && playVid2 == false && playVid3 == false && playVid4 == false && playVid5 == false) {
  print("video1");
  vid1.play();
  playVid1 = true;
 
}
if ( playVid1 ){
  image(vid1, 330, 250, 560, 316); 

} else {
  playVid1 = false;
}
if (rVal2 == 1 && playVid2 == false && playVid0 == false && playVid1 == false && playVid3 == false && playVid4 == false && playVid5 == false) {
  print("video2");
  vid2.play();
  playVid2 = true;
}
if ( playVid2 ){
  image(vid2, 150, 300, 560, 316); 

} else {
  playVid2 = false;
}
if (rVal3 == 1 && playVid3 == false && playVid0 == false && playVid1 == false && playVid2 == false && playVid4 == false && playVid5 == false) {
  print("video3");
  vid3.play();
  playVid3 = true;
}
if ( playVid3 ){
  image(vid3, 200, 330, 560, 316); 
 
}
  else{
    playVid3 = false;
}

if (rVal4 == 1 && playVid4 == false && playVid0 == false && playVid1 == false && playVid2 == false && playVid3 == false && playVid5 == false) {
  print("video4");
  vid4.play();
  playVid4 = true;
}
if ( playVid4 ){
  image(vid4, 200, 250, 560, 316); 

} else {
  playVid4 = false;
}

if (rVal5 == 1 && playVid5 == false && playVid0 == false && playVid1 == false && playVid2 == false && playVid3 == false && playVid4 == false) {
  print("video5");
  vid5.play();
  playVid5 = true;
}
if ( playVid5 ){
  image(vid5, 220,200 , 560, 316); 

} else {
  playVid5 = false;
}

}

function readSerial(data) {
  ////////////////////////////////////
  //READ FROM ARDUINO HERE
  ////////////////////////////////////
 
  if (data != null) {
    // make sure there is actually a message
    // split the message
    let fromArduino = split(trim(data), ",");
    // if the right length, then proceed
    if (fromArduino.length == 6) {
      // only store values here
      // do everything with those values in the main draw loop
      rVal0 = fromArduino[0];

      rVal1 = fromArduino[1];

      rVal2 = fromArduino[2];
     
      rVal3 = fromArduino[3];
     
      rVal4 = fromArduino[4];
     
      rVal5 = fromArduino[5];

      print(fromArduino[0]+ " "+fromArduino[1]+ " "+fromArduino[2]+ " "+fromArduino[3]+ " "+fromArduino[4]+ " "+fromArduino[5]);
    
    }

    //////////////////////////////////
    //SEND TO ARDUINO HERE (handshake)
    //////////////////////////////////
    let sendToArduino = "\n";
    writeSerial(sendToArduino);
  }
}

Arduino Code

//Arudino Code

int pForce0 = 0;
int pForce1 = 0;
int pForce2 = 0;
int pForce3 = 0;
int pForce4 = 0;
int pForce5 = 0;

void setup() {
  Serial.begin(9600);

  // start the handshake
  while (Serial.available() <= 0) {
    Serial.println("0,0,0,0,0,0"); // send a starting message
    delay(300);                   // wait 1/3 second
  }
}

void loop() {

  
  // wait for data from p5 before doing something
  while (Serial.available()) {
    if (Serial.read() == '\n') {

      int force0 = analogRead(A0);
      delay(2);
      int sensor0 = 0;
      if (force0 > 200 && pForce0 < 100) {
        sensor0 = 1;

      }
      pForce0 = force0;

      int force1 = analogRead(A1);
      delay(2);
      int sensor1 = 0;
      if (force1 > 200 && pForce1 < 100) {
        sensor1 = 1;

      }
      pForce1 = force1;

      int force2 = analogRead(A2);
      delay(2);
      int sensor2 = 0;

      if (force2 > 200 && pForce2 < 100) {
        sensor2 = 1;

      }
      pForce2 = force2;

      int force3 = analogRead(A3);
      delay(2);
      int sensor3 = 0;
      if (force3 > 200 && pForce3 < 100) {
        sensor3 = 1;

      }
      pForce3 = force3;

      int force4 = analogRead(A4);
      delay(2);
      int sensor4 = 0;
      if (force4 > 200 && pForce4 < 100) {
        sensor4 = 1;
        
      }
      pForce4 = force4;

      int force5 = analogRead(A5);
      delay(2);
      int sensor5 = 0;
      if (force5 > 200 && pForce5 < 100) {
        sensor5 = 1;
        
      }
      pForce5 = force5;


      Serial.print(sensor0);
      Serial.print(",");

      Serial.print(sensor1);
      Serial.print(",");

      Serial.print(sensor2);
      Serial.print(",");

      Serial.print(sensor3);
      Serial.print(",");

      Serial.print(sensor4);
      Serial.print(",");

      Serial.println(sensor5);

    }
  }
}

Challenges:

One of the first issues we encountered was getting the videos to play over the map as it was playing under the map as a separate screen. To solve this issue we had to add a position to the video as well as hide the video before and after playing. Once we fixed this issue we then made each video work individually, which was quite simple, but when trying to make all of them work, none of the videos would play. For this, we realized there was an issue within Arduino that wasn’t sending the value of the force sensor separately so that p5js could read each value separately and use it for the appropriate video. Once we fixed this issue, we then had to make it so that each video would play only one at a time, and only play once the video playing was over, for this to the if statements that required the video to not be playing to start we added that other videos had to also be not playing.

Overall, the issue we encountered the most was consistency as the videos would play and then not play, even when we changed nothing but reopened the tab. What we realized was that there was an issue with the serial communication, and only when we closed the tabs properly, would the p5js and Arduino be able to communicate properly.

Reflection:

In the end, we not only learn new concepts in implementing our idea but were able to apply a lot of what we learned this semester. Although our project was not as creative as we originally each individually wanted, it is something that we both this is important and truly care about. Moving forward we would add more countries, or even do all the countries, although that would not be as engaging for the user, however, they could pick a few countries they are interested in. We also realized how limited information for some of these issues is as we spent quite a bit of time trying to find resources and compile ways to learn more. Although this is only one small thing, it is a step towards raising awareness for issues in a way that engages the views, gives them information, and is a way to learn more. If nothing else, we hope everyone is able to learn something new and want to learn more through our project!

MY6 (final project progress)

For our final project, we have decided to take this opportunity to showcase 6 different current events around the world, that we believe should have more exposure in the media. Through this, we would like the people affected by these issues to be the focus of how these events are presented in the media.  To do this we will use p5js to display a world map with the 6 countries these issues are happening in highlighted, which will be projected onto a surface that will use Arduino to trigger videos and images in p5js. We have selected the counties, and the events, along with the videos and images. We hope that through these videos the lives of the people affected by these issues are the focus, followed by the images which are headlines of these events in the news articles.

Example of Video:

Example of Image:


Technical Difficulties:

So far, we have a map that has the six countries highlighted, we are able to make an image appear of the news article, however, our first issue is embedding a video into p5js, either through a link or downloaded and uploaded as a media file. Next, we have set up a sensor in Arduino, which we know works and is able to read values, however, when tried to make the sensor trigger the image (as we don’t know how to use a video) it does not read the values. We have used “webSerial_handshake_simpler” example provided by the professor, to test the sensor as well as log the rVal (reading of the sensor) which works, however, in trying to get it to do the same to the background with our map it does not work and does not trigger the image either.

Here are two videos demonstrating the two issues.

Our fail:


working example:

Finally, we would like along with the force sensor to trigger p5js to zoom into the map and then play the videos and present the headlines (this will be triggered by matching the cut out of the country onto the country on the map which will be projected onto a paper surface that the sensors are under [image of the model included]) which is our third and final major issue.

p5js Code:

arduino:

#define FORCE_SENSOR_PIN A0 // the FSR and 10K pulldown are connected to A0

int sensor = analogRead(A0); 

void setup() {
  Serial.begin(9600);
  // start the handshake
  while (Serial.available() <= 0) {
//    Serial.println("0,0"); // send a starting message
    delay(300);            // wait 1/3 second
  }
}

void loop() {
  // wait for data from p5 before doing something
  while (Serial.available()) {
    int left = Serial.parseInt();
    int right = Serial.parseInt();
    if (Serial.read() == '\n') {
 
      delay(1);
      Serial.print(sensor);
    }
 int sensor = analogRead(FORCE_SENSOR_PIN);
  Serial.print(sensor); // print the raw analog reading
   
  }
}


credit for p5js world map: https://editor.p5js.org/Kumu-Paul/sketches/wq3Uh5dBp


serial communication exercises 

exercise 1

This exercise was similar to what we did in class, except instead of controlling the height of the ball with a sensor, it was static, and set for the ball to be in the middle of the screen.

p5js

Arduino
void setup() {
  Serial.begin(9600);
  pinMode(2, OUTPUT);
  pinMode(5, OUTPUT);
  while (Serial.available() <= 0) {
    Serial.println("0,0"); // send a starting message
    delay(300);              // wait 1/3 second
  }
}

void loop() {
  while (Serial.available() > 0) {
    // read the incoming byte:
   int inByte = Serial.read();
    switch (inByte) {
      case 0:
        digitalWrite(2, LOW);
        digitalWrite(5, LOW);
        break;
      case 1:
        digitalWrite(2, HIGH);
        break;
      case 2:
        digitalWrite(5, HIGH);
        break;
    }

    int sensorValue = analogRead(A0);
    Serial.print(sensorValue);
    Serial.print(",");
    sensorValue = analogRead(A1);
    Serial.print(sensorValue);
    Serial.println();
  }
}

exercise 2

In the second exercise, we controlled the brightness of the LED with the x position of the mouse, by moving the mouse to the right the light got brighter, and moving it toward the left the light gets dimmer until it turns off. For this, we mapped the x position values into 255 to control the brightness of the LED.

p5js

Arduino
[code]
void setup() {
  Serial.begin(9600);
  pinMode(2, OUTPUT);
  pinMode(5, OUTPUT);
  while (Serial.available() <= 0) {
    Serial.println("0,0"); // send a starting message
    delay(300);              // wait 1/3 second
  }
}
void loop() {
  while (Serial.available() > 0) {
    // read the incoming byte:
   int inByte = Serial.read();
    switch (inByte) {
      case 0:
        digitalWrite(2, LOW);
        digitalWrite(5, LOW);
        break;
      case 1:
        digitalWrite(2, HIGH);
        break;
      case 2:
        digitalWrite(5, HIGH);
        break;
    }
    int sensorValue = analogRead(A0);
    Serial.print(sensorValue);
    Serial.print(",");
    sensorValue = analogRead(A1);
    Serial.print(sensorValue);
    Serial.println();
  }
}
[/code]

exercise 3 

This final exercise was a bit more complicated, we had to not only control the light with the ball bouncing, but the velocity of the ball using the potentiometer instead of the left and right keys. I think for me it was important to understand that the potentiometer was not controlling the wind, but was the wind. At first, when trying to find a solution I wanted to map the values within the value of the wind when really it needed to be mapped within the x position values so that the sensor would control the X position of the ball.

p5js

Arduino
void setup() {
  Serial.begin(9600);
  pinMode(5, OUTPUT);
  while (Serial.available() <= 0) {
    Serial.println("0,0"); // send a starting message
    delay(300);              // wait 1/3 second
  }
}

void loop() {
  while (Serial.available() > 0) {
    
   int inByte = Serial.read(); // takes data from p5JS about ball position
   
   int windValue = analogRead(A0);//Wind value from potentiometer
   
   analogWrite(5, inByte);//swtiches on LED when ball bounces

    
    Serial.print(windValue);
    Serial.println();
  }
}
Video

final project idea

for the final project, I have a few ideas, some are more creative than practical use, I’ll mention two but a third could be further working on the instrument from last week.

the first is recreating something like this:

or even this:

using p5js to create the design, and then using Arduino to change the color with someone’s body or some sort of control and if possible I would like to sync the design with music. the idea is to have someone’s body create a generative art piece, perhaps it could even be to create the art with their motion.

the second idea is to recreate a game like polar bowler

where I would use p5js for a screen and Arduino for the game’s controls and sound, which I could also use with p5js.

i could perhaps combine and use the other design as a background.

dora crosswalk!

for this week’s assignment, I struggled to come up with an idea for a few days, until I finally came up with the idea of creating some like this:

the idea was that it was instead a bathroom stall, and using an ultrasonic sensor, the light would either turn on or off, and I would use a side switch as a lock to determine if the light was red or green, occupied or empty. To learn how to use the ultrasonic sensor, I used the Sparkfun Arduino guidebook where they give many different examples and explanations on how to use different items in the kit, as well as a code to use the ultrasonic sensor.  For the coding of the ultrasonic sensor, the most difficult part was getting the sensor to then return the distance it was measuring and use it in the code to determine the color of the light.

In trying to execute the idea, I thought that the switch would either turn on or off, so I couldn’t use it to change color, but instead, I could use the ultrasonic sensor to change the color. I then reconsidered and thought about using the ultrasonic sensor to determine the color of the lights to create a cross-walk where the distance of the pedestrian decided both the color of the light for them to cross and the color of the light for cars to pass by. To incorporate a button I wanted to make it so that if Dora reached the road but didn’t want to cross she could switch the color of the lights, make hers red and the light for the cars green, but I couldn’t get the code to work. I tried using two different if statements which I realized wouldn’t work and instead, I tried using && but what would happen is the lights would be off and turn on with the button, and once on when Dora was close, instead of having a green light and cars a red light they would both quickly flash red and green.

In the end, although it wasn’t what I wanted the button to be used for, I added it as headlights to the car, which wasn’t difficult besides having to be careful with the wires and making sure they were long enough.

In the future I think the more I understand how to code within Arduino, the more I will be able to accomplish.

Here are a few clips of Dora crossing the road!

https://youtube.com/shorts/mXF2TBsvka4

smell me switch!

For this week’s assignment, I first thought about a switch that would turn an LED light on when you sit, and while this was definitely possible, I wanted to do something a bit more fun. As I was sitting, I got the idea to connect two clips to my septum ring and let the current run through the ring. It first started as a joke, I just wanted to see what would happen, but then I realized I wanted to use my septum as the switch or button. I struggled for a bit to decide how to make it a switch, by connecting the clips to the right the light was on, but because it was connected the only way to turn it off was to disconnect the clips. Somehow I came up with the idea to instead extend two wires with metal and have them touch the ring. I tested it out with my water bottle and saw that it could work, but I wanted something that perhaps doesn’t look amazing, but looks better than my purple water bottle. I used cardboard and hot glue to make a triangular pyramid and glue paper over it to make it look a bit better. The idea is to make the pyramid smell nice and when you sniff the LED lights up! (this only works for people with septum rings, although I imagine other piercings could work too)

here’s a video of me doing it!

WILD WILD TAXI!

Concept:

I originally had this idea in thinking about OOP and continued to work on it since. Wild Wild Taxi is a game that I have played for the majority of my life, even now, most of my friends know how much I enjoy the game. Unfortunately, as I mentioned before because Flashplayer is no longer available I have decided to recreate the game so be able to enjoy the game in some way now.

In the actual design of the game, in all of the different versions of the game, there has been a different theme, from basic car driving, to what I wanted to look like the highways of Abu Dhabi, to what is now the streets of New York. Looking at the game now, it just is nice to look at than before and feels more like a game.

Implementation:

To be able to actually recreate the game I knew there would have to be different states, or screens of the game, which I’ll call START, INSTRUCTION, GAME, GAME OVER. In each of these pages there were different components, the first two START and INSTRUCTION, are images I created based on the taxi theme and using the key pressed function to move onto the next mode. Once on the GAME mode, you can use the left and right arrows to move from lane to lane within the set boundaries that are the lanes. In the GAME mode, you don’t lose unless you click the left or right arrow, which in a way isn’t very accurate of a game, but I appreciate games that don’t make me lose when I am not playing since I often tend to multitask, but in the future, this could be a pause mode so that the entire game pauses. Once you crash into a car, from any of the four corners, the game is then over and you can restart the game, and continue where you left off. With all of this, there is a sound that is in the background that adds to the effect of the chaos or the “Wild Wild” component.

Challenges:

In envisioning the game, I didn’t realize all the different components that went into creating a game. In the end, there were two main challenges, first, while there is sound, the sound I originally wanted was to play an ignition sound during the START and INSTRUCTION phase, then a sound of cars driving in the GAME phase, and finally a crash sound when the cars crash and the game is over. As it is now, is also okay, but I think having the sound as feedback to the actions of the player adds to the interaction between the game and the player. While I was able to overcome this challenge, I didn’t realize the about of thinking that would go into making the game end when the cars are crashing, it was all very logical, but it took a lot of thinking to understand and account for all the scenarios in which a car is crashing in relation to the X and Y position of both the Taxi and the other cars.

Reflection:

Overall, this was definitely another learning experience. I got off to a slow start, but I am satisfied with the current state of the game. Throughout this process, and at this point in the semester I have realized that I have two major challenges within the class that was apparent throughout this project. First, I think coding requires you to think logically while also paying attention to details in a way that I am not used to. I think this forces you to look at every line of code and think in the order of what needs to happen when, for example, what line needs to be drawn, and does it happen before or after the cars move. And I think along with this, I like to understand why something is the way it is, so as I am trying to figure out what exactly needs to be written in the code, I am also trying to understand every component of the line and where it is overall. In time, I think this will get better, but for now, it is intimidating. The other major challenge, that I think is, even more, intimidating in a way is the endless amount of possibilities when I am creating something, the ability do that makes me feel like I have to think of all the possibilities and consider which I will like the most in the end, the process in coding it, and then the visual component that I in every assignment, I spend the most time. Overall, this has all made me appreciate WILD WILD TAXI more, and excited to continue to work on it to ultimately replicate the original version.

With that, here is WILD WILD TAXI!

*sound doesn’t work when embedded

Wild Wild Taxi (Midterm)

In a previous assignment, I decided to recreate a game, which is more of an appropriate project for the midterm as an OOP assignment. However, this is the perfect opportunity to recreate the game with components that make it more like the real game.

Components that are necessary for recreating the game are (1)adding the keyPressed function so that the mouse is no longer controlling the car, but the space bar to drive forward, and left and right arrow keys to move left and right, (2) add a component so that when the cars crash the game is over and restarts, (3) it might be ambitious but to recreate the car crashing sound effect, but it could also be that I have car sounds in the background which I have found different effects here. Visually, I would like to make the cars look more realistic by adding a roof to the car using the push and pop component or simply adding a rectangle of a different color on top which I played with but wasn’t successful. Finally, I of course want to add the direction/start page, which like the car sounds would make a sound with every button the player presses on, and make the car start in a lane and not on the bottom left corner.

At  this point, this is where I am:


this is water

For this week, there we many different ideas that came to mind, but at some point, I thought about the saying, “This Is Water”, that David Foster Wallace refers to in a commencement speech. The first image that came to mind was of fish, and when I googled it, this came up:

I then thought about how I could recreate this in some way while focusing on the text, originally I wanted to recreate the entire image, with the words “This is Water” using circle packing to recreate water. So I began by looking at different videos,

random circles with no overlap
animated circle packing 
animates circle packing image 

While these videos were very helpful in understanding the concept, they weren’t in psj5 so while I could understand the components, I still needed help recreating the idea in psj5, which is when I was able to find examples like the ones in the videos but in psj5, none of them had all of the components of what I wanted to do, so I added a component that would make the circles stop filling in empty spots,  and another that from a black and white image, would fill in the spots where there is a white pixel.

One of my first attempts I began with this:


But then I tried a bunch of different images and styles,

These were the final images, that allowed me to get this result:

Moving forward, I would want to combine the idea of letters coming back to a home location so that the bubbles can go from random positions to form a word.

credit to:

https://editor.p5js.org/aryan.chharia@gmail.com/sketches/RdVQUoMEJ

https://editor.p5js.org/AmritAmar/sketches/oL0gKBOyS

Wild Wild Taxi (OOP)

For this week’s assignment, I first struggled to come up with an idea, I didn’t want to keep the same idea from last week, or I didn’t really see how it would benefit from an OOP, so instead, I thought about different games I like to play. Wild Wild Taxi has been (as “childish” as it may be) one of my favorite games since I was in maybe 1st grade.

Recently I haven’t been able to play it because it requires Flashplayer, which is not longer available. So, I began with the activity we did in class,

I then wanted to change the speeds of the car and control the Y position of the red car, but with this I wasn’t able to control the car so I tried added if loops in different places.

Still, even when I added an if statement to update the car, it was updating the position of all of the cars, I could control the Y position, but again, of all the cars. I had to figure out a way to control the Y position of just the red car.

Finally, I figured out that in order to control just one car that was created through the class, I would have to run it separately so that I could update its position, I also flipped the cars because moving side to side isn’t very realistic for cars. I also played around with other components and added a few other things, like changing the speed and color, so it would appear to be different cars that are passing.

Since I chose this project for me to be able to play the game, I would like to continue adding components, like a score, and the position of the car being changed by the keys being pressed, but for now, here is what I have! You can move the car to a different lane so it doesn’t get rear-ended by other cars.