Squid Game

Introduction

Our task in this report is to get information from at least one analog sensor and at least one digital sensor (switch), and use this information to control at least two LEDs, one in a digital fashion and the other in an analog fashion, in some creative way.

I will use the Arduino prototyping board for the digital and analog input and output for the interaction.

For the digital input I will use a push button.

For the digital output a LED is used.

For the analog input a sound sensor is used.

For the analog LED output an RGB LED is used.

Challenged Faced

The first challenge faced is to identify the needed input and output devices.

After researching the available simple devices, I decided on using buttons, sound sensor, LED and RGB LED.

The pins used for digital are the integer pins in the Arduino. The analog pins are pin A0 to A5 on the Arduino.

The second challenge was to do the circuit and connection required. I used tutorials from Arduino forums in order to connect the circuit.

The third challenge was to code the Arduino , using the Arduino IDE I wrote a code in C to program the Arduino.
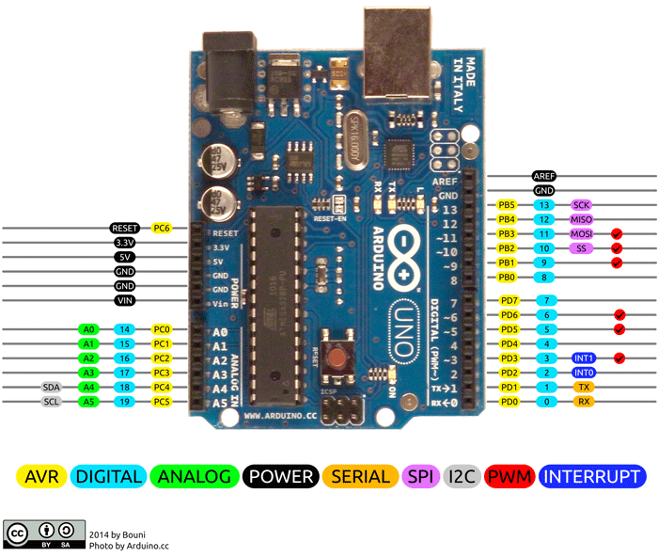
Video:

Procedure

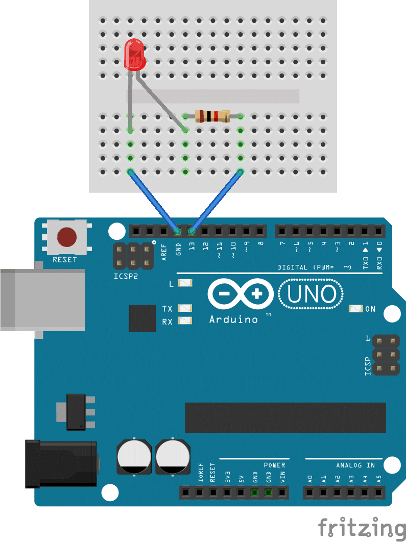
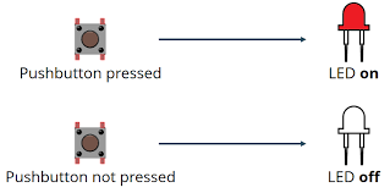
Step 1 : Button with LED output

Digital input controlling a digital input button.

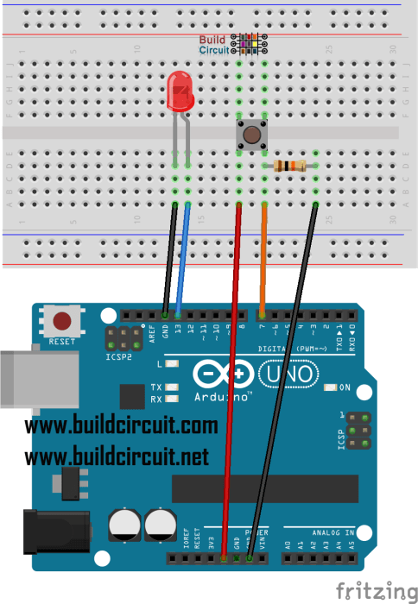
Connecting the button:

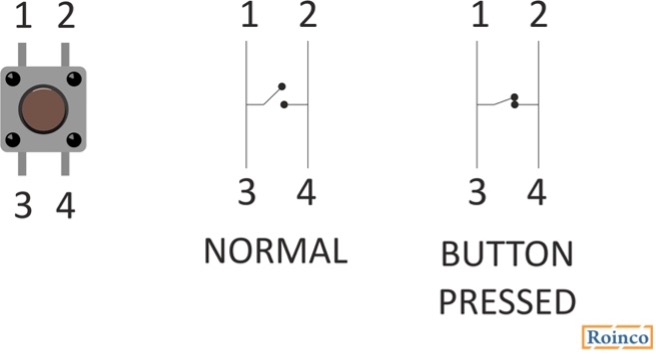
The button is connected to pin 7 through a resistor of 1 kohm.

Step 2 : LED Digital

The connection of the LED is to the digital pin 13.

Code for connecting the button and the led:

int ledPin = 13; // The LED is connected to pin 13
int button = 7; // The button is connected to pin 7
int val = 0;
void setup () {
   pinMode (ledPin, OUTPUT); // The LED pin is an output
   pinMode (button, INPUT); // The pin of the button is an entry
   }
void loop () {
 
   val = digitalRead (button); // Reading the button

   if (val == 1) {// If the value of the button is 1
     digitalWrite (ledPin, HIGH); // Turn on the LED
   }
   else {// Otherwise:
     digitalWrite (ledPin, LOW); // Turn off the LED
   }
}

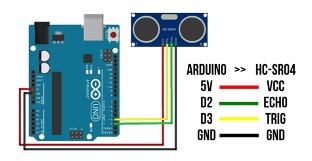
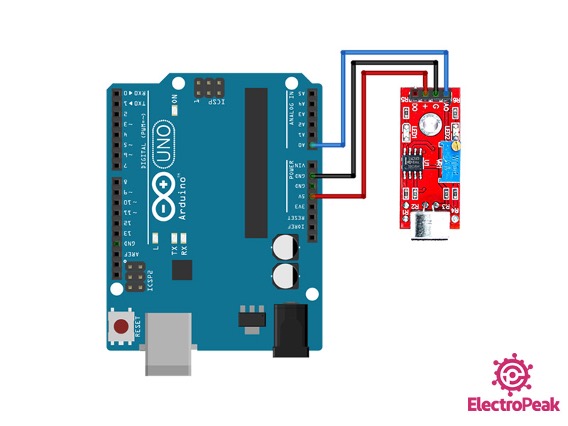
Step 3 : Input analog

The analog input I are using is a sound sensor KY-037

It is connected to A0 analog pin on Arduino.

Step 4: Analog output

As analog output I will use the 4 pin RGB LED.

In order to make it easier to connect it, I will use a module of RGB light: KY-016 RGB FULL COLOR LED MODULE.

The module is an RGB 4 pin LED connected to 3 resistor each of 150ohm to protect the pins.

This module uses PWM in order to send analog signals to the LED to turn on in different colors.

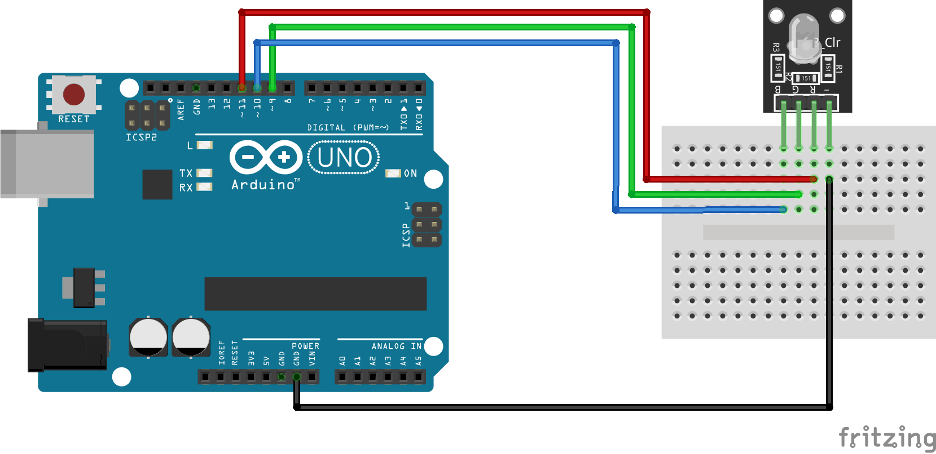
The connection is done as per the table below:

Pins Arduino Pin
R Pin 11
B Pin 10
G Pin 9
GND GND

The code to control the RGB light is first to write in the setup:

pinMode(redpin, OUTPUT);
  pinMode(bluepin, OUTPUT);
  pinMode(greenpin, OUTPUT);
  Serial.begin(9600);

Then I need to add in the function setcolor:

void setColor(int red, int green, int blue)
{
  //use PWM to controlt the brightness of the RGB LED
  analogWrite(redPin, red);
  analogWrite(greenPin, green);
  analogWrite(bluePin, blue);
}

Now I can use the setcolor function in the Arduino loop code to change the color depending on different functions.

I programmed it depending on the sound of the sensor:

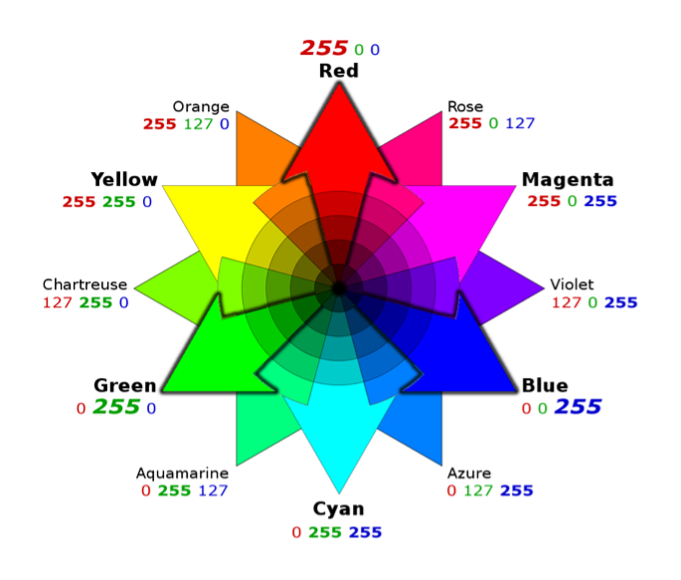
sound lower than 25 : no color

sound between 25 and 30 : yellow color

sound higher than 30 : red color

Using the code for colors:

setColor(255, 0, 0);  // red
setColor(0, 255, 0);  // green  
setColor(255, 255, 0);  // yellow

Final Outcome:

The circuit is built now and all inputs and outputs are working.

In order to give it a mission, I designed the code as the following:

SQUID GAME green and red light

Rule of the game: the player should press the button when the red light is on

Winner: blue lights turns on

When squid game starts, the sound sensor detects it and start a sequence:

-Green light is on

-Green is off and Red light is on for a short time: in this time the player should press the button

-if the player pressed the button while the red light was on, he will win

-if the player wins both lights will be blue indicating a win

-if the player doesn’t press in time, no blue light is on, so he lost.

Rule of the game: the player should press the button when the red light is on

Winner: blue lights turns on

Song for quid game: https://www.youtube.com/watch?v=9jcHItQvKIQ

Conclusion

As I completed this project I learned about different inputs and outputs and how the Arduino could be used to have different applications.

Squid Game Code

int ledPin = 13; // The LED is connected to pin 13
int button = 7; // The button is connected to pin 7
int val = 0;
int redpin =11;
int bluepin=10;
int greenpin=9;

void setup () {
   pinMode (ledPin, OUTPUT); // The LED pin is an output
   pinMode (button, INPUT); // The pin of the button is an entry
   pinMode(redpin, OUTPUT);
  pinMode(bluepin, OUTPUT);
  pinMode(greenpin, OUTPUT);
  Serial.begin(9600);
setColor(0, 0, 0);
   }
void loop () {

   int sound = analogRead(A0); 

Serial.print(sound); Serial.println(" Sound"); 

//if (sound<40) setColor(, 0, 0);//green
//else if (sound<42) setColor(255, 255, 0);  //yellow
//else if (sound>42) setColor(255, 0, 0);  //red
if (sound>42)
{ setColor(255, 255, 0); 
delay(5000);
setColor(255, 0, 0);
delay(2000);
val = digitalRead (button); // Reading the button

   if (val == 1) {// If the value of the button is 1
     digitalWrite (ledPin, HIGH); // Turn on the LED
     setColor(0, 0, 255);
     delay(2000);
     digitalWrite (ledPin, LOW);
   }
   else {// Otherwise:
     digitalWrite (ledPin, LOW); // Turn off the LED
     delay(2000);
   }}

else setColor(0, 0, 0);

}
void setColor(int red, int green, int blue)
{
  //use PWM to controlt the brightness of the RGB LED
  analogWrite(redpin, red);
  analogWrite(greenpin, green);
  analogWrite(bluepin, blue);
}

Switch

Introduction

Our task in this report is to create an unusual switch that doesn’t require the use of our hands. I will use the arduino prototyping board for the digital input and output for the interaction.

The hands-free switch is attached to a digital input pin on the Arduino, and then, with code, I took the input from that and turn on an led (digital output). The arduino digital I/O is a requirement for this exercise. That means I need a pull-down resistor with our hands-free switch in order for Aurdino to read the input.

As a hand free switch we used two options:

-option 1 : LDR light dependent resistor that turns the light on and off depending on the light in the room.

-option 2: Ultrasonic sensor that detects distance and turns the light off and on depending on an obstacle in front of the sensor.

Challenge Faced

As working on the Arduino board for the first time, the challenges I faced were understanding the pin diagram and how to define each pin.

After looking at the breakout pinout of the Arduino uno, I was able to identify which pins I will use for our input and output.

I decided to use the pins:

  • 13 digital output for LED
  • 6 input for LDR
  • For ultrasonic sensor:

Procedure

First step was to identify the output and input.

As output we used the LED light, and we connected it using a pull up resistor as per the following circuit:

Code in the setup: pinMode(13, OUTPUT);

Code to turn on the led: digitalWrite(13, HIGH);

Code to turn off the led: digitalWrite(13, LOW);


Second step is to connect the switch:

Option 1 LDR:

We connected an LDR as the following circuit:

The pin of LDR went to analog pin on Arduino A5 through a pull down resistor.

If we cover the LDR the LED connected to pin 13will turn on.

The code used is:

Setup: Serial.begin(9600);

Loop: int ldrStatus = analogRead(ldrPin);

Option 2 : Ultrasonic sensor

Second option is using an ultrasonic sensor as the following:

We connected the ultrasonic sensor by the circuit:

So when the distance is low the green light will be on. Green light is connected to pin 12 in the Arduino.

Demonstration :

Conclusion

As we completed this project we realized how diverse is the Arduino and how it could be used in many different application.

long duration; 
int distance;
int echoPin=2 ;
int trigPin=3;

void setup() {

  Serial.begin(9600);
  pinMode(trigPin, OUTPUT); 
  pinMode(echoPin, INPUT); 
  pinMode(13, OUTPUT); 
  pinMode(12, OUTPUT);
  pinMode(A0, INPUT); 

}

void loop()
{
//LDR code
  int ldrStatus = analogRead(A0); 
  Serial.println(A0);
  if (ldrStatus <= 300) digitalWrite(13, HIGH);
  else digitalWrite(13, LOW);

  //ultrasonic code
  digitalWrite(trigPin, LOW);
  delayMicroseconds(2);
  digitalWrite(trigPin, HIGH);
  delayMicroseconds(10);
  digitalWrite(trigPin, LOW);
  duration = pulseIn(echoPin, HIGH);
  distance = duration * 0.034 / 2; 
  Serial.println("Distance: ");
  Serial.print(distance);
  if (distance <= 10) digitalWrite(12, HIGH);
  else digitalWrite(12, LOW);
  
}


Mid Project: Bouncing Ball Game (Final)

Introduction:

Bouncing ball game is one of the old era game which is much popular and is easy to play. The main logic behind this game is to remove all the marbles or tiles from the top of the screen by bouncing the ball towards it through a simple stick laid at the bottom of screen. The ball moves randomly in any direction based on the collision of ball with the stick and touches the marbles at the top with different speed.

Inspiration for the Project:

Children are always found of ball games and the bouncing of ball not only release stress but also gives opportunity for a healthy activity. The visualization of ball bouncing in computer graphics gives smooth and realistic touch to eyes and fun to visualize such graphics. The old game gadgets and devices always incorporate such small games i.e. ball bouncing game. The game rules are easy to understand and anyone can play this game without any professional training. These are facts which inspired me a lot to implement ball bouncing game for my mid project.

Challenges and Problems:

It was challenging for me to give different direction to ball and to simulate the direction based on the collision of ball on stick residing at the bottom of the screen. It was challenging for me to move the ball with random speed and velocity. I faced little problem when detecting collision between ball and marble. It was challenging for me to display marbles on top of the screen at random positions. The addition of more speed and velocity if the ball is hitting the stick at same position was challenging for me.


Procedure:

 I started by implementing a ball class as ball object is the main object of the game. In this class I implemented function for the movement of the ball. The class contains attributes for the speed and velocity of the ball movement which sets based on the marble position and collision of ball with the stick. For sound effect I initialized audio sample object which further loads an external sound and plays when ball hits the bottom stick.

I implemented the displayball() inside ball class which draws a ball shape object based on the given screen position and specified size. I filled the ball shape with black color and using nostroke() function to give ball a realistic look.

Then I implemented the marble class which is responsible for displaying marbles at the top of the screen. The marble class object further used in marble aims class which is responsible for handling the collisions of ball with marbles.

In marble constructor I am setting the default size of marble and default position of marble.

I then implemented the display marble function which displays the marble in rectangular shape on top of the screen with specified width and height assigned through the constructor of the marble class.

I game class I implemented function to calculate the ball speed and velocity. If the ball position is far from the targeted marbles then increasing the speed and velocity of the ball.  

I implemented the isBallTouchMarble() function which uses distance function to check if the ball touches any marble or not. If the distance between the ball and marble is 0 then the function is returning true otherwise false.

Finally in main program I am initializing the game class object and calling the relevant functions in setup function to display marbles, ball and stick on screen. In draw function which is iterating infinite times I am calling calculate function which updates the ball speed and velocity based on the marble collisions.

Below I attached my final code including data class along with setup and draw function.

import ddf.minim.*;

Minim minim = new Minim(this);

boolean start= false;
class Ball 
{
  PVector MarblePosition;
  PVector velocity;
  PVector acceleration;
  AudioSample groove;
  float MarbleSize = 0;

Ball(float MarbleSize)
{
  
  
  this.MarbleSize = MarbleSize;
 
  groove = minim.loadSample("collision.wav");
  MarblePosition = new PVector(200,500);
  velocity = new PVector(2,2);
  acceleration = new PVector(0.008,0.008);
  
}

void MoveBall()
{
  if(MarblePosition.x>(width-(MarbleSize/2))|| MarblePosition.x<(MarbleSize/2) )
  {  
  velocity.x = velocity.x*(-1);
  acceleration.x = acceleration.x*(-1);
  this.groove.trigger();
  }

  if(MarblePosition.y>(height-(MarbleSize/2)) || MarblePosition.y<(MarbleSize/2) )
  {
   
  velocity.y = velocity.y*(-1);
  acceleration.y = acceleration.y*(-1);
  this.groove.trigger();
  }
  
  MarblePosition = MarblePosition.add(velocity);
  velocity = velocity.add(acceleration);
}

void DefaultVelocity()
{
  velocity.x=2;
  velocity.y=2;
}

void SimulateDirection(float x,float y)
{
  acceleration = new PVector(x,y);
}

void DisplayBall()
{
 noStroke();
 fill(random(255));
 ellipse(MarblePosition.x,MarblePosition.y,MarbleSize,MarbleSize);
}

}

class Game
{
  Ball ball;
  Marble Marble;
  Aims marbleaims;
  int score = 0;
  int level = 1;
  
  Game()
  {
  ball = new Ball(50);
  Marble = new Marble(120 , 30);
  marbleaims= new Aims();
  marbleaims.LoadMarbles();
  }

  void calculate()
  {

  marbleaims.AimCollision(ball);
  if(ball.MarblePosition.y> height-(Marble.MarbleHeight*2))
  {
    
  if((Marble.MarblePosition.x - (Marble.MarbleWidth/2)-(ball.MarbleSize/2)) < ball.MarblePosition.x && 
        ball.MarblePosition.x < ((Marble.MarblePosition.x + (Marble.MarbleWidth/2) + ball.MarbleSize/2)))
        {
          
    ball.velocity.y = ball.velocity.y*(-1);
    ball.acceleration.y = ball.acceleration.y*(-1);

    ball.groove.trigger();
    
     }
  }
 
  
  ball.MoveBall();
  Marble.MoveMarble(int(mouseX));
 
}

  void display()
  {
   marbleaims.DisplayMarbleAim();
   ball.DisplayBall();
   Marble.DisplayMarble();
   if(ball.MarblePosition.y>height-(Marble.MarbleHeight))
   {
    background(255);
    textSize(40);
    fill(random(255),random(255),random(255));
    text("You lost the ball! Game Over!",width/2-200,height/2);
    start=true;
    noLoop();
  }
  
  textSize(30);
  score=marbleaims.marblescount-marbleaims.currentmarblecounts;
  text("score : "+score,width-200,50);
  
  if(score==marbleaims.marblescount)
  {
    background(255);
    textSize(40);
    fill(random(255),random(255),random(255));
    text("LEVEL "+level+" COMPLETED",width/2-100,height/2);
    ++level;
    marbleaims.LoadMarbles();
  }

}
}


class MarbleAim
{
 
 PVector MarblePosition;
 float MarbleSize = 40;
 
 MarbleAim(int x,int y)
 {
   
   MarblePosition = new PVector(x,y);
 }


  boolean isBallTouchMarble(Ball ball)
  {

  if(dist(MarblePosition.x,MarblePosition.y,ball.MarblePosition.x,ball.MarblePosition.y)<(this.MarbleSize/2+ball.MarbleSize/2))
  {
    return true;
  }
  return false;

  }
 
  void DisplayMarbleAim()
  {
   stroke(0);
   strokeWeight(2);
   fill(255,0,0);
   rectMode(CENTER);
   rect(MarblePosition.x,MarblePosition.y,MarbleSize,MarbleSize);
  }

}


class Aims
{
  
  int marblescount;
  int currentmarblecounts;
  
  ArrayList<MarbleAim> marbleaims;

  Aims()
  {
    marbleaims=new ArrayList<MarbleAim>();
  }

  void LoadMarbles()
  {
    
    for(int i=40; i<height/2; i += 60)
    {
      for(int j=40; j<width-20; j += 50)
      {
        int flag=int(random(0,2));
        if(flag == 1)
        {
          marbleaims.add(new MarbleAim(j,i));
        }
      }
    }

    marblescount=marbleaims.size();
    currentmarblecounts=marblescount;
   } 


  void AimCollision(Ball ball)
  {
  
  for(int i = marbleaims.size()-1; i>=0; i--)
  {
      MarbleAim MarbleAim= marbleaims.get(i);
      
    if(MarbleAim.isBallTouchMarble(ball))
    {
      ball.velocity = ball.velocity.mult(-1);
      ball.acceleration = ball.acceleration.mult(-1);
      marbleaims.remove(i);
      currentmarblecounts -= 1;
    }
  }
}
  
  void DisplayMarbleAim()
  {
    for(MarbleAim t: marbleaims){
    t.DisplayMarbleAim();
  }
}
}


// Marble class for displaying marbles at the top of the game screen
class Marble
{

  PVector MarblePosition;
  float MarbleWidth;
  float MarbleHeight;


Marble(float MarbleWidth,float MarbleHeight)
{

  this.MarbleWidth = MarbleWidth;
  this.MarbleHeight = MarbleHeight;
  MarblePosition = new PVector(width/2,(height-MarbleHeight/2));

}

void MoveMarble(int x)
{
  MarblePosition.x=x;
}

void DisplayMarble()
{
  noStroke();
  fill(0);
  rectMode(CENTER);
  rect(MarblePosition.x,MarblePosition.y,MarbleWidth,MarbleHeight);
}


}


Game game;


void startgame()
{
  game.calculate();
  game.display();  
}

void setup()
{
  size(1000,800, P2D); 
  game = new Game();
  background(255);
  
}

void draw()
{
  background(255);
 if(!start)
 {
   startgame();
 }
 else
 {
   textSize(18);
   text("The game is starting......", 40, 120); 
 }
}

Conclusion:

In this mid project I learned how to move objects with different speeds and directions. I learned how to create a list of objects and renders on the screen at random positions. I learned how to check intersection of two objects. I learned how call one class function into another class and how to encapsulate the functionalities of each class. I learned how to build and map the game logics in an object oriented way.


Bouncing Ball mid Term Project

Inspiration:

There are many games but I was inspired by the popping of the balls which is very fun to play. The visualization of bouncing of ball improves eye movement. It comes under stress reliever games category and the game logic is so simple so anyone can play and used to of the game. The game gives a perfect movement break and enhance sensory regulations in a smooth way. The health boosting game logic inspired me to implement bouncing ball game.

Rules for the game:

The rules for the game is very simple and one can play the game even by mouse movement. The main objective of the game is to pop all of marbles by bouncing balls. The top of the screen is filled with random marbles. At the bottom of screen we have a pile or stick on which ball is bouncing. We can bounce the ball in any direction to break the marbles which are at top of the screen. The user wins when screen cleared out from all marbles.  The user will lose the game if the ball drops from the bottom of the screen.

Implementation Strategy:

For the implementation I will make class for marble which represents the marble object. The color of the marble will be randomly selected. Same in pattern I will implement functions based on the behaviors and game logic and then simply calling those functions in order to perform actions at run time.

Objects using in Game:

Ball Object: This is the ball object which is bouncing on the stick placed at the bottom of the screen.

Marble Object: This is the marble object and in game the marbles will be placed at random positions on top of the screen with random colors.

Storyboard of the Game:

The game comprises of 3 screens.

  1. The initial screen for starting the game and prompting for how to play the game.
  2. The main screen where marbles are placed at top of screen and ball object is placed for bouncing.
  3. The third and final screen is for showing the score of the game. The third screen will pop up either when all marbles cleared up or when ball drops from the bottom of the screen.


Progress Code:

void setup() 
{
  
  size(800, 800);
  for(int i=0;i<height;i++)
  {
    for(int j=0;j<200;j++)
    {
        noStroke();
       fill(random(255));
        rect(i,j,50,50);
      j=j+50;
    }
    i=i+50;
  }
  
}

Progress Visualization:

Week 4: Population by Year Visualization

Introduction:

In this assignment I am going to draw visualization graphs. Gives me opportunity to learn how to draw graphical representation of information and data. Human eye is trained on colors and patterns, and visualizing big scale data in terms of graphs and charts helps in understanding the data niches.

The idea for computer graphic:

Every country economics depends upon the population and population of every country is increasing day by day. I got my idea of data visualization from the population of kingdom of Saudi Arabia. I collected data of KSA population from 1951 to 2019.

Challenges and Problems:

It was challenging for me to decide for the right graph to visualize population data. Plotting the points on x and y coordinates was also challenging because population is increasing for every next year. Reading of each year population value and storing in a 2D array was little challenging for me. Converting values to different data types in order fit in the graphs was challenging for me.

Procedure:

The very first thing I did is to create a class to manage important functions for converting data types and reading data from the external file. The data class constructor is retrieving data from the external file and then splitting the data based on splitter value. Each row contains year and population data and all rows are storing in a 2D array.

The data class contains functions which convert int values to float and float to int data types in order to fit in the graph. I override the functions with different parameter values for conversion from one type to another. I worked with indexing to get and return the right value from the 2D array.

Then I initialized a color array and fill up with color hex values. I initialized the data class object in the setup function and pass the external file name as parameter into it. I called the getRowCount function to get the number of rows which is year count.

In draw function, I am setting the background of the screen and setting the stroke weight to 230. Then I am aligning center and setting text for the graph title with text size 20. Then I initialized for loop in draw function which iterates till number of years ranges from 1951 to 2019. Then rounding the population value by 1000000 to get the value in float in order to represent on the graph. Then I worked on mouse movement on graph and prompting text which contains the population rounded value and year.

Below I attached my final code
class Data 
{

  int nrows;
  String[][] data;
  
  Data(String filename)
  {
    String[] rows = loadStrings(filename);
    data = new String[rows.length][];
    
    for (int i = 0; i < rows.length; i++) 
    {
      // split the row on the tabs
      String[] datasplit = split(rows[i], TAB);
      // copy to the Data array
      data[nrows] = datasplit;
      nrows++;
     
    }
    // resize the 'data' array as necessary
    data = (String[][]) subset(data, 0, nrows);
  }
  
  
  int getRowCount() 
  {
    return nrows;
  }
  
  
  // find a row by its name, returns -1 if no row found
  int getRowIndex(String name) 
  {
    for (int i = 0; i < nrows; i++) 
    {
      if (data[i][0].equals(name)) 
      {
        return i;
      }
    }
    return -1;
  }
  
  
  String getRowName(int row) 
  {
    return getString(row, 0);
  }


  String getString(int rowIndex, int column) 
  {
    return data[rowIndex][column];
  }

  
  String getString(String rowName, int column) 
  {
    return getString(getRowIndex(rowName), column);
  }

  
  int getInt(String rowName, int column) 
  {
    return parseInt(getString(rowName, column));
  }

  
  int getInt(int rowIndex, int column) 
  {
    return parseInt(getString(rowIndex, column));
  }

  
  float getFloat(String rowName, int column) 
  {
    return parseFloat(getString(rowName, column));
  }

  
  float getFloat(int rowIndex, int column) 
  {
    return parseFloat(getString(rowIndex, column));
  }
  
  
  void setRowName(int row, String what) 
  {
    data[row][0] = what;
  }


  void setString(int rowIndex, int column, String what) 
  {
    data[rowIndex][column] = what;
  }

  
  void setString(String rowName, int column, String what) 
  {
    int rowIndex = getRowIndex(rowName);
    data[rowIndex][column] = what;
  }

  
  void setInt(int rowIndex, int column, int what) 
  {
    data[rowIndex][column] = str(what);
  }

  
  void setInt(String rowName, int column, int what) 
  {
    int rowIndex = getRowIndex(rowName);
    data[rowIndex][column] = str(what);
  }

  
  void setFloat(int rowIndex, int column, float what) 
  {
    data[rowIndex][column] = str(what);
  }


  void setFloat(String rowName, int column, float what) 
  {
    int rowIndex = getRowIndex(rowName);
    data[rowIndex][column] = str(what);
  }  
  
}

color[] palette = {#133463, #365FB7, #799AE0, #F4EFDC, #BA9B65};

Data populationData;
int nrows;
float mx = 79;
int opacity = 20;
int ellipseColor = 225;

void setup() 
{
  size(1000, 600);
  populationData = new Data("KSAPopulation.tsv");
  nrows = populationData.getRowCount(); 
}

void draw() 
{
  background(153);
  stroke(230);
  fill(230);
  textAlign(CENTER);
  textSize(20);
  text("Population of Saudia Arabia by year", width/2, 30);
  
  textAlign(LEFT);
  
  //read Data for population of each year:
  for(int row = 0; row < nrows; row++)
  {
    int years = populationData.getInt(row, 0);
    float populations = populationData.getFloat(row, 1);
    float x = map(populations, 8570449, 29709449, 80, width-80);
    float y = map(years, 2019, 1951, 80, height-180);
    float x2 = map(row, 0, 69, 80, width-80);
    
    float roundedPopulations = populations/1000000;
    
    if(years % 10 == 1)
    {
       line(x, y, width-90, y); 
       fill(palette[0], opacity);
       noStroke();
       quad(x, y, width-80, y, width-80, height-80, x, height-80);
    }
        
    //X-axis label lines
    line(x2, height-80, x2, height-85);
    
    //X-axis text in difference of 10
    if((row % 10 == 0) || (row == 69))
    {
      stroke(255);
      fill(255);
      text(roundedPopulations, x2-20, height-60);
    }
    
    if((years == 1951) || (years == 2019))
    {
      text(years, x2-40, y);
      line(x2, y, x2, height-85);
    }
    
    //Information Line - with Interaction   
    if((mx > 80) && (mx < width-80))
    {
      if(abs(mx - x) < 7)
      {
        strokeWeight(2);
        line(mx, y, mx, height-80);
        fill(palette[3]);
        text(years, mx+10, y-65);
        text(roundedPopulations, mx + 6, y-45);
      }
    }  
     
     //Ellipse dot 
     
     stroke(ellipseColor);
     int d = 7;
     fill(ellipseColor);
     ellipse(x, y, d, d);
    }
     
  }
  

void mouseMoved() 
{
  mx = mouseX;
}   


Final work:


Conclusion:

I learned how to draw a graph and represent numerical values on it. Gives me opportunity to work on 2D arrays. I learned how to convert one data type to another. I experienced text rendering on graphs. I learned ow to get and set 2D array indexes. Helps me to build my logic on data visualization. I learned how to override functions with same name but different parameters. I learned how to manipulate for loop iterations on a series of data and check for different conditions in order to represent data on graphs.

Week 3: Object Oriented Ball Dropper Game

Introduction:

Week 3 comes with more challenges and more learning regarding processing programming. We have to implement some real objects using object oriented programming and program in a manageable way. We have to implement our own functions to show different behaviors of our objects and properties to display characteristics.

Challenges and Problems:

The very first challenge that I faced is to sketch the logic for the game. To give random movements to balls and moving them continuously from top to bottom is challenging for me to implement in code. During game implementation, it is challenging for me to track the position of the ball after each movement. I came across at situation where two balls intersecting with each other. To check for the intersection of two balls was challenging for me.

Procedure:

I started by implementing a class for bag. The bag is handling with mouse movement and when it touches any ball then it will count in bag. In bag class I implemented structure for the bag which is of circular shape and have some radius. I implemented basic methods for bag class which are displaybag() and to check if the bag touches any ball dropping from top to bottom of screen.

Then I implemented class for ball which is also of round shape and has its own behavior. I implemented displaybag() function for ball class. I implemented functions to move the ball with specific speed and also check if the ball position exceeding the screen width and height using ballIntersection() function which returns Boolean value. I implemented balldropper() class where bag class and ball class objects are initialized. In ball dropper class I am checking if the bag touches any ball which dropping from top to bottom. I implemented functions to drop the ball with random speed and from random positions.

I implemented watcher class which i used for start and end of the game and counting the time in milli seconds. The main function of this class is TimeCounterEnds() which checks if the time to catch the ball exceed the time frame in which ball moves from top to bottom.

I initialized global variable to count the total balls in bag. In setup function I am initializing object for watcher class and start the timer to watch the ball capturing behavior of the game. In draw function I am handling the bag with mouseX and mouseY and by using for loop checking if the watcher time ends or not. If the watch time ends then initializing more balls to drop from top to bottom. I used another for loop to display each ball by using displayball() function. I used if else statement inside for loop to check if the ball touches the bag by using IsBallCaptured() function.

Below I listed all the code work for all the classes that is implemented for ball game.

class Bag
{
  //Default attributes for bag
  float xPosition; 
  float yPosition; 
  float radius; 

  //Default constructor for bag
  Bag(float radius, float xPosition, float yPosition)
  {
    this.xPosition = xPosition; 
    this.yPosition = yPosition; 
    this.radius = radius;
  }
  
   //to show the bag
  public void DisplayBag() 
  {
    stroke(127);
    fill(127);
    ellipse(xPosition, yPosition, radius*2, radius*2);
  }

  // to check if two balls intersect with eachother or not
  public boolean intersect(BallDropper d) 
  {
    float distance = dist(xPosition, yPosition, d.xpos, d.ypos);
    if (distance < (radius+d.r)) 
    {
      return true;
    }
    else 
    {
      
      return false;
    }
  }
}


// Class for Ball dropper
class BallDropper 
{

  float xpos;
  float ypos;
  color ballcolor;
  float r;
  float ballspeed;

  //default constructor for Ball Dropper
  BallDropper() 
  {

    this.r = 8; 
    this.xpos = random(width); 
    this.ypos = -r * 4; 
    this.ballspeed = random(1, 5);
    this.ballcolor = color(50, 100, 150);
  
  }

  //for dropping BallDropper from top of screen
  public void balldrop()
  {
    this.ypos+=ballspeed;
  }

  //check if the BallDropper goes out of screen or not
  public boolean balloutofscreen()
  {
    if (ypos > height +r*4)
    {
      return true;
    } 
    else 
    {
      return false;
    }
  }

  //to display BallDropper
  public void DisplayBall()
  {
    fill(50, 100, 150);
    noStroke();
    ellipse(xpos, ypos, r*2, r*2);
  }

  
  public void IsBallCaptured()
  {
    ballspeed = 0;
    ypos = -1000;
  }

}


class Watcher 
{
  //Attributes for time measure and time count
  int timemeasure; 
  int BallsTime; 

  //Default constructor for watcher initialized with deafult time
  Watcher(int t)
  {
    this.BallsTime = t;
  }

  // start the time counter
  public void startWatcher() 
  {
    this.timemeasure = millis(); 
  }

  //Check if the watcher time is finished or not
  public boolean TimeCounterEnds()
  {

    int timeElapsed = millis() - timemeasure;
    //checking if the remaining time is greater than default initialized time
    if (timeElapsed > BallsTime) 
    {
      return true;
    } 
    else 
    {
      return false;
    }

  }

}


class Ball
{
  float ballxpos; 
  float ballypos; 
  float ballRadius; 
  float xposSpeed;
  float yposSpeed;
  color ballcolor;

   //Construtor to draw ball
  Ball(float ballRadius)
  {
    this.ballRadius = ballRadius;
    this.ballxpos = random(width);
    this.ballypos = random(height);
    this.xposSpeed = 5;
    this.yposSpeed = 5;
  }

  // To move the ball 
  public void ballMove()
  {
    ballxpos += xposSpeed;
    ballypos += yposSpeed;

    if (ballxpos > width || ballxpos < 0)
    {
      xposSpeed *= -1;
    }
    if (ballypos > height || ballypos < 0) 
    {
      yposSpeed *= -1;
    }
  }


  // to display ball position
  public void DisplayBallPosition() 
  {
    stroke(0);
    fill(ballcolor);
    ellipse(ballxpos, ballypos, ballRadius*2, ballRadius*2);
    ballcolor = color(100, 50);
  }

  // check if two balls intersect with eachother
  public boolean ballIntersection(BallDropper BallDropper)
  {
    float distance = dist(ballxpos, ballypos, BallDropper.xpos, BallDropper.ypos);
    if (distance < (BallDropper.r + ballRadius))
    {
      return true;
    } 
    else 
    {
      return false;
    }
    
  }
   
  //to give random color to ball
  public void highLight() 
  {
    ballcolor = color(#6535B4);
  }
}


//Initializing Bag object
Bag Bag;

//Initializing time watcher for game
Watcher Watcher;

//Initializing Balls
BallDropper rainBalls[];

//Total Balls in bag count
int totalBalls = 0;


//Setup for game screen configuration
public void setup()
{
  size(1000, 700);
  Bag = new Bag(32, 0, 0);
  rainBalls = new BallDropper[1000];
  Watcher = new Watcher(300);
  Watcher.startWatcher();
  
}


public void draw() 
{
  background(#E3A9A9);
  Bag.xPosition = mouseX;
  Bag.yPosition = mouseY;
  Bag.DisplayBag();

  if (Watcher.TimeCounterEnds() == true) 
  {
    rainBalls[totalBalls] = new BallDropper();
    totalBalls++;
    if (totalBalls >= rainBalls.length) 
    {
      totalBalls = 0;
    }
    Watcher.startWatcher();
  }

  for (int i=0; i<totalBalls; i++)
  {
    rainBalls[i].balldrop();
    rainBalls[i].DisplayBall();

    if (Bag.intersect(rainBalls[i]))
    {
      rainBalls[i].IsBallCaptured();
    }
  }
}

Final work:

Conclusion:

This assignment supports me learn more of object oriented programming and gives me opportunity to work on real time programming by using classes and objects. How to initialize any object and use its functions and variables. I learned how to build a game structure in a manageable and reusable way. I get opportunity to practice calling of class object inside any class to ensure encapsulation. I learned how to move objects and give them some speed. I also merged my previous knowledge of for loops and 2D shapes with object oriented programming.


Week 2

In this assignment, I explore for () and while () loops functionalities. Merging previous knowledge of 2D shapes drawing I sketch an interactive computer graphics. Furthermore, I go more in depth in graphics coding and geometry of computer graphics. I explore how repetition of objects and shapes can result in interactive art work. This assignment art work memorize me the old computer graphics which came with old windows XP, 98. I explore more in randomization to sketch shapes in logical and meaningful way.

I draw an interactive computer graphic in which random shapes draw on screen at random times with random sizes of random colors and patterns. All it’s happening with chunks of for () loops iterating random times. At the same time random removal of shapes also happening at random places to allocate more space to new shapes at random places.

Video :

Week 2

Challenge:

The major problem I faced during the removal of shapes which is drawing continuously using for() loop with random sizes and random shapes at random times. Its challenging for me to implement the randomization in logical way so that those shapes which draw first will become small and new random shapes comes with larger visualization at front. Drawing and removing of shapes from random positions is challenging for me. I faced a problem while implementing random iterations of for () loops to draw shapes at random number of times.

Process:

I started my interactive computer graphic art by implementing a 2D grid of rectangles. This is done with a nested loop() which fills up the whole screen with small rectangles. This logic implemented easily and does not take much of time.

Then I implement code for random shapes. For this I logically assigned each shape a number ranging from 0 to 4. The shape is selecting randomly and I used simple if else statements to move into drawing the respective shape in randomized for loop structure. I used random stroke() color with no fill() inside the for() loop to draw shapes of random color. I also put randomization of shape sizes in such a way that the shapes sizes are increasing as for() loop iterations are increasing. In this way I achieved small shapes at back and larger shapes at front. I implement two versions of triangles using random for() loops of random sizes and random shapes of triangles. This is achieved by scaling the shapes with random scaler inside for() loop.

Then I code for random filling and removing of the shapes. I made a logic to fill the small rectangular shapes with grey whitish color from random places at the same time when for() loops randomly iterating to draw shapes. In this way older shapes becomes vanishing from the scene and getting new space for new shapes at random positions. I used similar color as the background color to persist the continuous state of shape drawing using for() loops. In this way I achieved my objective to not mess up the screen with a lot of random shapes. I implemented my own functions to separate randomness and for() loops.

Final work:

The final interactive computer graphic which I achieved using random looping techniques is as below.

Code:

float h,w;
int fillx;
int filly;

int dfillx,dfilly;
void setup()
{
size(800,800);
h=height;
w=width;
background(#D1D079); 
fillx=int(w/2);
filly=int(h/2);
dfillx=200;
dfilly=300;
drawgrid();
}

void drawgrid()
{
  for(int i=0;i<h;i++)
  {
    for(int j=0;j<w;j++)
    {
        noStroke();
       fill(#E1DA8B);
        rect(i,j,5,5);
      j=j+5;
    }
    i=i+5;
  }
}

void drawtriangles1(int count)
{
  for(int i=0;i<count;i++)
  { 
  noFill();
  DontDraw();
  strokeWeight(random(5));
  float px=random(h);
  float py=random(w);
  float tscale=random(100);
  stroke(random(255),random(255),random(255));
  triangle(px,py,px,py+tscale,px+tscale,py);
  OkDrawIt();
  }
}

void drawtriangles(int count)
{
  for(int i=0;i<count;i++)
  { 
  noFill();
  DontDraw();
  strokeWeight(random(5));
  float px=random(h);
  float py=random(w);
  float tscale=random(100);
  stroke(random(255),random(255),random(255));
  triangle(px,py,px+tscale,py,px,py+tscale);
  OkDrawIt();
  }
}

void drawcircles(int count)
{
  for(int i=0;i<count;i++)
  { 
  noFill();
  DontDraw();
  strokeWeight(random(5));
  float r= random(100);
  float px=random(h);
  float py=random(w);
  stroke(random(255),random(255),random(255));
  arc(px,py,r,r,0,radians(360));
  OkDrawIt();
  }
}

void drawsquares(int count)
{
  for(int i=0;i<count;i++)
  {
   strokeWeight(random(5));
  noFill();
  DontDraw();
  float r= random(100);
  float px=random(h);
  float py=random(w);
  stroke(random(255),random(255),random(255));
  rect(px,py,r,r);
  OkDrawIt();
  }
}

void drawshapes()
{
  int shape=int(random(4));
  float times= random(5);
  if(shape==1)
  {
     DontDraw();
     drawcircles(int(times));
     OkDrawIt();
  }
  else if(shape==2)
  {
     DontDraw();
    drawtriangles1(int(times));
    OkDrawIt();
  }
  else if(shape==3)
  {
     DontDraw();
    drawsquares(int(times));
    OkDrawIt();
  }
  else
  {
     DontDraw();
    drawtriangles(int(times));
    OkDrawIt();
  }
}

void OkDrawIt()
{
  for(int i=0;i<int(random(10000));i++)
  {
    stroke(#D1D079);
  strokeWeight(2);
  rect(dfillx, dfilly,5,5);
  int direction = int(random(4));

  if(direction==0)
  {
     dfillx = dfillx + 5;
  }
  else if(direction==1)
  {
     dfillx = dfillx - 5;
  }
  else if(direction==2)
  {
     dfilly = dfilly + 5;
  }
  else
  {
    dfilly = dfilly - 5;
  }
  }
  

}

void DontDraw()
{
  for(int i=0;i<int(random(10000));i++)
  {
    stroke(255, 100);
  strokeWeight(2);
  rect(fillx, filly,5,5);
  int direction = int(random(4));

  if(direction==0)
  {
     fillx = fillx + 5;
  }
  else if(direction==1)
  {
     fillx = fillx - 5;
  }
  else if(direction==2)
  {
     filly = filly + 5;
  }
  else
  {
    filly = filly - 5;
  }
  }
  

}


void draw()
{
  
  frameRate(2);
  drawshapes();
  

}


Week 1: Self Portrait Ant Man – Theyab Alalawi

Introduction:

In this interactive media course, I am learning about science behind graphics. In this first week assignment, I revised my basic concepts of math and geometry to prepare myself for basic graphical shapes. I worked on processing software in java programming language and draw a self-portrait using basic shapes. The sketching art with coding is totally different by sketching art with manual paper pencil work. I found the way of graphical coding interesting and fun and at same time I faced some hurdles while understanding the root science of graphics and art.

The idea for self-portrait:

My spare time often spent with my little brother. I was watching cartoon with him and I observe that there are many cartoon characters whose looks like humans. It was an animation cartoon movie in which ants and insects doing small activities in their farms. I planned to sketch an ant man with some aged look. The movie inspired me a lot and I researched a little more on google about ant cartoons. I found many ant characters, some have round faces, and some have rectangle faces.

Later I sketched my idea and brainstorm on my idea. I decided to portrait a man looking ant character with hairs, eyes and many legs and arms. Below are some characters from which I inspired for my self-portrait.


Challenges and Problems:

The processing code is in java programming language. It’s a little challenging for me to understand the syntax and code flow in processing while using java programming. The syntax is bit different from native java language. The big challenge I faced during connecting different shapes together to visualize my portrait. Very hard to memorize each and every pixel x and y values on the screen and doing math calculation to move on to specified next pixel location or point on screen. My most of time spent on sketching face. Testing my code on processing is also very hectic task for me as I have to run the code after each new statement of code. It’s a challenging task for me to understand the planes structures and how coordinate system works for processing to draw shapes. The documentation of processing is not so elaborative, they just mentioned about the functions calling and syntax. Its challenging for me to try multiple angles and values on same functions to get the desired results as this thing reduced the reusability of my code.

Procedure:

The very first thing I did is drew a rectangular shape for face. I gave large value for radius of rectangle to make the corners round. I used in my code local variable in float data type to store the location of rectangle.

I fill the whole face with yellow color and eyes with white and black combination. Then I code two rectangles for eye brows and fill the rectangles with black color. After placing eye brows I started work on hairs on the upper part of rectangular face shape. For hairs I outline a small part of arc curve to place the hairs in zig zag pattern on face head location. I repeated the arc shapes multiple times to fill the head face in same pattern to outline hairs on face head.

Then based on the rectangle location is code, I code two arcs of circular shapes for eyes. I gave angle values for arc in radians. Then I placed the arcs on right locations relative to the rectangular shape. Then I fill the colors of the shapes. I made eyes a little large from normal eyes size to give look n feel of an ant man. After placing eyes on right place on face I stored the eyes location x and y values to new temporary variables. Then I worked to draw ears which are of rectangular shape and placed on right places on each side of rectangular face relative to the eyes location.

Then I moved forward to sketch nose and mouth parts. For this I code arcs and place one after each other and filled them with white and black combination to sketch nose with moustache. Fill the moustache part white and nose with black color. For mouth I trim the circular arc shape in half and fill the lower half circle with reddish color.

After completing the face shape, I worked on body shape. While coding circular and rectangular shapes, I gave different values to stroke weight function. I used arc functions to distinguish the origins of legs and arms on body. I placed 3 arms on each side of body and 2 legs below the body.

Finally I gave background color to make the portrait more focusable as my self-portrait was most of in yellow color.

Final Portrait:

After connecting multiple curves and shapes, I came up with my final self-portrait which is according to my brainstorm idea and imagination.

Code

void setup()
{
size(700,800);
background(#B7841E);
}


void draw()
{
fill(#DDE33E);
strokeWeight(2);


//drawing face
rect(150,120,200,250,450);
float fcy=150;
float fcx=120;

//drawing hairs
fill(#141510);
arc(fcy+145,fcx+10,100,60,radians(260),radians(300));
arc(fcy+140,fcx+10,100,60,radians(260),radians(300));
arc(fcy+135,fcx+10,100,60,radians(260),radians(300));
arc(fcy+130,fcx+10,100,60,radians(260),radians(300));
arc(fcy+125,fcx+10,100,60,radians(260),radians(300));
arc(fcy+120,fcx+10,100,60,radians(260),radians(300));
arc(fcy+115,fcx+10,100,60,radians(260),radians(300));
arc(fcy+110,fcx+10,100,60,radians(260),radians(300));
arc(fcy+105,fcx+10,100,60,radians(260),radians(300));
arc(fcy+100,fcx+10,100,60,radians(260),radians(300));
arc(fcy+95,fcx+10,100,60,radians(260),radians(300));
arc(fcy+90,fcx+10,100,60,radians(260),radians(300));
arc(fcy+85,fcx+10,100,60,radians(260),radians(300));
arc(fcy+80,fcx+10,100,60,radians(260),radians(300));
arc(fcy+75,fcx+10,100,60,radians(260),radians(300));
arc(fcy+70,fcx+10,100,60,radians(260),radians(300));
arc(fcy+65,fcx+10,100,60,radians(260),radians(300));
arc(fcy+60,fcx+10,100,60,radians(260),radians(300));
arc(fcy+55,fcx+10,100,60,radians(260),radians(300));
arc(fcy+50,fcx+10,100,60,radians(260),radians(300));
arc(fcy+45,fcx+10,100,60,radians(260),radians(300));

//drawing eye brows
fill(#141510);
rect(fcy+30,fcx+25,50,10,450);

fill(#141510);
rect(fcy+120,fcx+25,50,10,450);

//drawing ears
fill(#DDE33E);
rect(fcy-20,fcx+80,20,40,80);

fill(#DDE33E);
rect(fcy+200,fcx+80,20,40,80);

//drawing eyes
fill(#141510);
arc(fcy+60,fcx+80,60,80,radians(0),radians(360));
fill(#FAFAF2);
arc(fcy+60,fcx+80,30,50,radians(0),radians(360));
fill(#141510);
arc(fcy+140,fcx+80,60,80,radians(0),radians(360));
fill(#FAFAF2);
arc(fcy+140,fcx+80,30,50,radians(0),radians(360));

//drawing nose upper
fill(#FAFAF2);
arc(fcy+100,fcx+160,80,80,radians(160),radians(380));
fill(#DDE33E);
arc(fcy+100,fcx+180,80,80,radians(190),radians(350));
//drawing nose
fill(#141510);
arc(fcy+100,fcx+160,20,20,radians(0),radians(360));

//drawing nose
fill(#141510);
arc(fcy+100,fcx+160,20,20,radians(0),radians(360));

//drawing mouth
fill(#EA3254);
strokeWeight(0);
arc(fcy+100,fcx+190,80,50,radians(0),radians(180));

strokeWeight(2);
fill(#DDE33E);
arc(fcy+100,fcx+220,30,30,radians(30),radians(140));


//drawing neck
fill(#DDE33E);
rect(fcy+75,fcx+250,50,40,0);

fill(#DDE33E);
rect(fcy,fcx+280,200,250,450);
float fby=fcy,fbx=fcx+280;

//drawing arms
fill(#ED1D2B);
strokeWeight(0);
arc(fby+50,fbx+80,30,30,radians(0),radians(360));
arc(fby+160,fbx+80,30,30,radians(0),radians(360));

arc(fby+50,fbx+120,30,30,radians(0),radians(360));
arc(fby+160,fbx+120,30,30,radians(0),radians(360));

arc(fby+50,fbx+160,30,30,radians(0),radians(360));
arc(fby+160,fbx+160,30,30,radians(0),radians(360));
float army=fby+50,armx=fbx+80;
fill(#DDE33E);
strokeWeight(0);
rect(army-100,armx-10,100,20,50);
rect(army-120,armx+30,120,20,50);
rect(army-140,armx+70,140,20,50);
//arms 1
rect(army-100,armx-90,20,100,50);
rect(army-120,armx-70,20,120,50);
rect(army-140,armx-50,20,140,50);
//arm 2
rect(army+100,armx-10,100,20,50);
rect(army+100,armx+30,120,20,50);
rect(army+100,armx+70,140,20,50);
//arm 3
rect(army+180,armx-90,20,100,50);
rect(army+200,armx-70,20,120,50);
rect(army+220,armx-50,20,140,50);

//legs
fill(#ED1D2B);
strokeWeight(0);
arc(fby+70,fbx+220,30,30,radians(0),radians(360));
arc(fby+140,fbx+220,30,30,radians(0),radians(360));
float legy=fby+70,legx=fbx+220;
fill(#DDE33E);
strokeWeight(0);
rect(legy-10,legx-10,20,140,50);

rect(legy+60,legx-10,20,140,50);
}


Conclusion:

This assignment was a fun for me. It supports me to enhance my imagination power and transformed my thinking as an artist mindset. I came up with lot of more ideas while doing this assignment. I made a grip on processing software and basic of java coding for graphics. I comprehend the use of points on 2D plane. This assignment increase my knowledge about how to combine basic shapes to sketch more useful shapes for visualization of different objects.