Pet the Plant: D.I.Y Christmas Special Edition

https://editor.p5js.org/Minjae0216/sketches/Qyv31CZ2_

Concept:

Through “Pet the Plant”, I wanted to make an interactive project that allows you to experience the satisfaction of growing your plant friend without the real responsibilities or risks. In this game, there are three different plants that you can choose to grow and make your own Christmas tree.

I was inspired by my friend who failed to grow her plants. By using an Arduino and different sensors, users can go through the physical motions of caring for a plant, allowing the digital plant to grow without any accidents or loss. The virtual experience is coded in p5.js and designed with Canva.

The reason for <Special Edition: D.I.Y Christmas Tree> is for the environment and the Christmas season. People buy Christmas trees in UAE to enjoy the winter. However, I thought buying Christmas trees was not environmentally friendly. Buying a Christmas tree is often considered environmentally unfriendly due to concerns like deforestation, transportation emissions, and the use of chemicals on tree farms. So, I think of other solutions that can help people to not purchase Christmas trees every winter. Making your own Christmas tree virtually will help the environment and save you money!
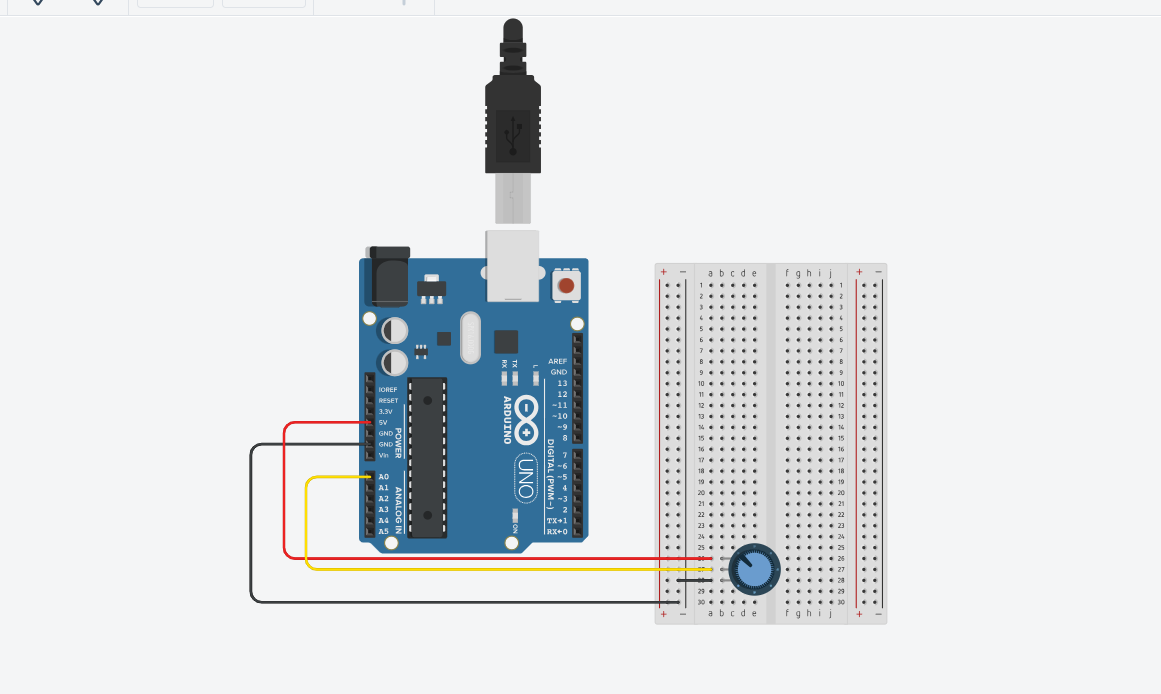
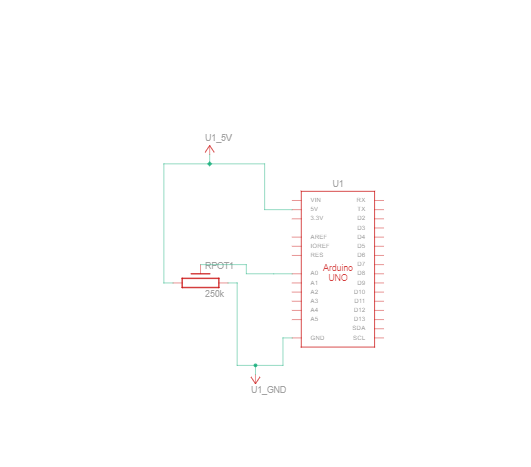
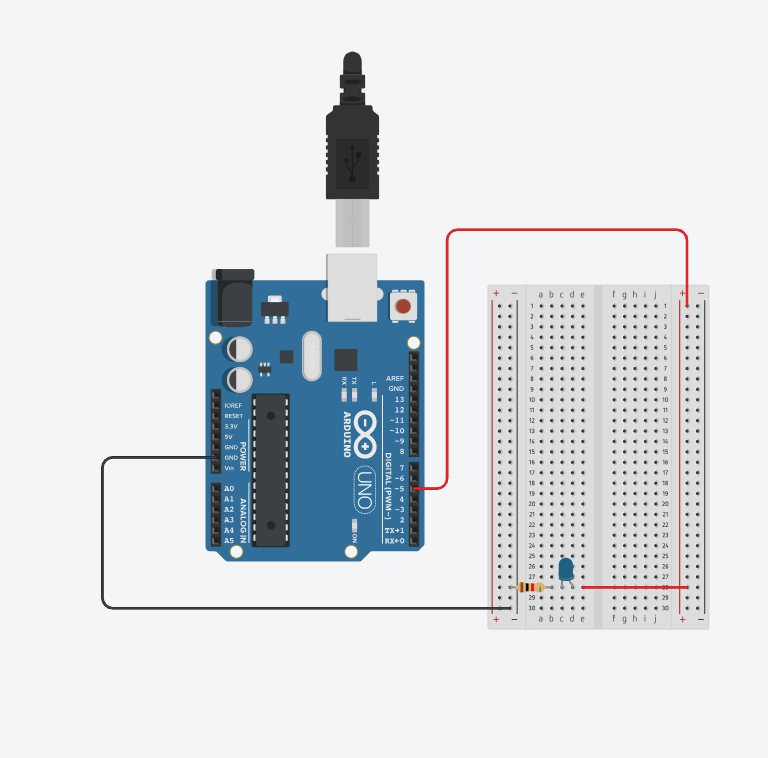
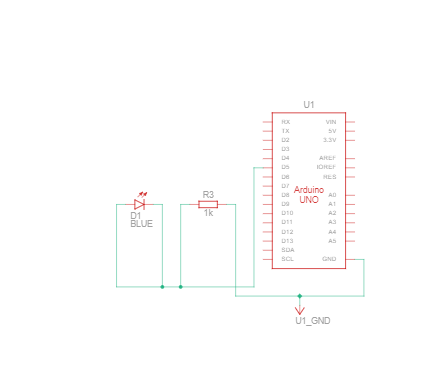
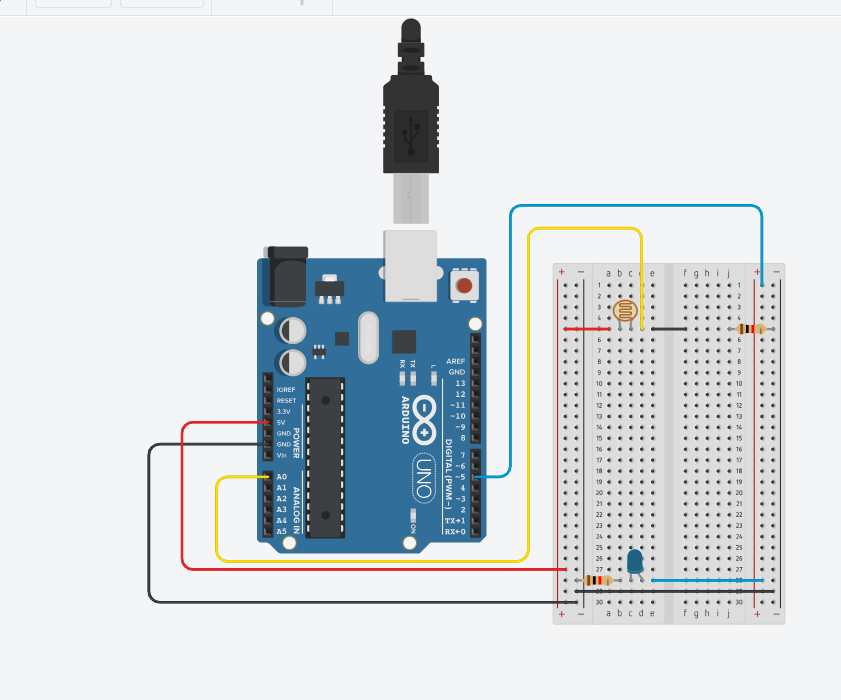
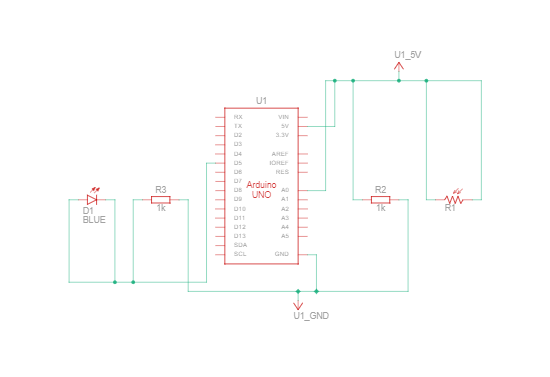
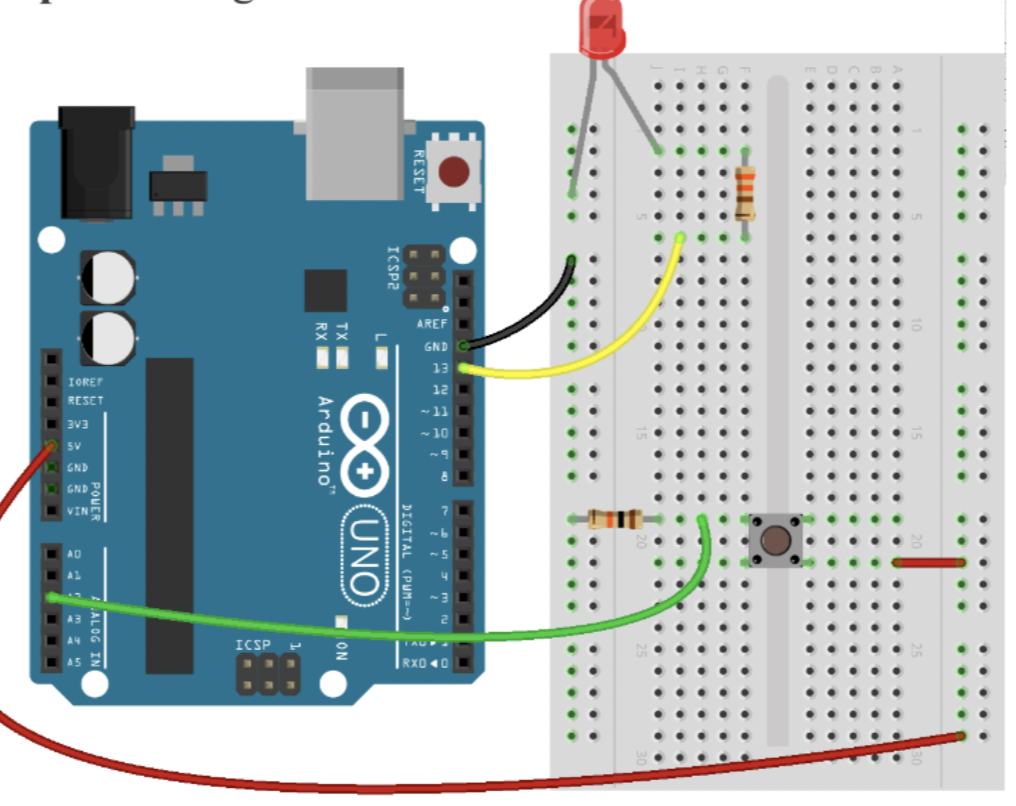
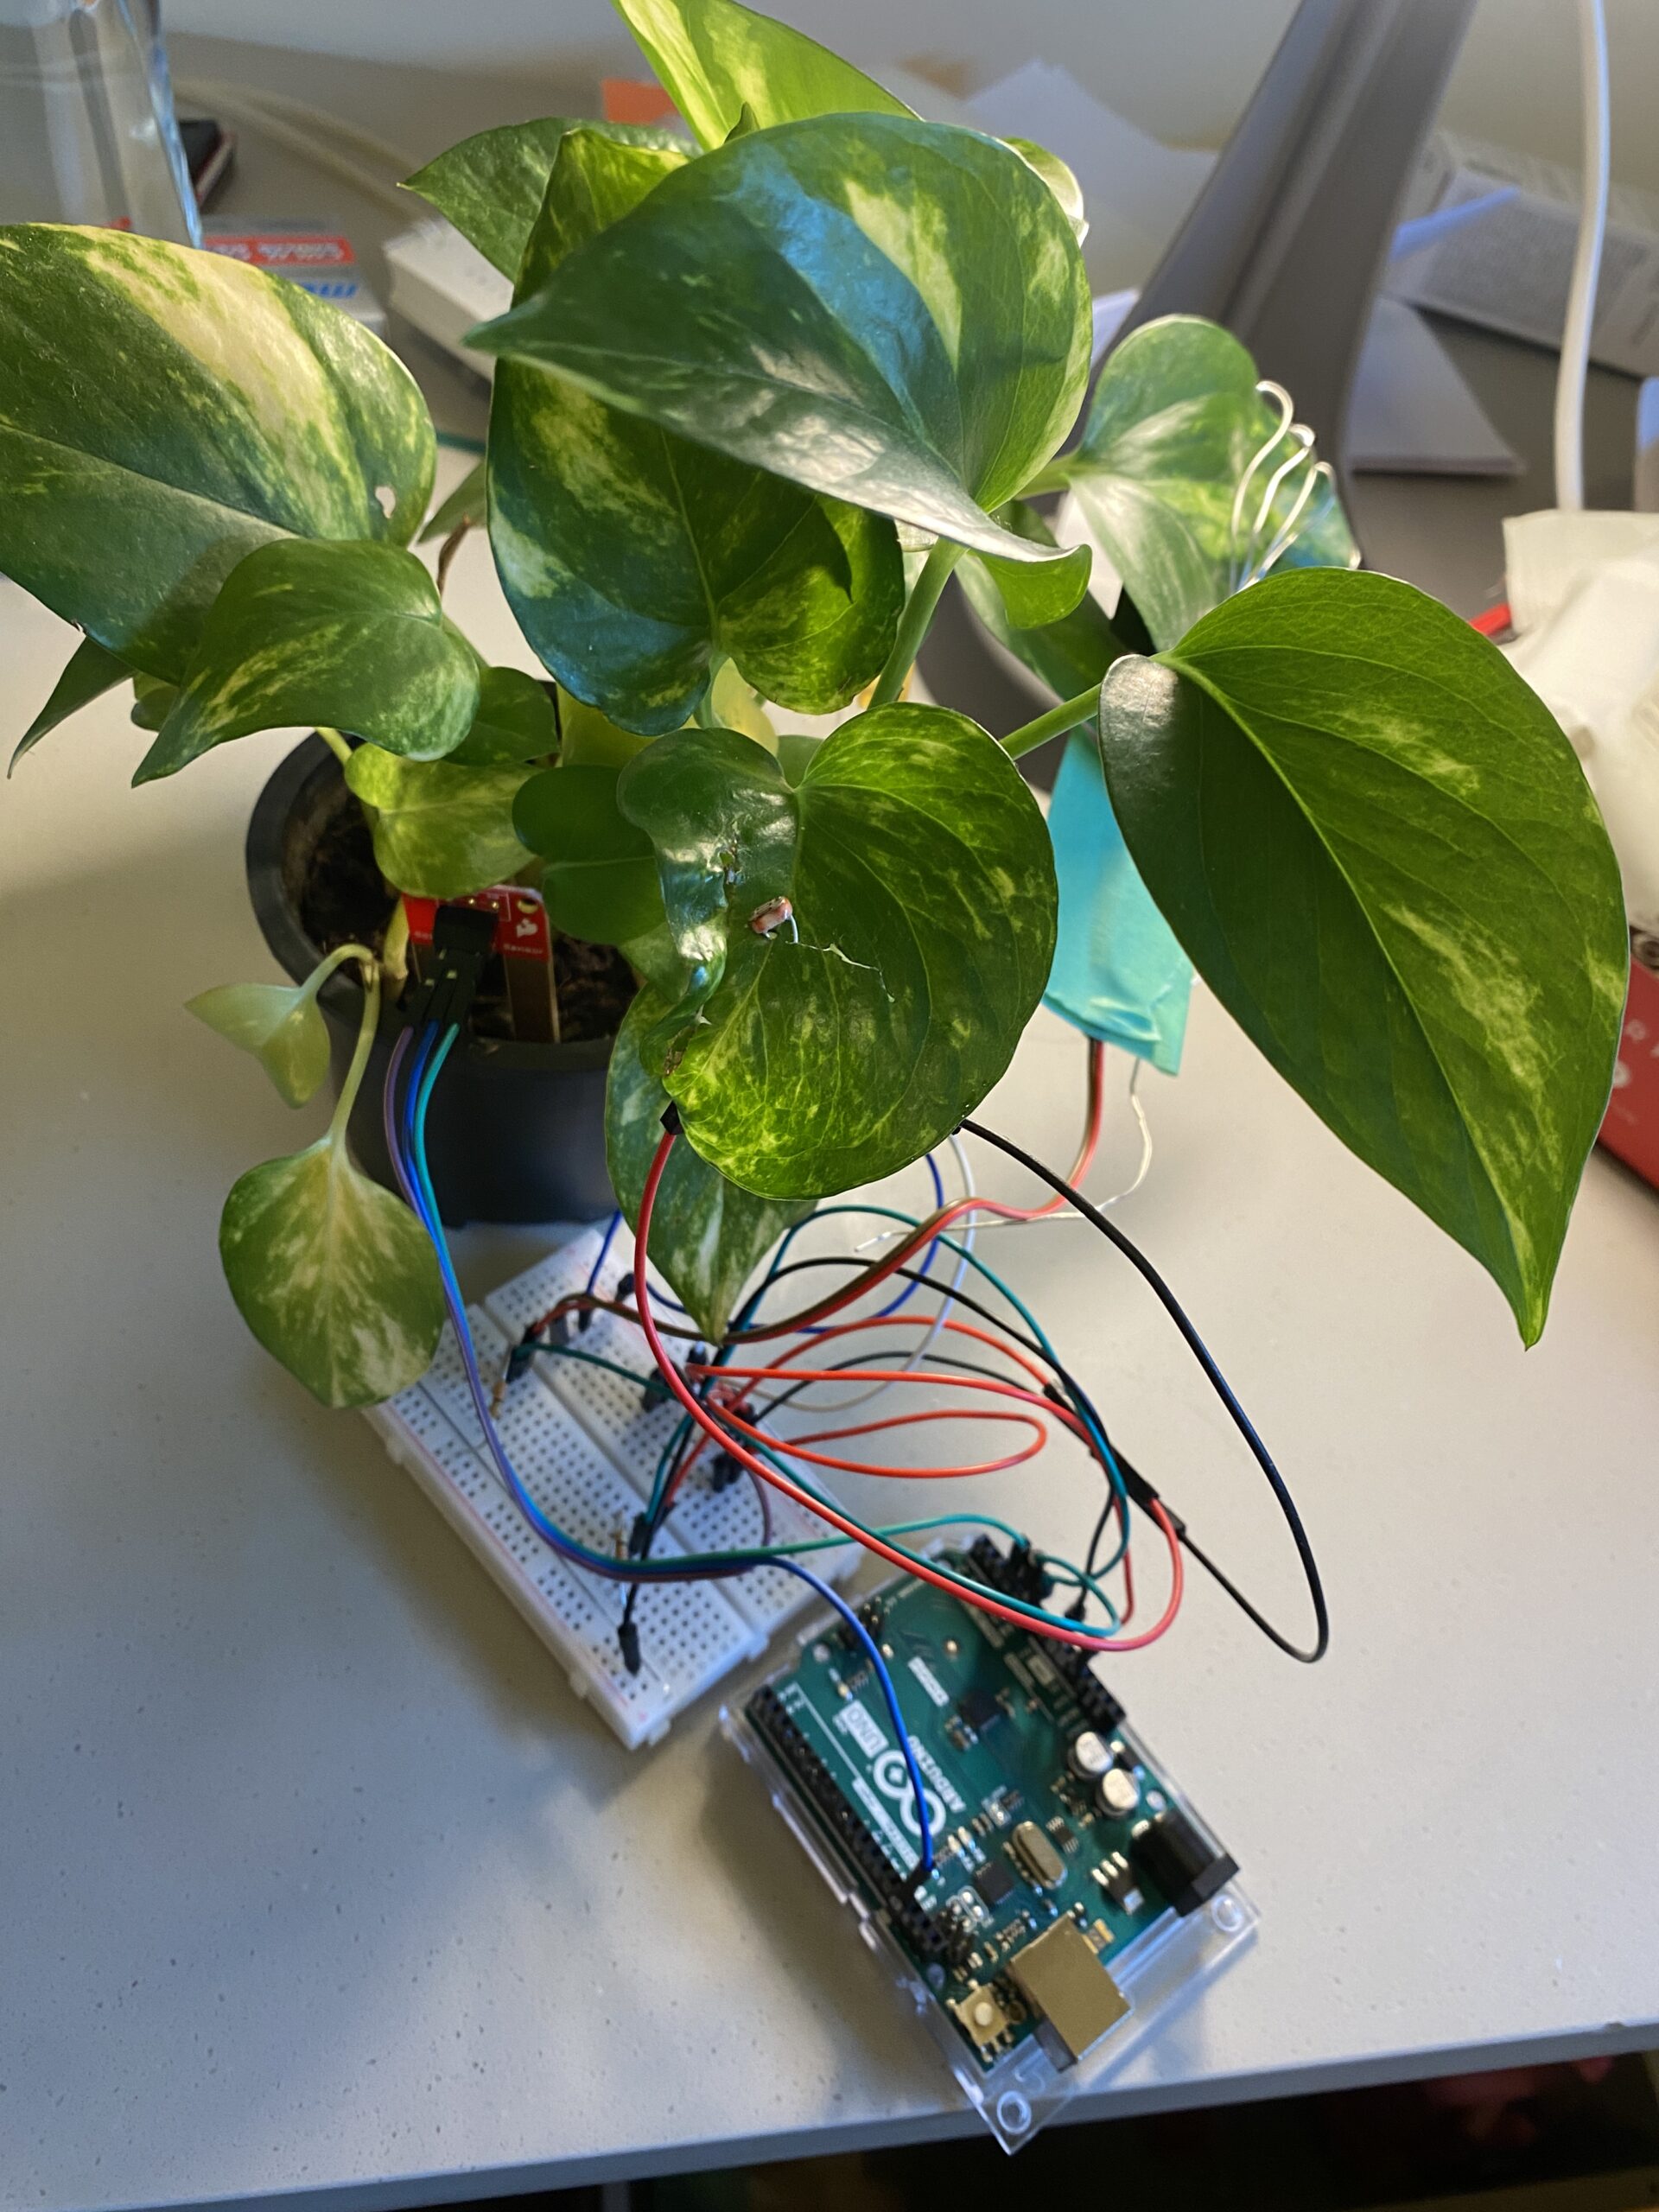
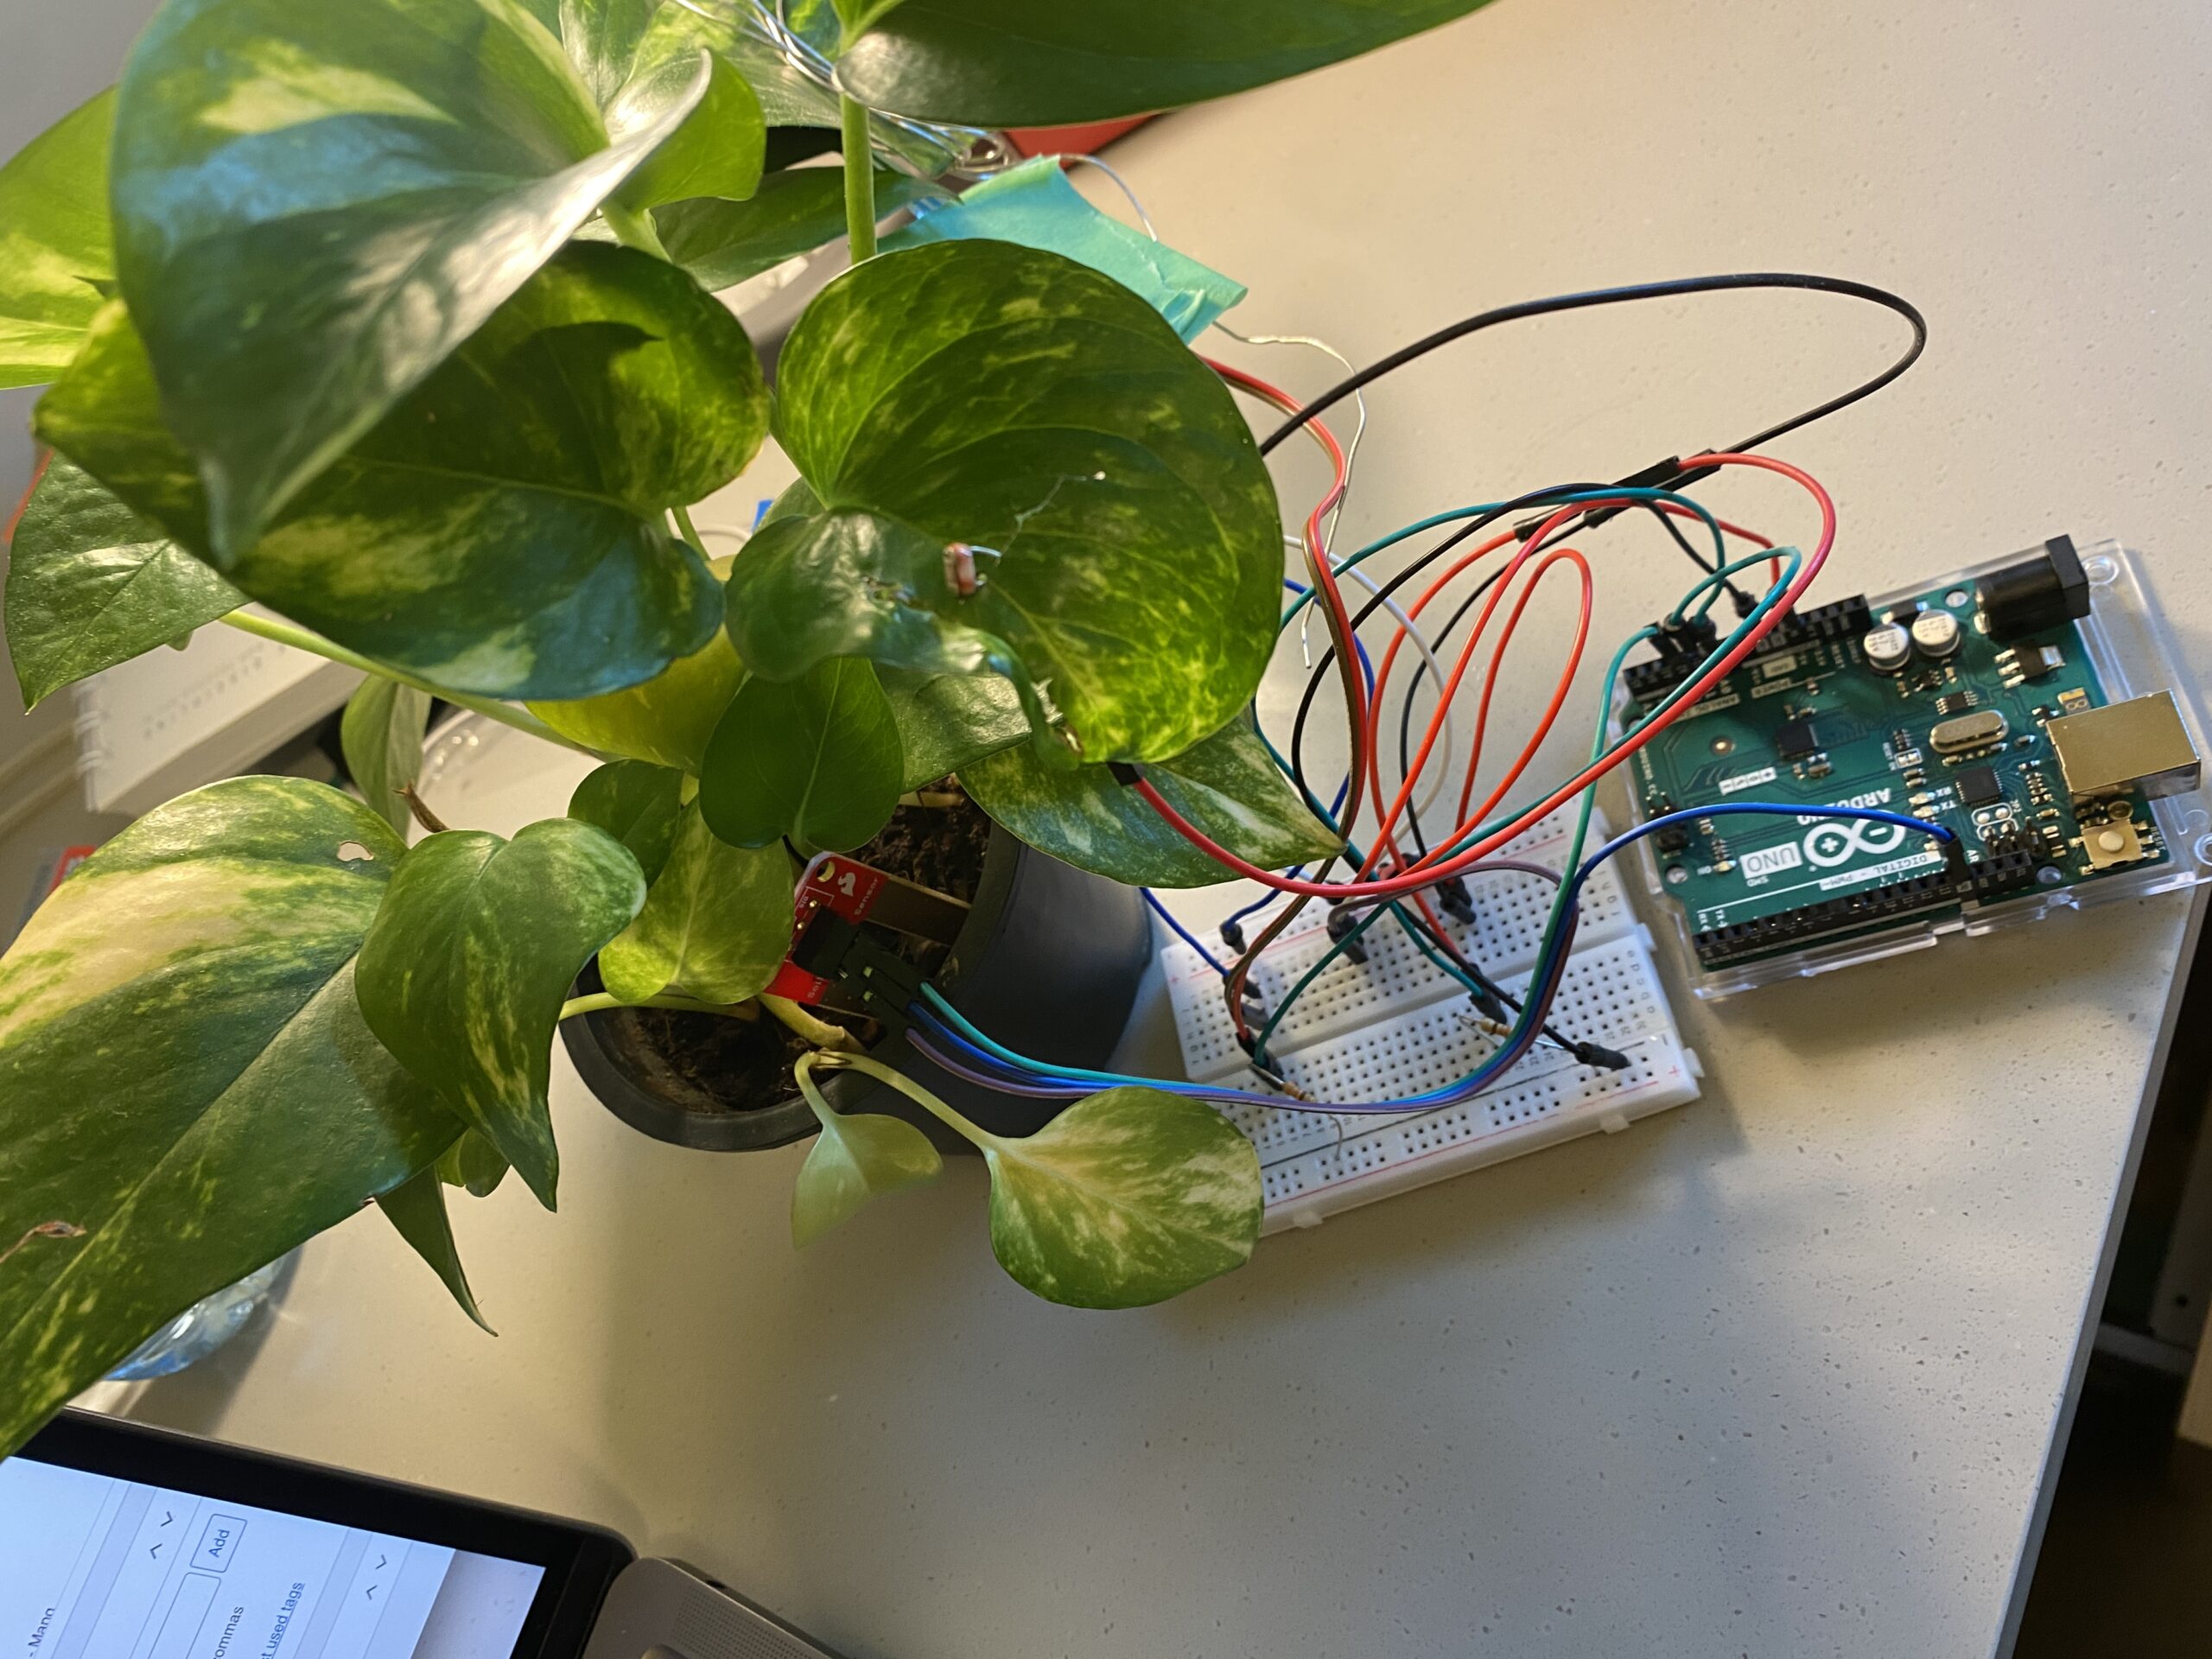
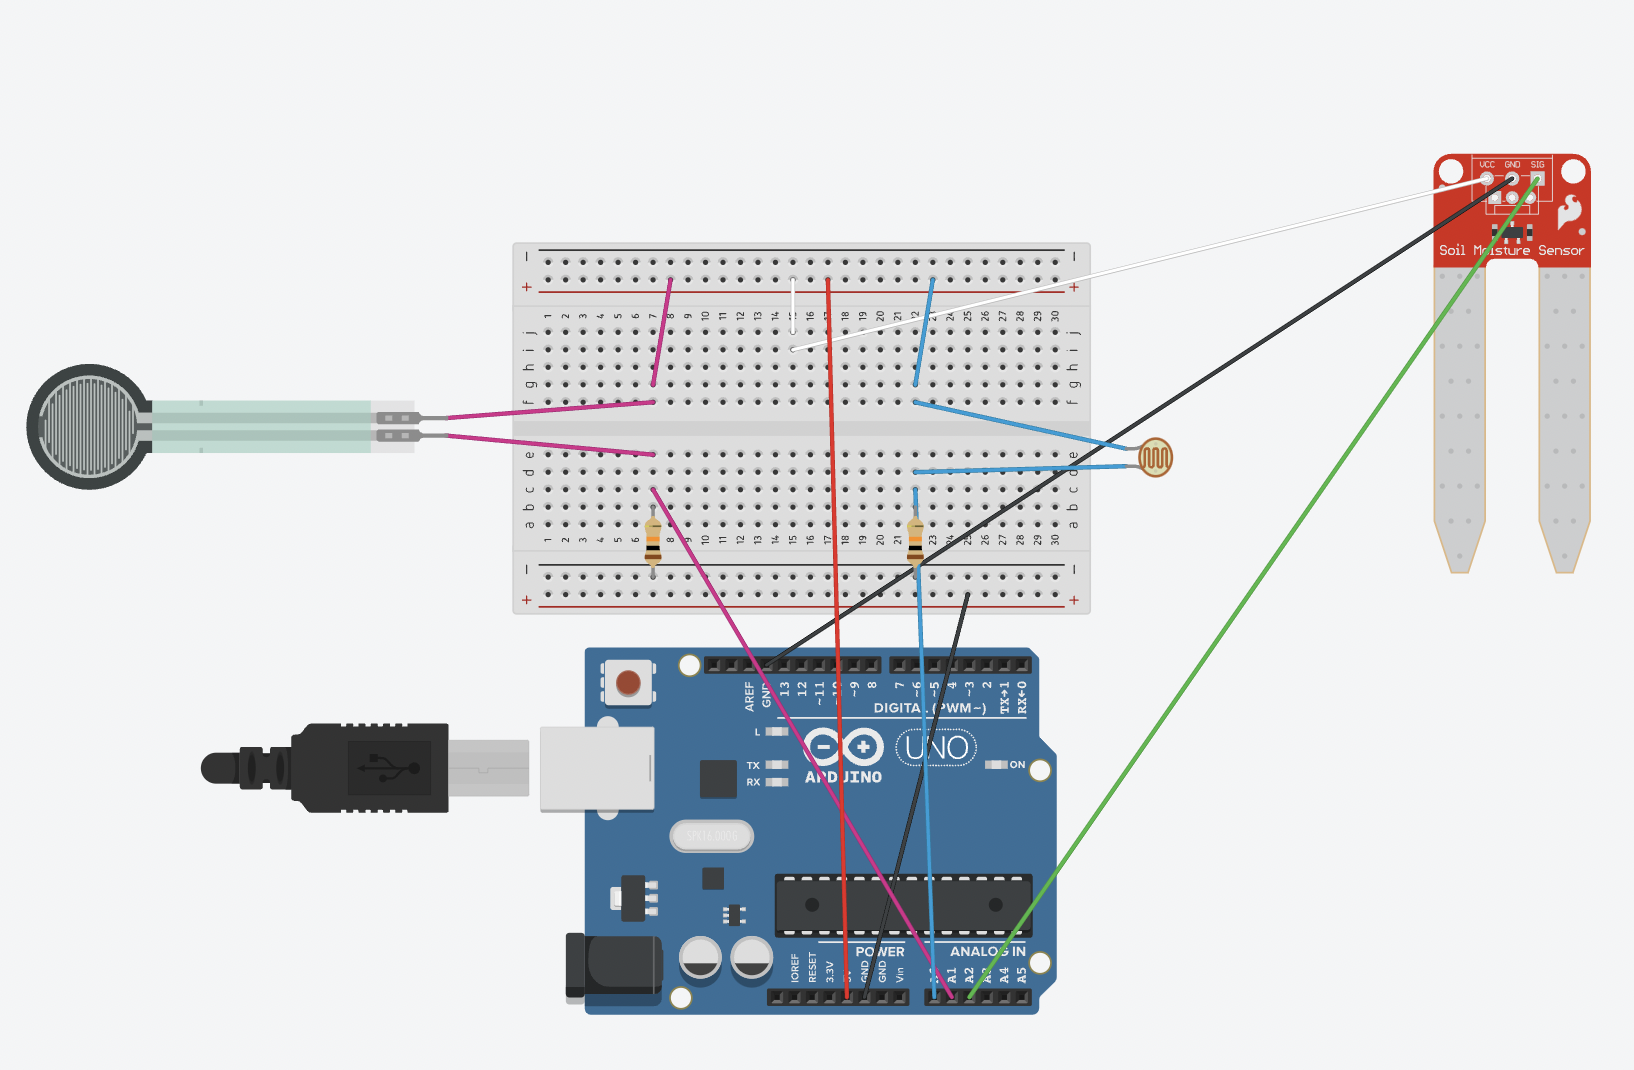
Hardware Image:

P5.js Screen Image:

User Testing:

IM Showcase:

IMG_9979

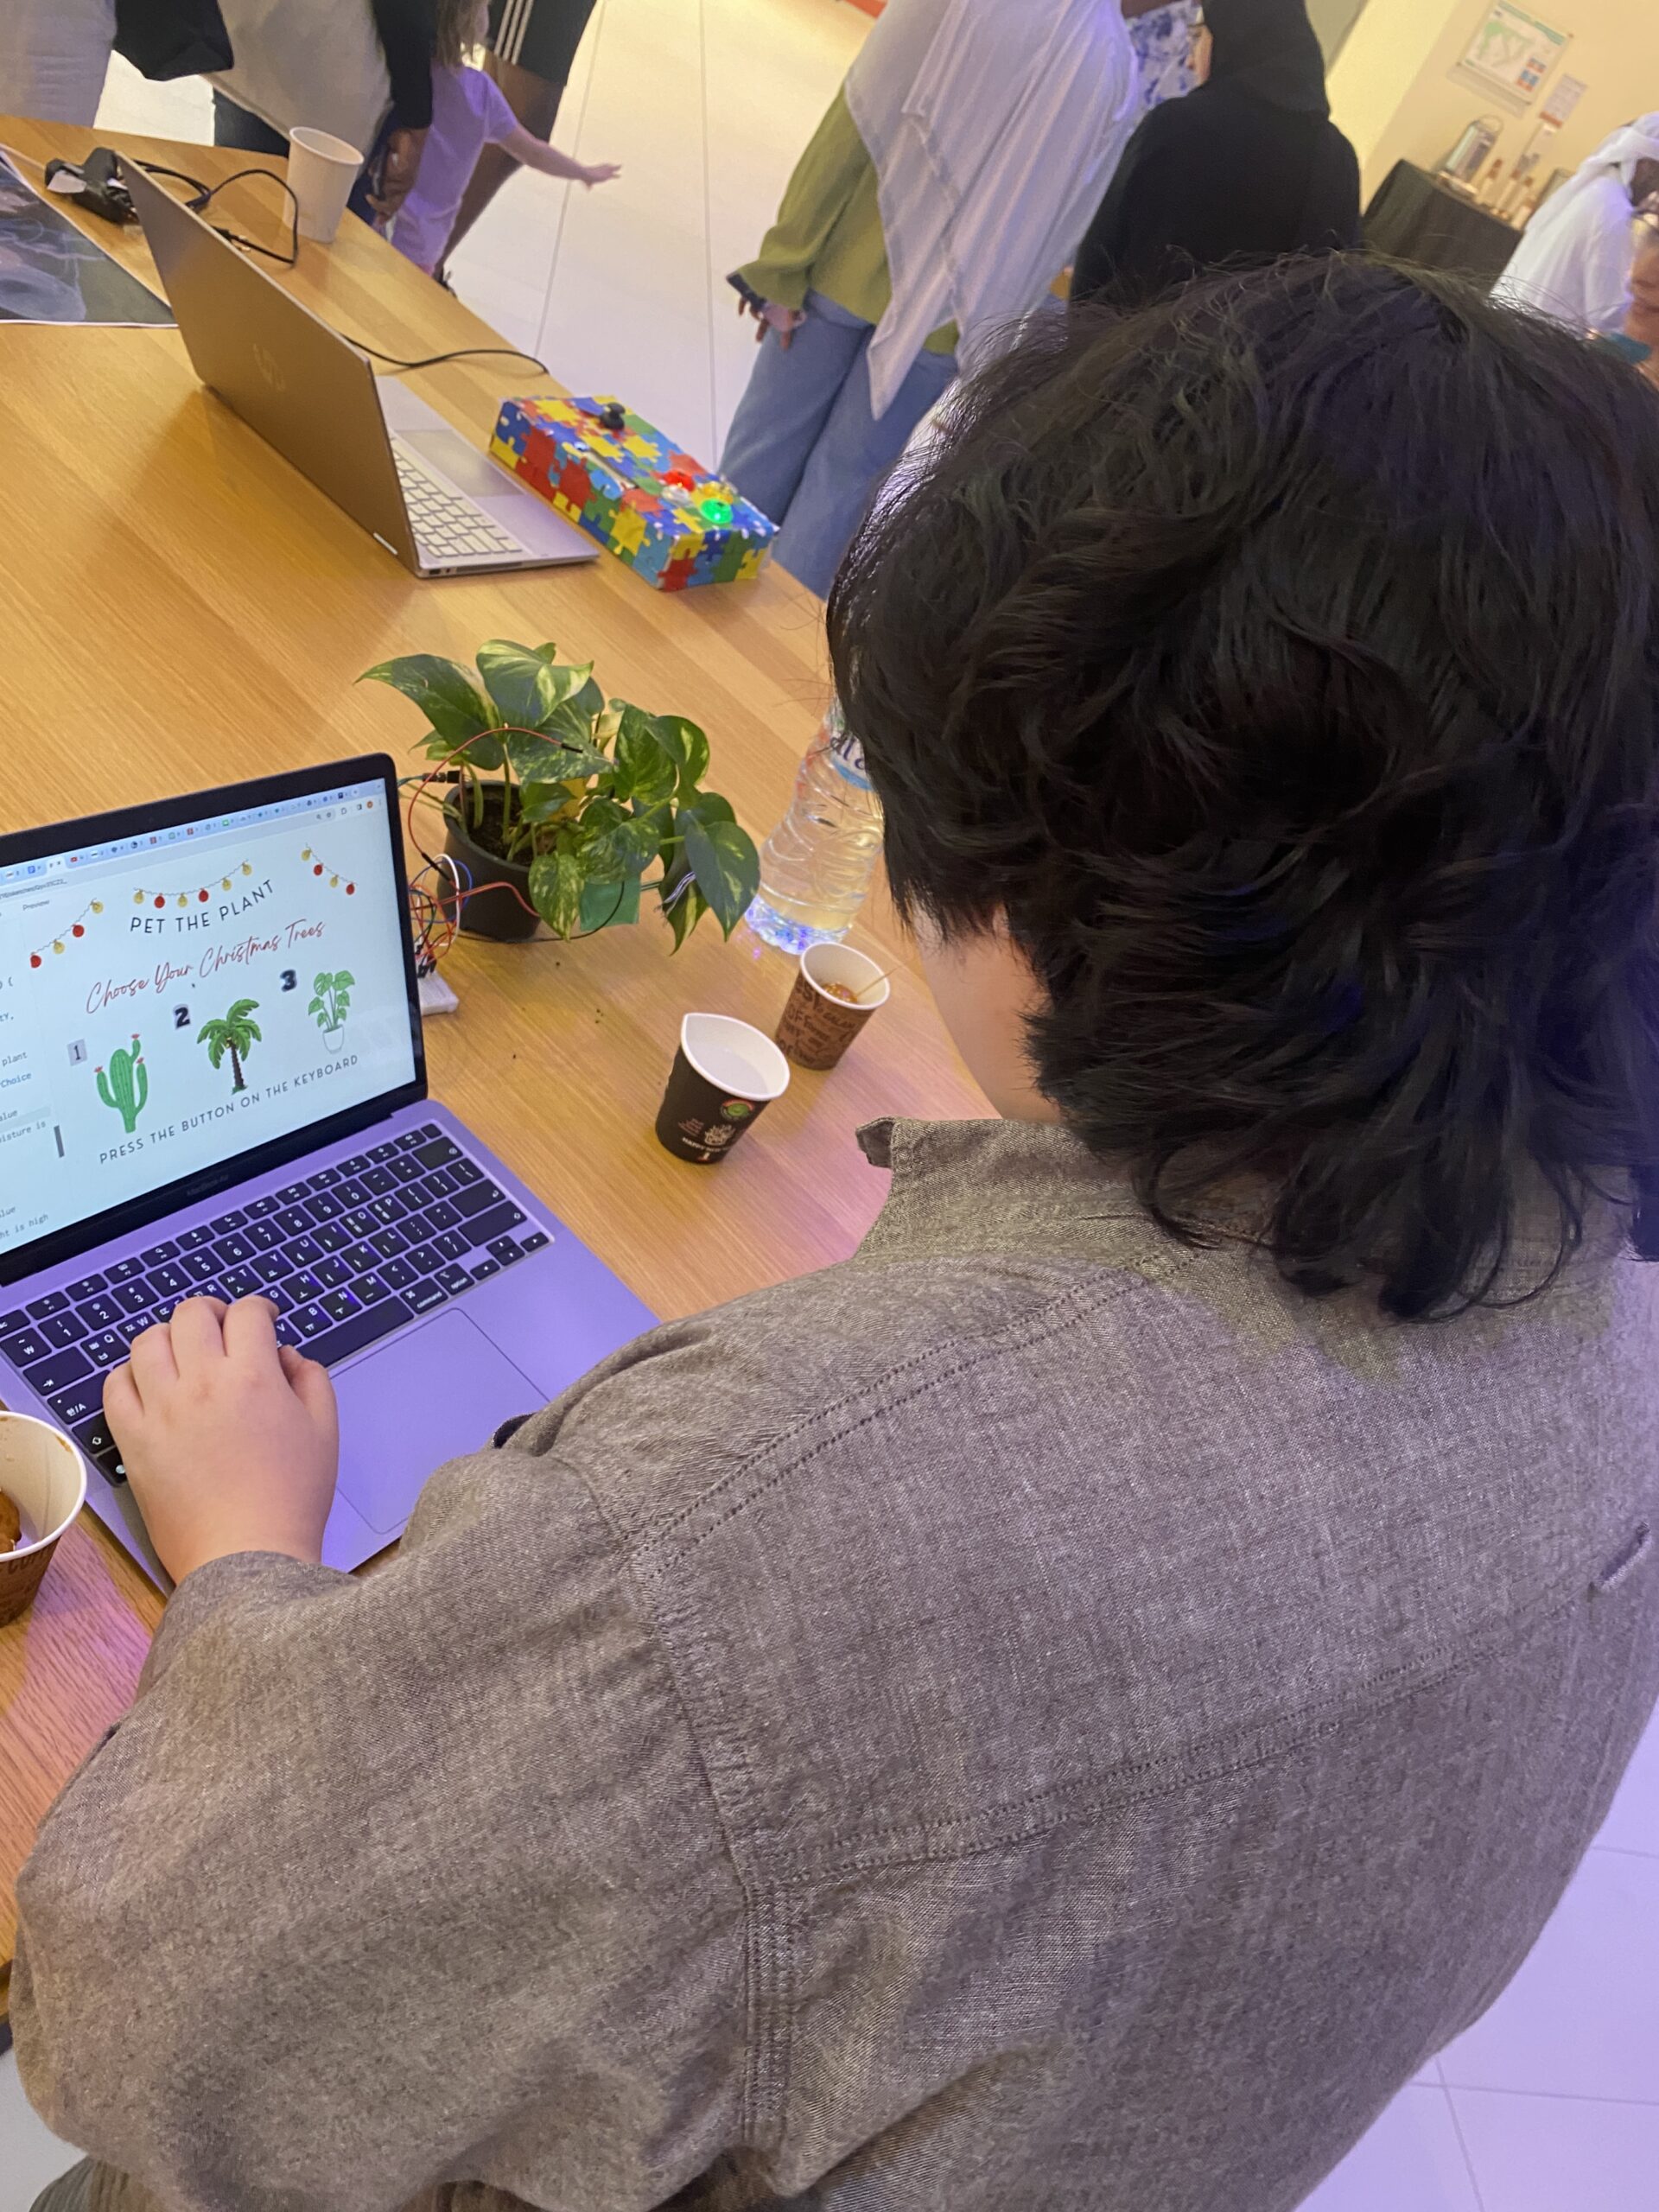
Many people came to see the IM showcase! My project was very popular for kids because it was pretty clear to understand through my screen and the instructions were clear. They liked my interactive project with plants. However, there was some problem in giving water. I had to put the max value to the soil moisture sensor, but I thought it would be fine. People gave too much water to plants, so sometimes virtual plants went so big. It was still an amazing day to experience!

Implementation:

<Arduino Code>

// Arduino code

// Input:
// A0 - photocell sensor
// A1 - force resistor sensor
// A2 - soil moisture sensor

int photocellPin = A0; //photocell sensor
int forceSensorPin = A1; //force resistor sensor
int soil = A2; //soil moisture sensor
int forceSensorValue = 0;

void setup() {
  Serial.begin(9600);
  pinMode(photocellPin, INPUT);
  pinMode(forceSensorPin,INPUT);
  pinMode(soil, INPUT);
}

void loop() {
  // Read the value from three sensors
  int lightValue = analogRead(photocellPin);
  int forceSensorValue = analogRead(forceSensorPin);
  int soilValue = analogRead(soil);

  // Send the value to p5.js
    Serial.print(soilValue);
    Serial.print(",");
    Serial.print(lightValue);
    Serial.print(",");
    Serial.print(forceSensorValue);
    Serial.println(); // Print a newline to indicate the end of the data

My Arduino code establishes input connections for a photocell sensor, force resistor sensor, and soil moisture sensor on analog pins A0, A1, and A2. In the setup function, the serial communication is initiated at a baud rate of 9600, and the pinMode is configured for the three pins. Within the main loop, analogRead captures values from the photocell, force sensor, and soil sensor, and these readings are sent to the serial port.

<P5.js Code>

// Define global variables for images, page tracking, and sensor data
let backgroundImage;
let choicebackgroundImage;
let resultbackgroundImage;
let merrychristmasImage;
let cactusImage;
let greenplantImage;
let palmtreeImage;
let currentPage = 1;
let serial;
let latestData = "waiting for data";
let plantSize = 80;
let plantX, plantY;
let xOffset = 0;
let yOffset = 0;
let userChoice = ''

//Sensor Values
let soilMoistureValue = 0;
let photocellValue = 0;
let forceSensorValue = 0;

//Ornament Variables
let ornaments = ['https://i.imgur.com/FPuVyGI.png', 'https://i.imgur.com/fJxVZe3.png', 'https://i.imgur.com/rGZS7Yx.png']; 
let currentOrnament = '';
let ornamentsList = [] ;
let hasOrnament = false;
let isAddingOrnament = false;


//Preload images before setup
function preload() {
  //loadimages
  backgroundImage = loadImage('https://i.imgur.com/lGiEbaQ.png');
  choicebackgroundImage = loadImage('https://i.imgur.com/tmRSqeN.png')
  cactusImage = loadImage('https://i.imgur.com/kIxRg6H.png')
  palmtreeImage = loadImage('https://i.imgur.com/A8tjpQM.png')
  greenplantImage = loadImage('https://i.imgur.com/yMYwr8D.png'); 
  resultbackgroundImage = loadImage('https://i.imgur.com/1IHM8SH.png')
  merrychristmasImage = loadImage ('https://i.imgur.com/MoUEmwD.png')
  
  //Load Ornament Images
   for (let i = 0; i < ornaments.length; i++) {
    ornaments[i] = loadImage(ornaments[i]);
  }
}

// Setup function, called once at the beginning
function setup() {
  // Create canvas fit to the background image
  createCanvas(700,500);
    // Connect to the p5.serialport server
  serial = new p5.SerialPort();
 // Set up serial communication
 serial.list();
 serial.open('/dev/tty.usbmodem101');

 serial.on('connected', serverConnected);

 serial.on('list', gotList);

 serial.on('data', gotData);

 serial.on('error', gotError);

 serial.on('open', gotOpen);

 serial.on('close', gotClose);
 
}

// Callback function when connected to the serial server
function serverConnected() {
 print("Connected to Server");
}

// Callback function when a list of serial ports is received
function gotList(thelist) {
 print("List of Serial Ports:");

 for (let i = 0; i < thelist.length; i++) {
  print(i + " " + thelist[i]);
 }
}

// Callback function when the serial port is opened
function gotOpen() {
 print("Serial Port is Open");
}

// Callback function when the serial port is closed
function gotClose(){
 print("Serial Port is Closed");
 latestData = "Serial Port is Closed";
}

// Callback function when an error occurs in serial communication
function gotError(theerror) {
 print(theerror);
}

// Callback function when new data is received from the serial port
function gotData() {
 
  let currentString = serial.readLine();
  console.log('serial received: ' + currentString);
  trim(currentString);
  if (!currentString) return;
  console.log(currentString);
  latestData = currentString;

  // Split the received data into values
  let dataValues = split(latestData, ',');

  // Assign the values to the corresponding variables
  console.log(dataValues);
  if (dataValues.length === 3) {
    console.log('got 3 values');
    soilMoistureValue = int(dataValues[0]);
    console.log('soil: ' + soilMoistureValue);
    photocellValue = int(dataValues[1]);
    console.log('photocell: ' + photocellValue);
    forceSensorValue = int(dataValues[2]);
    console.log('force: ' + forceSensorValue);
  
}

}


//fullscreen
function keyPressed() {
  if (key === 'f') {
    toggleFullscreen();
  }
}

// Draw function, called continuously
function draw() {
  if (currentPage === 1) {
    drawStartPage();
  } else if (currentPage === 2) {
    drawChoicePage();
  } else if (currentPage === 3) {
    drawResultPage();
  }

}

// Draw function for the start page
function drawStartPage() {
  background(backgroundImage);

  if (mouseIsPressed) {
    currentPage = 2; // Move to the next page when clicked
  }
}

// Draw function for the choice page (next page)
function drawChoicePage() {
  background(choicebackgroundImage);

  textSize(24);
  fill(0);
  

  if (keyIsPressed) {
    // Check the pressed key and move to the corresponding page
    if (key === '1') {
      userChoice = 'cactus';
      currentPage = 3; // Go to the third page with cactus
    } else if (key === '2') {
      userChoice = 'palmTree';
      currentPage = 3; // Go to the third page with green plant
    } else if (key === '3') {
      userChoice = 'greenPlant';
      currentPage = 3; // Go to the third page with palm tree
    }
  }
}


// Draw function for the result page (last page)
function drawResultPage() {
  background(resultbackgroundImage);

   // Display selected plant based on user choice
  if (userChoice === 'cactus') {
    plantX = 485 + xOffset;
    plantY = 337 + yOffset;
    image(cactusImage, plantX, plantY, plantSize, plantSize);
  } else if (userChoice === 'palmTree') {
    plantX = 489 + xOffset;
    plantY = 341 + yOffset;
    image(palmtreeImage, plantX, plantY, plantSize, plantSize);
  } else if (userChoice === 'greenPlant') {
    plantX = 500 + xOffset;
    plantY = 339 + yOffset;
    image(greenplantImage, plantX, plantY, plantSize, plantSize);
  }

  // Check sensor values and simulate plant growth for all plant types
  if (userChoice === 'cactus' || userChoice === 'palmTree' || userChoice === 'greenPlant') {
    // Check soil moisture sensor value
    if (soilMoistureValue > 860) {
      // Increase size when soil moisture is high
      plantSize += 1.5;
      xOffset -= 0.8;
      yOffset -= 1.4;
    }

    // Check photocell sensor value
    if (photocellValue > 70) {
      // Increase size when light is high
      plantSize += 1.5;
      xOffset -= 0.8;
      yOffset -= 1.4;
    }

    // Check force sensor value
    if (forceSensorValue > 1000) {
      // Add ornament when force sensor value is high
      isAddingOrnament = true;
    }
  }

  // Display ornaments
  for (let i = 0; i < ornamentsList.length; i++) {
    let ornament = ornamentsList[i];
    image(ornament.image, ornament.x, ornament.y, ornament.size, ornament.size);
  }

  // If the photocell value is less than 10, switch to a Christmas background
  if (photocellValue < 10) {
    background(merrychristmasImage);
    if (userChoice === 'cactus') {
      plantX = 485 + xOffset;
      plantY = 337 + yOffset;
      image(cactusImage, plantX, plantY, plantSize, plantSize);
      
      // Display the selected plant based on user choice along with ornaments
      if (ornamentsList[0]) {
        for (let i = 0; i < ornamentsList.length; i++) {
          let ornament = ornamentsList[i];
          image(ornament.image, ornament.x, ornament.y, ornament.size, ornament.size);
        }
      }
  } else if (userChoice === 'palmTree') {
      plantX = 489 + xOffset;
      plantY = 341 + yOffset;
      image(palmtreeImage, plantX, plantY, plantSize, plantSize);
    
      if (ornamentsList[0]) {
        for (let i = 0; i < ornamentsList.length; i++) {
          let ornament = ornamentsList[i];
          image(ornament.image, ornament.x, ornament.y, ornament.size, ornament.size);
        }
      }
  } else if (userChoice === 'greenPlant') {
      plantX = 500 + xOffset;
      plantY = 339 + yOffset;
      image(greenplantImage, plantX, plantY, plantSize, plantSize);
    
      if (ornamentsList[0]) {
        for (let i = 0; i < ornamentsList.length; i++) {
          let ornament = ornamentsList[i];
          image(ornament.image, ornament.x, ornament.y, ornament.size, ornament.size);
        }
      }
  }
    
  }
  
}
// MousePressed function checks if the user is ready to add an ornament and if the click is within the plant area
function mousePressed() {
   // Add ornament at the clicked position
  if (isAddingOrnament && mouseX > plantX && mouseX < plantX + plantSize && mouseY > plantY && mouseY < plantY + plantSize) {
    // Add ornament at the clicked position
    let ornament = {
      image: random(ornaments),
      x: mouseX,
      y: mouseY,
      size: 40, // Adjust the size of the ornament as needed
    };

    ornamentsList.push(ornament);

    // Reset the flag
    isAddingOrnament = false;
  }
}


I’ve created a p5.js sketch that brings a virtual Christmas tree to life, responding to Arduino sensors and user interactions. The code begins by initializing global variables, including images for backgrounds, plants, and ornaments, as well as parameters for page tracking and sensor data.

In the setup function, the canvas is created, and a connection to the p5.serialport server is established for communication with an Arduino. Callback functions are set up to handle various serial events, ensuring a smooth connection between the digital representation and physical sensor inputs.

The draw function renders different pages based on user choices and sensor inputs. Users progress through pages by clicking the mouse or pressing keys to select the type of plant displayed on the last page.

The drawResultPage function, specific to the final page, displays the chosen plant with dynamic growth simulation based on soil moisture, light intensity, and force sensor values. The plant size adjusts, and ornaments are added under specific conditions, creating an interactive and festive atmosphere. The code also intelligently switches to a Christmas-themed background in low-light conditions, enhancing the holiday spirit.

My code handles user interactions, allowing users to enter fullscreen mode with the ‘f’ key and add ornaments to the virtual tree by clicking on it. The integration of visual elements, sensor data, and user interactions results in an engaging experience, turning virtual festivities into a tangible and interactive celebration of the Christmas season.

<Communication between Arduino and p5.js>

function drawResultPage() {
  background(resultbackgroundImage);

   // Display selected plant based on user choice
  if (userChoice === 'cactus') {
    plantX = 485 + xOffset;
    plantY = 337 + yOffset;
    image(cactusImage, plantX, plantY, plantSize, plantSize);
  } else if (userChoice === 'palmTree') {
    plantX = 489 + xOffset;
    plantY = 341 + yOffset;
    image(palmtreeImage, plantX, plantY, plantSize, plantSize);
  } else if (userChoice === 'greenPlant') {
    plantX = 500 + xOffset;
    plantY = 339 + yOffset;
    image(greenplantImage, plantX, plantY, plantSize, plantSize);
  }

  // Check sensor values and simulate plant growth for all plant types
  if (userChoice === 'cactus' || userChoice === 'palmTree' || userChoice === 'greenPlant') {
    // Check soil moisture sensor value
    if (soilMoistureValue > 860) {
      // Increase size when soil moisture is high
      plantSize += 1.5;
      xOffset -= 0.8;
      yOffset -= 1.4;
    }

    // Check photocell sensor value
    if (photocellValue > 70) {
      // Increase size when light is high
      plantSize += 1.5;
      xOffset -= 0.8;
      yOffset -= 1.4;
    }

    // Check force sensor value
    if (forceSensorValue > 1000) {
      // Add ornament when force sensor value is high
      isAddingOrnament = true;
    }
  }

  // Display ornaments
  for (let i = 0; i < ornamentsList.length; i++) {
    let ornament = ornamentsList[i];
    image(ornament.image, ornament.x, ornament.y, ornament.size, ornament.size);
  }

  // If the photocell value is less than 10, switch to a Christmas background
  if (photocellValue < 10) {
    background(merrychristmasImage);
    if (userChoice === 'cactus') {
      plantX = 485 + xOffset;
      plantY = 337 + yOffset;
      image(cactusImage, plantX, plantY, plantSize, plantSize);
      
      // Display the selected plant based on user choice along with ornaments
      if (ornamentsList[0]) {
        for (let i = 0; i < ornamentsList.length; i++) {
          let ornament = ornamentsList[i];
          image(ornament.image, ornament.x, ornament.y, ornament.size, ornament.size);
        }
      }
  } else if (userChoice === 'palmTree') {
      plantX = 489 + xOffset;
      plantY = 341 + yOffset;
      image(palmtreeImage, plantX, plantY, plantSize, plantSize);
    
      if (ornamentsList[0]) {
        for (let i = 0; i < ornamentsList.length; i++) {
          let ornament = ornamentsList[i];
          image(ornament.image, ornament.x, ornament.y, ornament.size, ornament.size);
        }
      }
  } else if (userChoice === 'greenPlant') {
      plantX = 500 + xOffset;
      plantY = 339 + yOffset;
      image(greenplantImage, plantX, plantY, plantSize, plantSize);
    
      if (ornamentsList[0]) {
        for (let i = 0; i < ornamentsList.length; i++) {
          let ornament = ornamentsList[i];
          image(ornament.image, ornament.x, ornament.y, ornament.size, ornament.size);
        }
      }
  }
    
  }
  
}
// MousePressed function checks if the user is ready to add an ornament and if the click is within the plant area
function mousePressed() {
   // Add ornament at the clicked position
  if (isAddingOrnament && mouseX > plantX && mouseX < plantX + plantSize && mouseY > plantY && mouseY < plantY + plantSize) {
    // Add ornament at the clicked position
    let ornament = {
      image: random(ornaments),
      x: mouseX,
      y: mouseY,
      size: 40, // Adjust the size of the ornament as needed
    };

    ornamentsList.push(ornament);

    // Reset the flag
    isAddingOrnament = false;
  }
}

In the drawResultPage function, the code checks the sensor values (soil moisture, photocell, and force sensor) and simulates plant growth based on these values. If conditions related to sensor values are met, the plant size is increased, and offsets are adjusted to simulate growth. If the force sensor value is high, the variable isAddingOrnament is set to true, indicating that an ornament should be added. The code also includes a section for displaying ornaments on the plant based on user interactions. If isAddingOrnament is true, the mousePressed function adds an ornament at the clicked position within the plant area.

In summary, the p5.serialport library is used to establish a connection between the p5.js sketch and the Arduino, enabling real-time communication and interaction based on sensor data. The code continuously reads data from the Arduino, processes it, and updates the visual representation of the Christmas tree accordingly.

Digital Challenges & Future Improvement:

Before working on “Pet the Plant”, my projects mostly involved using a single Arduino sensor. However, for this project, I needed to incorporate three different sensors. Initially, I tackled each sensor’s interaction separately by coding them in different p5.js sketches. The challenge arose when I had to merge all these interactions into one comprehensive project and figure out a way to smoothly transition between them.

For future improvement, I would like to use the real plant to make the design of a virtual plant. For this project, I did not know how to animate a real plant to make a virtual plant, and I used pngs to show the virtual plants to users. However, since it is “Pet the Plant”, it would be much more friendly to users if I used their real plants to be virtual plant like avatars of a human and grow them in the game. This could be achieved through computer vision and image processing techniques to capture and interpret the characteristics of users’ real plants. By using a webcam or other image-capturing devices, the system could analyze the live feed of the real plant, extracting features such as color, size, and overall health. I can enable users to see their real plants reflected in the virtual environment. Also, I might implement interactive features where users can virtually nurture and care for their specific plant avatars.


Pet the Plant

Concept:
“Pet the Plant” is an interactive project that merges the physical and digital realms to provide users with the satisfaction of nurturing a virtual plant without the responsibilities and risks associated with real plants. Inspired by the creator’s struggles in maintaining live plants, the project employs Arduino and various sensors to simulate the physical actions of caring for a plant, while the digital aspect, coded in p5.js, reflects the plant’s growth.

Components:
1. Arduino Sensors:
– Potentiometer: Used to select from five different virtual plants.
– Force Resistor Sensor: Mimics soil patting motions by squeezing between fingers.
– Water Level Sensor: Allows users to virtually water the plant by pouring water into a cup.
– Photocell: Reads ambient “sunlight” affecting the virtual plant’s size and cloud visibility.

2. Digital Interface:
– Coded in C++ for Arduino and p5.js for the virtual experience.
– Utilizes p5.serialcontrol for communication between Arduino and p5.js.
– Screenshots in a GIF format showcase various scenes of the digital experience.

“Plant the Pet” Set-Up:
The physical interface is designed to align with the plant theme:
– Arduino and wires hidden inside a shoebox with a connecting hole to the laptop.
– Four holes on top for the sensors, placed inside small plant pots.
– Brown air-dry clay serves as simulated dirt, covered with fake grass to enhance the plant-like appearance.

Smart Plant Growth Monitor:
This project introduces a hands-on experience for users to monitor virtual plant growth on a computer screen. Key components include:
– Physical Soil Sensor: Arduino-powered soil moisture sensor.
– Digital Plant Simulation: Developed using P5.js for visual appeal.
– Real-time Data Exchange: Arduino collects and sends soil moisture data to the P5.js environment.
– User Interaction: Users physically water the virtual plant by adding water to the soil sensor.
– Feedback System: Visual feedback in the P5.js simulation reflects plant growth based on soil moisture levels.

Arduino & P5.js Outgoing Ongoing Data:
The Arduino collects real-time soil moisture data and transmits it to the P5.js environment. This ongoing data exchange facilitates a dynamic and responsive virtual plant simulation, allowing users to observe the impact of their actions on the plant’s growth in real-time. The interaction is designed to be user-friendly, creating an engaging and educational experience in the realm of virtual gardening.


Arduino Code

int pot; //potentiometer
int fsr; // force sensitive resistor
int humid; // humidity & temperature level sensor
int light; // photocell

void setup() {
  Serial.begin(9600);
}

void loop() {
  pot = analogRead(A0);
  fsr = analogRead(A1);
  humid = analogRead(A2);
  light = analogRead(A3);
  Serial.print(pot);
  Serial.print(',');
  Serial.print(fsr);
  Serial.print(',');
  Serial.print(humid);
  Serial.print(',');
  Serial.print(light);

}


Week 11: Final Project Proposal 1

<Smart Plant Growth Monitor>

I want to create a hands-on experience for users to monitor the growth of a virtual plant on their computer screen by interacting with a physical soil sensor using Arduino and p5 js. The Interactive Plant Growth Monitor provides a basic yet engaging experience where users can observe the impact of watering on a virtual plant. This project aims to introduce the concept of real-time data exchange between physical sensors and digital simulations in a user-friendly manner.

Components: Physical Soil Sensor, Digital Plant Simulation, Real-time Data Exchange, User Interaction, Feedback System

Arduino-powered soil moisture sensor to measure the soil’s moisture level. P5.js for a simple and visually appealing digital plant simulation on the computer screen. Arduino collects real-time soil moisture data and sends it to the P5.js environment. Users water the virtual plant by physically adding water to the soil sensor. Visual feedback in the P5.js simulation reflects the plant’s growth based on the soil moisture level.

Week 11: Reading Response

Disability Inspires Design

According to Charles Eames, design depends largely on constraints. The sequence of events challenges the so-called trickle down effect whereby advances in mainstream design are expected to eventually find their way into specialist products for people with disabilities, smaller markets that could not have supported cost of their development. Flow in the opposite direction is just as interesting. When the issues around disability catalyze new design thinking and influence a broader design culture in return.

Initially, closed captioning was introduced in the 1970s as a response to the needs of the deaf and hard-of-hearing community. However, its impact has expanded beyond its original purpose. Nowadays, closed captioning is commonly used by people who are not deaf or hard of hearing but find it helpful in various situations, such as when watching videos in noisy environments or in situations where audio is not desirable. The inclusive design principles that emerged from addressing the needs of the deaf and hard-of-hearing community have influenced the broader design culture. Designers now recognize the importance of creating products and services that are accessible to diverse user groups. This shift in mindset has led to the integration of accessibility features in various technologies, ranging from mobile applications to online platforms, making them more user-friendly for everyone.

The evolution of closed captioning illustrates how addressing specific disability-related challenges can lead to innovative design solutions that, in turn, benefit a much larger and diverse audience. This example underscores the idea that inclusive design, inspired by considerations for people with disabilities, can have a positive ripple effect throughout the design landscape.

Week 11: In-Class Exercise

Exercise 1:

make something that uses only one sensor on Arduino and makes the ellipse in p5 move on the horizontal axis, in the middle of the screen, and nothing on Arduino is controlled by p5

For Arduino, I used a potentiometer to change the position of the ellipse in the p5js sketch. The ellipse starts from the left of the canvas, and it moves horizontally as the values from the potentiometer increase. The values from the potentiometer are mapped to the x coordinates of the ellipse, moving it across the horizontal axis in the middle of the screen.

//// Arduino Code


//void setup() {
  // put your setup code here, to run once:
  Serial.begin(9600);

//}

//void loop() {
  // put your main code here, to run repeatedly:
  int sensor = analogRead(A0);
  delay(5);
  Serial.println(sensor);

//}


let left = 0;

function setup() {
  createCanvas(400, 400);
}

function draw() {
  background(220,110,250);
  fill("green");
  ellipse(left, 50, 50, 50);
}

function keyPressed() {
  if (key == " ") {
    // important to have in order to start the serial connection!!
    setUpSerial();
  }
}

function readSerial(data) {
  left = map(data, 0, 1023, 0, 400);
}


Exercise 2:

make something that controls the LED brightness from p5

In this p5.js sketch, moving the mouse horizontally controls the brightness of an LED, represented by the variable `mybrightness`. The canvas background changes in shades of blue with the mouse’s x-position. Pressing the space bar initiates a serial connection to the Arduino, enabling real-time communication. The `readSerial` function reads data from the Arduino, and the current brightness value is sent back by appending a new line character. This simple interaction allows the LED brightness to respond in real time to the horizontal mouse movement on the canvas.

Arduino Code:

// - 5 - LED
int ledpin=5;//pin for led to be used

void setup() {
  // Start serial communication so we can send data
  // over the USB connection to our p5js sketch
  Serial.begin(9600);

  pinMode(5,OUTPUT);//setting mode as output
  pinMode(LED_BUILTIN, OUTPUT);
}

void loop() {
  // wait for data from p5 before doing something
  while (Serial.available()) {//while we read from serial
    digitalWrite(LED_BUILTIN, HIGH); // led on while receiving data
    int brightness=Serial.parseInt();//the brightness is gotten from data from p5
    if (Serial.read() == '\n') {//if we read \n,
      analogWrite(ledpin, brightness);//turn on the led based on the intensity gotten from p5
      Serial.println();//send \n
    }
  }
  digitalWrite(LED_BUILTIN, LOW);//if it is not reading, turn of checker light
}


P5 js Code:

let mybrightness=0;
function setup() {
  createCanvas(255,255);//make the canvas size 255 by 255
  textSize(18);//set text size to 18
}

function draw() {

  background(0,0,mouseX);//background be shades of blue
  fill(255);//text be white

  if (!serialActive) {
    text("Press Space Bar to select Serial Port", 20, 30);
  } else {
    text("Connected", 20, 30);
    
  }
  mybrightness=mouseX;//equate the mouseX to mybrightness
}

function keyPressed() {
  if (key == " ") {
    // important to have in order to start the serial connection!!
    setUpSerial();//when space is pressed connect to arduino
  }
}

// This function will be called by the web-serial library
// with each new line of data. The serial library reads
// the data until the newline and then gives it to us through
// this callback function

function readSerial(data) {
    let sendToArduino = mybrightness+'\n';
    writeSerial(sendToArduino);//send mybrightness to arduino
}

Exercise 3: 

take the gravity wind example and make it so every time the ball bounces one led lights up and then turns off, and you can control the wind from one analog sensor

The p5.js sketch features a blue ball that bounces on the canvas, and a corresponding LED turns on whenever the ball hits the floor. The wind effect on the ball’s movement is controlled by an analog sensor connected to the Arduino. When a ‘d’ key is pressed, a serial connection is established between p5.js and the Arduino. Pressing the space bar creates a new bouncing ball with a random mass and resets its position. The Arduino reads the wind intensity from an analog light sensor, and the LED is turned on or off based on the received brightness value from p5.js. The wind strength is then sent back to p5.js, completing the real-time interaction between the bouncing ball simulation and the Arduino-controlled LED.


Arduino Code:

int LedPin = 5;//pin to display light

void setup() {
  // Start serial communication so we can send data
  // over the USB connection to our p5js sketch
  Serial.begin(9600);

  // We'll use the builtin LED as a status output.
  // We can't use the serial monitor since the serial connection is
  // used to communicate to p5js and only one application on the computer
  // can use a serial port at once.
  pinMode(LED_BUILTIN, OUTPUT);

  // Outputs on these pins
  pinMode(LedPin, OUTPUT);//set pin as output

}

void loop() {
  // wait for data from p5 before doing something
  while (Serial.available()) {//while we read from serial
    digitalWrite(LED_BUILTIN, HIGH); // led on while receiving data for checker
    int bright = Serial.parseInt();//read data from p5 and store in bright
    if (Serial.read() == '\n') {//if the serial read is \n,
      digitalWrite(LedPin, bright);//turn on or off led depending on the value of bright
      int windsens=analogRead(A0);//read the windspeed from lightsensor
      delay(5);//wait small to get reading
      Serial.println(windsens);//send windspeed to p5
    }
  }
  digitalWrite(LED_BUILTIN, LOW);//if not active turn checker led off
}

P5 js Code:

let velocity;
let gravity;
let position;
let acceleration;
let wind;
let drag = 0.99;
let mass = 50;
let led=0;//variable controlling the led

function setup() {
  createCanvas(640, 360);
  fill(0,0,255);//ball to be blue
  position = createVector(width/2, 0);
  velocity = createVector(0,0);
  acceleration = createVector(0,0);
  gravity = createVector(0, 0.5*mass);
  wind = createVector(0,0);
}

function draw() {
  background(0,50);//background black with transperacy 50
  applyForce(wind);
  applyForce(gravity);
  velocity.add(acceleration);
  velocity.mult(drag);
  position.add(velocity);
  acceleration.mult(0);
  ellipse(position.x,position.y,mass,mass);
  if (position.y > height-mass/2) {
      velocity.y *= -0.9;  // A little dampening when hitting the bottom
      position.y = height-mass/2;
    }
  if(position.y==height-mass/2){led=1;}//if the ball touches the floor, turn on led
  else{led=0;}//otherwise turn led off
}

function applyForce(force){
  // Newton's 2nd law: F = M * A
  // or A = F / M
  let f = p5.Vector.div(force, mass);
  acceleration.add(f);
}

function keyPressed() {
  if (key == "d") {//when d is pressed create connection
    // important to have in order to start the serial connection!!
    setUpSerial();
  }
  if (key==' '){//when space is pressed create new ball and call bounce effect
    mass=random(15,80);
    position.y=-mass;
    velocity.mult(0);
  }
}
function readSerial(data) {
    wind.x=map(int(data),0,1023,-2,2);//map the value gotten from the arduino to wind.x
    let sendToArduino = led+'\n';
    writeSerial(sendToArduino);//send the value of led to the srduino
}


Week 10: Team Project

<How To Make an Instrument>

My Arduino project combines an ultrasonic distance measurement sensor, a switch button, and a buzzer to create an interactive instrument. The ultrasonic sensor, consisting of a trig pin (connected to pin 10) and an echo pin (connected to pin 11), is utilized to measure the distance between the sensor and an object. The setup initializes the pins and sets up serial communication. In the loop function, the sensor is triggered to emit ultrasonic waves, and the duration of the wave’s round trip is measured. The distance is then calculated in centimeters based on the speed of sound. Additionally, a switch button connected to analog pin A0 turns on the music when I press the switch button.


int trig = 10;
int echo = 11;
long duration;
long distance;
int switch;

void setup() {
  pinMode(echo, INPUT);

  pinMode(trig, OUTPUT);

  Serial.begin(9600);
}

void loop() {
  digitalWrite(trig, LOW); //triggers on/off and then reads data
  delayMicroseconds(2);
  digitalWrite(trig, HIGH);
  delayMicroseconds(10);
  digitalWrite(trig, LOW);
  duration = pulseIn(echo, HIGH);
  distance = (duration / 2) * .0344;    //344 m/s = speed of sound. We're converting into cm


  int notes[7] = {261, 294, 329, 349, 392, 440, 494}; //Putting several notes in an array
  //          mid C  D   E   F   G   A   B

  switch = analogRead(A0); //defining switch as digital button


  if (distance < 0 || distance > 50 || force < 100) { //if not presed and not in front

    noTone(12); //dont play music

  }

  else if ((force > 100)) {  //if pressed

    int sound = map(distance, 0, 50, 0, 6);  //map distance to the array of notes
    tone(12, notes[sound]);  //call a certain note depending on distance

  }


}


The musical aspect of the project involves an array of seven notes, representing the musical scale from mid-C to B. When the conditions are met (distance within a certain range and sufficient force applied), the distance is mapped to an index in the notes array. The corresponding note is then played using the tone function on pin 12. The project incorporates conditional statements to determine when to play a note and when to remain silent, providing an interactive experience where the user can generate musical tones by manipulating the distance and switch parameters.


I used this video to learn about the distance sensor and the tips to make a code for the music notes. To enhance my project, consider implementing error handling for the distance measurements, such as checking for valid sensor readings or outliers. I believe that adding comments to clarify the purpose of specific code sections can improve code readability, making it easier for others to understand the logic behind each step. Additionally, I want to incorporate debounce mechanisms for the switch button to prevent false triggers. Experimenting with different musical scales or incorporating dynamic melodies based on changing sensor inputs could add depth and creativity to the musical aspect of my project.

Week 10: Reading Response

“My child can’t tie his shoelaces, but can use the iPad.”

I would like to write about the problem of using touch screens starting from the young generation these days. In the passage, the interesting part for me was that ” A child can’t understand Hamlet, but can understand Cat In The Hat. Yet, it’s Shakespeare, not Dr. Seuss, who is the centerpiece of our culture’s literature.” Today, tools that are dumbed down for children’s minds or children’s bodies are called “toys”. The younger generation using iPads more than books comes with a few concerns. Firstly, reading on screens might not be as good for understanding as reading from a real book. Also, the quick and fun stuff on iPads can make kids want more instant rewards, possibly leading to addiction-like behavior. iPads can make it easy to switch between apps and do many things at once, which could make it hard for kids to focus. The lack of a real, hands-on experience with books means missing out on a unique way of learning. Lastly, relying too much on iPads might limit kids from experiencing different things. I believe it is important to find a balance between screen time and other activities for healthier development.

Thus, to solve this kind of problem coming from touch screens, creating brain interfaces for kids should focus on making learning fun and balanced. These programs should help with reading, thinking, and problem-solving, while also making sure kids don’t spend too much time on screens. It’s important to give rewards in a fair way, so kids feel good about their achievements without getting too hooked. Making the programs interactive and including things to see and hear can make learning more exciting. Encouraging movement and using different senses is also good for helping kids develop important skills. These programs should cover a lot of different subjects and work together with teachers to make sure they’re helpful for learning. Parents should be able to check on what their kids are doing and guide them, making sure they use the programs responsibly. And most importantly, these programs should be for everyone, considering the different ways kids learn and where they come from so that every child can enjoy and learn from them.

Week9: Mini DJ Player

My Arduino code simulates a mini DJ player by incorporating a potentiometer and a switch. The potentiometer, connected to analog input pin A1, emulates a DJ slider or knob, allowing you to control the brightness of an LED connected to PWM pin 11. This provides a visual representation of adjustments such as volume or fading effects.

Meanwhile, the switch, connected to digital input pin A2, mimics a button on the DJ player. When the button is pressed, a yellow light connected to pin 13 is activated briefly, creating a visual cue for a button press or an effect. The code establishes a loop that continuously reads the analog sensor value, and button state, and adjusts LED brightness accordingly, producing a dynamic and interactive simulation of a basic DJ player interface.

It does not look like DJ player in the bright light, and it was hard for me to take a video with one hand and simultaneously press the button with another hand.

int led = 11; //the PMW pin the LED is attached to

void setup(){
  Serial.begin(9600);
  //declare pin 11 to be output:
  pinMode(led,OUTPUT);
  pinMode(13, OUTPUT); //yellow light
  pinMode(A2, INPUT); //button
}
  // put your setup code here, to run once:


void loop() {
  // put your main code here, to run repeatedly:
  int sensorValue = analogRead(A1);
  //Serial.println(sensorValue);

  int buttonState = digitalRead(A2); //button

  Serial.println(buttonState);
  if (buttonState == 1) {
    digitalWrite(13, HIGH);
    delay(100);

  } else {
    digitalWrite(13, LOW);
    //delay(300);
  }


  //set the brightness of pin 11 according to the sensor value/4)
  analogWrite(led, sensorValue/4);

  //wait for 30 milliseconds to see the diming effect
  delay(30);
}

One particularly interesting aspect of the code is the use of the analog input from a potentiometer to control the brightness of an LED. The line int sensorValue = analogRead(A1); reads the analog input from pin A1, representing a DJ slider or knob. The subsequent analogWrite(led, sensorValue/4); adjusts the brightness of an LED on pin 11 based on this input, creating a dynamic and interactive simulation of volume or fade control. This part of the code adds a tangible and intuitive user interface element to the mini DJ player simulation.

(I also refer to the slides from Professor!)

Week 9: Reading Response

“Physical Computing’s Greatest Hits and Misses”

In this article, the author talks about things that often show up in projects using physical computing. They say we should see these things as a kind of creative playground, not as limits. It’s like having a favorite game on the playground – it’s familiar, but the real fun starts when you add your special twist. The article mentions the Mattel/Nintendo Power Glove from 1989, adding a bit of nostalgia. Despite being old, it shows how simple ideas, like tapping, can become exciting. This glove, though basic, laid the foundation for the fun interactions we see in drum gloves today. The Power Glove reminds us that even simple ideas can turn into cool and unique things with time.

The article rightly says that gloves, especially drum gloves, are almost as popular as theremin instruments. Drum gloves are fun because they connect to something everyone understands – tapping to make a rhythm. Unlike the abstract theremin, drum gloves have a familiar way of making sounds. Tapping gives a structured way to create notes, making it easy for people to use. This fits well with the idea in the article that common themes in physical computing can be a starting point for creative expression, not a block.

The Power Glove from 1989 is a great example. It’s simple but directly connects with gestures, like tapping, which laid the groundwork for the engaging drum gloves we have today. The Power Glove and drum gloves show a balance between what’s familiar and what’s new, making physical computing a creative playground where each new version adds to the story of interactive art.

“Making Interactive Art: Set the Stage, Then Shut Up and Listen”

In “Making Interactive Art: Set the Stage, Then Shut Up and Listen,” the writer offers valuable insights into interactive art, likening it to a performance rather than a finished painting or sculpture. This perspective aligns seamlessly with the encouragement from the first reading to see physical computing as a creative playground, where established themes act as a starting point rather than a constraint.

The advice that the author suggests to the audience what their course of action could be resonates deeply. It encourages artists to think beyond creating a static piece and consider how they can guide the audience to uncover their own stories and emotional interpretations. This aligns with the idea that the stage is set not just by the artist but evolves with the contributions of the audience. It’s a beautiful way of framing interactive art as a collaborative journey where the artist provides the stage, and the audience brings the performance to life.

In my opinion, this approach to interactive art introduces a refreshing shift from the traditional view of art as a one-way communication. It empowers the audience to be co-creators, transforming the artistic experience into a shared exploration. The emphasis on suggesting rather than dictating allows for a more organic and diverse range of interpretations, enriching the overall impact of the artwork. It reinforces the notion that true interactivity lies not just in the technology but in the dialogue between the artist, the work, and the audience.

Week 8: Reading Response

In Norman’s text, “Emotion & Design: Attractive Things Work Better,” the author explores the importance of aesthetics and first impressions in website design. He emphasizes that users tend to judge a website based on its initial look and feel, which significantly influences their perception of its quality and trustworthiness. The concept of the three cognitive stages (visceral, behavioral, and reflective) sheds light on the fact that aesthetics often take precedence over content. The reference to the connection between affect and cognition highlights that our emotions and cognitive processes are intertwined, and designers should consider both aspects to create truly effective and user-friendly designs. One excellent example of interactive media that highlights the importance of both usability and aesthetics is a mobile app. Mobile apps are prevalent in our daily lives and encompass various categories, from social media and productivity tools to games and entertainment. The visual design of the app, including color schemes, typography, and overall layout, significantly affects the aesthetics. A visually appealing app with a well-thought-out design can make users more likely to engage with it and spend more time on it.

Furthermore, Hamilton’s text provides the early days of the Apollo program and her pioneering contributions to computer science and software engineering. She defied societal expectations for women at the time and played a pivotal role in the coding of Apollo missions. Her meticulous attention to detail, evidenced by cautionary notes like ‘Do not touch P01,’ ensured the astronauts’ safety. Hamilton faced challenges and made mistakes during her journey, but her deep passion for her work never wavered. Her lasting commitment, combined with her remarkable contributions, portrays her as a pioneer who left a significant mark on the tech world. I greatly admire Margaret Hamilton and her influence on software engineering. Her story inspires everyone, demonstrating the endless potential that comes from dedicating yourself to your craft with innovation and genuine love.