So here it is. The end of our project. I honestly do not know where to begin. I guess it started as just a small idea Paulin had, and after discussing it with me our excited minds started to race towards building the game.
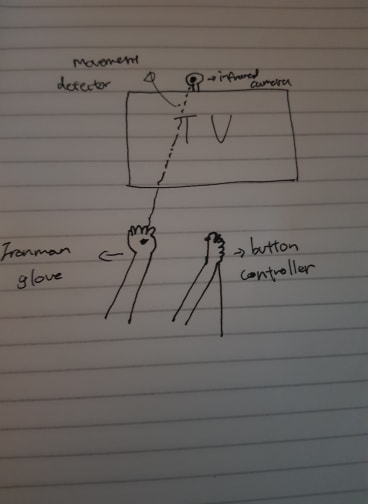
When we started planning the blueprint of our game, we knew that our common goal was to make the game as authentic as possible. We really desired the user to have an experience with their body as if they were Iron Man, which is why we had the kinetic camera idea along with the Iron Man glove. Moreover, we also needed the game to be like a “video game”. Not so simple, and not so easy. With that in mind, here is what we have accomplished.
Like most video games, we had a main menu and features inside it.
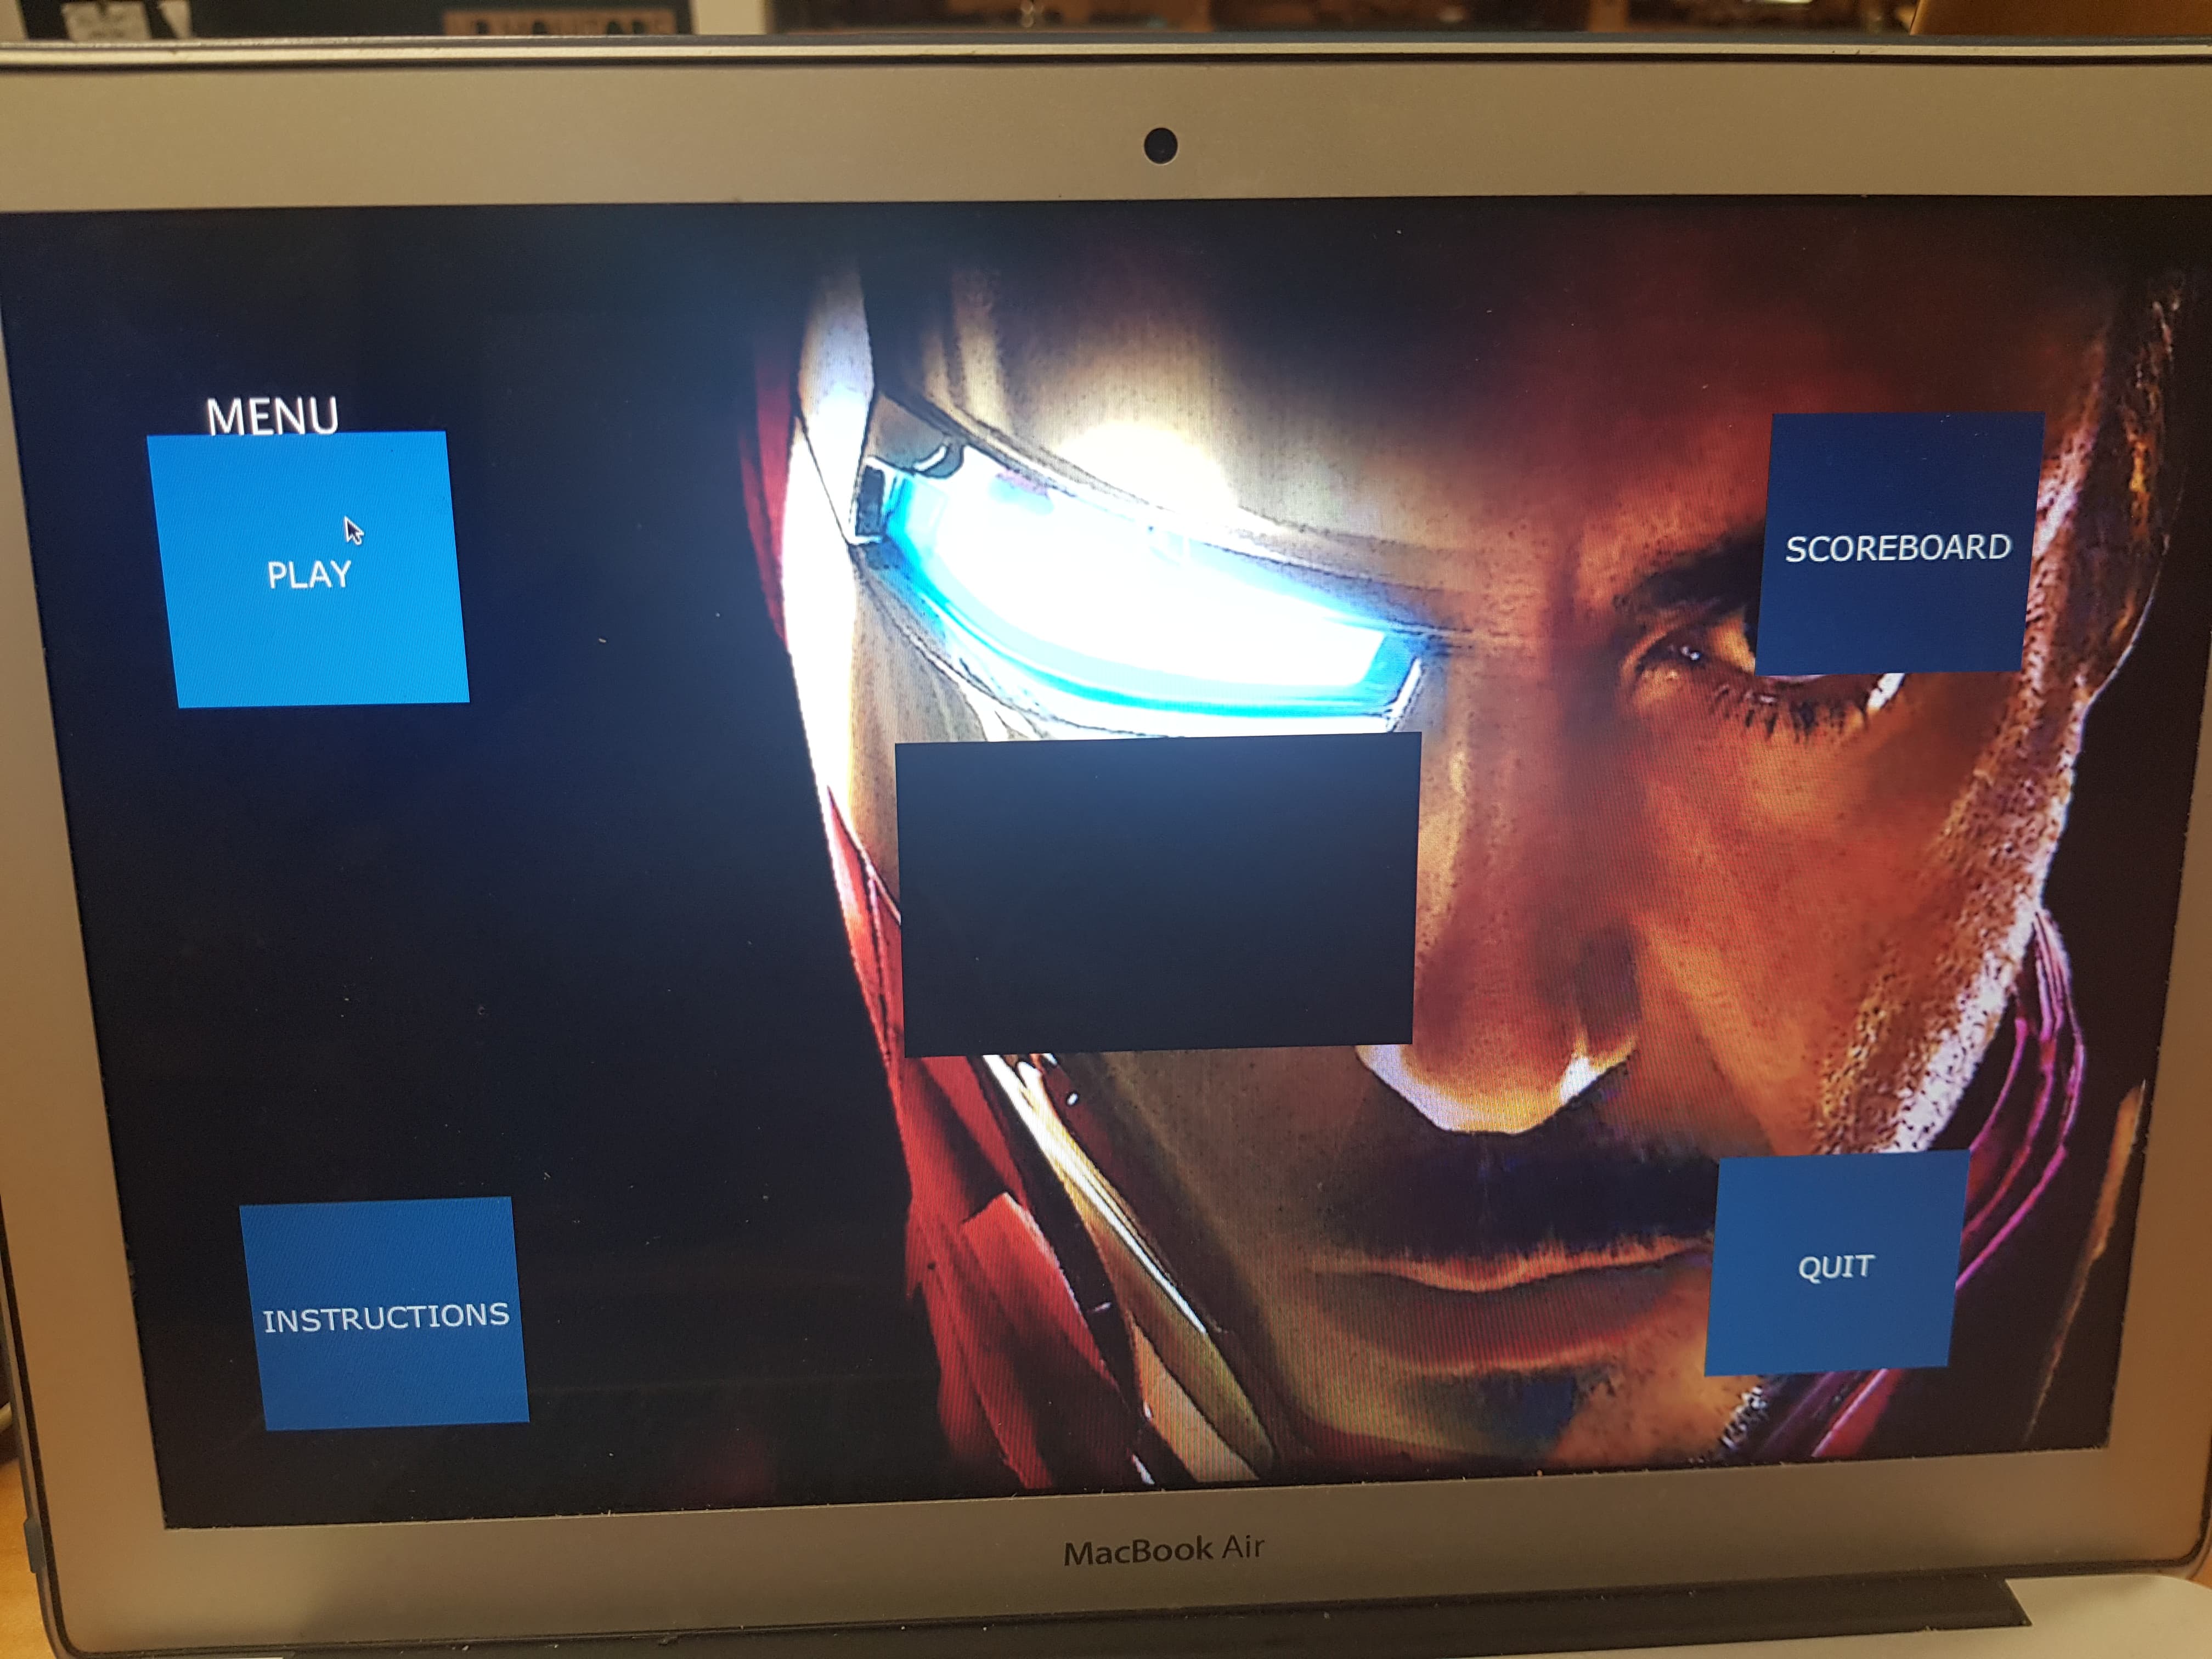
The menu would have buttons so that each would serve its function: play game, take a look at scoreboard, read the instructions, quit. In case you are wondering about the black screen in the middle, we decided that it would be better to have a demo before first-timers started playing the game. So we implemented a visualization of the camera so that the target could see themselves or specifically their kinetic movements to know that their aiming was supposed to be colored red, and if they pushed their arm forward (color changed to dark red) they knew they were shooting.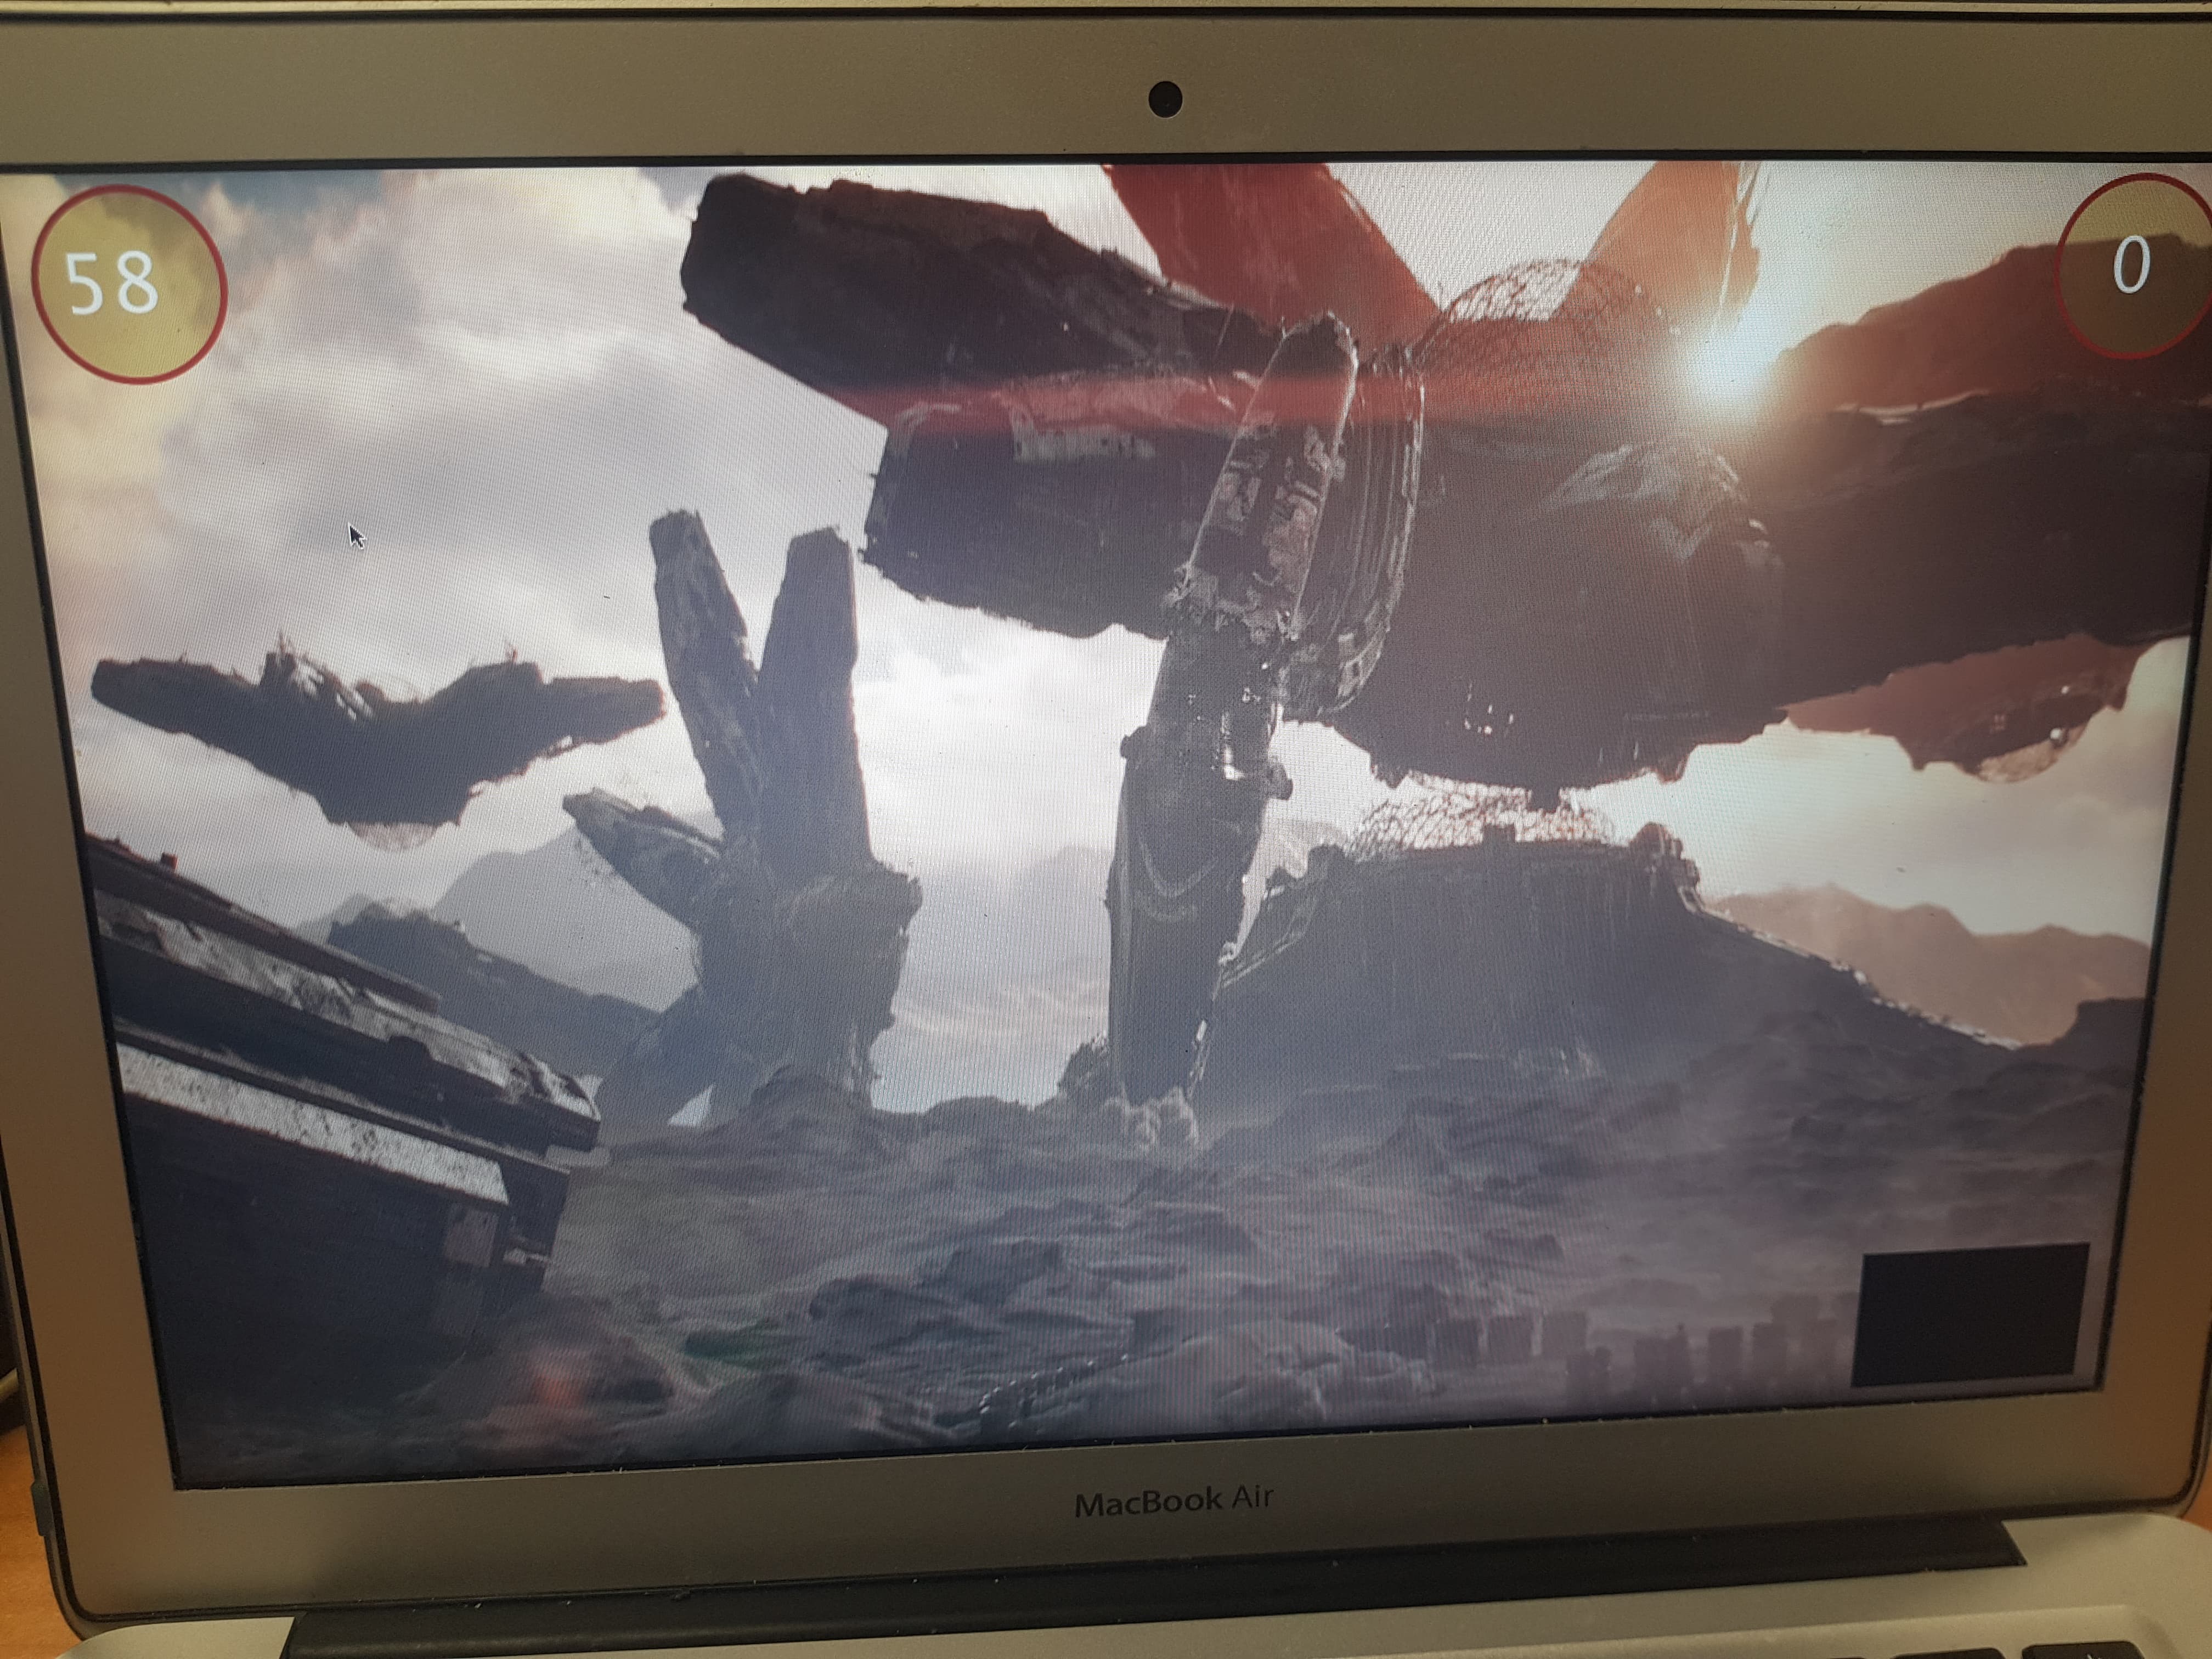
Inside the game, there are mainly three features. On the upper left hand side, you can see that the timer is ticking down. We set this to 2 minutes so that everyone during the showcase could have a fair chance and amount of time to play the game. On the upper right hand side, you could see a counter which measured the score. This counted the targets we killed and stored them into the array, then displaying the size of that array. Since the draw() function was looping, this was updating the whole time. On the bottom right hand side, we again had the visualization of the kinetic camera to show how the user was moving in relation to the camera’s view.
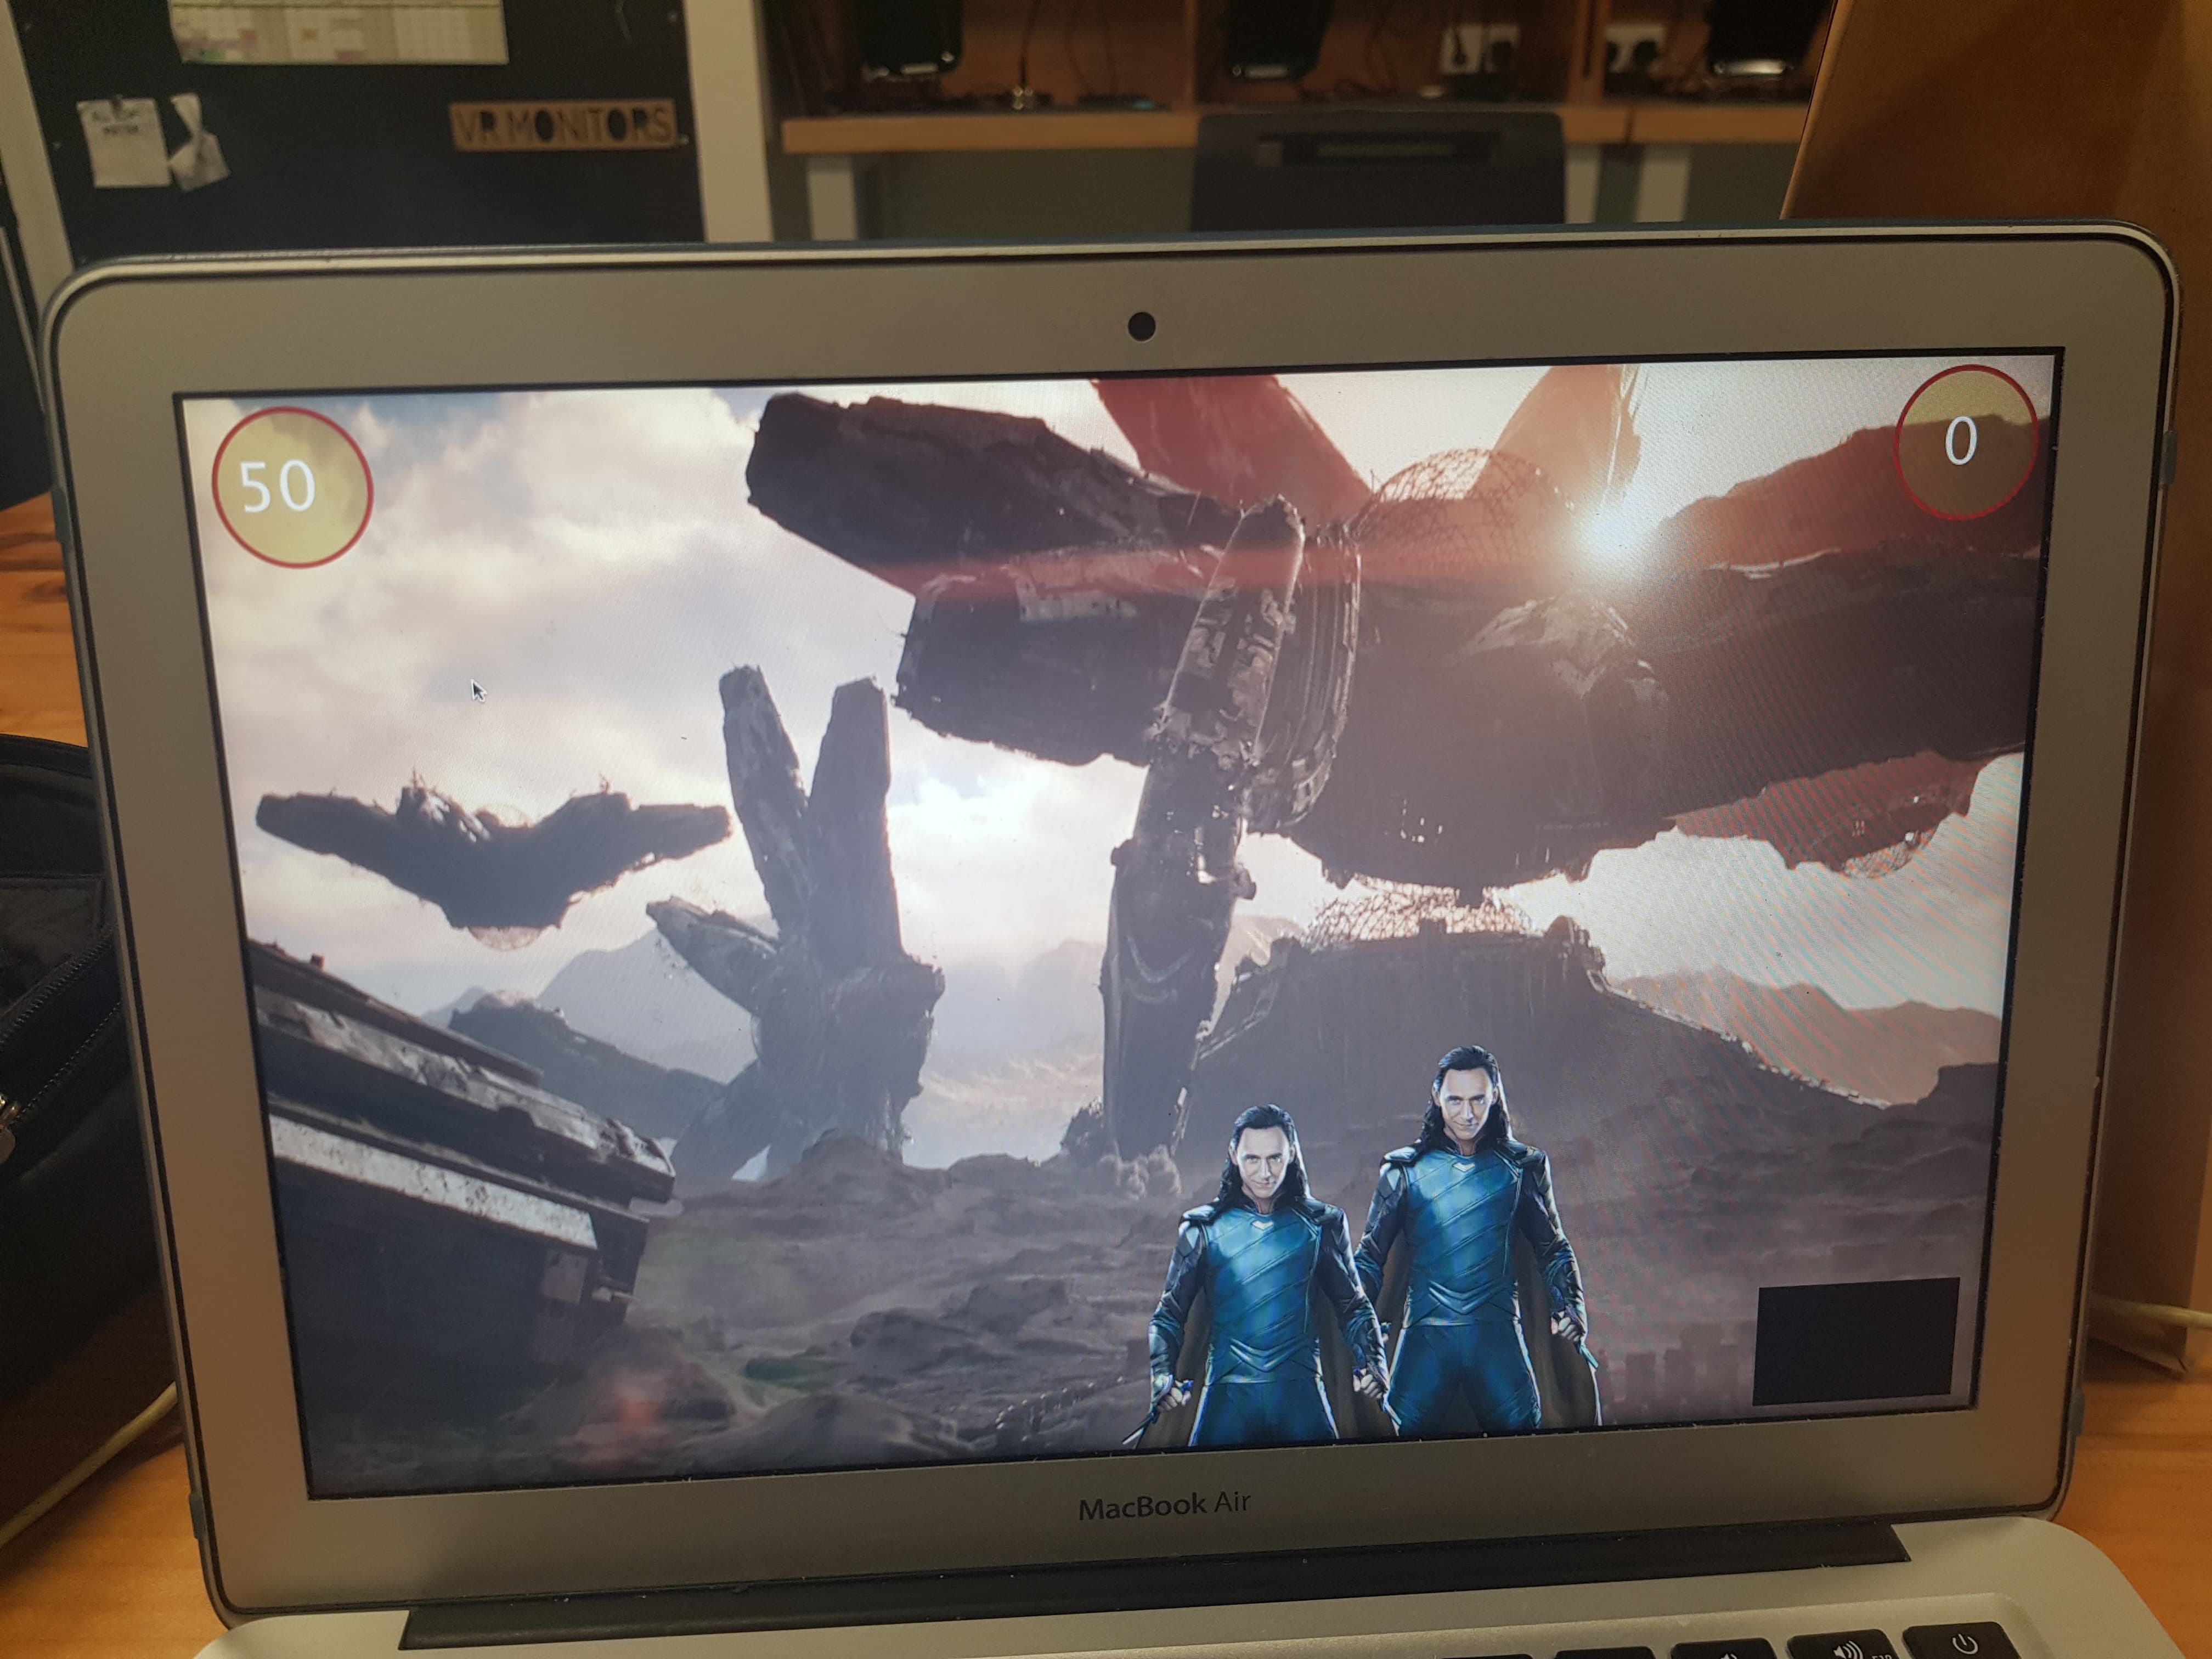
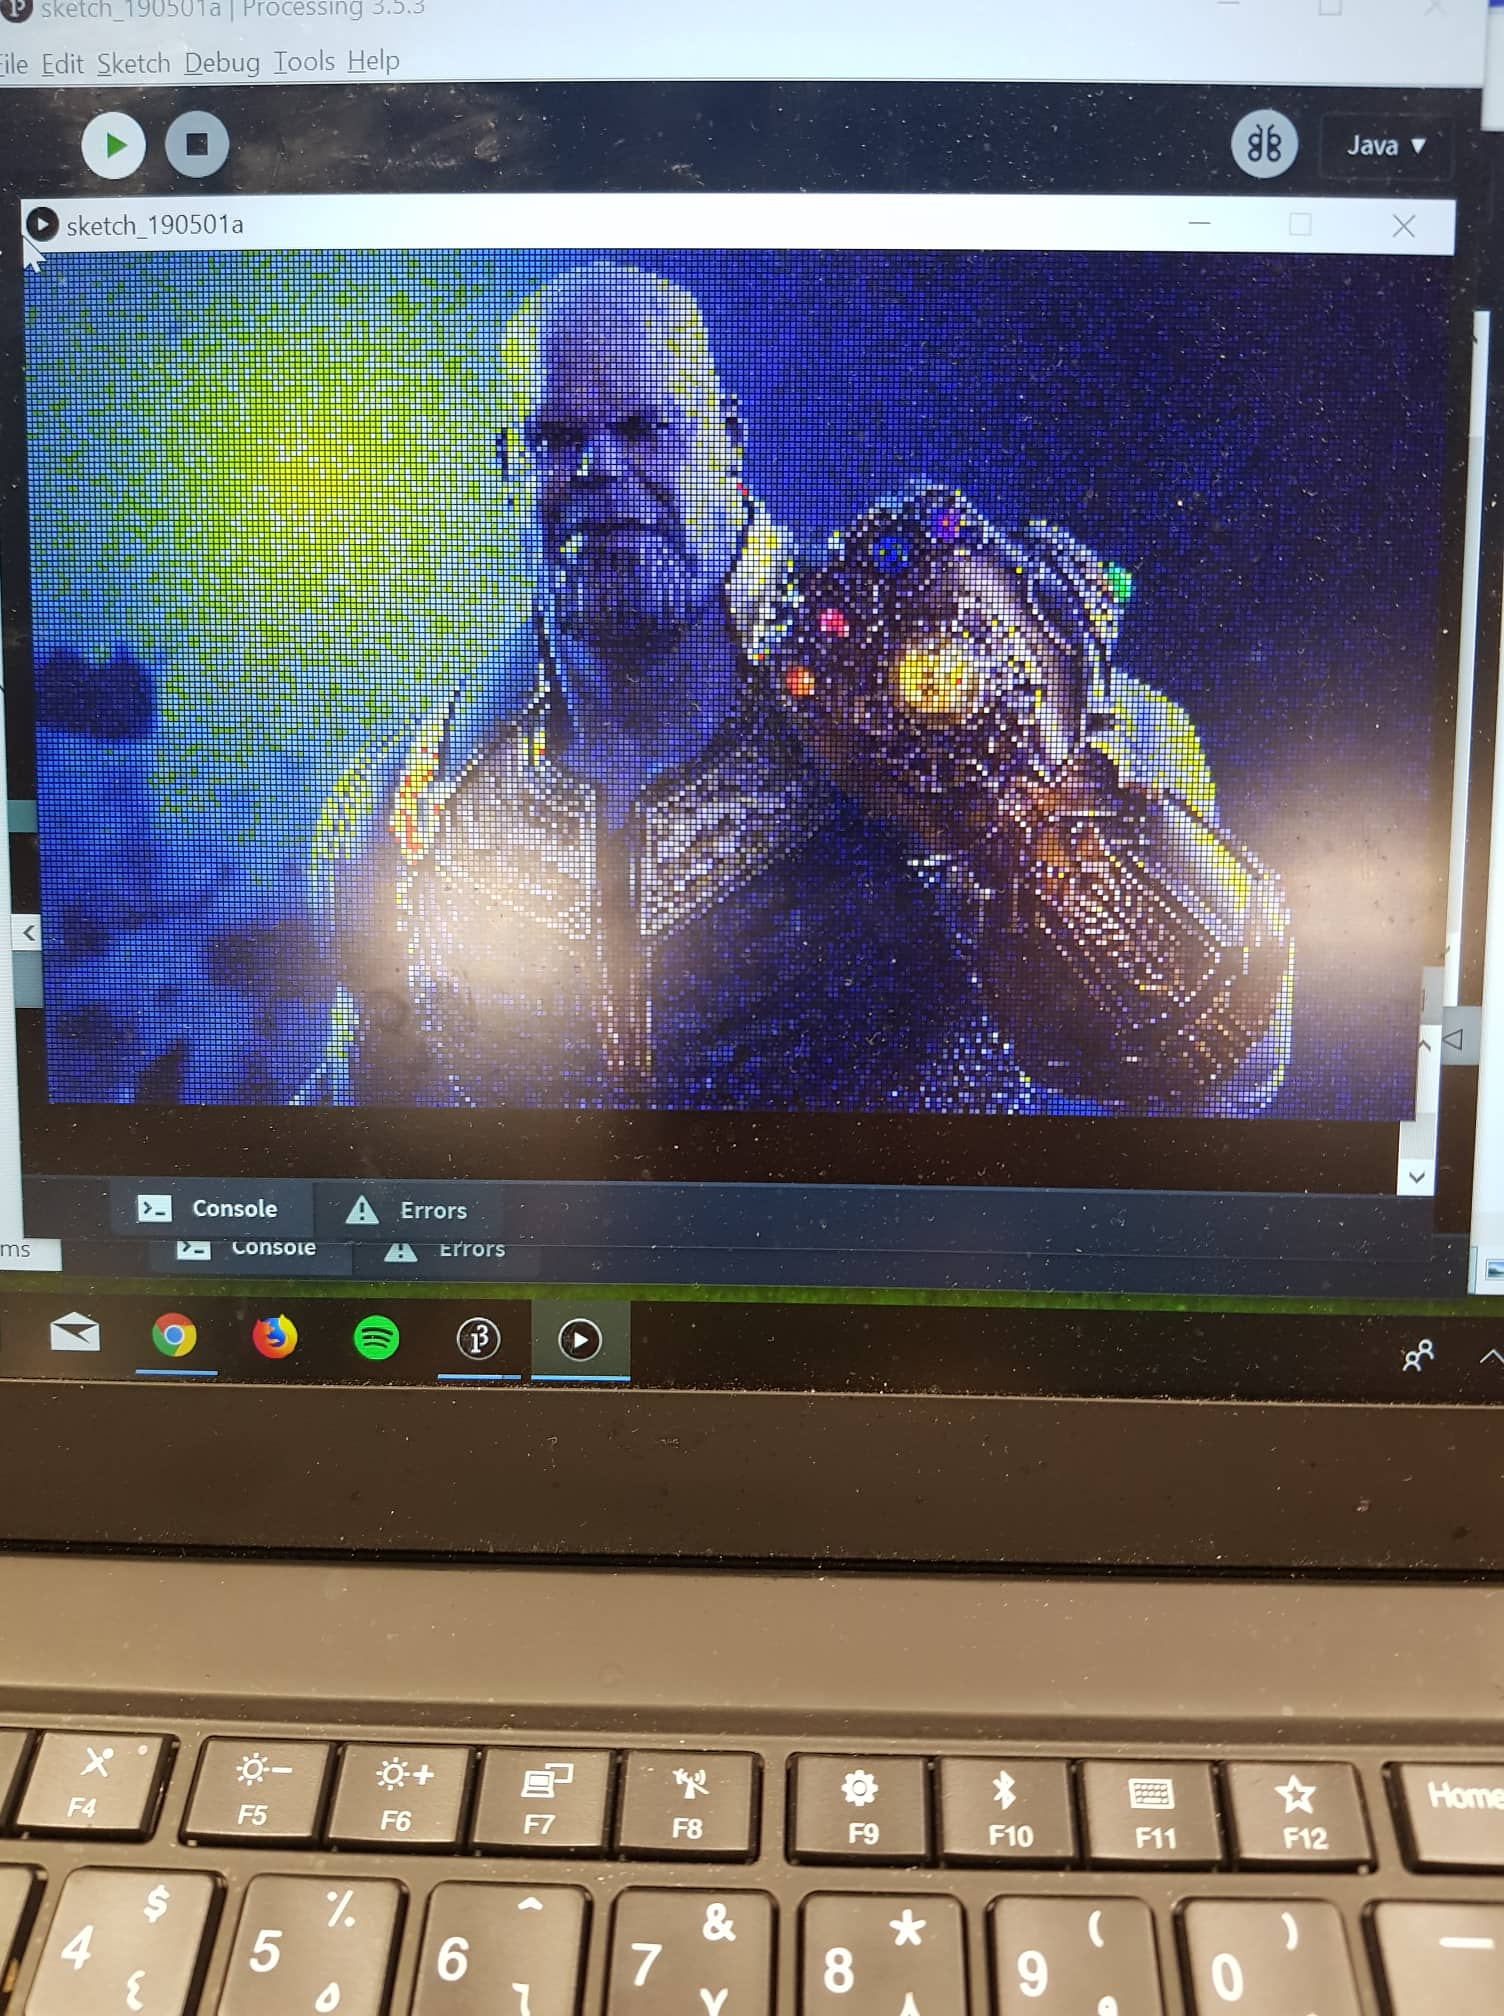
We then added targets. These would appear randomly and move in random animations as long as they were inside the screen. When the user aimed and the shooting motion was detected (the shoot was defined as object closest to kinetic camera, which was arm pushed forward) the targets would be hit and disappear. We had a cursor as well to update where the user was moving . The animations at some point were moving very smoothly, but when we tried to add another png image (Thanos) as another target to shoot, things had a bad turn and the whole game slowed down quite intensively. We managed to make it faster by cutting parts that we didn’t need, save as much CPU and memory as possible, but I believe that after a while Paulin’s Macbook Air could not handle an intensive game like this very well. That was certainly one aspect that felt really sore, but in the end it was all the effort worth it to be able to make this sort of game.

After the game, the user would enter their name and their score would appear (from the size of the score array mentioned earlier). Then both the key and value would go into the hash map, the value (score) would be sorted through another array list, and looping through the hash map we would find that score and print out the top five winners. We had to use an array list since hash map did not allow sorting, and hash map was the one of the few data structures that allowed a key:value system that would link two identities of variables together. Either way, numerous people were excited to see their scores being put up in the scoreboard after playing the game.
One of our good friends, Harper, filmed a short clip of our other good friend, Ramon, playing the game.
An earlier version of the game is hard to find since we have been building upon the same file and overwriting the progress as we went. However I do have some earlier code for my scoreboard and my overall menu that I would like to share.
PImage menupic;
PImage bpic;
PImage spic;
PImage ipic;
import controlP5.*;
import java.util.Map;
import java.util.Collections;
int state = 0;
ControlP5 a;
ControlP5 c;
ControlP5 d;
String output;
PFont b;
PFont yo; //for Scoreboard text input
final int menu = 0;
final int game = 1;
final int scoreboard = 2;
final int options = 3;
final int quit = 4;
float score = 10;
int iu = 0;
HashMap<String,Float> hm = new HashMap<String,Float>();
ArrayList<Float> al = new ArrayList<Float>();
int tracker = 0;
int counter = 0;


void setup(){
  menupic = loadImage("menu.jpg"); //menu picture
  bpic = loadImage("background.jpg"); //background picture
  spic = loadImage("scoreboard.jpg"); //scoreboard picture
  ipic = loadImage("instructions.png");
  size(1920,1030);


  //MENU INTERACTIONS
  a = new ControlP5(this); //a is for menu
  b = createFont("Verdana",30); //font for menu
  yo = createFont("Verdana",15); //font for scoreboard form
  a.addButton("Play") //name
    .setPosition(100,150) //position
    .setSize(250,200) //size
    .setFont(b) //font
    ;
  a.addButton("Scoreboard")
    .setPosition(1500,150)
    .setSize(250,200)
    .setFont(b)
    ;
  a.addButton("Instructions")
    .setPosition(100,750)
    .setSize(250,200)
    .setFont(b)
    ;
  a.addButton("Quit")
    .setPosition(1500,750)
    .setSize(250,200)
    .setFont(b)
    ;
    //C = Back Button
  c= new ControlP5(this); //c is for back button
  c.addButton("Back")
    .setPosition(1500,750)
    .setSize(250,200)
    .setFont(b)
    ;
    //D = Scoreboard
  d= new ControlP5(this); //d is for scoreboard screen

  d.addTextfield("Insert Name Here").setPosition(200,800).setSize(200,50).setAutoClear(false).setFont(yo);
  d.addBang("Submit").setPosition(400,800).setSize(200,50).setFont(yo);


}

void draw(){
  image(menupic,0,0);
  if(state == 0){ //Menu
    textSize(40);
    text("MENU",50,100);
    c.hide();
    a.show();
    d.hide();
  }
  else if(state == 1){ //Game
    runGame();
    score = random(50);

    a.hide();
    //c.hide();
    c.hide();
    d.hide();
  }
  else if(state == 2){ //Scoreboard
    image(spic,0,0);

    c.show();
    a.hide();
    d.show();

    updateBoard();

  }
  else if(state ==3){ //Instructions
    background(0);
    image(ipic,850,20);
    textSize(40);
    text("1. Click \"Play Game\"",300,400);
    text("2. Stand on the designated platform",300,500);
    text("3. Use your hand to aim, push your hand towards the kinect camera to shoot",300,600);
    text("4. After the game write your name, submit, and see how well you did!",300,700);
    c.show();
    a.hide();
    d.hide();
  }
  else if(state ==4){ //Quit
    exit();
  }
}

void runGame(){
  image(bpic,0,0);
}

void Play(){
  state = 1;
}
void Scoreboard(){
  state = 2;
}
void Back(){
  state = 0;
}
void Instructions(){
  state = 3;
}

void Quit(){
  state = 4;
}

void Submit(){ //Submit form for text input in Scoreboard
  output = d.get(Textfield.class,"Insert Name Here").getText();

  hm.put(output,score);
  hm.put("hey",10.0);
  al.add(10.0);
  hm.put("hi",7.5);
  al.add(7.5);
  if(score != 0){
    al.add(score);
  }

  //println(output);
}

void updateBoard(){
  textSize(60);
  text("SCOREBOARD",750,90);


  java.util.Collections.sort(al,Collections.reverseOrder());


    for(int i = 0; i < al.size(); i++){
     //println((float)al.get(i));
     if((float)al.get(i) != 0 && i<5){
         println((float)al.get(i));
        text((float)al.get(i),800, 300+i*60);

      }
    }


    for (Map.Entry me : hm.entrySet()) {

      Object test = me.getKey();

      if(test != null){
        if(al.contains(me.getValue())){
          if(tracker<5){
             text((String)me.getKey(),400,300+iu*60);

             iu+= 1;
             tracker+=1;
          }
        }
        else{
          continue;
        }
      }
    }
    iu = 0;
    tracker = 0;
}
Overall, this was very stressful at times but in the end one of the most fun projects I have worked on in my life. Building towards something that I knew other people would marvel at (did you get the pun) and enjoy playing was the true motivation Paulin and I had when we started creating this project. Although the game was lagging a bit during the game, we are still happy that people at the showcase were able to have a fun experience playing our shooting game. I hope you enjoyed reading this as well, and below is the code (main function) of our project. Farewell!
// ======== Final Interactive Media Project Spring 2019 ========= //


//----------Libraries------------------//
import processing.video.*;
import processing.sound.*;
import org.openkinect.freenect.*;
import org.openkinect.freenect2.*;
import org.openkinect.processing.*;
import org.openkinect.tests.*;
import controlP5.*;
import java.util.Map;
import java.util.Collections;

//-------- GLobal Variables----------//

PImage menupic;
PImage bpic;
PImage spic;
PImage ipic;
int state = 0;
ControlP5 a;
ControlP5 c;
ControlP5 d;
String output;
PFont b;
PFont yo; //for Scoreboard text input
final int menu = 0;
final int game = 1;
final int scoreboard = 2;
final int options = 3;
final int quit = 4;
//float score;
int iu = 0;
HashMap<String, Float> hm = new HashMap<String, Float>();
ArrayList<Float> al = new ArrayList<Float>();
int tracker = 0;
int counter = 0;


//Paulin Global Variables
//kinect
PImage img, dImg;
float angle;
Kinect kinect;
boolean shoot;
float minShoot;
float minThresh;
float maxThresh;
//Targets
ArrayList<Targets> targets;
Targets target;
//cursor
Aiming_Box aiming_Circle;
float rx, ry, scale, _rx, _ry;
float _x = 0;
float _y = 0;
//timer
int m, sec;
//score
ArrayList<Integer> score;
//Animations and sound
SoundFile blasterSound;
SoundFile avengers;
Boom boom;
Blaster blaster;
//Movie Intro;
//diframes
ArrayList<Integer> dists;
int numfc;
int threshold;
int randint, pattern;
//Timer
int begin, duration, time;
float prevWidth, prevHeight;
int shootthreshold;
Timer clock;
PImage Imheart;


//-------------------------------------------//
//-------------------------------------------//
//-------------------------------------------//
void setup() {
  //size(640, 480);
  fullScreen();
  menupic = loadImage("menu.jpg"); //menu picture
  bpic = loadImage("background.jpg"); //background picture
  spic = loadImage("scoreboard.jpg"); //scoreboard picture
  ipic = loadImage("instructions.png");

  //score = random(50);


  //Paulin's SetUP
  prevWidth = 1920;
  prevHeight = 1030;
  //Kinect
  kinect = new Kinect(this);
  kinect. initDepth();
  kinect.initVideo();
  img = createImage(kinect.width, kinect.height, RGB);
  angle = kinect.getTilt();
  shoot = false;
  minShoot = 650;
  minThresh = 700;
  maxThresh = 780;
  //Objects
  targets = new ArrayList<Targets>();
  aiming_Circle = new Aiming_Box();
  //Score
  score = new ArrayList<Integer>();
  //Animation
  blasterSound = new SoundFile(this, "shortblast.wav");
  avengers = new SoundFile(this, "IMbgmus.wav");
  avengers.play();
  avengers.loop();
  boom = new Boom();
  // Intro = new Movie(this,"IMintro.mov");
  blaster = new Blaster();
  //DiffFrame
  numfc=10;
  dists = new ArrayList<Integer>(numfc);
  threshold = 40;
  scale = .1;
  //timer
  begin = millis();
  duration = 120;
  time = 180;
  _rx =_ry = 0;
  shootthreshold = 3840;
  clock = new Timer();
  //Imheart = loadImage("ironmanheart.png");

  //------------------------------------//
  //

  //MENU INTERACTIONS
  a = new ControlP5(this); //a is for menu
  b = createFont("Verdana", height*(25/prevHeight)); //font for menu
  yo = createFont("Verdana", height*(15/prevHeight)); //font for scoreboard form
  a.addButton("Play") //name
    .setPosition(width*(100/prevWidth), height*(150/prevHeight)) //position
    .setSize(int(width*(250/prevWidth)), int(height*(200/prevHeight))) //size
    .setFont(b) //font
    ;
  a.addButton("Scoreboard")
    .setPosition(width*(1500/prevWidth), height*(150/prevHeight))
    .setSize(int(width*(250/prevWidth)), int(height*(200/prevHeight)))
    .setFont(b)
    ;
  a.addButton("Instructions")
    .setPosition(width*(100/prevWidth), height*(750/prevHeight))
    .setSize(int(width*(250/prevWidth)), int(height*(200/prevHeight)))
    .setFont(b)
    ;
  a.addButton("Quit")
    .setPosition(width*(1500/prevWidth), height*(750/prevHeight))
    .setSize(int(width*(250/prevWidth)), int(height*(200/prevHeight)))
    .setFont(b)
    ;
  //C = Back Button
  c= new ControlP5(this); //c is for back button
  c.addButton("Back")
    .setPosition(width*(1500/prevWidth), height*(750/prevHeight))
    .setSize(int(width*(250/prevWidth)), int(height*(200/prevHeight)))
    .setFont(b)
    ;
  //D = Scoreboard
  d= new ControlP5(this); //d is for scoreboard screen

  d.addTextfield("Insert Name Here").setPosition(200, 800).setSize(200, 50).setAutoClear(false).setFont(yo);
  d.addBang("Submit").setPosition(400, 800).setSize(200, 50).setFont(yo);
}

void draw() {
  image(menupic, 0, 0);
  if (state == 0) { //Menu
    textSize(30);
    text("MENU", width*(150/prevWidth), height*(150/prevHeight));
    c.hide();
    a.show();
    d.hide();
    img.loadPixels();
   SetThresholdsandRecords();// This function goes pixel by pixel looking for the shortest distance to the sensor and will provide the values of rx and ry which will be send to the aiming box

   img.updatePixels();
   image(img,width/2-width/8 ,height/2-height/8, width/4,height/4);
    time = duration;
    begin = millis();
    for(int i=0; i<score.size();i++){
      score.remove(i);
    }
  } else if (state == 1) { //Game
    runGame();
    a.hide();
    //c.hide();
    c.hide();
    d.hide();
  } else if (state == 2) { //Scoreboard
    image(spic, 0, 0);

    c.show();
    a.hide();
    d.show();

    updateBoard();
  } else if (state ==3) { //Instructions
    background(0);
    image(ipic, 850, 20);
    textSize(40);
    text("1. Click \"Play Game\"", width*(300/prevWidth), height*(400/prevHeight));
    text("2. Stand on the designated platform", width*(300/prevWidth), height*(500/prevHeight));
    text("3. Use your hand to aim, push your hand towards the kinect camera to shoot", width*(300/prevWidth), height*(600/prevHeight));
    text("4. After the game write your name, submit, and see how well you did!", width*(300/prevHeight), height*(700/prevHeight));
    c.show();
    a.hide();
    d.hide();
  } else if (state ==4) { //Quit
    exit();
  }
}


//---------------------------Functions---------------------------------//
void runGame() {
  image(bpic, 0, 0,width,height);
  //image(Intro,0,0,width,height);
  img.loadPixels();
  //kinect
  SetThresholdsandRecords();// This function goes pixel by pixel looking for the shortest distance to the sensor and will provide the values of rx and ry which will be send to the aiming box
  img.updatePixels();
  image(img,width-width/8 - width/80,height-height/8- height/80, width/8,height/8);
  if (shoot==true) {
    pushStyle();
    fill(255, 0, 0);
    popStyle();
  }
  //Targets
  add_target();
  target_functions();
  //Aiming_box
  aiming_Circle.update(rx, ry, shoot);
  color TempColor = color_Aiming_Box();
  aiming_Circle.display(TempColor, shoot, blasterSound, blaster);
  //timer & Score
  timer();
  printScore();
}


void Play() {
  state = 1;
}
void Scoreboard() {
  state = 2;
}
void Back() {
  state = 0;
}
void Instructions() {
  state = 3;
}

void Quit() {
  state = 4;
}

void Submit() { //Submit form for text input in Scoreboard
  output = d.get(Textfield.class, "Insert Name Here").getText();
  //println(output);

    if((float)score.size() != 0.0){
      hm.put(output, (float)score.size());
      al.add((float)score.size());
    }


}

void updateBoard() {
  textSize(60);
  text("SCOREBOARD", 750, 90);


  java.util.Collections.sort(al, Collections.reverseOrder());


  for (int i = 0; i < al.size(); i++) {
    //println((float)al.get(i));
    if ((float)al.get(i) != 0 && i<5) {

      text((float)al.get(i), 1000, 300+i*60);
      println(al.get(i));
    }
  }


  for (Map.Entry me : hm.entrySet()) {

    Object test = me.getKey();

    if (test != null) {
      if (al.contains(me.getValue())) {
        //if (tracker<5) {
          text((String)test, 700, 300+iu*60);
          //println(me.getValue());
          iu+= 1;
          tracker+=1;
        //}
      } else {
        continue;
      }
    }
  }
  iu = 0;
  tracker = 0;
}

/*
      if(al.contains(me.getValue())){
 println(me.getValue());
 if(hm.containsKey(me.getKey())){
 if(me.getValue() != null){
 text((String)me.getKey(),700,500-iu*100);
 text((float)me.getValue(),1000, 500-iu*100);
 iu+= 1;
 }

 }
 }
 }
 iu = 0;
 */

//----Paulin's Function----//
void SetThresholdsandRecords() {
  PImage dImg = kinect.getDepthImage(); //To get the default kinect image to find manually the thresholds
  //image(dImg,0,0);
  shoot = false;
  int record = 4500;
  _x=_y=0;
  int totdis;
  float total =0;
  int[] depth = kinect.getRawDepth();
  for (int x = 0; x<kinect.width; x++) {
    for (int y =0; y< kinect.height; y++) {
      int offset = x + y*kinect.width;
      int d = depth[offset];
      if (d>=minThresh && d<maxThresh) {
        img.pixels[offset] = color(245,72,72);
        //if (d<record) {
          //record = d;
         _x+=x;
         _y+=y;
        //}
        //_x+=x;
        //_y+=y;
        total++;
      } else  if (d>=minShoot && d<=minThresh){
        img.pixels[offset] = color(255,0,0) ;
        shoot=true;
        _x+=x;
        _y+=y;
        total++;
      }
      else{
       img.pixels[offset] = color(0,0,0) ;
      }
    }
  }

  if (total>0) {
    _x= _x/total;
    _y= _y/total;
  }


  _rx += ((640-_x)-_rx)*scale;
  rx = map(_rx, 150, 640-150, 0, width);
  _ry += (_y-_ry)*scale;
  ry = map(_ry, 110, 480-110, 0, height);
  //ellipse(rx,ry,30,30);
  //dists.add(record);
  //if (dists.size()==numfc)
  //  dists.remove(0);
  //totdis = dists.get(0) - dists.get(dists.size()-1);
  ////println("totdis -> ",totdis);
  //println(totdis);
  //if (totdis>shootthreshold) {
  //  shoot =true;
  //}
  //println("shoot ->", shoot);
}

//To provide a different color to the aiming box if it is shooting
color color_Aiming_Box() {
  color Color;
  Color = color(255, 255, 255);
  for (int i = 0; i<targets.size(); i++) {
    if (aiming_Circle.rx>targets.get(i).x
      &&aiming_Circle.rx<(targets.get(i).x+targets.get(i).w)
      &&aiming_Circle.ry>targets.get(i).y
      &&aiming_Circle.ry<(targets.get(i).y+targets.get(i).h)) {
      Color = color(255, 0, 0);
      break;
    }
  }
  return(Color);
}

//To move the angle of the kinect
void keyPressed() {
  if (key == CODED) {
    if (keyCode == UP) {
      angle++;
    } else if (keyCode == DOWN) {
      angle--;
    }
    angle = constrain(angle, 0, 30);
    kinect.setTilt(angle);
  }
}

//Set up timer in the right corner
void timer() {
  float lettersize = height*.054;
  float timerposition = width*.04125;
  float Yposition = height*.08125;
  float position = timerposition + (width*.125);
  //float secondposition = position + (width*.022);
  if (time > 0) {
    time = duration - (millis() - begin)/1000;
    pushStyle();
    stroke(188, 23, 23);
    strokeWeight(width*.003);
    fill(188, 166, 23, 100);
    ellipse(timerposition+width*.01, Yposition-lettersize/3.1+height*.01, height*.128, height*.128);
    fill(255);
    textSize(lettersize);
    text(time, timerposition-width*.02, Yposition+height*.01);
    popStyle();
  }
  if (time ==0) {
    state = 2;
    textSize(40);
    text("GAME OVER!: ", 600, 90);
  }
}

// add a target  every 120 frames
void add_target() {
  randint = int(random(3));
  pattern = int(random(45));
  if(frameCount%10==0){
    targets.add(new Targets(shoot, randint, pattern));
  }
  //if(time<60 && time>30){
  //if (frameCount%80==0) {
  //  targets.add(new Targets(shoot, randint, pattern));
  //}
  //}
  //else if (time>60 && time<90){
  //   if (frameCount%100==0) {
  //  targets.add(new Targets(shoot, randint, pattern));
  //}
  //}
  //else if(time>90){
  //      if (frameCount%100==0) {
  //  targets.add(new Targets(shoot, randint, pattern));
  //}
  //}
  //else if(time<30){
  //          if (frameCount%120==0) {
  //  targets.add(new Targets(shoot, randint, pattern));
  //          }
  //}
}

//All the targets functions
void target_functions() {
  for (int i = 0; i<targets.size(); i++) {
    targets.get(i).display();
    targets.get(i).destroy(shoot, aiming_Circle);
    targets.get(i).update();
    if (targets.get(i).destroyed == true) {
      //println("Object being destroyed -> target size -> ",targets.size());
      //blasterSound.play();
      boom.display(targets.get(i).x, targets.get(i).y);
      targets.remove(i);
      score.add(i);
      //println(" destroyed -> target size -> ",targets.size());
    }
  }
}

void printScore() {
  float lettersize = height*.054;
  float Yposition = height*.08125;
  float ScorePos = width*.75;
  float PointPos = ScorePos + height*.15;
  float numPos = PointPos + height*.03;
  pushStyle();
  stroke(188, 23, 23);
  strokeWeight(width*.003);
  fill(188, 166, 23, 100);
  ellipse(numPos+width*.09, Yposition-lettersize/3.1+height*.01, height*.128, height*.128);
  fill(255);
  textSize(lettersize);
  //text("Score", ScorePos, Yposition);
  //text(":", PointPos, Yposition);
  text(score.size(), PointPos+width*.095, Yposition+height*.01);
  popStyle();
}

void intro() {
}
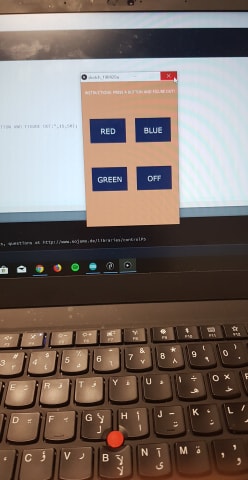 The LEDs: