Nicholas & Shama Final Project Documentation

Idea

Why is it so hard to get into the stock market? There are so many acronyms and complex words that make it difficult to get into the legal gambling sphere that is trading stocks. Seeing this, we decided to create an installation that simplified the whole process of buying and selling stocks.

Implementation

The implementation of this project had 3 sides: the backend where buy and sell orders were created by interacting with the trading API, the display in p5JS where choices were presented to the user, and the Arduino-based controls where the user can manipulate purchase and sales.

The backend

Using Nodejs and the Alpaca Trading API, we were able to create multiple endpoints that allowed us to send and receive data.

Endpoints

POST /buy_orders -> make a buy order for a stock

Arguments

  • ticker (string) -> the ticker of the stock to make a purchase of

Returns

  • order (Alpaca Order Object) -> an object representing the order made

POST /sell_all -> liquidate all stocks and close all open positions

Arguments – None

Returns – Status 200 if successful

GET /timeline -> current equity trends, percent loss and gain

Arguments – None

Returns

  • equity (Number[]) -> list of numbers of equity through the past 24 hours
  • profit_loss (number) -> gain or loss in USD
  • profit_loss_pct (number) -> gain or loss in percentage
  • start_val (number) -> value of initial equity value, used to measure profit loss

GET /rand_tickers -> get two random tickers to choose from (NYSE)

Arguments – None

Returns

  • tickers (string[2]) -> list of 2 different tickers

The implementation goes as follows

import express from 'express'
import cors from 'cors'
const Alpaca = require('@alpacahq/alpaca-trade-api')
const fs = require('fs')
require('dotenv').config()
const app = express()
const port = 8000

const stocklist = [];
let alpaca;
if(process.env.ENV==='DEVELOPMENT'){
    alpaca = new Alpaca({
        keyId: process.env.TEST_ALPACA_KEY_ID,
        secretKey: process.env.TEST_ALPACA_SECRET_KEY,
        paper: true,
    })
}else if(process.env.ENV==='PRODUCTION'){
    alpaca = new Alpaca({
        keyId: process.env.ALPACA_KEY_ID,
        secretKey: process.env.ALPACA_SECRET_KEY,
        paper: false,
    })
}else{
    throw new Error("Error: Environment Not Properly Selected")
}

//read stocklist 
fs.readFile('stocklist.txt', function(err, data) {
    if(err) throw err;
    var array = data.toString().split("\n");
    for(const stock of array) {
        const [symbol, name] = stock.split(' ')
        if(symbol&&name){
            let currstock ={
                symbol,
                name:name.replace("\"","")
            }
            stocklist.push(currstock)
        }
    }
});

app.use(express.json())
app.use(cors())


app.post('/buy_order', async(req, res)=>{
    try{
        const {ticker} = req.body;
        const order = await alpaca.createOrder({
            symbol:ticker,
            qty:1,
            side: 'buy',
            type:'market',
            time_in_force:'day'
        })
        res.json({order})
    }catch(e){
        console.log(e)
        res.status(400).send('err')
    }
})


app.post('/sell_all', async(req, res)=>{
    try{
        await alpaca.closeAllPositions();
        res.json({'success':'success'})
    }catch(e){
        console.log(e)
    }
})

app.get('/timeline', async(req, res)=>{
    try{
        const history = await alpaca.getPortfolioHistory({
            period: '1D',
            timeframe:'1Min'
          })
        const last_elem = history.equity[history.equity.length-1]===null ? Math.max(0, await history.equity.findIndex(e=>e===null)): history.equity.length;
        const cut_history = {
            equity:history.equity.slice(0,last_elem),
            profit_loss: history.profit_loss[last_elem-1],
            profit_loss_pct: history.profit_loss_pct[last_elem-1],
            start_val: history.profit_loss[last_elem-1] + history.equity[last_elem-1]
        };
        if(cut_history.profit_loss)
            res.json({...cut_history})
        else
            res.json({equity:[200,100,50,200],profit_loss:20,profit_loss_pct:0.1})
    }catch(e){
        console.log(e)
        res.send('err')
    }
})

app.get('/randtickers', async(req,res)=>{
    try{
        const rand1 = Math.floor(stocklist.length * Math.random());
        let rand2 = Math.floor(stocklist.length * Math.random());
        while(rand2===rand1){
            rand2 = Math.floor(stocklist.length * Math.random());
        }
        res.json({tickers: [stocklist[rand1],stocklist[rand2]]})
    }catch(e){
        res.status(400).send('err')
    }
})


app.listen(port, () => {
  console.log(`Example app listening on port ${port}`)
})

Display

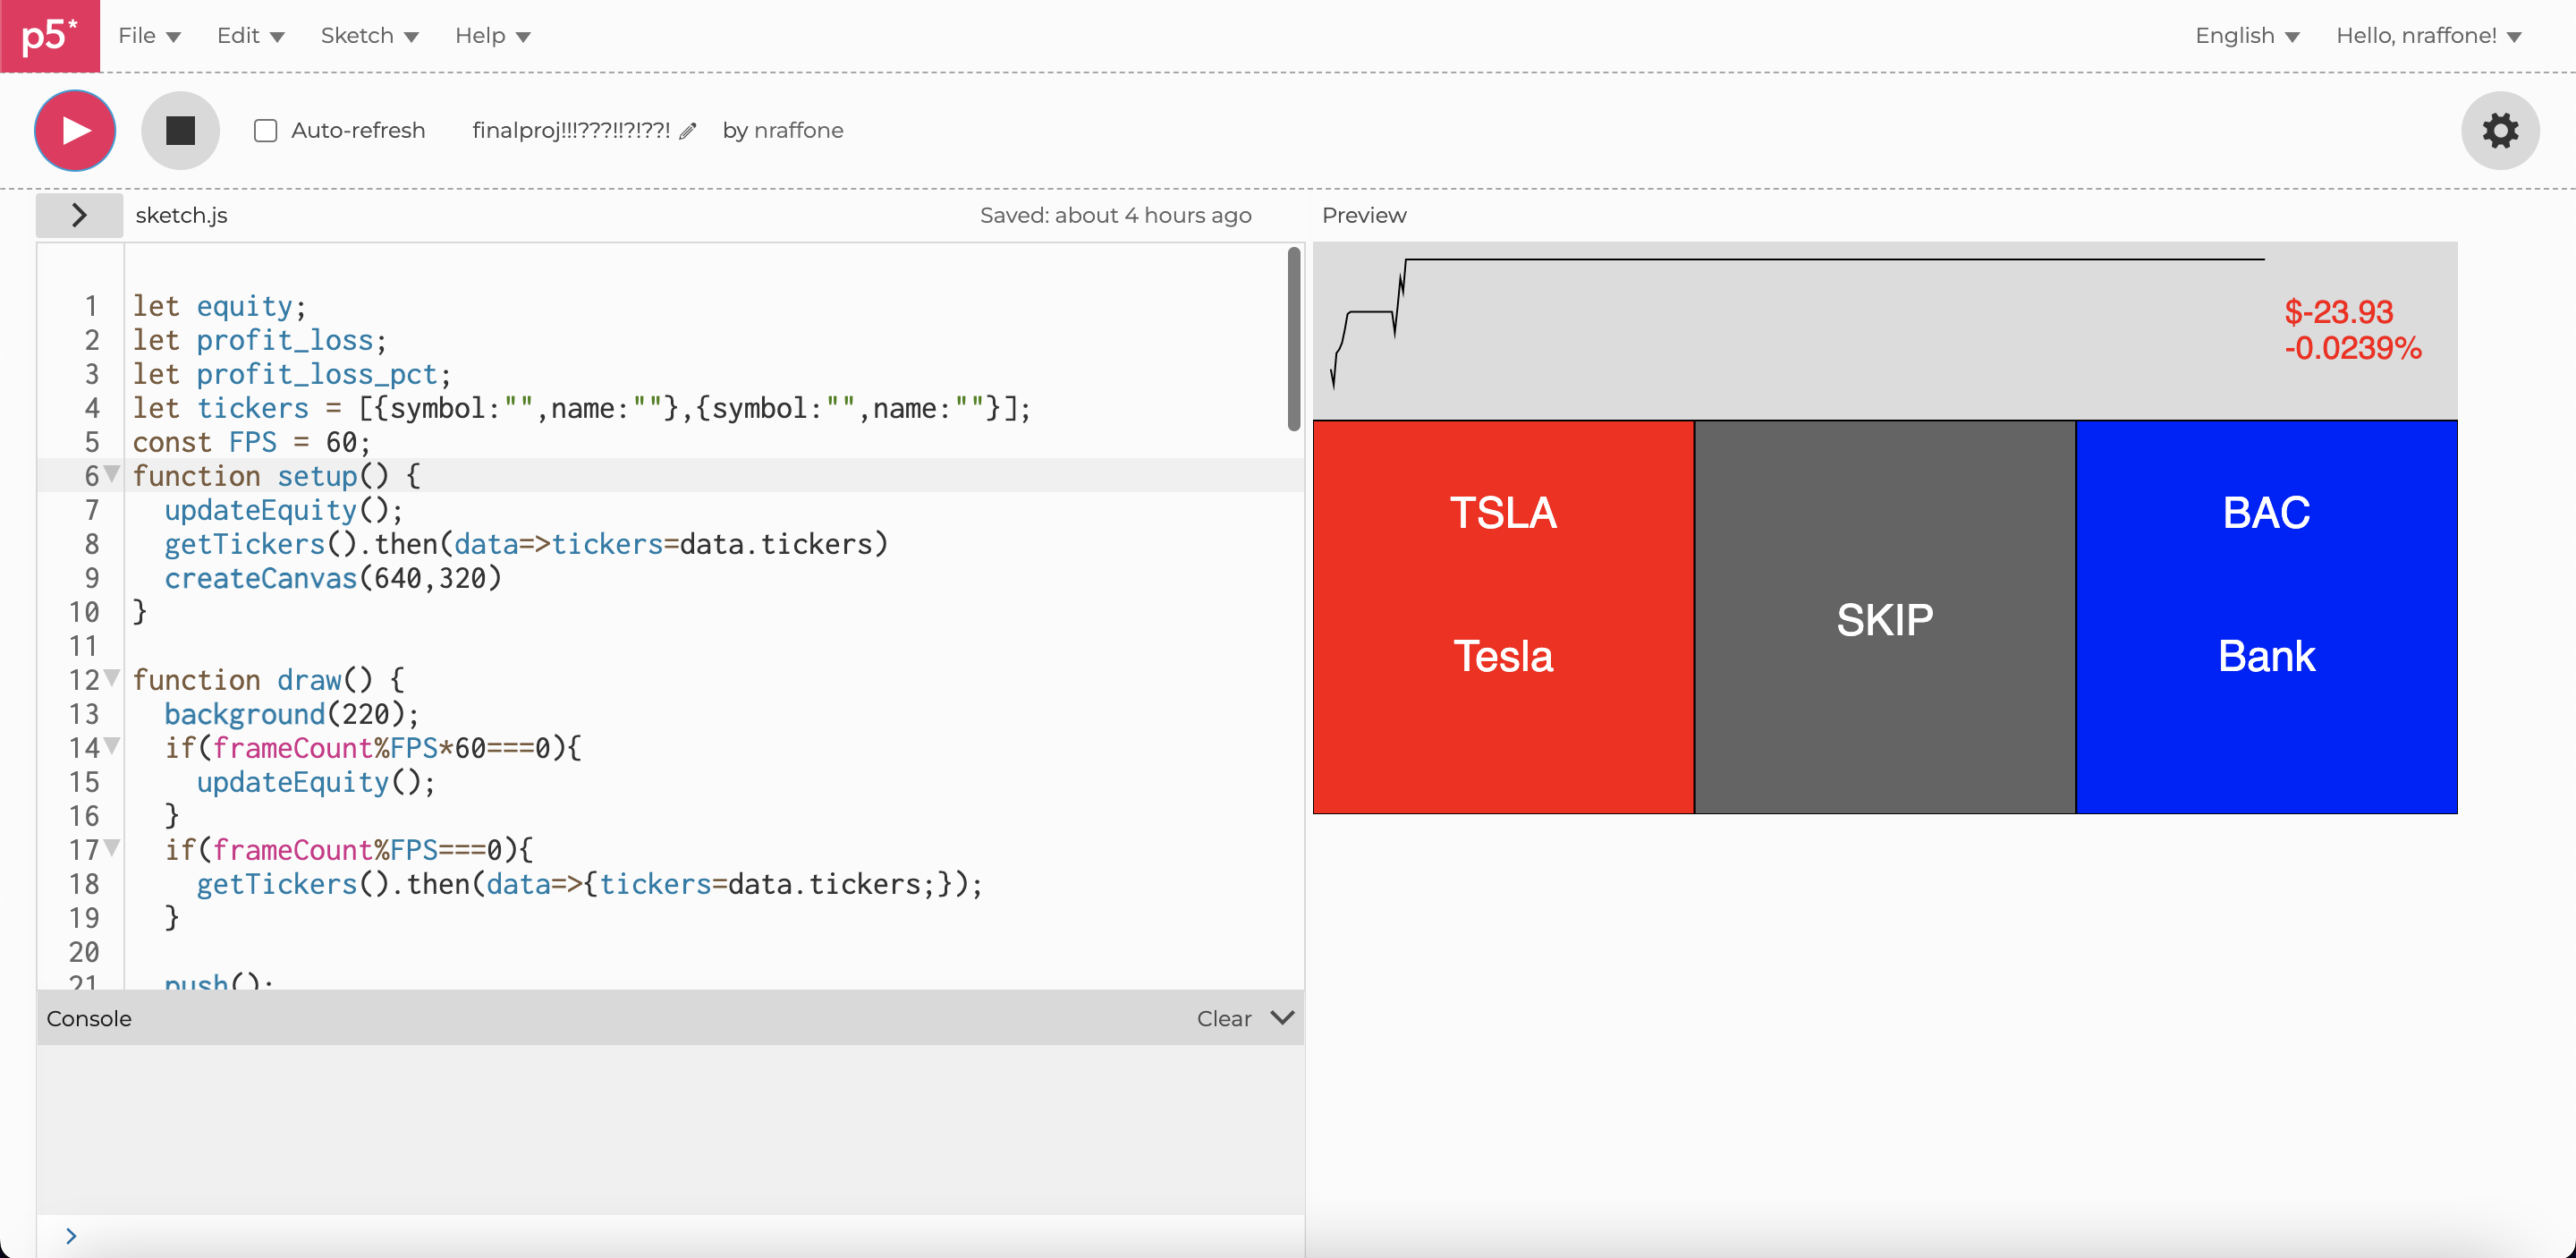
We used p5js for our display, where the user is shown 3 options (2 stocks and 1 skip), as well as their current stock trend. The rotation at the bottom shows the user which option they are hovering over, in addition to the flickering of the background.

To display the equity at the top, we got the data from the API and displayed it on the screen using a p5js shape

function setup() {
  getTimeline().then(resp=>{
      equity = resp.equity;
      profit_loss = resp.profit_loss
      profit_loss_pct = resp.profit_loss_pct
      start_val = resp.start_val
    })
  createCanvas(1440,600);
}

function plotTimeline(equity){
  if(!equity){
    return;
  }
  const Emin = Math.min(Math.min(...equity), start_val) - 10;
  const Emax = Math.max(start_val, Math.max(...equity)) + 10;
  const maxGraphHeight = height/4;
  const plotEquity = [];
  push();
  noFill();
  stroke(0)
  beginShape();
  for(let i =0; i<equity.length; i++){
    vertex(map(i,0,equity.length, 10, 5*width/6),map(equity[i], Emin, Emax, 10, maxGraphHeight))
  }
  endShape();
  push();
  stroke(100,100,100)
  line(0,map(start_val||equity[0], Emin, Emax, 10, maxGraphHeight),5*width/6,map(start_val||equity[0], Emin, Emax, 10, maxGraphHeight));
  pop()
  pop();
}

To get the ticker data, we got the data from the backend, and set a global object to hold the values

async function getTickers(){
  try{
    const data = await fetch('http://localhost:8000/randtickers')
    return data.json()
  }catch(e){
    console.log(e)
  }
}
function draw() {
  background(255);
  currSelect = Math.min(Math.max(Math.floor(map(potVal, minPVAL, maxPVAL, 0, 3)),0),3)
  //update every minute (bcuz that's how it works serverside)
  if(frameCount%FPS*60===0){
    getTimeline().then(resp=>{
      equity = resp.equity;
      profit_loss = resp.profit_loss
      profit_loss_pct = resp.profit_loss_pct
      start_val = resp.start_val
    })
  }
  
  push();
  //choice 0
  if(currSelect === 0 && Math.floor(frameCount/60)%2===0){
    fill(200,100,100)
  }else{
    fill(255,0,0)
  }
  rect(0,20+height/4,1*width/3,3*height/4-20)
  
  //choice 1 (skip)
  if(currSelect === 1 && Math.floor(frameCount/60)%2===0){
    fill(175,175,175)
  }else{
    fill(100,100,100)
  }
  rect(width/3,20+height/4,1*width/3,3*height/4-20)
  
  //choice 2
  if(currSelect === 2 && Math.floor(frameCount/60)%2===0){
    fill(100,100,200)
  }else{
    fill(0,0,255)
  }
  rect(2*width/3,20+height/4,1*width/3,3*height/4-20)
  pop();
  
  push();
  fill(255)
  noStroke();
  textSize(24)
  textAlign(CENTER)
  text(tickers[0].symbol, width/6, 2*height/4)
  text(tickers[0].name, width/6, 3*height/4)
  text("SKIP", 3*width/6, 11*height/16)
  text(tickers[1].symbol, 5*width/6, 2*height/4)
  text(tickers[1].name, 5*width/6, 3*height/4)
  if(flicker){
    fill(255);
    text(`SELECTED${".".repeat(map(frameCount%60,0,59,1,4))}`, (currSelect*2+1)*width/6, 7*height/8)
  }
  pop();
  plotTimeline(equity);
  
  push();
  textSize(18);
  fill(profit_loss<0?255:0,profit_loss>0?255:0,0)
  text(`${profit_loss?'$'+profit_loss.toString():""}`, 5*width/6+10, height/7)
  text(`${profit_loss_pct?(profit_loss_pct*100).toString().slice(0,7)+"%":""}`, 5*width/6+10, height/7+20)
  pop();
  
  push();
  if(selling && Math.floor(map(frameCount%60, 0, 59, 0, 2))){
    textAlign(CENTER)
    textSize(50)
    fill(0)
    rect(width/4, height/4, width/2, height/2)
    fill(255,0,0);
    text('SELLING', width/2, height/2);
  }
  pop();
  push()
  fill(0,255,0)
  noStroke()
  circle(width/2, height, RAD*2)
  angleMode(DEGREES)
  let xdeg = 180- map(potVal, minPVAL, maxPVAL, XOFFSET, 180-XOFFSET)
  let x = width/2 + cos(xdeg) * XRAD
  let y = Math.sqrt(XRAD**2 - (x-(width/2))**2) + height
  
  let xlrange = [width/2-RAD, width/2-RAD, width/2]
  let ylrange = [height, height, height - RAD]
  
  let xrrange = [width/2, width/2+RAD, width/2+RAD]
  let yrrange = [height - RAD, height, height]
  
  triangle(xlrange[currSelect], ylrange[currSelect], x, height-y+height, xrrange[currSelect], yrrange[currSelect]);
  pop()
}

To handle the orders, we had to connect with the arduino, so in the mean time we implemented the code structure that enabled us to receive data and update the states in the program as necessary.

function readSerial(data) {
  ////////////////////////////////////
  //READ FROM ARDUINO HERE
  ////////////////////////////////////

  if (data != null) {
    let fromArduino = split(trim(data), ",");
    if(fromArduino.length === 3){
      if(prevsellbtn == 0 && sellbtn == 1){
          selling=true;
          sellAll().then(()=>selling=false);
          end_time = frameCount + (FPS*SELLTIME)
      }else if(prevbuybtn == 0 && buybtn == 1){
        if(!flicker){
          flicker=true;
      switch(currSelect){
        case 0:
          makeOrder(tickers[0].symbol)
          .then(()=>getTickers())
          .then(data=>{tickers=data.tickers;flicker=false;});
          break;
        case 1:
          getTickers()
          .then(data=>{tickers=data.tickers;flicker=false;});
          break
        case 2:
          makeOrder(tickers[1].symbol)
          .then(()=>getTickers())
          .then(data=>{tickers=data.tickers;flicker=false;});
          break;
        }
      }
    }
      prevsellbtn = sellbtn;
      prevbuybtn = buybtn;
      sellbtn = parseInt(fromArduino[0])
      buybtn = parseInt(fromArduino[1])
      potVal = maxPVAL - parseInt(fromArduino[2])
    //////////////////////////////////
    //SEND TO ARDUINO HERE (handshake)
    //////////////////////////////////
    if(end_time && end_time > frameCount){
      writeSerial("1\n");
    }else{
      writeSerial("0\n");
      if(frameCount<end_time){
        end_time = 0;
      }
    }
  }
}}

The idea being that a potentiometer value from arduino would dictate the highlighted choice, and a button would lock the choice in to make a purchase. A user would also be able to close all open positions through a button press, and that would send a positive value to the arduino serial.

Arduino Implementation

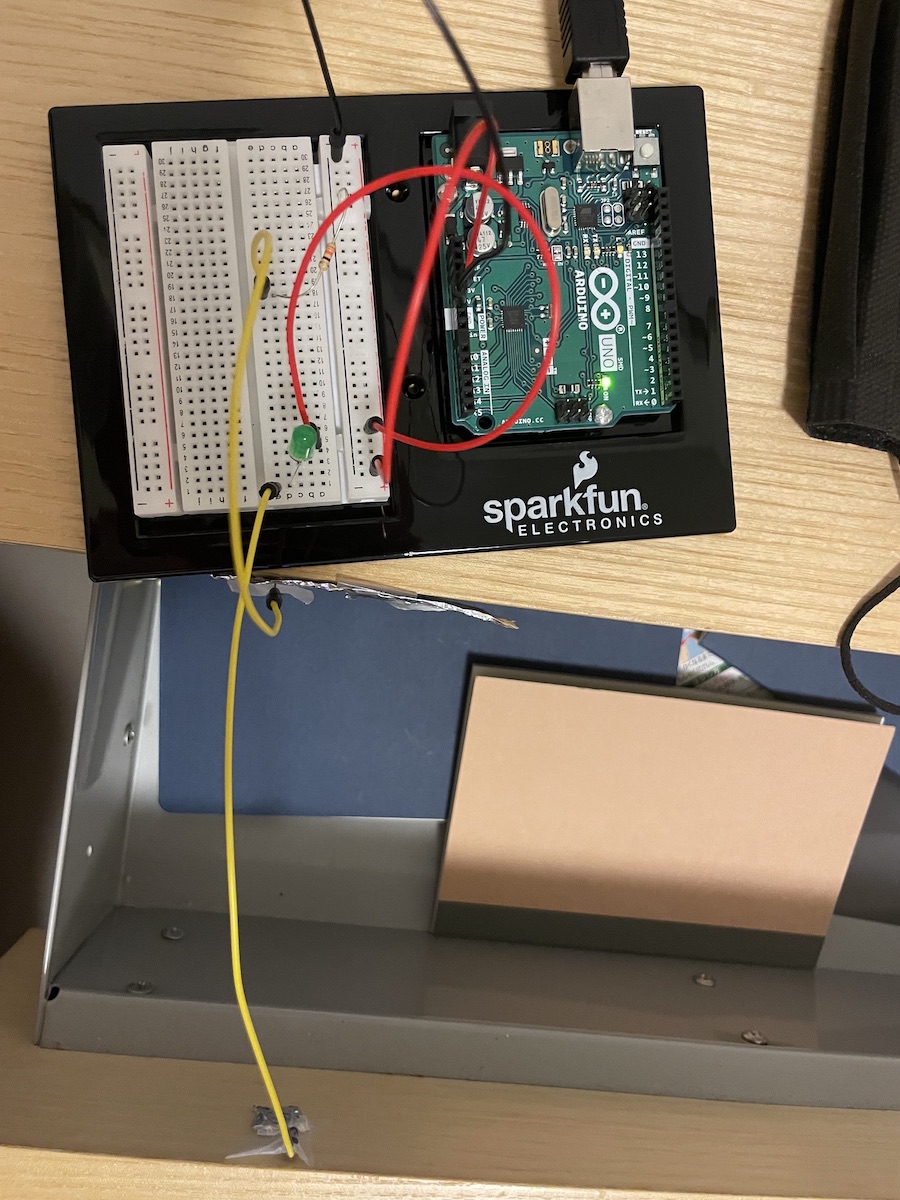
As mentioned previously, we needed a potentiometer and two buttons, but we also wanted to add sound and lights for feedback. We loaded two sounds onto a microSD card onto the arduino, one for a sale and one for a purchase, and loaded them as follows along with the LEDs.

#include <SPI.h>
#include <Adafruit_VS1053.h>
#include <SD.h>
#define BREAKOUT_RESET  9      // VS1053 reset pin (output)
#define BREAKOUT_CS     10     // VS1053 chip select pin (output)
#define BREAKOUT_DCS    8      // VS1053 Data/command select pin (output)
#define SHIELD_RESET  -1      // VS1053 reset pin (unused!)
#define SHIELD_CS     7      // VS1053 chip select pin (output)
#define SHIELD_DCS    6      // VS1053 Data/command select pin (output)
#define CARDCS 4     // Card chip select pin
#define DREQ 3       // VS1053 Data request, ideally an Interrupt pin

Adafruit_VS1053_FilePlayer musicPlayer = Adafruit_VS1053_FilePlayer(SHIELD_RESET, SHIELD_CS, SHIELD_DCS, DREQ, CARDCS);
  
void setup() {
  Serial.begin(9600);
  pinMode(2, INPUT);
  pinMode(7, INPUT`);
  pinMode(1, OUTPUT);
  pinMode(5, OUTPUT);
  pinMode(6, OUTPUT);
  pinMode(4, OUTPUT);
  pinMode(3, OUTPUT);
  while (Serial.available() <= 0) {
    Serial.println("0,0,0"); 
    delay(300); 
  }
  if (! musicPlayer.begin()) { 
     while (1);
  }
  
   if (!SD.begin(CARDCS)) {
    while (1); 
  }
  musicPlayer.setVolume(20,20);
  musicPlayer.useInterrupt(VS1053_FILEPLAYER_PIN_INT); 
}

We then parsed the p5js output and sent back the button and potentiometer values.

int SELLPIN = 2;
int BUYPIN = 7;
int POTPIN = A0;
void loop() {
if (Serial.available()) {
  int sellBTN = digitalRead(SELLPIN);
  int buyBTN = digitalRead(BUYPIN);
  int sensorValue = analogRead(POTPIN);
  Serial.print(sellBTN);
  Serial.print(',');
  Serial.print(buyBTN);
  Serial.print(',');
  Serial.print(sensorValue);
  Serial.println("");
    if(buyBTN){
musicPlayer.playFullFile("/track001.mp3");
}
if(sellBTN){
musicPlayer.playFullFile("/track002.mp3");
}
    byte c = Serial.read();
    if(c=='1'){
        digitalWrite(1, 1);
        digitalWrite(5, 1);
        digitalWrite(6, 1);
        digitalWrite(4, 1);
        digitalWrite(3, 1);
    }else{
        digitalWrite(1, 0);
        digitalWrite(5, 0);
        digitalWrite(6, 0);
        digitalWrite(4, 0);
        digitalWrite(3, 0);
    }
}
}

This way, we were able to get the p5js input and send out our own values using the handshake procedure.

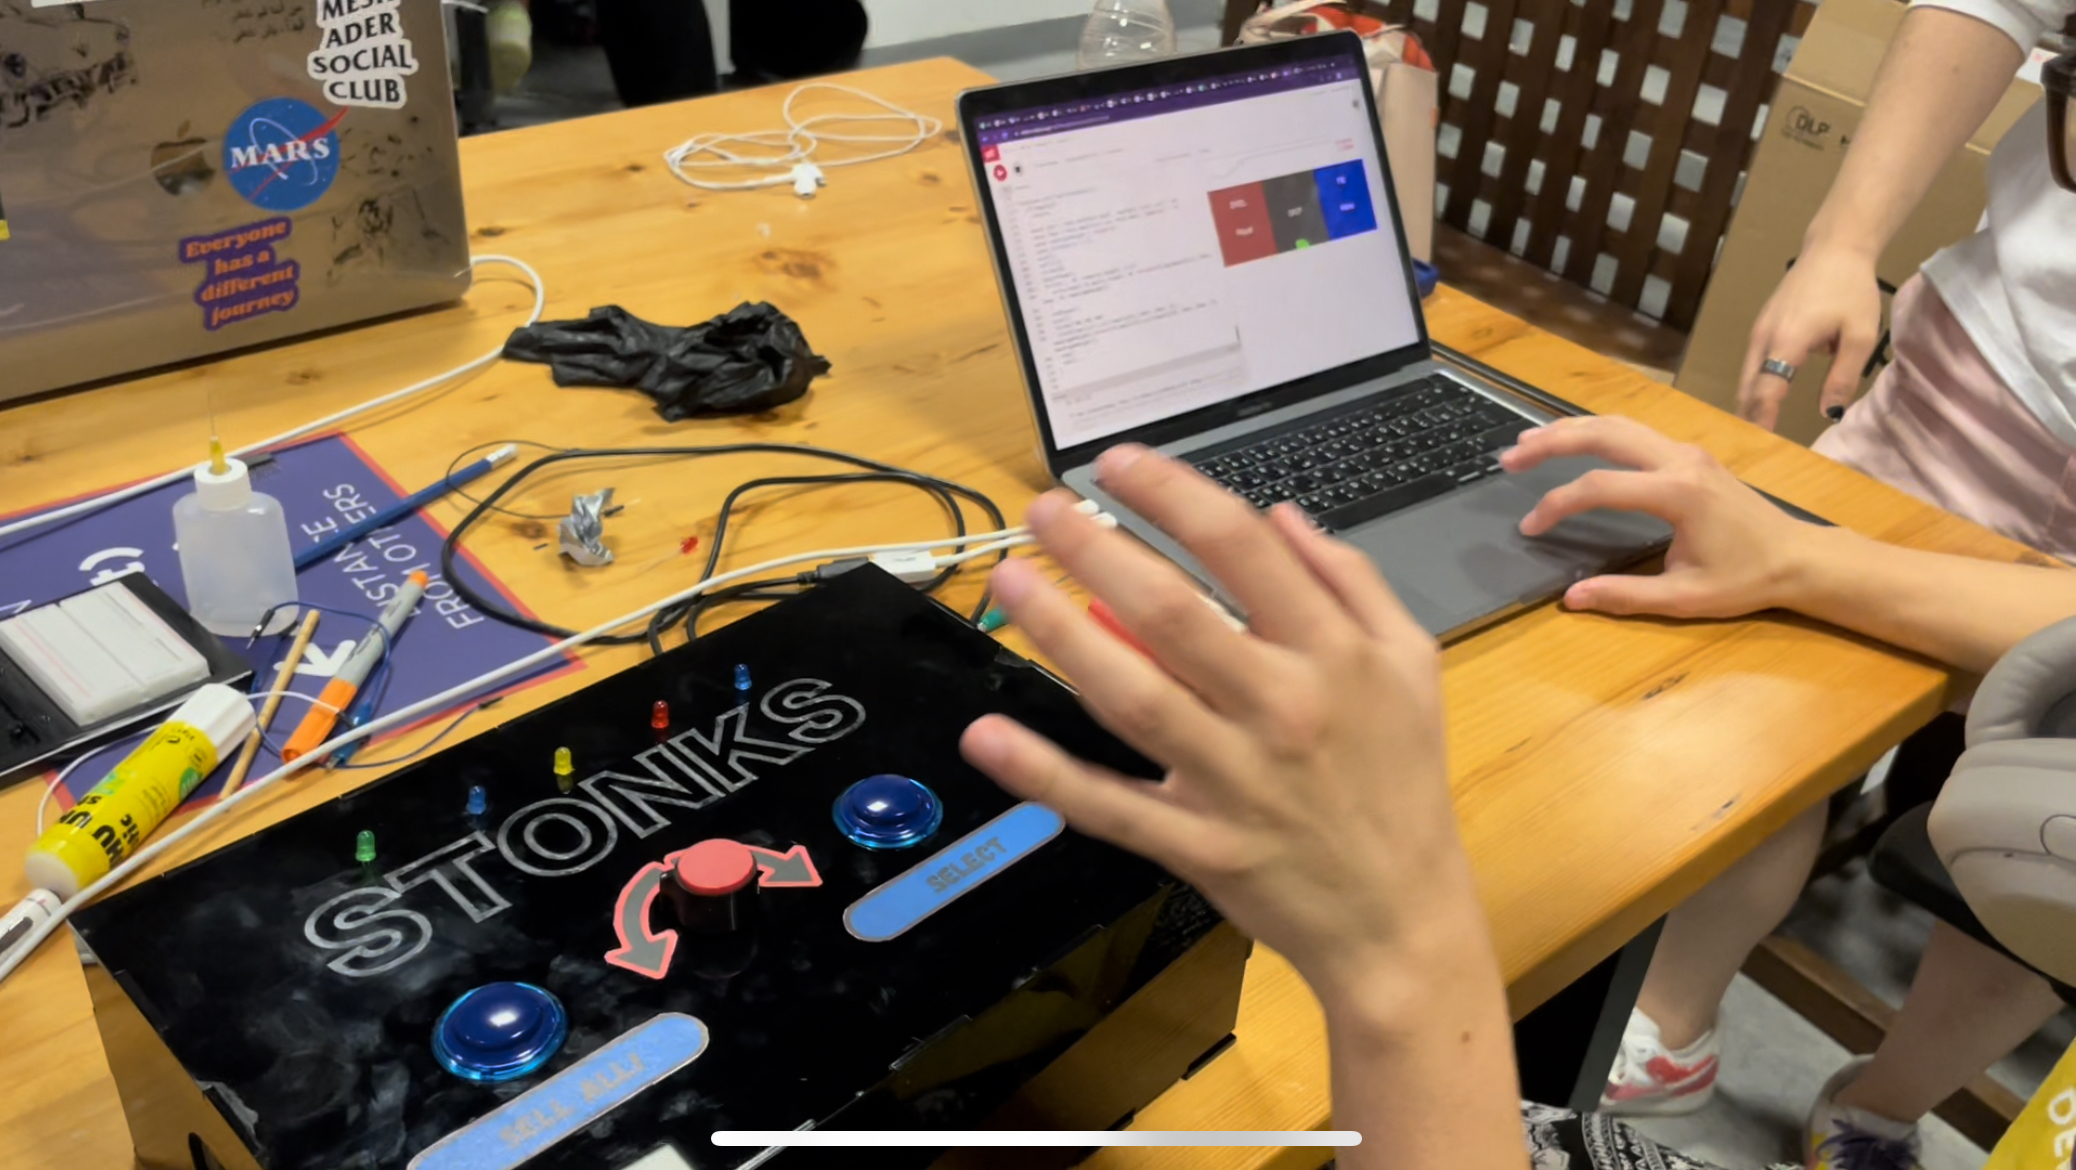
The image shows the complete implementation.

Reflections

Overall, the implementation worked well and made for an intuitive program that enabled people to experiment with the stock market. One of the main limitations of our system is that it only functions between 17:30-00:00 GST due to the stock market being open only for those hours. Other than that however, we found that it provided an interactive experience for the user.

We initially wanted to use an airhorn for the selling sound, but we had hardware restrictions, so decided to go for a speaker instead. We had a couple software slip ups too, as out of nowhere during one of our work sessions, my Google Chrome quit and couldn’t be reopened. In addition, some of the ports on the arduino we used were not working, so we had to test out many different ports before the system worked at full capacity.

We’re happy with the project we made in the class, and hope that the users as less afraid of investing. The repository for the backend can be found here. The .env file is not provided, so the user must provide their own API keys.

Nicholas and Shama Final Project Progress

The project has been moving along well, with progress being done on all fronts. The simple Node backend has been complete with the Alpaca trading API, and looks as follows:

import express from 'express'
import cors from 'cors'
const Alpaca = require('@alpacahq/alpaca-trade-api')
const fs = require('fs')
require('dotenv').config()
const app = express()
const port = 8000

const stocklist = [];
let alpaca;
let startval;
if(process.env.ENV==='DEVELOPMENT'){
    alpaca = new Alpaca({
        keyId: process.env.TEST_ALPACA_KEY_ID,
        secretKey: process.env.TEST_ALPACA_SECRET_KEY,
        paper: true,
    })
    startval = 100000;
}else if(process.env.ENV==='PRODUCTION'){
    alpaca = new Alpaca({
        keyId: process.env.ALPACA_KEY_ID,
        secretKey: process.env.ALPACA_SECRET_KEY,
        paper: false,
    })
}else{
    throw new Error("Error: Environment Not Properly Selected")
}

//read stocklist 
fs.readFile('stocklist.txt', function(err, data) {
    if(err) throw err;
    var array = data.toString().split("\n");
    for(const stock of array) {
        const [symbol, name] = stock.split(' ')
        if(symbol&&name){
            let currstock ={
                symbol,
                name:name.replace("\"","")
            }
            stocklist.push(currstock)
        }
    }
});

app.use(express.json())
app.use(cors())


app.post('/buy_order', async(req, res)=>{
    try{
        const {ticker} = req.body;
        const order = await alpaca.createOrder({
            symbol:ticker,
            qty:1,
            side: 'buy',
            type:'market',
            time_in_force:'day'
        })
        res.json({order})
    }catch(e){
        console.log(e)
        res.status(400).send('err')
    }
})


app.post('/sell_all', async(req, res)=>{
    try{
        await alpaca.closeAllPositions();
        res.json({'success':'success'})
    }catch(e){
        console.log(e)
    }
})

app.get('/timeline', async(req, res)=>{
    try{
        const history = await alpaca.getPortfolioHistory({
            period: '1D',
            timeframe:'1Min'
          })
        const last_elem = await history.equity.findIndex(e=>e===null);
        const cut_history = {
            equity:history.equity.slice(0,last_elem),
            profit_loss: history.profit_loss[last_elem-1],
            profit_loss_pct: history.profit_loss_pct[last_elem-1]
        };
        res.json({...cut_history})
    }catch(e){
        console.log(e)
        res.send('err')
    }
})

app.get('/positions', async(req, res)=>{
    try{
        const positions = await alpaca.getPositions();
        res.json(positions)
    }catch(e){
        res.send('err')
    }
})

app.get('/randtickers', async(req,res)=>{
    try{
        const rand1 = Math.floor(stocklist.length * Math.random());
        let rand2 = Math.floor(stocklist.length * Math.random());
        while(rand2===rand1){
            rand2 = Math.floor(stocklist.length * Math.random());
        }
        res.json({tickers: [stocklist[rand1],stocklist[rand2]]})
    }catch(e){
        res.status(400).send('err')
    }
})


app.listen(port, () => {
  console.log(`Example app listening on port ${port}`)
})

The data for the stocks is manipulated and returned from the server between 5:30pm-12:00am GST.

On the p5js end, we have created the functions to get, post, and display data. It looks like this when the stock market is open:

let equity;
let profit_loss;
let profit_loss_pct;
let tickers = [{symbol:"",name:""},{symbol:"",name:""}];
const FPS = 60;
function setup() {
  updateEquity()
     .then(()=>getTickers())
     .then(data=>tickers=data.tickers)
  createCanvas(640,320)
}

function draw() {
  background(220);
  if(frameCount%FPS*60===0){
    updateEquity();
  }
  if(frameCount%FPS===0){
    getTickers().then(data=>{tickers=data.tickers;});
  }
  
  push();
  fill(255,0,0)
  rect(0,20+height/4,1*width/3,3*height/4-20)
  fill(100,100,100)
  rect(width/3,20+height/4,1*width/3,3*height/4-20)
  fill(0,0,255)
  rect(2*width/3,20+height/4,1*width/3,3*height/4-20)
  pop();
  
  push();
  fill(255)
  noStroke();
  textSize(24)
  textAlign(CENTER)
  text(tickers[0].symbol, width/6, 2*height/4)
  text(tickers[0].name, width/6, 3*height/4)
  text("SKIP", 2*width/4, 11*height/16)
  fill(255)
  text(tickers[1].symbol, 5*width/6, 2*height/4)
  text(tickers[1].name, 5*width/6, 3*height/4)
  pop();
  plotTimeline(equity);
  
  push();
  textSize(18);
  fill(profit_loss<0?255:0,profit_loss>0?255:0,0)
  text(`${profit_loss?'$'+profit_loss.toString():""}`, 5*width/6+10, height/7)
  text(`${profit_loss_pct?(profit_loss_pct*100).toString().slice(0,7)+"%":""}`, 5*width/6+10, height/7+20)
  pop();
  
}

async function makeOrder(ticker){
  try{
    const data = await fetch('http://localhost:8000/buy_order',{
      method:"POST",
      headers : { 
        'Content-Type': 'application/json',
        'Accept': 'application/json'
       },
      body:JSON.stringify({ticker})
    })
    jsonData = await data.json();
    return jsonData;
  }catch(e){
    console.log(e)
  }
}

async function sellAll(){
  try{
    await fetch('http://localhost:8000/sell_all',{
        method:"POST",
        headers : { 
          'Content-Type': 'application/json',
          'Accept': 'application/json'
         },
    })
    return 'success'
  }catch(e){
    console.log(e)
  }
}

async function getTimeline(){
  try{
    const data = await fetch('http://localhost:8000/timeline')
    const jsonData = await data.json()
    return jsonData;
  }catch(e){
    console.log(e)
  }
}

async function getTickers(){
  try{
    const data = await fetch('http://localhost:8000/randtickers')
    return data.json()
  }catch(e){
    console.log(e)
  }
}

function plotTimeline(equity){
  if(!equity){
    return;
  }
  const Emin = Math.min(...equity);
  const Emax = Math.max(...equity);
  const maxGraphHeight = height/4;
  const plotEquity = [];
  push();
  noFill();
  stroke(0)
  beginShape();
  for(let i =0; i<equity.length; i++){
    vertex(map(i,0,equity.length, 10, 5*width/6),map(equity[i], Emin, Emax, 10, maxGraphHeight))
  }
  endShape();
  pop();
}

function updateEquity(){
  getTimeline().then(resp=>{
      equity = resp.equity;
      profit_loss = resp.profit_loss
      profit_loss_pct = resp.profit_loss_pct
    })
}


The graph at the top shows the progress made, and the numbers on the right show current profits. The 3 bars in the middle display the current options.

We have been also working on the physical computing end, where we’re testing implementations for our beloved airhorn.

To wrap up our project, we have to hook up the hardware and software end, which is the “hardest” 10%, as the professor mentioned in class

Serial Communication Assignment

Exercise 1

By using a potentiometer, we were able to move the ball across the screen.

Arduino Code

void setup() {
  Serial.begin(9600);
  while (Serial.available() <= 0) {
    Serial.println("0"); // send a starting message
    delay(300);              // wait 1/3 second
  }
}
void loop() {
  while (Serial.available() > 0) {
    // read the incoming byte:
    int inByte = Serial.read();
    int sensorValue = analogRead(A0);
    Serial.print(sensorValue);
    Serial.println();
  }
}

P5JS code

let serial; // variable to hold an instance of the serialport library
let portName = "/dev/tty.usbmodem14201"; // fill in your serial port name here
let yPos;
let onOff=0;
let xval = 0;

function setup() {
  createCanvas(640, 480);
  serial = new p5.SerialPort(); // make a new instance of the serialport library
  serial.on("list", printList); // set a callback function for the serialport list event
  serial.on("connected", serverConnected); // callback for connecting to the server
  serial.on("open", portOpen); // callback for the port opening
  serial.on("data", serialEvent); // callback for when new data arrives
  serial.on("error", serialError); // callback for errors
  serial.on("close", portClose); // callback for the port closing

  serial.list(); // list the serial ports
  serial.open(portName); // open a serial port
  yPos=height/2;
}

function draw() {
  background(255);
}

// get the list of ports:
function printList(portList) {
  // portList is an array of serial port names
  for (let i = 0; i < portList.length; i++) {
    // Display the list the console:
    print(i + " " + portList[i]);
  }
}

function serverConnected() {
  print("connected to server.");
}

function portOpen() {
  print("the serial port opened.");
}

function serialEvent() {
  // read a string from the serial port
  // until you get carriage return and newline:
  let inString = serial.readLine();
  //check to see that there's actually a string there:
  if (inString.length > 0) {
    let inVal = parseInt(inString)
    xval = map(inVal, 1023, 0, 0, width)
  }

  serial.write(onOff);
}

function serialError(err) {
  print("Something went wrong with the serial port. " + err);
}

function portClose() {
  print("The serial port closed.");
}

Exercise 2

Now in the opposite direction, we used arrow keys on the computer to modify the brightness of an LED in Arduino

Arduino Code

void setup() {
  Serial.begin(9600);
  while (Serial.available() <= 0) {
    Serial.println("0"); // send a starting message
    delay(300);              // wait 1/3 second
  }
}
void loop() {
  while (Serial.available() > 0) {
    // read the incoming byte:
    int inByte = Serial.read();
    analogWrite(3, inByte);
    Serial.print("ye");
    Serial.println();
  }
}

P5JS Code

let serial; // variable to hold an instance of the serialport library
let portName = "/dev/tty.usbmodem14201"; // fill in your serial port name here
let yPos;
let onOff=0;
let xval = 0;
let outVal = 0;

function setup() {
  createCanvas(640, 480);
  serial = new p5.SerialPort(); // make a new instance of the serialport library
  serial.on("list", printList); // set a callback function for the serialport list event
  serial.on("connected", serverConnected); // callback for connecting to the server
  serial.on("open", portOpen); // callback for the port opening
  serial.on("data", serialEvent); // callback for when new data arrives
  serial.on("error", serialError); // callback for errors
  serial.on("close", portClose); // callback for the port closing

  serial.list(); // list the serial ports
  serial.open(portName); // open a serial port
  yPos=height/2;
}

function keyReleased() {
  if (keyCode === LEFT_ARROW) {
    outVal = max(outVal - 10, 0) ;
  } else if(keyCode === RIGHT_ARROW) {
    outVal = min(outVal+10, 255);
  }
  return false;
}

function draw() {
  background(255);
}

// get the list of ports:
function printList(portList) {
  // portList is an array of serial port names
  for (let i = 0; i < portList.length; i++) {
    // Display the list the console:
    print(i + " " + portList[i]);
  }
}

function serverConnected() {
  print("connected to server.");
}

function portOpen() {
  print("the serial port opened.");
}

function serialEvent() {
  // read a string from the serial port
  // until you get carriage return and newline:
  let inString = serial.readLine();
  serial.write(outVal);
}

function serialError(err) {
  print("Something went wrong with the serial port. " + err);
}

function portClose() {
  print("The serial port closed.");
}

Exercise 3

Combining the ball p5js example with a potentiometer, we were able to create an interactive arduino-p5js experience.

Arduino Code

void setup() {
  Serial.begin(9600);
  while (Serial.available() <= 0) {
    Serial.println("0"); // send a starting message
    delay(300);              // wait 1/3 second
  }
}
void loop() {
  while (Serial.available() > 0) {
    // read the incoming byte:
    int inByte = Serial.read();
    analogWrite(3, inByte);
    int sensorValue = analogRead(A0);
    Serial.print(sensorValue);
    Serial.println();
  }
}

P5JS Code

let serial; // variable to hold an instance of the serialport library
let portName = "/dev/tty.usbmodem14201"; // fill in your serial port name here
let velocity;
let gravity;
let position;
let acceleration;
let wind;
let drag = 0.99;
let mass = 50;
let hDampening;
let inVal = 0;
let outVal = 0;

function setup() {
  createCanvas(640, 360);
  noFill();
  position = createVector(width/2, 0);
  velocity = createVector(0,0);
  acceleration = createVector(0,0);
  gravity = createVector(0, 0.5*mass);
  wind = createVector(0,0);
  hDampening=map(mass,15,80,.98,.96);
  serial = new p5.SerialPort(); // make a new instance of the serialport library
  serial.on("list", printList); // set a callback function for the serialport list event
  serial.on("connected", serverConnected); // callback for connecting to the server
  serial.on("open", portOpen); // callback for the port opening
  serial.on("data", serialEvent); // callback for when new data arrives
  serial.on("error", serialError); // callback for errors
  serial.on("close", portClose); // callback for the port closing
    serial.list(); // list the serial ports
  serial.open(portName); // open a serial port
}

function draw() {
  background(255);
  if (!keyPressed){
    wind.x=0;
    velocity.x*=hDampening;
  }
  applyForce(wind);
  applyForce(gravity);
  velocity.add(acceleration);
  velocity.mult(drag);
  position.add(velocity);
  acceleration.mult(0);
  ellipse(position.x,position.y,mass,mass);
  if (position.y > height-mass/2) {
      velocity.y *= -0.9;  // A little dampening when hitting the bottom
      position.y = height-mass/2;
    }
 outVal = position.y >= height-mass/2-5 ? 255 : 0;
 wind.x = map(inVal, 0, 1023, -5, 5)*hDampening;
}

function applyForce(force){
  // Newton's 2nd law: F = M * A
  // or A = F / M
  let f = p5.Vector.div(force, mass);
  acceleration.add(f);
}

function keyPressed(){
  if (key==' '){
    mass=random(15,80);
    position.y=-mass;
    velocity.mult(0);
  }
}

Video

Nicholas- Final Project Concept

Idea

I wanted to make something that feels like it has real world consequences, so my idea for the final project is a real life stock trading application. I want to create an integration that creates an interactive experience for the end user.

Implementation

There are 3 components to this idea: A physical method to trading stocks, a display of profits, and a web server that connects the integration to the outside world. The user should be able to choose to either buy Stock A, Stock B, or skip the purchase. There will also be a button to liquidate all stocks and turn a profit.

Arduino Implementation:

  1. A potentiometer that the user turns to select stock A, stock B, or skip
  2. A button that the user can press to liquidate stocks
  3. A servo that pushes down an airhorn upon liquidation

P5js Implentation:

  1. A display with the text of Stock A, B or skip
  2. A Graph with current value of stocks
  3. Text showing how much liquid and stock money the user has

Web Server Implementation:

  1. Send new stock data to P5JS
  2. Send wallet data to p5js
  3. Send purchase requests to Alpaca Stock API

The catch

its real money that I run away with at the end of the semester.

Digital and Analog Switches: Nicholas

Inspiration

I wanted to create a moving spotlight using a potentiometer that work as if you are pointing at a light bulb and turning it on. I also wanted to create two different modes that would alternate between analog and digital signals using a button.

Implementation

First, I had to create the logic for the analog and digital switches based on the potentiometer value. I did this with the following code:

const int LEDpins[] = {3, 5, 6, 10, 11};

double mapf(float value, float fromLow, float fromHigh, float toLow, float toHigh) {
  return (value - fromLow) * (toHigh - toLow) / (fromHigh - fromLow) + toLow;
} 

double mappedD(float mapValue, int currPin){
  double absDist = abs(mapValue - currPin);
  return mapf(absDist, 0, PIN_LENGTH-1, 255, 0);
}

//code for analog write
double mapValue = mapf(potValue, 0, 1023.0, 0, PIN_LENGTH-1);
for(int i = 0; i < PIN_LENGTH; i++){
    analogWrite(LEDpins[i], max(0,mappedD(mapValue, i)-100));
}

//code for digital write
int intMapVal = map(potValue, 0, 1023, 0, PIN_LENGTH-1);
for(int i = 0; i < PIN_LENGTH; i++){
    digitalWrite(LEDpins[i], intMapVal==i);
}

By creating my own map functions, I was able to have a floating point value that determined how much each light bulb should light up. For the analog setting, the light was too bright at most values, so I decreased the values by 100 and constrained them to prevent integer underflow.

I also did added some logic for the button handling, and a light show would play while holding the button down, and would switch between analog and digital on release.

if(buttonState == LOW && prevState == HIGH){
   toggled = !toggled;
   for(int i = 0; i < PIN_LENGTH; i++){
      analogWrite(LEDpins[i], false);
    }
 }
 if(buttonState == HIGH && prevState == HIGH){
  if(millis() > timer){
    timer=millis()+interval;
    for(int i = 0; i < PIN_LENGTH; i++){
      LEDOn[i] = random(2);
    }
   }
   for(int i = 0; i < PIN_LENGTH; i++){
      digitalWrite(LEDpins[i], LEDOn[i]);
    }
 }

In doing this, I was able to create a light show dependent on the switch, which takes in a digital input, and potentiometer, which takes in a continuous input.

Reflection

Moving forwards, I would like to experiment with different mathematical functions for displaying luminosity as a linear scale may not have been best. I would also like to explore different ways to turn the knob as it was very difficult to turn and observe the effects without blocking the view.

Creative Switch

Inspiration

Back home, my brothers would get frustrated whenever I borrowed something from their drawer and didn’t close it properly. To combat this, I decided to create a simple mechanism that has a light turn on whenever the drawer is fully closed.

Implementation

To implement this, I created a circuit that was disconnected at one point. Connecting two wires would complete the circuit and light up the bulb. My initial idea was to have two wires taped to the insides of the drawer, but this failed since it was difficult lining up the two wires perfectly. As a result, I decided to use aluminum foil to extend the reach of the wires. Using a fat strip, I was able to establish a connection when the drawer was closed. Below is the circuit and a demonstration of the circuit.

Reflection

I felt like the most difficult part of this was creating a seamless integration of the wires into the drawer. As of now, the drawer is only able to be opened about 10cm before it falls out of the breadboard, so being able to have a long wire could fix this. Furthermore, the wire should probably go underneath or through the side, since I can’t place or take anything from the drawer while its open. Moving forwards, I also want to add another color designating the drawer is open, so that it’s more obvious to the user that the drawer must be closed.

Nicholas- Midterm Game

Idea

For my midterm, I decided to create a game based on old flash games: simple premises with a hint of an 8 bit aesthetic. The game Lift involves the player spamming their space bar to lift the barbell. The user can choose their difficulty in the form of the weight, and is given 10 seconds to complete the game, or else they lose. To give the user some feedback, I added a progress bar on the left of the screen and a progressing image of a person lifting the barbell.

Implementation

I first created a class that represented the game, featuring a weight and a set of reusable buttons that started or increased/decreased the game difficulty. I reflected the game difficulty with a changing color for the text and the start and restart had moving text that oscillated to draw the players attention.

As the user plays the game, the image and flame behind the image would progress to indicate how close the user is to completing the game. A sound would play to give a sense of feedback to the user. I also increased the size and redness of the time left text to create a sense of urgency for the player. The image used is a trace of myself, but shaded black to look less awkward.

I controlled the mouse clicks and button presses by game screen state in order to ensure nothing outside the screen was being modified. The shaking and game end time were calculated by taking the current time and adding them to a variable, and I used perlin noise for the duration after a user pressed the space bar to shake the images and display the fire.

Reflection

I enjoyed making this game as I think I was able to make it function consistently with a set style. I think there is some tweaking necessary in terms of difficulty as weights over 300kg feel practically impossible, but someone with fast fingers could prove me wrong. I would also like to see a leaderboard functionality, but outside of the local scope that would require some type of file manipulation or connection to an external database.

Midterm Progress- Nicholas

Idea

The idea for my game is based on those old-school flash games I used to play in middle school: I wanted a simple single player game with moderate replayability. I settled on the concept of a game where the user would spam a button on the keyboard to accomplish some goal with ranging levels of difficulty, using weight lifting as a theme.

Implementation

I started by creating the game class, which involves a variable holding the current screens and methods for each screen. I needed a game start screen, an ingame screen, and a game complete screen. I also created a clickable rectangle component I used for buttons that had optional text inside, with a method that returns whether or not the button is being hovered or not.

The game also has a weight variable which controls the amount of resistance the game will enact on the user so a higher weight makes the game harder. I used buttons to dynamically change the weight value.

As of now, the user mashes space bar to increase the current level of completion, and if the user is unable to complete the game within a specific timeframe, the game results in a loss.

To control the game restart, I used another method that reinitializes the game, setting all class variables back to their original value, which also gets called in the constructor.

Play the WIP game here

TODO (in order of importance):

  1. Implement background images that reflect the progression of the game
  2. Implement music to play in the back
  3. Implement sounds for the users button presses (can get annoying to make sure it isn’t too loud)
  4. Styling for colors and text

Assignment 4: Visualizations

Inspiration

For this project, i wanted to showcase some data from my childhood: Pokémon. I found a dataset on Kaggle which showed all pokemon and their typings, battle statistics, amongst other details.

I decided to create a pie chart that showcased the distribution of primary pokemon typings in P5js.

Implementation

I imported the dataset into p5js and began collecting information on each pokemon by creating a map, and assigning the keys to each type, and accumulated as I went through. I then pushed this to an array so I could create the pie chart.

pokemonMap = new Map();
numRows = table.getRowCount();
for (let r = 0; r < numRows; r++){
    let type = table.getString(r, 'type1');
    if(!pokemonMap.get(type)){
      pokemonMap.set(type, {val: 1});
    }else{
      pokemonMap.get(type).val+=1;
    }
}
anglearr = [];
for(let [type,obj] of pokemonMap){
  anglearr.push({type,val:obj.val})
}

I standardized each value by dividing by the total number of rows then multiplying by 360 to get the arc of each type by degrees. I increased the currangle variable so I could slowly build towards 360 degrees.

background(255);
  let currangle = 0;
  for(let i=0; i < anglearr.length; i++){
    fill(random(255),random(255),random(255));
    let nextdeg = anglearr[i].val/numRows*360;
    arc(width/2, height/2, width/2, height/2, currangle, nextdeg, PIE);
    currangle+=nextdeg;
  }

It wasn’t possible to tell which type belonged to which slice, so I added some trigonometry to add text that was offset by a radius to display each type next to their slice, with the same background color.

let midangle = (2*currangle+nextdeg)/2
let y = textrad * sin(midangle)
let x = textrad * cos(midangle)
text(anglearr[i].type, width/2+x, height/2+y)

The completed pie chart looks like this:

Reflection

I think there are some issues surrounding some of the sizes of the slices, but I am happy with the result. Most of my time writing the code for this comprised of figuring out the operations to use to standardize the angles and where to place the text. I know that pokemon was a part of many of our childhoods, and I find that looking back with an analytical lens is pretty interesting.

Assignment 3: OOP

Inspiration

For this assignment, I was inspired by the  Tron movies.  While I was too young to watch the originals, I loved how cool the light cycles were and wanted to make a piece of art that was based on collections of lines moving independently.

The idea I had was to have a collection of random lines bounce off of the walls and off of each other. For added effect, I wanted the lines that bounced off of each other to swap colors, and the background of the piece was to be the color of the line with most bounces.

Implementation

I began writing the class for the Lines. Each had to have a stroke weight, initial X&Y position, a current X&Y position, a dy and dx, a current color, and a list of past colors and X&Y positions. Here’s the code for the constructor I used.

class BouncyLine{
  constructor(dx, dy, radius, posX, posY){
    this.color = color(random(255), random(255), random(255));
    this.dx = dx;
    this.dy = dy;
    this.radius = radius;
    this.posX = posX;
    this.posY = posY;
    this.initposX = posX;
    this.initposY = posY;
    this.numcollisions = 0;
    this.pastlist = [];
  }
}

I would have to update the current posX and posY based on dx and dy, and account for collisions along the wall. I would also have to push a previous line with the current initposX and initposY to the array I had, and then update initposX and Y to the current posX and posY.

updateList(){
  this.pastlist.push([this.initposX, this.initposY, this.posX, this.posY, this.color]);
    this.initposX = this.posX;
    this.initposY = this.posY
}
update(){
  this.posX += this.dx;
  this.posY += this.dy;
  if(this.posX > width-this.radius || this.posX<this.radius){
    this.dx*=-1;
    this.updateList();
  }
  if(this.posY > height-this.radius || this.posY<this.radius){
    this.dy*=-1
    this.updateList();
  }
}

Then, to draw the line, I would have to take the strokeWeight of the line, draw each line in the array, then draw the current one.

draw(){
    strokeWeight(this.radius*2);
    for(let i=0; i<this.pastlist.length; i++){
      stroke(this.pastlist[i][4])
      line(this.pastlist[i][0],this.pastlist[i][1],this.pastlist[i][2],this.pastlist[i][3]);
    }
    stroke(this.color);
    line(this.initposX, this.initposY, this.posX, this.posY);
  }

To simplify, I created a run() method that ran both draw() and update():

//method to draw the circle and update its position
run(){
  this.draw();
  this.update();
}

For the setup() function, I had to initialize all of the lines in an array, making sure that none of them started inside of each other.

let randradius;
let linelist = [];
let maxradius;
let xoffset;
let maxdx;
let maxdy;
let bg;

function setup() {
  createCanvas(500, 500);
  bg = color(220,220,220)
  xoffset = 30;
  maxradius = 3;
  maxdx = 3;
  maxdy = 3;
  for(let i=0; i<width/(xoffset+maxradius)-1; i++){
    randradius = random(maxradius);
    linelist.push(new BouncyLine(
      random(maxdx),
      random(maxdy),
      randradius,
      (i+1)*xoffset,
      random(randradius,height-randradius),
    ));
  }
}

I then had to account for collisions, which was done by checking the Euclidean distance between 2 lines. If a collision was detected, I would find the opposite of the dx and dy for both, and swap their colors after updating the lists for both lines. I would also note the number of collisions they have with each other by incrementing numcollisions for both.

checkCollision(otherHead){
    if(sqrt((otherHead.posX-this.posX)**2+(otherHead.posY-this.posY)**2)<(this.radius+otherHead.radius)){
      this.dx*=-1;
      this.dy*=-1;
      this.updateList();
      otherHead.updateList();
      otherHead.dx*=-1;
      otherHead.dy*=-1;
      let otherColor = otherHead.color;
      otherHead.color = this.color;
      this.color = otherColor;
      this.numcollisions +=1;
      otherHead.numcollisions+=1;
    }
  }

To draw them, I ran the run() method for everything in the linelist, and had a nested for loop to check each combination of lines if there was a collision.

function draw(){
  background(bg);
  for(let i=0; i < linelist.length; i++){
    linelist[i].run();
  }
  for(let i=0; i < linelist.length-1; i++){
    for(let j=i+1; j < linelist.length; j++){
      linelist[i].checkCollision(linelist[j])
    }
  }

Finally, I added a global function that compared the number of collisions, and extracted the color of the line with most collisions. I then set this to the bg variable, which updated each time.

function getMostCollisions(linelist){
  let maxcollisions = 0;
  let maxcollisioncolor;
  for(let i=0; i < linelist.length; i++){
    if(linelist[i].numcollisions>maxcollisions){
      maxcollisions = linelist[i].numcollisions;
      maxcollisioncolor = linelist[i].color;
    }
  }
  return maxcollisioncolor||bg;
}

My piece was complete, and looks like this:

Reflection

I really liked how OOP modularized everything and added to reusability. I would like to keep thinking about how I can best format my code for readability, as the page was pretty cluttered by the end. I would also like to think about expanding my class to handle a list of lines, so that the code would be even more organized.