THE IDEA
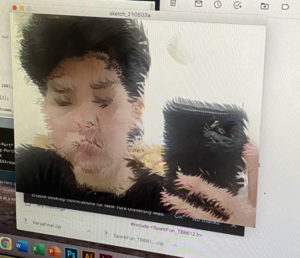
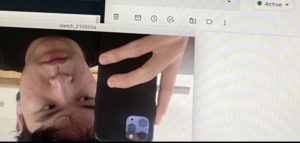
The final project turned out to be an artistic expression in its true form, developing chaotically and very unexpectedly. The essence of this project is to reflect over your own reflection, viewer by interacting with my project gets to see the distorted, trippy yet witty images of the face. This goes to display that we live in a world where the grimace that you put on may not be the true reflection of one’s identity or perhaps personaity.
Since it’s an arts installation, giving any instruction would ruin the mystery that the project holds. Any uniform shapes or identically consistent styles would ruin the whole aesthetics as the exhibition of mirrors projects and celebrates the diversity and the will to think outside the box. Not only it challenges the audience to render many untrivial ideas, but also immerses the audience into the galaxy of unknown and unseen.
While doing the project, I got inspired by many things, but what had finally set my thoughts on the project was the combination of psychic TV shows where psychic would force her patients to believe in something that they are not, and also the many apps like Photo Booth, Snapchat or even Instagram that has filters that alter the way one sees itself.
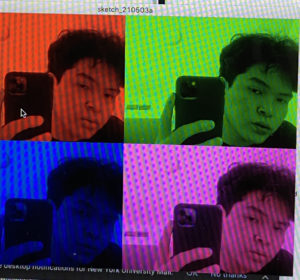
The main trick is in simplicity. The processing code consists of several stages of realities: starting from distortion, to alienation, to taking a visit to an upside world only to see thriple and frouple of you at the final stage. During this emerging and magical process, the spiral hypnosis adds up to the whole surrealistic moment that was intended to be recreated. The sonic unearthy sound of the motor contributes to making the experience more sensual and industrial.
MIRRORS
THE PROCESSING CODE
import processing.video.*;
import processing.serial.*;
Serial myPort;
int switcher = 0;
int cellSize = 5;
int duration = 155;
// Number of columns and rows in our system
int cols, rows;
Capture video;
void setup(){
  size(640,480);
  frameRate(20);
  cols = width / cellSize;
  rows = height / cellSize;
  colorMode(RGB, 255, 255, 255, 100);
  printArray(Serial.list());
  String portname=Serial.list()[1];
  println(portname);
  myPort = new Serial(this, portname, 9600);
  myPort.clear();
  myPort.bufferUntil('\n');
  video = new Capture(this, width, height);
  video.start();
  background(0);
}
void draw(){
  tint(256,256,256);
  background(0);
  if (video.available()){
    video.read();
    video.loadPixels();
  }
  if(switcher==0){
    for (int i = 0; i < cols; i++) {
      // Begin loop for rows
      for (int j = 0; j < rows; j++) {

        // Where are we, pixel-wise?
        int x = i*cellSize;
        int y = j*cellSize;
        int loc = (video.width - x - 1) + y*video.width; // Reversing x to mirror the image

        float r = red(video.pixels[loc]);
        float g = green(video.pixels[loc]);
        float b = blue(video.pixels[loc]);
        // Make a new color with an alpha component

        color c = color(r, g, b, 75); //make smth out of the last number using potentiometer

        // Code for drawing a single rect
        // Using translate in order for rotation to work properly
        pushMatrix();
        translate(x+cellSize/2, y+cellSize/2);
        // Rotation formula based on brightness
        rotate((2 * PI * brightness(c) / 255.0));
        rectMode(CENTER);
        fill(c);
        noStroke();
        // Rects are larger than the cell for some overlap


        ellipse(0, 0, 5, 50);

        popMatrix();
      }
    }
    //image(video,0,0);
  }
  else if(switcher == 1){
        background(0,0,255);

        for (int i = 0; i < cols;i++) {
      // Begin loop for rows
      for (int j = 0; j < rows;j++) {

        // Where are we, pixel-wise?
        int x = i * cellSize;
        int y = j * cellSize;
        int loc = (video.width - x - 1) + y*video.width; // Reversing x to mirror the image

        // Each rect is colored white with a size determined by brightness
        color c = video.pixels[loc];
        float sz = (brightness(c) / 255.0) * cellSize;
        rectMode(CENTER);
        fill(255);
        noStroke();
        rect(x + cellSize, y + cellSize, sz, sz);
      }
    }
    //scale(-1,1);
    //image(video,-width,0);
  }
  else if(switcher == 2){

    scale(-1,-1);
    image(video,-width,-height);
  }
  else if(switcher == 3){
  tint(256, 0, 0);
  image(video, 0, 0, width/2, height/2);
  tint(0, 256, 0);
  image(video, width/2, 0, width/2, height/2);
  tint(0, 0, 256);
  image(video, 0, height/2, width/2, height/2);
  tint(256, 0, 256);
  image(video, width/2, height/2, width/2, height/2);
}
  else{
    println("Switcher = 0 again");
    switcher = 0;
  }
}
void mousePressed(){
  switcher++;
}
void serialEvent(Serial myPort) {
  String s=myPort.readStringUntil('\n'); //open port, read
  s=trim(s);
  myPort.write(duration + "\n");
}
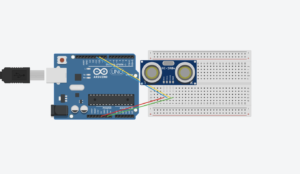
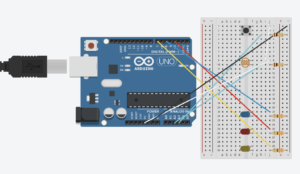
ARDUINO CODE
#include <SparkFun_TB6612.h>

#define AIN1 2
#define BIN1 7
#define AIN2 4
#define BIN2 8
#define PWMA 5
#define PWMB 6
#define STBY 9
int duration = 0;

const int offsetA = 1;
const int offsetB = 1;

Motor motor1 = Motor(AIN1, AIN2, PWMA, offsetA, STBY);

void setup() {

  Serial.begin (9600);
  Serial.println("0");

}

void loop() {


  while (Serial.available()) {

  duration = Serial.parseInt();
      if (Serial.read() == '\n') {
      motor1.drive(duration,1000);
      }
  }

}
THE DISPLAY
THE PROJECT