Nisala and Jana: Final Final Final

Well, this has been quite a journey. Obviously, working together with Nisala was quite a lot of desperate laughing, excited high fives and cries for help that both Jack and Aaron patiently listened to- so big big thank you!

The IM show itself was a lot of fun. We managed to fix most of the bugs/imperfections that we caught during the user testing – we fixed the descriptions, colors, adjusted the mapped values and got an iMac to manage the load of data. Eventually, we decided for two colors on the screen only (red for the shapes that are being adjusted and submitted, and white for the already submitted ones). This helped to increase clarity for the user.

We adjusted the mapped values for volume right at the start of the show, so it would take into account the amount of noise in the room – which was quite significant. The only issue was the light – because we changed our location last minute into the corner behind a curtain (where people could scream privately and shamelessly). Therefore, we wanted a light leading people into the corner, but we did not consider that it would interfere with the readability of the descriptions. Me and Nisala’s ambition to be sustainable and laser-cut cardboard waste for the descriptions was a good step for the environment, however, in a dark corner, with the wrong angle of light, it did not facilitate the best conditions for the desired interaction. So, if installing this next time, this would be the first thing to carefully consider. Together with the height of the stand, since we unintentionally discriminated short people.

People, however, had a lot of fun screaming into the microphone. When they left the space, they were smiling a lot – and giving them the private corner to do so was definitely a good choice as they could loosen up a little more. This was quite a success as our intention was not only to collect data on how people feel at this stressful time of the year but also to relief a little of the stress.

Though to some people, a further explanation had to be given about the meaning of what they have seen on the screen, most people understood the concept. The interaction for most people was smooth – just getting them to actually read the instructions first instead of pressing random buttons was a bit of a challenge (but this is where better light could help us if displayed next time).

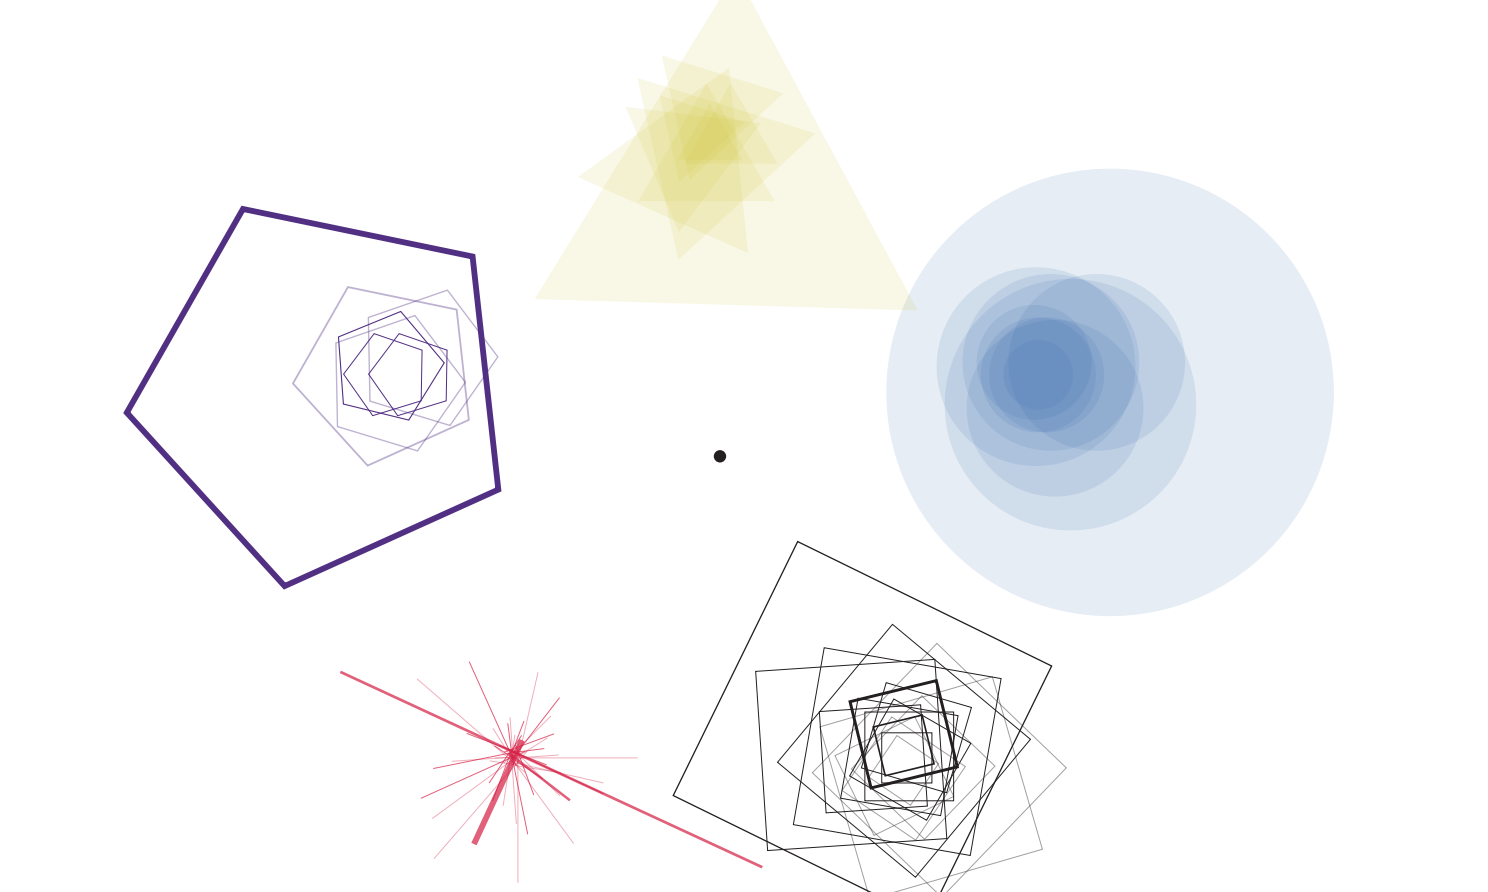
Here is the video of the final data that we collected from the show.

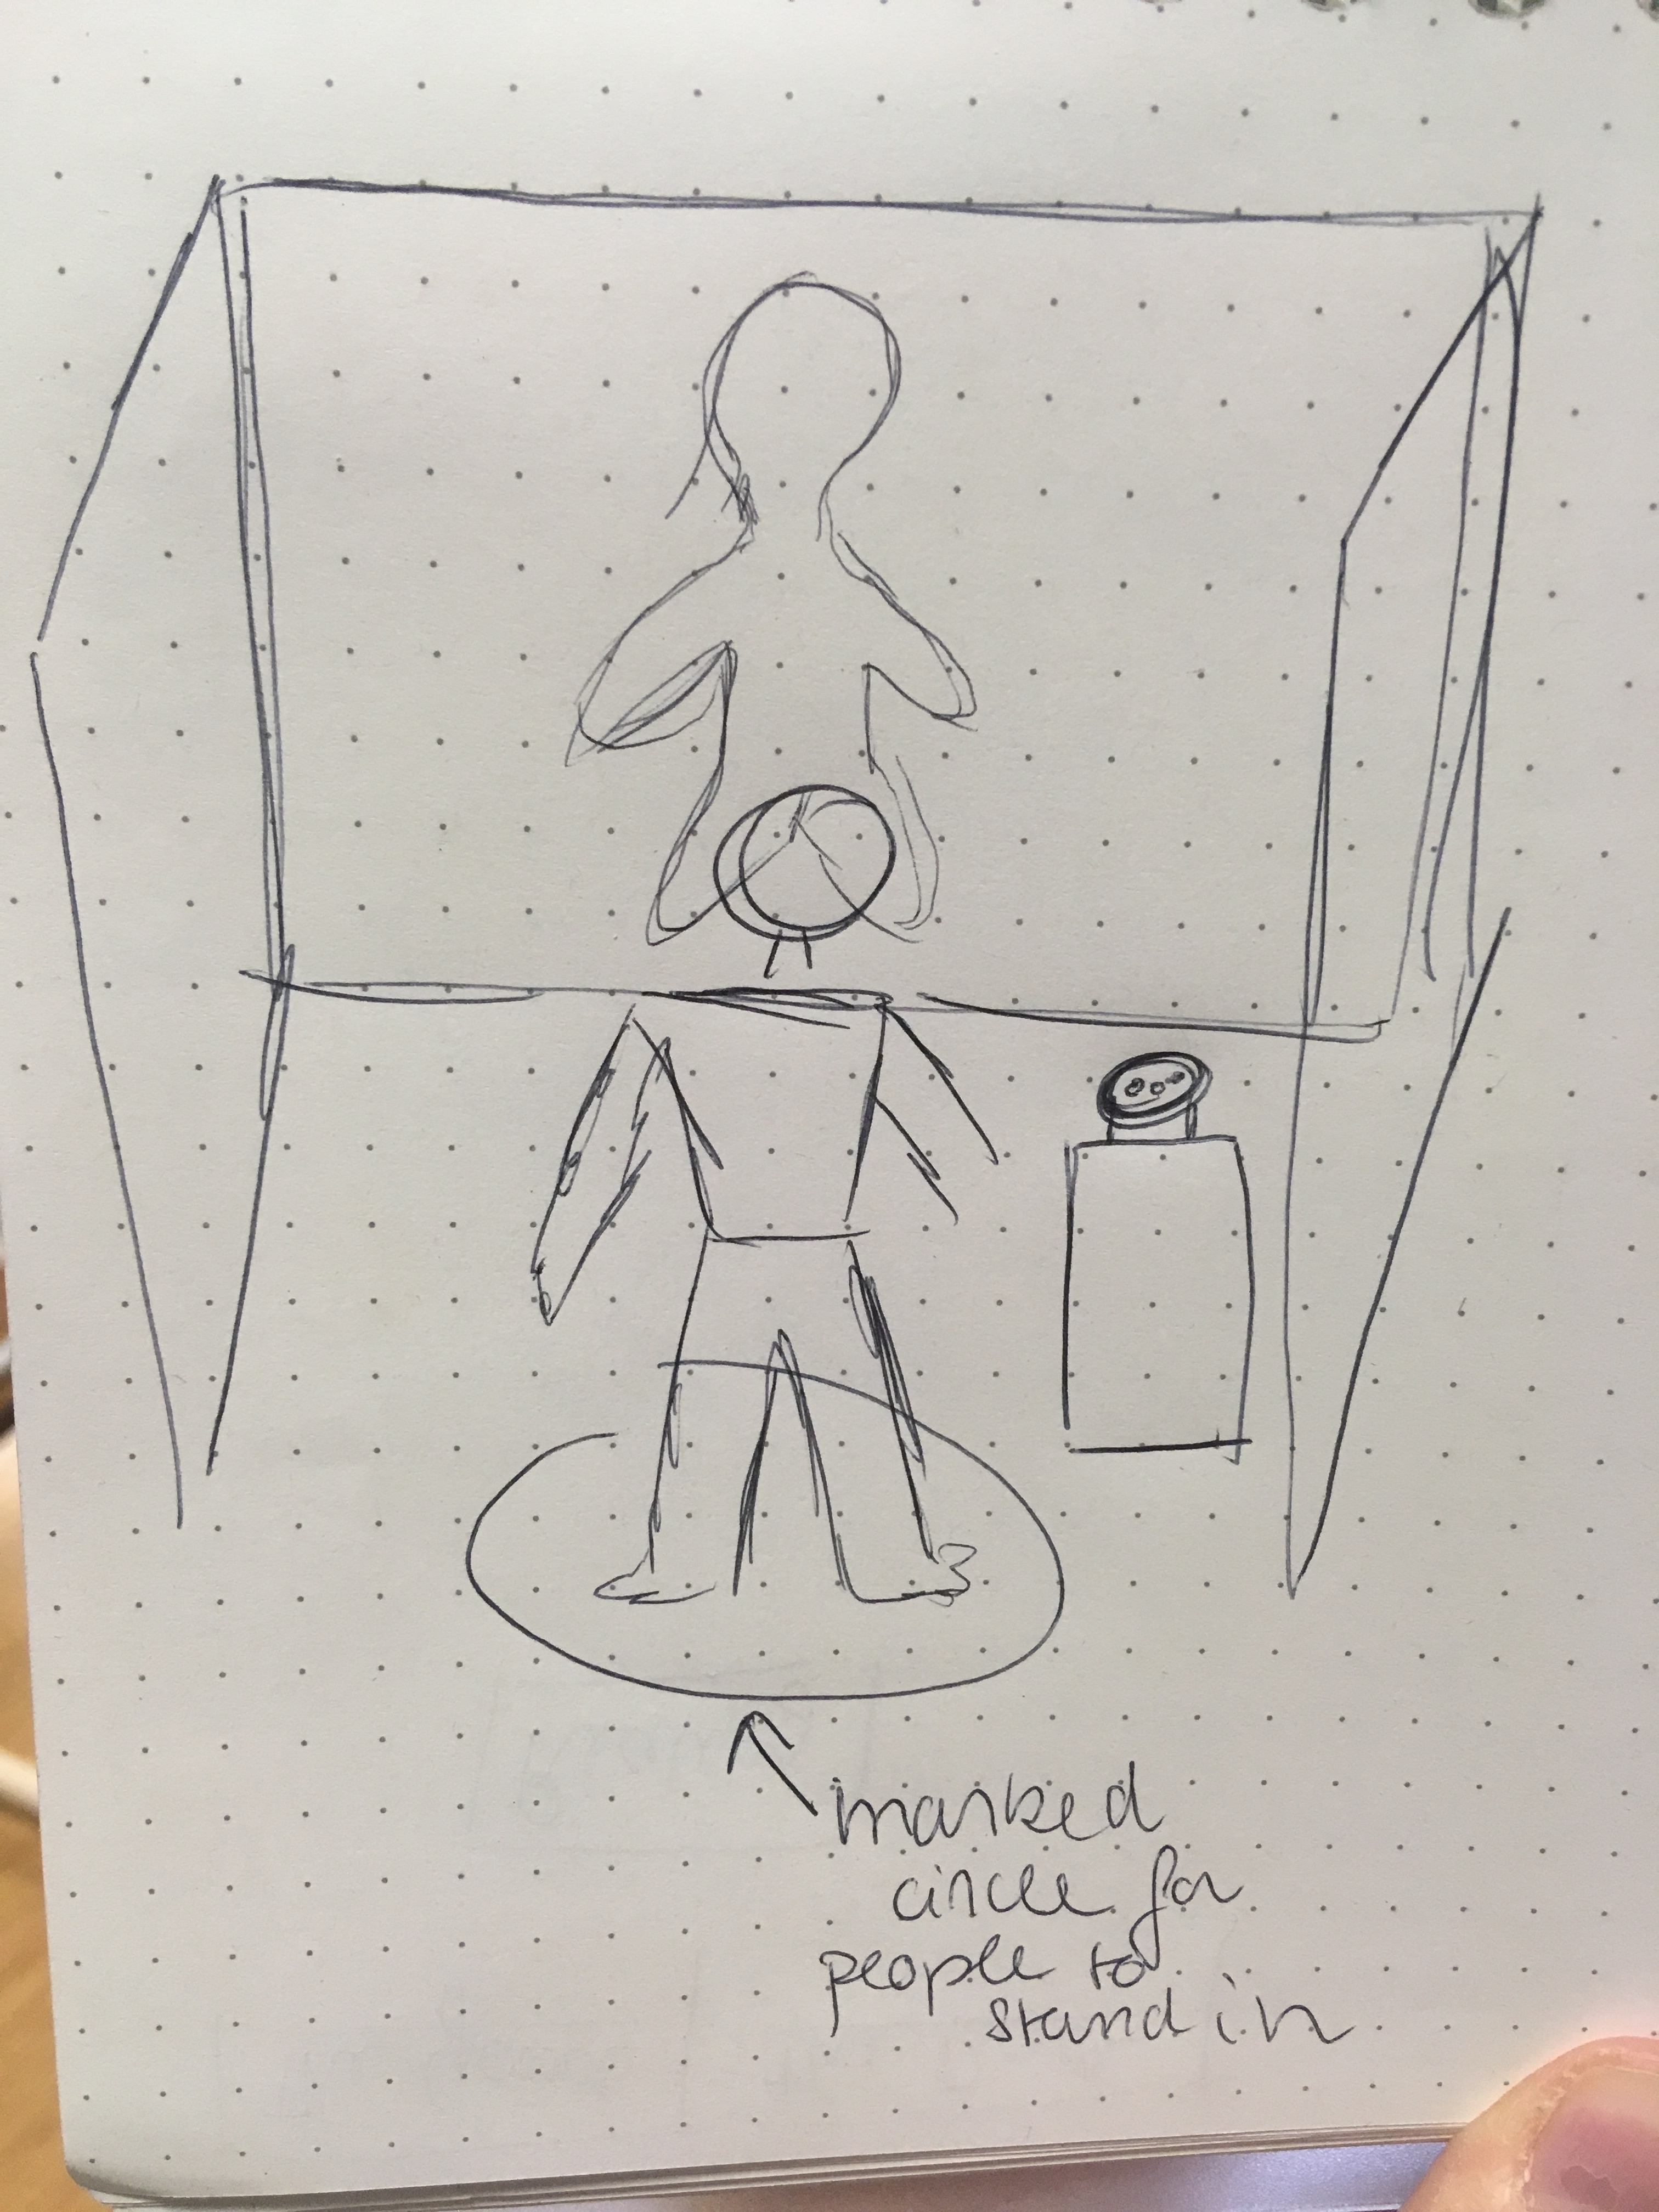
Here is our final setup:


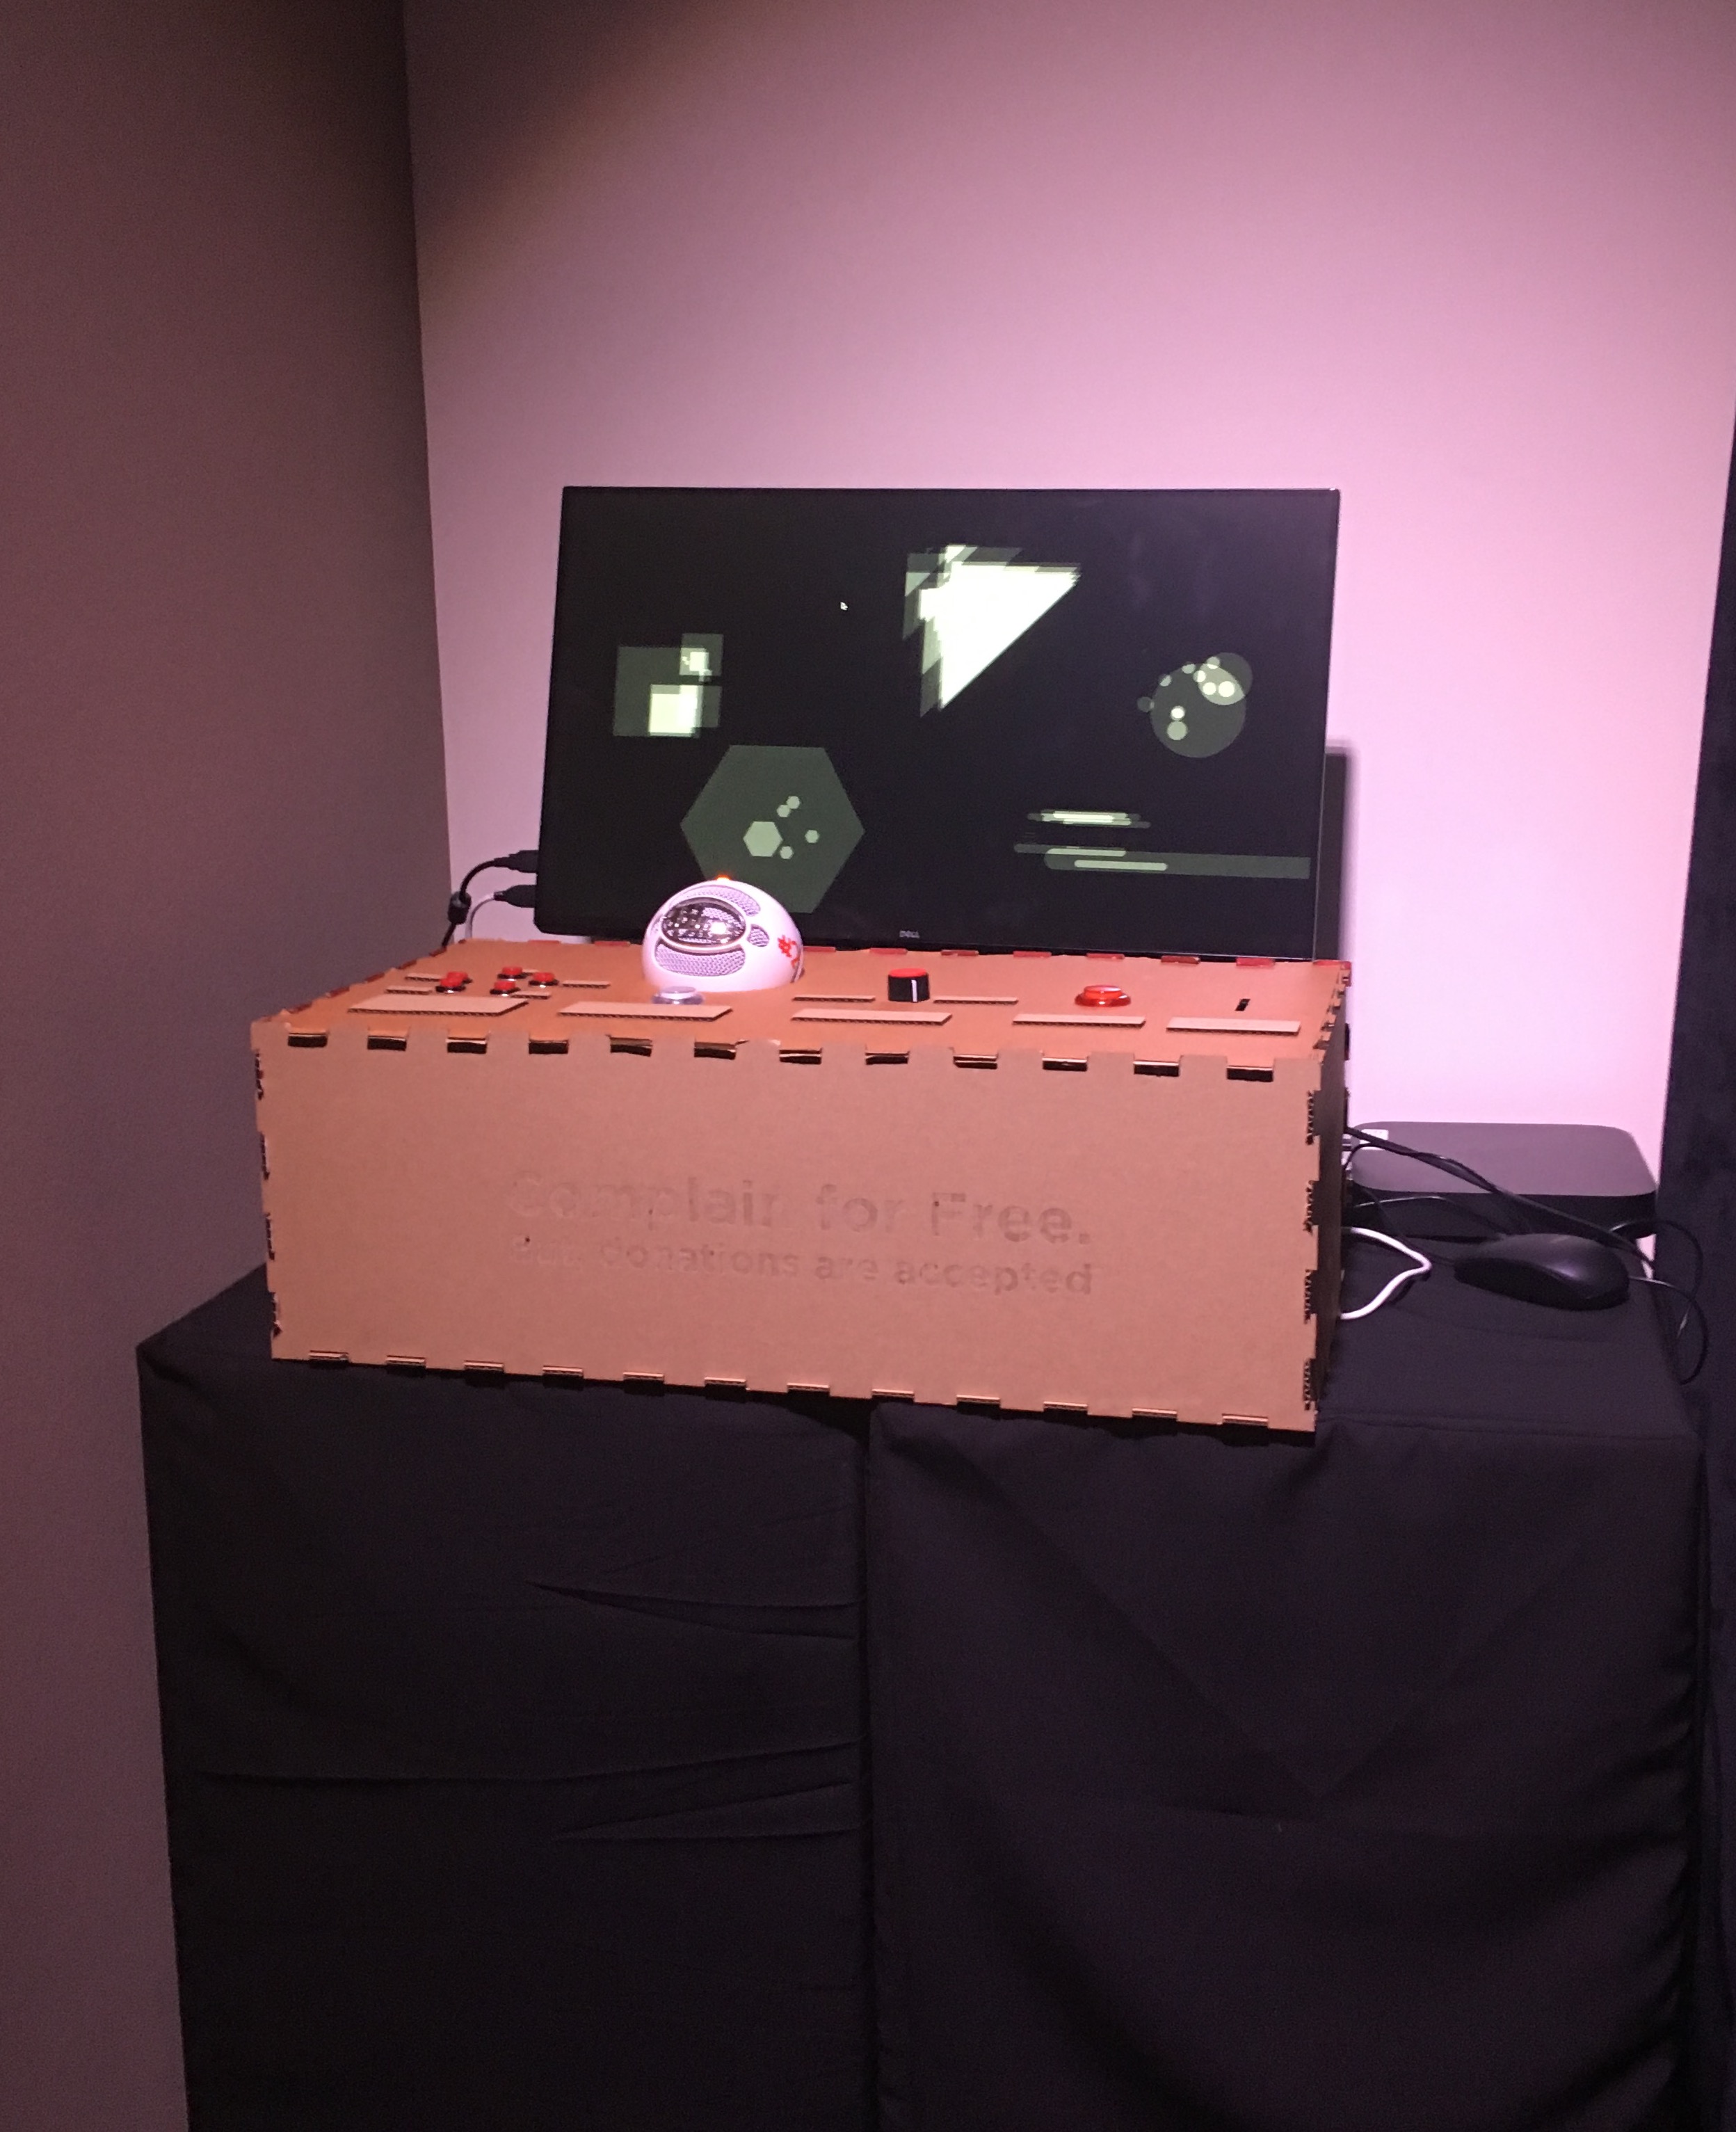
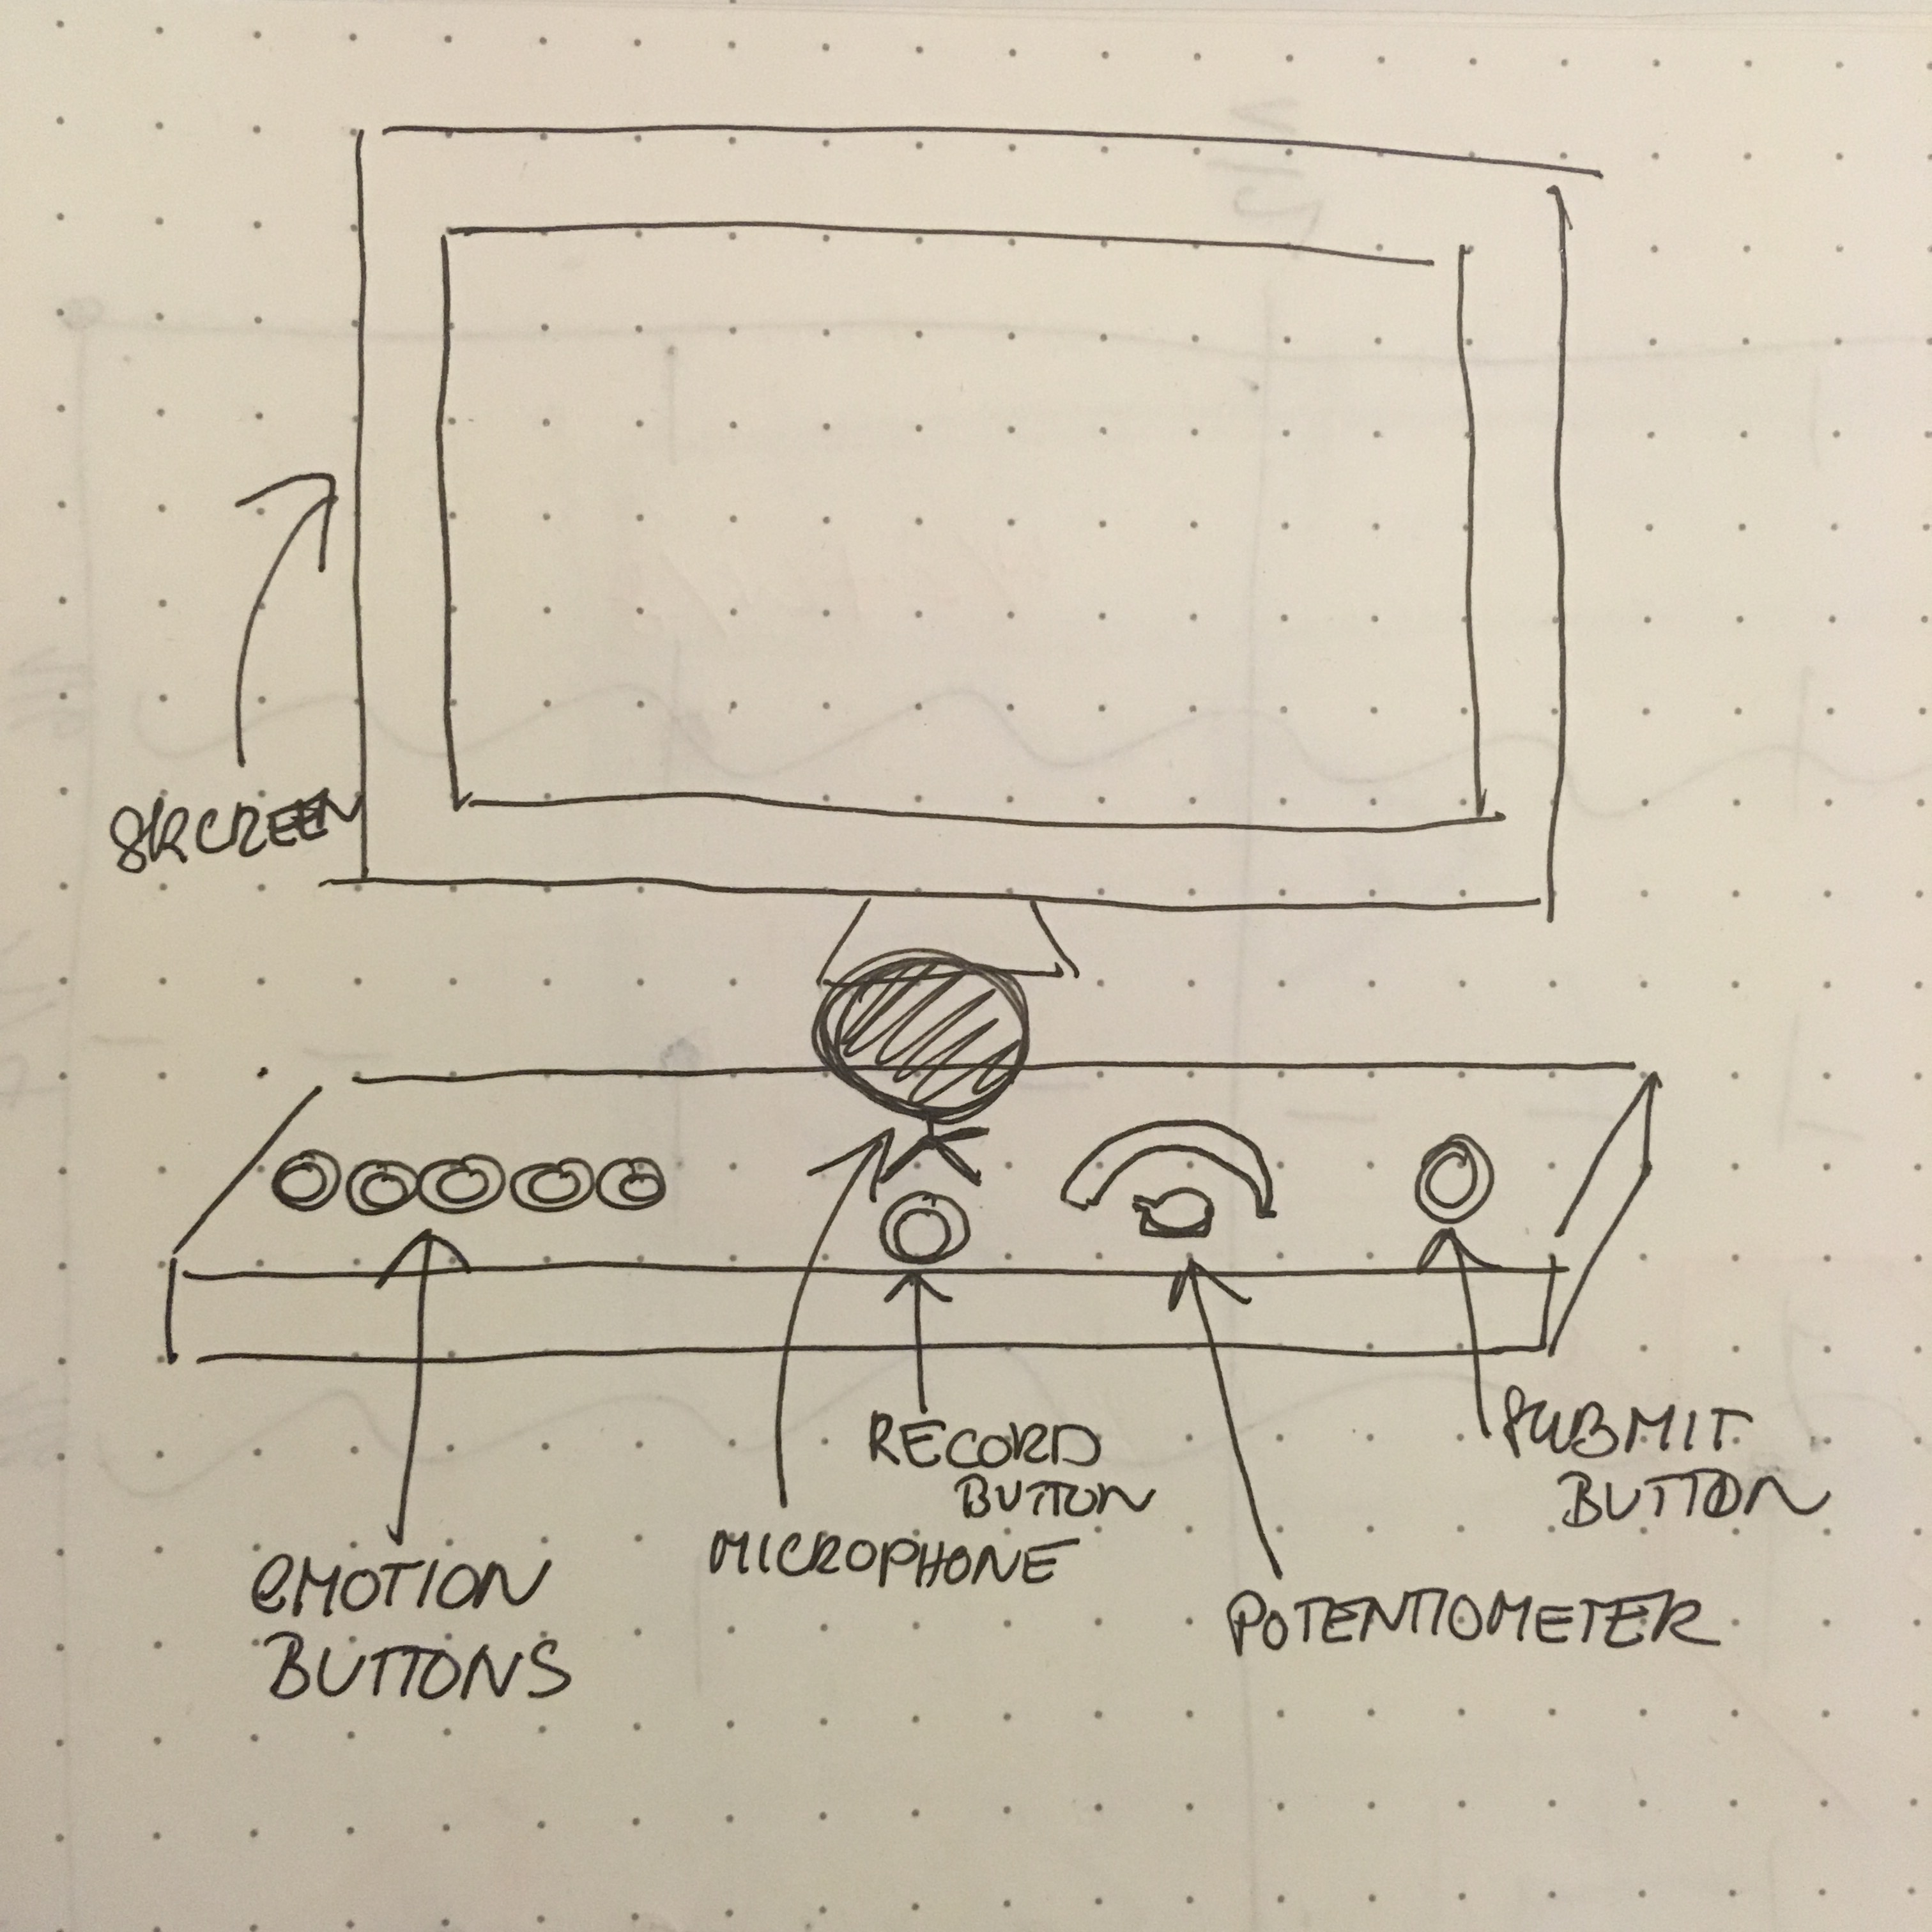
Close up of the interface:

Sadly, people did not feel THAT much better to support our efforts financially (of course this was a joke – or wasn’t it?). They reacted to this humorous touch really well.

The Arduino code:

const int ledWHITE = 12;
const int ledRED = 13;
int buttonConfirmArdi = 8;
int buttonHoldArdi = 9;

int buttonConfirmState = 0;
int buttonHoldState = 0;

void setup() {
  // put your setup code here, to run once:
  Serial.begin(9600);
  Serial.println("0,0,0,0,0,0,0,0");
  pinMode(2, INPUT);
  pinMode(3, INPUT);
  pinMode(4, INPUT);
  pinMode(5, INPUT);
  pinMode(6, INPUT);
  pinMode(8, INPUT);
  pinMode(9, INPUT);
  pinMode(12, OUTPUT);
  pinMode(13, OUTPUT);

}

void loop() {
  if (Serial.available() > 0) {
    char inByte = Serial.read();
    delay(0);
    int sadButton = digitalRead(2);
    int fearButton = digitalRead(3);
    int joyButton = digitalRead(4);
    int angerButton = digitalRead(5);
    int disgustButton = digitalRead(6);

    int potentiometer = analogRead(A0);

    int buttonConfirm = digitalRead(8);
    int buttonHold = digitalRead(9);

    delay(0);
    Serial.print(sadButton);
    Serial.print(',');
    Serial.print(fearButton);
    Serial.print(',');
    Serial.print(joyButton);
    Serial.print(',');
    Serial.print(angerButton);
    Serial.print(',');
    Serial.print(disgustButton);
    Serial.print(',');

    Serial.print(potentiometer);
    Serial.print(',');
    Serial.print(buttonHold);
    Serial.print(',');
    Serial.println(buttonConfirm);


  }

  buttonConfirmState = digitalRead(buttonConfirmArdi);
  buttonHoldState = digitalRead(buttonHoldArdi);

  if (buttonConfirmState == HIGH) {
    // turn LED on:
    digitalWrite(ledRED, HIGH);
  } else {
    // turn LED off:
    digitalWrite(ledRED, LOW);
  }


  if (buttonHoldState == HIGH) {
    // turn LED on:
    digitalWrite(ledWHITE, HIGH);
  } else {
    // turn LED off:
    digitalWrite(ledWHITE, LOW);
  }
}

Processing Code:

//calling the class.

ArrayList<DrawCircle> circles;
ArrayList<DrawSquare> squares;
ArrayList<DrawTriangle> triangles;
ArrayList<DrawLine> lines;
ArrayList<DrawHexagon> hexagons;

//establishing the communication with arduino
import processing.serial.*;
Serial myPort;

//Emotion Buttons

int sadButton=0;
int prevSadButtonState=0;

int fearButton =0;
int prevFearButtonState =0;

int joyButton =0;
int prevJoyButtonState =0;

int angerButton =0;
int prevAngerButtonState =0;

int disgustButton =0;
int prevDisgustButtonState =0;


int potentiometer;


//For Button
int buttonState=0;
int prevButtonState = 0;

//for Held Button
int buttonStateHold = 0;

boolean confirmColor= false;

//Audio stuff, from mic.

import processing.sound.*;
Sound s;


AudioIn audioInput;
Amplitude analyzer;

float volume;

boolean readyToDraw;


void setup() {
  //size(640, 480);
  fullScreen();
  noFill();
  blendMode(ADD);
  //stuff for Arduino.
  printArray(Serial.list());
  String portname=Serial.list()[11];
  println(portname);

  myPort = new Serial(this, portname, 9600);
  myPort.clear();
  myPort.bufferUntil('\n');


  //AUDIO INITIALIZATION
  // Create an Audio input and grab the 1st channel
  audioInput = new AudioIn(this, 0);
  println("here is the input " + audioInput);
  // start the Audio Input
  audioInput.start();

  // create a new Amplitude analyzer
  analyzer = new Amplitude(this);
  // Patch the input to an volume analyzer
  analyzer.input(audioInput);


  //initialize the arrayList

  circles = new ArrayList <DrawCircle>();
  squares = new ArrayList <DrawSquare>();
  hexagons = new ArrayList <DrawHexagon>();
  lines = new ArrayList <DrawLine>();
  triangles = new ArrayList <DrawTriangle>();
}


void draw() {
  //if (confirmColor == false) {
  //    if (buttonState==1) {
  //        confirmColor=true;
  //        fill(255);
  //    } else {
  //      fill(0, 255, 0);
  //    } 
  //  }

  background(0);

  //  fill(20,30); 
  //rect(0,0, width,height);
  //pushStyle();
  //fill(100,50);
  //rect(0,0, height, width);
  //popStyle();

  // Get the overall volume (between 0 and 1.0)
  volume = analyzer.analyze();

  //update and display the circles, squares, etc.
  updateDisplayForLoop();

  //Only draw the shape that corresponds with the button.
  clickEmotionButton();
}


void serialEvent(Serial myPort) {
  String s =myPort.readStringUntil('\n');
  s=trim(s);
  if (s!=null) {
    int values[]=int(split(s, ','));
    sadButton = values[0];
    fearButton = values[1];
    joyButton = values[2];
    angerButton = values[3];
    disgustButton = values[4];
    potentiometer= values[5];
    buttonStateHold = values[6];
    buttonState= values[7];
  }
  println(sadButton, fearButton, joyButton, angerButton, disgustButton, potentiometer, buttonState, buttonStateHold);
  myPort.write(0);
}


void clickEmotionButton() {

  //ONLY DRAW THE CIRCLE IF THE SAD BUTTON PRESSED.
  if (prevSadButtonState==1 && sadButton==0) {

    circles.add(new DrawCircle());

    if (prevButtonState==1 && buttonState==0) {
      fill(0, 0, 255, 40);
      circles.add(new DrawCircle());
    }
  } 


  //ONLY DRAW THE SQUARE IF THE FEARBUTTON PRESSED

  if (prevFearButtonState==1 && fearButton==0) {

    squares.add(new DrawSquare());
    if (prevButtonState==1 && buttonState==0) {
      squares.add(new DrawSquare());
    }
  }

  //ONLY DRAW THE HEXAGON IF THE JOYBUTTON PRESSED
  if (prevJoyButtonState==1 && joyButton==0) {
    hexagons.add(new DrawHexagon());

    if (prevButtonState==1 && buttonState==0) {
      hexagons.add(new DrawHexagon());
    }
  }

  //ONLY DRAW THE LINE IF THE ANGERBUTTON PRESSED
  if (prevAngerButtonState==1 && angerButton==0) {
    lines.add(new DrawLine());

    if (prevButtonState==1 && buttonState==0) {
      lines.add(new DrawLine());
    }
  }


  //ONLY DRAW THE TRIANGLE IF THE DISGUSTBUTTON PRESSED
  if (prevDisgustButtonState==1 && disgustButton==0) {
    triangles.add(new DrawTriangle());

    if (prevButtonState==1 && buttonState==0) {
      triangles.add(new DrawTriangle());
    }
  }


  prevSadButtonState= sadButton;
  prevFearButtonState= fearButton;
  prevJoyButtonState = joyButton;
  prevAngerButtonState = angerButton;
  prevDisgustButtonState = disgustButton;
  prevButtonState = buttonState;
}


void updateDisplayForLoop() {


  for (DrawCircle circle : circles) {
    circle.update(potentiometer, buttonState, buttonStateHold);
    fill(255, 40);
    circle.display();
  }


  for (DrawLine line : lines) {
    line.update(potentiometer, buttonState, buttonStateHold);
    line.display();
  }

  for (DrawSquare square : squares) {
    square.update(potentiometer, buttonState, buttonStateHold);
    square.display();
  }

  for (DrawHexagon hexagon : hexagons) {
    hexagon.update(potentiometer, buttonState, buttonStateHold);
    hexagon.display();
  }


  for (DrawTriangle triangle : triangles) {
    triangle.update(potentiometer, buttonState, buttonStateHold);
    triangle.display();
  }
}

class DrawCircle {

  PVector center;
  float angle;
  float radius;// radius if rotation

  float circleSize;

  float x;
  float y;
  float lineWeight;

  float energyLevel;

  boolean confirm;


  float speedModifier;


  //the center oof the imaginary circle
  int centerX; 
  int centerY;

  int circleColor;
  int circleStrokeColor;


  DrawCircle() {


    centerX= width/2 + width/3; 
    centerY = height/2-height/16;

    center = new PVector(centerX, centerY);
    radius = 300;
    circleSize = 30;
    lineWeight=1;
    speedModifier=120;
    confirm=false;
    circleColor = color(216, 29, 68); 
    circleStrokeColor=color(216, 29, 68);
    ;
  }

  void update(int _potentiometer, int buttonState, int buttonStateHold) {


    //if (confirmVolume==true) {

    //  if(button2State==)
    //}


    if (confirm==false) {
      if (buttonState==1) {
        confirm=true;
        circleColor= color(255, 255, 255, 70);
        circleStrokeColor=color(255);
      }

      radius = map(_potentiometer, 0, 1023, 100, 50);//radiusModifier

      speedModifier = map(_potentiometer, 0, 1023, 150, 5);

      if (buttonStateHold==1) {   //If the button is held, then change these things.
        lineWeight = map(volume, 0, 1, 1, 20);
        circleSize = map(volume, 0, 1, 10, 1000);
      }
    }

    x = center.x + cos(angle)*radius;
    y = center.y + sin(angle)*radius;

    angle += PI/speedModifier; // speedModifier
  }


  void display() {
    fill(circleColor);
    stroke(circleStrokeColor);
    noStroke();
    //strokeWeight(3);
    ellipse(x, y, circleSize, circleSize);
  }
}

class DrawHexagon {

  PVector center;
  float angle;
  float radius;// radius if rotation

  float scaleSize;

  float x;
  float y;
  float lineWeight;

  float energyLevel;

  boolean confirm;


  float speedModifier;


  //the center oof the imaginary circle
  float centerX; 
  float centerY;
  
  int hexagonColor;
  int hexagonStrokeColor;

  DrawHexagon() {


    centerX= width/2 - width/6; 
    centerY = height/2 +height/3.5;

    center = new PVector(centerX, centerY);
    radius = 300;
    scaleSize = 10;
    lineWeight=1;
    speedModifier=120;
    confirm=false;
    hexagonColor = color(216, 29, 68);
    hexagonStrokeColor = color(216, 29, 68);
    
  }

  void update(int _potentiometer, int buttonState, int buttonStateHold) {


    if (confirm==false) {
      if (buttonState==1) {
        confirm=true;
        hexagonColor = color(255, 255, 255, 70);
        hexagonStrokeColor = color(255);
      }

      radius = map(_potentiometer, 0, 1023, 100, 50);//radiusModifier

      speedModifier = map(_potentiometer, 0, 1023, 150, 5);

      if (buttonStateHold==1) {   //If the button is held, then change these things.
        lineWeight = map(volume, 0, 1, 1, 20);
        scaleSize = map(volume, 0, 1, 10, 500);
      }
    }

    x = center.x + cos(angle)*radius;
    y = center.y + sin(angle)*radius;

    angle += PI/speedModifier; // speedModifier
  }


  void display() {
    fill(hexagonColor);
    stroke(hexagonStrokeColor);
    noStroke();
    //strokeWeight(3);


    pushMatrix();
    translate(x, y);
    scale(scaleSize/50);
    beginShape();
    vertex(0 - 44, 0 - sqrt(3) * 44);
    vertex(0 + 44, 0 - sqrt(3) * 44);
    vertex(0 + 2 * 44, 0);
    vertex(0 + 44, 0 + sqrt(3) * 44);
    vertex(0 - 44, 0 + sqrt(3) * 44);
    vertex(0 - 2 * 44, 0);
    endShape(CLOSE);
    popMatrix();
  }
}

class DrawLine {

  PVector center, point1, point2;
  float angle;
  float radius;// radius if rotation

  float circleSize;

  float x1, x2;
  float y1, y2;
  float lineWeight;

  float energyLevel;

  boolean confirm;


  float speedModifier;


  //the center oof the imaginary circle
  float centerX; 
  float centerY;
  
  int lineColor;


  DrawLine() {
    point1 = new PVector(x1, y1);
    point2 = new PVector(x2, y2);

    centerX= width/2 + width/6; 
    centerY = height/2 + height/3.5;

    center = new PVector(centerX, centerY);
    radius = 300;
    circleSize = 10;
    lineWeight=10;
    speedModifier=120;
    confirm=false;
    
    lineColor = color(216, 29, 68);
  }

  void update(int _potentiometer, int buttonState, int buttonStateHold) {

    if (confirm==false) {
      if (buttonState==1) {
        confirm=true;
        lineColor = color(255, 255, 255, 90);
      }

      radius = map(_potentiometer, 0, 1023, 100, 50);//radiusModifier

      speedModifier = map(_potentiometer, 0, 1023, 150, 5);

      if (buttonStateHold==1) {   //If the button is held, then change these things.
        lineWeight = map(volume, 0, 1, 3, 5);
        circleSize = map(volume, 0, 1, 10, 500);
      }
    }


    x1 = center.x + cos(angle)*radius;
    y1 = center.y + sin(angle)*radius;


    angle += PI/speedModifier; // speedModifier
  }


  void display() {
    //fill(lineColor);
    stroke(lineColor);
    //noStroke();
    strokeWeight(5);
    //strokeWeight(5);

    pushMatrix();
    translate(x1, y1);
    scale(circleSize/20);
    line(0, 0, 60, 0);
    popMatrix();
  }
}

class DrawSquare {

  PVector center;
  float angle;
  float radius;// radius if rotation

  float squareSize;

  float x;
  float y;
  float lineWeight;

  float energyLevel;

  boolean confirm;


  float speedModifier;
  
  //the center oof the imaginary circle
  int centerX; 
  int centerY;
  
  
  int squareColor;
  int squareStrokeColor;

  DrawSquare() {

    centerX=width/2- width/3; // the place where the object is drawn changes depending on what we input.
    centerY=height/2-height/16;
    
    center = new PVector(centerX, centerY);
    squareSize = 10;
    lineWeight=1;
    speedModifier=120;
    confirm=false;
    squareColor = color(216, 29, 68);
    squareStrokeColor = color(216, 29, 68);
  }

  void update(int _potentiometer, int buttonState, int buttonStateHold) {


    if (confirm==false) {
      if (buttonState==1) {
        confirm=true;
        squareColor = color(255, 255, 255, 70);
        squareStrokeColor = color(255);
      }

      radius = map(_potentiometer, 0, 1023, 100, 50);//radiusModifier
      speedModifier = map(_potentiometer, 0, 1023, 150, 5);


      if (buttonStateHold==1) {   //If the button is held, then change these things.
      lineWeight = map(volume, 0, 1, 1, 20);

      squareSize = map(volume, 0, 1, 10, 1000);
    }
    }


    x = center.x + cos(angle)*radius;
    y = center.y + sin(angle)*radius;

    angle += PI/speedModifier; // speedModifier
  }


  void display() {
    rectMode(CENTER);
    fill(squareColor);
    stroke(squareStrokeColor);
    noStroke();
    //strokeWeight(3);
    rect(x, y, squareSize, squareSize);
  }
}

class DrawTriangle{

  PVector center;
  float angle;
  float radius;// radius if rotation

  float circleSize;

  float x1, x2, x3;
  float y1, y2, y3;
  float lineWeight;

  float energyLevel;

  boolean confirm;


  float speedModifier;


  //the center oof the imaginary circle
  int centerX; 
  int centerY;
  
  int triangleColor;
  int triangleStrokeColor;

  DrawTriangle() {


    centerX= width/2; 
    centerY = height/2-height/3;

    center = new PVector(centerX, centerY);
    radius = 300;
    circleSize = 10;
    lineWeight=1;
    speedModifier=120;
    confirm=false;
    triangleColor = color(216, 29, 68);
    triangleStrokeColor = color(216, 29, 68);
  }

  void update(int _potentiometer, int buttonState, int buttonStateHold) {


    if (confirm==false) {
      if (buttonState==1) {
        confirm=true;
        triangleColor = color(255, 70);
        triangleStrokeColor = color(255);
      }

      radius = map(_potentiometer, 0, 1023, 100, 50);//radiusModifier

      speedModifier = map(_potentiometer, 0, 1023, 150, 5);

      if (buttonStateHold==1) {   //If the button is held, then change these things.
        lineWeight = map(volume, 0, 1, 1, 20);
        circleSize = map(volume, 0, 1, 10, 500);
      }
    }


    x1 = center.x + cos(angle)*radius;
    y1 = center.y + sin(angle)*radius;


    angle += PI/speedModifier; // speedModifier
  }


  void display() {
    fill(triangleColor);
    noStroke();
   // stroke(triangleStrokeColor);
    
    //strokeWeight(1);
    
    pushMatrix();
    translate(x1, y1);
    scale(circleSize/50);
    triangle(0, 0, 0, 90, 90, 0);
    popMatrix();
  }
}


Nisala and Jana: User Testing

Our user testing pointed out a couple of imperfections that, however, can be relatively easily fixed:

  • the users do not know they are supposed to hold the button to scream – instructions said only “Scream as loud as you are stressed”.
  • also, instructions overall need to be more visible and readable, some more clearly formulated (which we wanted to print out and paste only after user testing anyway, exactly for this reason)
  • the visuals on the screen are a little difficult to see and to distinguish, what’s happening. Solution for this: adjust the colors and the mapped values that affect the speed and radius of the path. We need to make more clear that people are submitting some data, all of which are visualized.
  • the program is getting a little laggy with more inputs – using an iMac instead of a laptop with a larger monitor can be a potential solution

Final Project Prototype

After a little freak-out moment, when the whole project stopped working after rewiring some buttons (which was solved by moving them from Pin 1 and starting at Pin 2) , we managed to bring it back to life (relatively) fast and finished up with the prototype. We finished all of the classes so they all draw different shapes (based on the emotion), scale them according to the volume input, and change their path and speed of movement based on the potentiometer value (that reflects an energy level of the respondent).

What also gave us a little (or a LOT) of troubles was making a shape that is not rect() or ellipse() – as they have one center point that is easily manipulated with-  and move and scale the shape while still maintaining the same proportions. Push and PopMatrix() was the solution for this as well as the scale() function within the Matrix.

Now when the code is fully working in its intended essence, we still need to work on making it more visually attractive so it better represents the data. Also, the sizes of the objects are little uneven, so we need to adjust the mapped values (and distinguish the ones that are being adjusted at the moment so that the respondent can see it clearly). User testing, however, is what will get us the closest to the most suitable range of values.

We also finalized the design for the interface and hopefully will get to building it tomorrow so that we can get to the user testing stage as fast as possible. 

Final Project Progress

My and Nisala’s final project is slowly coming to life. We started by finalizing the inputs we want to collect: 5 emotions (through 5 buttons), the stress level (using a microphone) and an energy level (using a potentiometer). Then we roughly sketched the way we want the data to be visualized- divided into 5 segments of 5 different shapes (based on the chosen emotion), having the microphone and potentiometer input adjust the size, speed, and radius of each individual shape.

When we started programming our first class, we struggled a bit with figuring out the logic of how to make individual shapes to be open to adjustments only until a new shape is drawn. We solved this by including a “submit button” at the end, which also makes it easier for the user to play around the different inputs, see how it reflects on the screen and submit the values only when all the inputs are finalized.

A similar problem occurred when we were recording the volume of the microphone input. The interaction was not clear- the volume kept changing even after the scream (so unless you were continuously screaming and simultaneously pressing the submit button, the size of the shape would not be changed). Therefore we decided to include another button, which would mimic the way we record voice messages on our phones. The user will simply hold the button down in order to record the scream – but even after that, he is able to record again and adjust other inputs before submitting the response.

The next uncertainty/challenge is definitely the physical part of the project that shapes the user experience. So far we heavily focused on the conceptual part and coding, therefore we really need to finalize how we are going to organize all of the components to achieve a smooth and straightforward interaction. We also need to figure out a couple of other details regarding the aesthetics of the shapes as well as how to distinguish the shape that is being adjusted at the moment from all the other ones that are already drawn.

Computer Vision for Artists and Designers

This thorough article gave me a very good understanding of how a computer is taught to see. Yet, primarily, shifted my attention to how we take our vision and the way we see and react to the world for granted since it’s a result of countless subconscious processes happing in our brain.

I found it very thought-provoking: humans can distinguish dark and light or objects and humans in a blink of an eye, without having to forcefully learn it. The processes are automatic and we cannot influence them, alter them nor stop them. Similarly to the way our brains are wired in to recognize faces – this mechanism is so efficient that we start seeing faces even where there are none. (As I recently learned, this phenomenon is called pareidolia, see a screenshot from a google search below for quick reference).

That’s why it was very interesting to read about how to teach computers all of these things through codes. Not only people programmed computers to “see” but they also alter what, how and when they see it based on the frame differences and pixel comparisons. They set very rigid boundaries of what the computer can and cannot see, which we can’t achieve with a human brain. It’s not even an imitation of how our brains work – it’s a completely different mechanism.

It made me realize that the way we make computers see (as described in the article) can actually serve as a crucial difference between computer “minds” and human minds (just think of the “I’m not the robot” kind of tests that show you a picture that a computer cannot transfer into text- and that I failed a way too many times that I’m slowly starting to doubt my own humanness).


In Class Exercise

I tried experimenting with the third dimension, and this is what (with Jack’s little help) came to life.

PImage possum;
float increment;
float z;


void setup() {
  size(700, 393, P3D);
  possum = loadImage("possum.jpg");
  increment = 7;
  noStroke();
}

void draw() {
  background(0); 
  possum.loadPixels();

  for (int y=0; y<possum.height; y+=increment) {
    for (int x=0; x<possum.width; x+= increment) {
      int index = x + y * possum.width;
      color pix = possum.pixels[index];
      float diam = map(brightness(pix), 0, 255, 1, 3)*(map(mouseX, 0, width, 10, 30));
      pushMatrix();
      translate(x, y, diam);
      fill(pix);
      box(diam/2);
      popMatrix();
    }
  }

  possum.updatePixels();
}


Final Project: Brainstorming

My initial impulse was to focus on a processing heavy project as me and physical computing did not turn out to be very good friends – but primarily because I would like to work on a bigger, more challenging project in Processing which we did not get to during the second half of the semester.

I would like to create an art-piece using computer vision. This would form a silhouette of the person standing in front of the camera that would mimic the person’s movement – and making them pretty much one person.

What would be happening on the screen, however, would be the most important. I would like the silhouette to be filled with a lot of tiny little objects – flowers, hearts, ice-cream, a lot of happy lively colorful objects. But in between those I would insert some very ugly objects (snakes, scary clowns, spiders etc.) which would not be visible through the beauty. Next to the person, there would be a stand with three buttons that would filter what the silhouette is made of – just pretty things, just ugly things, or both (probably marked as “The Pretty, The Ugly and The Reality”).

In order to make the experience unique for each person, I would like to have it separated by walls/curtains so only one person at a time can enter and interact. Also, I would like them to first interact with the piece without pressing the filters. I was thinking of doing this through putting instructions on the floor- which would indicate that stepping into a marked circle and interacting is the first step, and pressing the buttons the second. 

What does computing mean to me?

At this point, computing, or coding in particular, to me means a new way of thinking. I’m pretty sure that many people can relate to the story of coming from a rather outdated educational system to a new one, which actually cares about what you think and how you think. Though for me this transition from memorizing as a way of learning to critical thinking was introduced after entering the IB, after coming to NYUAD, it only deepened.

In particular, taking Intro to IM (and coding for the first time) challenged the way I look and solve problems a lot. Trying to come up with efficient ways (instead of time-consumingly ‘hardcoding’ the whole thing) that can be then very easily changed and applied to something else too, as well as bottom-down approach and breaking things down to smallest possible components gave me a lot of trouble at first, but at the same time gave me a good foundation of new valuable cross-disciplinary  skills.

Especially in relation to my love for (graphic) design, questioning the way I build things that people later interact with reshaped the way I think when designing. I started trying to predict what the reaction of the person will be and taking this prediction to my advantage when design decisions are to be made. This is where most of the readings came in handy – as the theoretical basis of design is often underdeveloped and underestimated, I never really put that much effort into exploring design through written pieces that raise critical questions and put things we take for granted into perspective.

Overall, calling the experience with computing becoming a better person would a bit of a stretch, but calling it becoming a person who is more critical and practical in regards to problem-solving and designing captures it a little better.

Even more dots

For this week’s assignment, we were supposed to use one of our Processing creations and connect it with Arduino. I decided to go with my Computer Art recreation, as I saw a lot of possibilities to play with the work a little bit.

What I ended up doing is simply mapping the potentiometer values to the number of dots in each segment as well as the size of the dots. In this way, if put on the maximum potentiometer value, the dots gradually consume the whole screen.

There were almost no issues with this, as I was working with an already existing code that worked properly. All I had to do is to start the communication with Arduino and add mapping of the values. The only thing that gave me a little trouble was finding the right values so that the increase in the size and number of dots is smooth and gradual. It just took a couple of trials and errors to achieve the desired effect and voilà.

Here is the Processing code:

//setting up the number of dots used in different segments
int numberCirclesA = 700;
int numberCirclesB = 1000;
int numberCirclesC = 3000;
int numberCirclesD = 5000;

//setting up communication with arduino
import processing.serial.*;
Serial myPort;


//setting up variables for x, y locations, and width of the dots
float x;
float y;
float w = 3;


void setup() {
  size (800, 390);
  //noLoop(); // to be activated only to see the exact replica of the original image


//setting up communication with arduino
  printArray(Serial.list());
  String portname=Serial.list()[51];
  println(portname);
  myPort = new Serial(this, portname, 9600);
  myPort.clear();
  myPort.bufferUntil('\n');
}


void draw () {
  background (255);
  noStroke();
  fill(0);


  // different segments in which the dots are being drawn
  
  for (int i = 0; i < numberCirclesA; i++) {
    pushMatrix();
    x = random(0, width);
    y =random(0, height);
    ellipse (x, y, w, w);
    popMatrix();
  }
  for (int i = 0; i < numberCirclesB; i++) {
    pushMatrix();
    y = (random(110, 150));
    x = (random(0, width));
    ellipse(x, y, w, w);
    popMatrix();
  }

  for (int i = 0; i < numberCirclesA; i++) {
    pushMatrix();
    x = random(0, width);
    y = (random(0, height -30));
    ellipse (x, y, w, w);
    popMatrix();
  }

  for (int i = 0; i < numberCirclesB; i++) {
    pushMatrix();
    y = (random(40, height - 70));
    x = random(0, width);
    ellipse(x, y, w, w);
    popMatrix();
  }

  for (int i = 0; i < numberCirclesC; i++) {
    pushMatrix();
    y = (random(20, height - 150));
    x = random(0, width);
    ellipse(x, y, w, w);
    popMatrix();
  }

  for (int i = 0; i < numberCirclesD; i++) {
    pushMatrix();
    y = (random(60, height - 200));
    x = random(0, width);
    ellipse(x, y, w, w);
    popMatrix();
  }
  for (int i = 0; i < numberCirclesD; i++) {
    pushMatrix();
    y = (random(40, height - 175));
    x = random(0, width);
    ellipse(x, y, w, w);
    popMatrix();
  }

  //tracking the mouser cursor
  print(mouseX);
  print (" ");
  println(mouseY);
}


//mapping the values of a potentiometer to number and width of the dots
void serialEvent(Serial myPort) {
  String s=myPort.readStringUntil('\n');
  s=trim(s);
  if (s!=null) {
    w=(int)map(int(s), 0, 1023, 3, 15 );
    numberCirclesD=(int)map(int(s), 0, 1023, 5000, 20000);
    numberCirclesA=(int)map(int(s), 0, 1023, 700, 20000);
    numberCirclesB= (int)map(int(s), 0, 1023, 1000, 20000);
    numberCirclesC= (int)map(int(s), 0, 1023, 3000, 20000);
  }
  println(numberCirclesD);
  myPort.write('0');
}

And here is Arduino code we used in class:

void setup() {
  // put your setup code here, to run once:
  Serial.begin(9600);
  Serial.println('0');
  pinMode(2, OUTPUT);
}

void loop() {
  if(Serial.available()>0){
    //inByte reads the values from Processing
    char inByte=Serial.read();
    int sensor = analogRead(A0);
    delay(5);
    Serial.println(sensor);
    digitalWrite(2, inByte);


Generative Text (questionable art)

For this week’s assignment, I created a little meaningless piece BUT with our favorite picture of Aaron. If the mouse is released, all of little Aarons wonder around, but when the mouse is pressed, all of them  (after a little hustle) form the word APPLES.

At first, I wanted to make the objects have a steering behavior (Shiffman has a great video with this). In theory, I understood the concepts and code, but when it came to implementing it on all of the objects that form the letters, not just one, I could not make it work. I was a little stubborn to admit that I bit off a little bit more than I could chew and only after a looong period of trying I had to go with something more familiar. Therefore the code is widely based on Aaron’s code we saw in class, with a little bit more playfulness and variations in the behavior. Spending some time, however, on understanding the steering was a great teaching moment, and yesterday’s full-on frustration turned to today’s motivation to actually make it work for another project.


And this is a little bonus not connected to the assignment, just a simpler version of what I was trying to do according to Shiffman’s code, but kind of failed to apply on a bigger scale.

The code and class for Formation of Aarons:

import geomerative.*;
RFont font;
RPoint[] pnts;
Photo[] formation;
PImage aaron, greenB;

void setup() {
  size(640, 360);

  //load the bckg image
  greenB = loadImage("green.jpg");


  //initialize and load the data (font)
  RG.init(this);
  font = new RFont("CaviarDreams.ttf", 150, RFont.CENTER);

  //get the points APPPLES out of the data
  pnts = getPoints("APPLES");


  int amountPerPoint = 1;

  //use the class
  formation = new Photo[pnts.length*amountPerPoint];


  int index = 0;
  for (int i=0; i<pnts.length*amountPerPoint; i+=amountPerPoint) {
    for (int j=0; j<amountPerPoint; j++) {
      int k = i+j;
      formation[i] = new Photo(width/2+pnts[index].x+random(-3, 3), height/1.5+pnts[index].y+random(-3, 3));
    }
    index++;
  }
}


void mousePressed() {
  for (int i =0; i<formation.length; i++) {
    formation[i].seek=true;
  }
}
void mouseReleased() {

  for (int i =0; i<formation.length; i++) {
    formation[i].xSpeed = random(-5, 5);
    formation[i].ySpeed = random(-5, 5);
    formation[i].seek=false;
  }
}
void draw() {
  background(0);
  image(greenB, 0, 0);
  for (int i=0; i<formation.length; i= i+2) {
    formation[i].seekHome();
    formation[i].update();
    formation[i].display();
    formation[i].checkEdges();
  }
}

RPoint[] getPoints(String str) {
  RCommand.setSegmentLength (10);
  RCommand.setSegmentator(RCommand.UNIFORMLENGTH);
  RGroup grp;
  grp = font.toGroup(str);
  grp = grp.toPolygonGroup();
  return grp.getPoints();
}


class Photo {
  float x, y, homeX, homeY;
  float xSpeed, ySpeed;
  boolean seek;
  char letter;
  PImage aaron;

  Photo(float _x, float _y ) {
    homeX = x = _x;
    homeY = y = _y;
    xSpeed = ySpeed = 0;
    // diam = _diam;
    seek = true;
  }

  void update() {
    x += xSpeed;
    y += ySpeed;
    xSpeed *= .95;
    ySpeed *= .95;

    aaron = loadImage("aaron.png");
  }

  void display() {
    aaron.resize(25, 50);
    image(aaron, x, y);
  }

  void seekHome() {
    if (seek) {
      float dirX = homeX-x;
      float dirY = homeY-y;
      dirX*=.05;
      dirY*=.05;
      xSpeed+=dirX;
      ySpeed+=dirY;
    }
  }

  void checkEdges() {
    if (y>height) {
      y=0;
    }
    if (y<0) {
      y=height;
    }
    if (x>width) {
      x=0;
    }
    if (x<0) {
      x=width;
    }
  }
}

Flying Aaron Code:

Vehicle vehicleA;
PImage blackhole;


void setup() {
size(640, 360);

vehicleA = new Vehicle(width/2, height/2);
blackhole = loadImage("black hole.jpg");

}

void draw(){
 background(0);
 image(blackhole, 0, 0);
vehicleA.update();
vehicleA.seek(new PVector(mouseX, mouseY));
vehicleA.display();

}
class Vehicle {
  float maxSpeed;
  float maxForce;
  float r;
  PImage a;
  PVector location, target, desired, velocity, acceleration;
  boolean mouseClose;


  Vehicle (float x, float y) {
    maxSpeed = 4;
    maxForce = 0.1;
    mouseClose = false;
    acceleration = new PVector(0, 0);
    velocity = new PVector(0, -2);
    location = new PVector(x, y);
  }


  void update () {

    //updated velocity
    velocity.add(acceleration);

    //to limit the speed
    velocity.limit(maxSpeed);
    location.add(velocity);

    //(come back to zero)
    acceleration.mult(0);

    a = loadImage("aaron.png");
  }

  void applyForce(PVector force) {
    //Q
    acceleration.add(force);
  }

  void seek (PVector target) {

    PVector desired = PVector.sub(target, location);
    desired.normalize();
    desired.mult(maxSpeed);

    //steering = desired minus velocity
    PVector steer = PVector.sub(desired, velocity);
    steer.limit(maxForce);

    applyForce(steer);
  }
  void display() {
    float theta = velocity.heading();
    pushMatrix();
    translate(location.x, location.y);
    rotate(theta + PI/2);
    image(a, 0, 0, 50, 100);
    popMatrix();
  }
}