I would like to attempt at incorporating science into my final project by making an interface where the user can pick and choose different genes to swap in and out, and through that they’ll learn what diseases come about with these mutations. I see a 3D DNA strand that is rotatable, perhaps with the use of LEDs to specify various locations that one could interact with and have a screen pop up on the side with the results of their interaction.
This project would require a lot of scientific research, just because I think that the specificity of a disease’s genetic origin may not be super clear. But I want the user interaction to be a distance away from the projected screen to give it a more future scientific feel. I also want to be able to explore the use of cameras and with that have the user’s entire body interact with the piece instead of just one part.
Wouldn’t it be really cool if we built an instrument that made us feel like a DJ? Gathering inspiration from the current use of DJ Consoles and launchpads in the live music industry, we decided on constructing an instrument focused on rhythm and remixing of sounds. We wanted a nice-looking interface that would allow us to modify specific values of sound, and trigger desired notes/mp3’s. But how did we want it to sound?
Have any of you ever asked Siri to beatbox? We had, and so had the internet. From this response from our voice assistant, through which we reference this week’s class discussions, we gave the instrument a name and an initial set of sounds. However, by tapping into the options available by Serial Communication between the P5.js and Arduino, we realized the potential versatility of our instrument. Our instrument did not need to have a specific set of sounds!
Product:
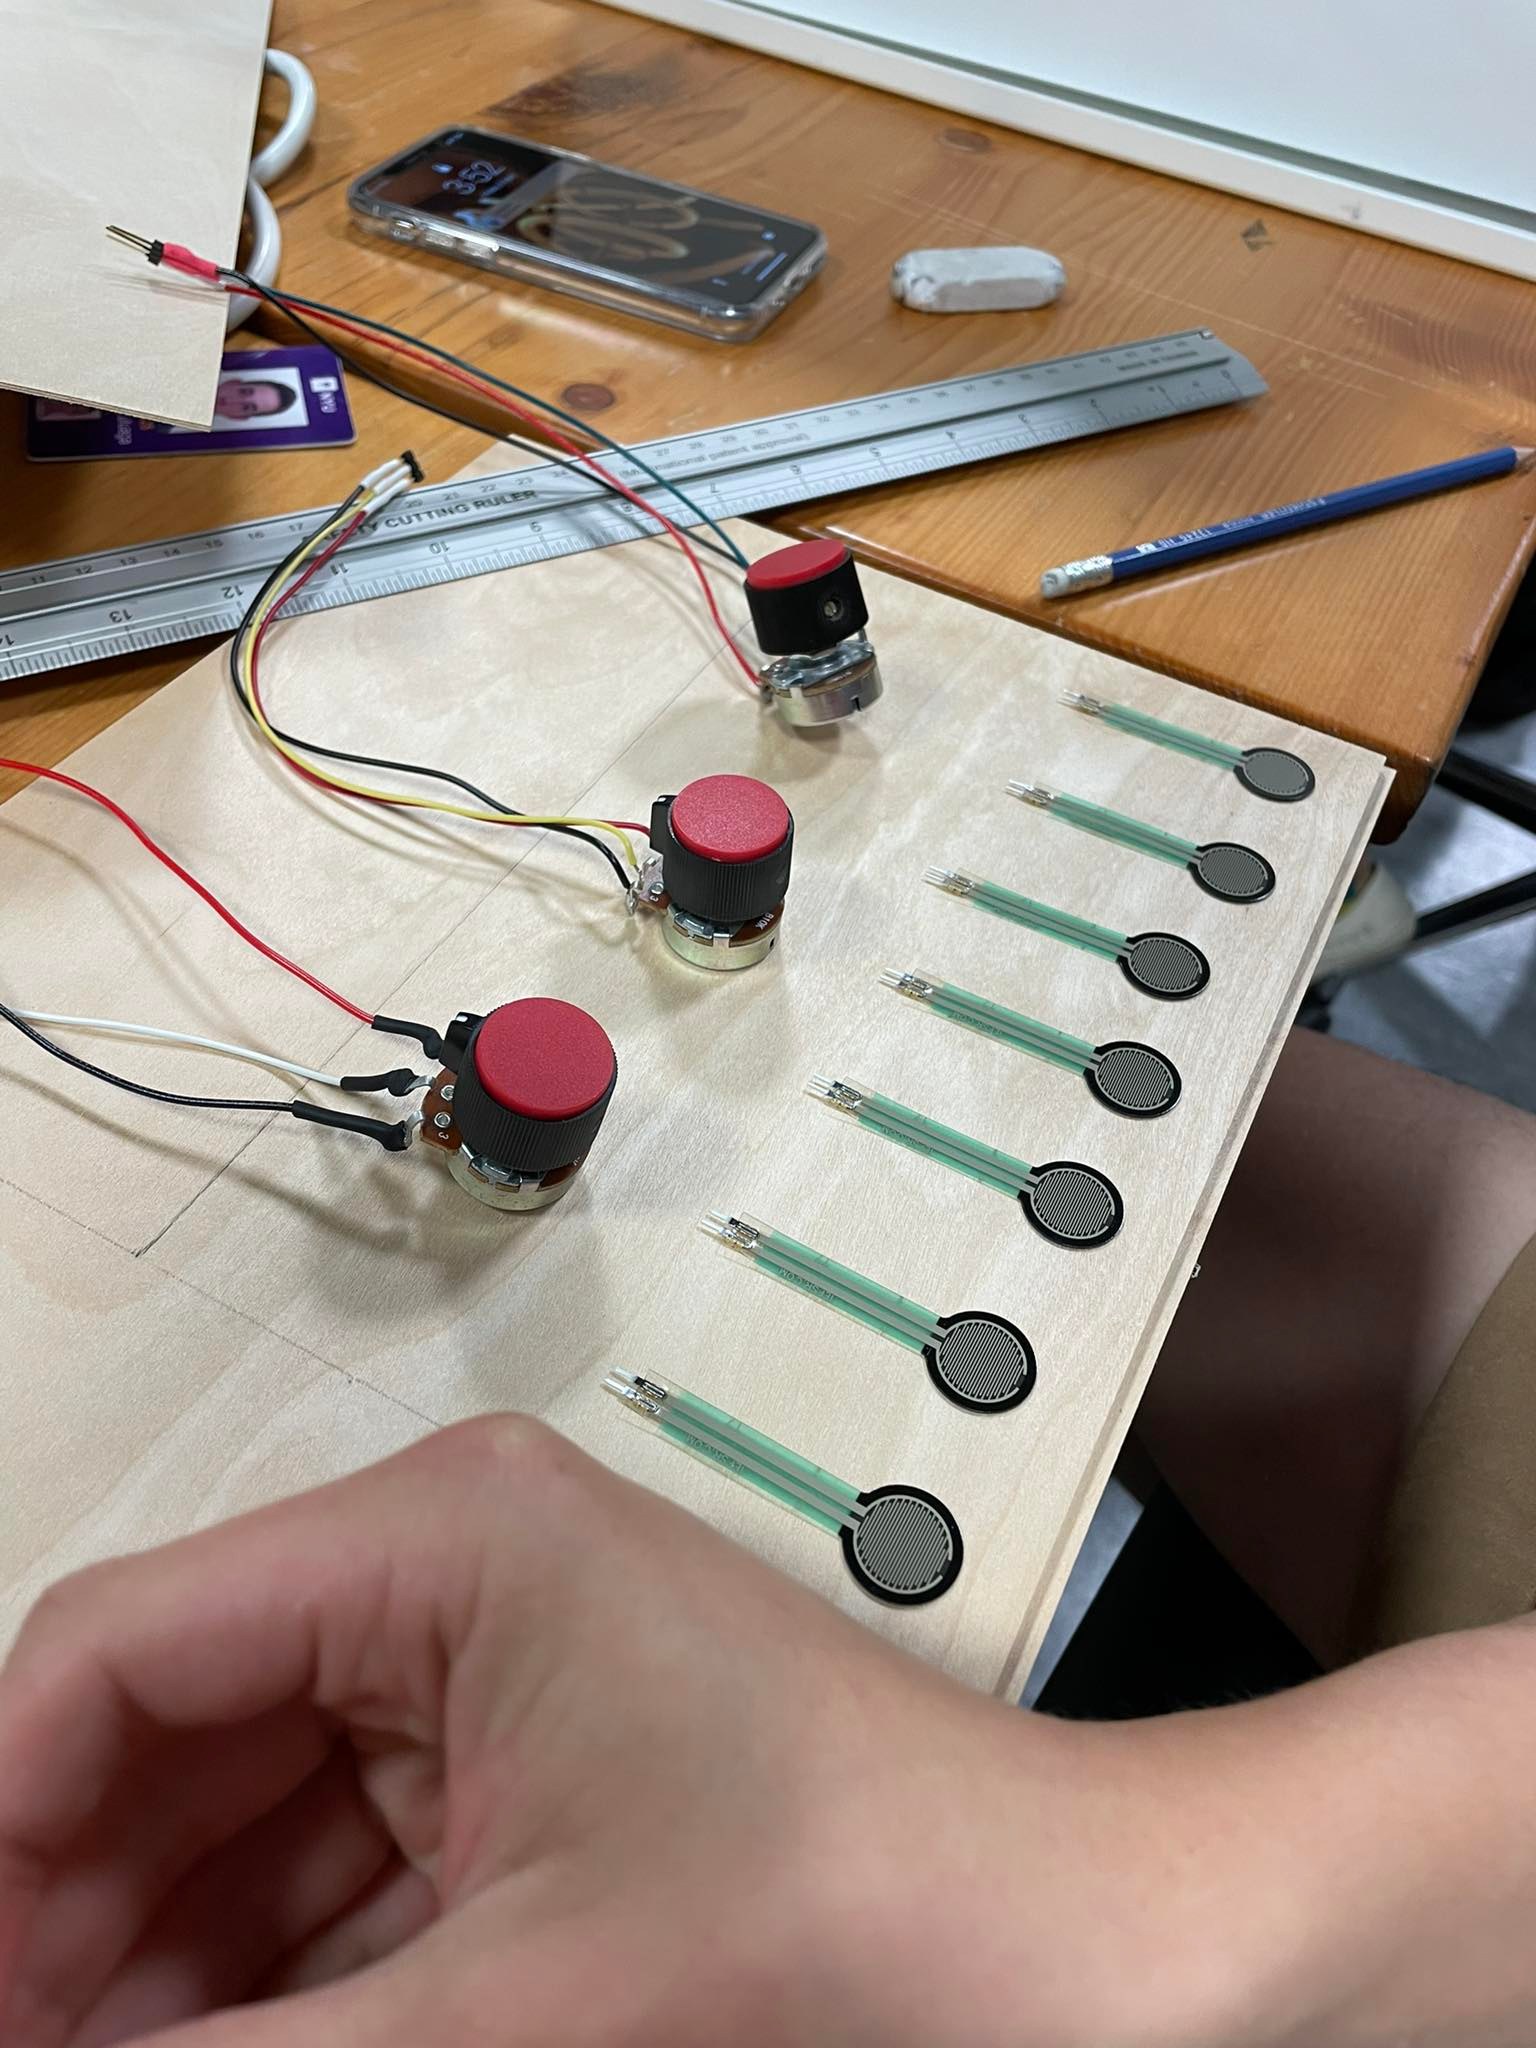
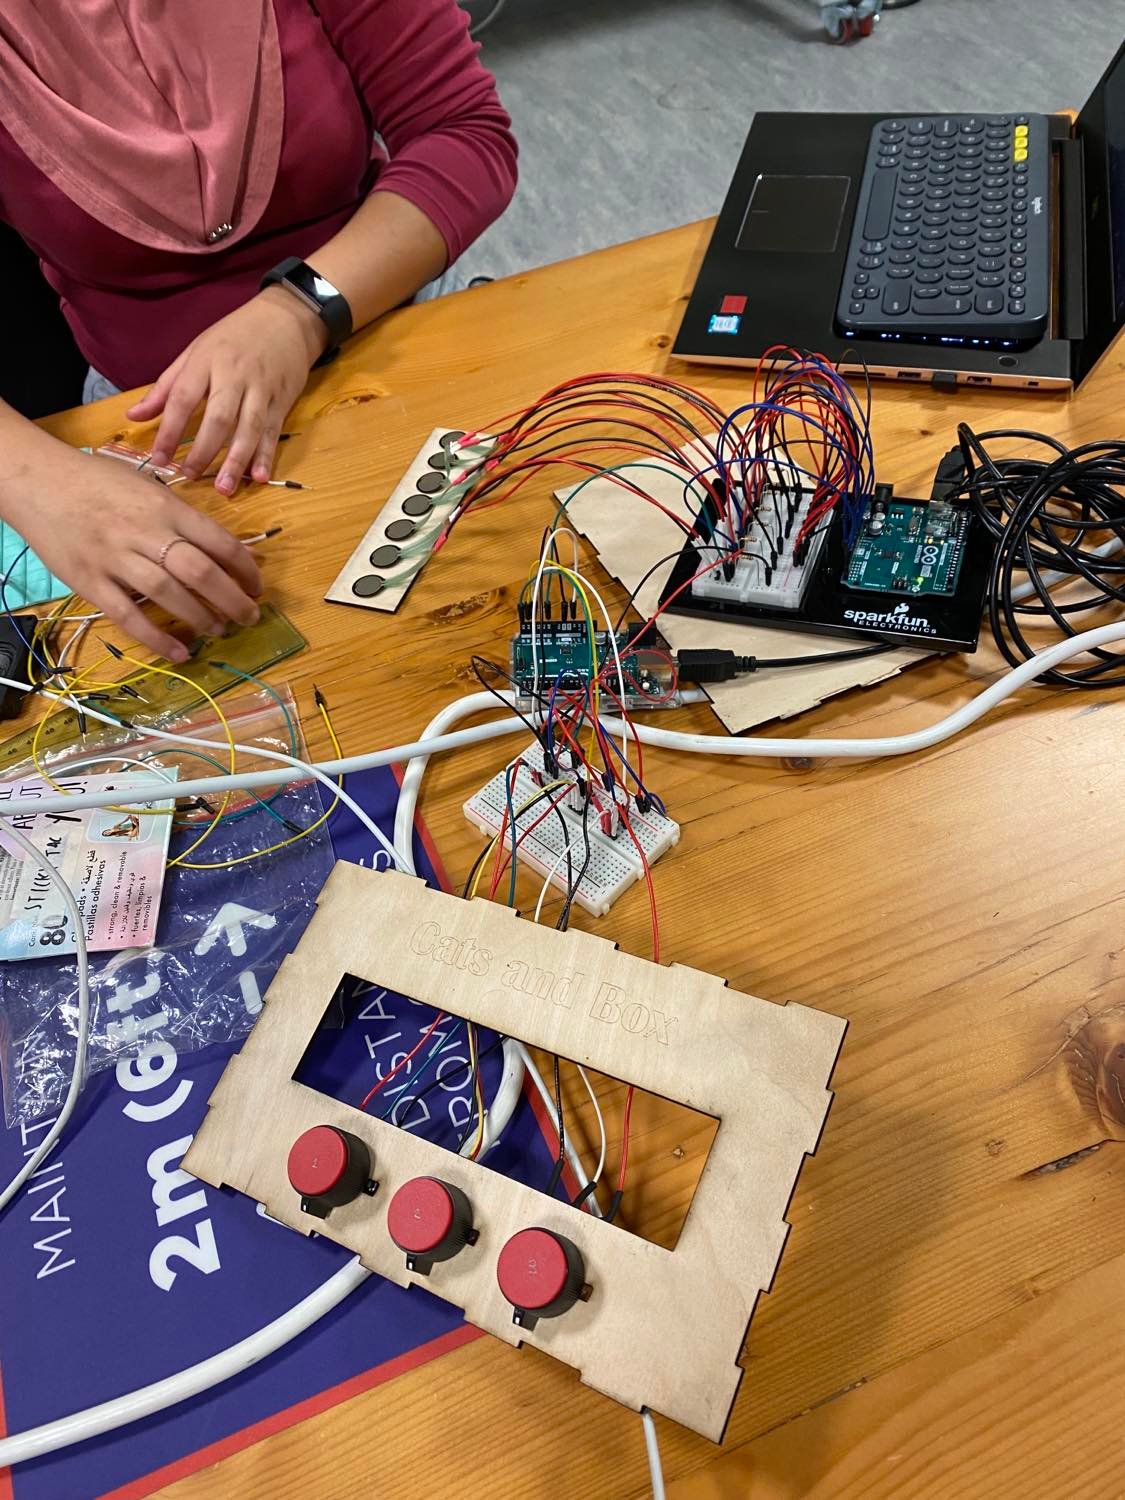
As preparation for the final project, and further Interactive Media endeavors, we wanted to explore the resources available to us in the Interactive Media lab by creating a neat interface and the serial connection. Thus, we built a wooden box with laser-cut sheets that would hold the cables inside/behind. This box has 3 potentiometers, which we soldered that control the volume of 3 different looping sounds. The first one from the left also controls the color of an RGB LED light (which you toggle on/Off with a button) to allow for a more immersive DJ experience. It also has a board with 7 pressure sensors that play a specific sound each.
With the way our code works, you are able to easily upload any .mp3 file to replace the current ones, and thus, completely change the sound of Cats and Box. This makes it similar to a launchpad in that you can completely customize the sounds you input.
Because we had 10 Analog inputs, we had to use two Arduinos, and write two different sets of code. Nevertheless, the premise is the same: We Serial.print a string of the values of each sensor in the arduino. This string is received by P5.js, assigning each value to a specific output. In P5.js we use if statements and variables to control the sounds and volumes.
Here are our codes:
Arduino – Juan’s Laptop
void setup() {
  Serial.begin(9600);
}
void loop() {
  int oneValue = analogRead(A0);

  int twoValue = analogRead(A1);

  int threeValue = analogRead(A2);

  int fourValue = analogRead(A3);

  int fiveValue = analogRead(A4);

  int sixValue = analogRead(A5);


    int sensorValue = oneValue;
    Serial.print(sensorValue);
    Serial.print(",");
    sensorValue = twoValue;
    Serial.print(sensorValue);
    Serial.print(",");
    sensorValue = threeValue;
    Serial.print(sensorValue);
    Serial.print(",");
    sensorValue = fourValue;
    Serial.print(sensorValue);
    Serial.print(",");
    sensorValue = fiveValue;
    Serial.print(sensorValue);
    Serial.print(",");
    sensorValue = sixValue;
    Serial.print(sensorValue);
    Serial.println();
    delay(1);
  }
P5.Js – Juan’s Laptop
Arduino – Lily’s Laptop
const int redPin= 9;
const int greenPin = 10;
const int bluePin = 11;

const int buttonPin = 2;
byte prevButtonState = LOW;
int currentButtonState;

unsigned long timer = 0;
bool blinking = false;
bool onOff = LOW;

const int colour_number = 7;
int ledState = LOW;

void setup() {
  Serial.begin(9600);
  pinMode(redPin, OUTPUT);
  pinMode(greenPin, OUTPUT);
  pinMode(bluePin, OUTPUT);
  currentButtonState = digitalRead(buttonPin);
}

void loop() {
int potValue1 = analogRead(A3);
int colourChoice = potValue1 / (1024 / colour_number);

//for checking if circuit is on or off
  byte currentButtonState = digitalRead(buttonPin);


  if(currentButtonState == HIGH && prevButtonState == LOW) {

    // toggle state of LED
    ledState = !ledState;

    // control LED arccoding to the toggled state

  if (colourChoice > colour_number - 1) {
    colourChoice = colour_number - 1;
  }

  else if (colourChoice == 0) {
    SetColor(18, 221, 54);
  }
  else if (colourChoice == 1) {
    SetColor(235, 242, 39);
  }
  else if (colourChoice == 2) {
    SetColor(234, 31, 37);
  }
  else if (colourChoice == 3) {
    SetColor(0, 255, 0);
  }
  else if (colourChoice == 4) {
    SetColor(249, 88, 212);
  }
  else if (colourChoice == 5) {
    SetColor(29, 33, 168);
  }
  else if (colourChoice == 6) {
    SetColor(0, 193, 249);
  }
  } else {
    digitalWrite(redPin, LOW);
    digitalWrite(greenPin, LOW);
    digitalWrite(bluePin, LOW);
    }
 // Serial.println(potValue1);
 // read the incoming byte - always read whether you need that info or not
   int inByte = Serial.read();

   int sensorValue = analogRead(A0);
    Serial.print(sensorValue);
    Serial.print(",");
    sensorValue = analogRead(A1);
    Serial.print(sensorValue);
    Serial.print(",");
    sensorValue = analogRead(A2);
    Serial.print(sensorValue);
    Serial.print(",");
    sensorValue = analogRead(A3);
    Serial.print(sensorValue);
    Serial.println();
    delay(300);
  }

void SetColor(int R, int G, int B) {
  analogWrite(redPin,   R);
  analogWrite(greenPin, G);
  analogWrite(bluePin,  B);
}
P5.Js – Lily’s Laptop
Process:
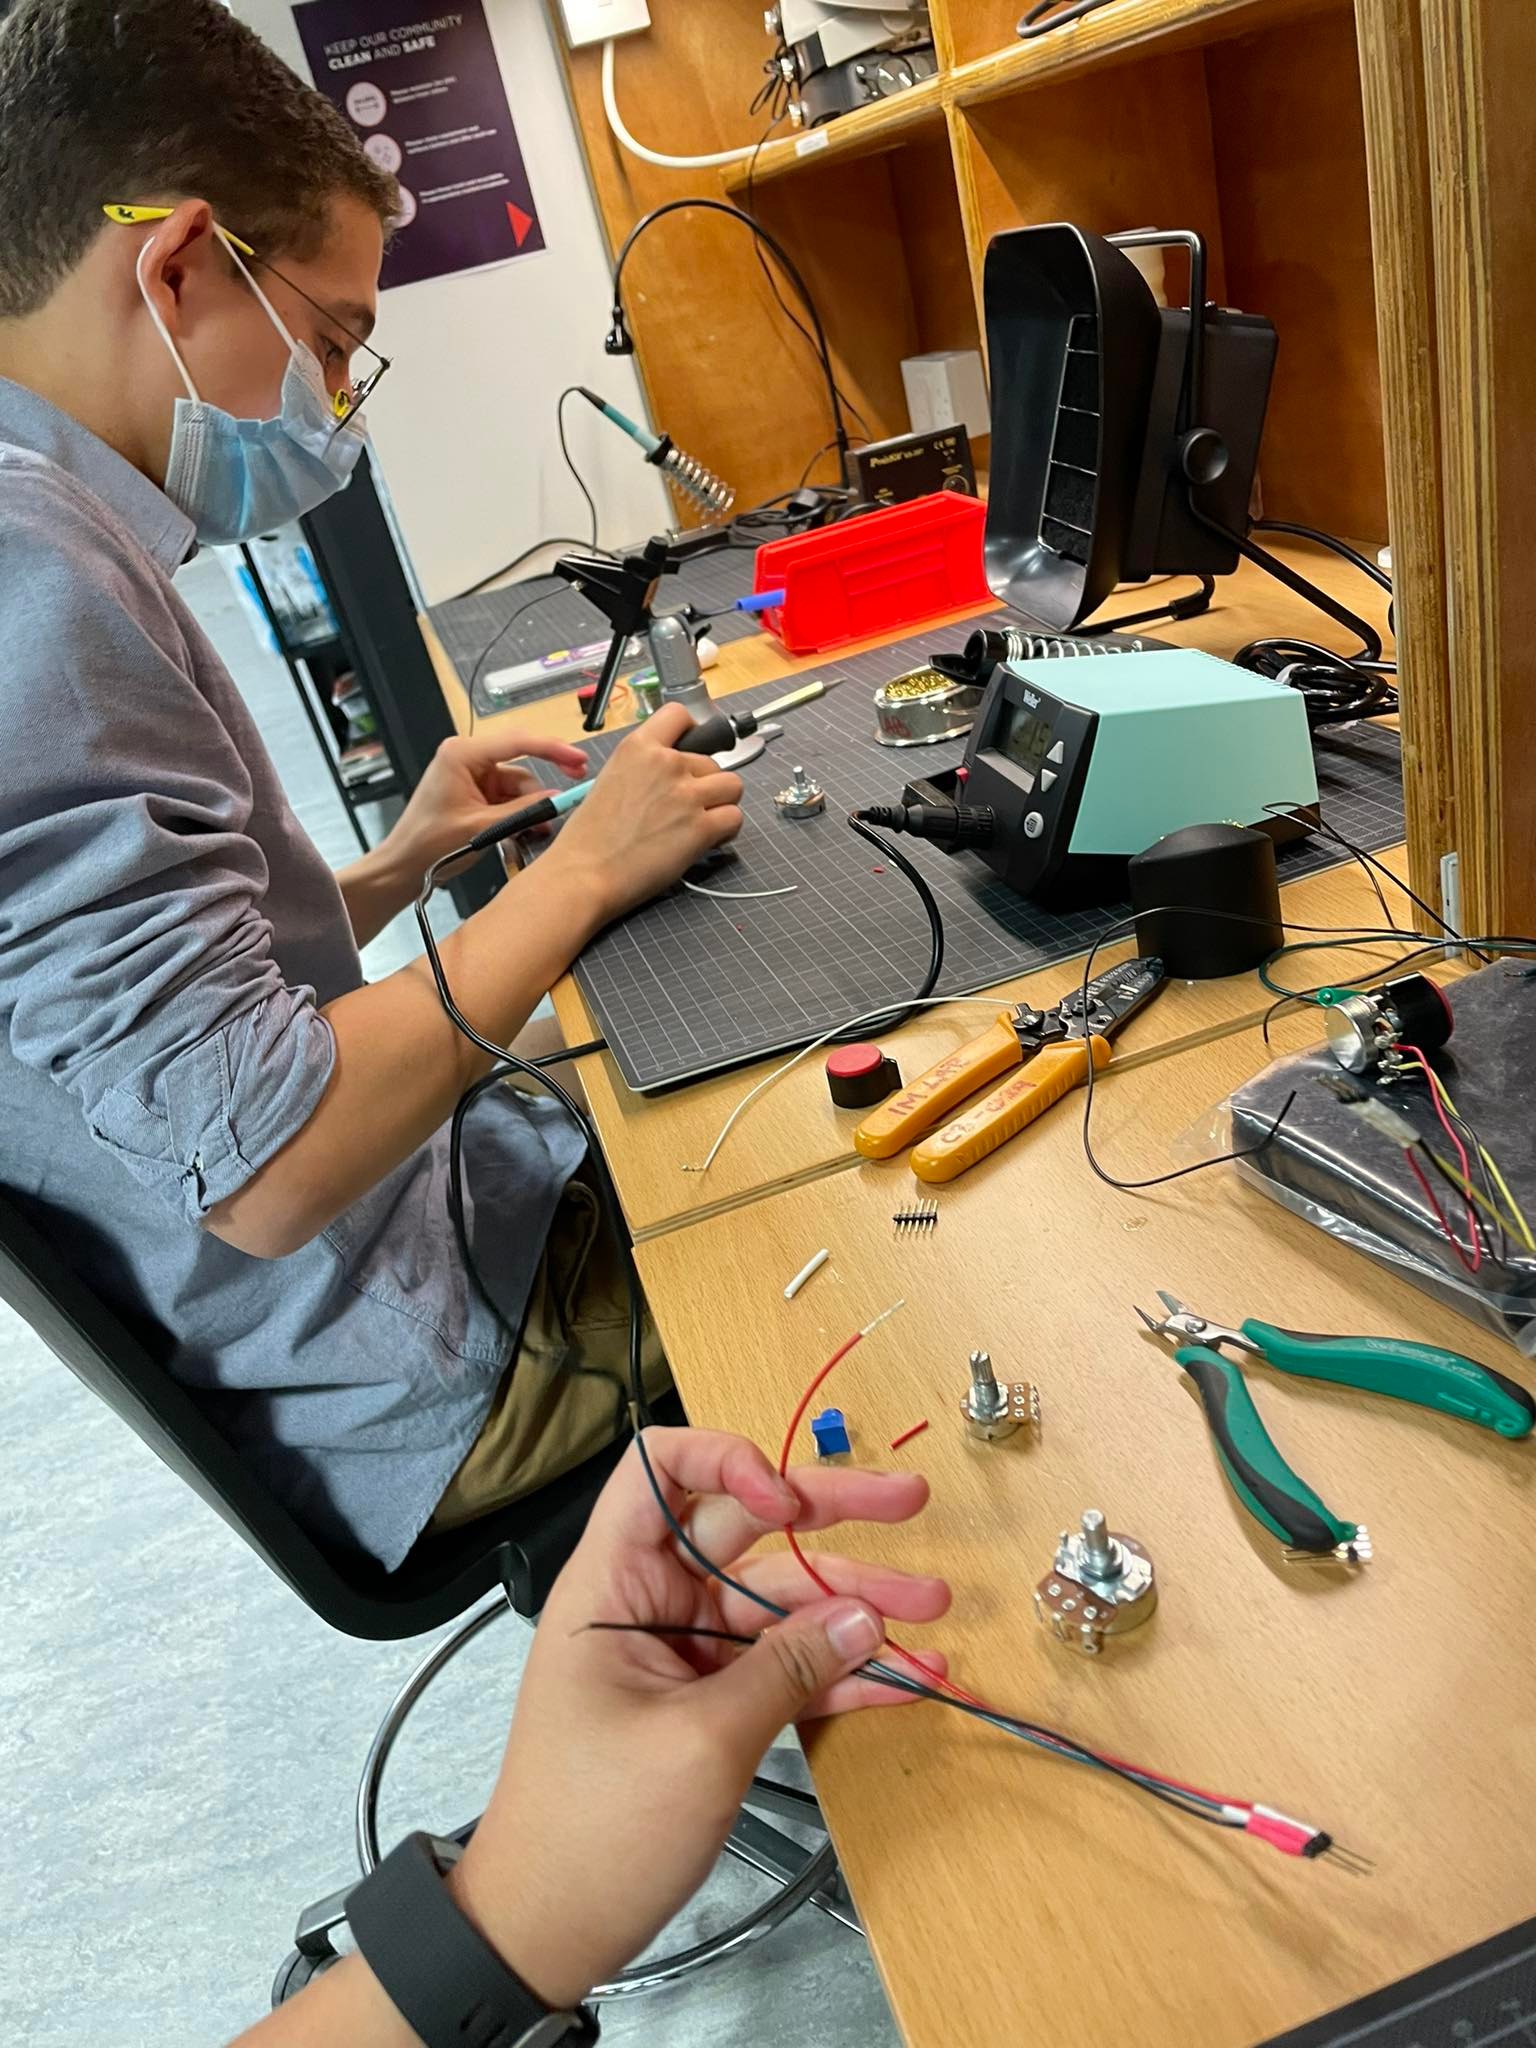
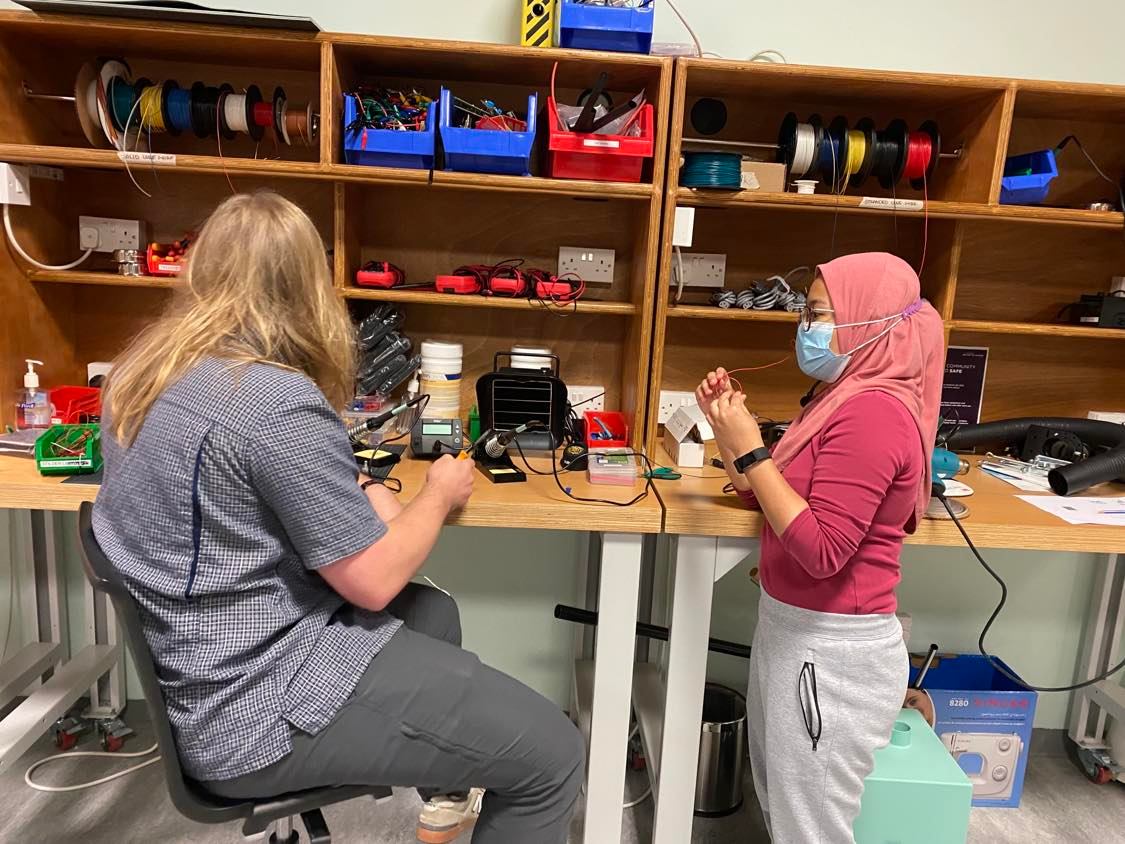
As previously mentioned, we needed to learn and study a lot to build Cats and Box. The first step was learning how to solder. During last week, Kyle Adams and other IM lab assistants were explaining the process to us, guiding us through safety procedures, and helping us with the brainstorming. Kyle, Zion and Alima dedicated a lot of time to guide us through the laser cutting for the box. Without them, we would be very very lost. Once we figured out our interface, building the code with the Serial connection was a big challenge. We struggled to understand the “handshake” and had to watch a few tutorials and read many, many articles to properly manipulate and update the code. Nick and Shamma were an incredible support for us. After many hours of work, we got everything functioning. And then, it was only a matter of assembly and fine-tuning.
Some pictures –
Here is our Final Product:
Reflection:
Juanma: I am very very proud of how our instrument looks. It is the product of countless hours spent in the IM lab and a representation of our steep learning curve. We decided to include many elements that were optional/outside of our scope in order to strengthen our toolbox, and I am very happy we did. In the future, I would like for the sounds to be a bit more seamless, to figure out a way to trigger them multiple times in a row without having to wait for it to end or creating noise, and to include a laser cut space for the LED and cables. However, these are the things that we will keep in mind in future projects and that don’t take away from the awesomeness of Cats and Box. Furthermore, I am very grateful for all the IM students and staff that were more than eager to teach us and help us reach our goal.
Lily: This assignment felt more like a final project than it does a weekly assignment – it took us several late nights to get the p5.js code functioning alongside the arduino. The arduino code was straightforward and it was fun to figure out how to work the RGB lights and button in line with that. However, more work definitely needs to be done to understand integrating sound through p5.js and arduino. Overall I’m very happy with what we came up with and working with Juan was seamless – he was good at things that I’m not good at and vice versa. I’m also very very thankful for Kyle and other IM lab assistants who were very happy to teach us new things like soldering, which truly is what made the mechanics of our instrument work.
After trying to figure out how to integrate the two switches together, I came up with the idea of using the potentiometer to toggle between three different LEDs – red for a bad face, yellow for a medium face and green for a happy face. This would lead to some sort of customer service device to give feedback on how you feel.
So far I have been understanding the wiring pretty well but to connect the coding with making what I want to physically happen has been slightly difficult. It feels difficult for my brain to wrap around. I was doing okay with the coding part of the first half of the semester, and the wiring physical part we’re learning now – but I’m a little slow to combine them.
In terms of creating this project – It was relatively easy to get the button to work (to turn on the blue LED) and to get the potentiometer connected to the three colored LEDs. With a little help from Juan, I was able to connect the two together and make it such that wen the button is pressed, the blue LED turns on and so does the potentiometer LEDs, and when clicked again, the customer service ‘device’ turns off.
const int redLight = 9;
const int yellowLight = 10;
const int greenLight = 11;
const int blueOnLight = 4;
const int button = 5;

const int LED_number = 3;

int ledState = LOW;
int lastButtonState;
int currentButtonState;

void setup()
{
  pinMode(redLight, OUTPUT);
  pinMode(yellowLight, OUTPUT);
  pinMode(greenLight, OUTPUT);
  pinMode(blueOnLight, OUTPUT);
  pinMode(button, INPUT_PULLUP);
  Serial.begin(9600);
  currentButtonState = digitalRead(button);
}

void loop()
{
  int potValue = analogRead(A0);
  int ledChoice = potValue / (1024 / LED_number);

  //for checking if circuit is on or off
  lastButtonState    = currentButtonState;
  currentButtonState = digitalRead(button);

  if(lastButtonState == HIGH && currentButtonState == LOW) {

    // toggle state of LED
    ledState = !ledState;

    // control LED arccoding to the toggled state
    digitalWrite(blueOnLight, ledState);
  }

//for customer service lights

  if (ledState == HIGH){
  if (ledChoice > LED_number - 1) {
    ledChoice = LED_number - 1;
  }

  else if (ledChoice == 0) {
    digitalWrite(redLight, HIGH);
    digitalWrite(yellowLight, LOW);
    digitalWrite(greenLight, LOW);
  }
  else if (ledChoice == 1) {
    digitalWrite(redLight, LOW);
    digitalWrite(yellowLight, HIGH);
    digitalWrite(greenLight, LOW);
  }
  else {
    digitalWrite(redLight, LOW);
    digitalWrite(yellowLight, LOW);
    digitalWrite(greenLight, HIGH);
  }
  } else {
    digitalWrite(redLight, LOW);
    digitalWrite(yellowLight, LOW);
    digitalWrite(greenLight, LOW);
    }
  Serial.println(potValue);
}
Without further ado, I present you with the customer service device:
Questions:
1. Agree or Disagree: “Your task in designing an interactive artwork is to give your audience the basic context, then get out of their way.”
2. What was your favorite computing creation from the first reading?
3. What strategies can you use to incorporate “shut up and listen” methodology in future IM projects?
4. How can we account for generation differences (ie. familiarity with tech) when we create Interactive art?
5. Share a (rough) drawing of a potential interactive art project that utilizes ideas from the first reading — for this one, think about it, the actual drawing will happen during class!
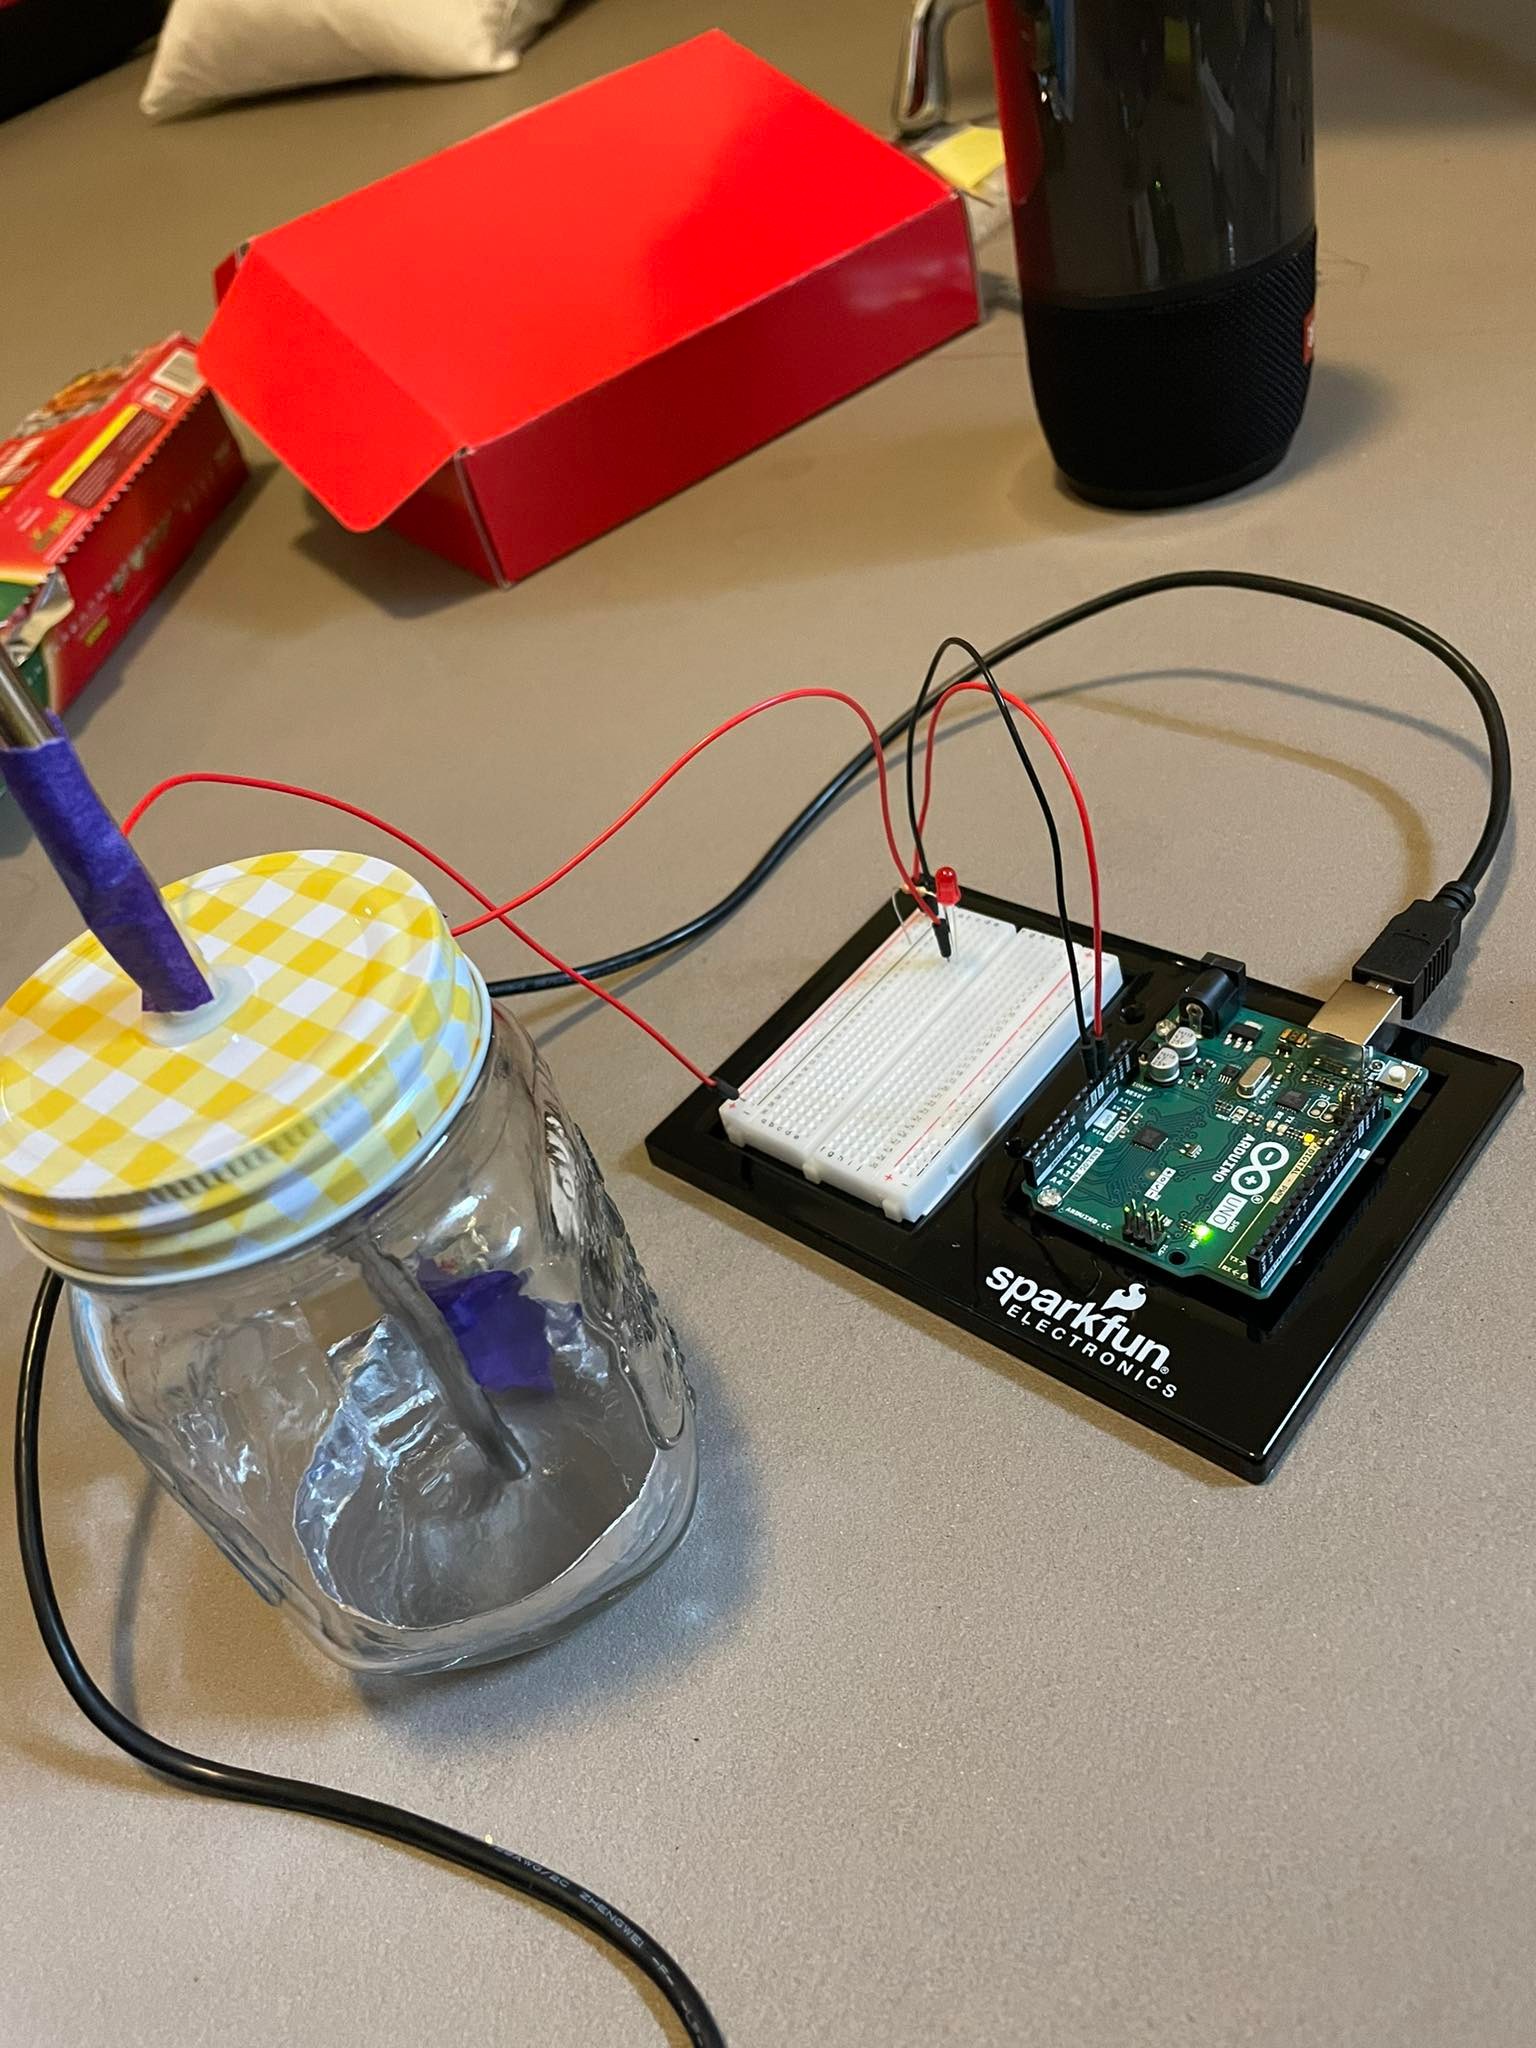
Initially, I wanted to create a secret entrance type switch with books, where if you aligned the books a specific way, the light would turn on (or in essence, the ‘door’ would open). However, this would require the use of hands in interacting with the books. So, I decided to shift away from this idea and play around with the use of one’s mouth in activating a switch.
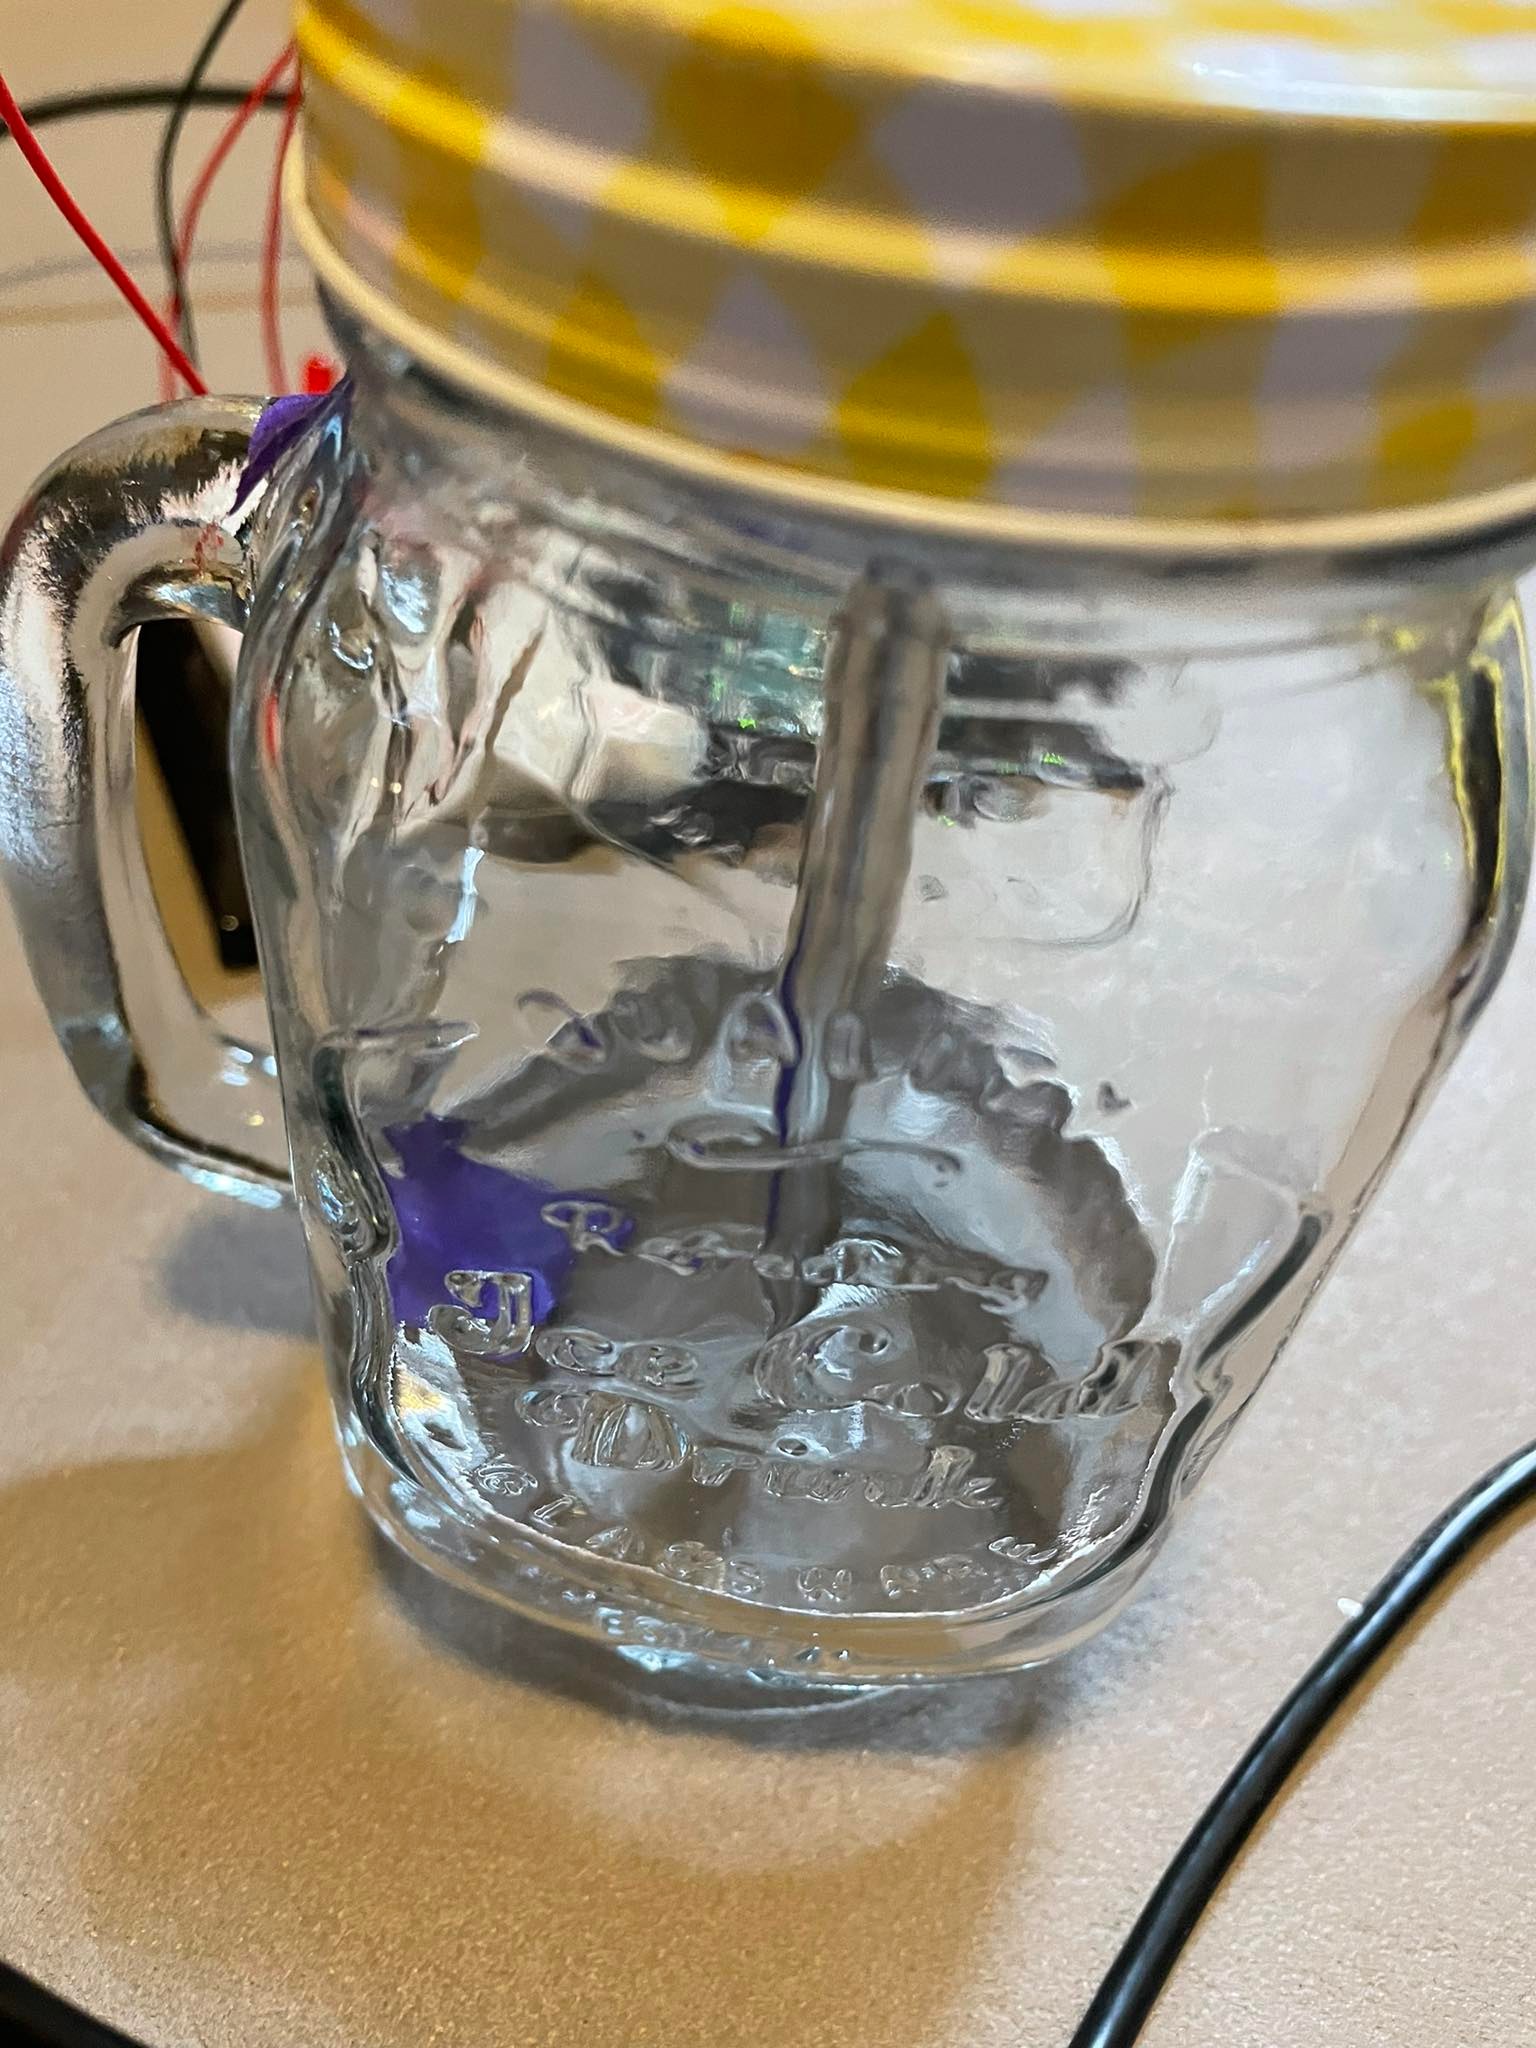
I decided to come up with a switch that involved the use of a metal straw and how the switch would work is that the light would turn on when the straw touched the bottom sides of the bottle (to indicate that the straw is at the bottomest place possible). With that, I put aluminum foil at the bottom of the bottle (thankfully my hands could fit inside the bottle – making this project easier but not as easy as I thought, to assemble) and you would use your mouth to move the straw around the edge of the bottle and if you are at the bottom edges, the light would turn on.
The circuit itself is very simple – with the use of a standard circuit in turning on a bulb but adding an extra wire to the straw, and another to the aluminum foil a the bottom of the bottle.
Without further ado, here are some pictures of the switch and a video at the end:
As soon as we were introduced to the midterm assignment – i.e. make a game, I immediately knew that I wanted to make a game that involved a cat (I absolutely love cats). So I decided to make a game with the premise: “Oh no, my cat escaped into my brother’s room! Help me find him quick before my brother comes back from the bathroom!!” I would put a 1-2 minute timer, depending on how many items are in the space/how difficult it is to complete with trial and error.
The biggest struggle was trying to find an easy to understand code template for drag and drop an item within the canvas – once I figured that out with the help of the professor into making it a class, I was able to design the game how I wanted to. I tried making it look as much like a bedroom (with plausible decorations/furniture).
A discussion that I had with Jack when trying to get to instruct the game such that if the user clicks on the cat and it is not under any furniture/decoration, then change the screen to the winning screen. However, the drag and drop mechanism works like so:
There is a hidden small box where each item is placed onto and whenever the mouse hovers over this box, it switches from arrow cursor to hand cursor making it easy for the user to know when it is draggable. Each item has its own dimensions so only at the center of each item can it be dragged.
If I wanted the winning screen to only appear when the cat is not behind anything then it needs to not overlap with the box – considering that the box is small, this would not be feasible. In order for this idea to work, then the box would need to very specifically cover each item with all its curves, and have a specific box for each specific item since each item has their own dimensions. One small flaw of the game is that after the cat is clicked, even if it is behind an item, it would immediately change to the winning screen – so if the user were just clicking on random objects and not even dragging then they could win the game.
Nonetheless, after figuring out the main game screen and how to toggle between modes/screens (i.e. the instructions, actual game, winning the game and losing the game screens), I had to focus on how to integrate sound into the project. I needed to ask Jack for help in figuring out how to make my audio play only once, which led to making a hasPlayed variable. This variable and the timer is then reset every time the player returns to the main instructions screen.
It was important to me to have a timer on the screen – 1. to add suspense and stress 2. it is a fairly easy game, so I made the timer be 10 seconds. I had to figure out how to make the timer not flash as the countdown continued – but with a bit of changing a few variables here and there it all worked out.
Overall I am very proud and cannot believe I just made an entire game!! I cannot believe I kept at it and tried to understand each line of code one by one in order to make what I envisioned in my head happen. I’ve learnt so much and want to make more!
I’m still at the beginning of my game making process so bear with me –
My idea is to make a game where the premise is – “Oh no, my cat escaped into my brother’s room! Help me find him quick before my brother comes back from the bathroom!!” I would put a 1-2 minute timer, depending on how many items are in the space/how difficult it is to complete with trial and error.
I’d like to create an animated moment where the cat scurries from the door to a hidden place in the room and then the game starts but I’m not quite sure how to integrate that.
The biggest problem I’ve had so far is trying to figure out the drag and drop – I’m able to do it successfully with one image but as soon as I try to make more than one image move, my code stops working. I also realize that I don’t completely understand how to make a class and how to ‘push’ it out in draw. I spent hours googling different ways to code in drag and drop (whether that be different shapes/images) but not many came up. Even with those that did, the code was too complex for me to understand.
I finally was able to work around a code to get several images working and moving but it isn’t very efficient. I’ll need to schedule a meeting with the Professor to figure out how to sort everything into classes and make it smoother overall.
Here is what I have so far – very plain but everything will start coming together in the next day/two:
As soon as I found out what the assignment was and learning how the professor was able to make the letters seek home and float around the screen, I knew I wanted to play around with it. I immediately took out my notebook and sketched my idea, which can be seen below (excuse the roughness of the sketch):
I then started to look for monospaced fonts that I liked. Since the messaging was personal, I wanted a font that could express that, instead of the common blocky, cold monospaced fonts. It took me hours, because preload would often not work, and sometimes I came across the error of not having any space to upload my fonts (even though I only uploaded 2 font files). The other problem I kept coming across is that the font was not actually monospaced, so that ruined the spacing of the individual letters when I put them in an array.
After finally deciding on a font, I then needed to figure out how to make several strings and arrays to make my idea work – I needed to separate out the three sentences in order to control how they seeked home. At one point, it did not allow me to use my class because it had not been initialized and guess what the problem was? I forgot a } somewhere in the code. One simple mistake stopped the entire code from running. It drove me insane. Now though, whenever my code doesn’t run, my first instinct is to check my brackets, and {}.
Credit to https://openprocessing.org/sketch/1351086 for the heart function <3
It is a little busy, but overall I'm really proud at how long I kept trying to make my idea happen and the amount of times I felt the urge to throw my laptop but didn't :)
Here it is:
Overall this was quite difficult for me – organizing it into functions and classes made it all the more confusing to understand the structure of how the code is being read and displayed.
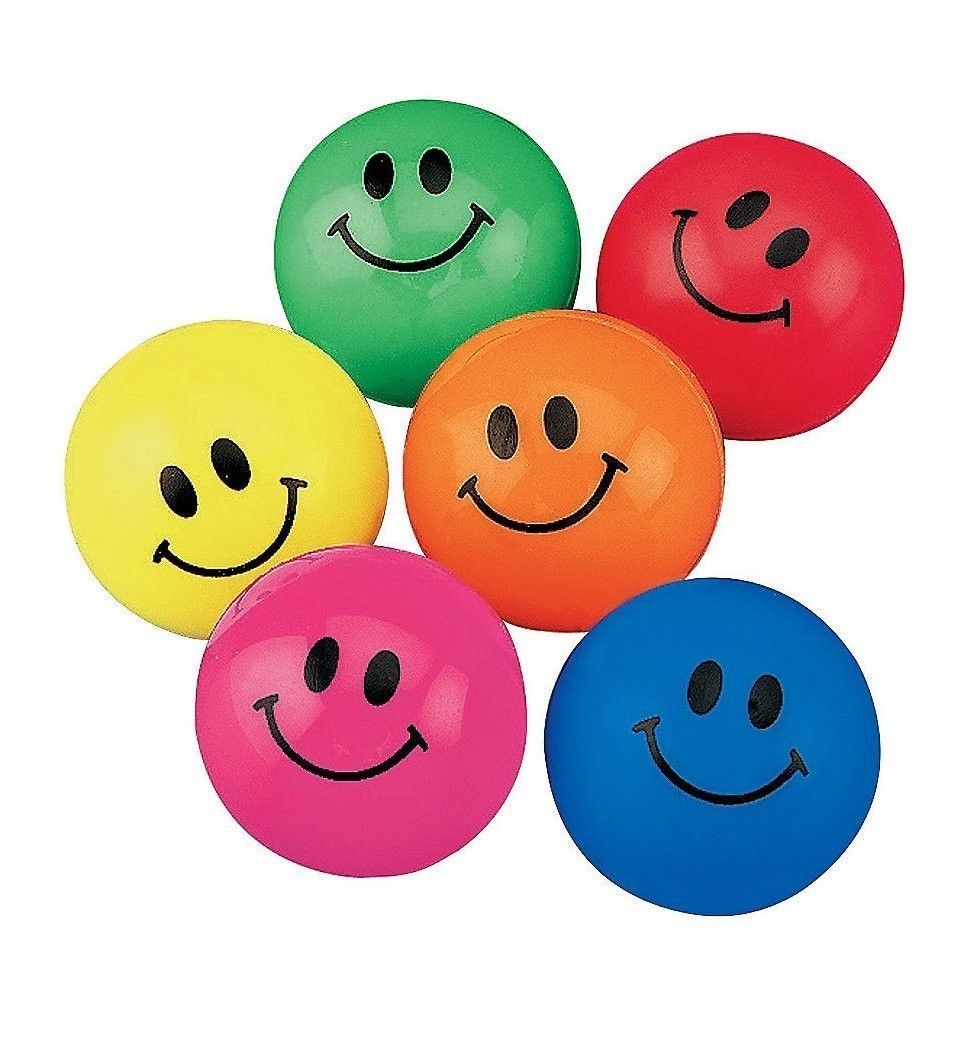
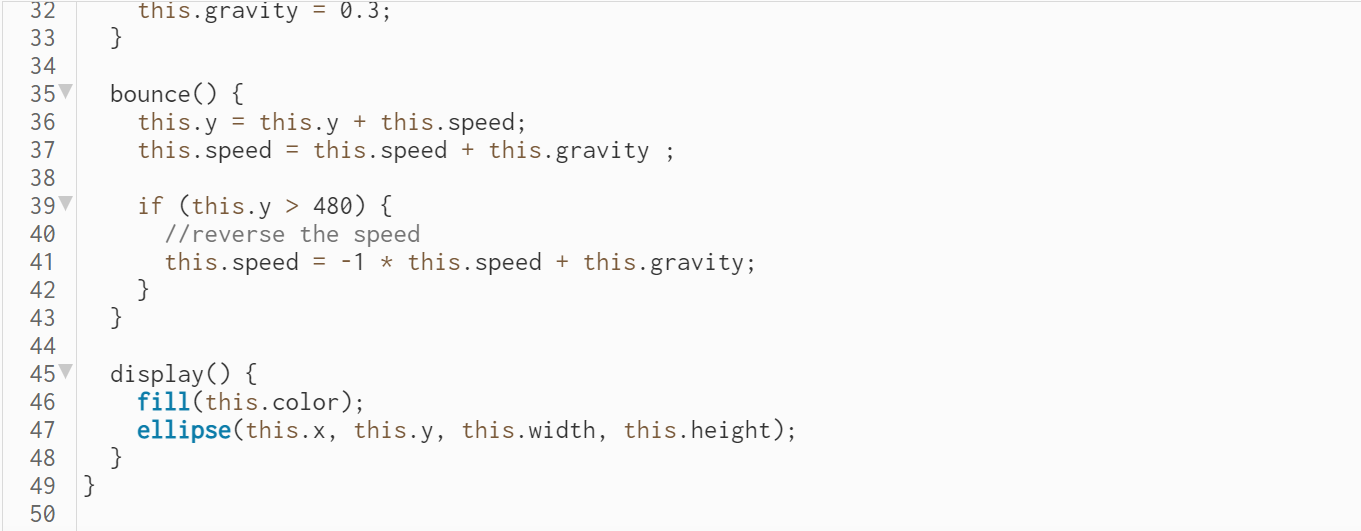
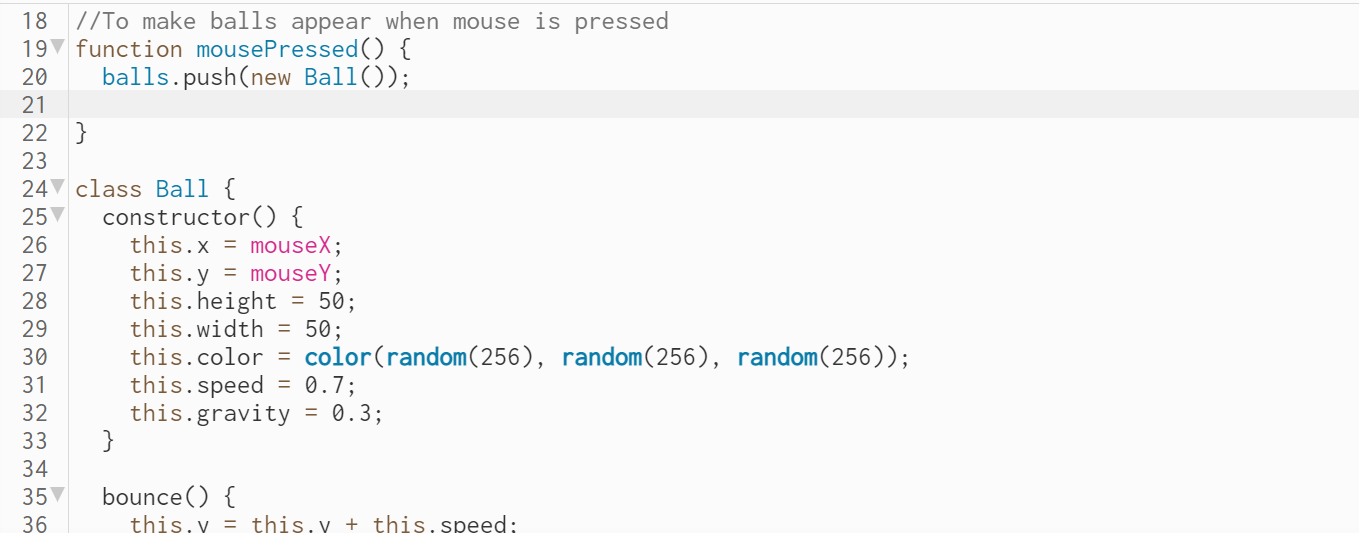
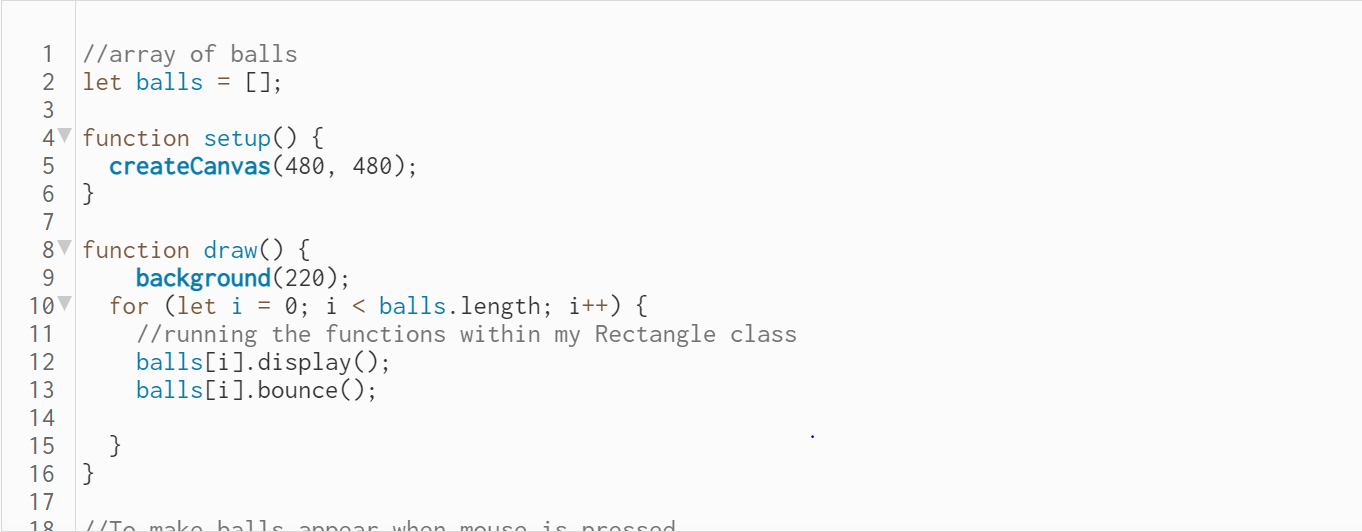
I knew that I wanted to recreate my childhood toy, the bouncy smiley ball – as shown here:
But I couldn’t figure out how to make the smiley face as part of the Ball class – nonetheless I wanted to make sure I incorporated the colorful aspect of the balls and play around with the gravity and speed to get the bounciness that I know. So I made sure to make my Ball class and in the draw() section push a new ball into my array so that it would create many balls on screen –
Here is what the final product looks like – it looks really fun when you spam click the canvas and place the balls at different heights.