Final Project: VR HandVenture

Concept:

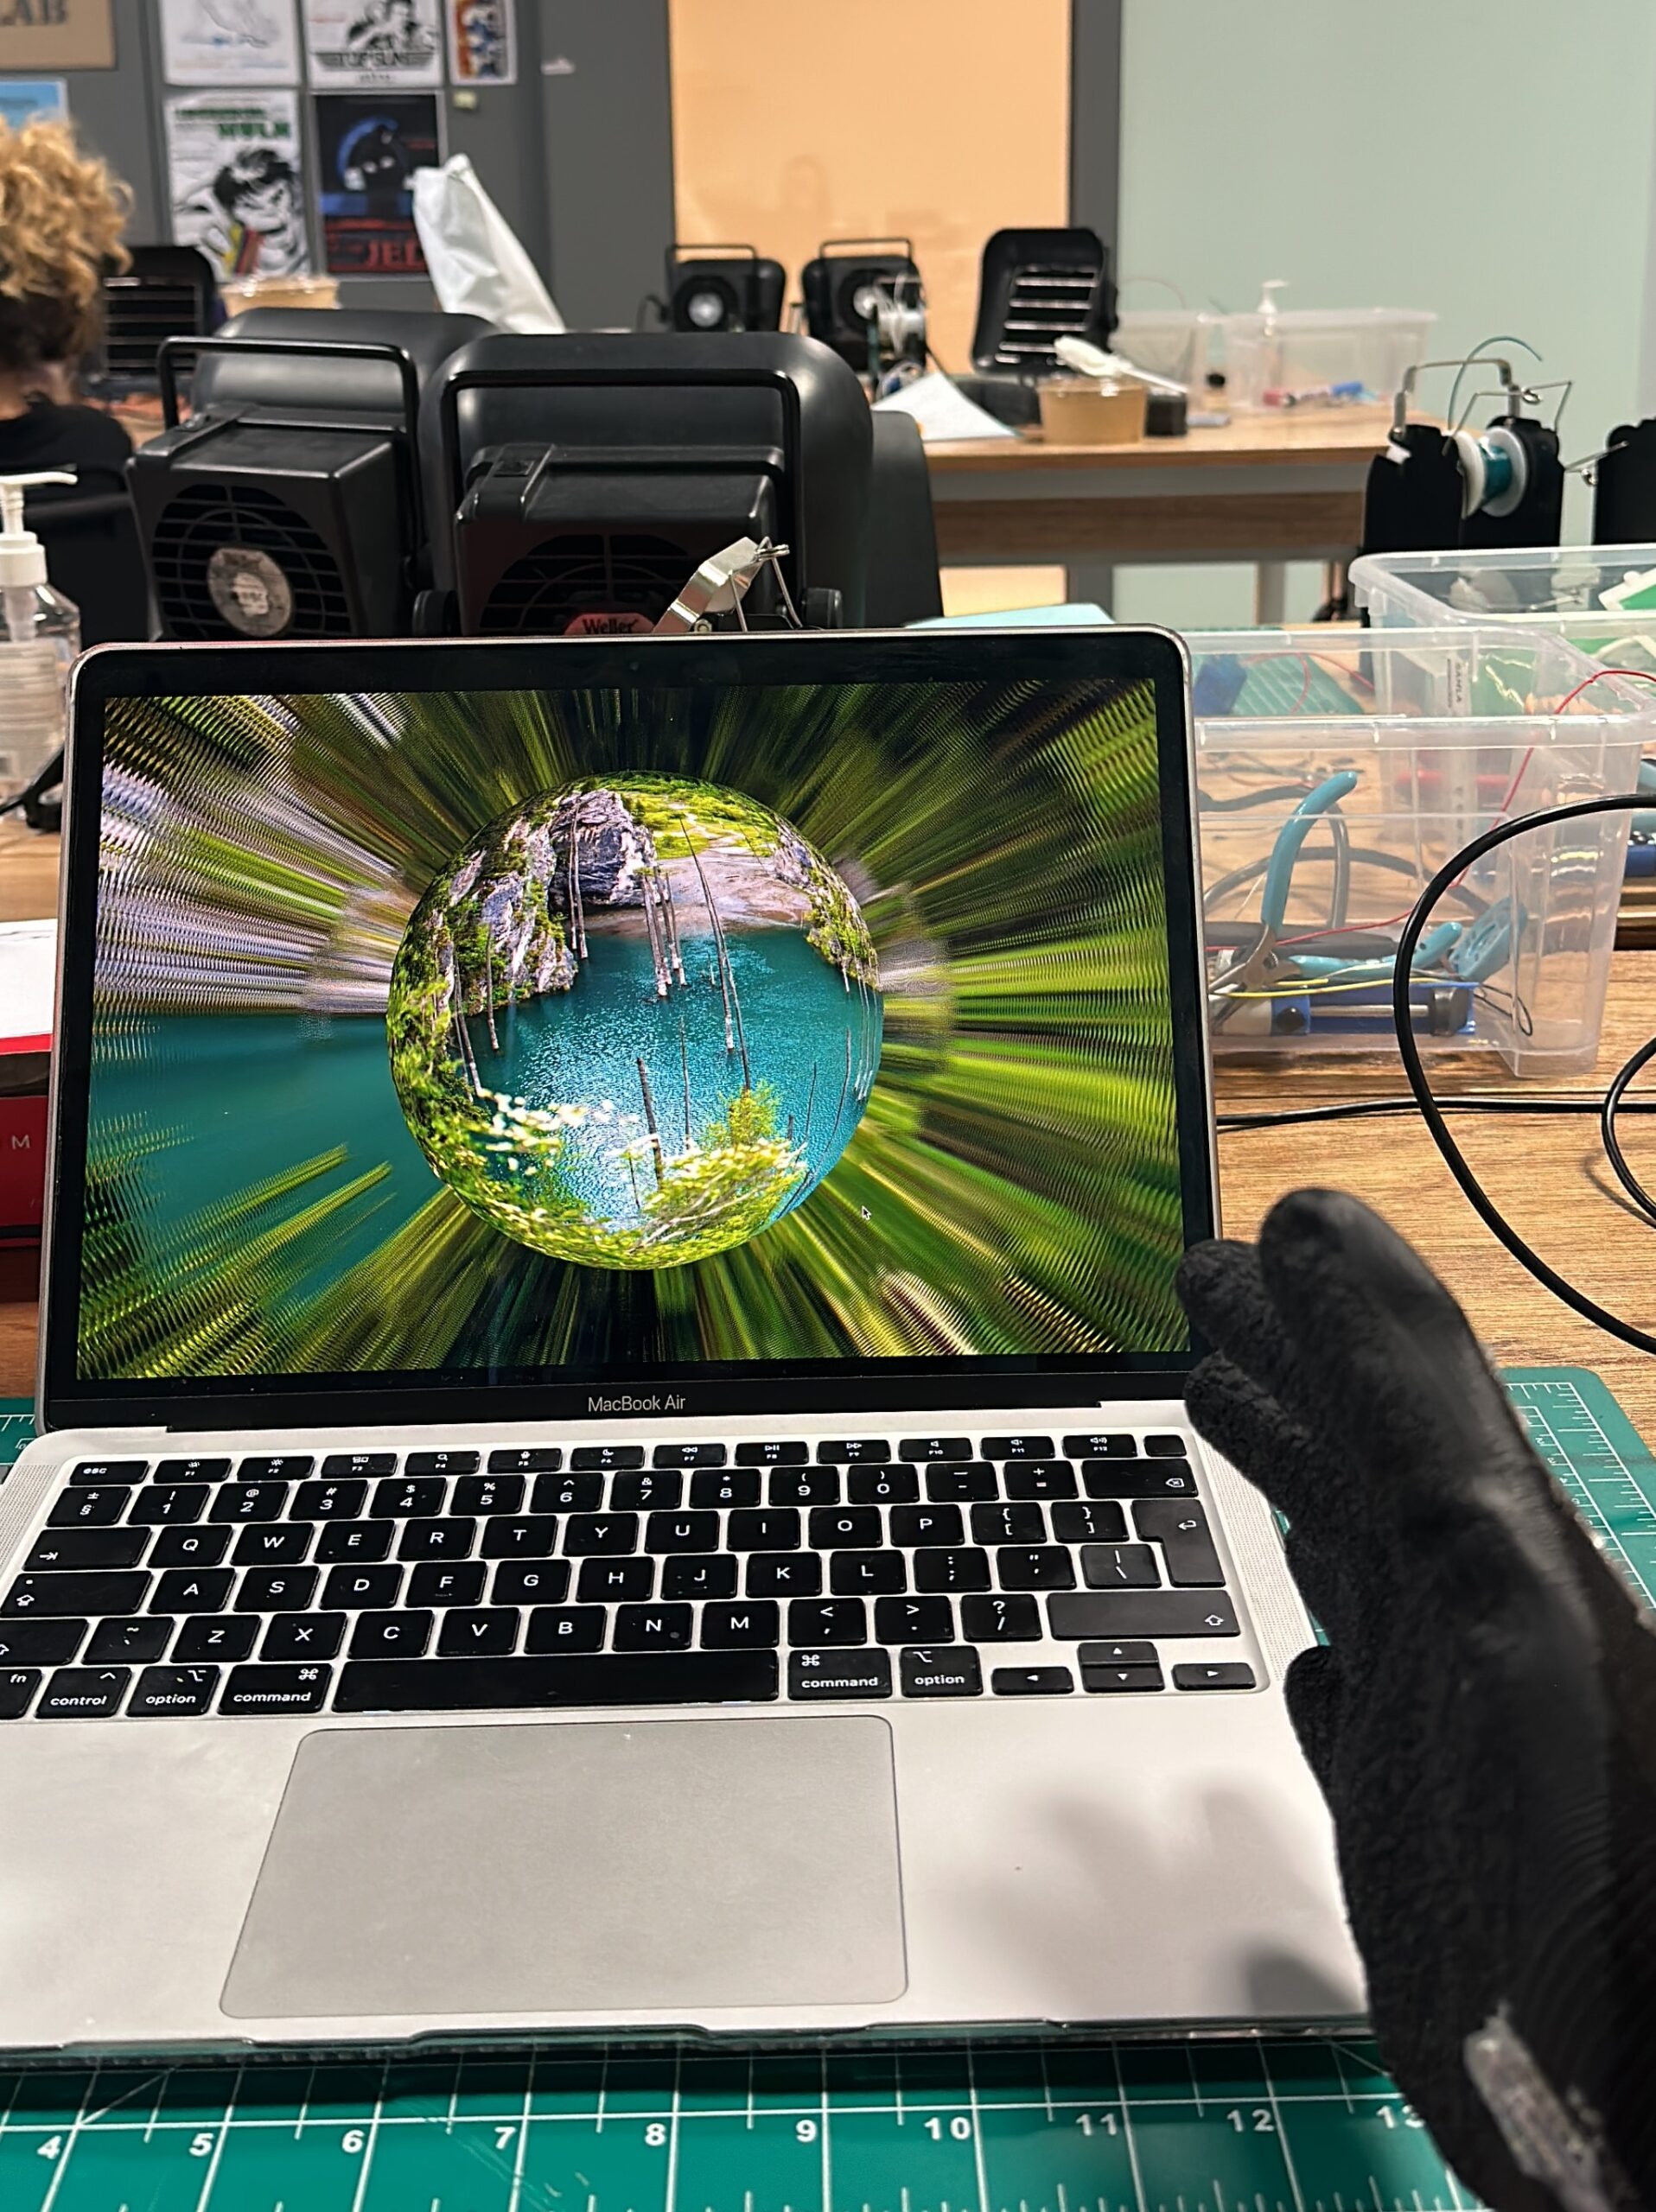
As the name of the project suggests, for my final project I created the “VR” gloves that allows the user to control the hand movement and explore different places of Kazakhstan through their panorama images. I have always been fascinated by the beauty of my country, and I want other people to see those beautiful places as well. The destination points that the user can explore include a variety of landscapes, starting from dense forests and mountain lakes, and ending with deserts and canyons.

The reason I named this project “VR HandVenture” is because moving inside the panorama image closely resembles the movement inside a VR world and our right hand is the main instrument through which we can explore the place ( “HandVenture” comes from the word “Adventure”; shoutout to Saamia and Sanjana who helped me come up with this project name that I think perfectly encapsulates the project’s main idea).

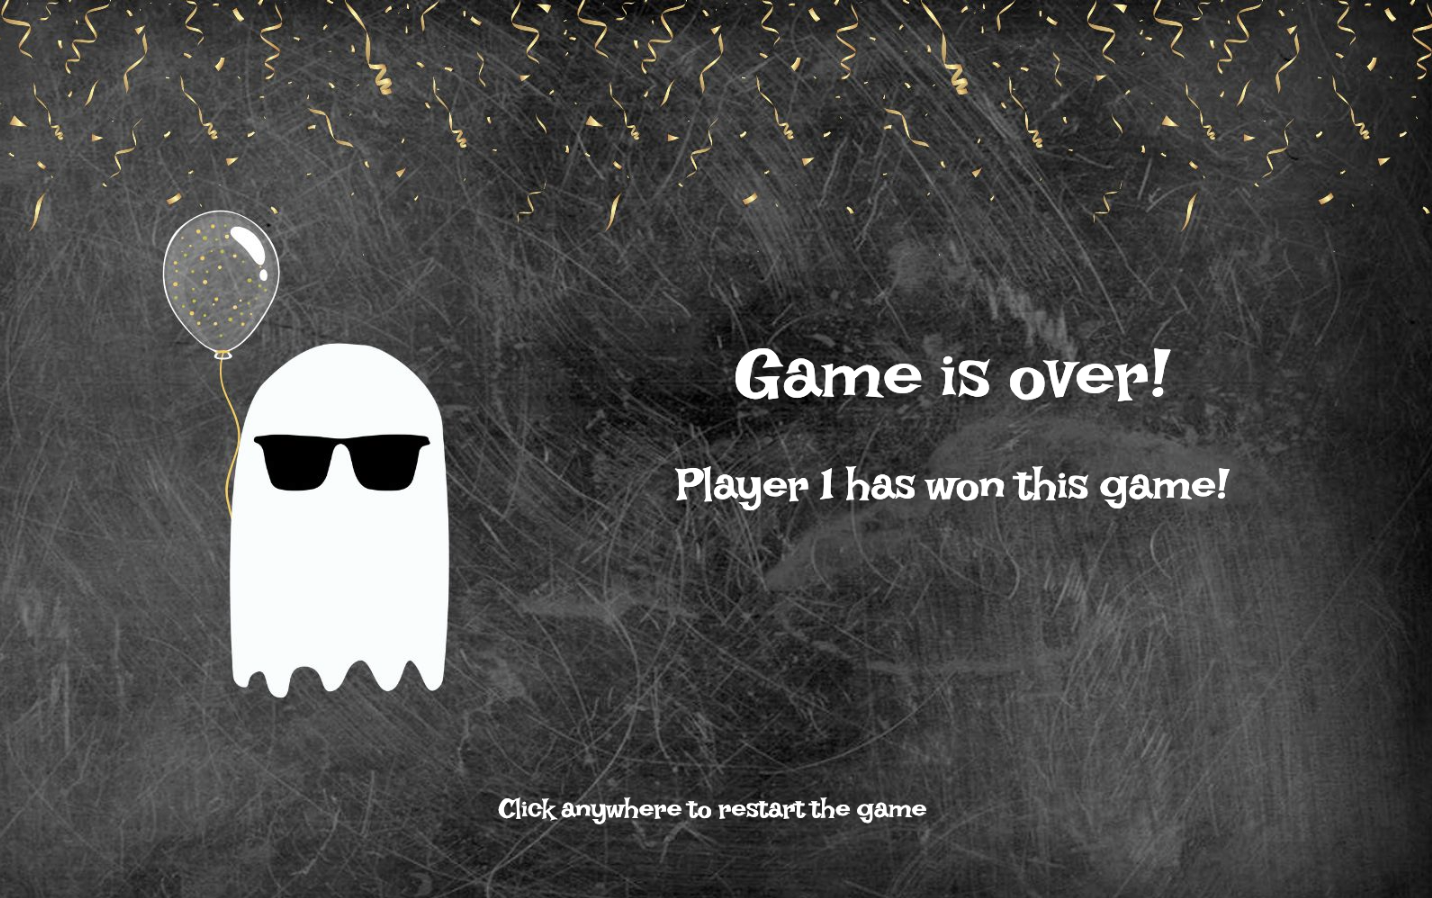
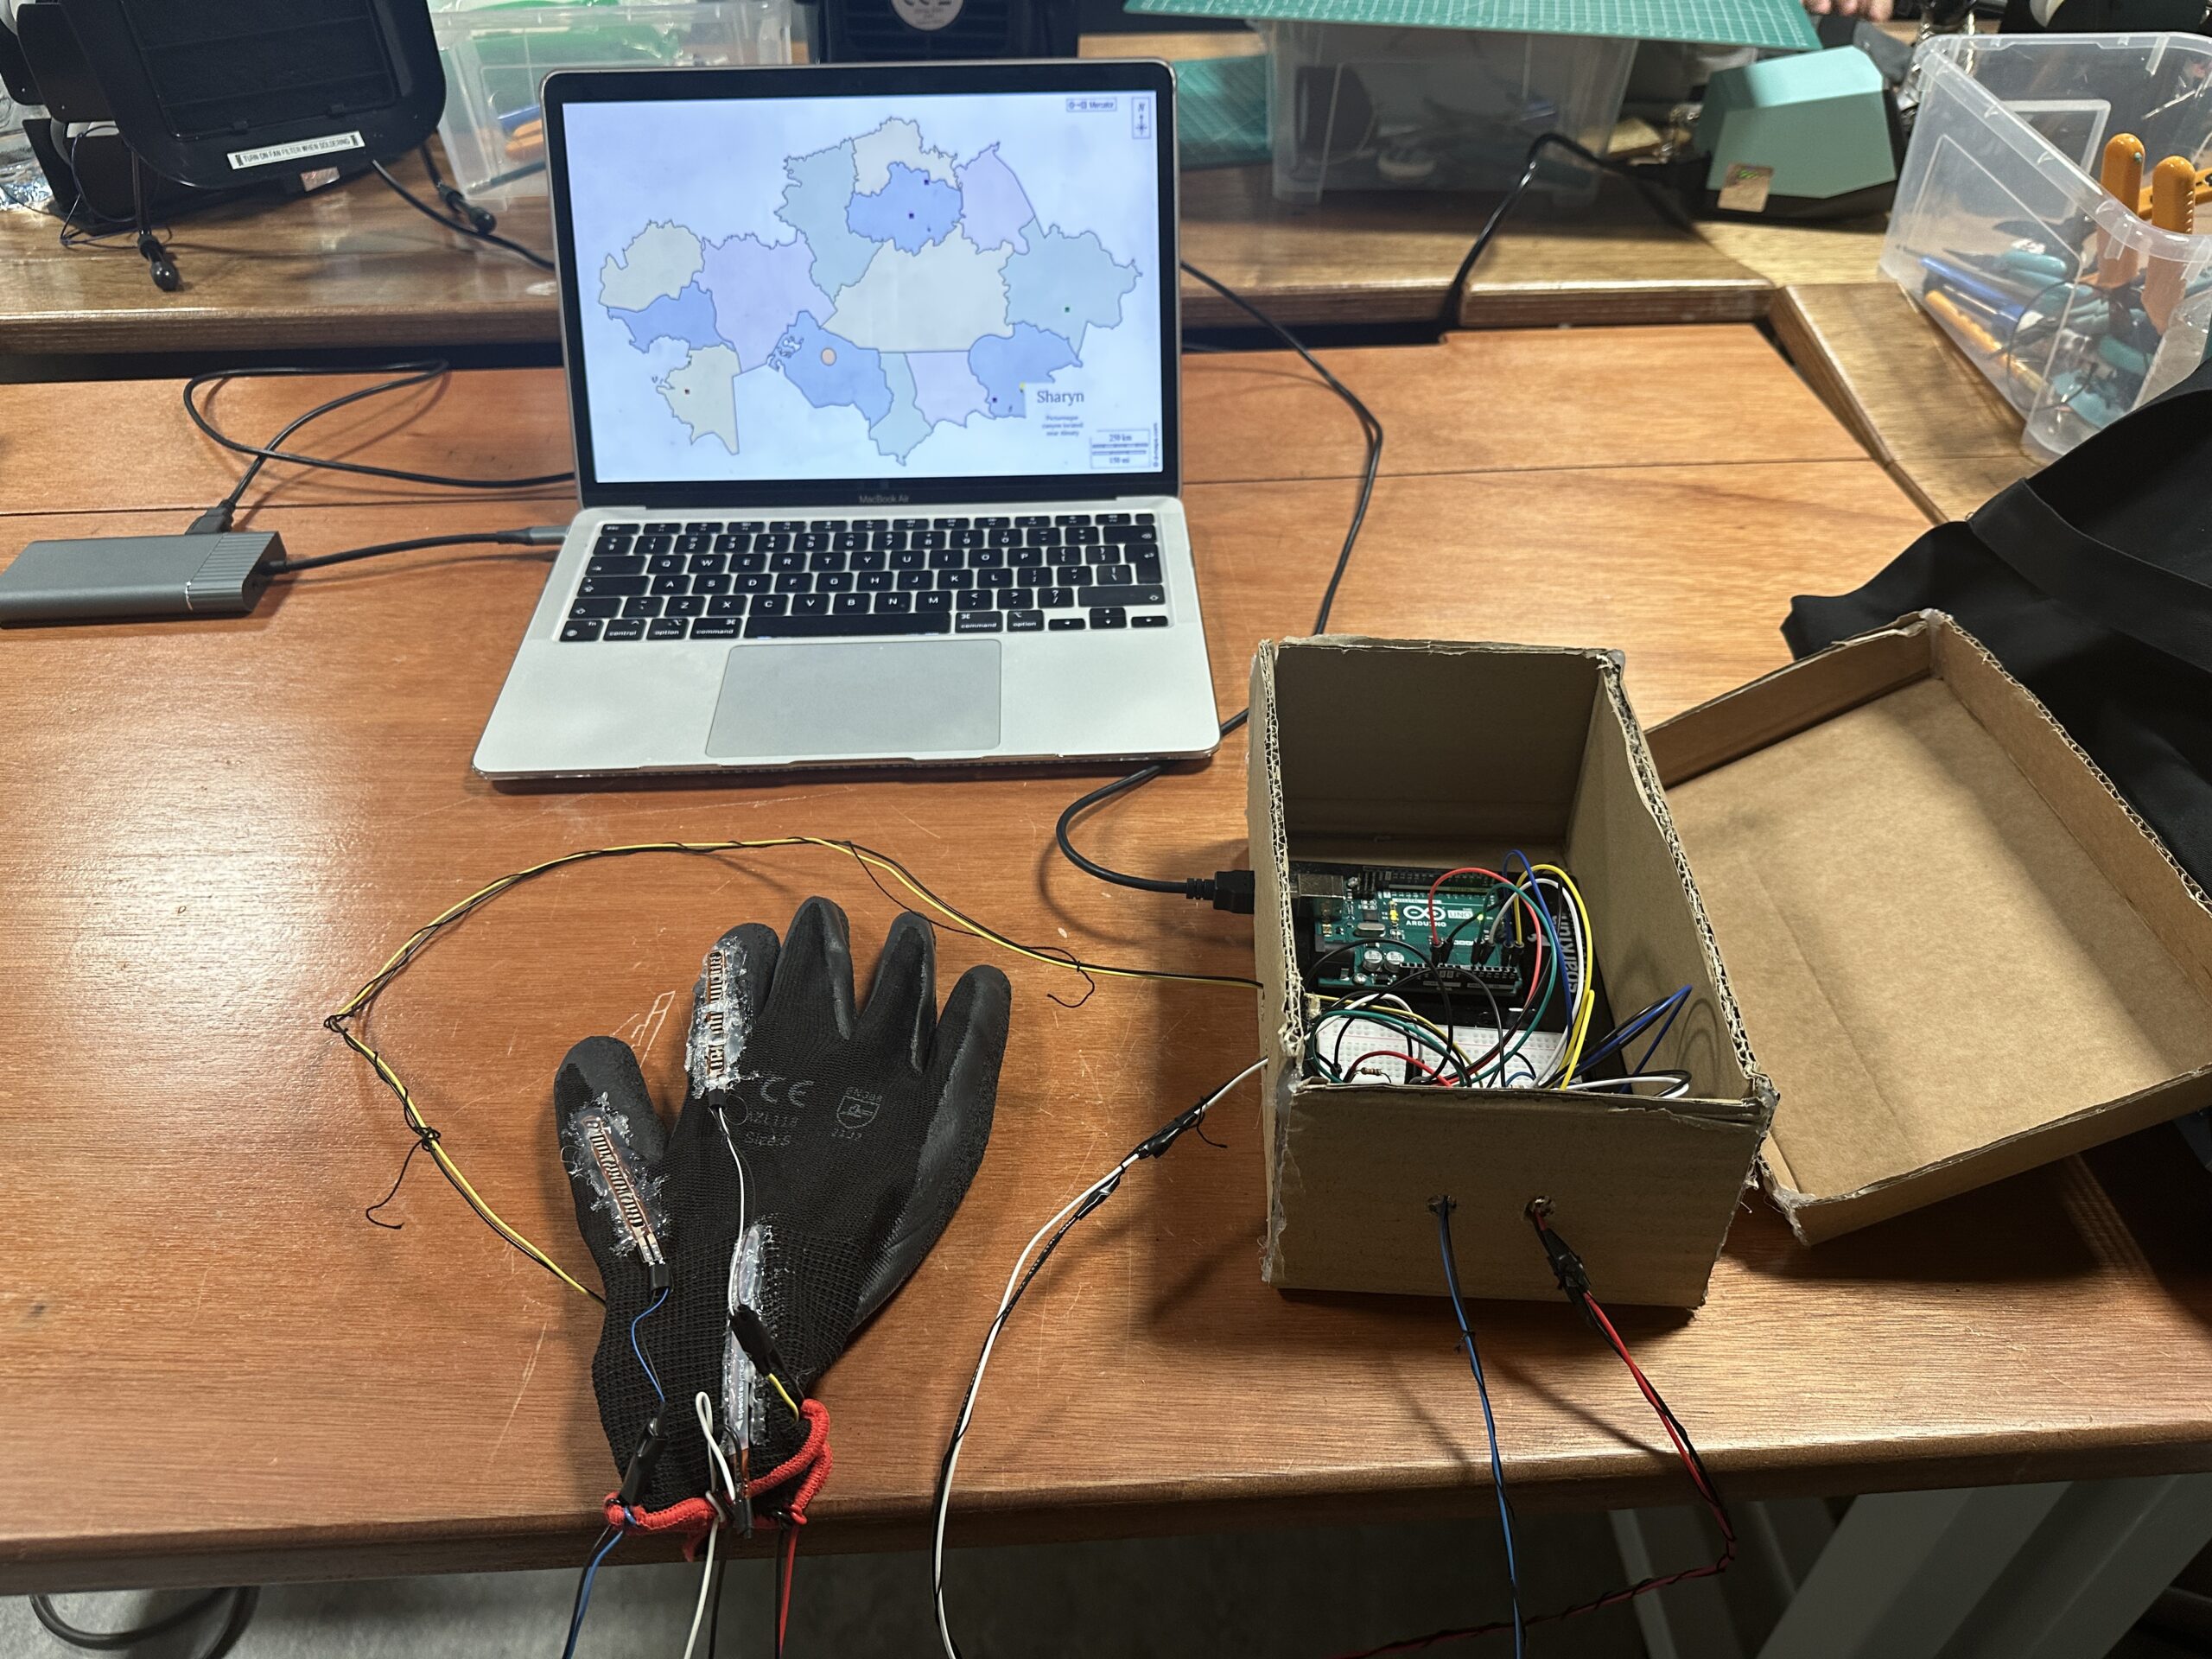
After the welcome page and following the instructions page, the user will be prompted to enter the main page, a page displaying Kazakhstan’s map,  where he/she later can choose the destination he/she wants to visit.  Before clicking on the corresponding destination, a small information about the place, including the name of the place and a short description, will be displayed to the user. The user can explore each destination through moving inside panorama  image using the hand movements. The movements that are available to the user are moving left, right and zooming in, out. When the user bends his/her hand to the right the image will move right, when bends to the left the image will move left, and bending index finger will allow the user to zoom in, while bending the thumb will allow to zoom out. When zooming out of the image, after reaching a certain threshold, the user exits the image and reaches a 3d space where the image will now be displayed in form of a sphere.

Implementation:

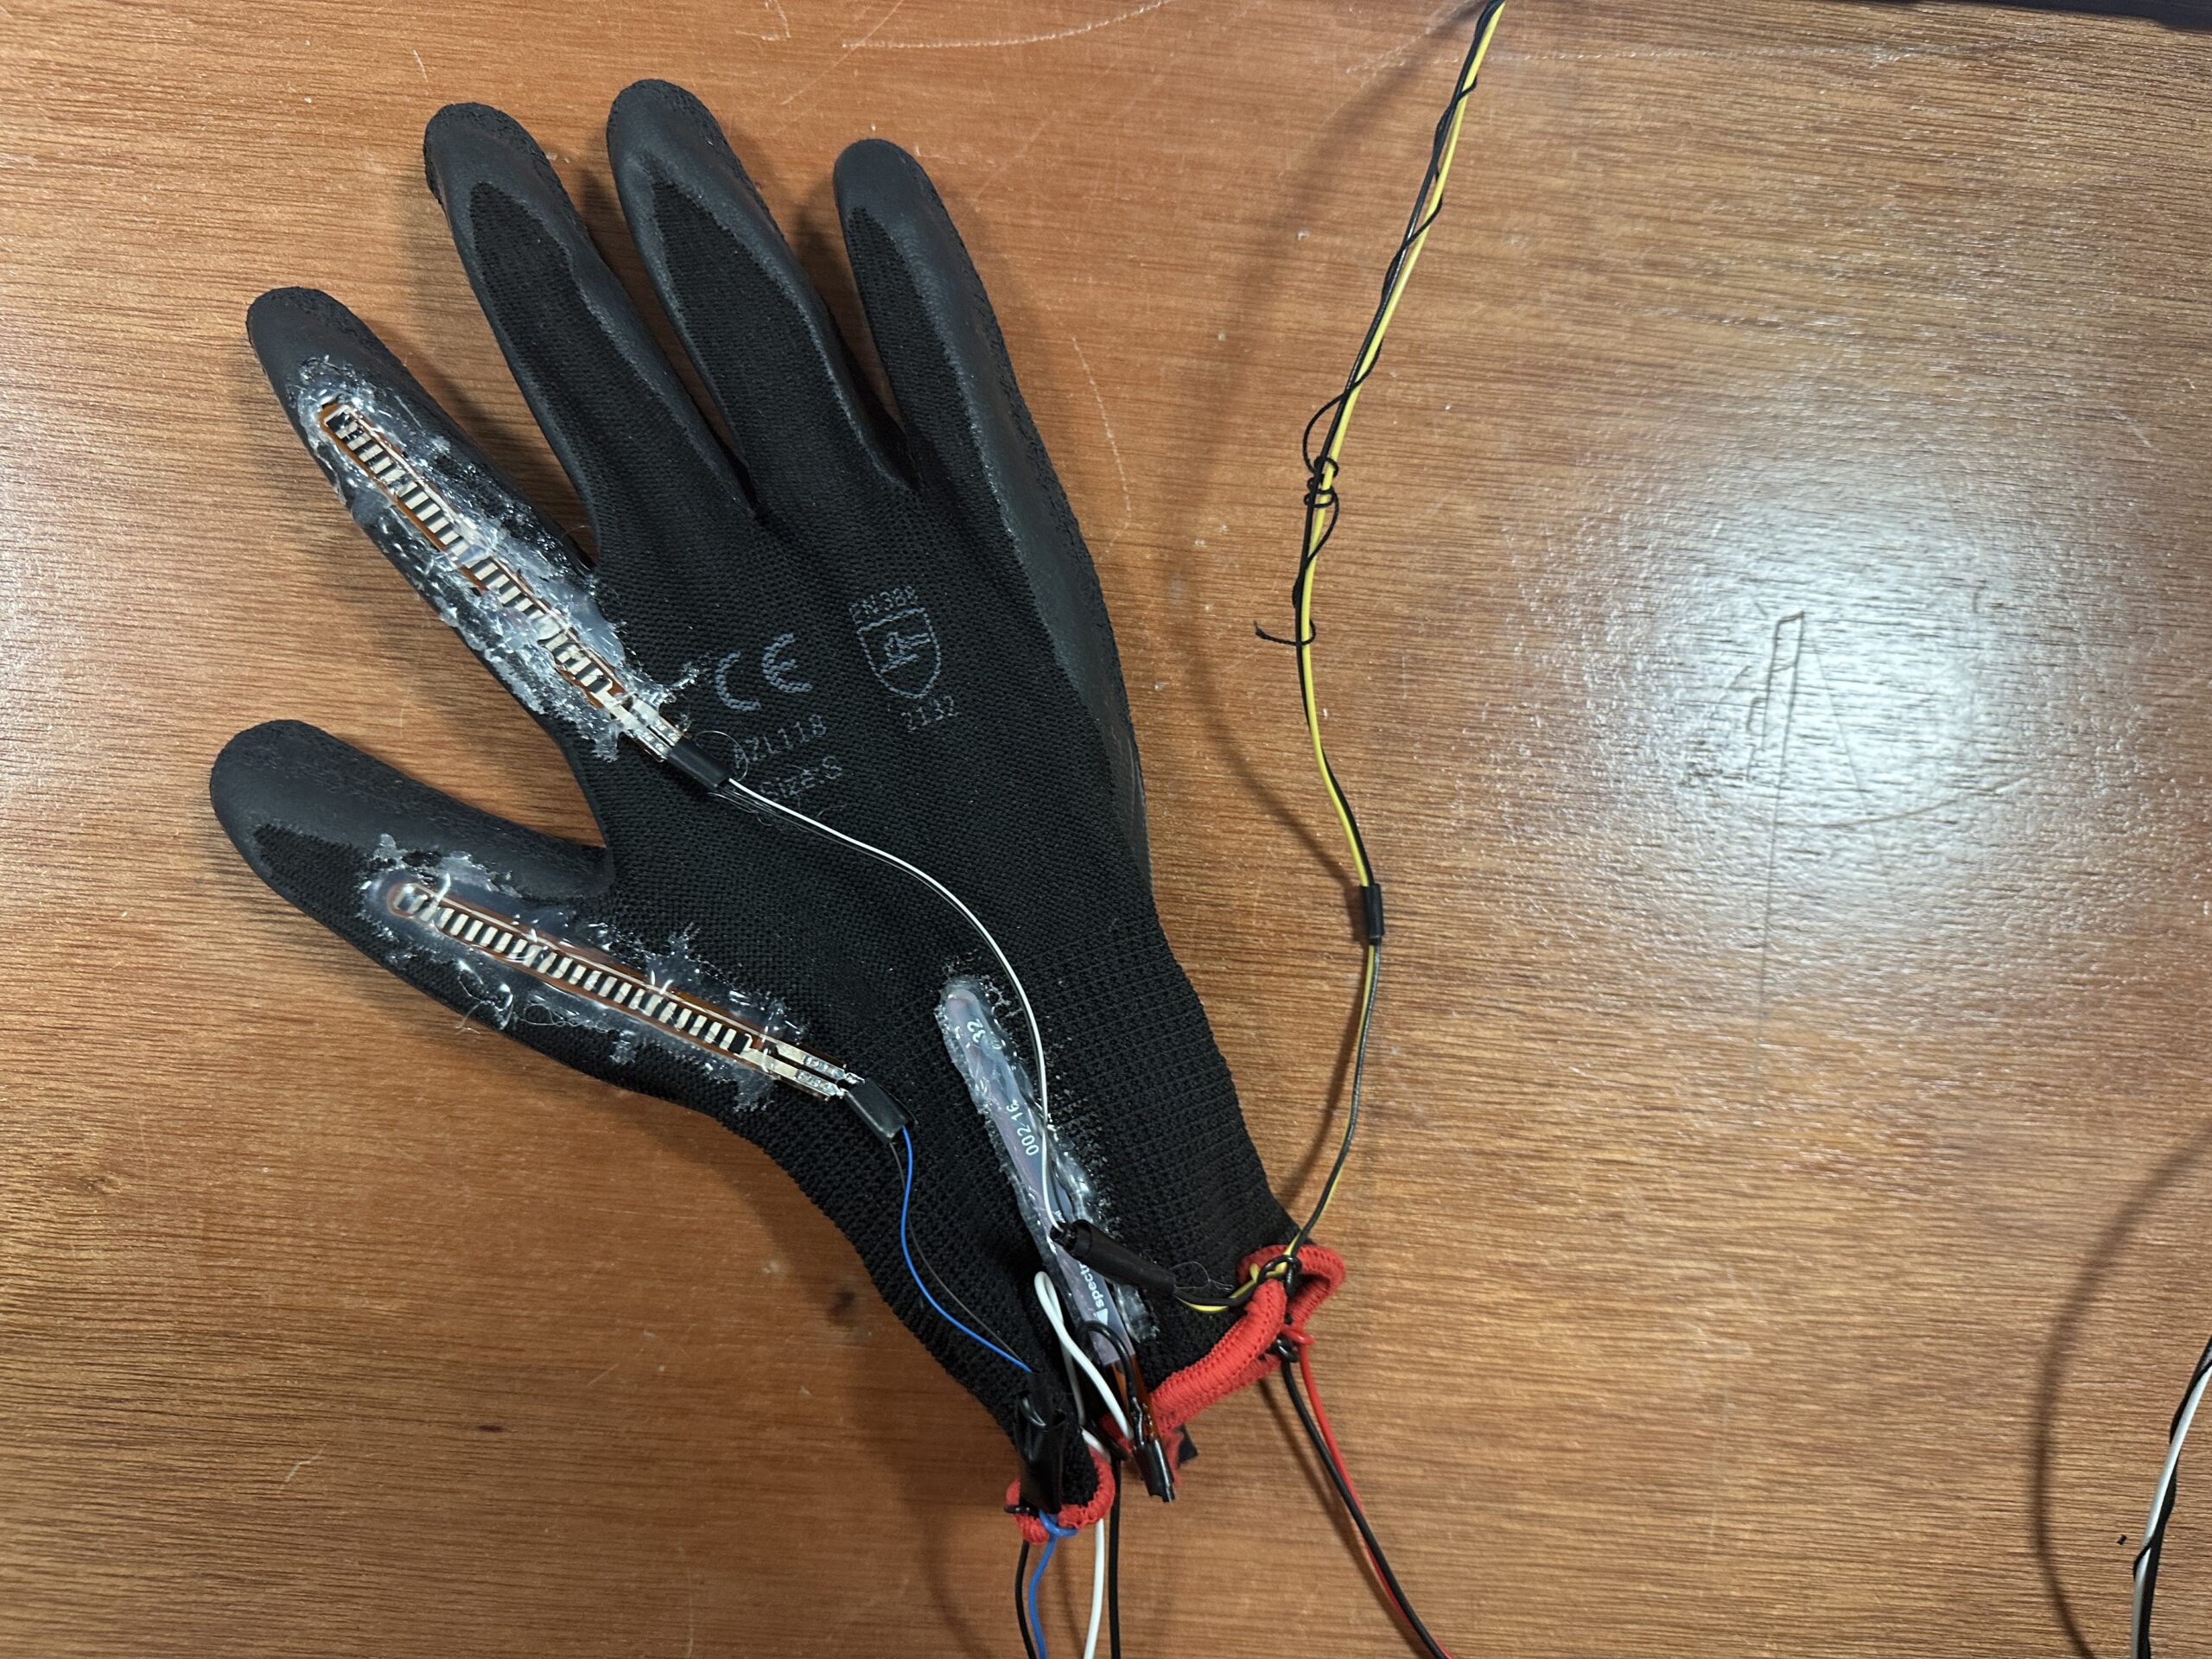
I attached flex sensors to the glove and used analog input received from them to detect the user’s hand movement. I attached two flex sensors to both sides the glove which are used to sense when the user bends his/her hand right or left and move the panorama image accordingly. I also attached two sensors to the index finger and to the thumb which are used to zoom in and zoom out inside the image.  I’ve used pretty useful feedback from the user-testing so I set the limit to how much the user an zoom in and out, as this has been creating problems with the experience because the sensors are too sensitive for detecting when the user continuously bended his/her hand.

Arduino code:

Arduino is used to read analog input from the flex sensors which it then  sends to p5.js through serial communication.

const int flexPin1 = A1; //controls movement right
const int flexPin0 = A0;  //controls movement left

const int flexPin5 = A5; //controls zooming in
const int flexPin4 = A4; //controls zooming out

int value_left; //save analog value
int value_right;
int value_zoomIn;
int value_zoomOut;

void setup(){

  Serial.begin(9600);

  //start the handshake
  while (Serial.available() <= 0) {
    Serial.println("0,0,0,0"); // send a starting message
    delay(300);
    delay(50);
  }
}

void loop(){
  
  // wait for data from p5 before doing something
  while (Serial.available()) {
    int isMoving = Serial.parseInt();
    if (Serial.read() == '\n') {

      //read the inputs from flex sensors
      value_right = analogRead(flexPin1); 
      value_left = analogRead(flexPin0);

      value_zoomIn = analogRead(flexPin5);
      value_zoomOut = analogRead(flexPin4); 
      delay(5);

      //send them to p5.js
      Serial.print(value_right);
      Serial.print(',');
      Serial.print(value_left);
      Serial.print(',');
      Serial.print(value_zoomIn);
      Serial.print(',');
      Serial.println(value_zoomOut);
   }
  }
  
}

p5.js code:

p5.js code is too large, so I’m embedding the link to my code.

p5.js is handling the main functions of the code such as creating visuals and a panorama-like experience, moving the image according to the value received from the Arduino, creating user interactivity with the map, popping text boxes when the user hovers over the destination rectangles, etc.

Communication between Arduino and p5.js:

Arduino gets the analog input from the flex sensors and sends them to p5.js, which measures that value, and if it exceeds a certain threshold, it moves the panorama image accordingly.

Demo:

Aspects that I’m proud of:

I’m really proud with how everything in this project turned out. I wasn’t really expecting initially that this will resemble a VR experience, so this was a pleasant surprise for me that I discovered during the process of making. I’m also proud with the idea of using gloves to move inside the image as I think that is a pretty cool and novel idea. In terms of the hardware part, I’m glad with how sensors are working as they’re giving pretty accurate answers since they have been placed on right locations on the glove.

 Areas for future improvement:

One of the areas for future improvements include adding more destination points to the map, because I have only 6 places so far. Also, I used hot glue to attach the flex sensors to the glove. Even though the connection is  good, it may not be long-term so one of the improvements could be sewing the flex senosors to the glove, as it is made of sewable material. In addition to that, it’s highly recommended for the user to hold the hand in a certain position initially (palm facing left side of the body and fingers pointing outwards) so that sensors would work best, and I’m planning on explaining it to user by demonstrating the hand position. One of the better ways to do this for the future would be recording a demo and attaching a video to the instructions page or adding a picture/gif with the corresponding hand posture.t

Week 14 – Final project User Testing

Sanjana was my user-tester for the latest version of my final project. As per the instructions, I didn’t give her any instructions before she started testing it, and was able to receive some valuable feedback on the ways I could improve instructions given to the user and discovered one bug that has a potential to be a cool feature haha.

Video:

Feedback:

  • Sanjana found it pretty easy to navigate the user interface and how the mapping between the glove and p5.js work. I feel like I needed to explain her that sensors are very sensitive so sometimes even minor bends affect the movement. The parts of the project that are working well are communication between the flex sensors and p5.js and also the graphics.
  • Through the user-testing, I realized that I should make it clearer in the instructions page how the user should hold her hand so that sensors would work the best way. I should also mention that the right, left, zoom in and out movements sometimes can be combined when corresponding hand movements are combined (i.e. when the user bends her thumb while bending her hand right)
  • This user-testing also helped me realize that that when zooming in or out, there’s some limit till which u can zoom in/out so that the image will not get distorted. By zooming in too much you can get very deep into the image so that only pixels will be visible and the image presented will not make sense. However, by zooming out of the image you can reach a cool 3d space where the image will cover the sphere (the cool feature I was talking about). See below image for reference.

Week 12 – Final Project Proposal Revision

Concept

I want to create an interactive game where the user will use the joystick to move the avatar and find the lost objects. The idea for this project came from this interactive web-based experience called The Healing Forest. Initially, I was thinking of creating a Fruit Ninja game as a group project because I wanted to make the user interact with the game using the camera  but then I figured out it would lack the physical computing part so I decided to settle on the idea of using a joystick. 

  • There will be a forest (or another setting) where the user will search for lost items by moving the avatar
  • The flashlight will illuminate the avatar’s path wherever it will go and other parts of the background will be dark

Arduino

Input:

  • Joystick will be used to control the movement of the avatar
  • Buttons
    • Will be used to switch between themes
    • Will be used to jump from obstacles such as stone, etc.

Output:

  • LEDs will be used to indicate a warning when obstacle is nearby

p5.js

Output:

  • p5.js will provide a gaming interface by displaying avatar, setting, etc. It will receive the x and y coordinates from the joystick and will parse them to the gaming screen to move the avatar accordingly. It will also send a signal to the Arduino when an obstacle is nearby to light up the warning LED.

Further Improvements

I want to add some stages before and after locating objects, but I’m still brainstorming on those. One of the ideas is to add another stage where the user would need to sort/place the found objects based on different attributes or some output could be displayed based on the items the user collects.

Final Project Proposal

Concept

For the final project, me and Sanjana are thinking of creating a Virtual Fruit Ninja. We want to take the concept of this mobile game to the next level by creating an immersive and interactive game experience allowing players to slice fruits virtually with their hands! The following project and our love for the game fruit ninja is the inspiration for this project: (https://naziafakhruddin.medium.com/gesture-controlled-flower-art-with-ml5-js-posenet-and-p5-js-61b98fa3fc68)

For this project, we are thinking of using the ml5 library, built on top of Tensor.js, and the PoseNet function to accurately track the position of the player’s hand in real time through the camera video. The goal is to create a seamless integration between the player’s hand movements and a virtual sword or blade in the game, simulating the experience of slicing real fruits with a knife.

The game mechanics will be intuitive and engaging. Players can wave their hands across the screen to slice the fruits as they appear, and the PoseNet function will accurately track their hand movements in real time, providing precise and responsive slicing actions. We will also leverage p5.js to create visually appealing graphics and animations, creating an engaging game environment that enhances the overall gameplay experience.

Challenge

One of the main challenges of this project will be optimizing the game’s performance to ensure smooth gameplay and minimize latency. We will need to carefully understand the output of the PoseNet model and use the information to update the virtual sword’s position and orientation in real-time.

Week 11 – In Class Exercises (Serial Communication)

Exercise 1: The value obtained from the potentiometer makes the ellipse in p5 move on the horizontal axis, in the middle of the screen, and nothing on arduino is controlled by p5.

p5.js

let rVal = 0;
let xPos = 0;
let rad = 50;


function setup() {
  createCanvas(400, 400);
  textSize(18);
}  

function draw() {
  background(255);

  if (!serialActive) {
    text("Press Space Bar to select Serial Port", 20, 30);
  } else {
    text("Connected", 20, 30);
    
    xPos = map(rVal, 0, 900, 0, 400);
    // Print the current values
    text('rVal = ' + str(rVal), 20, 50);
    ellipse(xPos, 200, rad, rad);
    text('xPos = ' + str(xPos), 20, 70);

  }
  
}

function keyPressed() {
  if (key == " ") {
    // important to have in order to start the serial connection!!
    setUpSerial();
  }
}


function readSerial(data) {
  ////////////////////////////////////
  //READ FROM ARDUINO HERE
  
  if (data != null) {
    
    let fromArduino = split(trim(data), ",");

    if (fromArduino.length == 1) {
      rVal = fromArduino[0];
    }

    //////////////////////////////////
    //SEND TO ARDUINO HERE (handshake)
    //////////////////////////////////
    let sendToArduino = 1 + "\n";
    writeSerial(sendToArduino);
  }
}

Arduino

void setup() {
  Serial.begin(9600);
  //pinMode(LED_BUILTIN, OUTPUT);

//start the handshake
  while (Serial.available() <= 0) {
    //digitalWrite(LED_BUILTIN, HIGH);
    Serial.println("0,0"); // send a starting message
    delay(300);
    //digitalWrite(LED_BUILTIN, LOW);
    delay(50);

  }
}

void loop() {
  // wait for data from p5 before doing something
  while (Serial.available()) {
     //digitalWrite(LED_BUILTIN, HIGH);
    int isMoving = Serial.parseInt();
    if (Serial.read() == '\n') {
      int photoVal = analogRead(A0); 
      delay(5);
      Serial.println(photoVal);
   }
  }
  //digitalWrite(LED_BUILTIN, LOW);
}


Exercise 2: Change the LED brightness by moving the ellipse on p5.js left or right.

let left = 0;
let right = 0;
let brightness = 0;
let rad = 50;

function setup() {
  createCanvas(400, 400);
  textSize(18);
}  

function draw() {
  background(255);

  if (!serialActive) {
    text("Press Space Bar to select Serial Port", 20, 30);
  } else {
    text("Connected", 20, 30);

    //the x position of the cirlce will control the brightness of the LED
    xPos = mouseX;
    ellipse(xPos, 200, rad, rad);
    brightness = map(xPos, 0, 400, 0, 255);
    brightness = int(brightness);
    
    // Print the current values
    text('Brightness = ' + str(brightness), 20, 60);
    text('xPos = ' + str(xPos), 20, 90);

  }
  
}

function keyPressed() {
  if (key == " ") {
    // important to have in order to start the serial connection!!
    setUpSerial();
  }
}


function readSerial(data) {
  ////////////////////////////////////
  //READ FROM ARDUINO HERE
  ////////////////////////////////////
  
  if (data != null) {
    
    let fromArduino = split(trim(data), ",");
    if (fromArduino.length == 1) {
      // we're not getting input from arduino
    }
    //////////////////////////////////
    //SEND TO ARDUINO HERE (handshake)
    //////////////////////////////////
    let sendToArduino = brightness + "\n";
    writeSerial(sendToArduino);
  }
}

Arduino

int ledPin = 5;

void setup() {
  Serial.begin(9600);
  pinMode(LED_BUILTIN, OUTPUT);
  pinMode(ledPin, OUTPUT);
  // start the handshake
  while (Serial.available() <= 0) {
    digitalWrite(LED_BUILTIN, HIGH); // on/blink while waiting for serial data
    Serial.println("0,0"); // send a starting message
    delay(300);            // wait 1/3 second
    digitalWrite(LED_BUILTIN, LOW);
    delay(50);
  }
}

void loop() {
  // wait for data from p5 before doing something
  while (Serial.available()) {
    digitalWrite(LED_BUILTIN, HIGH); // led on while receiving data
    int brightness = Serial.parseInt();
    if (Serial.read() == '\n') {
      delay(5);
      Serial.println("1");
    }
    analogWrite(ledPin, brightness);
  }
  digitalWrite(LED_BUILTIN, LOW);
}


Exercise 3: Alter the gravity wind example to make the LED light up and turn off every time the ball bounces , and control the wind using potentiometer.

p5.js

let velocity;
let gravity;
let position;
let acceleration;
let wind;
let drag = 0.99;
let mass = 50;

function setup() {
  createCanvas(640, 360);
  noFill();
  position = createVector(width/2, 0);
  velocity = createVector(0,0);
  acceleration = createVector(0,0);
  gravity = createVector(0, 0.5*mass);
  wind = createVector(0,0);
}

function draw() {
  background(255);
  
  if (!serialActive) {
    text("Press Space Bar to select Serial Port", 20, 30);
  } else {
    applyForce(wind);
    applyForce(gravity);
    velocity.add(acceleration);
    velocity.mult(drag);
    position.add(velocity);
    acceleration.mult(0);

    fill(0);
    ellipse(position.x, position.y, mass, mass);
    if (position.y > height - mass / 2) {
      velocity.y *= -0.9; // A little dampening when hitting the bottom
      position.y = height - mass / 2;
      isBouncing = 1;
    } else {
      isBouncing = 0;
    }
  }
}

function applyForce(force){
  // Newton's 2nd law: F = M * A
  // or A = F / M
  let f = p5.Vector.div(force, mass);
  acceleration.add(f);
}


function keyPressed() {
  if (key == " ") {
    // important to have in order to start the serial connection!!
    setUpSerial();
  } else if (key == "ENTER") {
    mass = random(15, 80);
    position.y = -mass;
    velocity.mult(0);
  }
}

function readSerial(data) {
  if (data != null) {
    // make sure there is actually a message
    // split the message
    let fromArduino = split(trim(data), ",");
    // if the right length, then proceed
    if (fromArduino.length == 1) {
      // only store values here
      // do everything with those values in the main draw loop
      let potValue = int(fromArduino[0]);
      
      //change the wind based on the potentiometer value
      wind.x = map(potValue, 0, 900, -5, 5);
    }

    //////////////////////////////////
    //SEND TO ARDUINO HERE (handshake)
    //////////////////////////////////
    let sendToArduino = isBouncing + "\n";
    writeSerial(sendToArduino);
  }
}

Arduino

int ledPin = 5;
const int potPin = A0;

void setup() {
  Serial.begin(9600);
  pinMode(LED_BUILTIN, OUTPUT);
  pinMode(ledPin, OUTPUT);
  pinMode(potPin, INPUT);
  
  // start the handshake
  while (Serial.available() <= 0) {
    digitalWrite(LED_BUILTIN, HIGH); // on/blink while waiting for serial data
    Serial.println("0,0"); // send a starting message
    delay(300);            // wait 1/3 second
    digitalWrite(LED_BUILTIN, LOW);
    delay(50);
  }
}

void loop() {
  // wait for data from p5 before doing something
  while (Serial.available()) {
    digitalWrite(LED_BUILTIN, HIGH); // led on while receiving data
    digitalWrite(ledPin, LOW);
    int isBouncing = Serial.parseInt();
    if (Serial.read() == '\n') {
      int potValue = analogRead(potPin);
      delay(5);
      Serial.println(potValue);
    }
    // Set LED brightness based on whether bouncing.
    if (isBouncing == 1) {
      digitalWrite(ledPin, HIGH);
    } else {
      digitalWrite(ledPin, LOW);
    }
  }
  digitalWrite(LED_BUILTIN, LOW);
}

Demo


Week 10 – Musical Instrument: Piano

Concept

After going over several examples of musical instruments that we could create using the specified digital and analog sensors, Sanjana Nambiar and I decided to settle on the old but gold piano. The concept behind our project is simple and straightforward: our piano will consist of 8 buttons that will correspond to piano tiles and the buzzer will play a corresponding musical note when the user presses one of the eight switch buttons. We integrated an analog input to our project by getting the value from the potentiometer and  mapping it to one of the four octaves. Based on this mapping, the button will play different variations of the same note i.e. A or a or a’ or a’’. Below is the illustration of the four octaves that we used and the corresponding notes and frequencies.

Code

// arduino-equivalent frequencies of the musical notes for each tile of the piano
// each note is stored in a list consisitning of three other notes of  different pitch
int T_C[4] = {65, 130, 262, 523};
int T_D[4] = {73, 147, 294, 587};
int T_E[4] = {82, 165, 330, 659};
int T_F[4] = {87, 175, 349, 698};
int T_G[4] = {98, 196, 392, 784};
int T_A[4] = {110, 220, 440, 880};
int T_H[4] = {123, 247, 493, 988};
int T_c[4] = {130, 262, 523, 1046};

//names of each tile and the corresponding digital  pins
const int A = 11;
const int C = 5;
const int D = 6;
const int E = 7;
const int F = 8;
const int G = 10;
const int H = 12;
const int c = 13;

const int Buzz = A0;

void setup()
{
  Serial.begin(9600); 

  //declare the switches as digital input devices
  pinMode(C, INPUT);
  pinMode(D, INPUT);
  pinMode(E, INPUT);
  pinMode(F, INPUT);
  pinMode(G, INPUT);
  pinMode(A, INPUT);
  pinMode(H, INPUT);
  pinMode(c, INPUT);
}

void loop()
{
  //read the analog input from the potentiometer
  int potPosition = analogRead(A3);

  //map that input to the the value in the range 0-4
  potPosition = map(potPosition, 0, 1023, 0, 4);
  Serial.println(potPosition);

  //value 4 is just a dummy value that will be used to detect the end of the potentiometer, 
  //so when we get value 4 from the poentiometer, we treat it as 3
  if(potPosition == 4){ potPosition = 3; }

  //play the correspondting tone for each of the 8 swithces
  while(digitalRead(C) == HIGH){ tone(Buzz,T_C[potPosition]); }
  while(digitalRead(D) == HIGH){ tone(Buzz,T_D[potPosition]); }
  while(digitalRead(E) == HIGH){ tone(Buzz,T_E[potPosition]); }
  while(digitalRead(F) == HIGH){ tone(Buzz,T_F[potPosition]); }
  while(digitalRead(G) == HIGH){ tone(Buzz,T_G[potPosition]); }
  while(digitalRead(A) == HIGH){ tone(Buzz,T_A[potPosition]); }
  while(digitalRead(H) == HIGH){ tone(Buzz,T_H[potPosition]); }
  while(digitalRead(c) == HIGH){ tone(Buzz,T_c[potPosition]); }

  noTone(Buzz);
}

Schematic

Demo

Future Improvements

Since we were limited in the use of sensors that we could use, our piano doesn’t really look like a real-world piano. So, one of the improvements we could make is to create a separate portable piano i.e. a cardboard piano covered with aluminum foil or equipped with force sensors, and adapt our code to play the same sounds when the corresponding tile will get pressed. We could also work on implementing the logic to handle the case when two tiles are pressed simultaneously.


Week 9 – “Sunlight” meter

Concept

My concept for this homework was inspired by the “Oasis” project which imitates a robotic flower that blooms only at night. For my project, I decided to create a”Sunlight” meter for the plants that warns when there’s not enough light around to conduct photosynthesis, and provides a solution in the form of an artificial “sunlight. I use a light sensor as an analog sensor to measure the “sunlight”, and if it will be below the standard brightness threshold needed for photosynthesis, there will be a RED warning light coming from a blinking red LED. Also, I’m also using a switch and two other yellow LEDs. Yellow LEDs are placed around the light sensor to imitate artificial sunlight such that when the user presses the switch (i.e. when there’s not enough light around for the plant to perform photosynthesis), those two yellow LEDs will light up and will provide artificial sunlight for the plant.  P.S. I am not using anything to indicate a plant in this project as I don’t have any plant in my room, but this arduino board can be placed near any plant easily tom measure the light around.


Video Demonstration

Circuit

Code

const int threshold = 150; //threshold for turning on the warning 

void setup()
{
  Serial.begin(9600);
     pinMode(5,OUTPUT); //LED that signals the warning
    
     pinMode(7,OUTPUT); //light LED 1
     pinMode(8,OUTPUT); //light LED 2

     pinMode(A0,INPUT); //switch
     pinMode(A1,INPUT); //light sensor

}
void loop()
{
    //reading analog voltage from the light sensor and storing it in an integer 
    int sensorValue  = analogRead(1);

    //scale sensorValue, which is btw 0 to 1023, to values btw 0 to 255 form analogWrite funtion which only receives  values btw this range
    int brightness = map(sensorValue, 0, 1023, 0, 255); 

    //if the light sensor's brightness value will be less than threshold value
    if(brightness < threshold){

      //make the warning red LED blink
      digitalWrite(5, HIGH);
      delay(500);
      digitalWrite(5, LOW);
      delay(500);

    } else{
      digitalWrite(5, LOW);
    }

  //switch will be a digital sensor
  int switchPosition = digitalRead(A0);

  //when the switch will be pressed, two yellow LEDs surrounding the light sensor will light up, imitating a sunlight
  if (switchPosition == HIGH) {
    digitalWrite(7, HIGH);
    digitalWrite(8, HIGH);
  } 
  else {
    digitalWrite(7, LOW);
    digitalWrite(8, LOW);

  }
}


Week 8 – Unusual Switch

Idea

Since we are not allowed to use our hands to create a switch, the first thing I thought of was using my legs. I wanted to make something that is simple but also useful/could solve some real problem. One of the habits that I have is toe-tapping which I keep doing unconsciously when I sit in one place for a long time.  It’s hard to consciously be aware of this, so the things that easily draw attention, such as a continuously blinking light bulb, could help me and other people having the same problem be more aware of when they do toe-tapping and consequently eradicate this disturbing behavior.


How it works

My switch consists of a ring made of aluminum foil and a flat square cardboard covered with aluminum foil. You wear the aluminum ring to your shoes and place the square cardboard right underneath your legs. Every time you fidget and touch the cardboard with your legs the bulb lights up, signaling you that you’re doing toe-tapping.


Video


Future Improvements

This switch design is pretty simple and straightforward, however it is not very practical if I want to use it to detect and fight my fidget behavior. So one of the future improvements would be to make the design more user-friendly: I could work on expanding the wires so that the light bulb will be right in front of me, not on the ground, and I’ll be able to actually see it when working on a desk.

Midterm – Ghostly Pong


Concept

My midterm project, which is called Ghostly Pong, is similar to the Ping Pong game but instead of 1 disk the players will play with 2, and the disks will keep periodically disappearing and reappearing, just like a ghost.

After hearing some valuable feedback during the class on my midterm progress, I decided to change the concept of my game and make it unique of a kind – something that you can’t play in real life. That was when I came up with the idea of “Ghostly Pong” – a Pong game with a disappearing disk. Furthermore, another special feature that I incorporated into my game which is not present in traditional Pong game is the idea of playing with 2 disks simultaneously.

Game features

  • Each player will have a paddle and an individual score counter
  • Players must hit the disk with their corresponding paddles, if they miss the disk, their opponents will score a point
  • Players can move the paddle only vertically (along the initially specified y-axis)
  • Paddles will be in rectangular shape, the disc will be in circular shape
  • The control key for the player 1 will be “W” and “S” keys, for the player 2 – “UP” and “DOWN” keys
  • The first player to score 10 points wins


Game design

In my code, I created different classes for Disk, Paddle, and Game objects. Each of these classes contains corresponding functions that aim at displaying the object, updating the coordinates, making the object move, and perform other features unique to the object. Every time a new game starts, new instances of these objects would be created.

Also, my game consists of 4 stages: Welcome page, Instructions page, Game, Game Over page. The draw() function will draw will display different screens based on the stage we’re in. Transitions from one stage to another is usually handled by the mouse click.

//display for a welcome page
function welcomePageDisplay(){
    image(bgWelcome, 0, 0, RES_W, RES_H);
    
    //restore default alignment modes
    rectMode(CORNER)
    textAlign(LEFT)
  
    fill(255)
    textFont("Lakki Reddy", 25) 
    let msg1 = "Welcome to the"
    
    //place all the text in the center of the screen
    let tWidth1 = textWidth(msg1)
    text(msg1, RES_W / 2 - (tWidth1 / 2), RES_H / 9)
  
    textFont("Comforter Brush",60);
    let msg2 = "Ghostly Pong Game"
    let tWidth2 = textWidth(msg2)
    text(msg2, RES_W / 2 - (tWidth2 / 2), RES_H / 4)
  
    textFont("Lakki Reddy",15) 
    let msg3 = "Click anywhere to continue to instructions page"
    let tWidth3 = textWidth(msg3)
    text(msg3, RES_W / 2 - (tWidth3 / 2), 10*RES_H / 11)

}

There are two separate functions for updating the screen when the player scores a goal or when the game is over: continueGame() get called when the disk enters one of the goals, hence in this function I create a new instances of only Disk objects. In the function restartGame(), I create a new instance of the whole Game, which in turn automatically creates new instances of Disk and Paddle objects.

The game will always have a background music, which will also change based on the game theme the user chooses. Moreover, the collision of the disk and the paddle, as well as the goals will be accompanied by different corresponding sounds (this can make the game a bit easier by giving some hints about the location of the disk when it disappears from screen).

P.S. For all the sound and images I used, I created a separate text file called “links” with the links to the websites from where I took those elements.

Problems I ran into

In terms of technical side, the most difficult and time-consuming part of this project was writing the code for checking the collision the paddle with the disk and making it bounce off as in the real life. In order to achieve this goal, I decided to rely on the physics’ law of collision: when the disk hits the surface, it will bounce with the same speed as before in the opposite direction(conservation of impulse) and it will also bounce off with the same angle (angle of incidence = angle of reflection). After a few trials and error , I succeeded in implementing this collision check and bouncing correctly.

The below code is where I implemented this logical check.

//Code for managing Disk bouncing when it touches paddles 
function Disk_Paddle_Contact(paddle, disk){
        
        //check whether the disk contacted the left paddle
        if ((disk.disk_xc - disk.disk_w/2 < paddle.px + paddle.pw/2) && (disk.disk_yc + disk.disk_h/2 > paddle.py - paddle.ph/2) && (disk.disk_yc - disk.disk_h/2 < paddle.py + paddle.ph/2)){
            if(disk.disk_speed_x < 0){
              
                //play the collision sound when disk touches the paddle
                collisionSound.play()
              
                //print(paddle.px,paddle.py)
                disk.disk_speed_x = - disk.disk_speed_x
            }
        }      
        //check whether the disk contacted the right paddle      
        else if ((disk.disk_xc + disk.disk_w/2 > paddle.pxr - paddle.pw/2) && (disk.disk_yc + disk.disk_h/2 > paddle.pyr - paddle.ph/2) && (disk.disk_yc - disk.disk_h/2 < paddle.pyr + paddle.ph/2)){
            if(disk.disk_speed_x > 0){
              
              //play the collision sound when disk touches the paddle
                collisionSound.play()
              
              //print(paddle.pxr,paddle.pyr)
              disk.disk_speed_x = - disk.disk_speed_x
        
            }
        }   
}
//Code for managing Disk bouncing when it touches boundaries 
    Disk_bouncing(){
        //this if statement will be executed if the disk touches right-side boundaries of the table
        if(this.disk_xc + this.disk_w/2 > RES_W){
          
          //this indicates, player 2 missed the disk, so play 1 scores one point
          score_player1 += 1
          goalSound.play()
          continueGame() 
        }
                
         //this if statement will be executed if the disk touches left-side boundaries of the table       
        else if(this.disk_xc - this.disk_w/2 < 0){
          
           //this indicates, player 1 missed the disk, so play 2 scores one point
           score_player2 += 1
           goalSound.play()
           continueGame() 
        }
  
       
        //this if statement will be executed if the disk touches upper or lower boundaries of the table
        if(this.disk_yc + this.disk_h/2 > RES_H || this.disk_yc - this.disk_h/2 < 0){
            if(RES_H/2 + 100 < this.disk_yc  || this.disk_yc < RES_H/2 - 100){
                this.disk_speed_y = - this.disk_speed_y
            }   
        }
      
        this.disk_xc = this.disk_xc + this.disk_speed_x
        this.disk_yc = this.disk_yc + this.disk_speed_y 

     }
}

What I’m particularly proud of

I’m proud of the good technical decision to create different classes for each of the Disk and Paddle objects, as this allowed me to easily create new instances of them, independently of each other, later in the game and to write a separate function on a global scope called ” Disk_Paddle_Contact(paddle, disk)” which takes instances of those classes and calculates whether there was a contact. I’m also proud of the good game design and the designs of the Welcome and Game Over pages.

Future improvements

Some people may find it hard to hit the disk as it constantly keeps disappearing. Therefore I decided to add some sound stimuli in terms of the collision sound and goal sound to help the user recognize when he/she scores a goal. One of the suggestions for future improvements would be making the paddles blink when the disk is nearby, thus sending some sort of a “hint” to the player of where the disk is located.

Another possible suggestion would be adding a volume slider for the game_display(), so that the user could control the intensity of a background music, and make it lower if it is too loud.

Week 5: Midterm progress

For this midterm project, I decided to create a computer modification of a Ping Pong game. In this game, the two players control the two paddles on either side of the game window. They move the paddles up or down to hit the moving ball. The score of a player increases when he/she hits the ball.

Game features:

  • Player must bounce the ball in order to score points
  • Each player will have a paddle and an individual score counter
  • Players can move the paddle only vertically (along the initially specified y-axis)
  • Paddles will be in rectangular shape, the disc will be in circular shape
  • The control key for the player 1 will be “W” and “S” keys, for the player 2 – “UP” and “DOWN” keys


The Most Complex Part:

The most complex  and time-consuming part of this project was writing the code for checking the collision the paddle with the disk and making it bounce off as in the real life. In order to achieve this goal, I decided to rely on the physic’s law of collision: when the disk hits the surface, it will bounce with the same speed as before in the opposite direction(conservation of impulse) and it will also bounce off with the same angle (angle of incidence = angle of reflection). After a few trials and error , I succeeded in implementing this collision check and bouncing correctly.

The below code is where I implemented this logical check:

//Code for managing Disk movement               
Disk_movement(){ 
    this.disk_xc = this.disk_xc + this.disk_speed_x
    this.disk_yc = this.disk_yc + this.disk_speed_y
}

//Code for managing Disk bouncing when it touches boundaries 
 Disk_bouncing(){

  
    //Code for bouncing off if disk hits the boundaries
    //this if statement will be executed if the disk touches right-side boundaries of the table
    if(this.disk_xc + this.disk_w/2 > RES_W){
      
      this.disk_speed_x = - this.disk_speed_x
    }
            
     //this if statement will be executed if the disk touches left-side boundaries of the table       
    else if(this.disk_xc - this.disk_w/2 < 0){
      
      this.disk_speed_x = - this.disk_speed_x
                 
    }
   
    //this if statement will be executed if the disk touches upper or lower boundaries of the table
    if(this.disk_yc + this.disk_h/2 > RES_H || this.disk_yc - this.disk_h/2 < 0){
        if(RES_H/2 + 100 < this.disk_yc  || this.disk_yc < RES_H/2 - 100){
            this.disk_speed_y = - this.disk_speed_y
        }
      
    }
 
    this.disk_xc = this.disk_xc + this.disk_speed_x
    this.disk_yc = this.disk_yc + this.disk_speed_y            
 }


Future Improvements:

I still don’t have images and sounds, so I will work on integrating them to this game. Apart from the background music, I also want to add a collision sound for when the disk hits the paddle.  In addition, I’m still working on adding the restart feature to the game, and I also want to make this game consist of several rounds.