Responses

#1: Her Code Got Humans on the Moon—And Invented Software Itself

Software engineering, a concept Hamilton pioneered, has found its way from the moon landing to nearly every human endeavor.

The article introduces Margaret Hamilton, mother of software engineering, and one of the most prominent figures that were part of the Apollo space mission. Two main points I got from this article were:

1). Hamilton is a renowned source of inspiration for all women in the tech industry, an industry that’s predominantly male (even more so during her time). Her uniquely ambitious life and undeniable robustness is pretty amazing and she is definitely not given enough recognition in the programming world. I found it very interesting reading about her story of the pilot01 issue where she was told that the issue “would never happen” and yet it did. Her intuition to debug is such a critical aspect of being a modern programmer, portraying how ahead of her time she was. I think being prepared for any crashes is a very important part of this work.

2). The concept of the ‘software’ didn’t really exist until then. I found it really interesting that the budget for the Apollo hadn’t even accounted for such a thing to a be a part of the project – and yet, it probably ended up being the most important factor of the mission.


#2: Attractive Things Work Better

The author explains why attractive things work better (they produce positive emotions which in turn make it easier to negate minor errors or difficulties). I found it really interesting that the author broke the though processes down into three fundamental levels:

  1. Visceral: at this level, we are at our simplest and most primitive. As we are incapable of reasoning and building upon our schemas, the appearance of design and the creation of good first impressions matter the most. I think this is the level that amateur designers (me, personally) tend to focus on the most without regarding the next two.
  2. Behavioral: here we are able to alter our actions according to some level of analysis.
  3. Reflective: by far, I think this is the most important level for designers. At this level, humans are very sensitive to experiences, training and education. We are also most vulnerable to variability through our different cultures and our experience/usability can have many individual differences. I think the factor of attraction also becomes relevant at this level as reflection also requires the awakening of long-lasting emotions and emotions are what we associate with beauty. Thus, any successful product will provoke reflection in the long term.
    However, in general, I believe a designer must know his/her audience well in order to comply with the demands that come with all three levels of processing. Although, fundamentally each is important, the reflective element is the most sensitive to humans and should therefore be given as much thought.

Kyle reads “Making Interactive Art: Set the Stage, Then Shut Up and Listen” by Tigoe

In this blog post, Tom Igoe describes the presentation of a piece of interactive arts as “The beginning of a conversation with the people who experience your work.” He introduces this concept to discourage other interactive media or physical computing artists from telling their audience blatantly how to interact with their artwork, rather than leaving physical suggestions as he would do.

It is like more classical artwork, like painting, in that you can the artist can give it whatever meaning they want, but what gives the artwork its meaning is what the viewer interacts with it. Each viewer sees the work through their own perspective, and thus has the power to give the artwork their own meaning. That is what art really is.

I believe that the author is attempting to defend interactive artwork as a craft, by connecting it to this meaning. He is educating other artists and telling them not to hand everything to their viewers, but to let them interpret it on their own.

 interactive artworks, are different from classical artwork in that the viewer interacts with them directly. Because of this, Tigoe suggests that there are specific strategies to making a piece of work physically discoverable. 

Here is a video of me playing with a highly discoverable interactive instillation at the Sydney Museum of Contemporary art last week.

Kyle Makes a Remote Controlled Crossbow

Hi I’m back to share some info about this cool project I did.

I have spent the last few weeks engineering this super cool remote controlled crossbow unit. The basic concept of the project was relatively simple: a crossbow controlled by 3 servo motors– two to position it in a 2 dimensional axis for aim, and another to release a crossbow bolt. I decided to use potentiometers to control the positioning servos, because it seemed most natural. I used a push button to release the trigger servo for the same reason.

All in all, the most time consuming part of the project was not coming up with or designing the unit, but engineering each piece of the crossbow to work in unison with every other. Since there were so many parts moving precisely in a free space, this was quite difficult,  especially since the unit needed to work repeatedly.

I decided that the way to allow the crossbow to move in space was to put it in a frame with servos pulling it from the edges of the frame. The vertical movement servo, connected to a small pulley wheel to reduce extraneous movement, pulled the crossbow up, while gravity would allow it to fall if the servo slacked tension. The horizontal servo, however, does not have gravity to counteract it, so I attached to opposite side to a spring that would create tension when pulled against.

Making everything the correct size with just scrap and a lack of proper tools (like a band saw) made it difficult. I spent a lot of time trying to overcome these problems.

One of the most difficult areas to fine tune was the trigger system. It was difficult to create a channel that not only held the crossbow bolt, but also was smooth enough to allow it to uniformly pass through the central hole in the cross bar. I decided to hot glue a plastic straw into a previously created channel in the wooden body of the bow. It took me quite a while to figure out a precise system that would allow the rubber band, which creates the force necessary to propel the bolt, to slide off the servo trigger and go straight into the notched end of the bolt. I used hot glue here like a makeshift 3d printer to make it so that the bolt would always lie in the right place.

In front of the bow I attached a board that a foam and cardboard target could be attached to.

The code was pretty simple for the most part. All I needed to do was connect my two potentiometers to the vertical and horizontal servo motors and make a button press.

#include <Servo.h>

const int vertPin = A0;

const int horzPin = A1;

int trigPin = 3;
int trigState = LOW;

Servo vertServo;
Servo horzServo;
Servo trigServo;

void setup() {
  // put your setup code here, to run once:
pinMode(trigPin, INPUT);
  vertServo. attach(9);
   horzServo. attach(6);
   trigServo. attach(11);

  Serial.begin(9600);
}

void loop() {
  // put your main code here, to run repeatedly:
  int vertState = analogRead(vertPin);
  int horzState = analogRead(horzPin);
  int trigRead = digitalRead(trigPin);

  int horzAngle = map(horzState, 0, 1023, 0, 180);
  int vertAngle = map(vertState, 0, 1023, 0, 180);

  vertServo.write(vertAngle);
  horzServo.write(horzAngle);

 Serial.print("read = ");
  Serial.println(vertState);
//  Serial.print(" Vertical = ");
//  Serial.println(vertAngle);
//  delay(100);
//  Serial.println(horzState);
//  Serial.print("Horizontal = ");
//  Serial.println(horzPin);

if (trigRead == LOW){
  trigServo.write (15);
} 
if (trigRead == HIGH) {trigServo.write(40);
}
}

I was concerned at first that my Arduino output did not have enough power to power all three servos simultaneously, but through experimentation, I found that I didn’t need to connect any external power.

I also found that I had a problem with crossing wires. I fixed this by braiding and twisting the wires connected to the remote controller and cleaning up the wiring of the breadboard in general.

I also had problems with syntax in my code, but once I fixed them, everything ended up coming together beautifully.

Reading Response – Emotion & Design: Attractive Things Work Better

Emotion & Design: Attractive Things Work Better – Don Norman

“One person’s acceptance is another one’s rejection. Worse, what is appealing at one moment may not be at another.” (Norman, 33).

After reading the following chapter on Emotion & Design by Norman, the quote indicated above struck me. It is one of the most difficult part of designing a product that I could not trace its roots, and often had to conclude the struggle to find the solution by acknowledging the fact that it cannot be explained. However, Norman tries to describe the following complexity by analyzing the three levels of processing in human brains, and I realized that it is crucial for the design to touch on the behavioral and reflective levels in order to acquire the satisfaction from the users.

As Norman mentions in the later part of the chapter, all humans are relatively similar in the visceral level but can be very different in the behavioral and reflective levels. And, the following idea, I believe, is the crucial part that the designer should have in mind at all times when designing a product. The interaction that the users take can be formulated based on their behavioral level and the take-away is determined by the reflective levels – which can explain the phenomenon of how users feel different when interacting with a product.

However, even though it is important to know the following concept, it still presents a huge problem for the designer. In order to reach the satisfaction for most users, the designers have to take into account of the “different” processing levels of the users’ brains and, ultimately, design something that can have the similar effect for all. Or, at the same time, it comes to the question of rather designing something for “all”, can we use the concept of processing levels to grasp and be effective on a specific type of users? If we were to change the view into targeting a specific group of users, I believe that understanding the processing levels will be absolutely helpful.

Reading Response – Her Code Got Humans on the Moon

Her Code Got Humans on the Moon – And Invented Software Itself – Robert McMillan

The following article on Margaret Hamilton’s involvement in the creation of the code for the Apollo Mission was an interesting read, not only that she serves as “the mother” of software engineering, but also that she programmed the software while predicting the possible error that the “higher-ups” thought was insignificant. The mindset of Hamilton’s higher-ups at the time represent what most engineers presume – the users will not make any mistakes. However, just as Hamilton created a supplement code to prevent the crash from using P01, it is necessary to think of all the possible interaction that can happen and be prepared for the implications. In the worst case, the crash could have led all the astronauts to die out in space.

The following idea was implemented in a recent project that I did in 24X event in early March, where I have designed a hypertext web application. After the product was completed and in the process of testing, I have realized that I would press the “back” button on the browser when I felt that I have made a mistake – and this led to a crash. Even though some people believed that I was thinking too much, I have added a supplement sets of code to prevent from going back. And, at the day of the presentation, I have witnessed many attendees trying to go back to revert their choices.

The software we design does not get to that point severity, but it still holds the point that as programmers and designers, we should not expect the users to exactly follow the path that is in our heads. And, this means that we need to think about all the possible unwanted directions and create either a preventive measure in the code or something that will place the user back into a forward direction, not backwards or crash. So, always debug, debug, and debug!

Code from Processing Intro

Colors, Shapes, & Interaction:

int rectX = 300;
int rectY = 100;
int rectWidth = 100;

color rectColor = color(255);
color circleColor = color(255);

color backgroundColor = color(255);


void setup() {
  size(640, 360);
}

void draw() {
  background(backgroundColor);
  

  if (mouseX > rectX // check if x is larger than our x starting point for our rectangle
    && mouseY > rectY // check if y is larger than our y starting point for our rectangle
    && (mouseX< rectX + rectWidth) // check if we're less than the horizontal boundary of our rect
    && (mouseY< rectY + rectWidth) //same as above but for the outer bound of the rect's height
    && mousePressed
    ) { 
    rectColor = color(255, 0, 0);
    circleColor = color(0, 255, 0);
  } else {
    rectColor = color(255);
    circleColor = color(255);
  }
  
  fill(rectColor);
  rect(rectX, rectY, rectWidth, rectWidth);
  
  fill(circleColor);
  ellipse(mouseX, mouseY, 50, 50);
}

void mousePressed(){
  backgroundColor= color(random(255), random(255), random(255));
}


Bouncing Balls:

int x, y, speedX, speedY;
float x2, y2, speedY2, gravity;

void setup(){
 size(640, 360); 
 x = width/2;
 y = 0;
 speedX = 9;
 speedY = 10;
 x2 = width/2;
 y2 = 0;
 speedY2 = 0;
 gravity = .5;
}

void draw(){
  background(255);
  //gravity bounce
  ellipse(x2, y2, 30, 30);
  y2 += speedY2;
  if (y2 > height || y2<0){
   speedY2 *= -.95; // speed = speed * -1;
  }
  speedY2 += gravity;
  y2 = constrain(y2, 0-1, height+1); // go a little outside for the constraints so that the flipping speed logci above works
  
  //whole screen bounce aaround ball
  ellipse(x, y, 30, 30);
  x += speedX;
  y += speedY; // y = y + speed;
  
  if (x > width || x<0){
   speedX *= -1; // speed = speed * -1;
  }
  
  if (y > height || y<0){
   speedY *= -1; // speed = speed * -1;
  }
}


Midterm Project: Mini Rube Goldberg machine

For the midterm project, I was interested in creating a series of interconnected reactions, and thought there’s nothing better than a Rube Goldberg machine that embodies that concept. At first, I was throwing around wild concepts, that involve the use of multiple sensors and intricate code. But, in the end I settled on less intricate structure, that was equally challenging.

The main parts this project is comprised of are:

  • A wooden ramp
  • 2 servos
  • Distance sensor
  • Force Sensitive Resistor
  • LCD Screen
  • Rubber ball
  • Marble

Although the project fulfills its purpose and main function, I would still have prefered to have some aspects of he code to be enhanced a bit – such as the movement of the servos in relation to the reaction, as well as the display on the LCD screen.

And here’s the video:

The code:

// include the library code:
#include <LiquidCrystal.h>

// initialize the library with the numbers of the interface pins

LiquidCrystal lcd(13, 12, 11, 10, 9, 8);   //defining lcd pins

int sensorValue = 0; // variable to store the value coming from the sensor
int sensorPin = A0; // select the input pin for LDR
int sensorMin = 1023;
int sensorMax = 0;
int fsrReading;

void setup(void) {
  Serial.begin(9600);
  pinMode(3, INPUT);
  lcd.begin(16, 2);
 
}

void loop() {
  sensorValue = analogRead(sensorPin); // read the value from the sensor
  Serial.println(sensorValue); //prints the values coming from the sensor on the screen

    //display text on lcd
    if (sensorValue > 100) {
      lcd.display();
      lcd.clear();
      lcd.setCursor(0, 0);
      lcd.print("Who let the");
      lcd.setCursor(0, 1);
      lcd.print("ball out!");
    } else {
      lcd.clear();
    }

      lcd.display();
      delay(100); 

  
}


Midterm Project: Flying Paper Airplanes

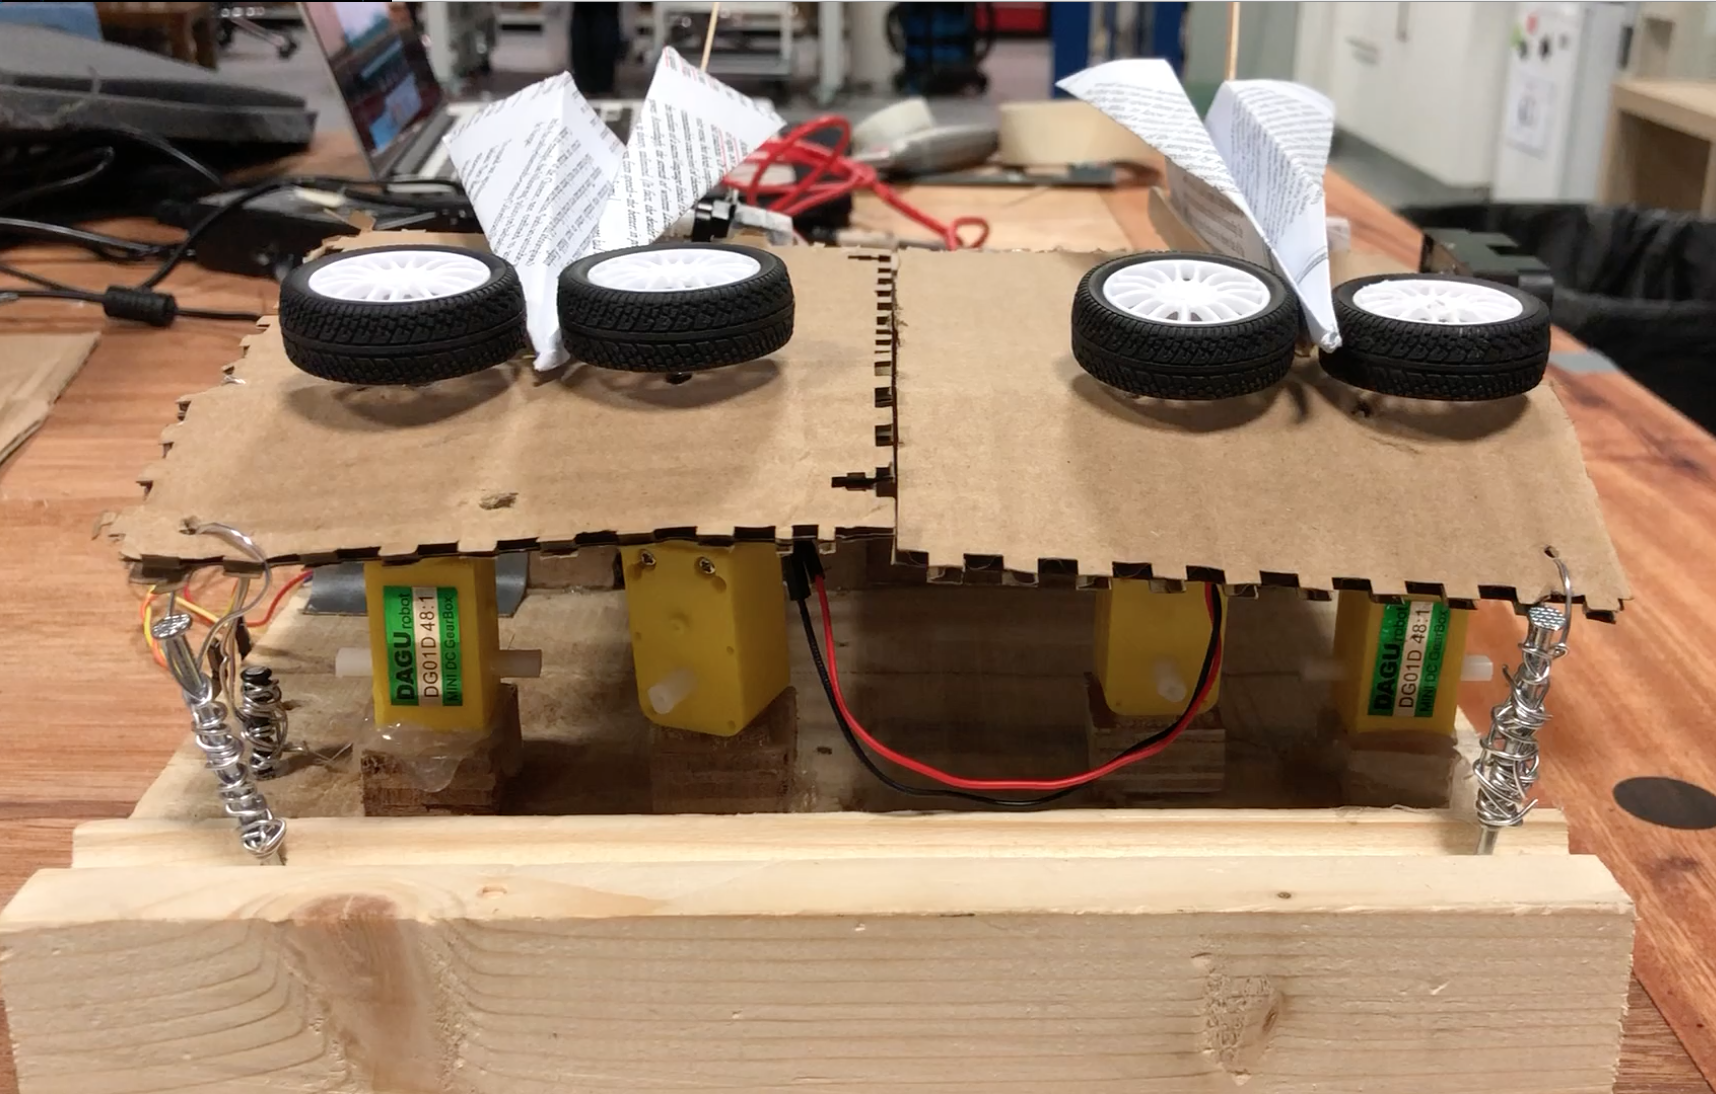
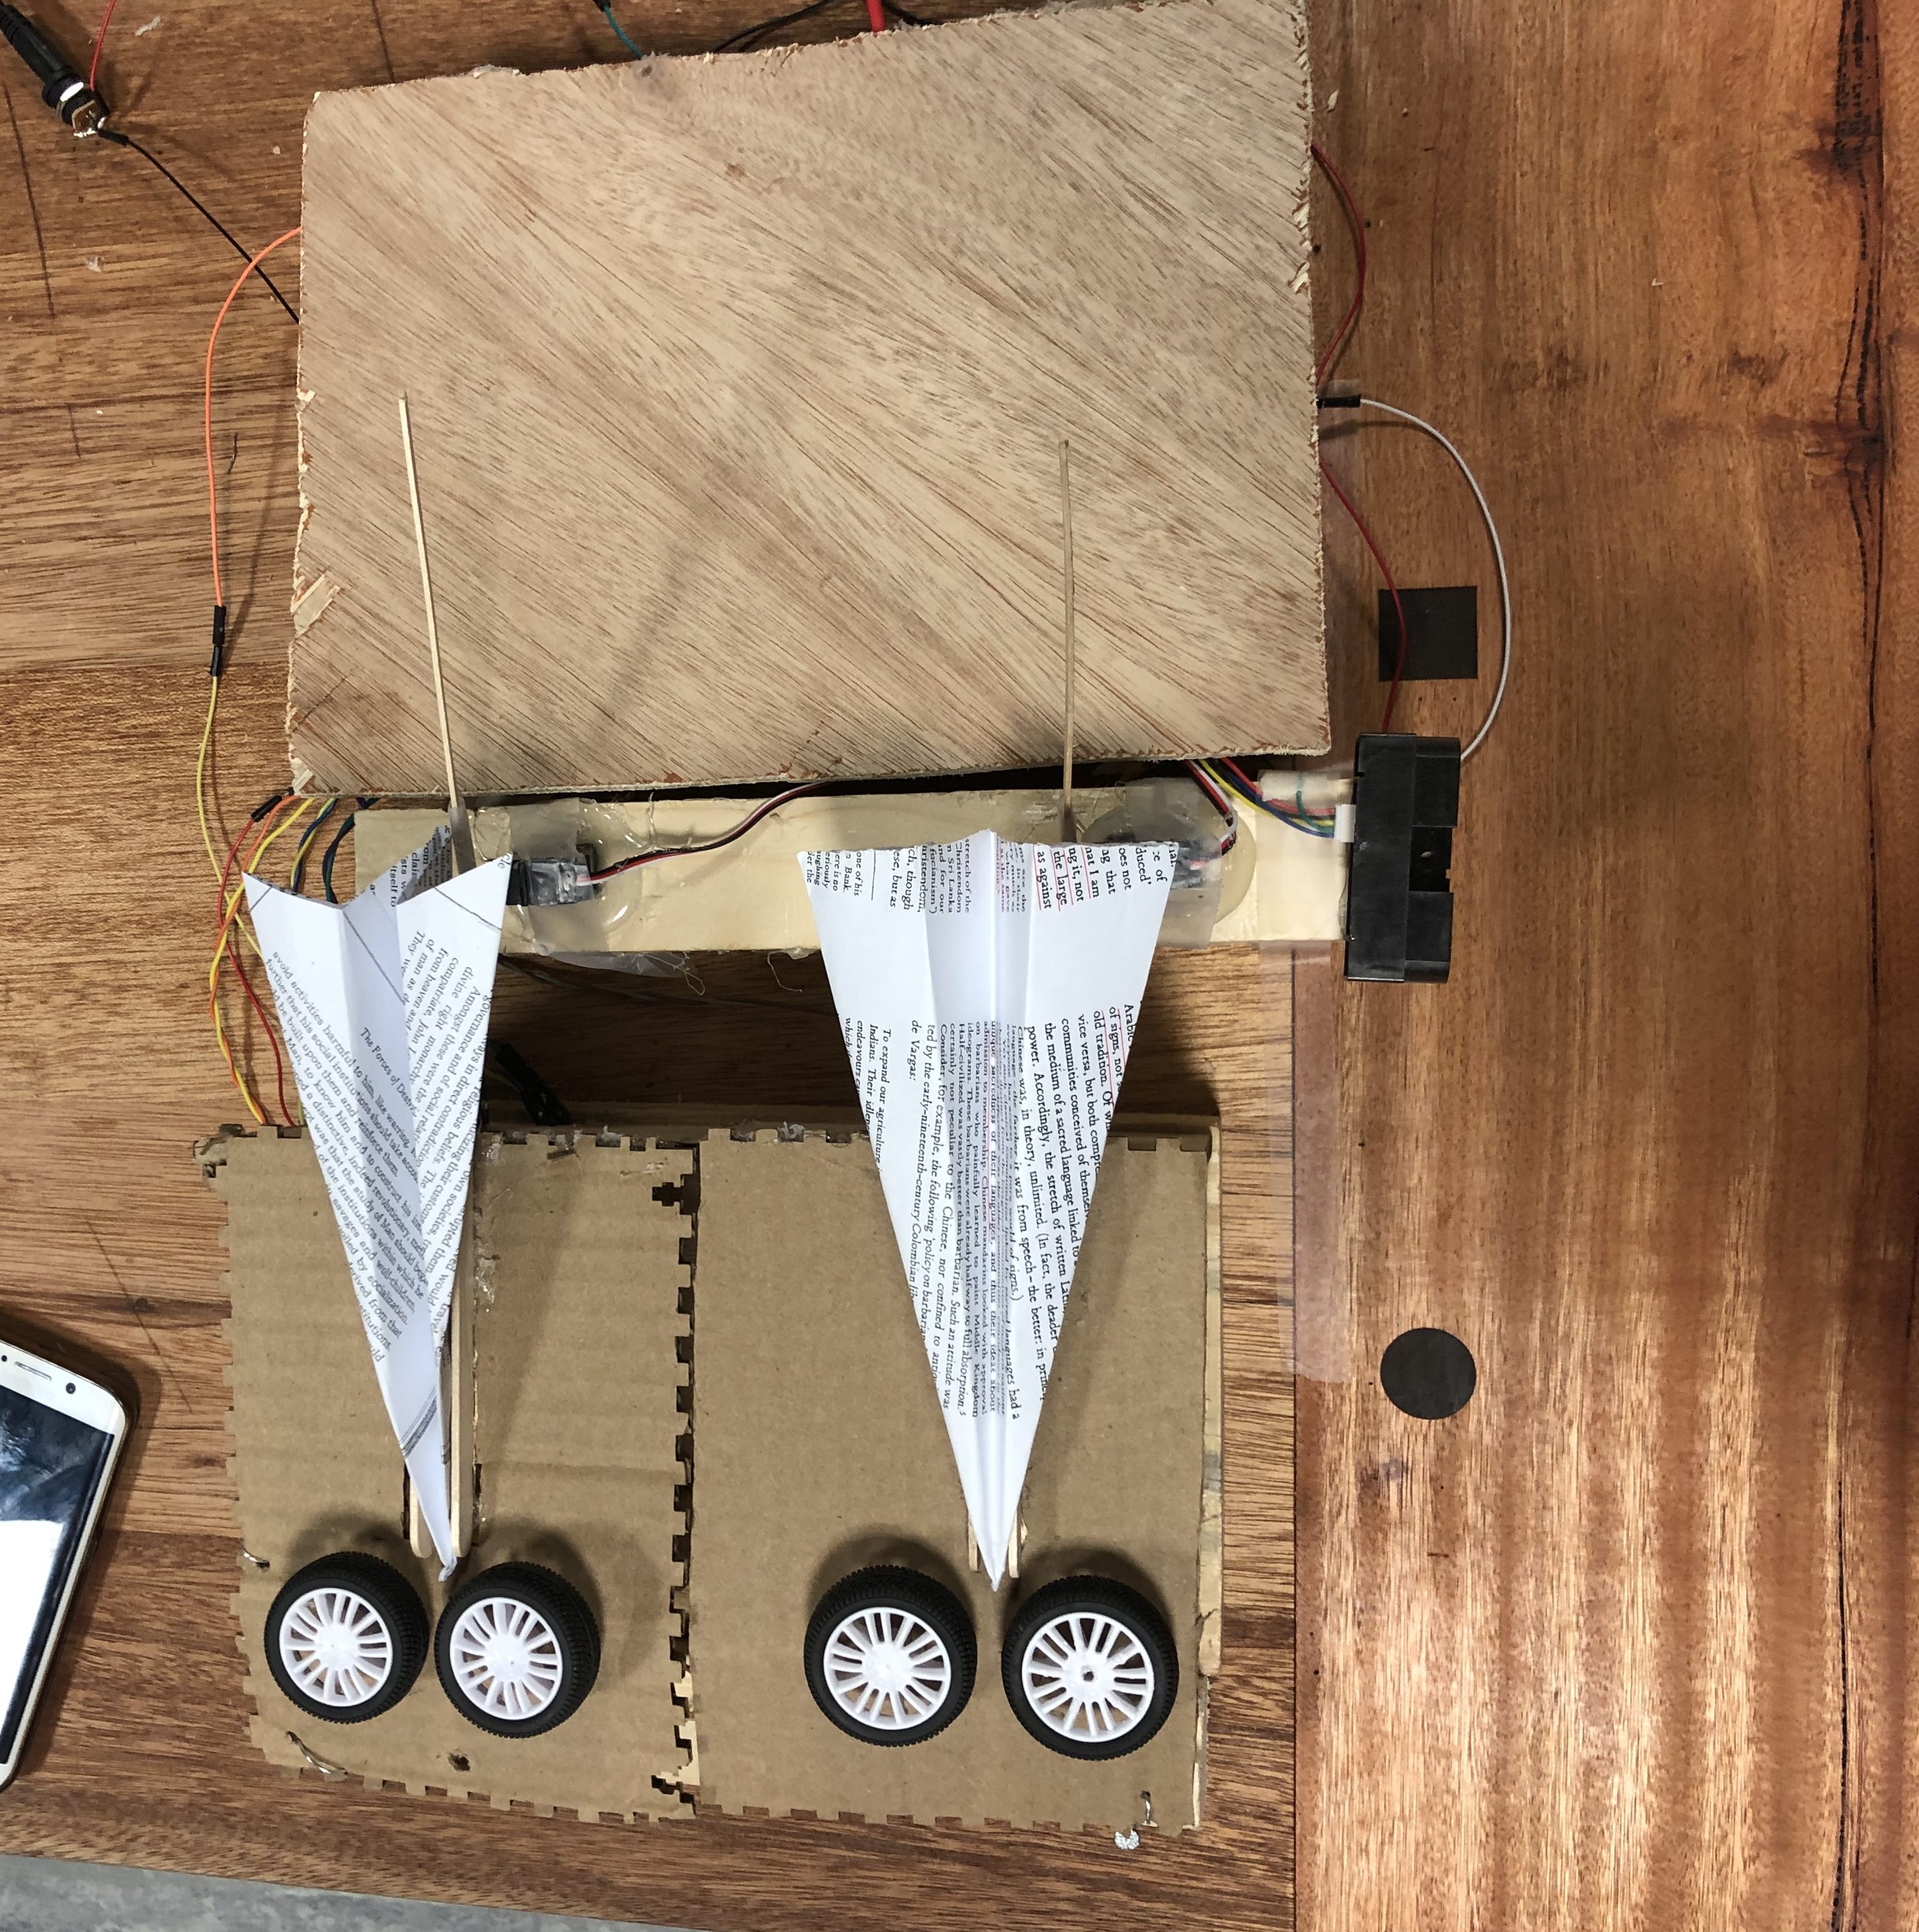
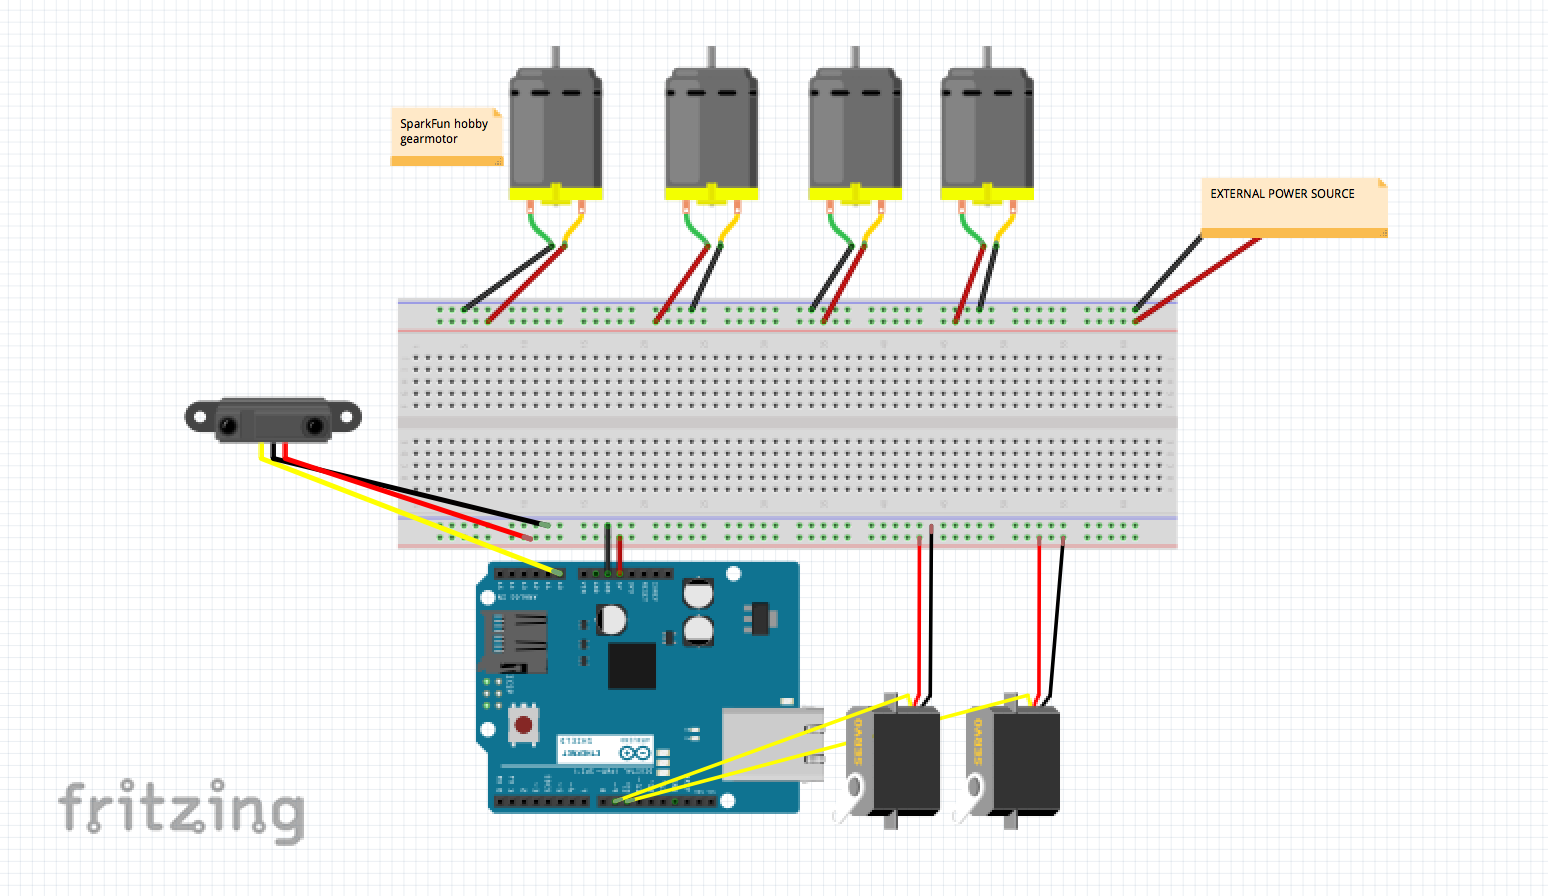
For my midterm project, my initial proposal was to use sound, projection, and motors to create an installation piece. After hearing back from Aaron, I reconstructed the plan and instead used motors to create a paper airplane launcher using four geared motors, two servo motors, and an infrared distance sensor. The sensor is connected to the servo motors, which then launch the airplanes whenever the sensor detects movement.

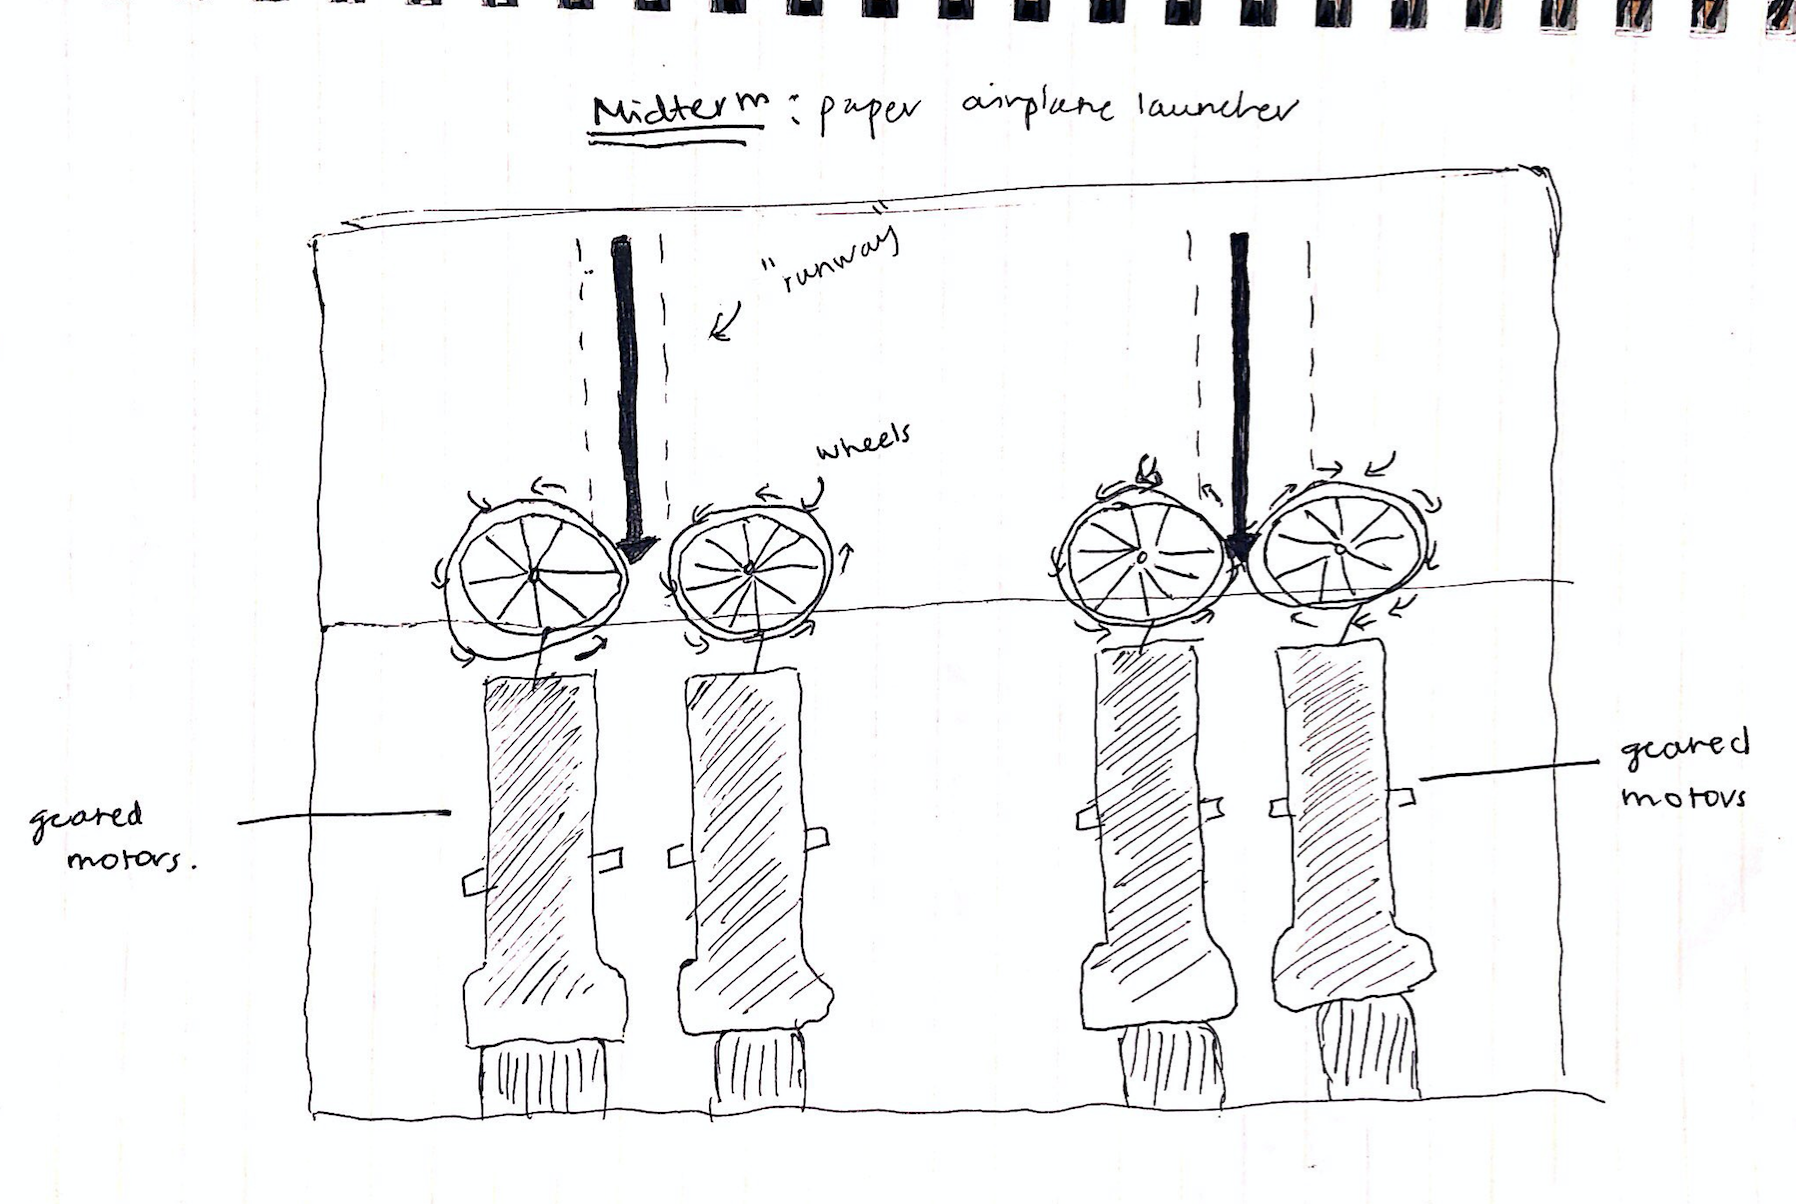
As for the launcher’s structure, I made a platform using wood and cardboard with two wheels connected to the motors on each side, so four wheels in total. Here’s a very rough sketch of that thought process:

And here’s what it looked like:

From Below
From Above

However, I faced several challenges with making this work. Apart from the issues with wiring and code, designing the launcher proved to be really difficult. This meant having to make sure that the wheels were not too close to the cardboard, lining up the sticks for the “runway”, testing the angles for the servo motor launchers, etc. Another challenge I faced at the beginning was powering the wheels. At first, I was using regular DC motors and the issue was that they would take a while to reach full speed, and it was difficult to time them with the servo motors. As a solution to this, I used geared motors (included in the SparkFun kit), which can reach to full speed as soon as you turn them on.

Here’s a fritzing sketch I made of my circuit: 

Here’s the code:

#include <Servo.h>

float distance = 0;

Servo myservo;
Servo myservo2;

void setup()
{
  Serial.begin (9600);

  myservo.attach(9);
  myservo2.attach(10);

}

void loop() {
  //read distance
  distance = analogRead(A0);
  Serial.println("someone there yo");

  if (distance > 600) {          //close distance
    Serial.println("someone there yo");
    //this code moves the servo
    myservo.write(70);            //move servo
    myservo2.write(60);
    delay(50);
  } else {
    myservo.write(0);
    myservo2.write(0);
    delay(50);
  }
}

Here’s a video demonstration:

The idea behind this project is to trigger the servo motors whenever a person appears in front of the sensor, thus launching the airplanes as part of a “surprise”. This means that ideally, the structure would be placed somewhere unexpected, such as at the entrance of a door for example. It also works as a paper airplane tester or racer. This would mean that you’d be able to use it to “race” two paper airplanes, using the same speed and force, to test which airplane can fly the furthest.  So, ultimately, the idea behind this project was to create something playful and “surprising”, to explore different forms of interactivity, and to be able to experiment with a “game” type of interaction (the paper airplane racer). The issue with having these two different uses for the project is that with the airplane racer, I would have to change the affordances and indicators by adding a button instead of the sensor, for example. Whereas the sensor works perfectly for the surprise element.


Post About Physical Computing’s Greatest Hits (and misses)


This article is a summary of technologies and tools that are commonly used in Physical computing but still have great potential to be innovated.

The second paragraph describes accurately one of my biggest strugglings in this class so far. Every time that I have to choose a project always the fear of not being original shows up and make my overthink and discard my ideas.

I found this article extremely helpful for two reasons: 1. It works as a guide of technologies that I can innovate in future projects. 2. It makes me realize that there more than one way to develop technologies and that there are big opportunities for innovation and creativity that can still be explored.

Post About “Making Interactive Art: Set the stage, then Shut up and Listen”

The article is a comparison between interactive work and interactive artwork. The main differences explained by the author are that interactive work is an experience or device made with the purpose of having a conversation with the user, in other words, the creator looks for a specific action of the user. In the other hand, Interactive artwork is about letting the users explore and interpret the experience and the artist should focus on the user’s reaction to his art.

My takeaway of this article is that I learned to differentiate between interactive artwork and interactive work. Several times, during this course, I have build machines without not even knowing what I want from the user. This has caused some of my projects ended up having an ambiguous interaction. Now,  the first question  that I am going to ask myself before starting assignment will be ” Is this interactive work or interactive artwork?”