Week 13: Final Project


Project concept:

For my final project, I stuck closely to the original concept and developed a straightforward yet engaging game. The premise involves safeguarding a car navigating a road from descending obstacles. Users are tasked to protect the car by moving it left and right using the buttons on the Arduino board. Failure to shield the car results is a game over, while successfully safeguarding it from at least 10 obstacles leads to victory. I introduced an element of challenge by ensuring that the car moves at a fast pace, adding a layer of difficulty for users as they skillfully escape the approaching obstacles.

User testing:

I tested the game with my friend Javeria, and given its straightforward design with limited options, she quickly understood the mechanics. During the experience, she said she was able to grasp the functionality effortlessly without any guidance. Her understanding of the game highlighted its user-friendly nature and accessibility.

Challenging part:

The core functionality of the game coding operates smoothly, demonstrating performance without encountering any errors related to its main features. Despite facing multiple challenges, the essential gameplay elements functioned flawlessly. However, the area requiring further improvement lies in the transition between pages. The aspect of navigating between different sections of the game could benefit from some enhancements.

I intentionally excluded the idea of an instruction page, as I, reflecting on my own experiences as a child, preferred the thrill of figuring things out independently. However, recognizing that not everyone shares this perspective, users may need guidance on understanding the fundamental operations of the game. 

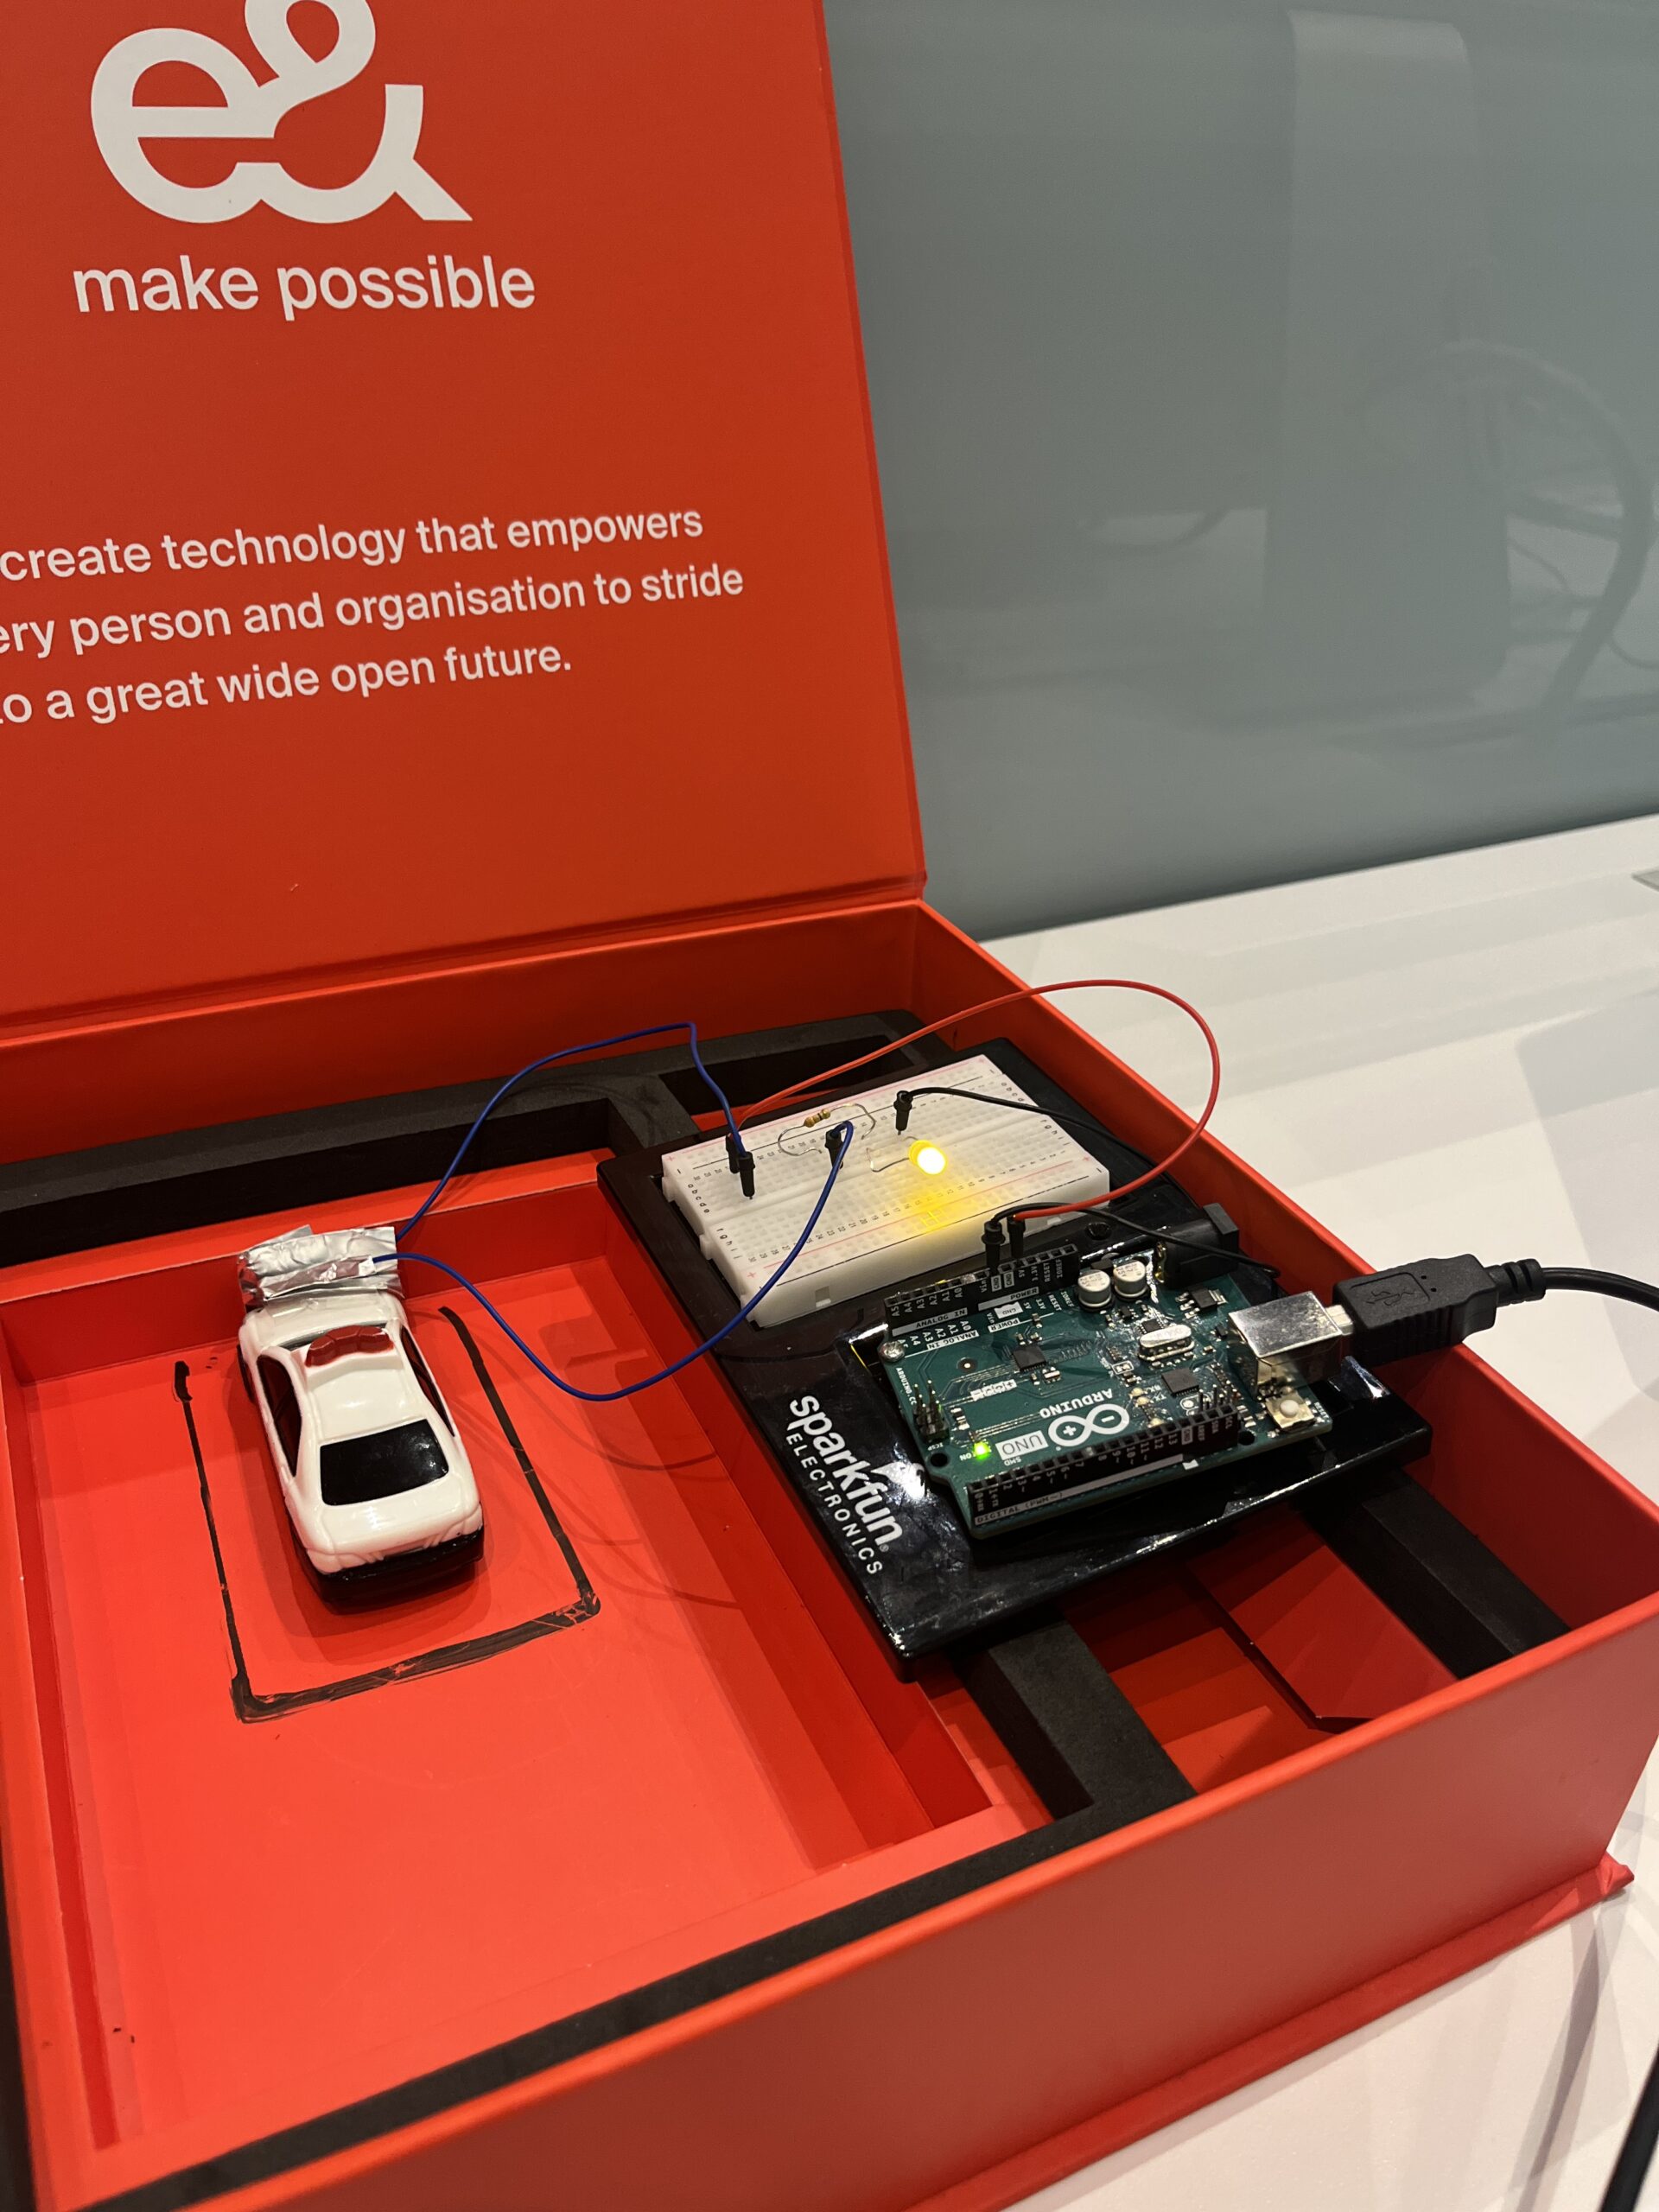
For the arduino I implemented simple 2 switches coding. Initially my p5 coding was the movement of the car to right and left using the keys of the keyboard. But by utilizing the readSerial() function as the communication link between p5.js and Arduino, the Arduino code is structured to retrieve the statuses of two switches and transmit these values to p5.js.

Arduino code:

const int switch1Pin = 4;  // Replace with the actual pin for switch 1
const int switch2Pin = 8;  // Replace with the actual pin for switch 2

void setup() {
  Serial.begin(9600);
  pinMode(switch1Pin, INPUT_PULLUP);
  pinMode(switch2Pin, INPUT_PULLUP);
  

  while (Serial.available() <= 0 ){
    Serial.println("0,0");
    delay(300);
  }
}

void loop() {


  while(Serial.available()) {
    if (Serial.read() == '\n') {
      int switch1State = digitalRead(switch1Pin);
      delay(5);
      int switch2State = digitalRead(switch2Pin);
      
      Serial.print(switch1State);
      Serial.print(',');
      Serial.println(switch2State);
    }
  }


  // if (switch1State == LOW) {
  //   // Switch 1 is clicked, set output to 1
  //   Serial.println("1");
  //   while (digitalRead(switch1Pin) == LOW) {
  //     // Wait until switch 1 is released
  //   }
  // } else if (switch2State == LOW) {
  //   // Switch 2 is clicked, set output to 0
  //   Serial.println("0");
  //   while (digitalRead(switch2Pin) == LOW) {
  //     // Wait until switch 2 is released
  //   }
  // }
}

p5.js code:

let img;
let rock;
let bg;
let car;
let obstacles = [];
let score = 0;
let bgSpeed = 2; // Background scrolling speed
let y1 = 0;
let y2;
let switch1State, switch2State;
let start;
let restart;
let gameStarted = false;
let gameOver = false;
let gameWon = false;
let winThreshold = 5;
let win;
let music;

function preload() {
  img = loadImage('pinkcarsss.png');
  rock = loadImage('rockss.png');
  bg = loadImage('backgroundroad.png');
  start = loadImage('startpage123.png');
  restart = loadImage('restartpage.png');
  win = loadImage('winpage123.png');
  music = loadSound('gamemusic.mp3');
}


function setup() {
  createCanvas(500, 600);
  car = new Car();
  y2 = height;
  music.play();
}

function draw() {
  background(250);

  // displaying of pages according to win/lose
  if (gameWon) {
    // Player wins
    drawWinPage();
  } else if (gameOver) {
    // Player loses
    drawLosePage();
  } else {
    // Display the start page
    image(start, 0, 0, width, height);

    if (gameStarted) {
      drawGame();
    }
  }
}

function drawWinPage() {
  image(win, 0, 0, width, height);
}

function drawLosePage() {
  image(restart, 0, 0, width, height);
}

function restartGame() {
  gameOver = false;
  gameStarted = false;
  score = 0;
  obstacles = [];
  setupGame();
}

function winGame() {
  gameWon = true;
  gameOver = false;
  gameStarted = false;
}

function mousePressed() {
  if (gameOver || gameWon) {
    if (mouseX > 200 && mouseX < 328 && mouseY > 235 && mouseY < 300) {
      restartGame();
    }
  } else if (!gameStarted) {
    if (mouseX > 200 && mouseX < 328 && mouseY > 235 && mouseY < 300) {
      gameStarted = true;
      setupGame();
    }
  }
}

function drawGame() {
  y1 += bgSpeed;
  y2 += bgSpeed;

  if (y1 > height) {
    y1 = -height;
  }
  if (y2 > height) {
    y2 = -height;
  }

  // Draw background images
  image(bg, 0, y1, width, height);
  image(bg, 0, y2, width, height);

  car.show();
  car.move();

  if (frameCount % 80 === 0) {
    obstacles.push(new Obstacle());
  }

  for (let obstacle of obstacles) {
    obstacle.show();
    obstacle.move();

    if (car.hits(obstacle)) {
      gameOver = true;
    }

    if (obstacle.offscreen()) {
      score++;
      obstacles.shift();
    }
  }

  if (score >= winThreshold) {
    winGame();
  }

  // score
  showScore();
}

function setupGame() {
  obstacles = [];
  score = 0;
  y1 = 0;
  y2 = height;
  car = new Car();
  gameStarted = true;
  gameOver = false;
  gameWon = false;
}

function showScore() {
  fill(0);
  textSize(17);
  text(`Score: ${score}`, 20, 20);
}

class Car {
  constructor() {
    this.w = 80;
    this.h = 90;
    this.x = width / 2 - this.w / 2;
    this.y = height / 2 - this.h / 2;
  }

  show() {
    fill(0, 255, 0);
    image(img, this.x, this.y, this.w, this.h);
  }

  move() {
    // Car moves automatically in the vertical direction
    this.y -= 3;

    // Reset car's position when it goes off the top
    if (this.y < -this.h) {
      this.y = height - this.h - 20;
    }
  }

  moveLeft() {
    this.x -= 10;
  }

  moveRight() {
    this.x += 10;
  }

  hits(obstacle) {
    return (
      this.x < obstacle.x + obstacle.w &&
      this.x + this.w > obstacle.x &&
      this.y < obstacle.y + obstacle.h &&
      this.y + this.h > obstacle.y
    );
  }
}

class Obstacle {
  constructor() {
    this.w = 40;
    this.h = 50;
    this.x = random(width - this.w);
    this.y = -this.h;
  }

  show() {
    fill(255, 0, 0);
    image(rock, this.x, this.y, this.w, this.h);
  }

  move() {
    this.y += 5;
  }

  offscreen() {
    return this.y > height;
  }

As for the p5, it contains the main logic of the game, with four different pages. There are multiple images added and also the elements like moving car and the rock are all png images. A happy music was also implemented in p5.

Looking ahead, I aspire to elevate the game beyond its current straightforward nature, by infusing it with more excitement and thrill. In terms of future enhancements, my goal is to inject more excitement into the game, moving beyond its current straightforward design. I’m also eager to explore and incorporate additional physical elements, further enhancing the interactive and immersive aspects of the gaming experience.

Video:

Week 11 Reading reflection

While going through the text, a specific passage that took my attention is the discussion about hearing aids. Unlike glasses, whose design has undergone comparatively less change, the writer highlights the evolving nature of hearing aids, emphasizing not only the modifications in their appearance but also the constant transformation of their discreet placement.

And in the part where, ‘Simple meets universal’, the author explores the complexities of designing for special needs, especially when dealing with a minority of the population. On one hand, there is a compelling business argument against further fragmenting the market by tailoring designs for small percentages of users. The concern here is that such a specialized approach might limit the product’s reach and economic viability.

Conversely, the concept of inclusive design, also known as universal design, introduces a principle-based contention. Inclusive design, by definition, aims to cater to the entire population. This definition intertwines two critical aspects: the acknowledgment that individuals possess varying abilities, and a recognition that people may have diverse needs and preferences regardless of their abilities. The former is commonly addressed through multimodal interfaces, incorporating visual, audible, and tactile cues to accommodate those with impaired touch, hearing, and/or sight. Meanwhile, the latter is often managed through multifunctional platforms, incorporating numerous features to appeal to a broad range of users.

A central question raised by the author is whether the pursuit of universal design, aiming to accommodate a diverse user base, might inadvertently lead to overly complex designs. There is a tension between the goal of inclusivity and the risk of creating designs that are intricate and potentially challenging to use. This prompts a consideration of how truly inclusive such designs are, and whether there are insights to be gained from navigating these design complexities.

Week 11 Serial Communication

Exercise 1

Team members: Nafiha, Javeria

Something that uses only one sensor  on Arduino and makes the ellipse in p5 move on the horizontal axis, in the middle of the screen, and nothing on arduino is controlled by p5.

P5JS code

let redValue = 0;
let transparency = 255;

function setup() {
  createCanvas(640, 480);
  textSize(18);
}

function draw() {
  if (key == " ") {
    initiateSerialConnection();
  }

  background(map(redValue, 0, 1023, 0, 255), 255, 255);
  fill(255, 0, 255, map(transparency, 0, 1023, 0, 255));

  if (!isSerialActive) {
    text("Press Space Bar to select Serial Port", 20, 30);
  } else {
    ellipse(redValue / 2, 240, 100, 100);
  }
}

function keyPressed() {
  if (key == " ") {
    initiateSerialConnection();
  }
}

function readSerial(data) {
  if (data != null) {
    let fromArduino = split(trim(data), ",");
    if (fromArduino.length == 2) {
      redValue = int(fromArduino[0]);
      transparency = int(fromArduino[1]);
    }
  }
}


Arduino code

void setup() {
 Serial.begin(9600);
 pinMode(LED_BUILTIN, OUTPUT);
// start the handshake
 while (Serial.available() <= 0)
{
   Serial.println("0,0"); // send a starting message
   delay(300);            // wait 1/3 second
 }
}
void loop()
{
 // wait for data from p5 before doing something
   while (Serial.available())
{
   digitalWrite(LED_BUILTIN, HIGH); // led on while receiving data
 // Read sensor value
 int sensorValue = analogRead(A0);
  Serial.print(sensorValue);
 // Map sensor value to screen width
 int screenValue = map(sensorValue, 0, 1023, 0, 800);
 // Send mapped value to p5.js
 Serial.println(screenValue);
 delay(50); //    for stability
}
digitalWrite(LED_BUILTIN, LOW);
}

Exercise 2

Something that controls the LED brightness from p5. LED’s brightness is changed by mouseX and the other’s by mouse Y.

P5JS code

let rVal = 0;
let alpha = 255;
let left = 0; // True (1) if mouse is being clicked on left side of screen
let right = 0; // True (1) if mouse is being clicked on right side of screen
function setup() {
 createCanvas(255, 255);
 textSize(18);
}
function draw() {
 // one value from Arduino controls the background's red color
 background(map(rVal, 0, 1023, 0, 255), 255, 255);
 // the other value controls the text's transparency value
 fill(255, 0, 255, map(alpha, 0, 1023, 0, 255));
 if (!serialActive) {
   text("Press Space Bar to select Serial Port", 20, 30);
 } else {
   text("Connected", 20, 30);
  
   // Print the current values
   text('rVal = ' + str(rVal), 20, 50);
   text('alpha = ' + str(alpha), 20, 70);
 }
 // click on one side of the screen, one LED will light up
 // click on the other side, the other LED will light up
 if (mouseIsPressed) {
   if (mouseX <= width / 2) {
     left = 1;
   } else {
     right = 1;
   }
 } else {
   left = right = 0;
 }
}
function keyPressed() {
 if (key == " ") {
   // important to have in order to start the serial connection!!
   setUpSerial();
 }
}
// This function will be called by the web-serial library
// with each new *line* of data. The serial library reads
// the data until the newline and then gives it to us through
// this callback function
function readSerial(data) {
 ////////////////////////////////////
 //READ FROM ARDUINO HERE
 ////////////////////////////////////
 if (data != null) {
   // make sure there is actually a message
   // split the message
   let fromArduino = split(trim(data), ",");
   // if the right length, then proceed
   if (fromArduino.length == 2) {
     // only store values here
     // do everything with those values in the main draw loop
    
     // We take the string we get from Arduino and explicitly
     // convert it to a number by using int()
     // e.g. "103" becomes 103
     rVal = int(fromArduino[0]);
     alpha = int(fromArduino[1]);
   }
   //////////////////////////////////
   //SEND TO ARDUINO HERE (handshake)
   //////////////////////////////////
  
   let sendToArduino = mouseX + "," + mouseY + "\n";
   writeSerial(sendToArduino);
 }
}

Arduino code

int leftLedPin = 2;
int rightLedPin = 5;
void setup() {
 // Start serial communication so we can send data
 // over the USB connection to our p5js sketch
 Serial.begin(9600);
 // We'll use the builtin LED as a status output.
 // We can't use the serial monitor since the serial connection is
 // used to communicate to p5js and only one application on the computer
 // can use a serial port at once.
 pinMode(LED_BUILTIN, OUTPUT);
 // Outputs on these pins
 pinMode(leftLedPin, OUTPUT);
 pinMode(rightLedPin, OUTPUT);
 // Blink them so we can check the wiring
 digitalWrite(leftLedPin, HIGH);
 digitalWrite(rightLedPin, HIGH);
 delay(200);
 digitalWrite(leftLedPin, LOW);
 digitalWrite(rightLedPin, LOW);
 // start the handshake
 while (Serial.available() <= 0) {
   digitalWrite(LED_BUILTIN, HIGH); // on/blink while waiting for serial data
   Serial.println("0,0"); // send a starting message
   delay(300);            // wait 1/3 second
   digitalWrite(LED_BUILTIN, LOW);
   delay(50);
 }
}
void loop() {
 // wait for data from p5 before doing something
 while (Serial.available()) {
   digitalWrite(LED_BUILTIN, HIGH); // led on while receiving data
   int posX = Serial.parseInt();
   int posY = Serial.parseInt();
   if (Serial.read() == '\n') {
     analogWrite(leftLedPin, posX);
     analogWrite(rightLedPin, posY);
     int sensor = analogRead(A0);
     delay(5);
     int sensor2 = analogRead(A1);
     delay(5);
     Serial.print(sensor);
     Serial.print(',');
     Serial.println(sensor2);
   }
 }
 digitalWrite(LED_BUILTIN, LOW);
}

Exercise 3

Bouncing ball: potentiometer is used as the analog sensor to control the breeze.

P5JS code

let velocity;
let gravity;
let position;
let acceleration;
let breeze;
let drag = 0.99;
let mass = 50;
let heightOfBall = 0;
function setup() {
  createCanvas(640, 360); // Create a canvas of 800x400 pixels
 
  noFill();
  position = createVector(width/2, 0);
  velocity = createVector(0,0);
  acceleration = createVector(0,0);
  gravity = createVector(0, 0.5*mass);
  breeze = createVector(0,0); 
}
function draw() {
  background(215);
  fill(0);
  
  if (!serialActive) {
    text("Press the space bar to select the serial Port", 20, 30);
  }
  else 
  {
    text("Arduino is connected! Press b to jump.", 20, 30);
  
  applyForce(breeze);
  applyForce(gravity);
  velocity.add(acceleration);
  velocity.mult(drag);
  position.add(velocity);
  acceleration.mult(0);
  ellipse(position.x,position.y,mass,mass);
    
  if (position.y > height-mass/2) {
      velocity.y *= -0.9;  // A little dampening when hitting the bottom
      position.y = height-mass/2;
    
    heightOfBall = 0;
    
    } 
    else {
      heightOfBall = 1;
    }
  }
}
function applyForce(force){
  // Newton's 2nd law: F = M * A
  // or A = F / M
  let f = p5.Vector.div(force, mass);
  acceleration.add(f);
}
function keyPressed() {
  if (key == " ") {
    // important to have in order to start the serial connection!!
    setUpSerial();
  }   
  else if (key=='b'){
    mass=random(15,80);
    position.y=-mass;
    velocity.mult(0);
  }
}
// this callback function
function readSerial(data) {
    ////////////////////////////////////
    //READ FROM ARDUINO HERE
    ////////////////////////////////////
  
     if (data != null) {
    // make sure there is actually a message
    
    let fromArduino = split(trim(data), ",");
    
       // if the right length, then proceed
    if (fromArduino.length == 1) {
//sensor value is the input from potentiometer
      let sensorVal = int(fromArduino[0]);
      
//potentiometer value ranges from 0 - 1023
//for values less than 400,wind blows to right
      if (sensorVal < 400){
        breeze.x=1
      }
//if value between 400 and 500, wind stops so ball stops
      else if(sensorVal >= 400 && sensorVal < 500){
        breeze.x = 0
      }
//if value greater than 500, wind blows to left
      else {
        breeze.x = -1
      }
          //////////////////////////////////
          //SEND TO ARDUINO HERE (handshake)
          //////////////////////////////////
    }
//height of ball sent to arduino to check if ball on floor or not
    let sendToArduino = heightOfBall  + "\n";
    writeSerial(sendToArduino);
  }
}

Arduino code

const int poten_pin = A0;
const int ledPin = 2;
void setup() {
 Serial.begin(9600); // Start serial communication at 9600 bps
 pinMode(LED_BUILTIN, OUTPUT);
 pinMode(ledPin, OUTPUT);
 pinMode(poten_pin, INPUT);
 // start the handshake
 while (Serial.available() <= 0) {
   digitalWrite(LED_BUILTIN, HIGH); // on/blink while waiting for serial data
   Serial.println("0,0"); // send a starting message
   delay(300);            // wait 1/3 second
   digitalWrite(LED_BUILTIN, LOW);
   delay(50);
 }
}
void loop()
{
 // wait for data from p5 before doing something
   while (Serial.available())
   {
     digitalWrite(LED_BUILTIN, HIGH);
     digitalWrite(ledPin, LOW);
//read the position of ball from p5
     int position = Serial.parseInt();
  
     if (Serial.read() == '\n') {
       // Read potentiometer value
     int sensorValue = analogRead(poten_pin);
     //send value to p5
     Serial.println(sensorValue);
     }
//if ball is touching the ground i.e. height is zero, turn LED on
     if (position == 0)
     {
       digitalWrite(ledPin, HIGH);
     }
     else{
       digitalWrite(ledPin, LOW);
     }
   }
     digitalWrite(LED_BUILTIN, LOW);
   }


Week 11 : Final project

The idea is to create an interactive car simulator that combines P5 and Arduino. Users will be able to simulate driving a car on a computer screen by using physical gestures detected by Arduino sensors. I would like to incorporate features such as LEDs and a horn into the system using sensors. The system aims to provide an engaging and interactive experience, where users can control various aspects of the virtual car’s behavior through their movements. Users can control the virtual car using physical gestures detected by sensors connected to Arduino. This project emphasizes careful and timely sensing of the user’s actions, translating them into responsive and engaging interactions within the virtual car simulation. The goal is to create an immersive experience that involves a dynamic exchange between the user and the simulated car, making the interaction enjoyable and interactive.

Week 10: Reading reflection

The portrayal of advanced and seemingly magical technologies in movies, such as those in the Marvel cinematic universe, often sparks fascination and a desire to bring such innovations into reality. The way characters interact with sophisticated devices, particularly through hand gestures, presents a captivating vision of the future. These depictions emphasize the incredible capabilities of the human hand, showcasing it as an organ with immense potential beyond its conventional functions. Hands become channel for unlocking extraordinary powers and controlling cutting-edge technologies, blurring the line between science fiction and reality. The realization of such innovations would not only revolutionize our daily interactions but also underscore the profound importance of the hand as a tool for both mundane tasks and, potentially, for accessing a realm of possibilities that were once considered purely imaginative. The fusion of technology and human anatomy serves as a testament to the boundless creativity and innovation that continues to drive our collective imagination.

The example of child can’t tie his shoelaces, but can use the iPad, depicts an analogy between the way tools are designed for adults and children and the complexity of literature aimed at different age groups. The comparison highlights the notion that tools designed for adults should leverage the full capabilities of mature minds and bodies, just as literature for adults delves into deeper complexities compared to children’s literature. The reference to Shakespeare and Dr. Seuss serves to exemplify this point, suggesting that while a child may not grasp the nuances of Shakespearean works, they can easily understand the simplicity of Dr. Seuss. The analogy extends to tools, emphasizing that limiting interaction to a single finger, as seen in some interfaces, is akin to restricting literature to a basic vocabulary. The argument suggests that such simplified tools might be accessible to children or individuals with certain disabilities, but fully functional adults deserve and can benefit from more sophisticated and nuanced interfaces that make use of their developed cognitive and physical capacities. It prompts a consideration of the balance between accessibility and the potential richness of interaction in the design of tools for adults.

Week 10: Musical Instrument

Team members: Javeria and Nafiha

For our assignment, we drew inspiration from a synthesizer and a sampler to create our own musical instrument. Our instrument incorporates three buttons, a piezo buzzer, a potentiometer, and a bunch of wires and resistors. It is designed such that each button triggers a distinct melody, and by adjusting the potentiometer, the pitch is modified, consequently altering the played melodies.

In terms of improving our instrument, one potential feature could be incorporating additional sound effects through the use of the potentiometer. However, overall, working on this assignment was really fun, and we’re pretty pleased with the outcome.

Week 9: Digital and Analog

Concept 

I tried to create an interactive traffic signal by integrating a push button and a potentiometer connected to two LEDs. Upon pressing the digital input push button, the red light illuminates, while the potentiometer, serving as the analog input, enables control over the brightness of the yellow light. This dual-input system represents a significant challenge, as initially, I could only manage them separately. 

Reflection: 

Coding proved to be an inspiring task, particularly in merging both analog and digital components seamlessly. Despite the initial difficulty, this project served as a valuable learning experience, providing insights into the intricacies of combining different inputs and coding for a cohesive interactive system. As I look ahead, the incorporation of the third color, red, looms as the next exciting phase, promising further growth and mastery of interactive design.

Materials used: 

  1. Arduino board 
  2. Potentiometer 
  3. 2 LEDs (red and yellow)
  4. Resistors 
  5. Tactile push-button switch
  6. Breadboard 
  7.  jumper wires

Video Links

Week 9: Reading response

Artists often provide detailed interpretations and instructions alongside their interactive pieces, potentially limiting participants’ freedom to interpret and engage. The author suggests that interactive art should be seen as a conversation starter, where the created environment or instrument is a catalyst for participants to take meaningful actions and derive their own understanding of the artist’s expression. This approach emphasizes the interactive nature of the art form and encourages a more open-ended and dynamic engagement between the artist, the work, and the audience. This also helps the artist to interact with the audience and get new perspectives and ideas which he/she could contribute to their new artworks. Giving the audience their space and freedom would actually change their perspective towards the artwork. Also the listening part mentioned by the author which is the next crucial step in creating interactive art. It involves actively listening to participants. Artists are encouraged to observe and interpret how individuals engage with the designed elements, noting emotional responses, comprehension levels, and overall reactions. The variety of responses, including excitement, indifference, or sharing newfound knowledge, is seen as part of an ongoing conversation between the artist and the audience.  More than perfecting an interactive artwork, the performance phase is more important and significant because it involves the real-time, unpredictable responses of participants. During the performance phase, the artist witnesses how individuals interpret and engage with the interactive elements. This phase is a live, evolving dialogue between the artist’s creation and the audience’s reactions. It allows for a deeper understanding of the diverse ways people interact with and derive meaning from the artwork.

Week 8: Reading reflection

As someone new to physical computing, finding inspiration in the idea that reusing existing concepts is a valuable part of the learning process is truly motivating. Throughout the works given, the work that inspired me the most is Scooby-doo paintings. The use of distance sensors and advanced camera technology in interactive art installations is captivating due to its ability to transform the viewer’s passive observation into an active and personalized experience. It blurs the lines between traditional artwork and audience participation, immersing viewers in the art’s narrative. As the artwork responds to the viewer’s presence or gaze, it becomes dynamic and engaging, fostering a deeper connection and sparking curiosity. Each interaction with the artwork is unique, creating a different emotional journey for every individual. This fusion of art and technology not only showcases creative expression but also represents a harmonious blend of the traditional and the contemporary, making it an innovative and intriguing form of artistic engagement.

In the blog “Making Interactive Art” by  TIGOE, he clearly mentions the task of a designer. I completely agree with that sentiment. During a recent exhibition, I attempted to engage with one of the games, but the artist overwhelmed me with a multitude of instructions that were challenging to grasp all at once. Instead of approaching or presenting an idea in this way, as TIGOE mentioned, when designing an interactive artwork, our primary objective is to provide the audience with essential context and then allow them to engage with the piece autonomously. Create the space, place objects for interaction, and hint at a sequence of events through their arrangement. Make interactive elements accessible by providing clear cues and handles. Ensure that objects meant to be untouched are not within reach. If you want the audience to uncover hidden elements, drop hints, but eliminate any unnecessary distractions or clutter from the environment to keep the focus on the intended experience. The audience plays a crucial role in completing the work through their actions. Guide them on how to engage, discover, and interpret the piece emotionally.

Week 8: Unusual Switch

Concept: For this assignment, I wanted to develop a concept related to car parking. As a driver, I often find parking to be the most challenging part of the process. I spend a lot of time trying to gauge if I’m at the right distance, whether my car is perfectly within the parking space, and whether I’m about to bump into the front wall. To address these concerns, I came up with a model that incorporates a simple solution: when your car is properly within the parking boundaries, a light starts blinking, indicating that you’ve successfully parked your car.

Demonstration

Process:

Materials and components used: LED lights, Cardboard box, Resistor, Wire, Aluminum foil, tape, Breadboard, and Arduino board. By using these elements, I created a parking lot, and a simple series connection, connected with aluminum foil. Two wired are attached with aluminum foil, when they are in contact, the LED lit up which indicates that the car is parked rightly.

Reflection:

I am content with my work, yet I would like improve it by adding some sound element if parked wrongly. And also I would like to improve the setup as well.