Week 11: Serial Communication

Serial Communication:

This week we learnt that serial communication is a way for devices, like an Arduino microcontroller and a computer, to exchange data. It allows the Arduino to send data to the computer or for the computer to send data to the Arduino.

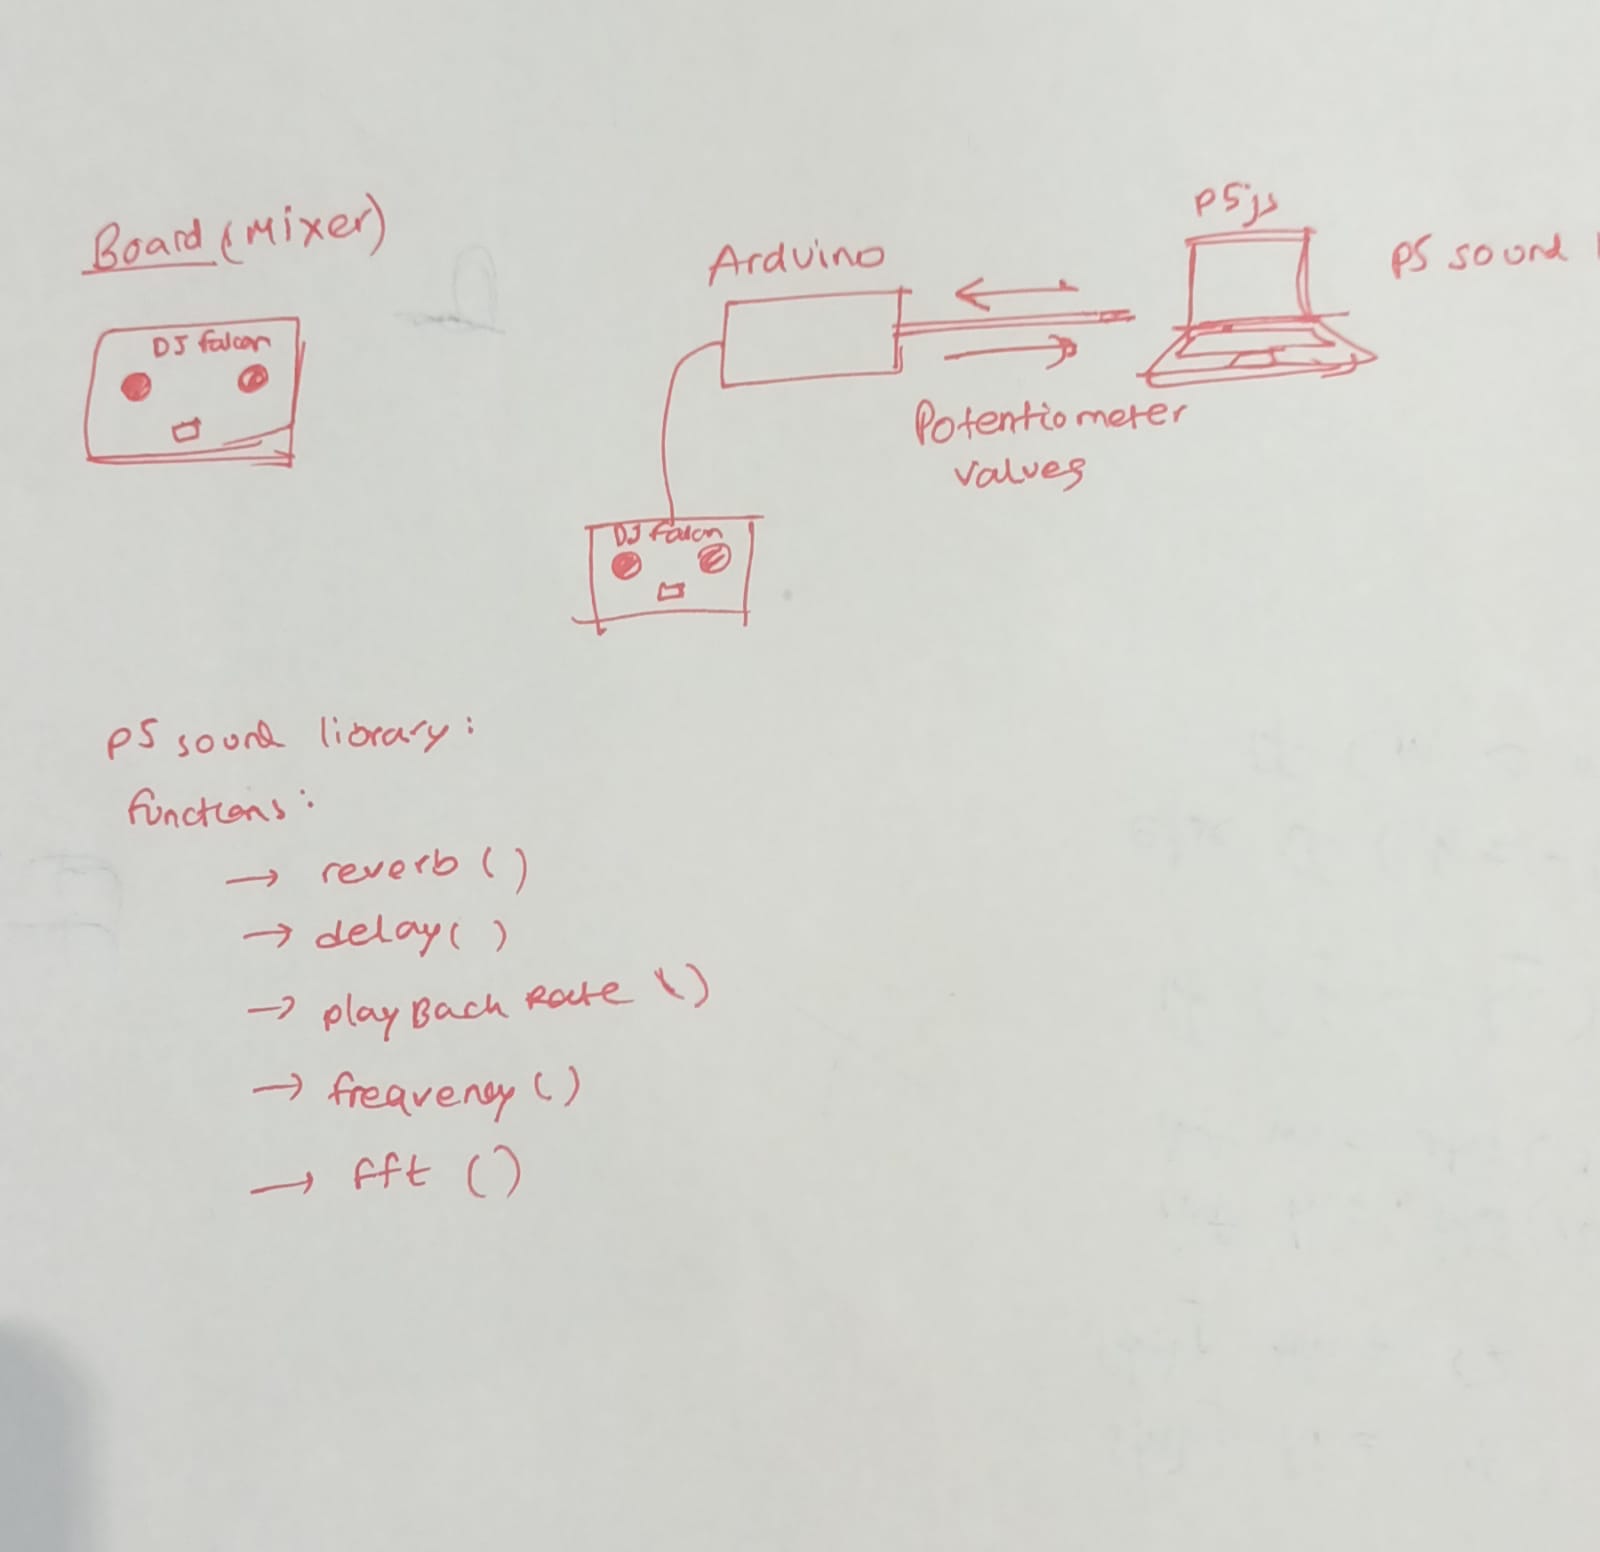
One way to establish serial communication between an Arduino and a computer is to use p5.js, a JavaScript library for creating interactive graphics and visualizations. To use serial communication with p5.js, we will need to use the p5.serialport library, which is a p5.js library that provides a wrapper around the popular serialport library for Node.js.

Once we have set up the p5.serialport library and created a p5.Serial object, we can use the serial.read() function to read data from the serial port and the serial.write() function to write data to the serial port. We can also use the serial.on() function to set up event listeners for different events, like when data is received or when the serial port is opened or closed.

Exercise 1:

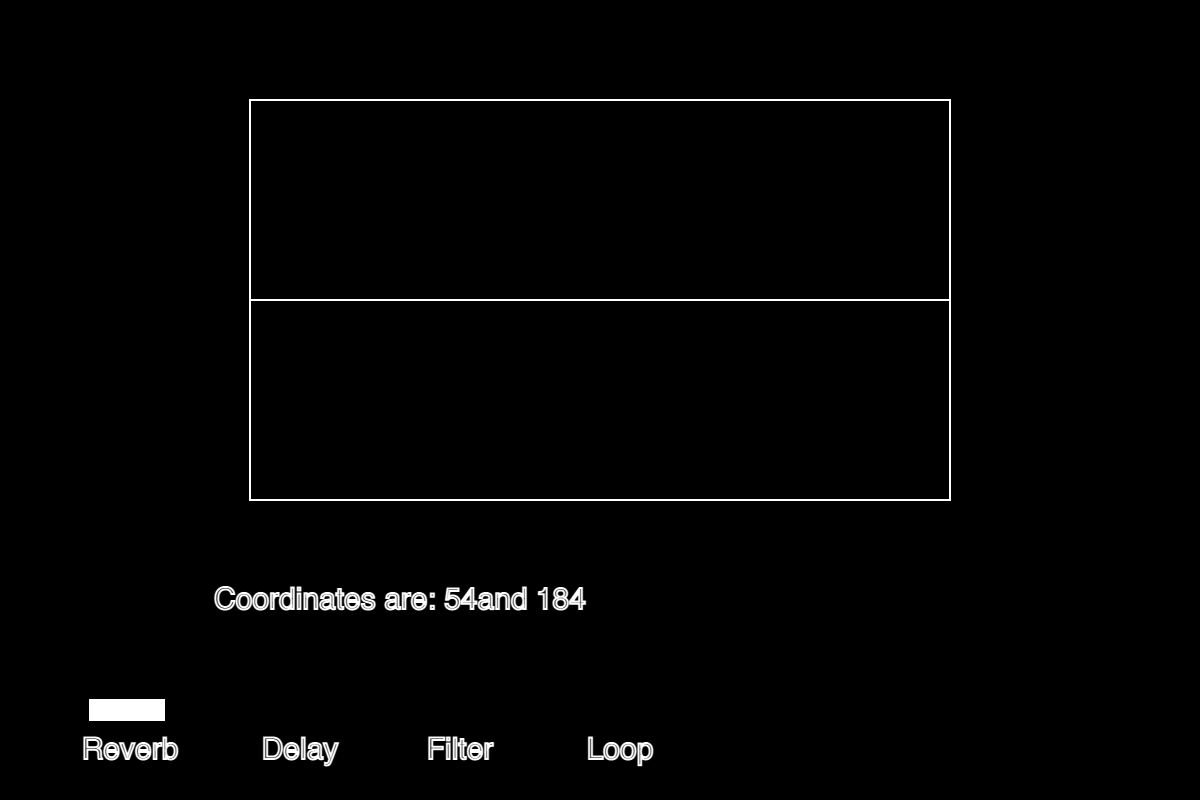
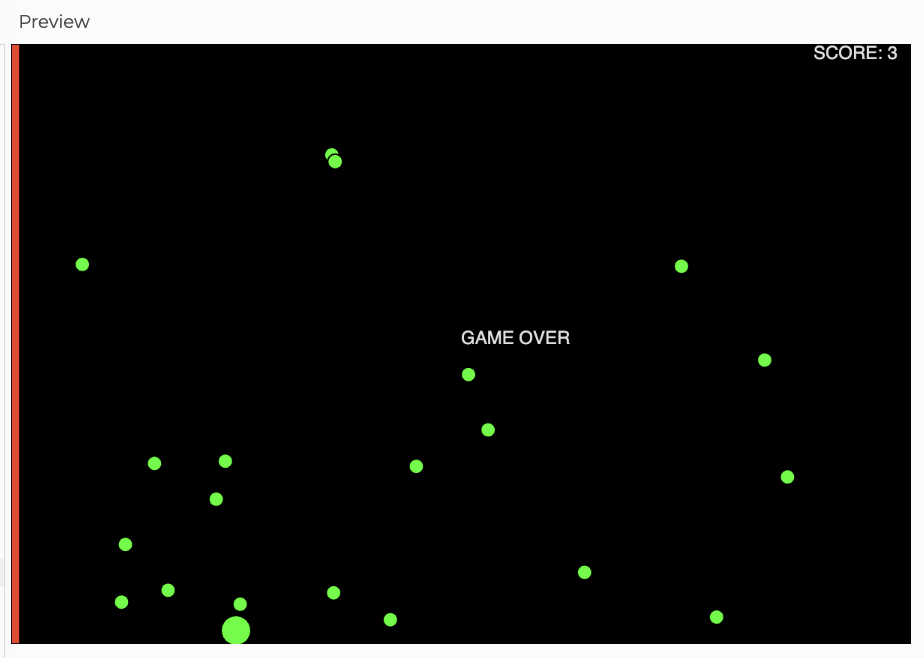
In class we practiced serial communication using a potentiometer example. We modified the potentiometer example demonstrated in class to create a ball that bounces horizontally across the screen at a speed that is determined by the value of the potentiometer. In our Arduino code, we used serial communication to send the value of the potentiometer to the p5.js sketch, which was then used to control the velocity of the bouncing ball:

Arduino Code:

void loop() {
// put your main code here, to run repeatedly:
 int potentiomenter = analogRead(A0); 
 int mappedPot = map(potentiomenter, 0, 1023, 0, 255); 
 Serial.write(mappedPot); 
delay(100);

n our p5.js sketch, we created a ball object using a Circle class with properties for the x and y positions and a move() method. The move() method only updates the x position of the ball, which is calculated using the value of the potentiometer that was read from the Arduino using serial communication. The y position of the ball remains constant along the horizontal axis at the height/2 position. The p5js code for this exercise:

// variable to hold an instance of the p5.webserial library:
const serial = new p5.WebSerial();
 
// HTML button object:
let portButton;
let inData;                   // for incoming serial data
let outByte = 0;              // for outgoing data
 
function setup() {
  createCanvas(400, 300);          // make the canvas
  // check to see if serial is available:
  if (!navigator.serial) {
    alert("WebSerial is not supported in this browser. Try Chrome or MS Edge.");
  }
  // if serial is available, add connect/disconnect listeners:
  navigator.serial.addEventListener("connect", portConnect);
  navigator.serial.addEventListener("disconnect", portDisconnect);
  // check for any ports that are available:
  serial.getPorts();
  // if there's no port chosen, choose one:
  serial.on("noport", makePortButton);
  // open whatever port is available:
  serial.on("portavailable", openPort);
  // handle serial errors:
  serial.on("requesterror", portError);
  // handle any incoming serial data:
  serial.on("data", serialEvent);
  serial.on("close", makePortButton);
}
 
function draw() {
  
   background(0);
   fill(255);
   text("sensor value: " + inData, 30, 50);
 
}
// if there's no port selected, 
// make a port select button appear:
function makePortButton() {
  // create and position a port chooser button:
  portButton = createButton("choose port");
  portButton.position(10, 10);
  // give the port button a mousepressed handler:
  portButton.mousePressed(choosePort);
}
 
// make the port selector window appear:
function choosePort() {
  if (portButton) portButton.show();
  serial.requestPort();
}
 
// open the selected port, and make the port 
// button invisible:
function openPort() {
  // wait for the serial.open promise to return,
  // then call the initiateSerial function
  serial.open().then(initiateSerial);
 
  // once the port opens, let the user know:
  function initiateSerial() {
    console.log("port open");
  }
  // hide the port button once a port is chosen:
  if (portButton) portButton.hide();
}
 
// pop up an alert if there's a port error:
function portError(err) {
  alert("Serial port error: " + err);
}
// read any incoming data as a string
// (assumes a newline at the end of it):
function serialEvent() {
  inData = Number(serial.read());
  console.log(inData);
}
 
// try to connect if a new serial port 
// gets added (i.e. plugged in via USB):
function portConnect() {
  console.log("port connected");
  serial.getPorts();
}
 
// if a port is disconnected:
function portDisconnect() {
  serial.close();
  console.log("port disconnected");
}
 
function closePort() {
  serial.close();
}

Exercise 2:

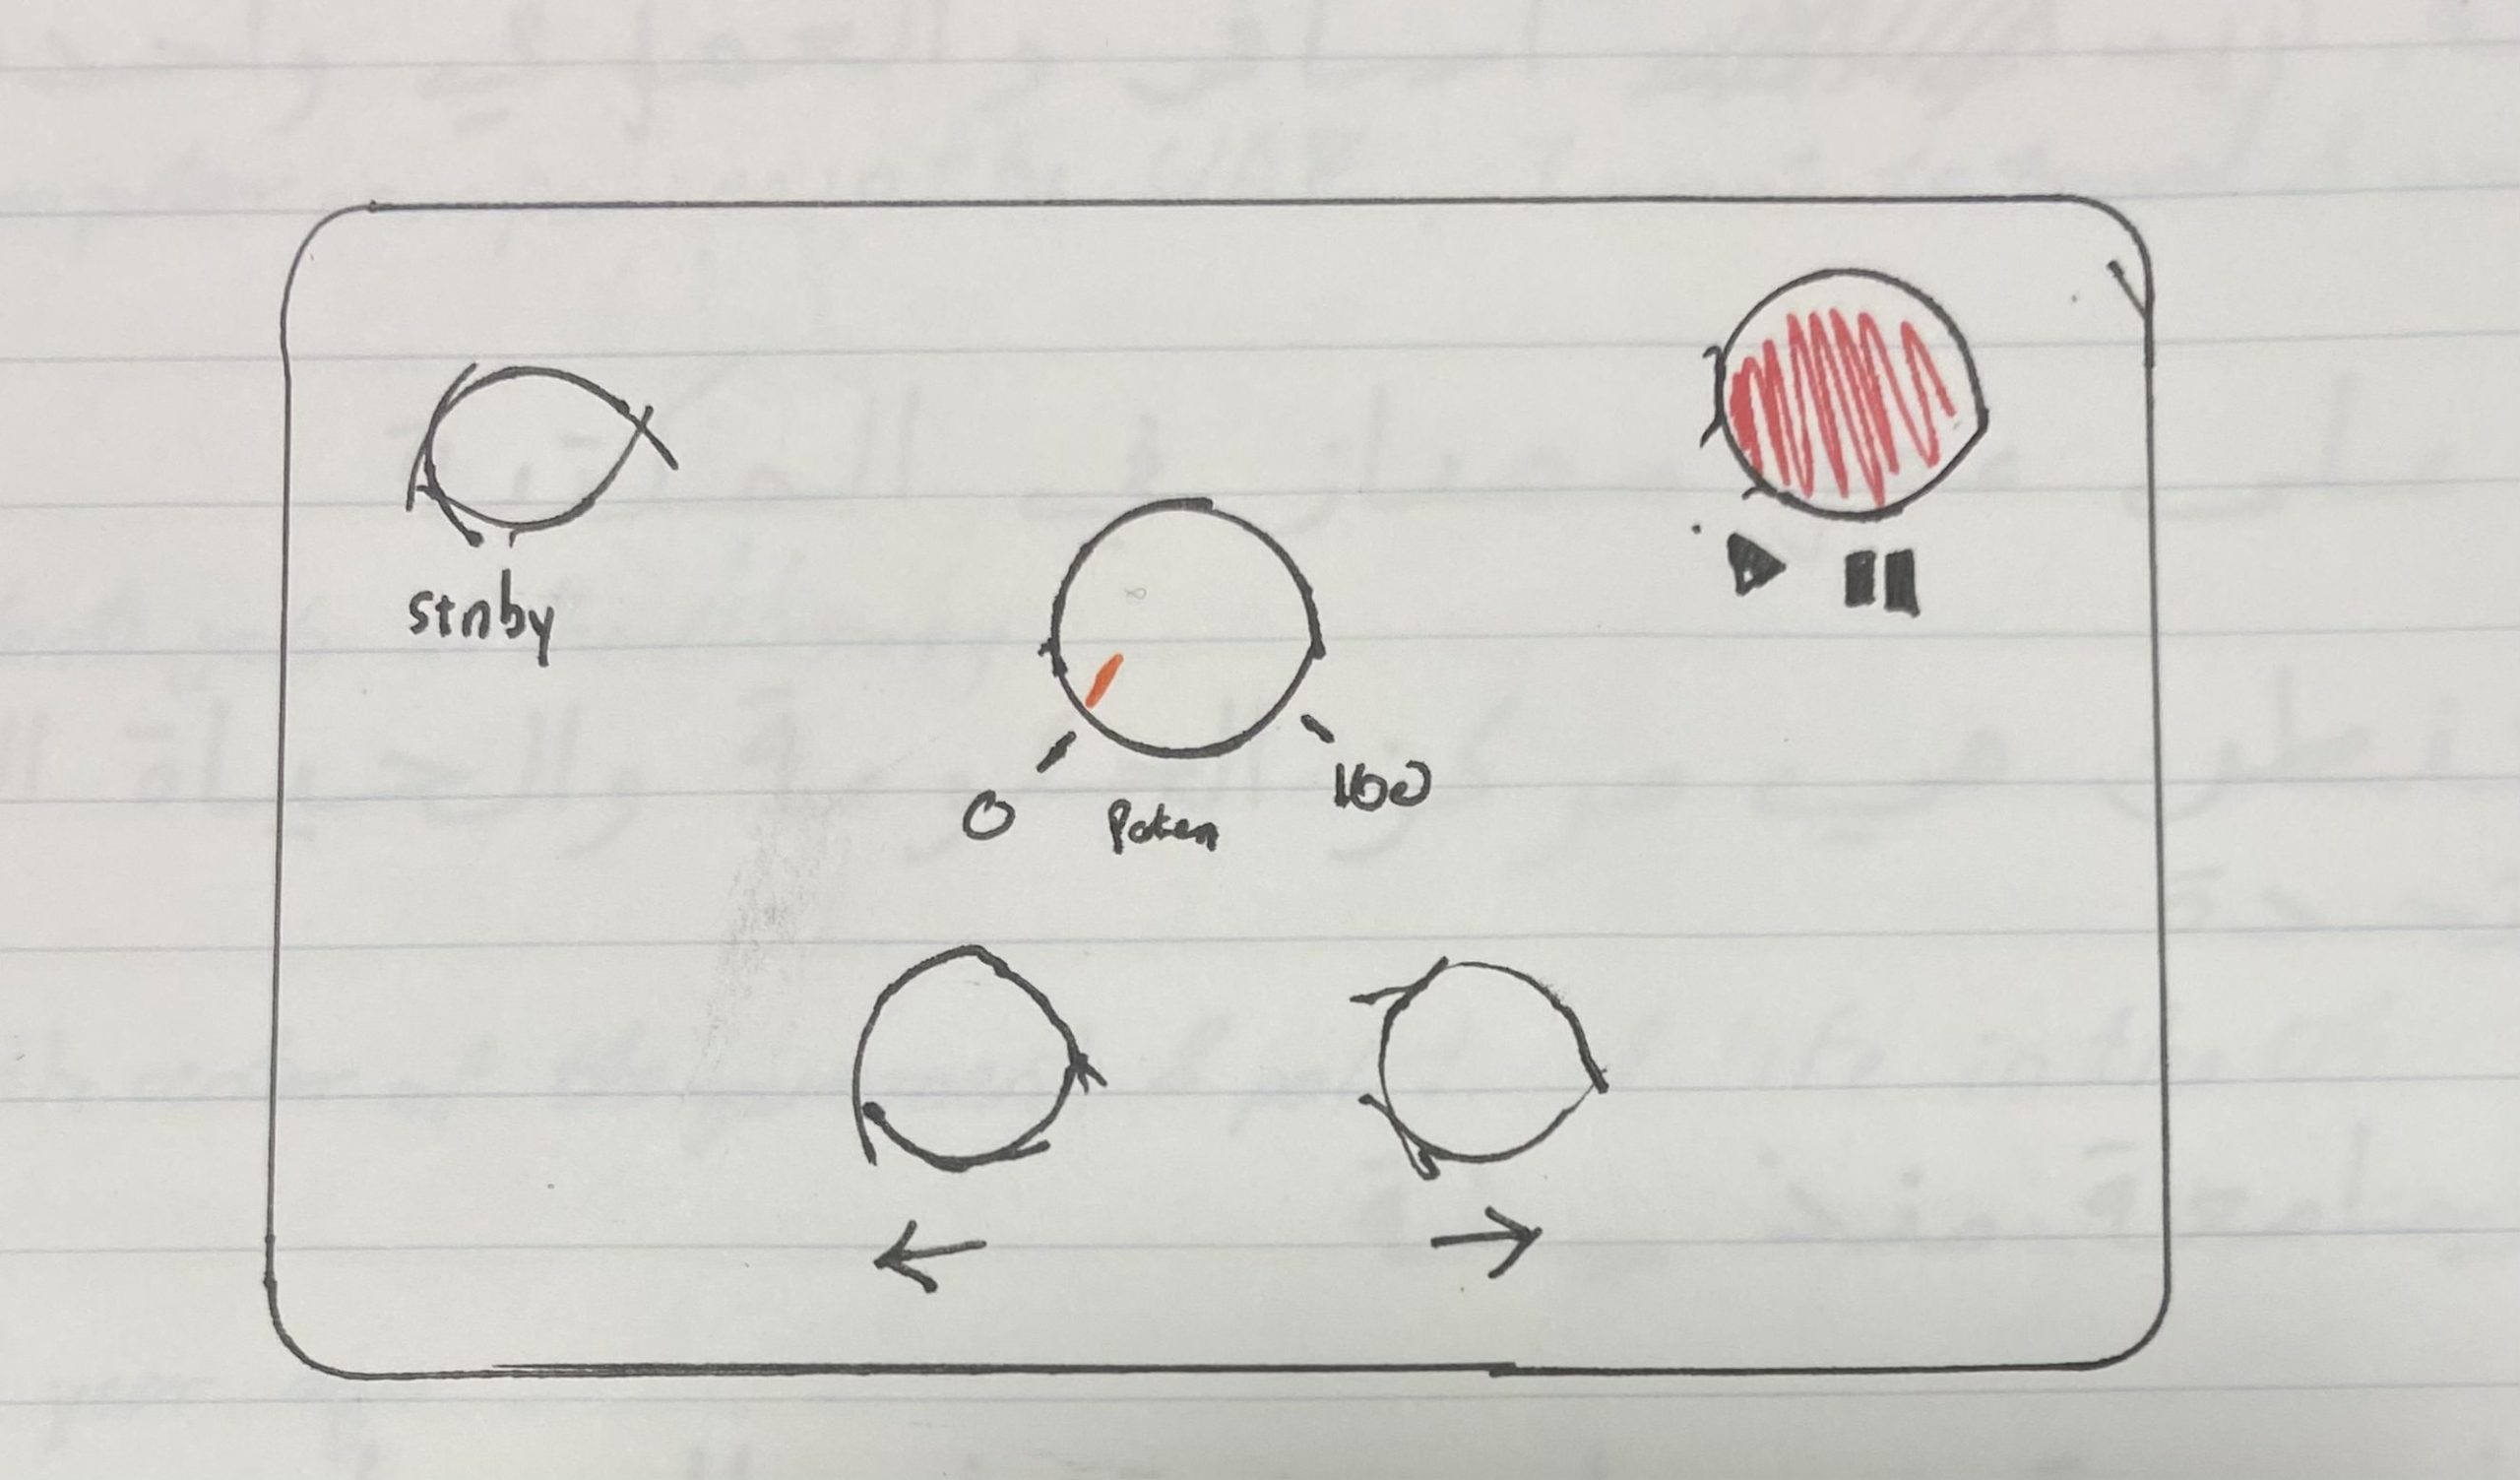
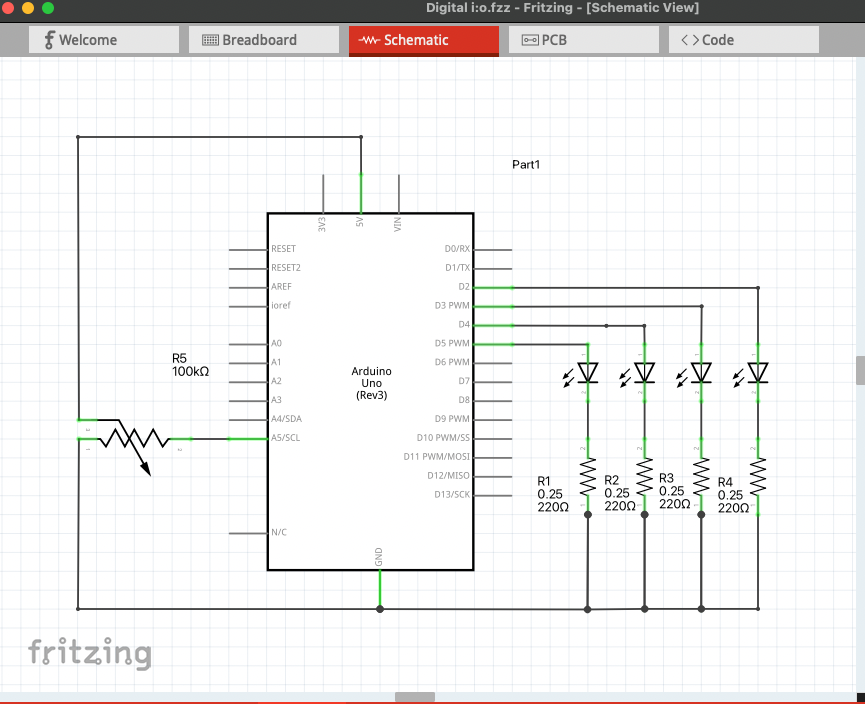
In our sketch, we created an interactive visual that represents a sun rising and falling in the sky and linked it to the brightness of an LED. When the up arrow key is pressed, the sun “rises” in the sky and the background color changes to a bright magenta. When the down arrow key is pressed, the sun “falls” and the background color deepens to a dark blue. We achieved this effect by using the y position of the sun, which was created using the Circle class from the previous exercise, to control the RGB values of the background color.

Arduino Code:

void setup() {
  Serial.begin(9600);
  pinMode(2, OUTPUT);
  pinMode(5, OUTPUT);
  while (Serial.available() <= 0) {
    Serial.println("0,0"); // send a starting message
    delay(200);      
  }
}
void loop() {
  while (Serial.available() > 0) {
    // read the incoming byte:
    int inByte = Serial.read();
    analogWrite(5,inByte);
    Serial.println();
  }
}

p5js Code:

let serialPort; // variable to hold an instance of the serialport library
let portName = "COM3"; // fill in your serial port name here
let currentXPos=0;
let currentYPos=240;
let switchStatus=0;
let value;
function setup() {
createCanvas(640, 480);
serialPort = new p5.SerialPort(); // make a new instance of the serialport library
serialPort.on("list", printListOfPorts); // set a callback function for the serialport list event
serialPort.on("connected", serverConnected); // callback for connecting to the server
serialPort.on("open", portOpened); // callback for the port opening
serialPort.on("data", serialDataReceived); // callback for when new data arrives
serialPort.on("error", serialError); // callback for errors
serialPort.on("close", portClosed); // callback for the port closing
serialPort.list(); // list the serial ports
serialPort.open(portName); // open a serial port
}
function draw() {
background(255);
value = map(mouseX, 0, width, 0, 255);
}
// get the list of ports:
function printListOfPorts(portList) {
// portList is an array of serial port names
for (let i = 0; i < portList.length; i++) {
// Display the list the console:
print(i + " " + portList[i]);
}
}
function serverConnected() {
print("Connected to server.");
}
function portOpened() {
print("The serial port opened.");
}
function serialDataReceived() {
// read a string from the serial port
// until you get carriage return and newline:
let incomingString = serialPort.readLine();
serialPort.write(value);
}
function serialError(err) {
print("Something went wrong with the serial port. " + err);
}
function portClosed() {
print("The serial port closed.");
}

Exercise 3:

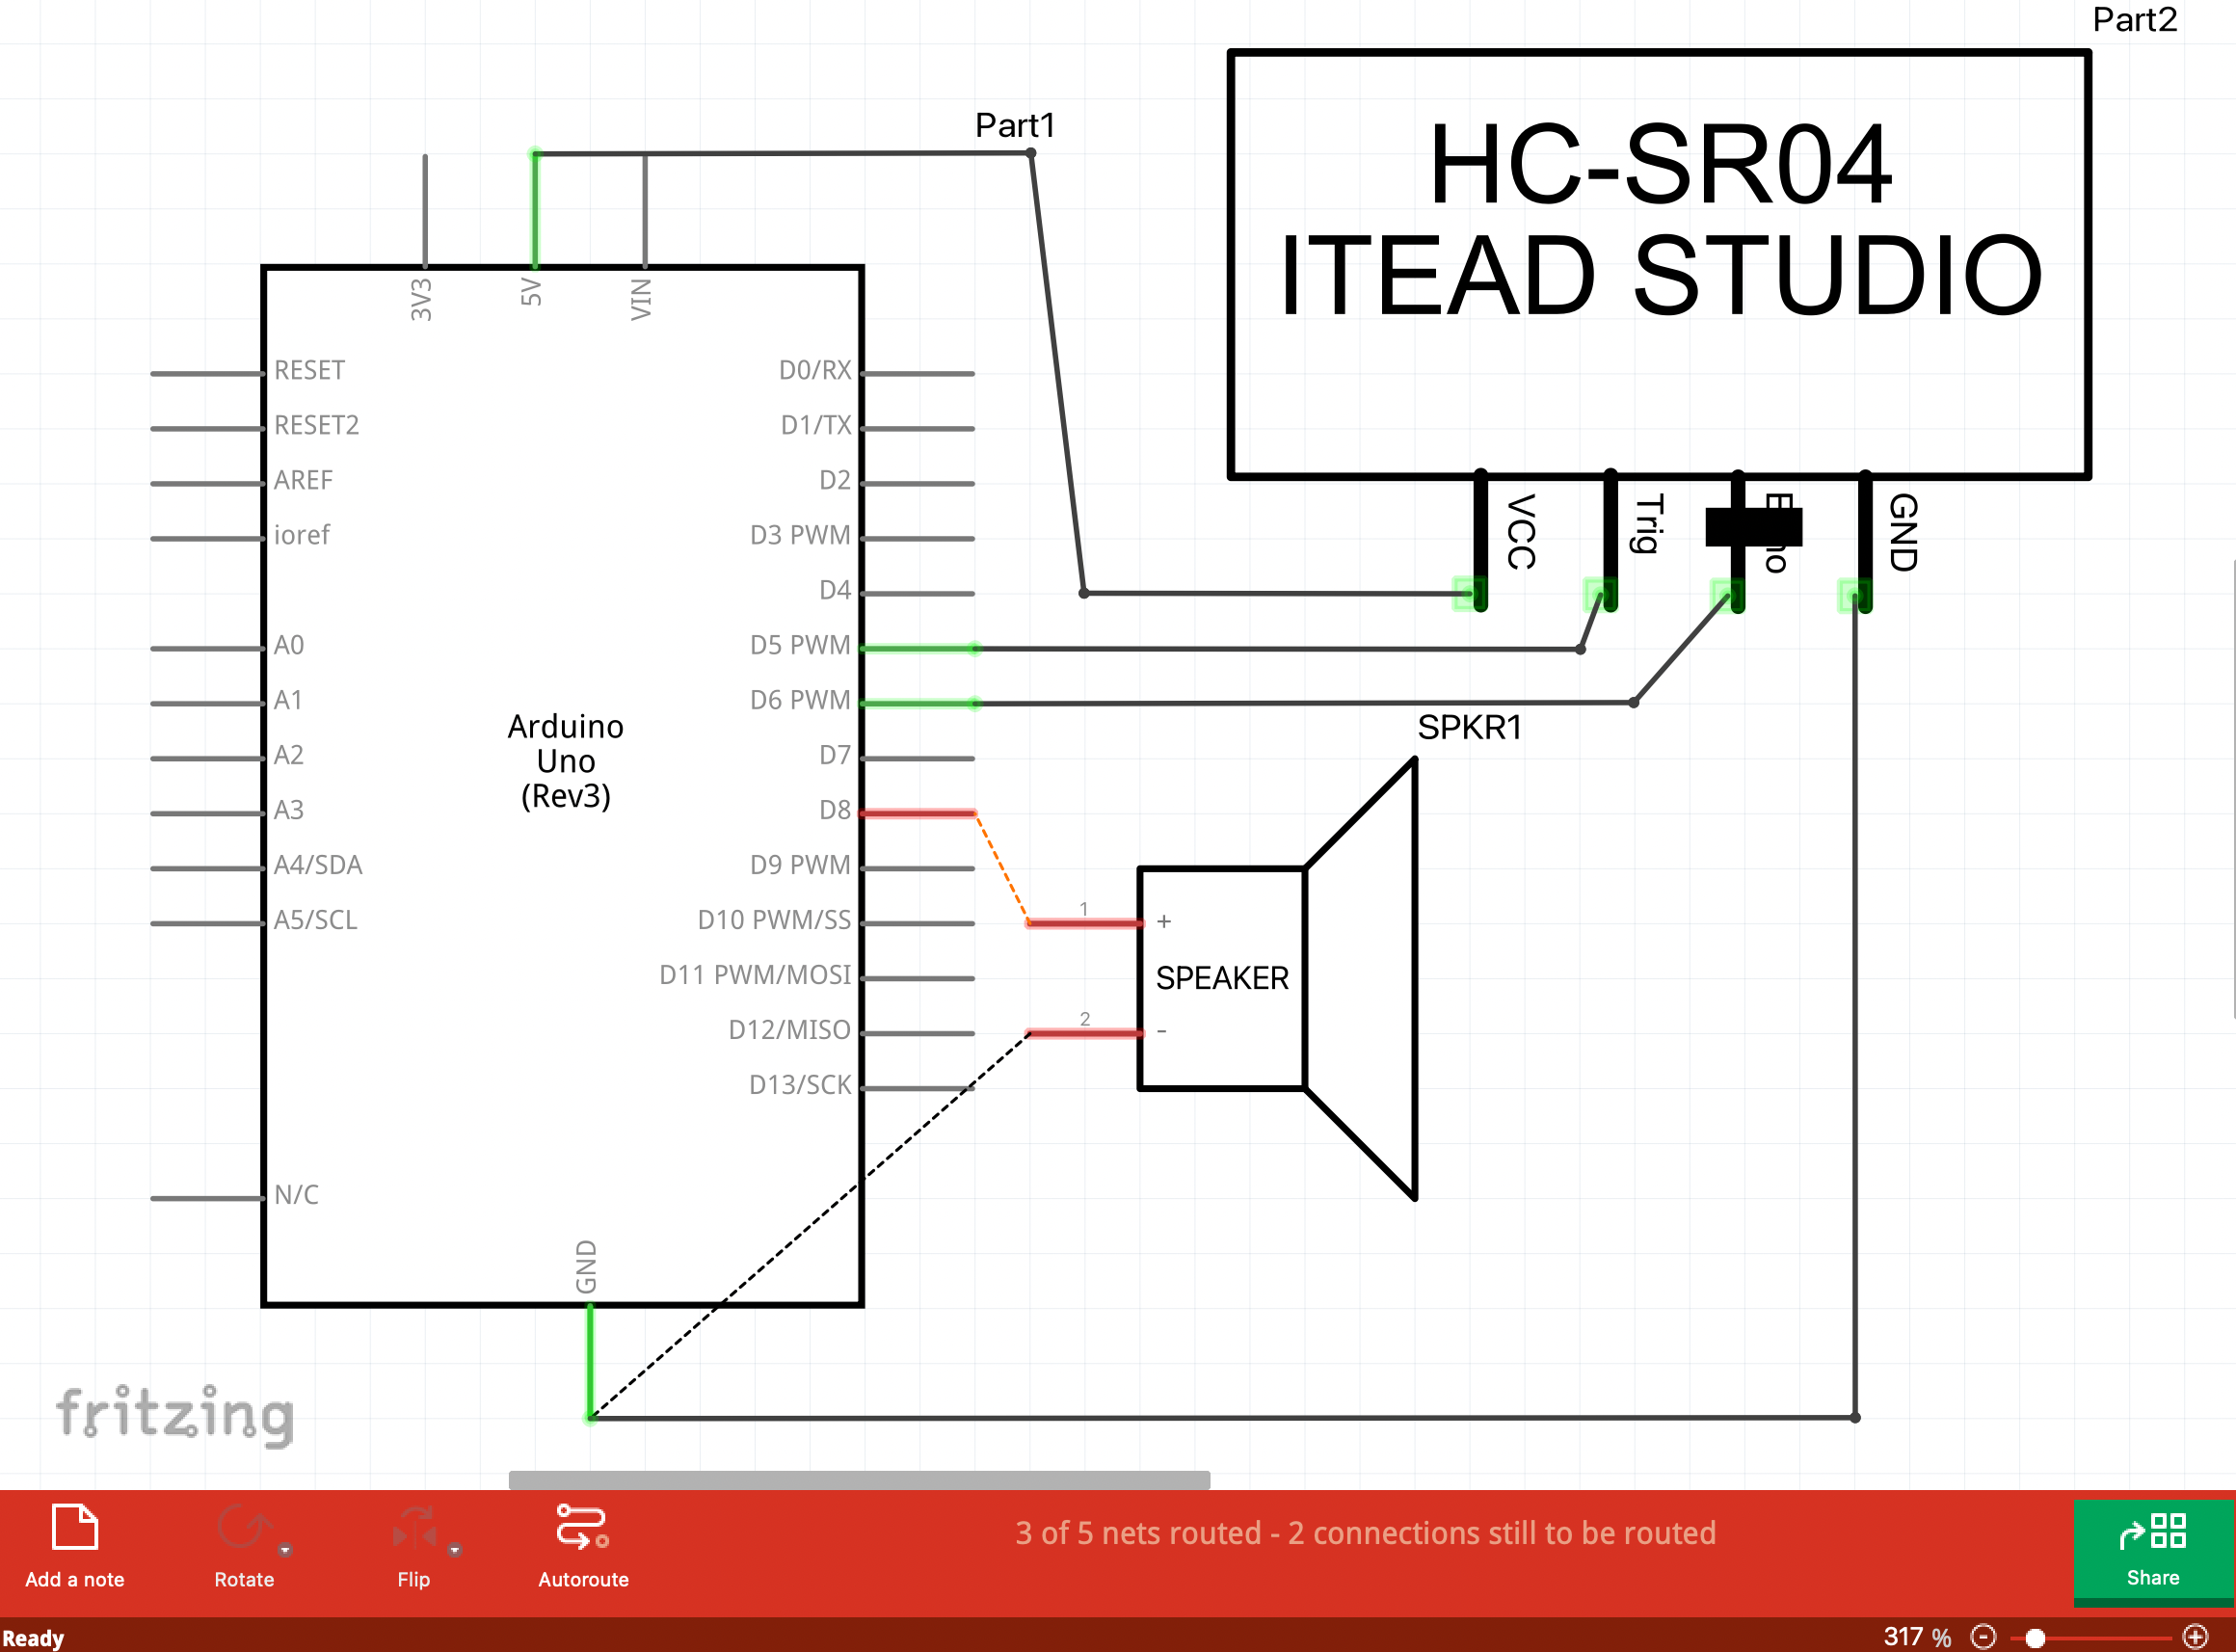
For the final assignment, we had to use bidirectional serial communication, which basically involved controlling a p5js sketch with an Arduino and changing the p5js sketch to modify the arduino. We made the ball move on the Arduino by using a distance sensor to modify the wind speed in p5js. Depending on the ball’s velocity, we programmed the p5js sketch so that an LED will turn on each time the ball bounces.

Arduino Code:

Arduino code
void setup() {
  Serial.begin(9600);
  pinMode(2, OUTPUT);
  while (Serial.available() <= 0) {
    Serial.println("0"); // send a starting message
    delay(300);              // wait 1/3 second
  }
}
void loop() {
  while (Serial.available() > 0) {
    // read the incoming byte:
    int inByte = Serial.read();
    analogWrite(2, inByte);
    int WindPower = analogRead(A0);
    Serial.println(WindPower);
    
  }
}

p5js Code:

let serialPort; // variable to hold an instance of the serialport library
let portName = "COM7"; // replace with your serial port name
let speed;
let weight;
let location;
let acceleration;
let wind;
let resistance = 0.99;
let mass = 50;
let windVal;

function setup() {
createCanvas(640, 360);
noFill();
location = createVector(width/2, 0);
speed = createVector(0,0);
acceleration = createVector(0,0);
weight = createVector(0, 0.5*mass);
wind = createVector(0,0);

serialPort = new p5.SerialPort(); // create a new instance of the serialport library
serialPort.on("list", printPortList); // set a callback function for the serialport list event
serialPort.on("connected", serverConnected); // callback for connecting to the server
serialPort.on("open", portOpen); // callback for the port opening
serialPort.on("data", serialEvent); // callback for when new data arrives
serialPort.on("error", serialError); // callback for errors
serialPort.on("close", portClose); // callback for the port closing
serialPort.list(); // list the serial ports
serialPort.open(portName); // open a serial port
}

// get the list of ports:
function printPortList(portList) {
// portList is an array of serial port names
for (let i = 0; i < portList.length; i++) {
// Display the list the console:
print(i + " " + portList[i]);
}
}

function serverConnected() {
print("Connected to server.");
}

function portOpen() {
print("The serial port opened.");
}

function serialEvent() {
// read a string from the serial port until a carriage return and newline are received
let inString = serialPort.readLine();
print(inString);
if (inString.length > 0){
windVal = map(inString, 0, 1023, -3, 3);
}
}

function serialError(err) {
print("There was an error with the serial port: " + err);
}

function portClose() {
print("The serial port closed.");
}

function draw() {
background(255);

wind.x = windVal;

applyForce(wind);
applyForce(weight);
speed.add(acceleration);
speed.mult(resistance);
location.add(speed);
acceleration.mult(0);
ellipse(location.x,location.y,mass,mass);

if (location.y > height-mass/2 - 25){
serialPort.write(255);
}
else serialPort.write(0);

if (location.y > height-mass/2) {
speed.y *= -0.9; // A little dampening when hitting the bottom
location.y = height-mass/2;


Overall, using serial communication with p5.js allows us to create interactive graphics and visualizations that can communicate with and control devices like the Arduino.
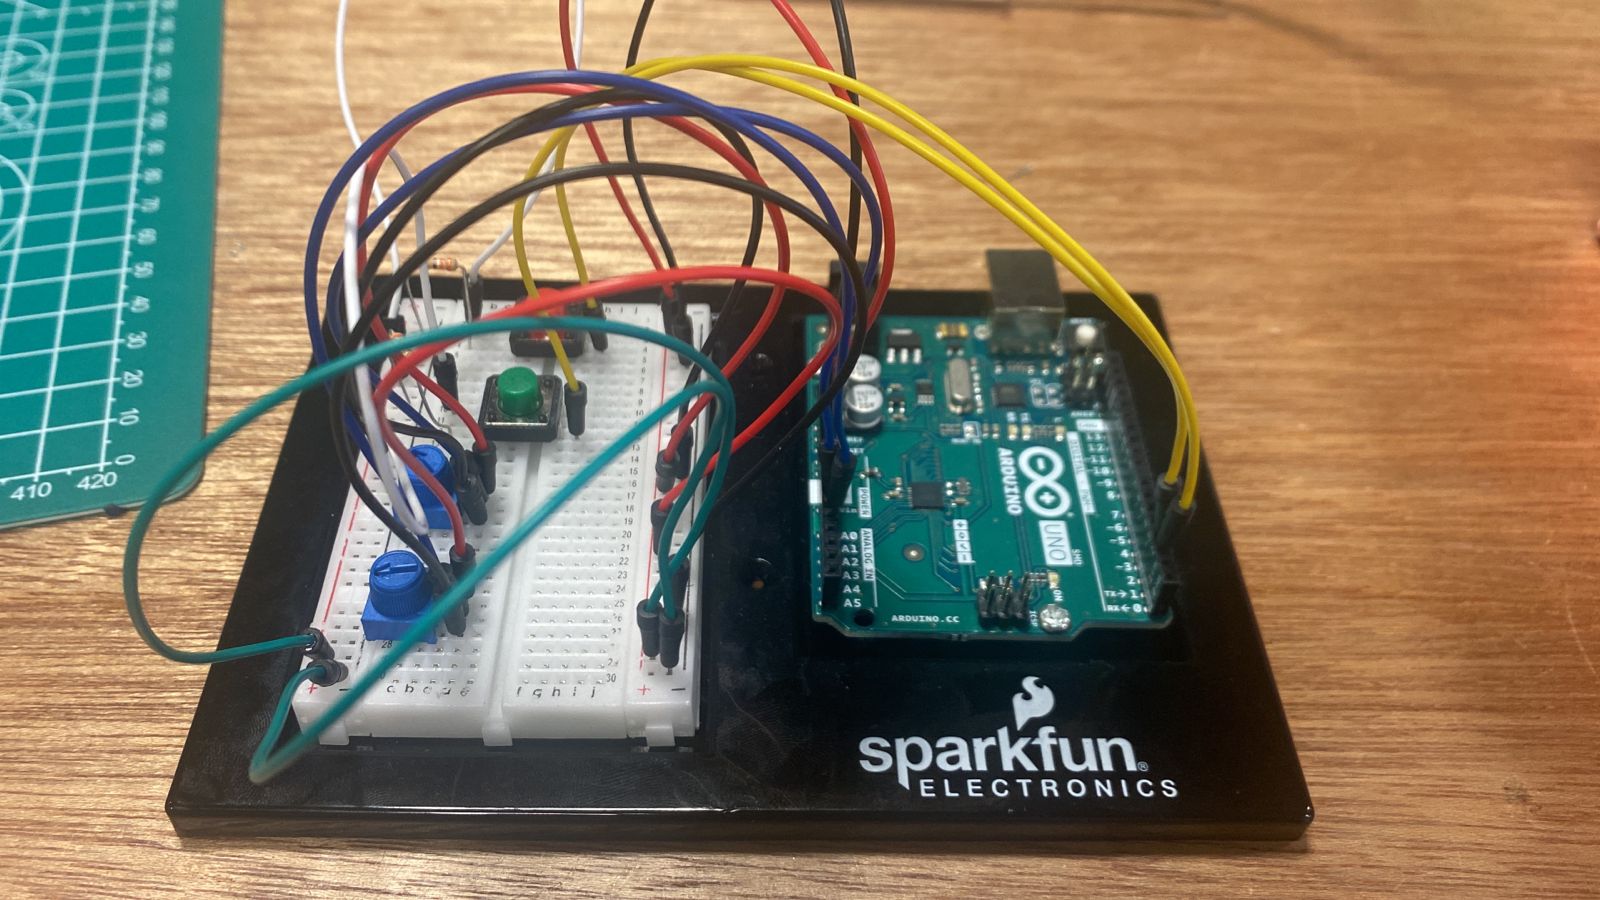
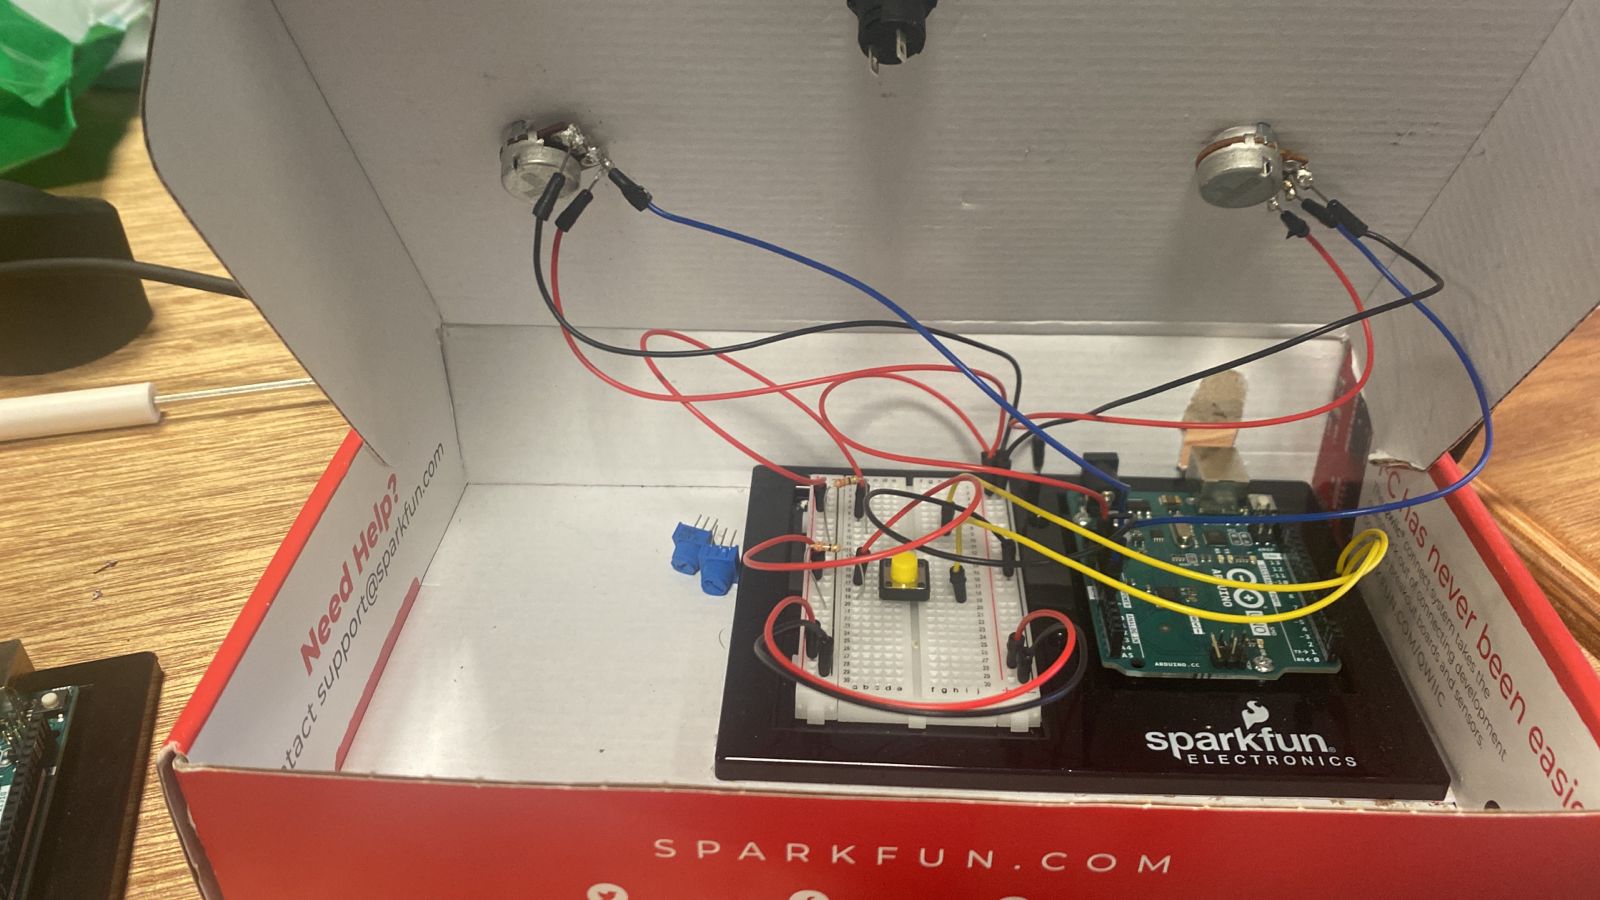


Final Project Documentation: DJ Falcon (Daniel and QM Naushad)

So, here it is! After fixing hundreds of errors and spending countless man hours, we finally have our project– DJ Falcon!

DJ Falcon:

Using Arduino and p5js, we created DJ Falcon, an audio mixer set that modifies tracks and makes everyone jam to the tunes. The mixer also has a visualizer whose waves sync with the audio being played.

The user is welcomed with this screen:

You can then choose a song from the list to mix:

Then you rotate the knobs on the mixer to shake things up!

The Process:

There are two parts to this code – the p5js part and the Arduino part.

Components Used:

Ph a000066 iso (1) ztbmubhmho      Arduino UNO board

12002 04      Breadboard

09939 01      
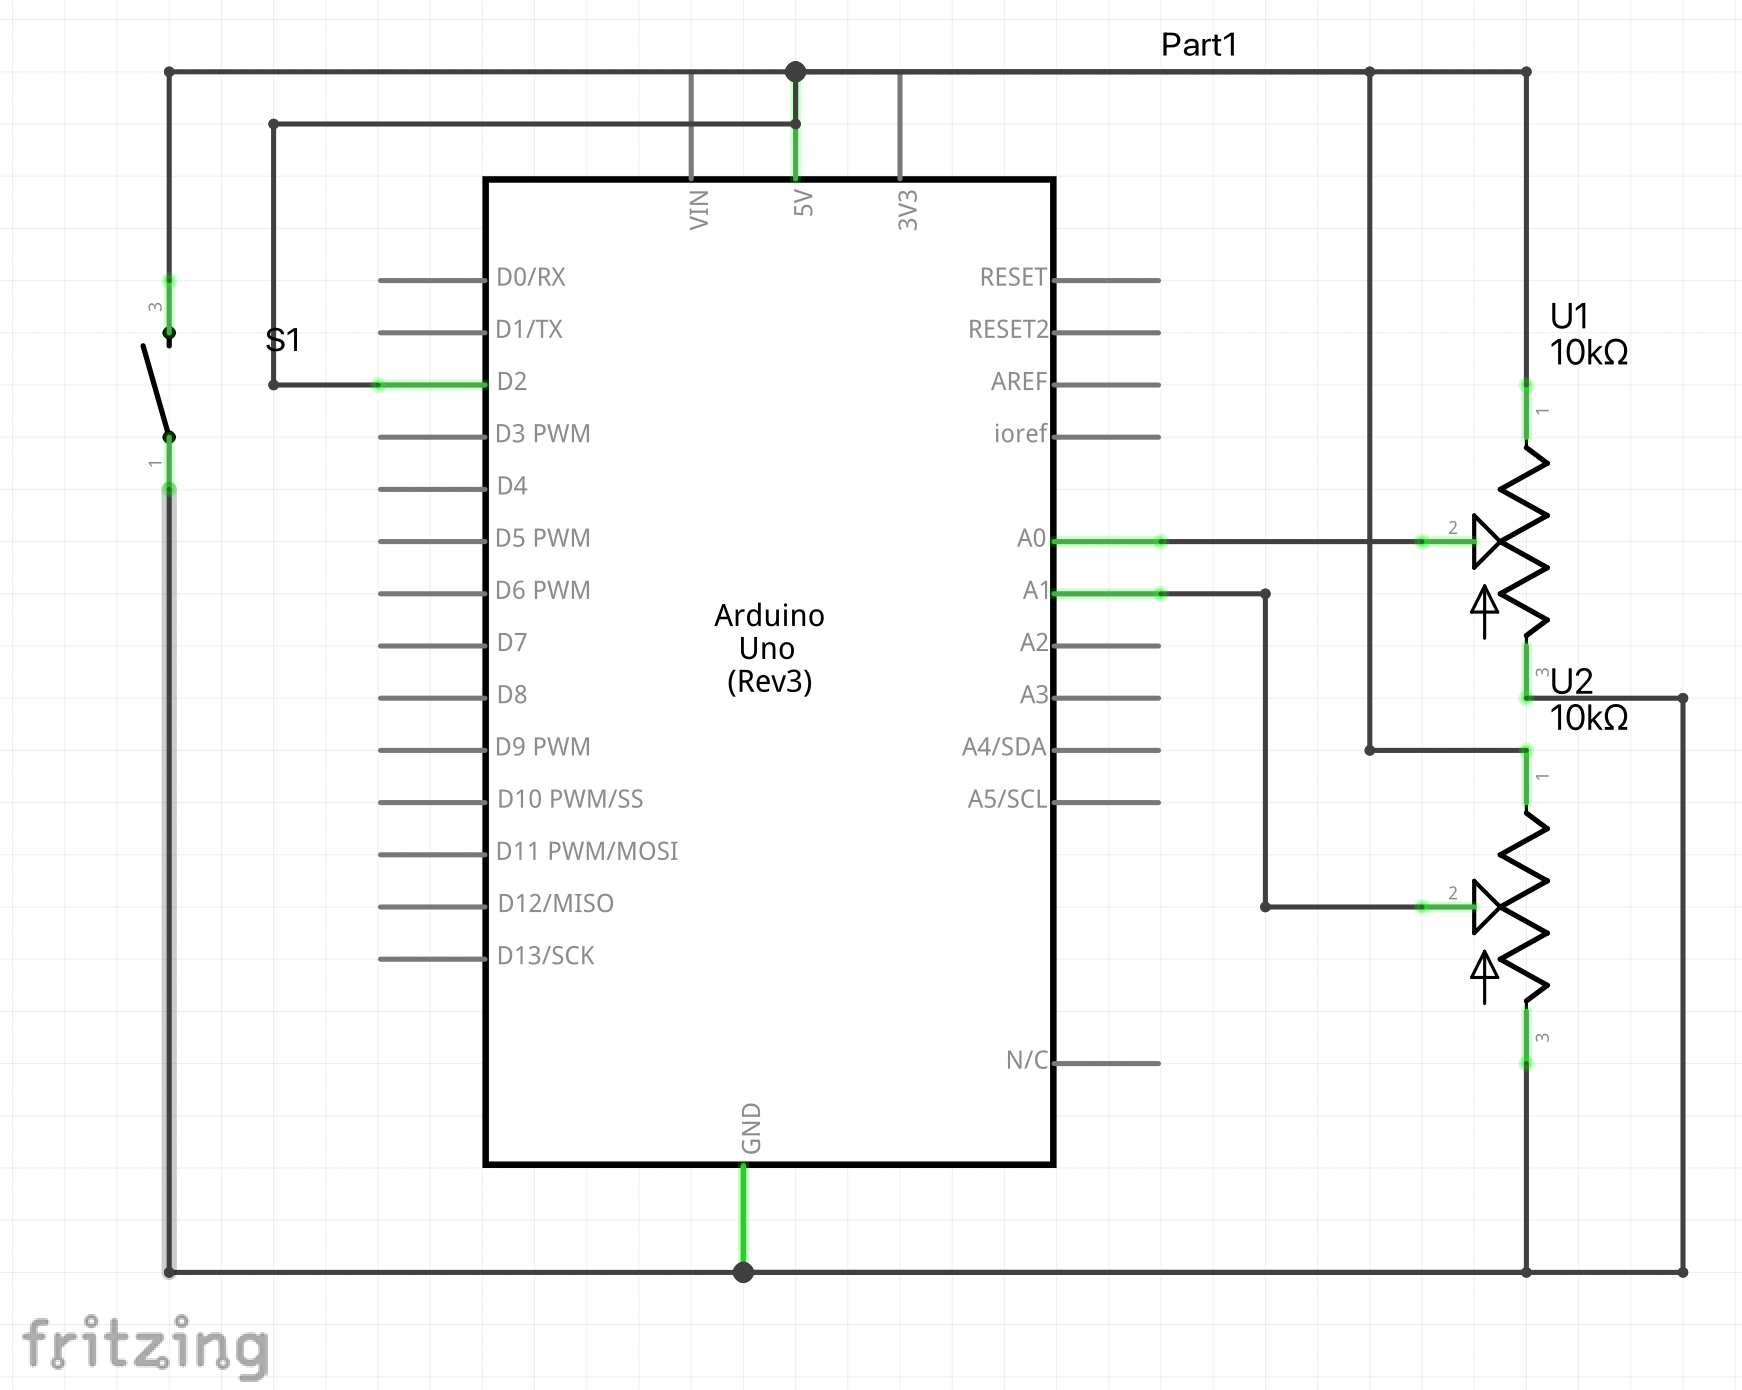
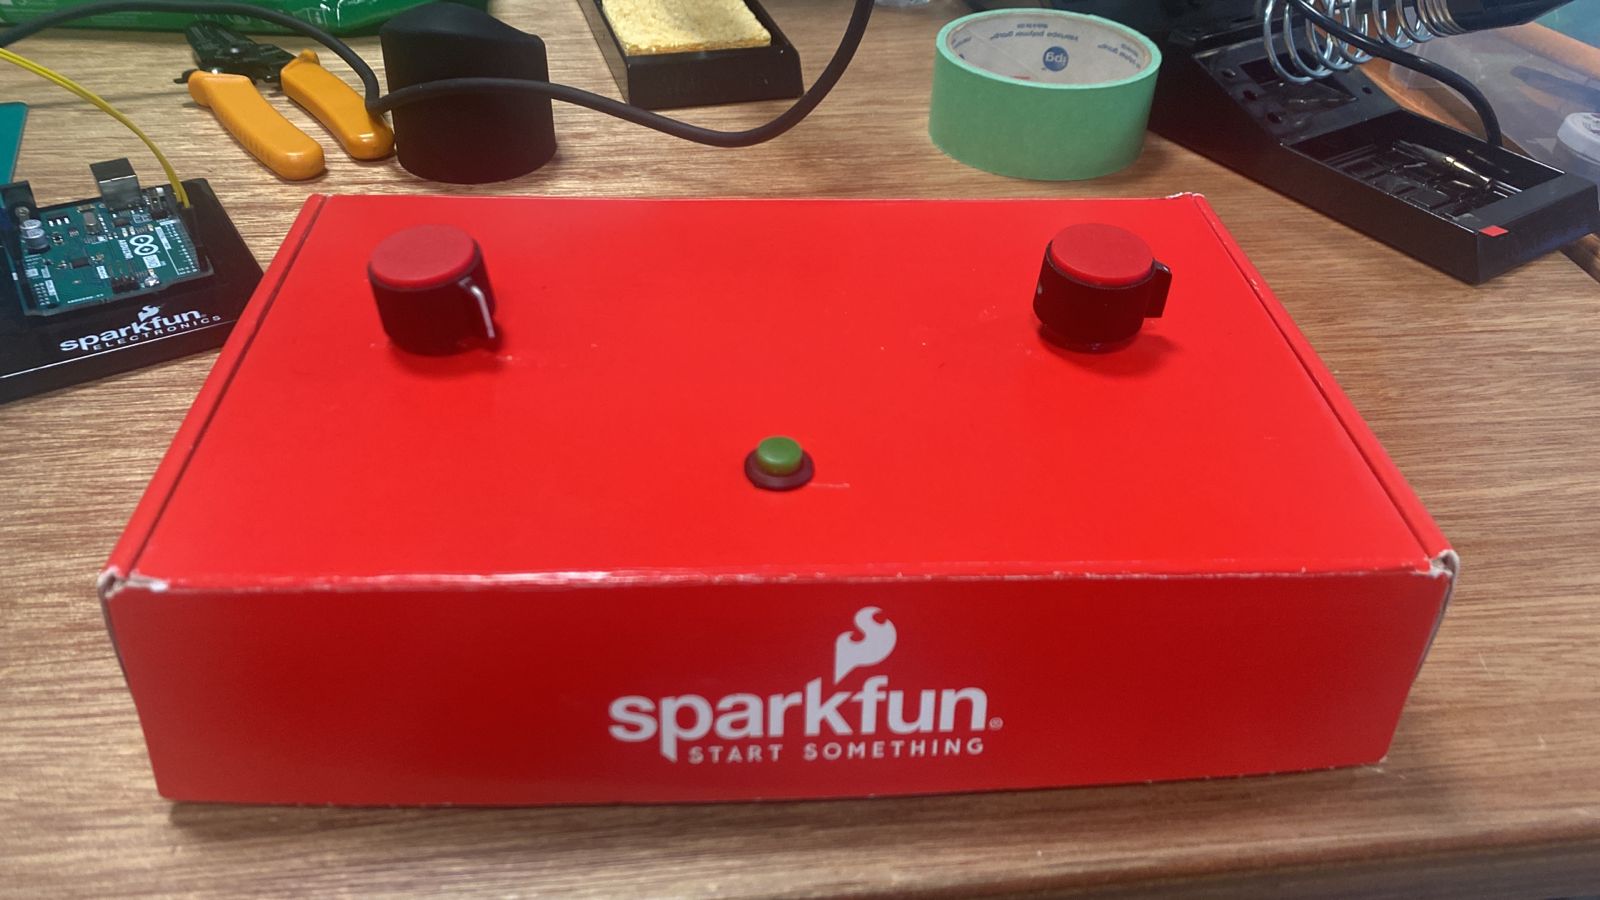
Rotary Potentiometers (2)

19c7994 40      Push down Switch (1)

Mfr 25frf52 10k sml     Resistors

11026 02      Jumper Wires

Apps and Online Services:

Ide web       Arduino IDE

Making p5.js Accessible. by Luis Morales-Navarro and Mathura… | by Processing Foundation | Processing Foundation | Medium        p5js


The Process:

We started the project by drawing out everything first in a notebook. Here’s the very first (very rough) sketch of our idea:

Daniel decided to work on the interface for the mixer while QM was going to put together the circuit and the hardware. After setting up the basic circuit on the breadboard and building a very basic interface with buttons on p5js, we had to connect the both.

We then incorporated the p5js sound library in our p5 code. We used the built in reverb, delay, frequency functions and tested those out together by uploading an mp3 file on p5js. It was all working fine. We had to then figure out how to take values from the potentiometer, map them, and use them as arguments for the sound functions.

But before that, we had to write code for reading the values from the pin. QM got to writing the code for the Arduino IDE while Daniel got to figuring out how to take those inputs in p5js. This is where we hit our first roadblock. We just could not figure out the correct p5js library for serial communication and also couldn’t figure out how to separate the values we got from the potentiometer and store them in variables. With a little help from Professor Ang, we finally figured out the right library and used a list to store our values from where we used split() and trim() function to separate the values from each input. This is the bit of code that helped us do it:

function serialEvent() {
  if (serial.available() > 0) {
    serialData = serial.readLine();
    if (serialData) {
      // false if serialData == null
      console.log(serialData);

      serialData = trim(serialData); // remove trailing whitespace
      serialValues = split(serialData, ","); // split the string to array
      console.log("serialValues ", serialValues);

      rev_value = Number(serialValues[0]);
      console.log("Rev: " + rev_value);

      rate_value = Number(serialValues[1]);
      console.log("Rate: " + rate_value);

      play_value = Number(serialValues[2]);
      console.log("Play/pause: " + play_value);

      standby_value = Number(serialValues[3]);
      console.log("Standby: " + standby_value);

      rev_mapped = map(rev_value, 0, 1023, 0, 100);
      rate_mapped = map(rate_value, 0, 1023, 0, 200);

      console.log("rev mapped: " + rev_mapped);
      console.log("rate mapped: " + rate_mapped);
    }
  }
}

It’s also worth mentioning that some of the code for the serial connection were reusable code snippets written by Professor Sherwood and Ang from class examples.

This is how our board looked:

Once we connected the Arduino board and had the serial connection going, it was now time to map the values to fit into the arguments. Daniel, being a Music major, had a pretty solid grip on the ranges for the different music functions like the dryness and wetness of reverb and had a good understanding of how our random values would translate to what we hear (QM also ended up learning a fair bit about music at this point from Daniel).

But even then, it wasn’t smooth sailing. Although we had an understanding of the values, p5 was playing its sly tricks with us with the inner working (or should I say, inner loopings!) of the draw() function causing a haphazard in the music where multiple tracks were playing by overlapping each other and it sounded more like a cacophony than a vibey night at a club.

One evening, after working for more than 5 hours continuously trying to solve these, we decided to call it a night and come back the next day.

Maybe sleeping on the bugs helped, because the next day, after the both of us worked simultaneously on our own laptops trying to fix the bugs, QM had a slight hint of a breakthrough when one of the buttons successfully paused the music without looping. Still it wouldn’t make it play again.

But then…(drumrolls) a moment of genius from Daniel and some tweaking of the code and suddenly everything worked! Words fail to describe how victorious we felt at that moment:

Now it was time to put everything together. QM, with a noob-level experience in soldering decided to solder the board together and Daniel would give a finishing touch to the interface, incorporating a dope background, cool fonts and a cleaner look. Here’s some of that scrappy soldering work:

And here’s Daniel’s work on the interface:

We were both happy with the font and the look of the mixer and the DJ Falcon mixer was ready.

The Schematic:

Code: Arduino IDE

const int switchPin1 = 2;
const int switchPin2 = 3;

void setup() {
  Serial.begin(9600);
  pinMode(switchPin1, INPUT); // initialize serial communications
  pinMode(switchPin2, INPUT);
}
 
void loop() {
  // read the input pin:
  int pot = analogRead(A0); 
  int mappedPot = map(pot, 0, 1023, 0, 255);
  Serial.print(pot);
  Serial.print(",");

  int potRev = analogRead(A1);
  int mappedtest = map(potRev, 0, 1023, 0, 255); 
  Serial.print(potRev);
  Serial.print(",");

  int button1 = digitalRead(switchPin1);
  int button2 = digitalRead(switchPin2);
  Serial.print(button1);
  Serial.print(",");
  Serial.println(button2);

  delay(1);


  delay(100);                                            
}

Code for p5js:

Improvements:

We had more ambitious ideas in mind like using the delay() feature and a standby button but those were causing bugs due to the draw() function of p5js, but we’re sure these can be implemented in the future.


Final Project update – Daniel and Q M Naushad

CONEPT

Our final project will be a mixer using an arduino board and P5js’ sound library.

DESIGN

The mixer will use the following components:

    • 1 potentiometer – analog input (Will work like a slider would in an actual mixer)
    • 2 buttons to switch between effects
    • 1 button to work as a Pause/Play button
    • [MAYBE] 1 button to work as a Bypass/Standby function

Here is a sketch of what it would look like:

We will use the Arduino’s box  to make the board and double as a place to hide the board.

The interface where you will mix is looking like this, currently I am working on it and designing it, this is not the final product/result as we’d like to add some color to it:

The line at the middle will react to the sound and hopefully produce colors and make a sound wave.

FUTURE PLANS

During the week we expect to finish the interface and Arduino set-up, and would be working on the code and synching in the sounds.

Only project that may come is being able to translate the values from the potentiometer to the parameters to make the effects take effect.

Final Project Idea

For the final project, I want to create a dancing pad by using Arduino and by serial communication on the p5js platform.

Dance Pad:

A dance pad is a panel with cells on which a person stands and steps on the panels following instructions on a screen. For each correct step on the panel, the player gets a point.

My implementation:

My implementation of the dance pad will use force sensitive sensors to record steps and on the screen color coded panels will indicate the steps the player has to move. The panels will change color and be synced with a sound track on p5js.

Possible challenges:

The main challenge would be to make the force sensitive sensors detect the steps correctly. Another challenge would be sync the color panels on the screen with the music without hardcoding.


Week 10: Air Piano

This is a fun instrument that lets you play simple tunes by waving your hands in the air!!

The basic idea is to be able to generate different frequencies of sound based on the position of your hand, which is sensed using an ultra-sonic sensor.

For this to work, the sensor has to be an open space such that there are no obstacles in front of it for at least a meter. Place your palm or any other obstacle in front of the sensor to obtain varying frequencies.

Schematics using Fritzing:

Here’s the code that makes it all work:

#define echoPin 6 
#define trigPin 5 
long duration; // variable for the duration of sound wave travel
int distance; // variable for the distance measurement
int tones;  
int tim=200;// duration for which one sound pulse will last
int buzzerPin = 8;
int space =500;

void setup() {
  pinMode(trigPin, OUTPUT); // Sets the trigPin as an OUTPUT
  pinMode(echoPin, INPUT); // Sets the echoPin as an INPUT
  pinMode(buzzerPin, OUTPUT);
  }
  
void loop() {
  
  //Finding distance of obstacle using ultrasonic sensor
  digitalWrite(trigPin, LOW);
  delayMicroseconds(2);
  digitalWrite(trigPin, HIGH);
  delayMicroseconds(10);
  digitalWrite(trigPin, LOW);
  
  duration = pulseIn(echoPin, HIGH); // Reads the echoPin, returns the sound wave travel time in microseconds
  distance = duration * 0.034 / 2; // Distance = time*speed/2
  
  //Emitting sound as per the distance
  
  tones =20+distance*5; //calculating the frequency that has to be emitted

   tone(buzzerPin, tones, tim); //emits sound at the specified frequency and for the specified duration
    
   delay (space); //delay between each beat
  
}

Improvements:

In the given code the sounds are emitted at a fixed time interval for a fixed duration. We can play around with this by changing the value of the variables ‘tim’ and ‘space’. Also, we can play around with the way the frequency is calculated from the distance.

Week 9: Digital Input-Output

Ramp Lights!

This week we learned how to control and manipulate digital and analog input/outputs on Arduino IDE. It was interesting how a few lines of code with basic instructions could control a physical output like an LED. For the assignment, I created a ramp light sequence (imagine lights turning on one by one on a ramp, tried to recreate that). The lights turn on sequentially with the rotation of a potentiometer. Here’s a video of how that turned out:

How it works:

The working of this is very simple: the potentiometer has values calibrated with its rotation, so I took those values as input and using if and else if conditions, I changed the state of the LEDs to HIGH or LOW.

The Schematics:

Here’s a diagram of the schematics made using Fritzing:

Arduino IDE code:

int potPin = A5;
int ledPin1 = 2;
int ledPin2 = 3;
int ledPin3 = 4;
int ledPin4 = 5;

void setup() {

  pinMode(potPin, INPUT);
  pinMode(ledPin1, OUTPUT);
  pinMode(ledPin2, OUTPUT);
  pinMode(ledPin3, OUTPUT);
  pinMode(ledPin4, OUTPUT);
  Serial.begin(9600);

}

void loop() {
  int potValue = analogRead(A5);
  Serial.println(potValue);

  if (potValue < 100) {
    digitalWrite(ledPin1, LOW);
    digitalWrite(ledPin2, LOW);
    digitalWrite(ledPin3, LOW);
    digitalWrite(ledPin4, LOW);
  }
  
  else if (potValue < 256) {
    digitalWrite(ledPin1, HIGH);
    digitalWrite(ledPin2, LOW);
    digitalWrite(ledPin3, LOW);
    digitalWrite(ledPin4, LOW);

  }


  else if (potValue < 512) {
    digitalWrite(ledPin1, HIGH);
    digitalWrite(ledPin2, HIGH);
    digitalWrite(ledPin3, LOW);
    digitalWrite(ledPin4, LOW);
  }

  else if (potValue < 768) {
    digitalWrite(ledPin1, HIGH);
    digitalWrite(ledPin2, HIGH);
    digitalWrite(ledPin3, HIGH);
    digitalWrite(ledPin4, LOW);
  }

  else if (potValue < 1024) {
    digitalWrite(ledPin1, HIGH);
    digitalWrite(ledPin2, HIGH);
    digitalWrite(ledPin3, HIGH);
    digitalWrite(ledPin4, HIGH);
  }


}

It was fun creating the ramp lights and seeing the lights turn on/off with the turn of my potentiometer!


Week 8: Unusual Switch- Productivity Detector!

Idea:

The objective of this week’s assignment was to create a hands-free switch in a simple circuit. For this, I came up with an idea to create a circuit that with a led that turns on when I close my laptop lid. My laptop battery drains when the lid is open, even if the screen is asleep. Sometimes, I would go to bed without closing my laptop lid and my laptop would die in the morning without me even using it. Hence, a led to detect that!

To implement this, I used tiny thin strips of aluminum foil on my laptop deck and the top of the laptop screen and aligned them so that they touch each other when the lid is closed. The aluminum strips are connected to the jumper and the circuit is completed on the breadboard.

Things to improve:

With code, I could create a more functional circuit which would be red when the lid is opened signaling battery drain and would turn green when the lid is closed.

Week 3: Object Oriented Programming

This week we were asked to create using Classes in Javascript. Classes are pretty cool because they store both data and functions and can be used to create ‘instances’. An apt analogy would be comparing a class to a cookie cutter and instances to cookies that can be cut using a cookie cutter. One cookie cutter can cut out an unlimited number of cookies and this makes classes very powerful. For this week’s assignment I made a very simple graphic called ‘Cats and Dogs’ (yes, the rain proverb!) and it shows a town at night where it’s raining cats and dogs, quite literally!

The process and the code:

For this assignment I relied solely on the Reference page of p5js and random tutorials on YouTube. I spent a lot of time trying to grasp how to write classes in Javascript. In the end what I made looks very simple, but I know that a lot more can be done using classes. Most of my time in this project was spent trying to understand classes.

I created 1 class that does it all, and I called it Drop. Besides the constructor() method, the class had two other methods, update() and show():

class Drop {
  constructor() {
    this.x = random(0, width);
    this.y = random(0, -height);
  }

  update() {
    this.y = this.y + 4;
    if (this.y > height) {
      this.y = random(0, -height);
    }
  }
  show() {
    noStroke();
    fill(0);
    // ellipse(this.x, this.y, 2, 10);
    image(doge, this.x, this.y, 40, 40);
    image(catto, this.x - 30, this.y + 60, 70, 70);
  }
}

The images of the dog and the cat was uploaded on to the project directly.

What I realized about Classes:

On their own, it’s hard to figure out stuff to do with Classes. I personally feel the true benefits of classes can be reaped when used in bigger projects where a class can be act as a cog in a machine.


Midterm Project (Game): Save the Snail

For the midterm project, I created a game in p5js called ‘Save the Snail’, which can be played directly inside the browser. Just hit Space and start playing! To play click and hold down on the mouse (any of the buttons) to move the snail. It’s pretty intuitive (I think) and one should easily get the hang of it after trying it out a couple times.

The idea:

The hardest part about making the game was coming up with an idea. I wanted the game to be simple, easy-to-play and kind of original. Apparently whatever I wanted to create had been implemented in one way or other. So I decided to not be too hung up on creating something totally new. I came up with this game idea where you had to ‘save’ an object from getting hit by obstacles.

The code:

The code for this game involves a lot of functions. I felt more comfortable using functions instead of classes so that’s what I went with. There are three main elements in the game:

  1. The frog
  2. The snail
  3. The rocks

I think the most important function in the code is the rockhit() function because it determines the end of the game. Here’s the code snippet:

function rockhit() {
  let temp = 0.5 * (snail_dia + rock_dia) - 2;
  let distance;

  for (let i = 0; i < rocksnum; i++) {
    distance = dist(xpoint, ypoint, rockposX[i], rockposY[i]);
    if (distance < temp) {
      return true;
    }
  }
  return false;
}

This function returns true if any of the rocks hit the snail. It checks this by iterating through a for loop.

To make the game interesting, I added difficulty levels to it. Again, I wanted to keep things extremely simple and easy-to-understand, so I added only two levels of difficulty: Easy and Hard. The difference the difficulty levels make is in the number of rocks that fall from above. I achieved this by simply adding an if condition to my code and changing the numrocks variable if the user chooses the hard level. Here’s the code for the interface that prompts the user to choose a level:

function chooseLevel() {
  imageMode(CENTER);
    image(banner, width / 2, height / 2, 400, 300);
    fill(207, 185, 151);
    textFont(myFont);
    textSize(40);
    stroke(139, 69, 19);
    strokeWeight(5);
    textAlign(CENTER, CENTER);
    text("Choose difficulty level", 0, height / 2 - 85, width);
    textSize(35);
    text(
      "EASY (hit UP ARROW)\nHARD (hit DOWN ARROW)",
      0,
      height / 2 + 2,
      width
    );
    imageMode(CORNER);
}

The if condition that increases the number of rocks:

function draw() {
  clear();
  background(bg);
  if (mode == 0) {
    welcomeScreen();
  }
  if (mode == 1) {
    chooseLevel()
  }
  if (mode == 2) {
    gamePlay();
  }
  if (mode == 3) {
    rocksnum = 30;
    gamePlay();
  }
}

To keep track of the score, I used a counter which just keeps on incrementing as time passes. A noLoop() statement stops the increment as soon as the game is over.

So that is how my midterm project turned out! It’s a simple game but I created it regardless because it’s something I would enjoy playing.

Things that could be improved:

The game could be made better by adding levels progressively after certain score thresholds. The graphics could have been

Week 5: Midterm Progress: Save the Snail

For my midterm project I’m creating a game called ‘Save the Snail’. It’s a very simple, easy-to-play game where the user tries to save a snail from getting eaten by a frog or getting hit by rocks.

Save the Snail:

The game will be extremely easy to play, and will just need a press on the keyboard or a click on the mouse. The frog will be at one end of the screen and the snail will keep getting attracted to the frog and the user’s click on the mouse will move the snail away to the right. At the same time there will be rocks falling randomly from the top of the screen and the user will also have to make sure the rocks don’t hit the snail. The gameplay overall is very simple. If the snail comes in contact with the frog or gets hit by the rocks, the screen shows the score and a game over message.

My Progress:

So far I have figured out how to make the rocks drop down randomly. I accomplished that using a class for the rocks and then a update() method to make them drop down. I also made the ‘snail’, currently it’s just a circle that keeps moving to the left and a built-in p5js function- mouseIsPressed()-  moves the circle ten units to the right.

Here’s a screenshot of the progress. The code is still very scratchy and uncommented for the most part:

Things left to do:

Although the code is somewhat functional, what makes or breaks a game is the interface. I am looking to make the interface a lot more friendly and add graphical elements to it. Also, I’ll maybe try to add difficulty levels but I’m not sure if I can make that happen. For now the game is an arcade style game, a very good way to kill time, haha.