This week, we started working individually on different parts of the game largely due to the nature of our virtually non-overlapping working hours (Maaz sleeps at 11 in morning which is when I wake up). Regardless, we sat together towards the end of the week to complete most of the functionalities of the game.
The code for the project can be found on the Github repository (which doesn’t have the latest code yet).
Demo & User testing #1
Demo
User testing #1
Processing
We started with coding the classes before integrating them. We started with the base classes like Item and Player which we then used to build the Level class and Game class. Maaz wrote the code for the Item class while I wrote the Player class and we tested the classes individually. After that, we had discussions on how to combine the two classes to start implementing the Level class, adjusting the base classes if necessary to get the classes to work together. Once Level was implemented, we then wrote a wrapper program (which will be cleaned up to make the Game class) to test all functions of Level.
Our main priority is to fully implement all the necessary game functions, especially the interactions between different classes as well as Processing – Arduino communication. Therefore, we used a lot of placeholders in the process (for example, though we had a list of sprites to use as items, we don’t have one for the player) as well as randomizations and default values (the items are appearing randomly and they all hold the same score for now). Using such placeholders and randomizations makes the game pretty easy for now (as can be seen in our user testing #1, where our player wins pretty quickly). We wanted to focus on having a version of the game that runs fully from start to finish. So far, we have managed to achieve this. For the rest of the project, we plan to make adjustments to existing functions in order to make the game more challenging. Some of the necessary adjustments include:
Building a system of item values: as of now, all the items are worth the same value (for testing purposes). We plan to add an extra Value attribute to the Item class and vary the value given to each item.
Changing frequency of appearance of items: right now, the items are added randomly. We plan to control which items will appear at which level (for example, Study away should only start appearing since sophomore year, and Capstone should only appear in senior year) and with different frequency (J-Term should only appear once per year, and it should have a higher value).
Finishing up with the graphics: right now, the graphics are at a minimum to guide the user through all the functions of the game. We will sure be touching up the appearance of the game.
Arduino
Distance measuring sensor: We have been experimenting with this sensor ever since the start of the project. Please refer to previous posts for a detailed description.
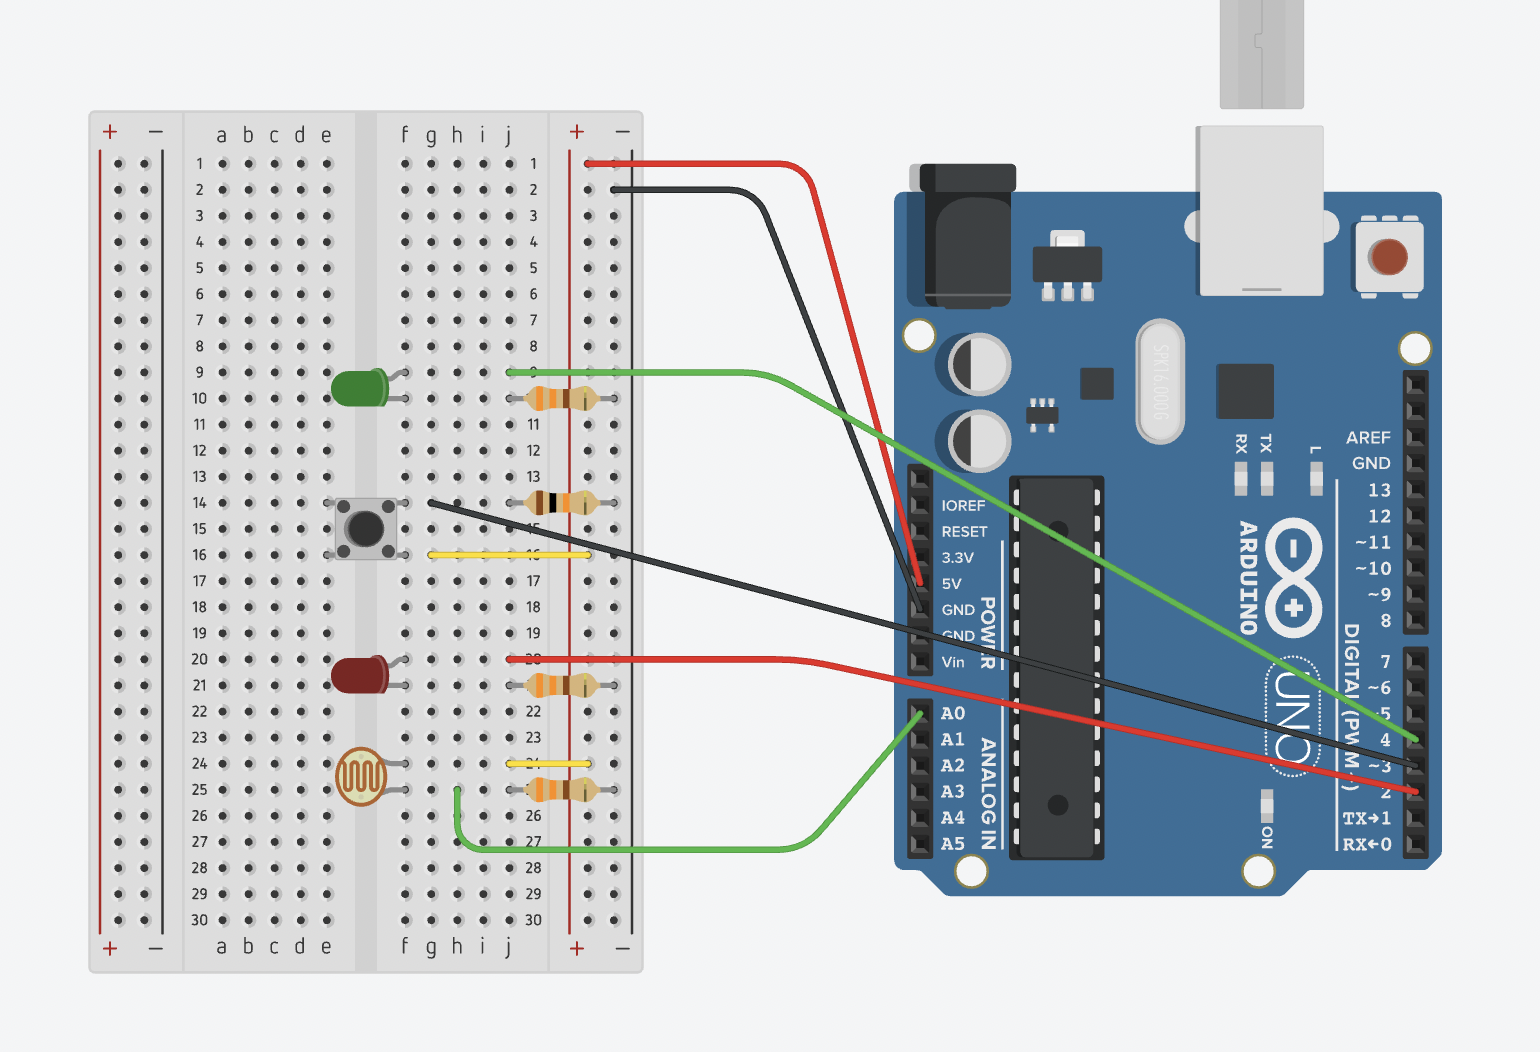
Potentiometer: We use the potentiometer to traverse the options on the screen, if available. The input value is mapped into the range of the number of available options, and the currently selected option is highlighted on the screen.
Button: The button is used in tandem with the potentiometer: while the potentiometer is used to traverse the option, the button is used to signify the actual selection of an option.
Tricolor LED: Initially, we planned on having 2 tricolored LEDs on the breadboard, each one of them corresponding to the two metrics of performance. However, with so many components on the breadboard, we ran out of pins to connect the two LEDs to. Also, it was hard to keep a track of which LED represented which performance. So we decided to have a single LED to show how good or bad the player was doing on the game. The LED would turn green if the player was doing well with regards to both academics and health, and it would turn red if the player did poorly in any of the two performances. In other cases, it would stay yellow. These signals were sent from Processing to Arduino to set the LED to the relevant color at that point in the game. This helped us to give an indication of the overall performance of the player.
Piezo buzzer: We decided to make the buzzer play a short sound whenever the player collided with any of the items. This was done by keeping a check within the checkCollision() method and sending a signal to Arduino to make the buzzer play a note. However, we noticed that it worked for almost all collisions except for a few, and we spent a lot of time trying to figure out why this problem occured. Even after trying out multiple different methods, it never gave perfect results, so we plan on working on it further in the coming week.
Graphics
Since our game was supposed to have items of 4 different categories, we realized that it was important to have enough items for all of them. The four categories are: academics – good, academics – bad, health – good, health – bad. We ended up making 19 different sprites using https://www.piskelapp.com/. This was a relatively hard process since getting the sprites to look good is always one of the most essential parts of making any game. Additionally, since the game is NYUAD-themed, it wasn’t possible to find relevant sprites on the internet and we had to make all of them on our own. All of the sprites are 100×100 pixels and most of the sprites have multiple frames; the Processing part of our game loops over all the frames to animate the sprites. This was a fun but tiring process, and below is a video of Maaz vibing to one of his favorite songs as he tries his luck with making some of the sprites.
In our previous post, Maaz and I mentioned that we would be using Processing and Arduino together to make a game for our final project which would be similar to Tetris. However, both of us were not very satisfied with how we were using the sensors in our game. We thought we could find some ways to better utilize the Arduino components. Additionally, after the discussion session on Monday, we were pretty sure that we had to make tweaks to the game play.
We now have a new version of our game. This version is very different from Tetris but it uses most of the sensors in the same way as the previous version did. The distance sensor continues to be the most important resistor, while we have added a few new features. This version is an NYUAD-themed game, in which the player playing the game sees certain objects falling down the screen. These objects will be of two categories: objects which the player should catch and objects which the player should avoid. The player controls the game using the breadboard which has the distance sensor mounted on it (the entire things acts as a “remote control”). Towards the right and left of the remote control will be a frame (made of cardboard for instance). The two sides of this frame represent the endpoints of the game screen, and they help us determine how far the distance sensor (and hence the remote control) is from one end of the screen. Using this “remote control”, the player’s position can also be displayed on the screen for the player to figure out how close/far away they are from objects that are to be caught/avoided.
The ground rules of the game are as the following:
Just like in the previous version of our game, this version will have multiple levels of varying difficulty. We plan to have four levels corresponding to four academic years, with each succeeding level harder than the previous one.
The player has to maintain two metrics of performances: academic performance and well-being. There are certain objects that are beneficial and objects that are harmful to a performance. You need to catch the good objects (which will increase your performance) and avoid the bad ones (which will decrease your performance).
Initially, both performances start at 50% and you need to take them both to 100% to finish the year and advance to the next academic year. If either of the performances reaches to 0, you fail the year.
If you fail, you are presented with 3 options:
You can either restart college (restarting the entire game)
Or you can restart the academic year (restarting that particular level)
Or you can drop out (exiting the game)
If you finishing all four academic years, you win the game (congrats on graduating)
You will be given a diploma and introduced to “other games” (Career, Graduate schools, might be coming soon (no they aren’t, we are not doing those for real))
Arduino – Processing communication
Distance sensor is implemented as a remote control:
The Arduino program calculates how far the remote control is from a vertical surface
The distance is sent to Processing which will map the distance into the player’s horizontal coordinate
An icon representing the player’s position on the Processing screen is updated accordingly
Processing will check for collision with items. If there is a collision, a signal is sent to Arduino to play a sound on the buzzer
When the player is presented with a screen that has options (for example, the starting screen can have Instructions, Start game, the ending screen can have Restart college, Restart the year, Drop out), the player can use the potentiometer on the Arduino to traverse the options and press a button when the desired option is selected to proceed.
Processing receives the signal from the potentiometer and maps it to a range to decide which option is currently selected by the player and communicates this back to the player by highlighting the option.
Two tricolor LEDs on the Arduino are used to communicate the player’s current performances, one to represent academic performance and the other to represent well-being. If the player’s performance in either is fulfilled (reaches 100), the LED(s) turns green; if performance is adequate, the LED(s) turns blue/yellow (?); and if performance is low (approaching 0), the LED(s) turns red.
I want to finish exercises in serial communication early so that I can focus on the final project.
Exercise 1.
Make something that uses only one sensor on arduino and makes the ellipse in processing move on the horizontal axis, in the middle of the screen, and nothing on arduino is controlled by processing.
Arduino
const int poten = A0;

void setup() {
  Serial.begin(9600);
  Serial.println("0");
}

void loop() {
  while (Serial.available()) {
    if (Serial.read() == '\n') {
      int sensor = analogRead(poten);
      delay(1);
      Serial.println(sensor);
    }
  }
}
Processing
import processing.serial.*;
Serial myPort;
int xPos=0;
int yPos;

void setup() {
  size(960, 720);
  yPos=height/2;
  printArray(Serial.list());
  String portname=Serial.list()[4]; //[4] "/dev/cu.usbmodem1101"
  println(portname);
  myPort = new Serial(this, portname, 9600);
  myPort.clear();
  myPort.bufferUntil('\n');
}

void draw() {
  background(255);
  ellipse(xPos, yPos, 30, 30);
}

void serialEvent(Serial myPort) {
  String s=myPort.readStringUntil('\n');
  s=trim(s);
  if (s!=null) {
    println(s);
    int value = int(s);
    xPos=(int)map(value, 0, 1023, 0, width);
  }
  myPort.write("\n");
}
Exercise 2.
Make something that controls the LED brightness from processing
Take the gravity wind example and make it so every time the ball bounces one led lights up and then turns off, and you can control the wind from one analog sensor
Demo
Arduino
const int poten = A0;
const int led1 = 3;
int onOff = 0;

void setup() {
  Serial.begin(9600);
  Serial.println("0");
}

void loop() {
  while (Serial.available()) {
    onOff = Serial.parseInt();
    if (Serial.read() == '\n') {
      int sensor = analogRead(poten);
      delay(1);
      Serial.println(sensor);
      if (onOff == 1) {
        analogWrite(led1, 255);
      } else {
        analogWrite(led1, 0);
      }
    }
  }
}
Processing
PVector velocity;
PVector gravity;
PVector position;
PVector acceleration;
PVector wind;
float drag = 0.99;
float mass = 50;
float hDampening;

import processing.serial.*;
Serial myPort;
int poten;

void setup() {
  size(640, 360);
  noFill();
  position = new PVector(0, 0);
  velocity = new PVector(0, 0);
  acceleration = new PVector(0, 0);
  gravity = new PVector(0, 0.5*mass);
  wind = new PVector(0, 0);
  hDampening=map(mass, 15, 80, .98, .96);

  String portname=Serial.list()[4]; //[4] "/dev/cu.usbmodem1101"
  myPort = new Serial(this, portname, 9600);
  myPort.clear();
  myPort.bufferUntil('\n');
}

void draw() {
  background(255);
  if (!keyPressed) {
    wind.x=poten;
    velocity.x*=hDampening;
  }
  applyForce(wind);
  applyForce(gravity);
  velocity.add(acceleration);
  velocity.mult(drag);
  position.add(velocity);
  acceleration.mult(0);
  ellipse(position.x, position.y, mass, mass);
  if (position.y > height-mass/2) {
    velocity.y *= -0.9;  // A little dampening when hitting the bottom
    position.y = height-mass/2;
  }
}

void applyForce(PVector force) {
  // Newton's 2nd law: F = M * A
  // or A = F / M
  PVector f = PVector.div(force, mass);
  acceleration.add(f);
}

void keyPressed() {
  if (keyCode==LEFT) {
    wind.x=-1;
  }
  if (keyCode==RIGHT) {
    wind.x=1;
  }
  if (key==' ') {
    mass=random(15, 80);
    position.y=-mass;
    velocity.mult(0);
  }
}

void serialEvent(Serial myPort) {
  String s=myPort.readStringUntil('\n');
  s=trim(s);
  if (s!=null) {
    int value = int(s);
    poten = (int)map(value, 0, 1023, 0, width*.01);
  }
  if (round(velocity.y) < 0) {
    myPort.write(1 + "\n");
  } else {
    myPort.write(0 + "\n");
  }
}
UPDATE APRIL 11. I made changes to the Processing file so that turning the potentiometer up and down can move the ball right and left.
PVector velocity;
PVector gravity;
PVector position;
PVector acceleration;
PVector wind;
float drag = 0.99;
float mass = 50;
float hDampening;

import processing.serial.*;
Serial myPort;
int poten;
int prevPoten = 0;
boolean movingRight = true;
int maxPoten;

void setup() {
  size(640, 360);
  noFill();
  position = new PVector(width/2, 0);
  velocity = new PVector(0, 0);
  acceleration = new PVector(0, 0);
  gravity = new PVector(0, 0.5*mass);
  wind = new PVector(0, 0);
  hDampening=map(mass, 15, 80, .98, .96);

  String portname=Serial.list()[4]; //[4] "/dev/cu.usbmodem1101"
  myPort = new Serial(this, portname, 9600);
  myPort.clear();
  myPort.bufferUntil('\n');

  maxPoten = (int)map(1023, 0, 1023, 0, width*.01);
}

void draw() {
  background(255);
  if (!keyPressed) {
    if (prevPoten < poten) {
      movingRight = true;
    } else if (prevPoten > poten) {
      movingRight = false;
    }
    if (!movingRight) {
      wind.x = -(maxPoten-poten);
    } else {
      wind.x = poten;
    }
    velocity.x*=hDampening;
  }
  applyForce(wind);
  applyForce(gravity);
  velocity.add(acceleration);
  velocity.mult(drag);
  position.add(velocity);
  acceleration.mult(0);
  ellipse(position.x, position.y, mass, mass);
  if (position.y > height-mass/2) {
    velocity.y *= -0.9;  // A little dampening when hitting the bottom
    position.y = height-mass/2;
  }
  prevPoten = poten;
}

void applyForce(PVector force) {
  // Newton's 2nd law: F = M * A
  // or A = F / M
  PVector f = PVector.div(force, mass);
  acceleration.add(f);
}

void keyPressed() {
  if (keyCode==LEFT) {
    wind.x=-1;
  }
  if (keyCode==RIGHT) {
    wind.x=1;
  }
  if (key==' ') {
    mass=random(15, 80);
    position.y=-mass;
    velocity.mult(0);
  }
}

void serialEvent(Serial myPort) {
  String s=myPort.readStringUntil('\n');
  s=trim(s);
  if (s!=null) {
    int value = int(s);
    poten = (int)map(value, 0, 1023, 0, width*.01);
  }
  if (round(velocity.y) < 0) {
    myPort.write(1 + "\n");
  } else {
    myPort.write(0 + "\n");
  }
}
The prompt for this week’s assignment is to make a musical instrument using digital sensors and analog sensors from the Arduino kit. But before getting into it:
Disclaimer: I know next to nothing about music. My project focuses much more on the technical side of it than the musical or aesthetic side.
My main idea was to make a piano-like device that can play different notes when different switches are triggered. The main problem is that the Arduino kit is limited in the size of the breadboard as well as the availability of components. There are only four buttons and while using them for four notes is a good idea, I found it pretty limiting. I also imagined it would be difficult to use the switches if they were all on the same board. So I tried to come up with an idea on how to expand the instrument to a wider area while still putting all the controlling components on the board. After many days of brainstorming and experimenting, I have made an instrument that can play 21 notes using three buttons, one distance measuring sensor, and a few helping extra components (paper!).
Following is a short demo of my product. Please excuse the bad camerawork. I would have tried to play a legit song if not for the disclaimer (see above). The circuit and the code can be found at the end of the post.
Processes
I figured that I could use one of the sensors to control the sounds. Among the available sensors, the distance measuring sensor seemed to be the most suitable for my idea. And thus I mostly tinkered with it through examples I found online, like this tutorial. My main idea was to put a number of separators increasingly further away from the sensor so that each separator will trigger a certain note.
The first step was programming the Arduino. Following the tutorial I linked above, I was able to play different notes when I put a surface at different distances from the sensor. I made some adjustments to the parameters used in the original code so that the calculatedDistance returned is in centimeters instead of inches because imperial units do not make sense to me. I was also able to get inspiration from BlinkWithoutDelay in order to play a note one time for a short duration then stop until the next note is triggered, instead of having the sound played constantly.
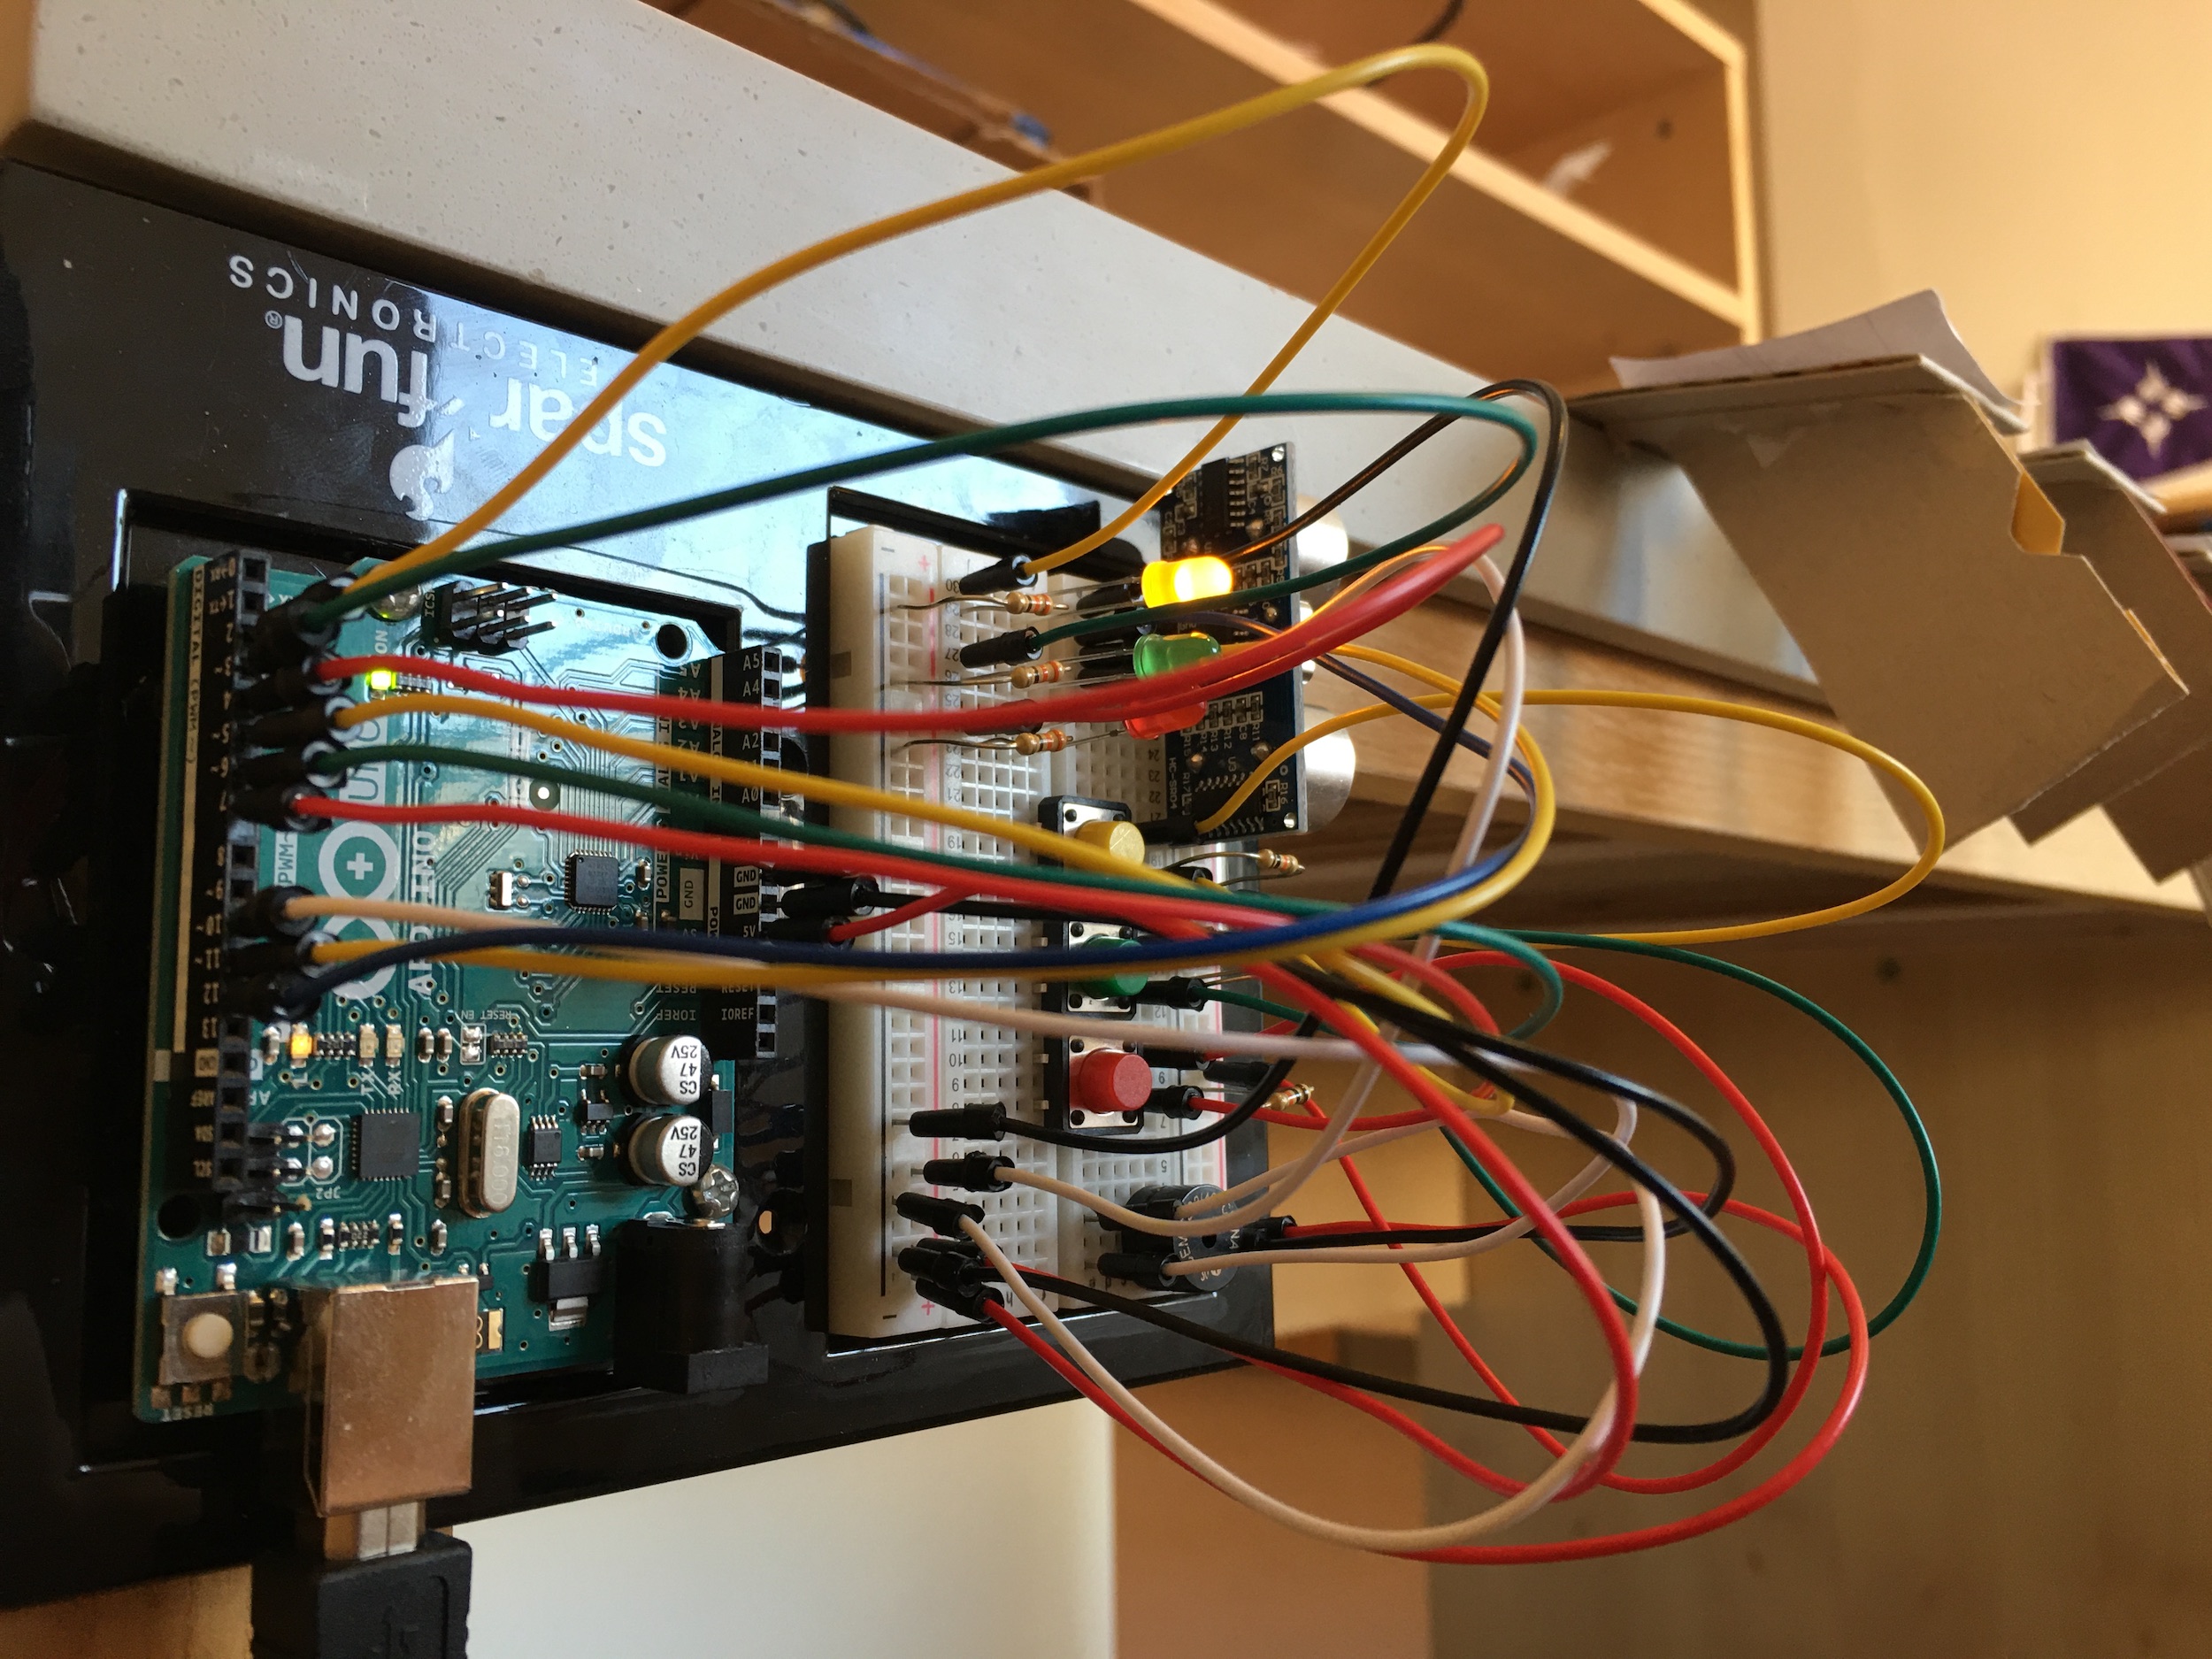
I originally planned to have 8 notes from C4 to C5, but as I was testing the board, I realized I could add more notes without having to increase the distances of the notes from the sensor. Instead, I added three buttons to the board, corresponding to three octaves (I hope I’m using the correct term here). Specifically, when no button is pressed or the yellow button is pressed, available notes are C4-B4. Similarly, green mode corresponds to C5-B5, and red mode corresponds to C6-B6. Theoretically, I could add one more blue button corresponding to one more octave, but I was running out of space on the breadboard and pins on the Arduino. In order to keep track and signify the current mode, I added three LEDs with the same colors as the buttons. The final circuit was pretty complicated due to the sheer number of jumper cables alone, so it took me a while to plug everything in correctly without one component messing up another.
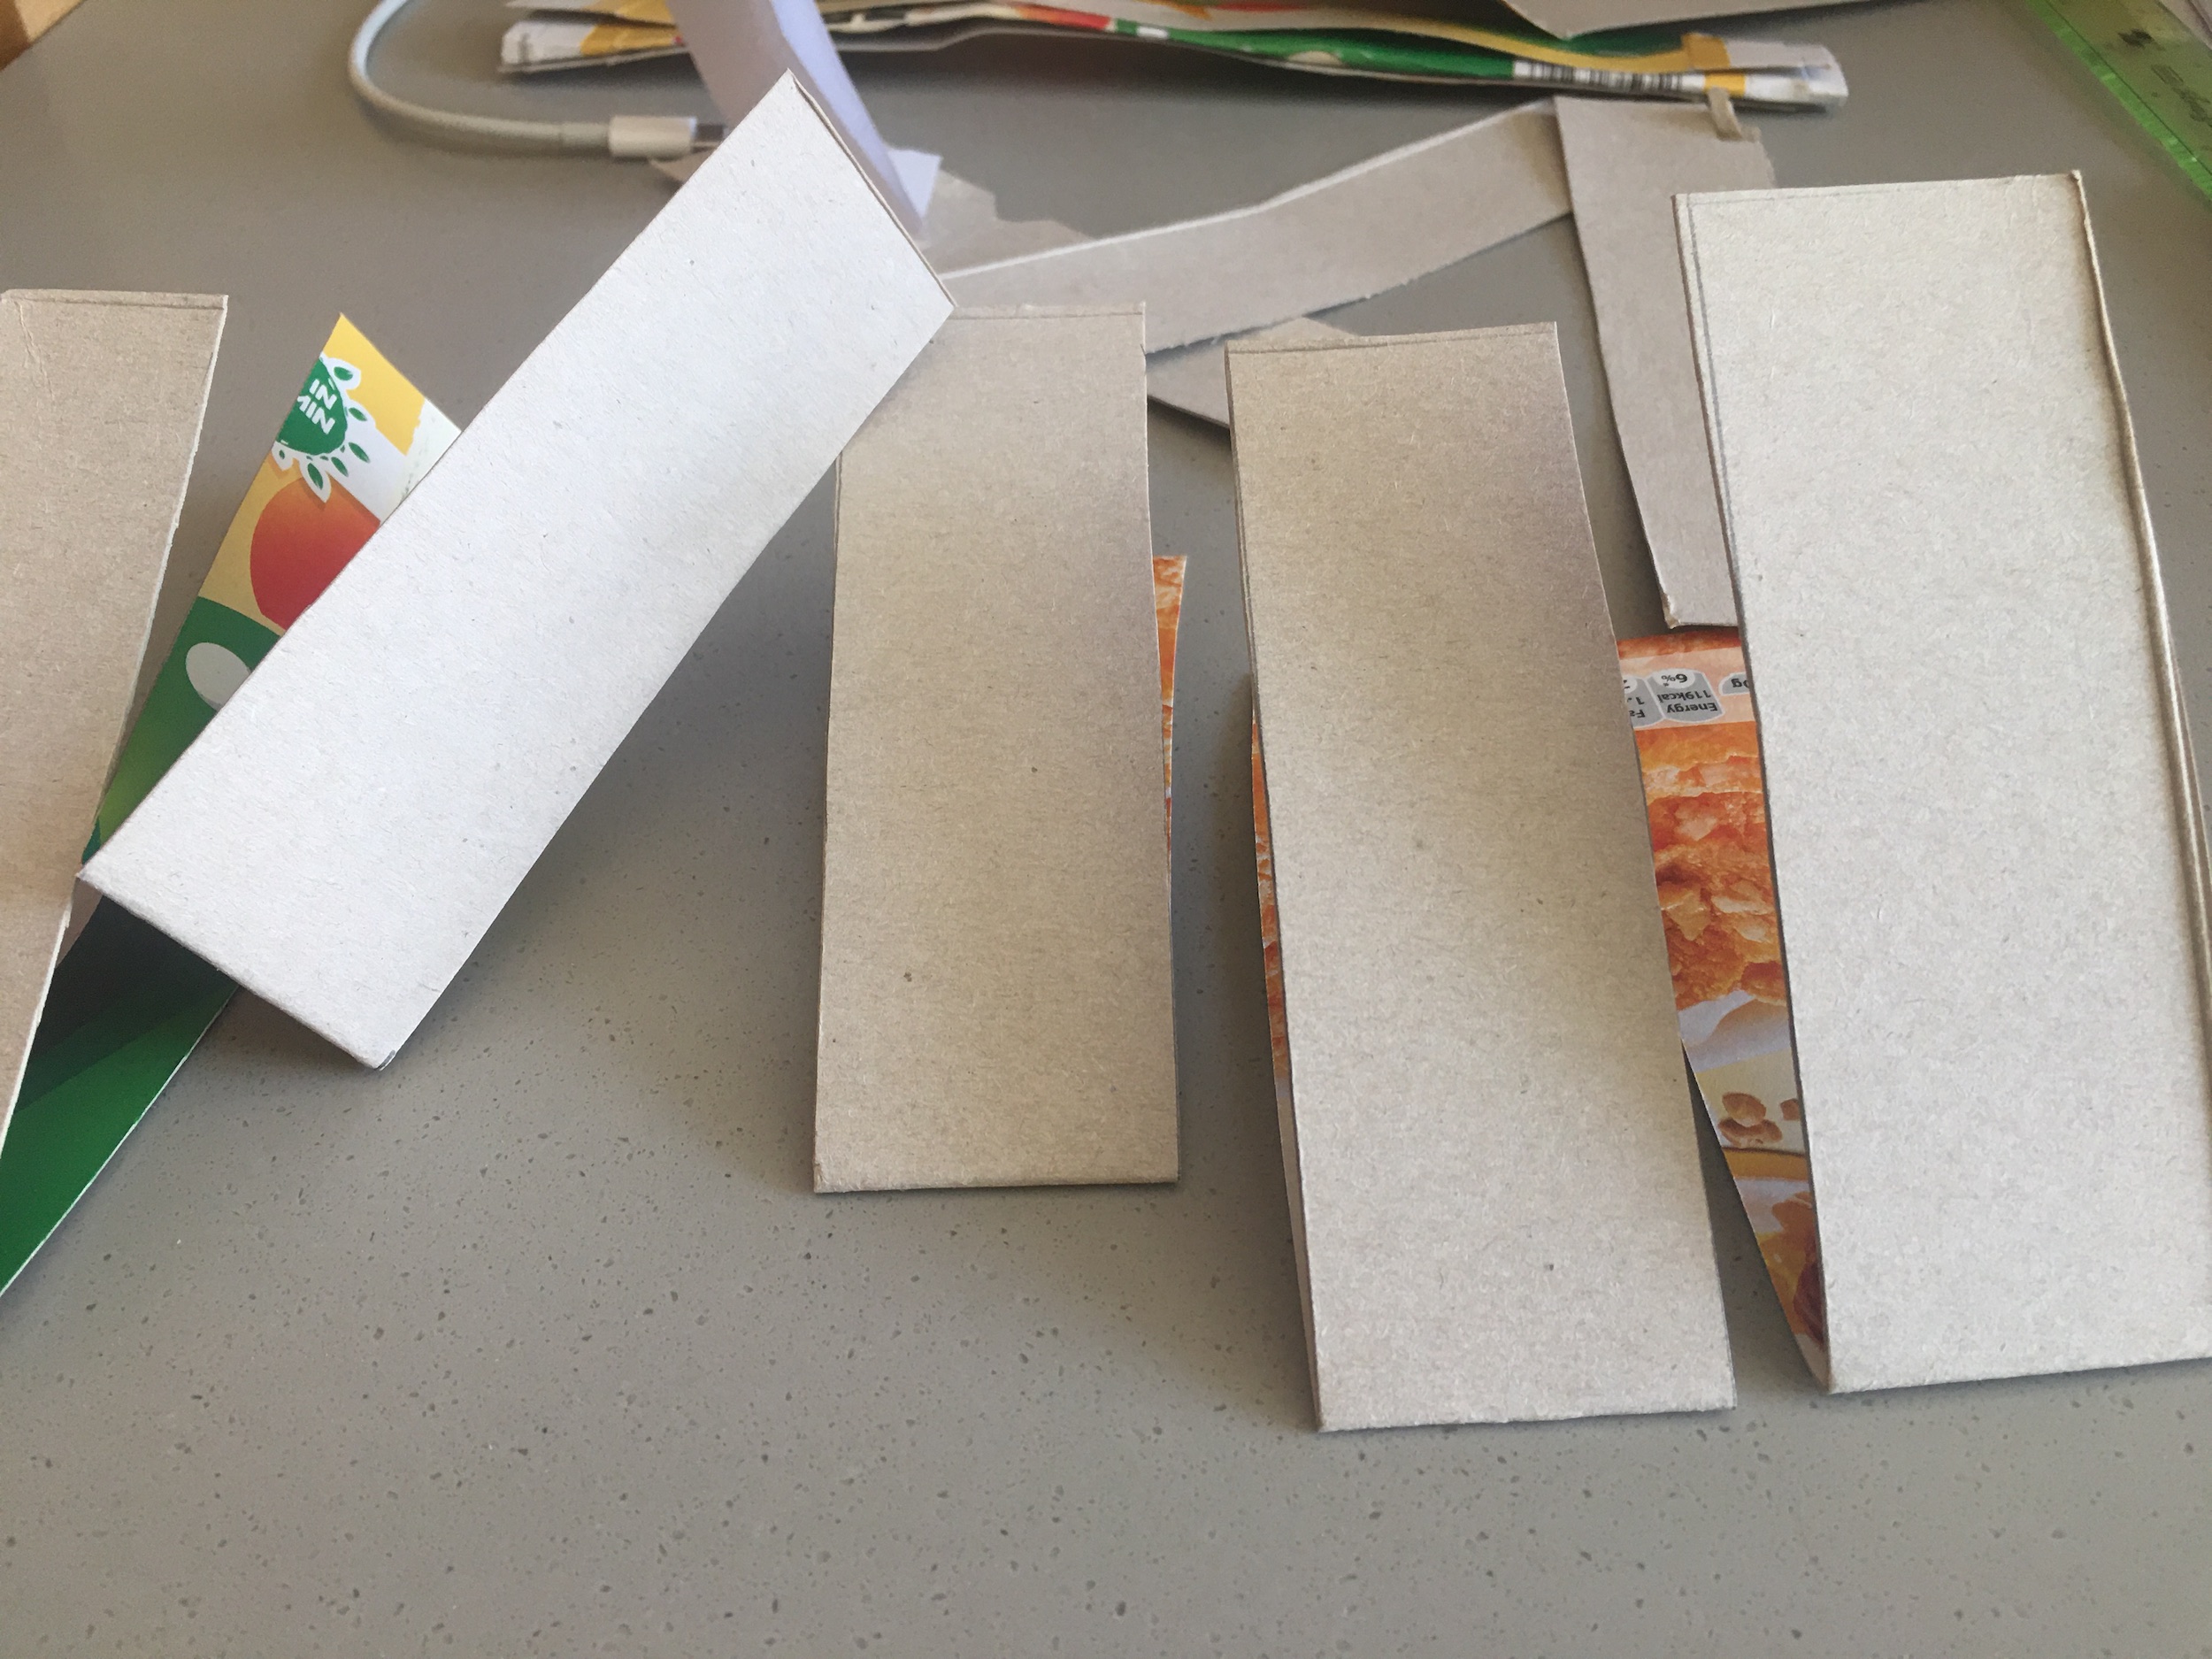
After finishing the board, I moved on to setting up the actual ‘keyboard’. The brainstorming behind this was pretty messy and took many days. I settled on improvising with cardboard. With limited resources, my final ‘keyboard’ was made out of old cereal box (hence the name of my project).
Making my cereal box piano keys
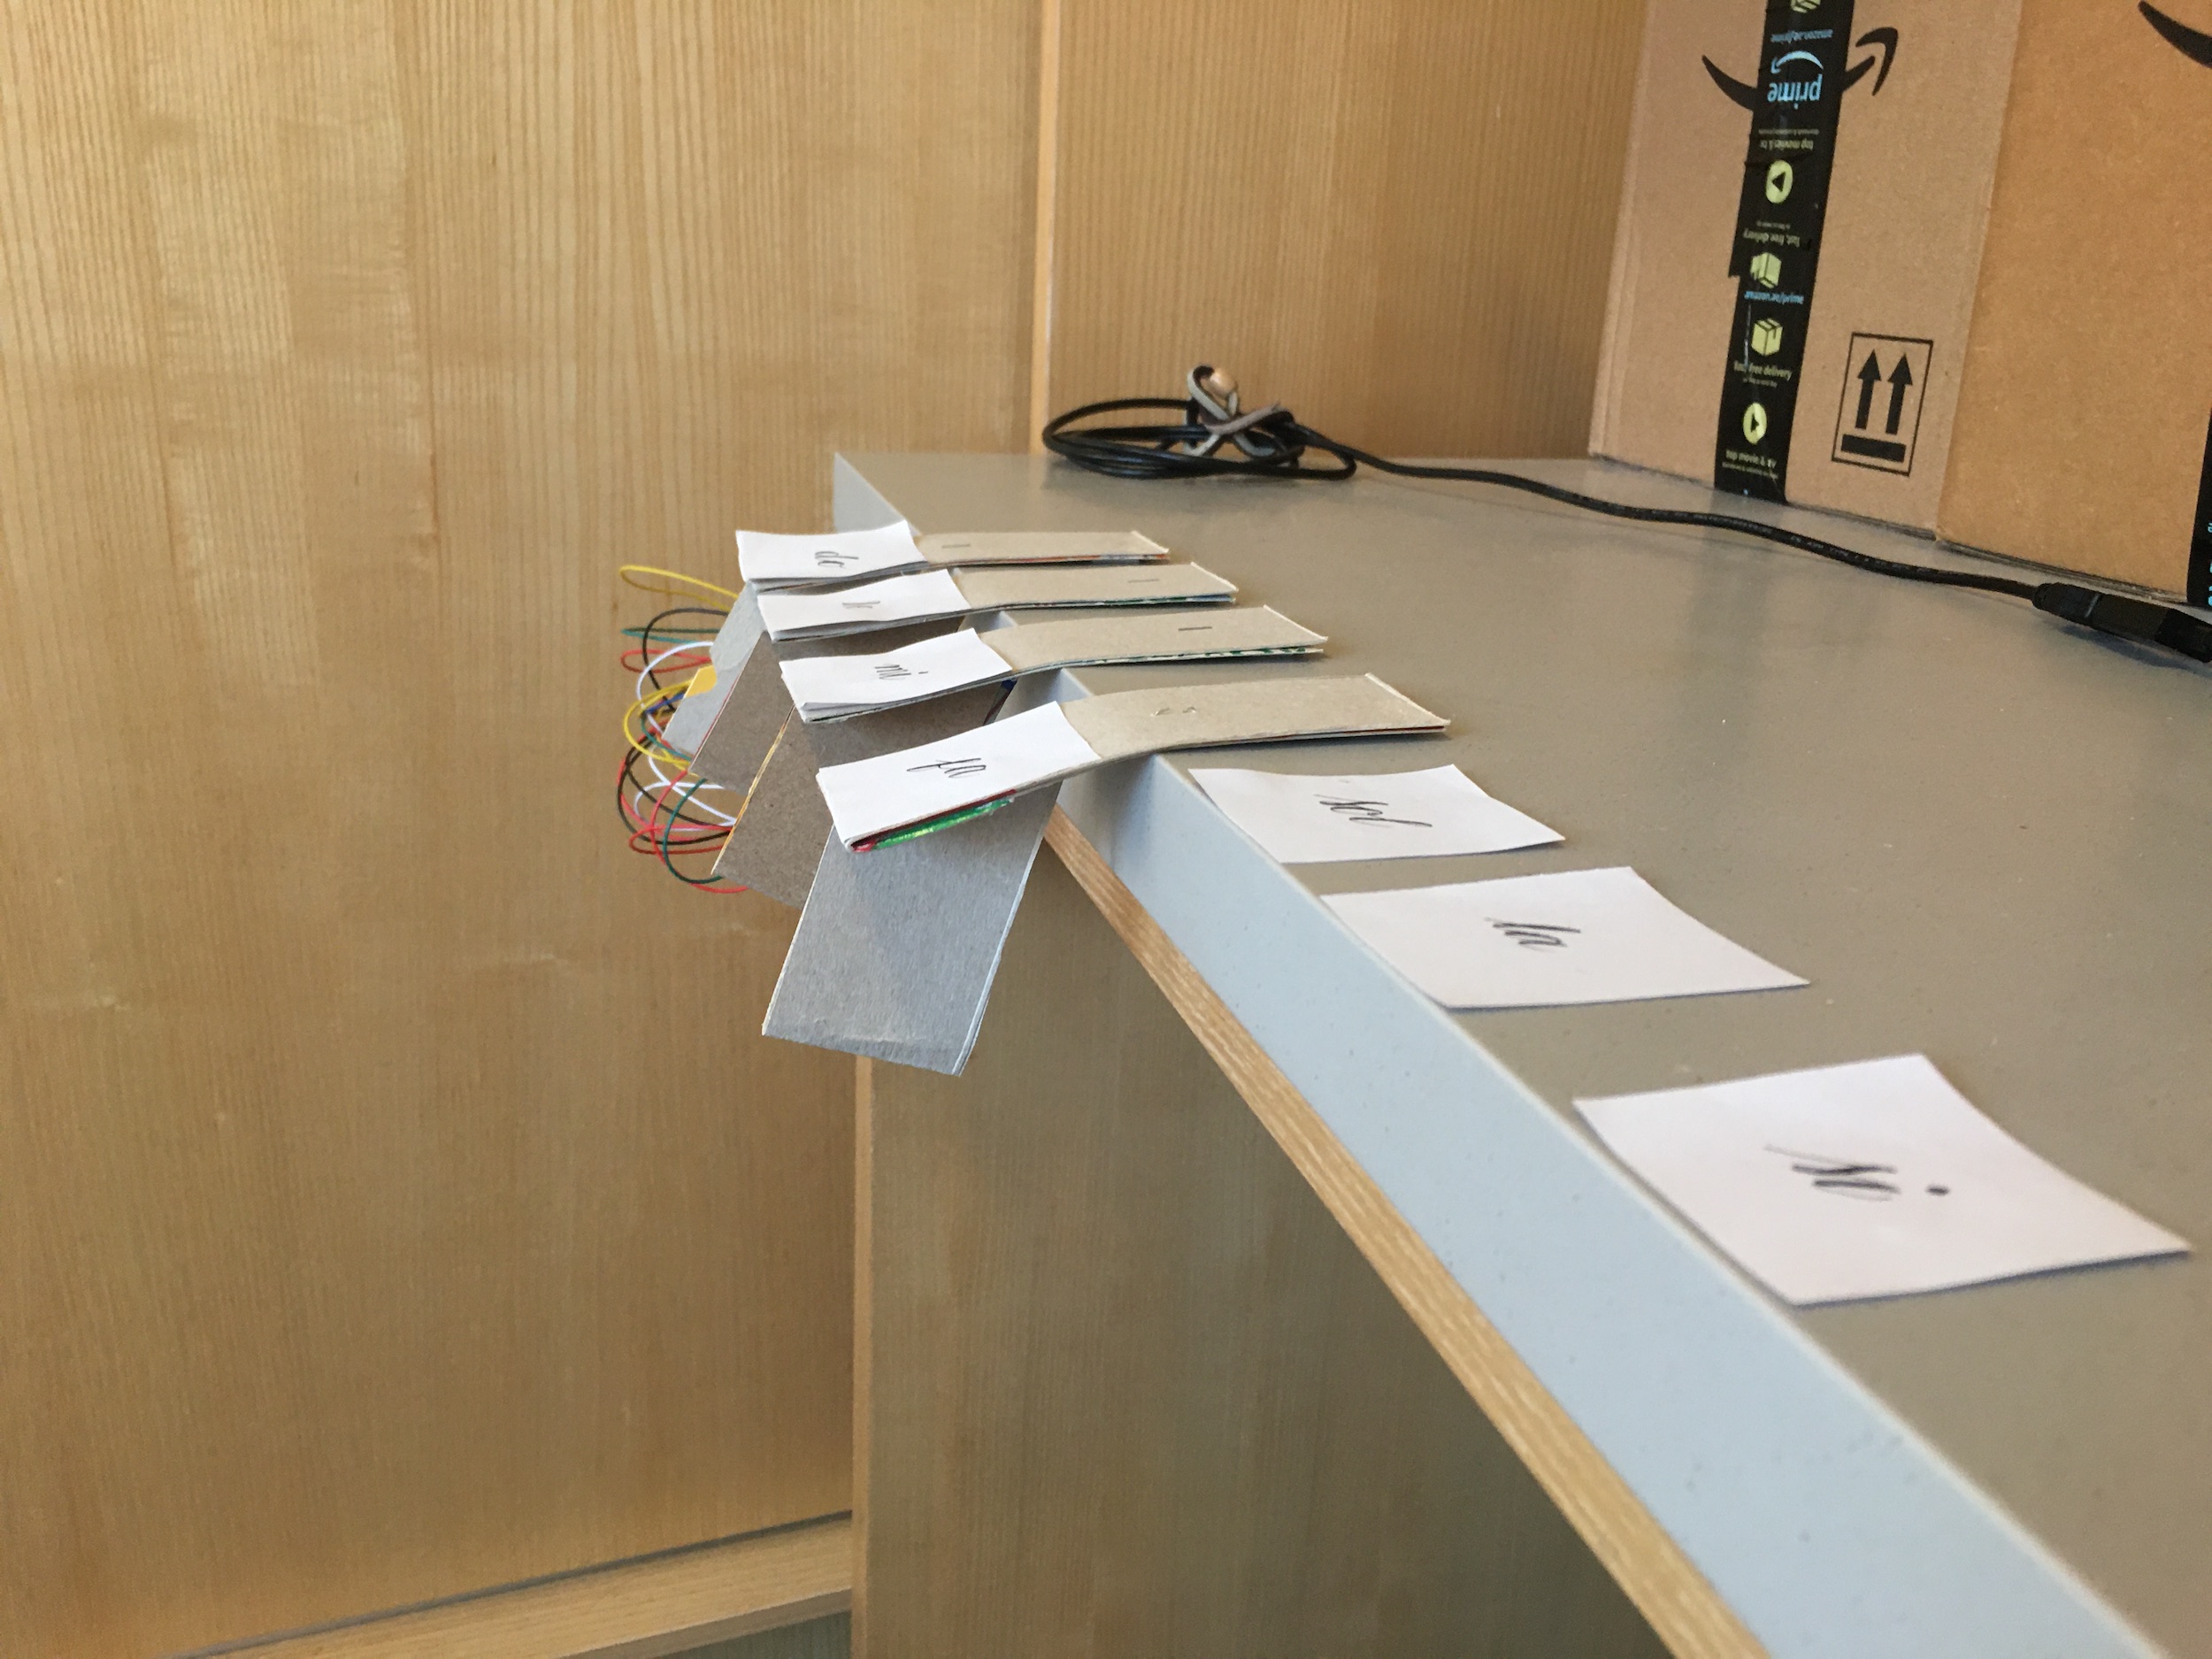
The final setup involved sticking the Arduino vertically to the desk and placing the ‘keys’ in the correct positions.
Problems
My biggest problem was that the readings from the sensor were relatively unstable. I experimented with it many times, but I didn’t manage to stabilize the analog input. Sometimes I put a static surface in front of the sensor from a fixed distance but the readings I got were fluctuating a lot. This proved to be a problem since the keys did not work quite smoothly as I wanted. As can be seen in the demo video, when I set up the last three keys in the same fashion, for some reason the distance returned was off by a very large margin.
What I learned
I learned a lot about the way the distance measuring sensor works. I also got the chance to solidify my understanding of the board and different circuit designs, since I needed to adjust the different components on the board and arrange them in such a way that one’s function does not result in another one’s non-function.
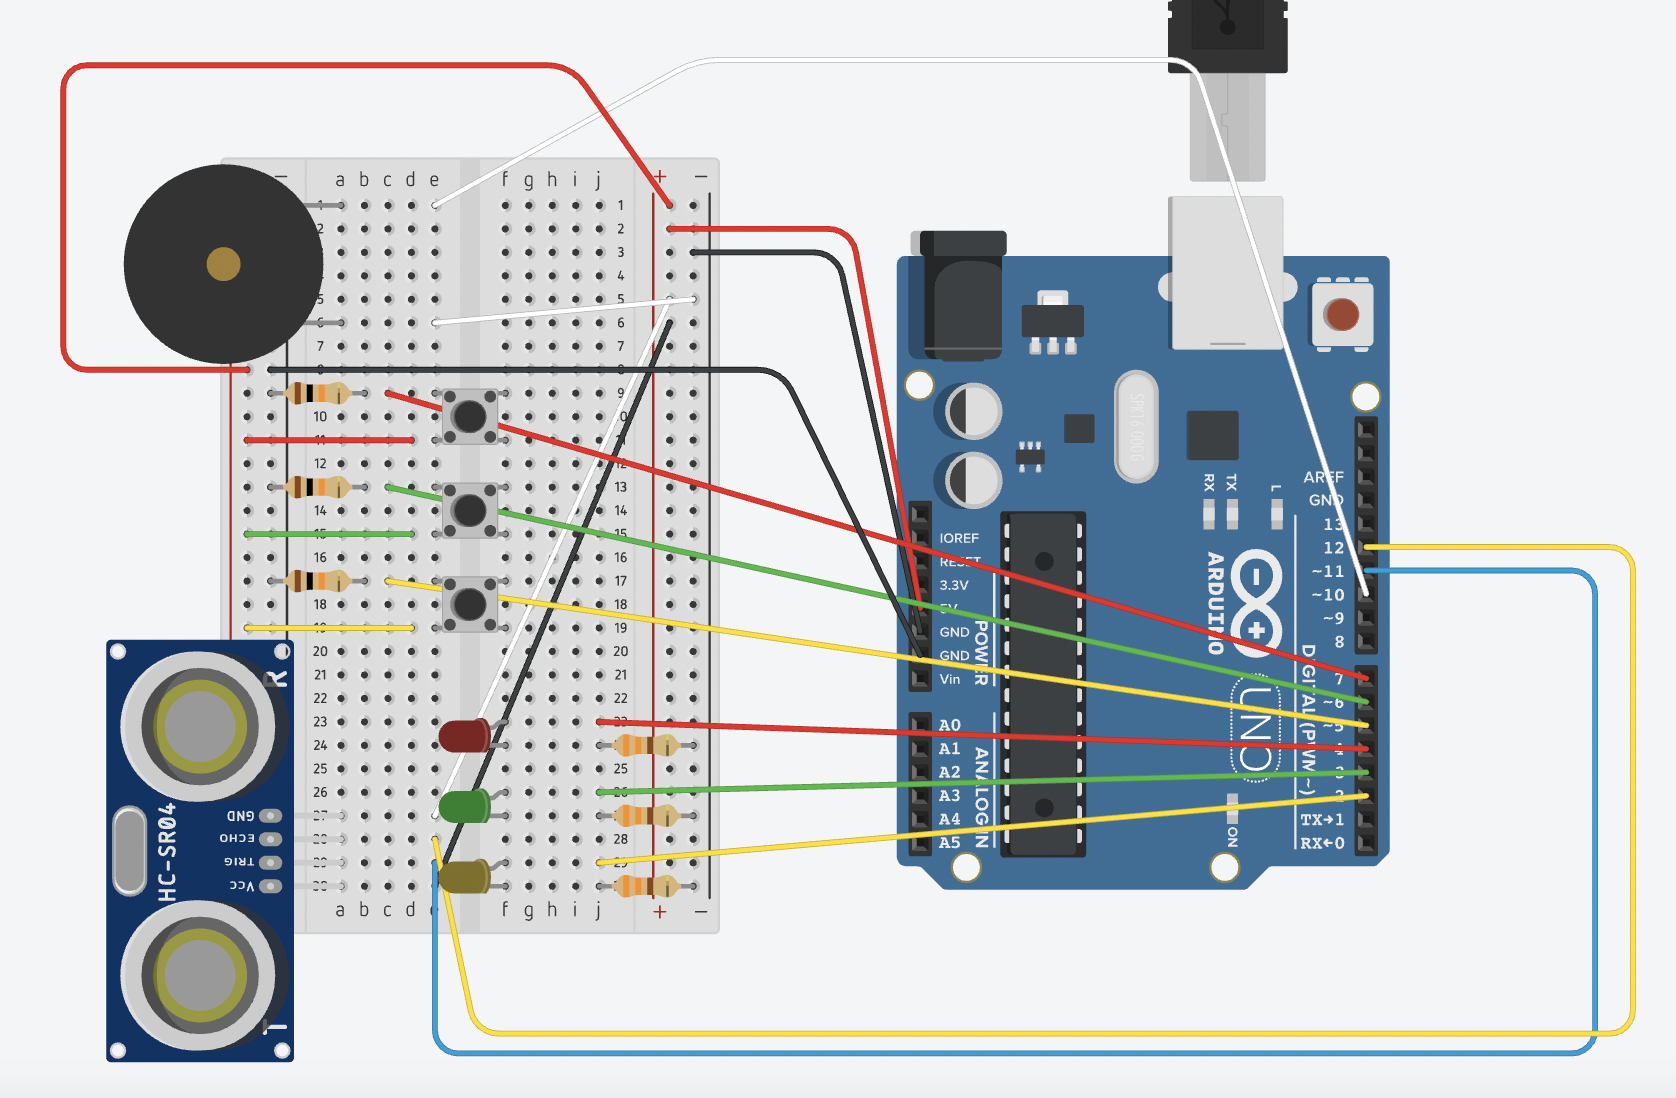
Circuit and code
#include "pitches.h"

const int trigPin = 11;
const int echoPin = 12;

int buttonPins[3] = {5, 6, 7}; // 5 = yellow, 6 = green, 7 = red
int currentButtonStates[3];
int previousButtonStates[3] = {LOW, LOW, LOW};
int ledPins[3] = {2, 3, 4}; // 2 = yellow, 3 = green, 4 = red
int ledStates[3] = {LOW, LOW, LOW};

int offset = 0;
int offsets[3] = {0, 7, 14};
float distance;

int previousNote = 8;

int notes[21] = {NOTE_C4, NOTE_D4, NOTE_E4, NOTE_F4, NOTE_G4, NOTE_A4, NOTE_B4, NOTE_C5, NOTE_D5, NOTE_E5, NOTE_F5, NOTE_G5, NOTE_A5, NOTE_B5, NOTE_C6, NOTE_D6, NOTE_E6, NOTE_F6, NOTE_G6, NOTE_A6, NOTE_B6};

void setup() {
  Serial.begin(9600);

  pinMode(trigPin, OUTPUT); // the trigger pin will output pulses of electricity
  pinMode(echoPin, INPUT); // the echo pin will measure the duration of pulses coming back from the distance sensor

  for (int i=0; i<3; i++) {
    pinMode(buttonPins[i], INPUT);
    pinMode(ledPins[i], OUTPUT);
  }
}

void loop() {
  // Buttons and LEDs
  for (int i=0; i<3; i++) {
    currentButtonStates[i] = digitalRead(buttonPins[i]);
    if (currentButtonStates[i] == HIGH && previousButtonStates[i] == LOW) {
      ledStates[0] = LOW;
      ledStates[1] = LOW;
      ledStates[2] = LOW;
      ledStates[i] = !ledStates[i];
      offset = offsets[i];
    }
    digitalWrite(ledPins[i], ledStates[i]);
    previousButtonStates[i] = currentButtonStates[i];
  }

  // Sound
  distance = getDistance();
  int currentNote = min(int(distance-10.0) / 7 + offset, 22);
  Serial.print(distance);
  Serial.print(" ");
  Serial.println(currentNote-offset);

  if (currentNote >= offset && currentNote < offset+7 && previousNote == 22) {
    tone(10, notes[currentNote], 300);
  }

  previousNote = currentNote;
  delay(50);
}

float getDistance() {
  float echoTime;
  float calculatedDistance;

  digitalWrite(trigPin, HIGH); // send out an ultrasonic pulse that's 10ms long
  delayMicroseconds(10);
  digitalWrite(trigPin, LOW);

  echoTime = pulseIn(echoPin, HIGH); // use the pulsein command to see how long it takes for the pulse to bounce back to the sensor

  calculatedDistance = echoTime / 58.0; // calculate the distance of the object that reflected the pulse (half the bounce time multiplied by the speed of sound)

  return calculatedDistance;
}
This assignment for week 9 focuses on the two forms of input/output information. I’ve never used light sensors like the photoresistor so I wanted to experiment around with it to figure out some idea on how to use it to control LED(s). I was mostly trying out the photoresistor’s sensitivity and it turned out it’s very sensitive to light and changes in light. Because of this, I decided to combine the assignment prompts: I used a button to switch the first LED on and off, the light from which will in turn control the second LED.
Here is a diagram of my circuit, with the red and green LEDs being controlled using digital and analog signals respectively:
And following is a demo of the circuit at work. Please excuse the night mode of the video. Since I was using one LED to control another, I needed to omit all light from elsewhere.
The sensitivity of the photoresistor is quite clear. When I adjust the light, the state of the green LED changes almost immediately. When I use the button to switch the red LED on and off, the green LED follows quite closely with only a very short delay. As seen in the demo, I also try to manually block the red light from reaching the photoresistor, in which case the green LED also switches off quickly.
I’m trying to think if there is some way to scale up this circuit for some real-life applications. Perhaps the two LEDs can be positioned in two separated spaces, with one button to switch on/off one LED while the second one can be controlled by some kind of separator (door, etc.) that can block or un-block the light coming from the first LED.
Problems
I haven’t had a good history with circuits ever since high school physics. I tried to reassemble the different components like the photoresistor and the button first to test my understanding, but I forgot many details so at first I got a lot of weird readings. For instance, I forgot the 10k Ω resistor for the button so the digital reading from the button was just jumping randomly between 0 and 1. Thankfully I haven’t broken anything so far. I really hope it stays that way.
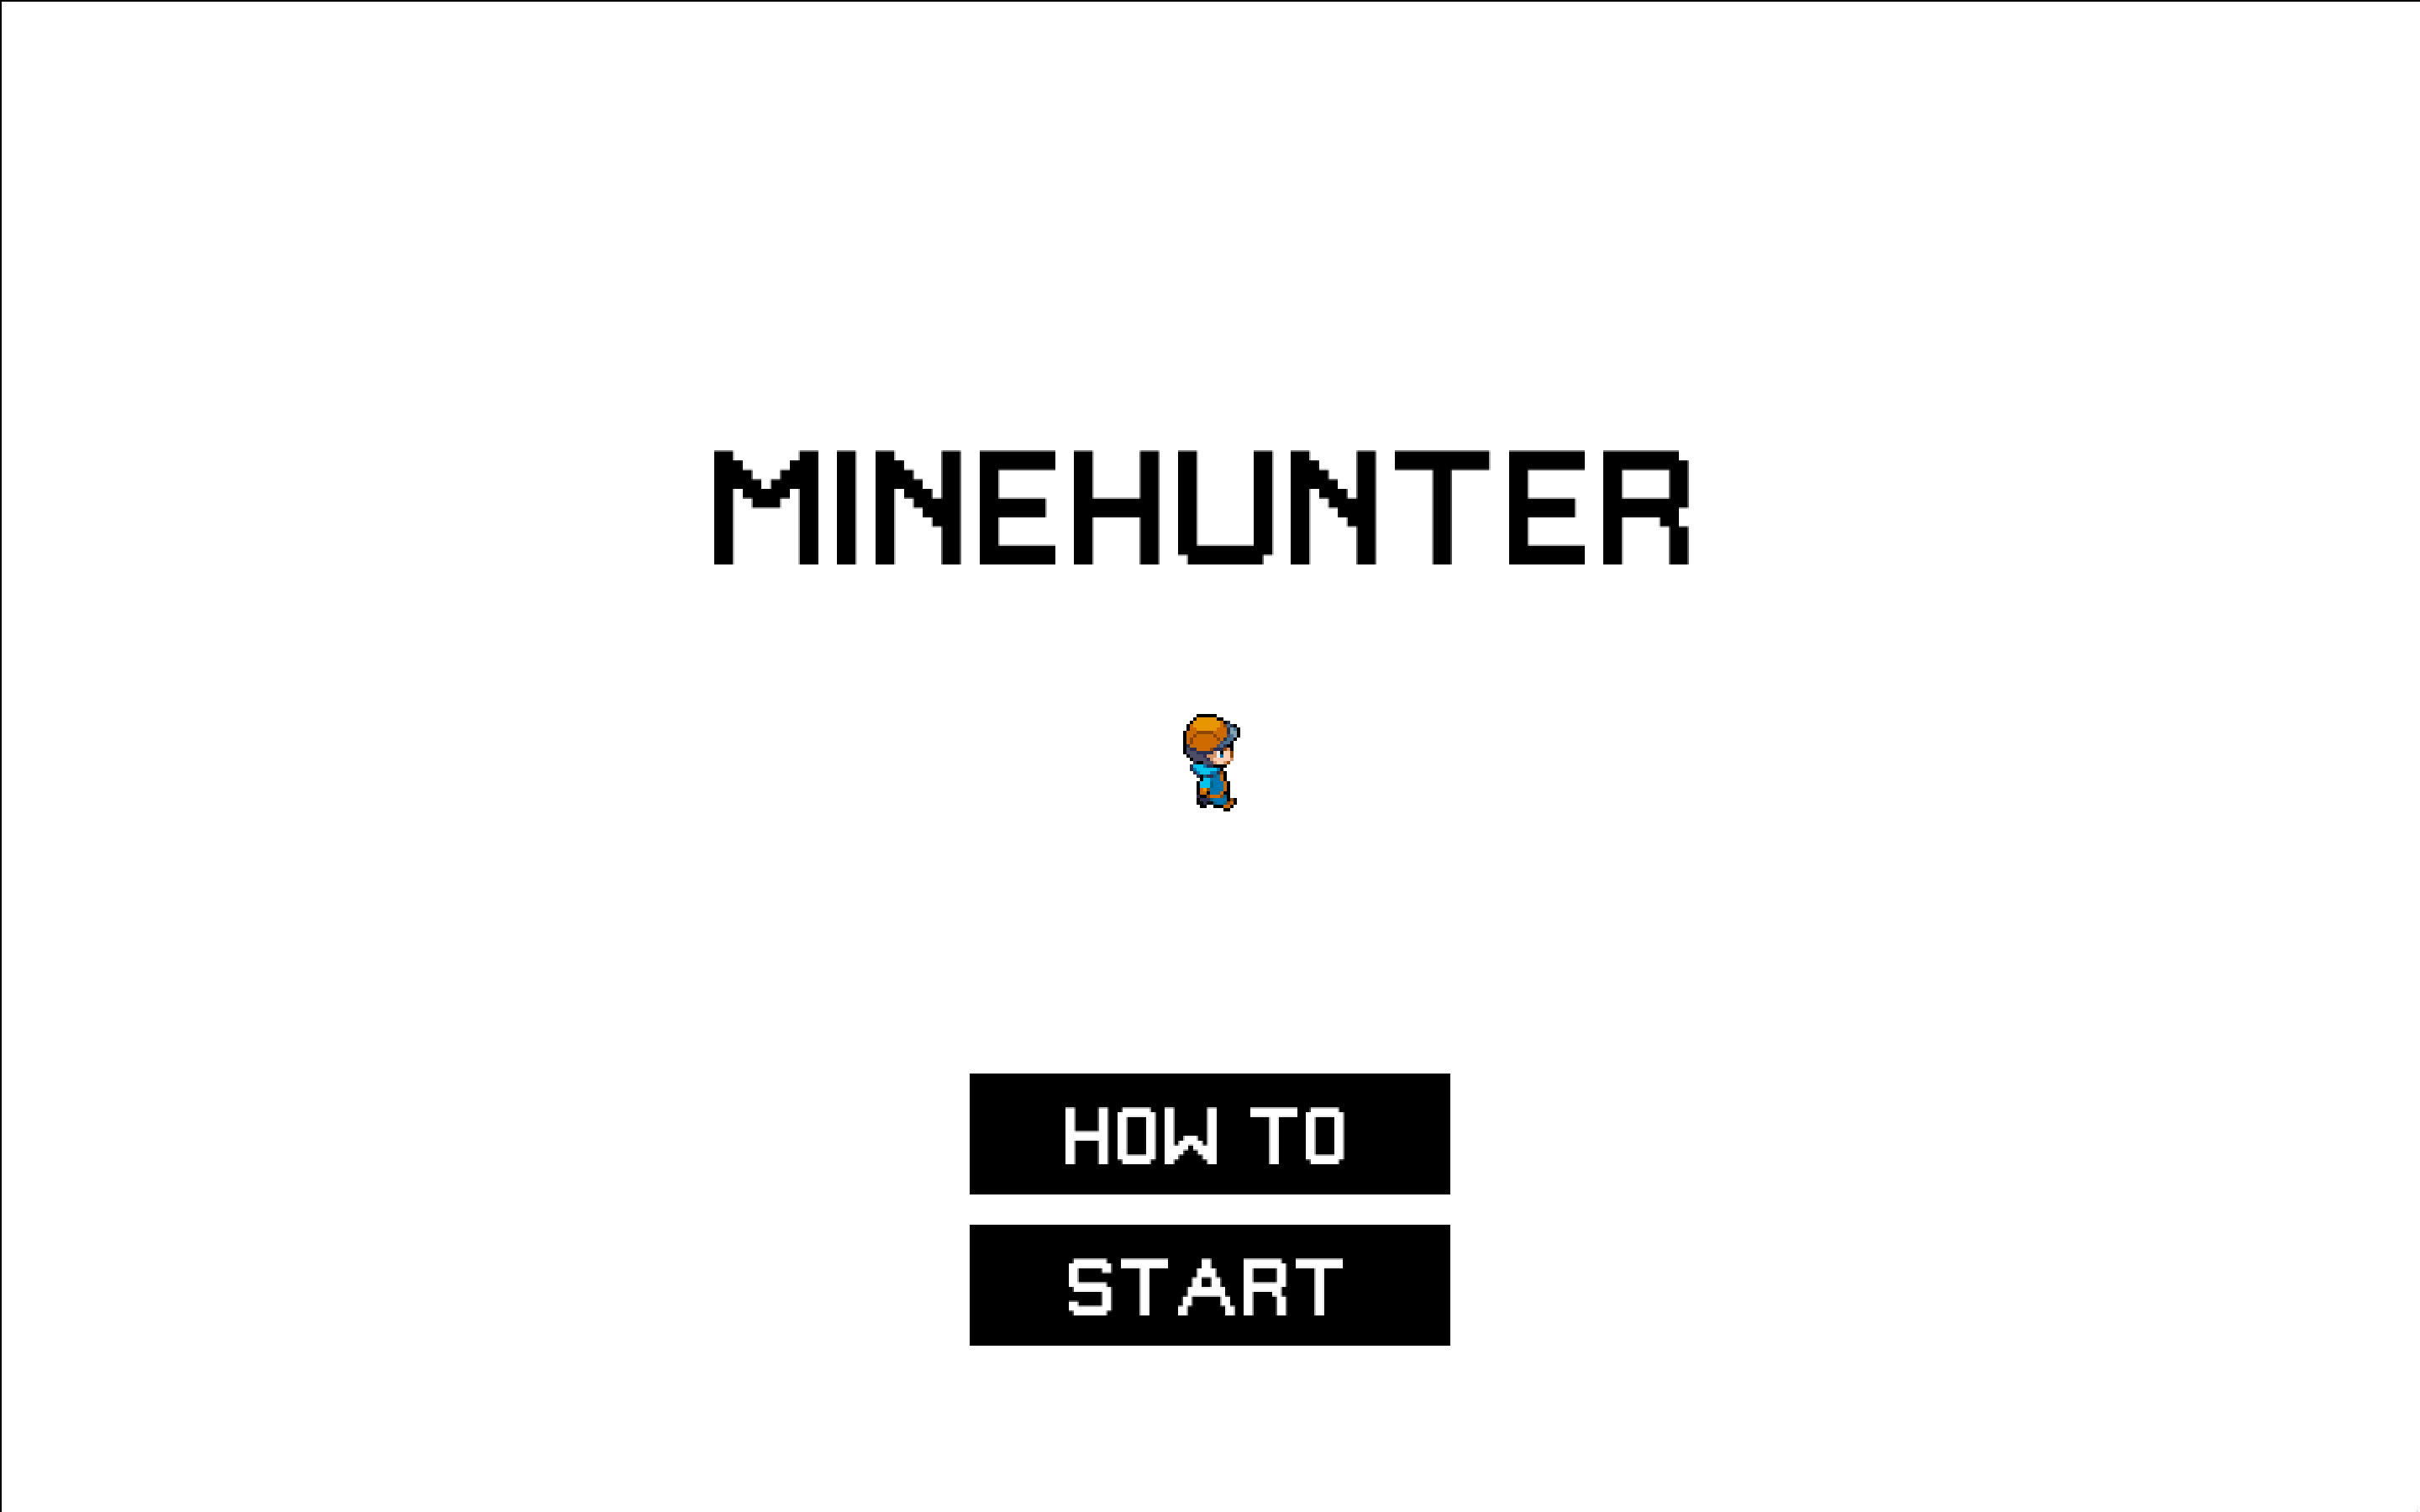
For the midterm, as per the last update, I work on the game Minehunter.
All the code and the files can be found here. Do be mindful of the folders in which the files are organized. The program will not run if the files are not in the correct folders with correct names. A zip file can also be found at the end of the post.
The game includes an 8×8 game board containing 8 mines scattered randomly across the board. The goal for the player is to uncover all of these hidden mines while maximizing their points. The player can move their character around the board using arrow keys (the current position is highlighted for better visibility). If the player thinks a cell has a mine, they can flag that cell by navigating to the cell then pressing the ‘F’ button. If the player changes their mind, they can press the ‘F’ button again to un-flag the cell. Otherwise, if they thinks a cell is safe, they can reveal the cell using the space bar. Once a safe cell is revealed, the cell shows a number representing how many of its neighbor cells have mines. ‘Neighbor cells’ are defined to be adjacent cells horizontally, vertically, and diagonally. These numbers are visible only when the player is in that cell. Each safe cell uncovered earns the player 2 points. There is also a Hint button that the player can click on to uncover a random safe cell, which costs 10 points.
The player either wins by successfully flagging all cells with mines, or loses by revealing a cell with a mine.
My main goal for this game is to increase player interactions. The rules of the game requires the player to navigate their character across the game board consistently to reveal or flag a cell and to revisit revealed cells, since numbers of neighbor mines are only visible for the current cell. More player movements are also required by the two goals of the game: to flag all mines, and to achieve higher points by revealing more safe cells.
Here is a short demo of my game (excuse my bad playing for the sake of the demo):
Breakdown of classes
Minehunter
This is the class for the entire game session. The most important attributes of this class are the various ArrayLists of PVectors. They store the coordinates of various cells for different purposes as specified by the names of the ArrayLists. I choose to use ArrayLists extensively because they support a wide range of functions suitable for my intentions: add() and size() can be used to quickly add new elements to the arrays and get their sizes without me having to manually keep track of array sizes; contains() can be used to check whether a certain object is included in an array instead of iterating through each element and making comparison and similarly with remove() for removing an object without knowing the specific index; clear() can be used to quickly remove all elements from the arrays, which is useful for resetting the game.
The Minehunter class also contains a range of functions for displaying the various screens, including the welcome screen, instruction screen, as well as win/loss screen. The core operation of these displaying functions is changing the global variable screen to reflect the current screen state, which is used in the switch statement in the main program to display the correct screen. Additionally, the class has a number of functions for different player actions like planting flags, revealing cells, getting hints, etc. and for resetting the game.
**Player**
This is the class for the player which displays and moves the player’s character around the game board. The class is also used to display the animated character in the welcome screen which moves automatically instead of waiting for keyboard signals like the player’s character during the game. The implementation of the Player class reuses the code from the lecture on images and sprite sheets.
**Reward**
This is a simple class for keeping track, updating, and displaying the player’s points.
Problems
My main issue is with the design of the game. I wanted to make the graphics more in the style of 8-bit games, but using 8-bit arts as the background for the game board, for some reason, slows down the game significantly. I left the function for displaying the background in the code but I didn’t use it, since I tried it on my laptop and the character’s movement slowed down as if the frame rate were changed. So in the end I settled with a amalgamation of 8-bit design and flat design.
Another problem I had was with the choice of fonts. The majority of texts in the game use a pixel game style font, but I figured the font does not look very legible when the texts are packed, or when uppercase and lowercase letters stand next to each other. So for the instruction screen, I used a different font for the sake of legibility.
One of the most important requirements for the program is to be able to store coordinates in the form (i, j). I initially intended to use the tuple data type, but apparently Processing does not support tuples in Java (it does in Python). My second plan was encoding the coordinates into strings of the form "ij" using the formula i*10+j and later on reverse the encoding using the / and % operations. Then there came the lecture on PVector which was exactly what I needed, and so I switched to use PVectors throughout my program. It was really useful and saved me a lot of time and effort.
References
The implementation of the Player class reuses the code from the lecture on images and sprite sheets.
Some of the underlying game logics and operations are reused from an assignment I did for another course.
For the midterm, coming up with a concrete idea took me quite a while. My initial plan was to continue developing the 2048 game that I made for week 3, but I found that once finished, there is not much room for tweaking the game any further. So I changed my direction and was hoping to use the tile-based premise (like what I used for 2048) and add in character movement (using sprite sheets) and probably a reward system with trading options for the midterm. What I settled on is a game I temporarily name Minehunter.
Idea
As the name suggest, the inspiration for the game comes from the classic game Minesweeper. A quick recap of rules can be found here but I am taking much liberty with it and will not strictly follow these rules. My goal is to use the underlying premise of Minesweeper and add to the user interaction aspect as well as complexity of the game (that is, winning is harder). I plan to implement the following features to achieve this:
Instead of mouse clicking on game cells, the player has an avatar on the game board (the hunter) that they move around using arrow keys. In order to reveal a cell (that the player is sure to be a safe cell) or to plant a flag (that the player is sure to be a mine), the player will have to move their avatar to the specific cell and press corresponding keys.
Once a safe cell is revealed, according to the formal rules, a number is shown representing the number of nearby mines (within the vicinity of 9 cells). I plan to change this so that the number will disappear once the player moves to a different cell, and will only reappear if the player toggles the cell again. This will increase the complexity of the game since the player will need to remember the figures instead of having them being shown permanently on the screen. (This is a loose idea for now, since I’m uncertain on whether it should be a feature.)
My plan is to implement a reward system consisting of points that the player can trade for help. Specifically, the player will start the game with a default of 10 points. For each flag the player manages to plant on a correct mine cell, 5 points are added. There will be a game agent capable of making safe moves (revealing non-mine cells) that the player can trigger, but at the price of having 5 points deducted. This means that if the player has 0 point left, they can’t ask for help from the agent until they successfully flag a mine and earn more points.
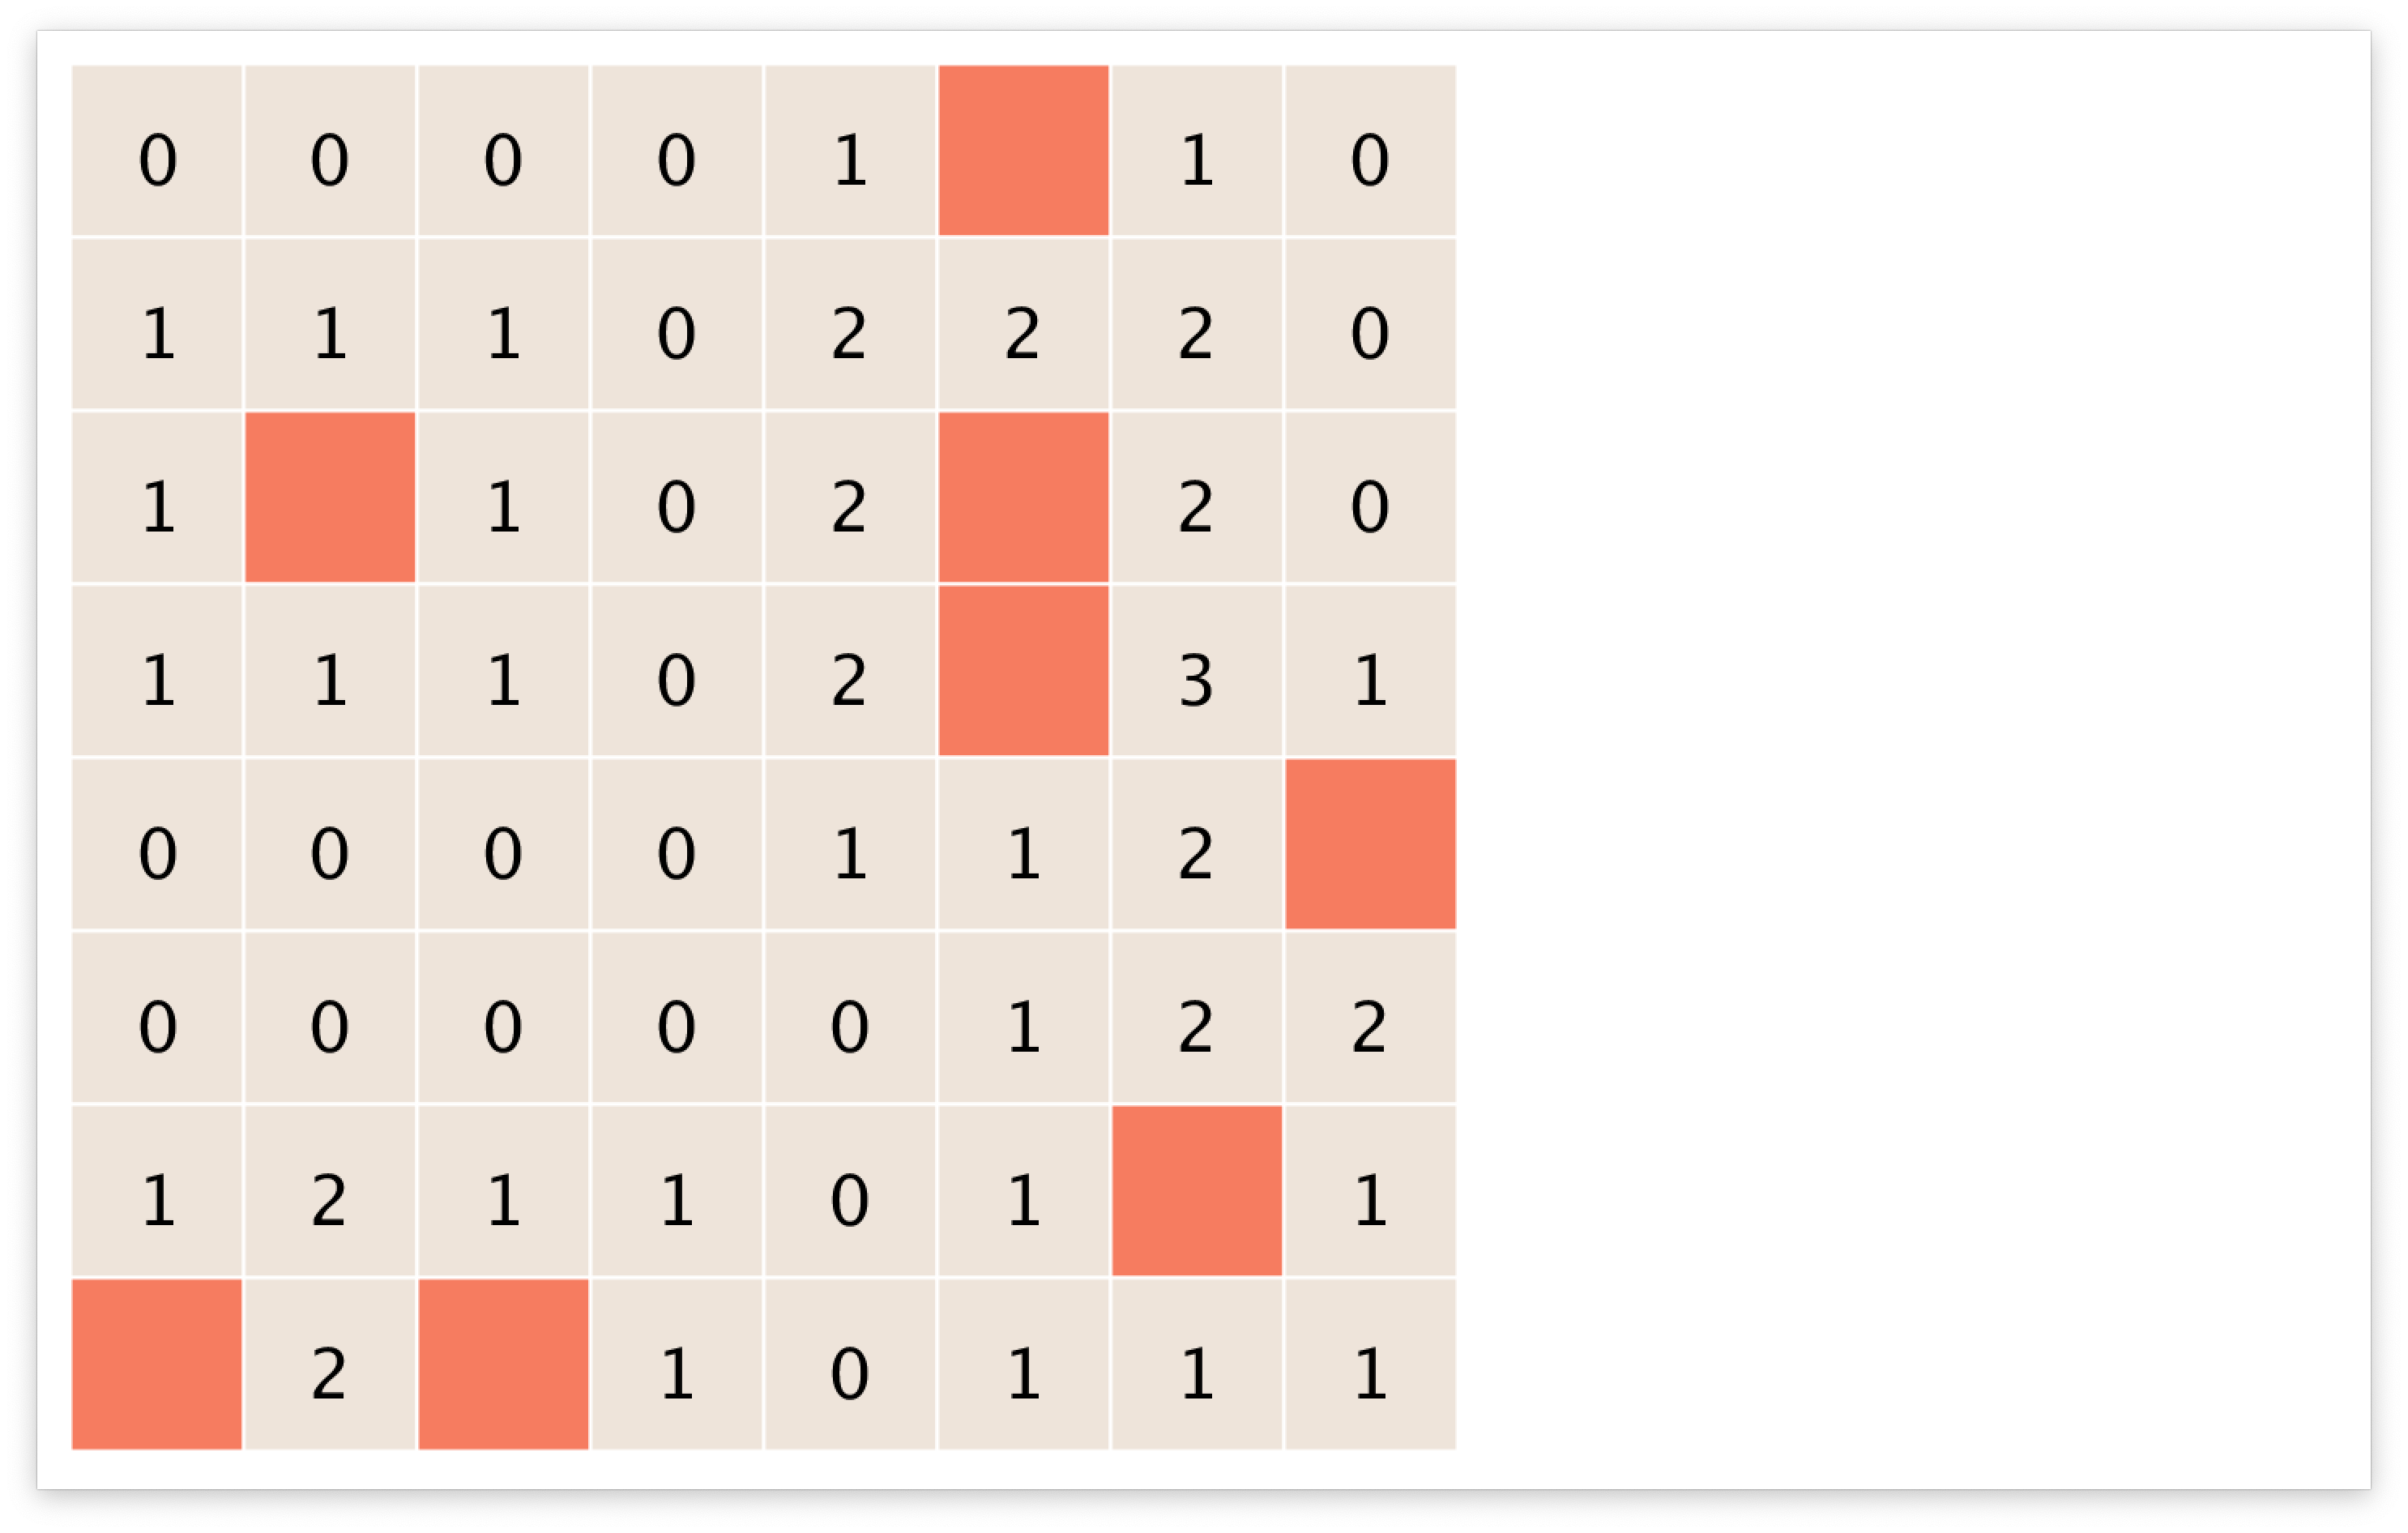
Progress
Settling on an idea took me a while, so I have not had much progress with the actual implementation. So far I have had a basic Minehunter class for implementing the game board, which is currently an 8×8 board with 8 mines randomly scattered across the board. The function numNeighborMines() has been written for calculating the number of nearby mines of a particular cell. I also have a basic main program to quickly visualize the game board and test out the functions I’ve written. When running the current program, pressing a random key will reveal the positions of the mines (in darker color) and the number of nearby mines for each of the non-mine cells. So far, the functions seem to run correctly and without errors.
Development
Here is an outline of the main game features that I will need to implement soon in order to build the rest of the game:
The Player class that will display the player’s avatar and allow the player to move around and interact with the game board.
The Reward class that will keep track of the player’s points and adjust according to the player’s actions.
The Agent class capable of making safe moves.
The GameState class for coordinating the game, reseting the game board, etc.
Screenshots & code
Here is a snapshot of my progress so far with initializing the game board:
Minehunter class
class Minehunter {
  int numRow = 8;
  int numCol = 8;
  int numMines = 8;
  boolean board[][] = new boolean[numRow][numCol];
  ArrayList<String> mines = new ArrayList<String>();
  ArrayList<String> minesFound = new ArrayList<String>();

  Minehunter() {
    // Initializing gameboard with no mine
    for (int i=0; i<numRow; i++) {
      for (int j=0; j<numCol; j++) {
        board[i][j] = false;
      }
    }

    // Formula for encoding coordinates:
    // (i, j): i = row coordinate, j = col coordinate
    // i, j <= 7 so can encoding in the form 'ij'
    // e.g. '56' = (5, 6) = row 5, col 6

    // Adding random mines (max 8) to gameboard
    while (mines.size() != numMines) {
      int i = int(random(numRow));
      int j = int(random(numCol));
      if (board[i][j] == false) {
        board[i][j] = true;
        mines.add(tupleToString(i, j));
      }
    }
  }

  int numNeighborMines(int row, int col) {
    int count = 0;
    for (int i=row-1; i<row+2; i++) {
      for (int j=col-1; j<col+2; j++) {
        if (i==row && j==col) {
          continue;
        } else {
          if (0 <= i && i < numRow && 0 <= j && j < numCol) {
            if (board[i][j] == true) {
              count += 1;
            }
          }
        }
      }
    }
    return count;
  }

  boolean isMine(int i, int j) {
    return board[i][j];
  }

  boolean gameWon() {
    return minesFound.size() == mines.size();
  }

  /**
   * Print a textual form of the board
   * For testing purposes
   */
  void printBoard() {
    for (int i=0; i<numRow; i++) {
      for (int j=0; j<numCol; j++) {
        if (board[i][j] == true) {
          print("X");
        } else {
          print("_");
        }
      }
      println();
    }
  }

  String tupleToString(int i, int j) {
    return str(i)+str(j);
  }

  /**
  * Coordinate in the form of 'ij'
  * i = ij / 10
  */
  int stringToX(String coordinate) {
    return int(int(coordinate) / 10);
  }

  int stringToY(String coordinate) {
    return int(int(coordinate) % 10);
  }

  void testMinehunter() {
    //println(stringToX("00"), stringToY("00"));
    //println(numNeighborMines(4, 4));
  }
}
For week 4 assignment with data visualization, I take my inspiration from the class demo with Google Trends data and the breakout room session in which Simran and I came up with an idea for data visualization but ended up not being able to finish it. The goal was to show the data in a more general fashion, only going into details upon request. That is, the idea is to aggregate interests by months instead of displaying them in weeks.
The particular set of data that I chose was the Google Trends data for the term “quarantine” recorded within the year 2020.
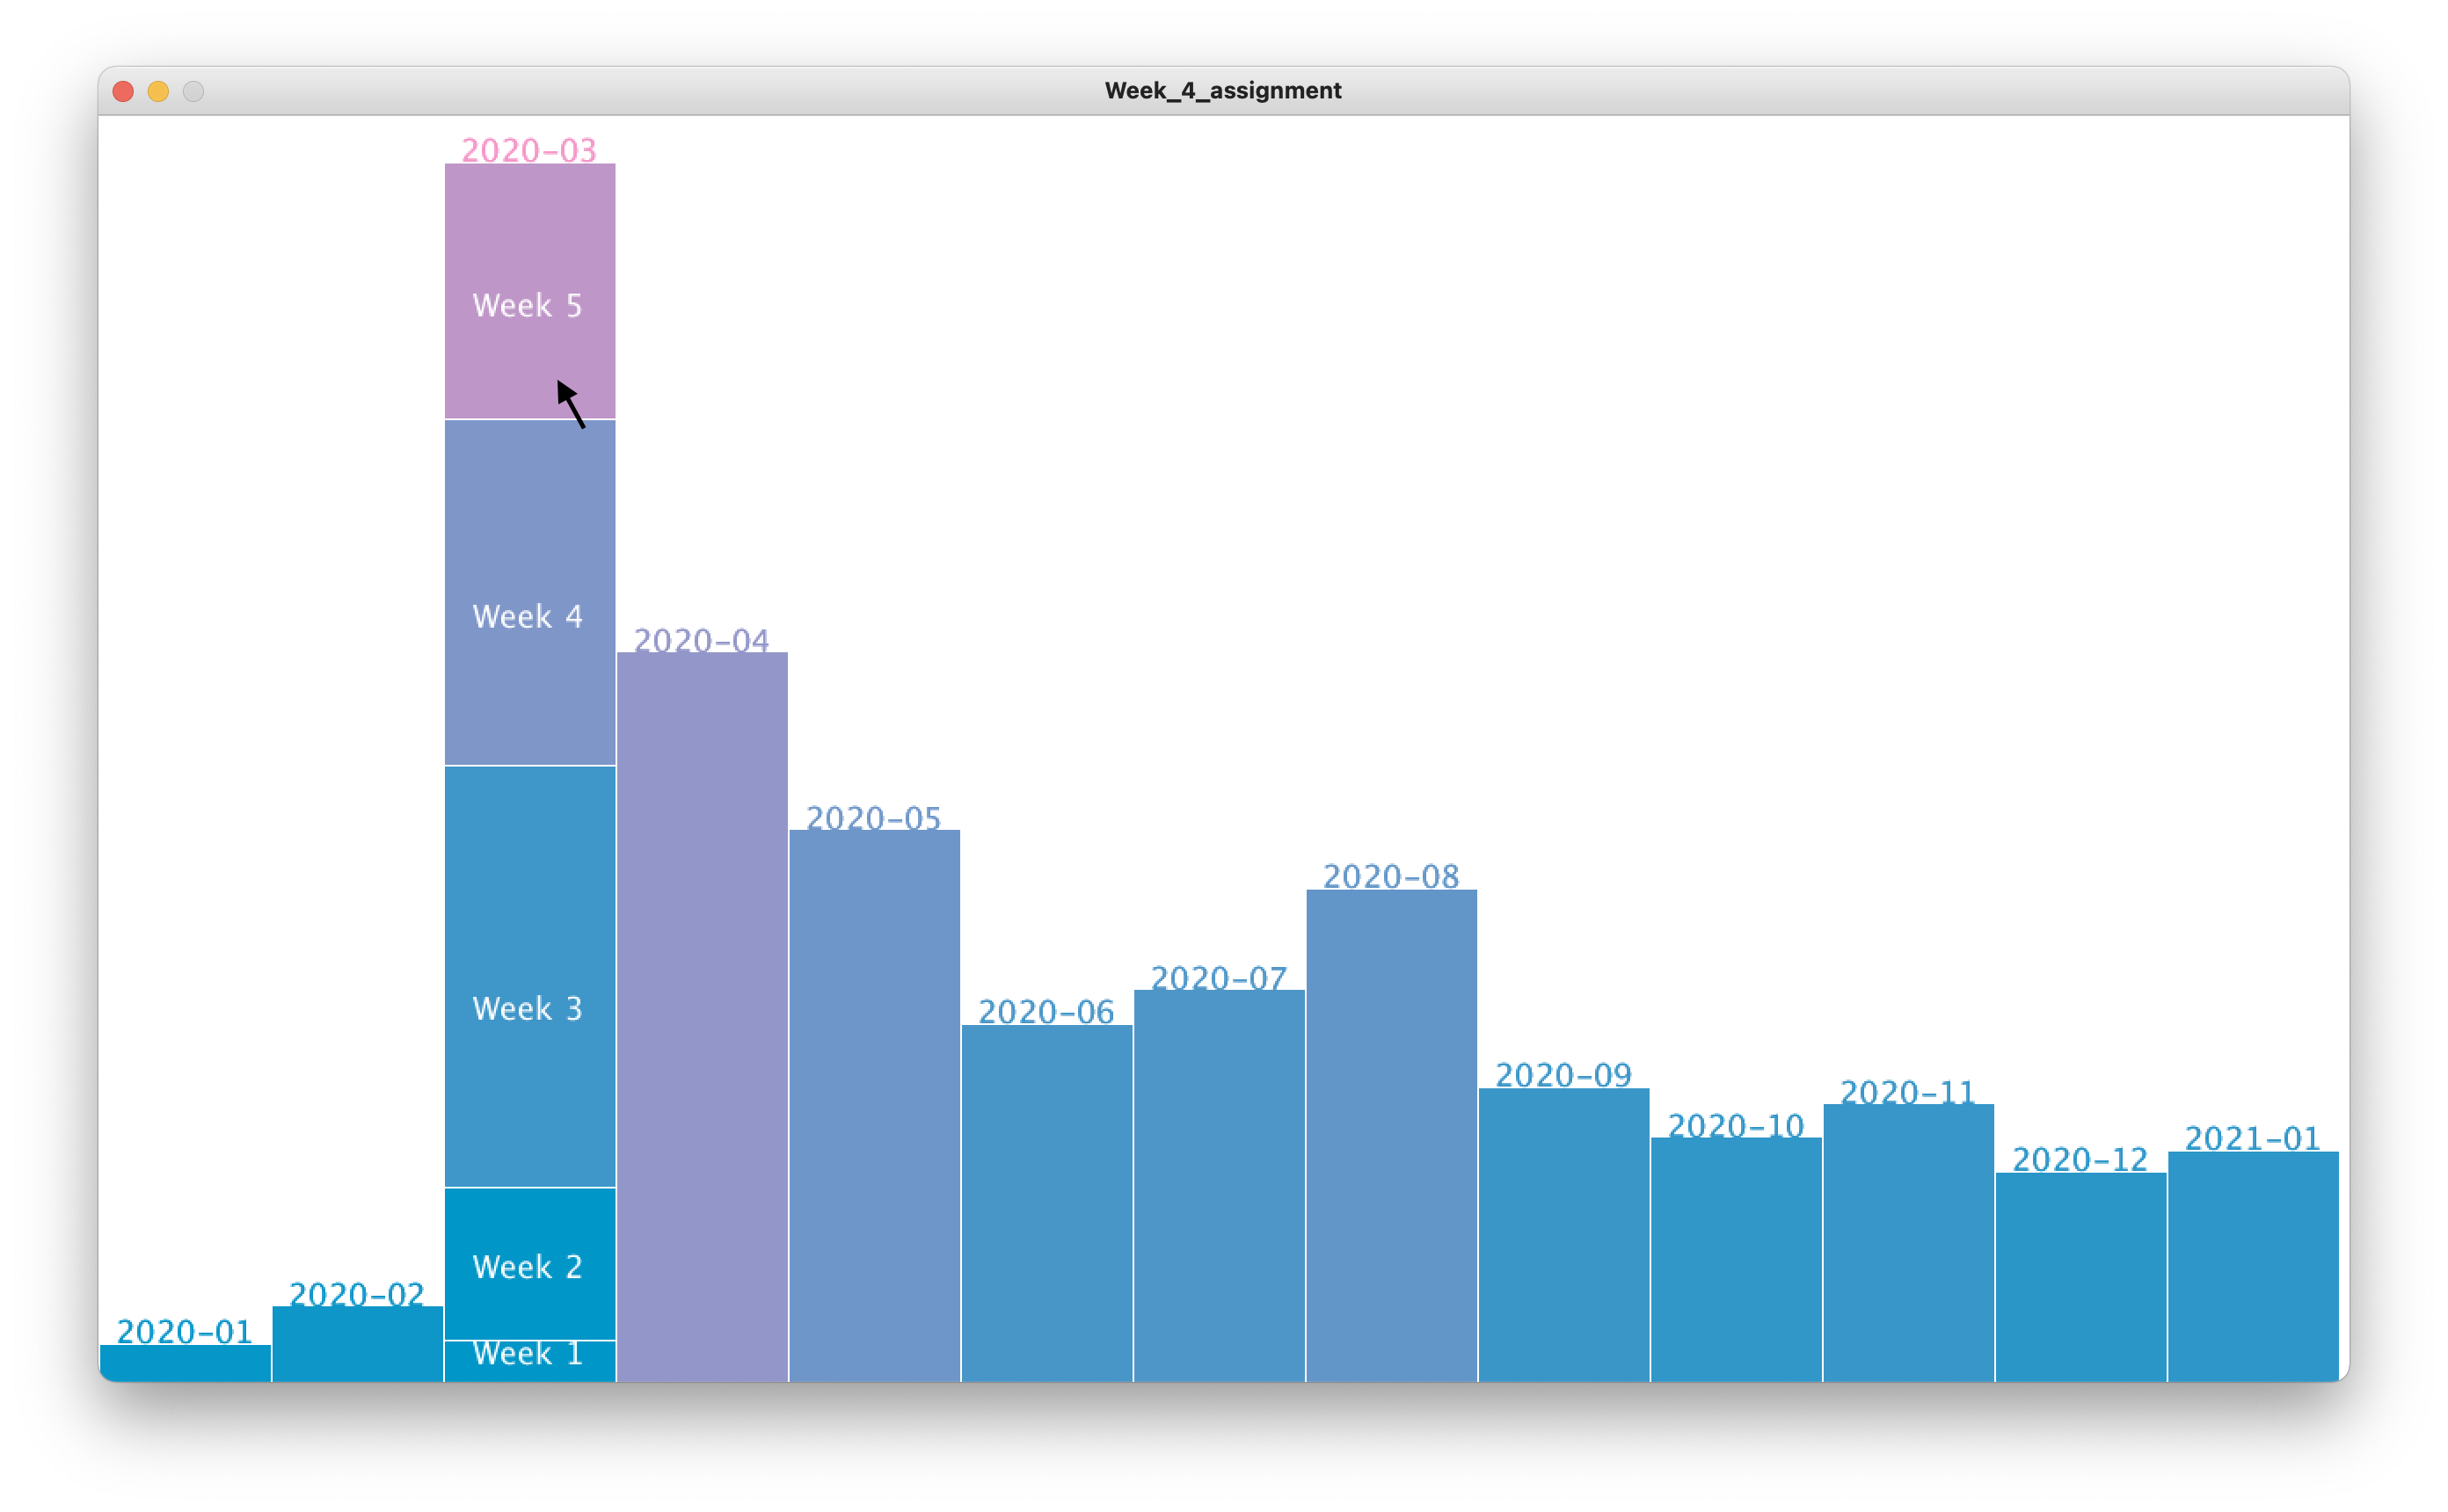
Here is a quick shot of my final product. When hovered on, a particular month column will show stacked columns of its weeks and their respective contributions to the month’s interest. (The black arrow represents the current position of my mouse. Apologies for this substitution; my actual mouse is not showing up in the screenshot.)
The code and the csv file can be found at the end of the post.
Processes
The data is easy to obtain and is already in relatively neat form, the only further cleaning necessary was to delete the first and last few unrelated rows. The next step was to break down the data into months, since it was originally divided into weeks. Since the time column of the .csv file was of the form "YYYY-MM-DD", I could use the String.substring() function to filter out the month, and add interests of the same month together. From this, drawing columns for months was relatively straightforward.
With the individual week data, first I was thinking along the line of having them also in column form that it would make the width of the week columns inconsistent, since some months have more weeks than others, and since month width was kept constant, the months with 5 weeks would appear to look more packed than those with only 4. For this reason, I decided to make the weeks into stacked columns instead, with the heights of all weeks in the same month adding up to the height of the respective month column.
Pitfalls
From a data perspective, in hindsight, I’m not sure if the form I chose for the graphs is a suitable one to visualize this particular set of data. When aggregated into months, some months became disproportionally higher than others (for instance, March vs. January). Because of this, months like January became so ‘short’ that the week names could not be properly and visibly displayed.
What I learned
I made extensive use of HashMaps since I found them particularly useful for looking up data using an index, especially if the index is not of type int (in this case, my HashMaps are searchable by names of months). I also found that they accept a wide range of data type, for instance, one HashMap I used has keys of type String and values of type ArrayList<Integer>.
Code
import java.util.Map;

Table table;
int numRow;
float monthWidth;
HashMap<String, Integer> interestByMonth = new HashMap<String, Integer>();
HashMap<String, ArrayList<Integer>> weekStacked = new HashMap<String, ArrayList<Integer>>();
ArrayList<String> nameOfMonths = new ArrayList<String>();
int maxInterest = 0;

void setup() {
  size(1280, 720);
  loadData();
  breakData();
  monthWidth = width/nameOfMonths.size();
}

void draw() {
  background(255);
  noStroke();
  drawMonths();
}

void loadData() {
  table = loadTable("multiTimeline.csv", "csv");
  numRow = table.getRowCount();
}

void breakData() {
  for (int i=0; i<numRow; i++) {
    TableRow row = table.getRow(i);
    String time = row.getString(0);
    // date in the form of "YYYY-MM-DD"
    //                     -0123456789-
    String month = time.substring(0, 7);
    int interest = row.getInt(1);
    if (interest > maxInterest) {
      maxInterest = interest;
    }
    if (!interestByMonth.containsKey(month)) {
      interestByMonth.put(month, 0);
      ArrayList<Integer> listOfWeeks = new ArrayList<Integer>();
      weekStacked.put(month, listOfWeeks);
      nameOfMonths.add(month);
    }
    int oldValue = interestByMonth.get(month);
    interestByMonth.put(month, oldValue+interest);

    ArrayList<Integer> listOfWeeks = weekStacked.get(month);
    listOfWeeks.add(interest);
  }
}

float drawEachMonth(String month, int order) {
  int interest = interestByMonth.get(month);
  float monthHeight = map(interest, 0, 300, 0, height); // the 300 is hardcoded
  float colorFactor = map(interest, 0, 300, 0, 255);
  int alpha = 255;
  stroke(255);
  if (int(mouseX / monthWidth) == order) {
    stroke(255);
    alpha = 0;
  }
  fill(colorFactor, 150, 200, alpha);
  rect(order*monthWidth, height-monthHeight, monthWidth, monthHeight);
  textAlign(CENTER);
  textSize(18);
  fill(colorFactor, 150, 200);
  text(month, (order+0.5)*monthWidth, height-monthHeight);
  return monthHeight;
}

void drawMonths() {
  for (int i=0; i<nameOfMonths.size(); i++) {
    String month = nameOfMonths.get(i);
    float monthHeight = drawEachMonth(month, i);
    drawWeeks(month, i, monthHeight);
    float throwaway = drawEachMonth(month, i);
  }
}

void drawWeeks(String month, int order, float monthHeight) {
  ArrayList<Integer> weekList = weekStacked.get(month);
  ArrayList<Float> weekHeights = new ArrayList<Float>();
  int numWeek = weekList.size();

  // Populate array of week heights w.r.t month height
  int monthInterest = interestByMonth.get(month);
  for (int i=0; i<numWeek; i++) {
    int curInterest = weekList.get(i);
    float ratio = float(curInterest)/float(monthInterest);
    float weekHeight = monthHeight * ratio;
    weekHeights.add(weekHeight);
  }

  for (int i=0; i<numWeek; i++) {
    float aggHeight = 0;
    for (int j=0; j<=i; j++) {
      aggHeight += weekHeights.get(j);
    }
    String weekLabel = "Week " + str(i+1);
    fill(map(i, 1, numWeek, 0, 255), 150, 200);
    stroke(255);
    rect(order*monthWidth, height-aggHeight, monthWidth, weekHeights.get(i));
    fill(255);
    textAlign(CENTER);
    text(weekLabel, (order+0.5)*monthWidth, height-aggHeight+weekHeights.get(i)*.6);
  }
}
For week 3, my goal is to make the game 2048 with Processing. I think this is a pretty suitable game to practice the various concepts from object-oriented programming, since it has various objects with the same attributes, and the different components of the game interact with one another regularly.
The game is essentially a 4×4 board with small square 1×1 tiles appearing on it, with each tile having a value which is 2 raised to some power (2, 4, 8, 16, etc.). The user can control in which direction they want to move the tiles using the right, left, up, or down keys on their keyboard. Whenever two tiles with the same value (and color) collide, they merge into a tile with double the value of each individual tile. After each move, a new tile of the lowest value (2) will appear randomly in an empty position. The goal of the game is to maximize the value on the tiles, that is, merge as many tiles as possible. The game will end when the user either wins (they reach a 2048 tile) or loses (there is no more empty space on the board and hence no further move is possible).
Here is a short demo of my program:
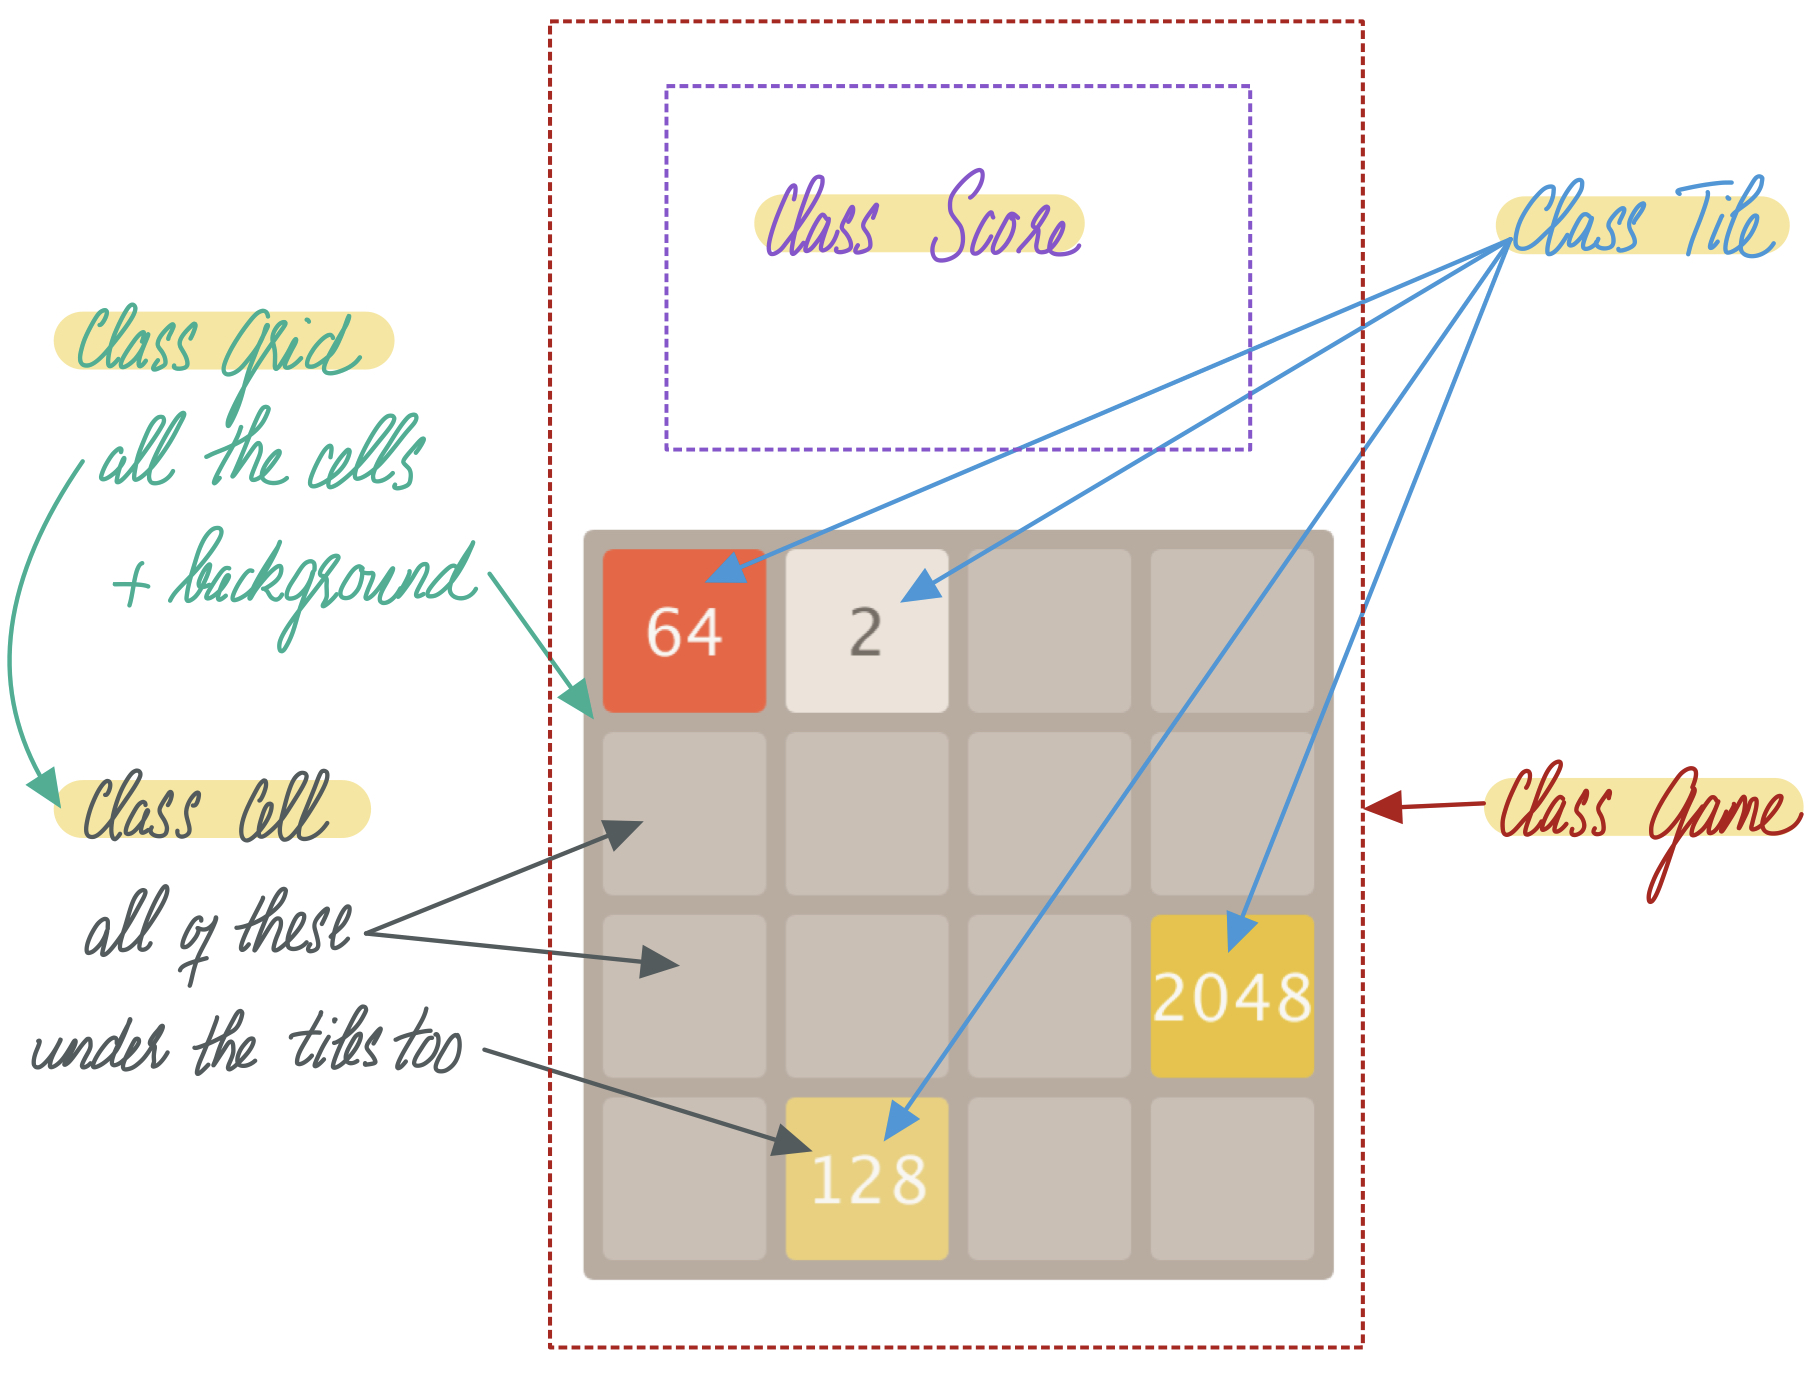
And here is a diagram illustrating the overall interface and outlining the basic classes of the game:
The code for the game can be found at the end of the post.
A note before starting on the details, as you can tell from the demo, I am not done with the game! The following parts outline my progress so far, and I intend to continue working on the game, so if you want to see how it turns out, here is my GitHub.
Breakdown of classes
Tile
Class Tile provides a common structure for all the tiles that will be constructed while the game runs. It has a number of attributes, but the most important ones include value (the value displaying on the tile, which determines the colors of the tile and the text), rowPos and colPos (the current coordinate of the tile on the board, with [0, 0] being the top left corner and [3, 3] being the bottom right corner; they get updated every time the tile is moved), moving and doneMoving (as the names reflect; used to initialize movement of various tiles). The class also has a number of functions, most of which are used in other classes to control the tiles’ interactions with one another and with other components of the game. The most important ones are display(), moveTileV() and moveTileH() (used to make a tile move vertically or horizontally).
Cell
The cells can be thought of as the underlying game board. They have the same layout and coordinates as the tiles, but as the tiles are initialized, displayed (and disappear) one by one as the game proceeds and move around the board, the cells are immobile. The most important attributes of a cell include occupied (boolean value to indicate whether or not there is a tile presently lying on top of the cell; it gets updated as the tiles move around), rowPos and colPos (similar to tiles), and queue (each cell has its own array to store tiles that are currently in its position; normally a cell’s queue will either be empty (unoccupied) or has one tile (occupied), so when the queue has two elements, there is a collision of tiles and they will merge). Cells have few functions among themselves, since most cell-related interactions are configured in the next class.
Grid
Each Grid object has an attribute called cells which is an array of Cell objects. My intention is to make Grid a kind of wrapper class that acts as a container for all the cells and an mediator between Cell class and Game class. For this reason, Grid is not exactly a unique class on its own, and you can see that most of the functions of this class actually call functions on cells. Some of the most usually used functions include vacant() and occupy() (used after moving existing tiles or creating new tiles to update the occupied status of a cell), enqueue() and dequeue() (to add a tile to the queue of a cell that it’s just moved to, or to remove a tile from the queue of a cell that it’s leaving, sometimes retrieving and removing the tile at once), peek() (to retrieve a tile without removing it from the queue).
Game
This is the encompassing class, wrapping and coordinating the interactions of all other classes. Each Game object has a Grid object, which has a Cell object itself. It also has 4 array containing Tile objects (4 queues). Another attribute is a HashMap called keyHandler, which maps the four key codes RIGHT, LEFT, UP, and DOWN with a boolean value to indicate which key has been pressed by the user to trigger the right movement of the tiles.
The two functions randTile() and specificTile() are used to initialized new tiles to add to the game.
There are four functions to calculate the next possible move of a tile, corresponding to which key the user has pressed: getRightDest(), getLeftDest(), getTopDest(), getBottomDest().
Using the coordinate retrieved from those functions, there are four other functions to move each individual tile: moveTileRight(), moveTileLeft(), moveTileUp(), moveTileDown(). These functions calls on various other functions and ensure interactions among the grid, the cells, and the tiles.
Before moving, the tiles are added to the four queues of the game one by one, in the order that they will be moved later. For example, if the user chooses to move all the tiles in the right direction, then the rightmost tiles in each row will be moved first, then the next tiles to their left will be moved, and so on. This is also the reason I choose the to use the queue data structure which enables the first in – first out flow. This phase of lining the tiles in queues in the four enqueueTiles() functions. Once all tiles have been added to queues in the correct order, they will in turn get retrieved and removed from the queue (still in the correct order, very important) and moved (using the moveTile() functions mentioned above). This moving phase is included in moveTilesFromQueue(). Moving one layer up, the two phases – adding tiles and moving tiles – are wrapped in the four moveGame() functions that are triggered by the key signal from the user.
Another important function is mergeTiles(), to be invoked when two same values tiles collide. I’m not done with this function yet – it partly works, as shown in the demo, but it still has a lot of bugs and pitfalls. This is also the starting point for further development of the game. Once two tiles collide and merge, they disappear and a new tile of twice the value will appear in their place, and functions from the Score class will be called on to update the score of the current game.
The Game class is missing some other important attributes and functions that I hope to incorporate: highestTile attribute and checkEnd() function to signal whether the game is won, lost, or in progress.
Score
This is the missing class! With the progress I’ve made, I haven’t constructed this class yet. Once made, the basics of the class will include the following: a currentScore attribute to store the score so far (the sum in value of all the currently visible tiles on the board) and is updated after each collision, a highestScore attribute storing, as the name suggests, the highest score so far of the current game section (each time the program is rerun is a new session).
Problems
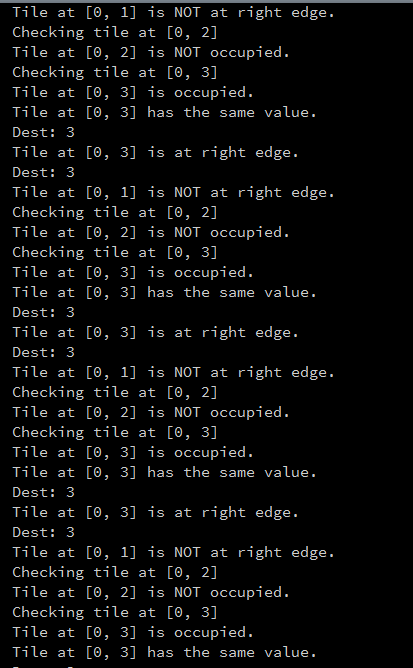
Lots and lots of them! Most of the problems I encounter have to do with using the wrong logic and unable to detect unpredictable behavior. For such problems, I try to pinpoint the issues by adding println() statements to the functions, especially to conditional statements and loops, printing out various attributes of the objects (I still leave a number of them in my code in case I will need them again). Rather than trying to imagine what is going on, I find that printing the results out gives a much better and tangible view into the program and what possibly went wrong. For example, the following is what I print out when testing the getRightTest() function:
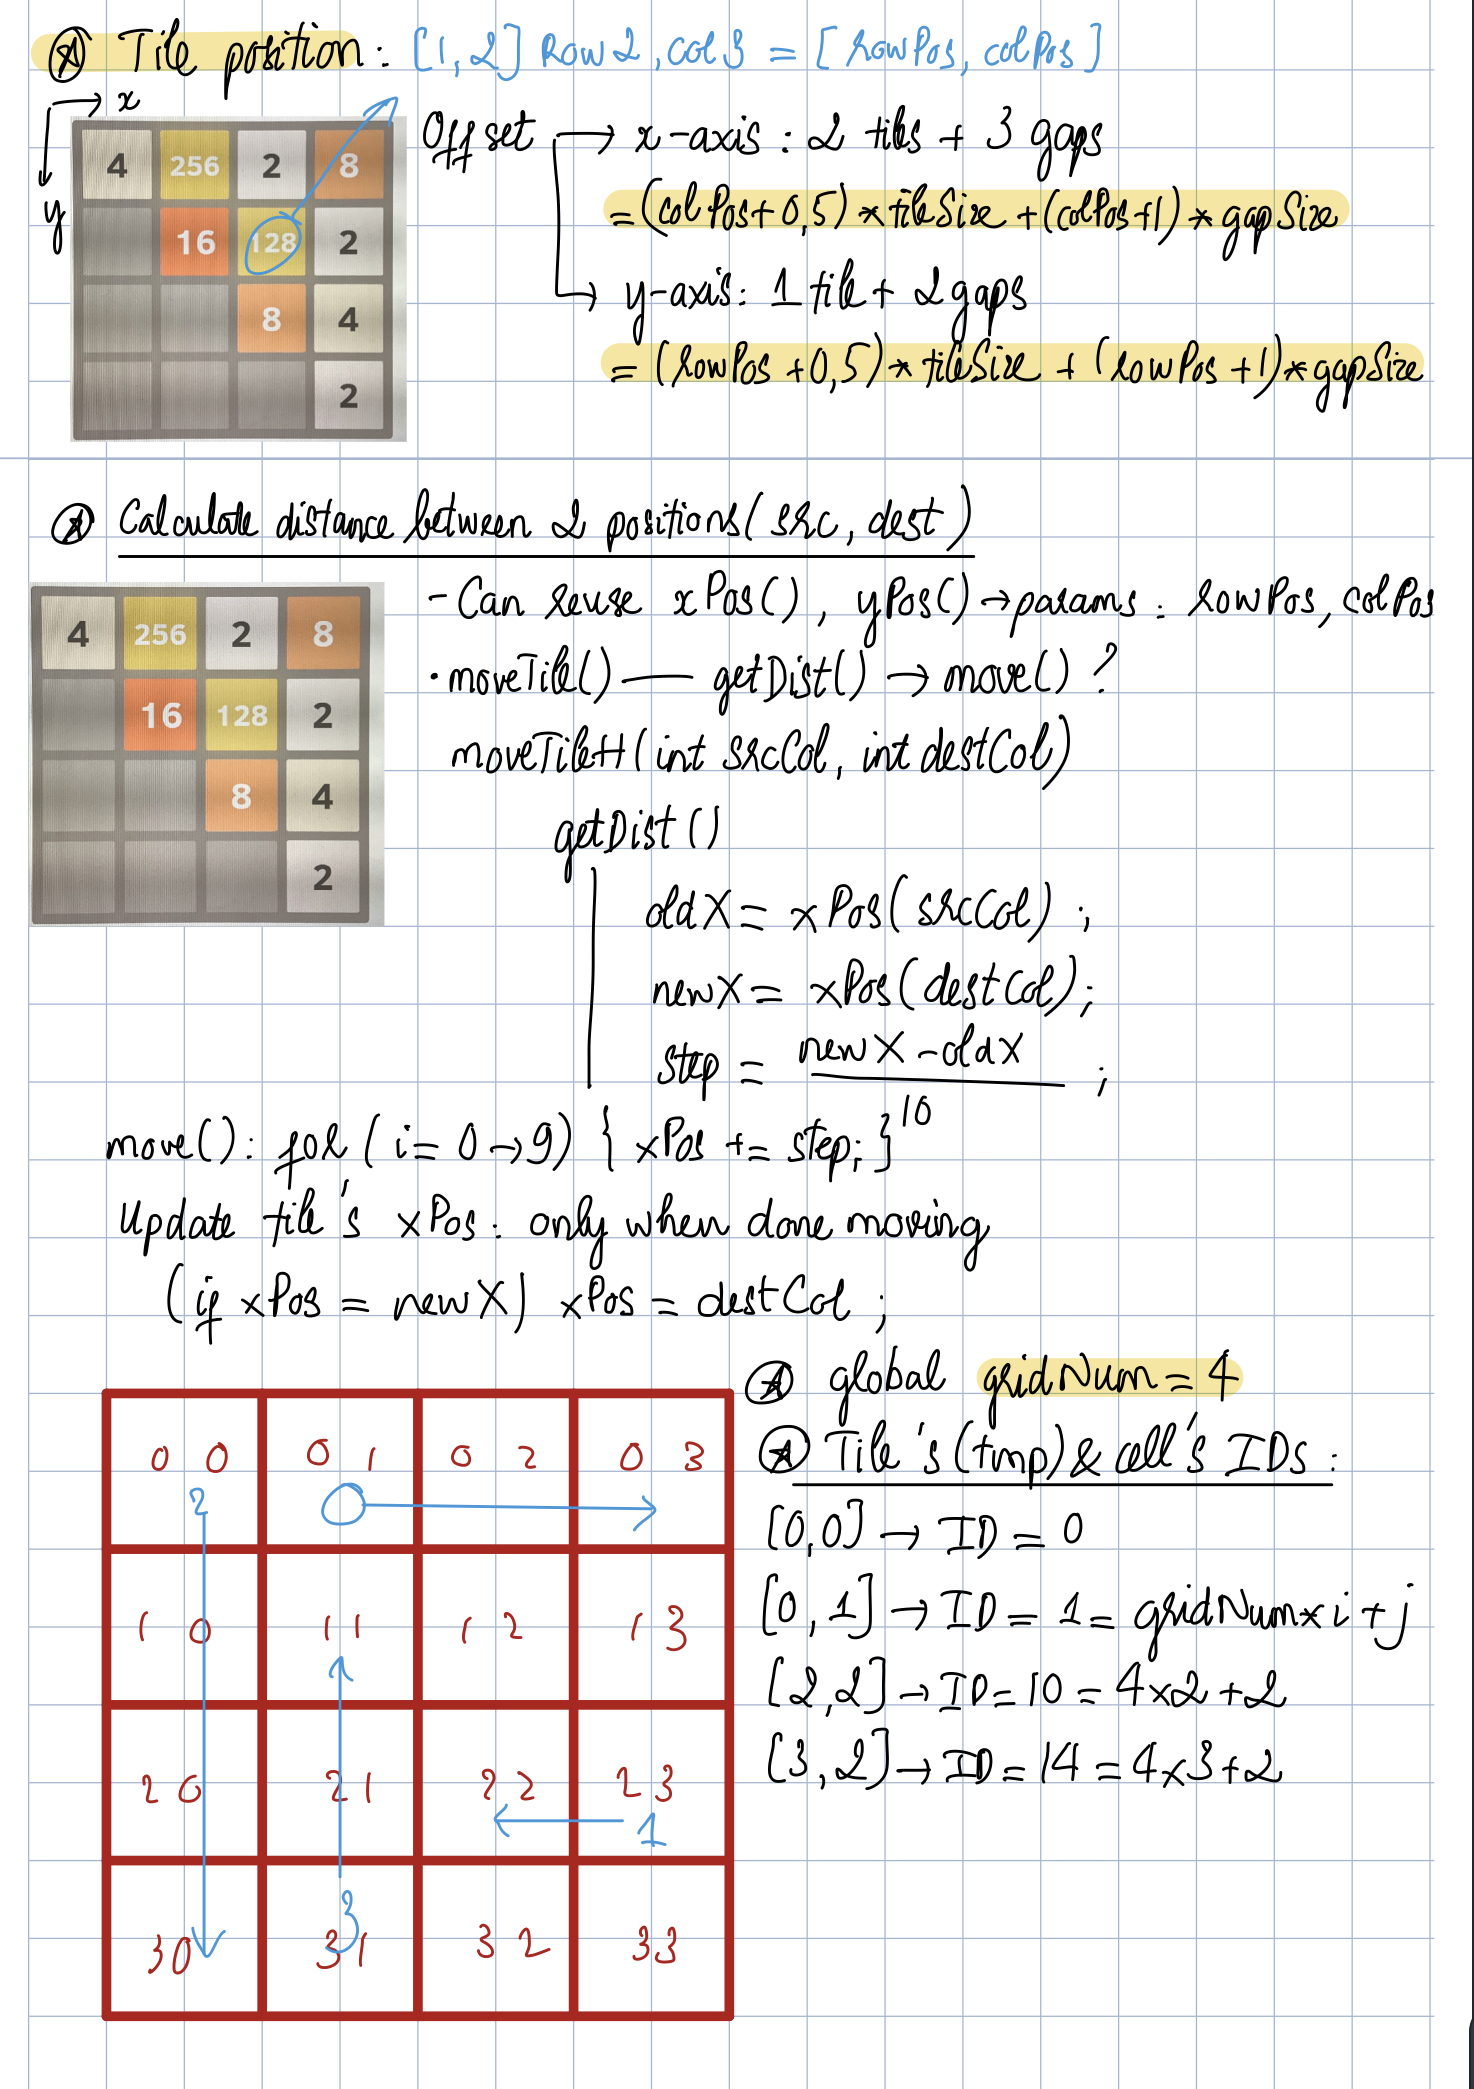
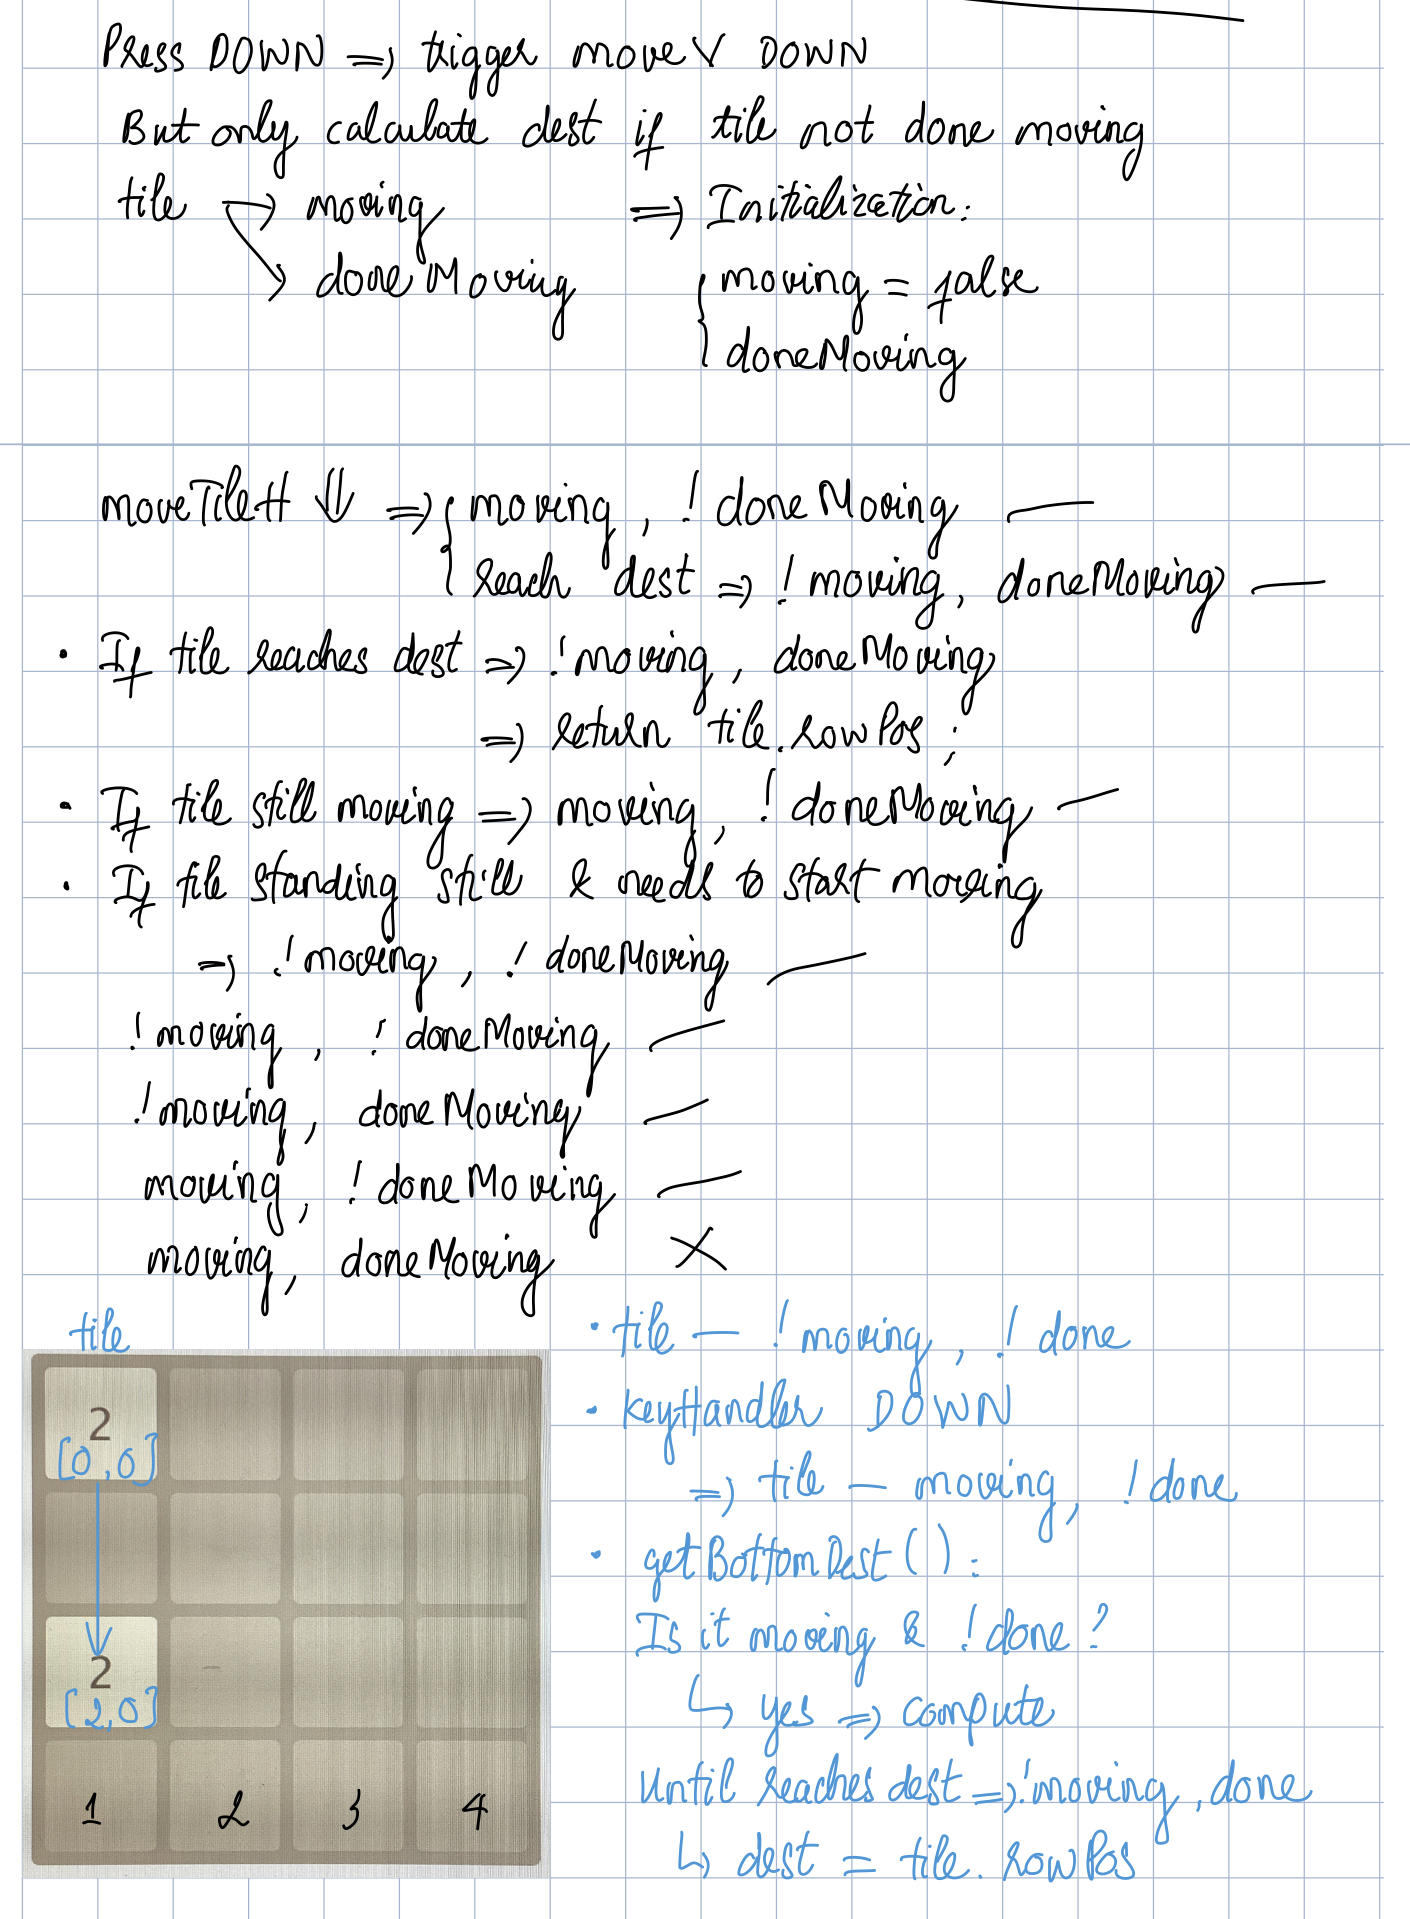
Whenever it is a logic problems (trying to figure out how to build the functions, etc.), I find taking notes by hands and drawing on pictures really help. Here is some of what I write and draw:
For the game, I also use a number of Java classes like HashMap, ArrayList, and ArrayDeque. I’m a bit lost deciding which ones to use, but other than that I find them all very helpful. Whenever I try to code some generic function, chances are there are already some built-in classes and data structures that handle exactly what I want to do. If you happen to suspect the same, I highly recommend doing a quick Google search. Most of the time I will search for something like “java queue oracle”, adding “oracle” so that it shows results from the Java platform API first.
My biggest takeaway from working on this game, though, has to do with a problem I had with my laptop. I wrote down my feelings on it and I’d like to quote from them:
Feb 6, 10:40 AM: I woke up to a blank Game class. It seemed I had accidentally deleted the temporary file that Processing had yet to save into the actual file. I was devastated. I was not prepared to write the entire class again. I hadn’t made a GitHub repo for the class at this point. Thank the Buddha I did have a backup file on Google Drive. After this I immediately went to push my code to GitHub. Ran into some other problems with command line along the way but it worked out. Now my code is on GitHub, as any code by any sane person should be.
In short, please back up your code.
Code
There are a lot of attributes and functions in my code that I define but never call on to use, which might be because I was working in some direction but then changed my mind and worked in a different direction. But since the game is not finished, I’m not deleting all of them yet in case I might need them when I continue with the program.
Tileclass
import java.util.Map;
// https://processing.org/reference/HashMap.html

class Tile {
  int value;
  color tileColor, textColor;
  float alpha = 0;
  boolean doneDisappearing = false;
  boolean overlap = false;
  boolean visible = true;
  boolean moving = false;
  boolean doneMoving = false;
  int rowPos, colPos;
  float yPos, xPos;
  HashMap<Integer, Integer> tileColorMap = new HashMap<Integer, Integer>();
  int tileSize = 100;
  int tileRound = 7;
  int gapSize = 12;
  float xOffset = width/2 - (gapSize*2.5 + tileSize*2);
  // yOffset might + extra offset to account for the score part
  float yOffset = height/2 - (gapSize*2.5 + tileSize*2);
  int gridNum = 4;
  int tileID;

  /**
   * Map tile values with corresponding colors in pairs of <Value, Color>
   * Note: wrapper class of color primitive type is Integer
   */
  void mapColors() {
    tileColorMap.put(2, color(238, 228, 218, alpha));
    tileColorMap.put(4, color(237, 224, 200, alpha));
    tileColorMap.put(8, color(242, 177, 121, alpha));
    tileColorMap.put(16, color(245, 149, 99, alpha));
    tileColorMap.put(32, color(246, 124, 96, alpha));
    tileColorMap.put(64, color(246, 94, 59, alpha));
    tileColorMap.put(128, color(237, 207, 115, alpha));
    tileColorMap.put(256, color(237, 204, 98, alpha));
    tileColorMap.put(512, color(237, 200, 80, alpha));
    tileColorMap.put(1024, color(237, 197, 63, alpha));
    tileColorMap.put(2048, color(237, 194, 45, alpha));
  }

  /**
   * Constructor of a tile
   * @param val value of the tile, must be of a value 2^n with 1 <= n <= 11
   *        row, col coordinate of the tile
   * [0, 0] is top left, [3, 3] is bottom right
   */
  Tile(int val, int row, int col) {
    value = val;
    rowPos = row;
    colPos = col;
    xPos = xPos(col);
    yPos = yPos(row);
    tileID = gridNum*row+col;
  }

  /**
   * Display a particular tile. Necessary params are all class attributes
   */
  void displayTile() {
    // Alpha might get updated so need to map colors again
    mapColors();
    tileColor = tileColorMap.get(value);
    // There are only two colors for text so no need for HashMap
    if (value <= 4) {
      textColor = color(119, 110, 101, alpha);
    } else {
      textColor = color(249, 246, 242, alpha);
    }

    updateAlpha();

    pushStyle();
    rectMode(CENTER);
    noStroke();
    fill(tileColor);
    rect(xPos, yPos, tileSize, tileSize, tileRound);
    fill(textColor);
    textSize(tileSize*.4);
    // tileSize*.5 is too big -- 4-digit values do not fit
    textAlign(CENTER, CENTER);
    text(value, xPos, yPos-textAscent()*.1);
    popStyle();
  }

  /**
   * Move tile horizontally to a new position
   * @param destCol column-coordinate of destination
   */
  void moveTileH(int destCol) {
    float oldX = xPos(colPos);
    float newX = xPos(destCol);
    float stepSize = (newX-oldX)/15;
    if (xPos != newX) {
      xPos += stepSize;
    }
    // stepSize can have long decimal part
    // Without rounding, xPos can offshoot newX by a fraction
    if (round(xPos) == newX) {
      xPos = newX;
      colPos = destCol;
      moving = false;
      doneMoving = true;
      updateID();
    }
  }

  /**
   * Move tile vertically to a new position
   * @param destRow row-coordinate of destination
   */
  void moveTileV(int destRow) {
    float oldY = yPos(rowPos);
    float newY = yPos(destRow);
    float stepSize = (newY-oldY)/15;
    if (yPos != newY) {
      yPos += stepSize;
    }
    if (round(yPos) == newY) {
      yPos = newY;
      rowPos = destRow;
      moving = false;
      doneMoving = true;
      updateID();
    }
  }

  /**
   * Change transparency of a tile. Used to make tile (dis)appear
   */
  void updateAlpha() {
    if (visible) {
      if (alpha < 255) {
        alpha += 17; // 17=255/15 (15, 30, 60 ...)
      } else {
        alpha = 255;
      }
      alpha = 255;
    } else {
      if (alpha > 0) {
        alpha -= 17;
      } else {
        alpha = 0;
      }
    }
  }

  /**
   * Update visibility of a tile to trigger its disappearing
   */
  void disappear() {
    visible = false;
  }

  /**
   * Update ID of a recently moved tile
   * So far not used much because it's too simple a calculation
   * I forget I made a function
   */
  void updateID() {
    tileID = gridNum*rowPos+colPos;
  }

  /**
   * Return the x-coordinate of a tile in pixels
   * @param colPos column coordinate (0, 1, 2, 3)
   * @return xPos corresponding x-coordinate in pixels
   */
  float xPos(int colPos) {
    return (colPos+.5)*tileSize + (colPos+1)*gapSize + xOffset;
  }

  /**
   * Return the y-coordinate of a tile in pixels
   * @param rowPos row coordinate (0, 1, 2, 3)
   * @return yPos corresponding y-coordinate in pixels
   */
  float yPos(int rowPos) {
    return (rowPos+.5)*tileSize + (rowPos+1)*gapSize + yOffset;
  }

  /**
   * Check if this tile and another tile has the same value
   * @param tile a second tile to compare
   * @return true if same value
   */
  boolean sameValue(Tile tile) {
    if (value == tile.value) {
      return true;
    } else {
      return false;
    }
  }

  /**
   * Checks if this tile is at the top edge aka first row
   * @return true if it is at the top edge
   */
  boolean isAtTopEdge() {
    if (rowPos == 0) {
      return true;
    } else {
      return false;
    }
  }

  /**
   * Checks if this tile is at the bottom edge aka last row
   * @return true if it is at the bottom edge
   */
  boolean isAtBottomEdge() {
    if (rowPos == 3) {
      return true;
    } else {
      return false;
    }
  }

  /**
   * Checks if this tile is at the left edge aka first column
   * @return true if it is at the left edge
   */
  boolean isAtLeftEdge() {
    if (colPos == 0) {
      return true;
    } else {
      return false;
    }
  }

  /**
   * Checks if this tile is at the right edge aka last column
   * @return true if it is at the right edge
   */
  boolean isAtRightEdge() {
    if (colPos == 3) {
      return true;
    } else {
      return false;
    }
  }

  /**
   * Reset movement attributes of the tile
   * aka not moving & hasn't started moving
   */
  void resetMovement() {
    moving = false;
    doneMoving = false;
  }

  /**
   * Misc code for testing purposes
   */
  void test() {
    println("Row: "+str(rowPos));
    println("Col: "+str(colPos));
  }
}
Cellclass
import java.util.ArrayDeque;
// https://docs.oracle.com/javase/9/docs/api/java/util/ArrayDeque.html

class Cell {
  int gridNum = 4;
  int cellID;
  int rowPos, colPos;
  float yPos, xPos;
  color cellColor = color(205, 191, 180, 255);
  boolean occupied = false;
  int cellSize = 100;
  int cellRound = 7;
  int gapSize = 12;
  float xOffset;
  float yOffset;
  int count = 0;
  ArrayDeque<Tile> queue = new ArrayDeque();

  /**
   * Constructor of a cell
   * @param row, col coordinate of the cell
   *        offset_x, offset_y offets to align the game board
   */
  Cell(int row, int col, float offset_x, float offset_y) {
    rowPos = row;
    colPos = col;
    xOffset = offset_x;
    yOffset = offset_y;
    xPos = xPos(col);
    yPos = yPos(row);
    cellID = gridNum*row+col;
  }

  /**
   * Display the cell
   * I'm warry of unpredicted behavior hence pushStyle() popStyle()
   */
  void displayCell() {
    pushStyle();
    rectMode(CENTER);
    noStroke();
    fill(cellColor);
    rect(xPos, yPos, cellSize, cellSize, cellRound);
    popStyle();
  }

  /**
   * Return the x-coordinate of a cell in pixels
   * @param colPos column coordinate (0, 1, 2, 3)
   * @return xPos corresponding x-coordinate in pixels
   */
  float xPos(int colPos) {
    return (colPos+.5)*cellSize + (colPos+1)*gapSize + xOffset;
  }

  /**
   * Return the y-coordinate of a cell in pixels
   * @param colPos column coordinate (0, 1, 2, 3)
   * @return yPos corresponding y-coordinate in pixels
   */
  float yPos(int rowPos) {
    return (rowPos+.5)*cellSize + (rowPos+1)*gapSize + yOffset;
  }
}
Gridclass
class Grid {
  float gridSize = 460;
  int gridNum = 4;
  int gridRound = 7;
  int cellSize = 100;
  int gapSize = 12;
  ArrayList<Cell> cells = new ArrayList<Cell>();
  float xOffset = width/2 - (gapSize*2.5 + cellSize*2);
  // yOffset might + extra offset to account for the score part
  float yOffset = height/2 - (gapSize*2.5 + cellSize*2);

  /**
   * Constructor of a grid
   */
  Grid() {
    for (int i=0; i<gridNum; i++) {
      for (int j=0; j<gridNum; j++) {
        Cell cell = new Cell(i, j, xOffset, yOffset);
        cells.add(cell);
      }
    }
  }

  /**
   * Change the size of a grid
   * To be honest I forgot I ever made this at all
   * Might find some use for it?
   */
  void setGridSize(int size) {
    gridSize = size;
  }

  /**
   * Display the background and the cells
   */
  void displayGrid() {
    displayBg();
    for (int i=0; i<cells.size(); i++) {
      Cell cell = cells.get(i);
      cell.displayCell();
    }
  }

  /**
   * Display the background
   * Once again I'm using pushStyle() popStyle() to be sure
   */
  void displayBg() {
    color bgColor = color(187, 172, 160, 255);
    pushStyle();
    fill(bgColor);
    noStroke();
    rectMode(CENTER);
    rect(width/2, height/2, gridSize, gridSize, gridRound);
    popStyle();
  }

  /**
   * Check if a cell is occupied
   * Though I don't think these params are ever used
   * @param row, col coordinate of the cell
   * @return true if occupied
   */
  boolean checkIfOccupied(int row, int col) {
    int id = getID(row, col);
    Cell cell = cells.get(id);
    return cell.occupied;
  }

  /**
   * Check if a cell is occupied
   * @param id ID of the cell
   * @return true if occupied
   */
  boolean checkIfOccupied(int id) {
    Cell cell = cells.get(id);
    return cell.occupied;
  }

  //void changeStatus(Tile tile) {
  //  int id = getID(tile.rowPos, tile.colPos);
  //  Cell cell = cells.get(id);
  //  cell.changeStatus();
  //}

  /**
   * Change an occupied cell to unoccupied
   * @param tile the tile to be moved or disappear
   */
  void vacant(Tile tile) {
    int id = getID(tile.rowPos, tile.colPos);
    Cell cell = cells.get(id);
    cell.occupied = false;
  }

  /**
   * Change an occupied cell to unoccupied
   * @param id ID of the tile to be moved away or disappear
   *           and/or cell to be cleared
   */
  void vacant(int id) {
    Cell cell = cells.get(id);
    cell.occupied = false;
  }

  /**
   * Change an unoccupied cell to occupied
   * @param tile the tile to be moved here or appear
   */
  void occupy(Tile tile) {
    int id = getID(tile.rowPos, tile.colPos);
    Cell cell = cells.get(id);
    cell.occupied = true;
  }

  /**
   * Change an unoccupied cell to occupied
   * @param id ID of the tile to be moved here or appear
   *           and/or cell to be occupied
   */
  void occupy(int id) {
    Cell cell = cells.get(id);
    cell.occupied = true;
  }

  /**
   * Add to the count of the cell (how many tiles are in it)
   * Cell's count attribute is actually kinda redundant.
   * Only needs to check the size of the queue.
   * @param tile the tile at the coordinate to be checked
   */
  void addCount(Tile tile) {
    int id = getID(tile.rowPos, tile.colPos);
    Cell cell = cells.get(id);
    cell.count += 1;
  }

  /**
   * Minus from the count of the cell
   * @param tile the tile at the coordinate to be checked
   */
  void minusCount(Tile tile) {
    int id = getID(tile.rowPos, tile.colPos);
    Cell cell = cells.get(id);
    cell.count -= 1;
  }

  /**
   * Add a tile to (the end of) a cell's queue
   * @param tile tile to be added
   */
  void enqueue(Tile tile) {
    int id = getID(tile.rowPos, tile.colPos);
    Cell cell = cells.get(id);
    cell.queue.add(tile);
  }

  /**
   * Retrieve and remove a tile from (the head of) a cell's queue
   * @param tile tile at the cell in question
   * @return tile at the head of the cell's queue
   */
  Tile dequeue(Tile tile) {
    int id = getID(tile.rowPos, tile.colPos);
    Cell cell = cells.get(id);
    return cell.queue.remove();
  }

  /**
   * Retrieve and remove a tile from (the head of) a cell's queue
   * @param id coordinate of the cell in question
   * @return tile at the head of the cell's queue
   */
  Tile dequeue(int id) {
    Cell cell = cells.get(id);
    return cell.queue.remove();
  }

  /**
   * Retrieve without removing a tile from the head of a cell's queue
   * @param id coordinate of the cell in question
   * @return tile at the head of the cell's queue
   */
  Tile peekFirst(int id) {
    Cell cell = cells.get(id);
    return cell.queue.peekFirst();
  }

  /**
   * Retrieve without removing a tile from the end of a cell's queue
   * @param id coordinate of the cell in question
   * @return tile at the end of the cell's queue
   */
  Tile peekLast(int id) {
    Cell cell = cells.get(id);
    return cell.queue.peekLast();
  }

  /**
   * Retrieve without removing a tile from the head of a cell's queue
   * I've just realized it's equivalent to peekFirst()
   * @param id coordinate of the cell in question
   * @return tile at the head of the cell's queue
   */
  Tile peek(int id) {
    Cell cell = cells.get(id);
    return cell.queue.peek();
  }

  /**
   * Return the current size of a cell's queue
   * aka how many tiles it currently contains
   * @param id coordinate of the cell to check
   * @return size of cell's queue
   */
  int queueSize(int id) {
    Cell cell = cells.get(id);
    return cell.queue.size();
  }

  /**
   * Check if a collision is happenning at a cell
   * Can be modified to get rid of count attribute
   * @param tile tile at the cell to check
   * @return true if a cell currently contains >1 tiles
   */
  boolean checkCollision(Tile tile) {
    int id = getID(tile.rowPos, tile.colPos);
    Cell cell = cells.get(id);
    if (cell.count == 2) {
      return true;
    } else {
      return false;
    }
  }

  /**
   * Check if a collision is happenning at any cell
   * @return true if any cell currently contains >1 tiles
   */
  boolean checkCollision() {
    for (int i=0; i<cells.size(); i++) {
      Cell cell = cells.get(i);
      if (cell.queue.size() == 2) {
        return true;
      }
    }
    return false;
  }

  /**
   * Return the coordinate of the cell with a collision
   * Only gets revoked when there is a collision anywhere in the board
   * @return i id of the first cell with a collision
   */
  int whereCollision() {
    for (int i=0; i<cells.size(); i++) {
      Cell cell = cells.get(i);
      if (cell.queue.size() == 2) {
        println("Collision in: "+str(i));
        return i;
      }
    }
    return -1;
  }
  /**
   * Return tile/cell ID corresponding to a coordinate
   * Rarely used, calling it is just as long as writing the code
   * @param row, col coordinate
   */
  int getID(int row, int col) {
    return gridNum*row+col;
  }

  /**
   * Misc code for testing purposes
   */
  void occHelper() {
    for (int i=0; i<4; i++) {
      for (int j=0; j<4; j++) {
        if (checkIfOccupied(i, j)) {
          println(i, j);
        }
      }
    }
  }
}
Gameclass
import java.util.Map;
import java.util.ArrayDeque;

class Game {
  Grid grid = new Grid();
  int gridNum = 4;
  HashMap<Integer, Boolean> keyHandler = new HashMap<Integer, Boolean>();
  int numTiles = 16;
  ArrayDeque<Tile> queue0 = new ArrayDeque();
  ArrayDeque<Tile> queue1 = new ArrayDeque();
  ArrayDeque<Tile> queue2 = new ArrayDeque();
  ArrayDeque<Tile> queue3 = new ArrayDeque();

  /**
   * Constructor of a game
   * Reset keyHandler = no arrow key has been pressed
   * Randomize a tile
   */
  Game() {
    keyHandler.put(LEFT, false);
    keyHandler.put(RIGHT, false);
    keyHandler.put(UP, false);
    keyHandler.put(DOWN, false);

    randTile();
  }

  /**
   * The main proceedings of the game
   */
  void displayGame() {
    grid.displayGrid();
    displayTiles();

    // For each loop check if an arrow is pressed
    // & revoke the corresponding game movement
    if (keyHandler.get(RIGHT)) {
      moveGameRight();
    } else if (keyHandler.get(LEFT)) {
      moveGameLeft();
    } else if (keyHandler.get(UP)) {
      moveGameUp();
    } else if (keyHandler.get(DOWN)) {
      moveGameDown();
    }
    if (allDoneMoving()) {
      // This works but in the case of 2 - 2 - 2 for example it's wrong
      checkAndMerge();

      randTile();
    }
  }

  /**
   * Check the entire game board to detect a collision
   * then merge the tiles that collided
   * A bit exhaustive to check every cell but not too taxing overall
   */
  void checkAndMerge() {
    for (int i=0; i<numTiles; i++) {
      if (grid.queueSize(i) == 2) {
        mergeTiles(i);
      }
    }
  }

  /**
   * Merge collided tiles
   * Still has a lot of bugs e.g. 3 same tiles on a row/col
   * @param id ID of the cell where the collision is
   */
  void mergeTiles(int id) {
    int value = grid.peek(id).value*2;
    int row = grid.peek(id).rowPos;
    int col = grid.peek(id).colPos;
    grid.dequeue(id);
    grid.dequeue(id);
    specificTile(value, row, col);
  }

  /**
   * Display all the valid tiles
   * Valid tiles: visible, no colliding yet
   */
  void displayTiles() {
    // For testing (console printing)
    int validTiles = 0;
    for (int i=0; i<numTiles; i++) {
      if (grid.checkIfOccupied(i)) {
        Tile curTile = grid.peek(i);
        validTiles += 1;
        curTile.displayTile();
      }
    }
  }

  /**
   * Add tiles to the four queues for moving to the right
   * @param queue the queue to be added to
   *        row the row to consider (0, 1, 2, 3)
   */
  void enqueueTilesFromRight(ArrayDeque<Tile> queue, int row) {
    queue.clear();
    // Rightmost tiles to be added (and later retrieved) first
    // e.g. [_][2][4][_]
    //      -0--1--2--3-
    //      Tile at -2- needs to move to -3- first
    //      so -2- is made vacant, -3- is made occupied
    //      When -1- moves -2- is now free
    for (int i=3; i>=0; i--) {
      int id = grid.getID(row, i);
      if (grid.checkIfOccupied(id)) {
        Tile curTile = grid.peek(id);
        queue.add(curTile);
      }
    }
  }

  /**
   * Add tiles to the four queues for moving to the left
   * @param queue the queue to be added to
   *        row the row to consider (0, 1, 2, 3)
   */
  void enqueueTilesFromLeft(ArrayDeque<Tile> queue, int row) {
    queue.clear();
    // Leftmost tiles to be added (and later retrieved) first
    // see enqueueTilesFromRight() for example, same logic
    for (int i=0; i<4; i++) {
      int id = grid.getID(row, i);
      if (grid.checkIfOccupied(id)) {
        Tile curTile = grid.peek(id);
        queue.add(curTile);
      }
    }
  }

  /**
   * Add tiles to the four queues for moving up
   * @param queue the queue to be added to
   *        col the col to consider (0, 1, 2, 3)
   */
  void enqueueTilesFromTop(ArrayDeque<Tile> queue, int col) {
    queue.clear();
    // Top tiles to be added (and later retrieved) first
    // see enqueueTilesFromRight() for example, same logic
    for (int i=0; i<4; i++) {
      int id = grid.getID(i, col);
      if (grid.checkIfOccupied(id)) {
        Tile curTile = grid.peek(id);
        queue.add(curTile);
      }
    }
  }

  /**
   * Add tiles to the four queues for moving down
   * @param queue the queue to be added to
   *        col the col to consider (0, 1, 2, 3)
   */
  void enqueueTilesFromBottom(ArrayDeque<Tile> queue, int col) {
    queue.clear();
    // Bottom tiles to be added (and later retrieved) first
    // see enqueueTilesFromRight() for example, same logic
    for (int i=3; i>=0; i--) {
      int id = grid.getID(i, col);
      if (grid.checkIfOccupied(id)) {
        Tile curTile = grid.peek(id);
        queue.add(curTile);
      }
    }
  }

  /**
   * Retrieve tiles from queues to move
   * @param queue the queue to be retrieved tiles from
   *        dir current moving direction
   */
  void moveTilesFromQueue(ArrayDeque<Tile> queue, String dir) {
    // Movement of a tile is triggered when
    // the previous tile has finished moving
    // but the first tile in queue has no such
    // anchor point to compare to, so it needs
    // to be retrieved and moved on its own.
    if (!queue.isEmpty()) {
      boolean lastTileDone = false;
      int sizeQueue = queue.size();
      Tile curTile = queue.remove();
      if (dir == "RIGHT") {
        moveTileRight(curTile);
      } else if (dir == "LEFT") {
        moveTileLeft(curTile);
      } else if (dir == "UP") {
        moveTileUp(curTile);
      } else if (dir == "DOWN") {
        moveTileDown(curTile);
      }
      if (curTile.doneMoving) {
        lastTileDone = true;
      }
      // Then for each remaining tiles,
      // retrieve and move them
      for (int i=0; i<sizeQueue-1; i++) {
        if (lastTileDone == true) {
          curTile = queue.remove();
          if (dir == "RIGHT") {
            moveTileRight(curTile);
          } else if (dir == "LEFT") {
            moveTileLeft(curTile);
          } else if (dir == "UP") {
            moveTileUp(curTile);
          } else if (dir == "DOWN") {
            moveTileDown(curTile);
          }
          if (!curTile.doneMoving) {
            lastTileDone = false;
          }
        }
      }
    }
  }

  /**
   * Move all tiles on board to the right
   * After all have finished moving
   * lock all keyHandler values, i.e.
   * no direction is currently chosen
   */
  void moveGameRight() {
    enqueueTilesFromRight(queue0, 0);
    enqueueTilesFromRight(queue1, 1);
    enqueueTilesFromRight(queue2, 2);
    enqueueTilesFromRight(queue3, 3);
    moveTilesFromQueue(queue0, "RIGHT");
    moveTilesFromQueue(queue1, "RIGHT");
    moveTilesFromQueue(queue2, "RIGHT");
    moveTilesFromQueue(queue3, "RIGHT");
    lockMovement();
  }

  /**
   * Move all tiles on board to the left
   */
  void moveGameLeft() {
    enqueueTilesFromLeft(queue0, 0);
    enqueueTilesFromLeft(queue1, 1);
    enqueueTilesFromLeft(queue2, 2);
    enqueueTilesFromLeft(queue3, 3);
    moveTilesFromQueue(queue0, "LEFT");
    moveTilesFromQueue(queue1, "LEFT");
    moveTilesFromQueue(queue2, "LEFT");
    moveTilesFromQueue(queue3, "LEFT");
    lockMovement();
  }

  /**
   * Move all tiles on board up
   */
  void moveGameUp() {
    enqueueTilesFromTop(queue0, 0);
    enqueueTilesFromTop(queue1, 1);
    enqueueTilesFromTop(queue2, 2);
    enqueueTilesFromTop(queue3, 3);
    moveTilesFromQueue(queue0, "UP");
    moveTilesFromQueue(queue1, "UP");
    moveTilesFromQueue(queue2, "UP");
    moveTilesFromQueue(queue3, "UP");
    lockMovement();
  }

  /**
   * Move all tiles on board down
   */
  void moveGameDown() {
    enqueueTilesFromBottom(queue0, 0);
    enqueueTilesFromBottom(queue1, 1);
    enqueueTilesFromBottom(queue2, 2);
    enqueueTilesFromBottom(queue3, 3);
    moveTilesFromQueue(queue0, "DOWN");
    moveTilesFromQueue(queue1, "DOWN");
    moveTilesFromQueue(queue2, "DOWN");
    moveTilesFromQueue(queue3, "DOWN");
    lockMovement();
  }

  /**
   * Check if all the tiles have done moving
   * @return false if any tile is not done
   */
  boolean allDoneMoving() {
    for (int i=0; i<numTiles; i++) {
      if (grid.checkIfOccupied(i)) {
        Tile curTile = grid.peek(i);
        if (!curTile.doneMoving) {
          return false;
        }
      }
    }
    return true;
  }

  /**
   * Set all keyHandler values to false
   * aka no (new) direction has been chosen.
   */
  void lockMovement() {
    if (allDoneMoving()) {
      keyHandler.put(RIGHT, false);
      keyHandler.put(LEFT, false);
      keyHandler.put(UP, false);
      keyHandler.put(DOWN, false);
    }
  }

  /**
   * Randomize a new tile of value 2
   */
  void randTile() {
    // Randomize a new coordinate
    // until an empty cell is found.
    int randRow = floor(random(4));
    int randCol = floor(random(4));
    while (grid.checkIfOccupied(randRow, randCol)) {
      randRow = floor(random(4));
      randCol = floor(random(4));
    }
    Tile tile = new Tile(2, randRow, randCol);
    grid.occupy(tile);
    grid.addCount(tile);
    grid.enqueue(tile);
  }

  /**
   * Add a new tile with specified value and coordinate
   * @param val value to be set to tile
   *        row, col coordinate of tile
   */
  void specificTile(int val, int row, int col) {
    Tile tile = new Tile(val, row, col);
    grid.occupy(tile);
    grid.addCount(tile);
    grid.enqueue(tile);
  }

  /**
   * Move a tile to the rightmost valid destination
   * @param tile tile to be moved
   */
  void moveTileRight(Tile tile) {
    tile.resetMovement();
    grid.vacant(tile);
    grid.minusCount(tile);
    grid.dequeue(tile);
    tile.moving = true;
    int dest = tile.colPos;
    if (tile.moving && !tile.doneMoving) {
      dest = getRightDest(tile);
    }
    tile.moveTileH(dest);
    grid.occupy(tile);
    grid.addCount(tile);
    grid.enqueue(tile);
  }

  /**
   * Move a tile to the leftmost valid destination
   * @param tile tile to be moved
   */
  void moveTileLeft(Tile tile) {
    tile.resetMovement();
    grid.vacant(tile);
    grid.minusCount(tile);
    grid.dequeue(tile);
    tile.moving = true;
    int dest = tile.colPos;
    if (tile.moving && !tile.doneMoving) {
      dest = getLeftDest(tile);
    }
    tile.moveTileH(dest);
    grid.occupy(tile);
    grid.addCount(tile);
    grid.enqueue(tile);
  }

  /**
   * Move a tile to the top valid destination
   * @param tile tile to be moved
   */
  void moveTileUp(Tile tile) {
    tile.resetMovement();
    grid.vacant(tile);
    grid.minusCount(tile);
    grid.dequeue(tile);
    tile.moving = true;
    int dest = tile.rowPos;
    if (tile.moving && !tile.doneMoving) {
      dest = getTopDest(tile);
    }
    tile.moveTileV(dest);
    grid.occupy(tile);
    grid.addCount(tile);
    grid.enqueue(tile);
  }

  /**
   * Move a tile to the bottom valid destination
   * @param tile tile to be moved
   */
  void moveTileDown(Tile tile) {
    tile.resetMovement();
    grid.vacant(tile);
    grid.minusCount(tile);
    grid.dequeue(tile);
    tile.moving = true;
    int dest = tile.rowPos;
    if (tile.moving && !tile.doneMoving) {
      dest = getBottomDest(tile);
    }
    tile.moveTileV(dest);
    grid.occupy(tile);
    grid.addCount(tile);
    grid.enqueue(tile);
  }

  /**
   * Return coordinate of the rightmost valid destination for a tile
   * @param tile tile to consider
   * @return col column coordinate of destination cell
   */
  int getRightDest(Tile tile) {
    if (tile.isAtRightEdge()) {
      // If current cell is already at right edge, don't move it
      // aka destination = itself
      //println("Tile at ["+str(tile.rowPos)+", "+str(tile.colPos)+"] is at right edge.");
      return tile.colPos;
    } else {
      // If it is not at edge, consider the tile to the right
      //println("Tile at ["+str(tile.rowPos)+", "+str(tile.colPos)+"] is NOT at right edge.");
      int curCol = tile.colPos + 1;
      while (curCol <= 3) {
        // Keep checking further (within board) until an invalid destination
        //println("Checking tile at ["+str(tile.rowPos)+", "+str(curCol)+"]");
        if (grid.checkIfOccupied(tile.rowPos, curCol)) {
          // If the current cell has another tile, check if two tiles have the same value
          // If they do they can be in the same cell (collision & merging happens)
          // If they don't then move back to the last valid destination
          //println("Tile at ["+str(tile.rowPos)+", "+str(curCol)+"] is occupied.");
          int rightTileID = gridNum*tile.rowPos + curCol;
          //Tile rightTile = tiles[rightTileID];
          Tile rightTile = grid.peek(rightTileID);
          if (tile.sameValue(rightTile)) {
            //println("Tile at ["+str(rightTile.rowPos)+", "+str(rightTile.colPos)+"] has the same value.");
            tile.overlap = true;
            return curCol; // ADDED -1 FOR TESTING
          } else {
            //println("Tile at ["+str(rightTile.rowPos)+", "+str(rightTile.colPos)+"] has different value.");
            return curCol-1;
          }
        } else {
          // If the current cell is free, check further
          //println("Tile at ["+str(tile.rowPos)+", "+str(curCol)+"] is NOT occupied.");
          curCol += 1;
        }
      }
      return curCol-1;
    }
  }

  int getLeftDest(Tile tile) {
    // See getRightDest(), same logic
    if (tile.isAtLeftEdge()) {
      //println("Tile at ["+str(tile.rowPos)+", "+str(tile.colPos)+"] is at left edge.");
      return tile.colPos;
    } else {
      //println("Tile at ["+str(tile.rowPos)+", "+str(tile.colPos)+"] is NOT at left edge.");
      int curCol = tile.colPos - 1;
      while (curCol >= 0) {
        //println("Checking tile at ["+str(tile.rowPos)+", "+str(curCol)+"]");
        if (grid.checkIfOccupied(tile.rowPos, curCol)) {
          //println("Tile at ["+str(tile.rowPos)+", "+str(curCol)+"] is occupied.");
          int leftTileID = gridNum*tile.rowPos + curCol;
          //Tile leftTile = tiles[leftTileID];
          Tile leftTile = grid.peek(leftTileID);
          if (tile.sameValue(leftTile)) {
            //println("Tile at ["+str(leftTile.rowPos)+", "+str(leftTile.colPos)+"] has the same value.");
            return curCol; // ADDED +1 FOR TESTING
          } else {
            //println("Tile at ["+str(leftTile.rowPos)+", "+str(leftTile.colPos)+"] has different value.");
            return curCol+1;
          }
        } else {
          //println("Tile at ["+str(tile.rowPos)+", "+str(curCol)+"] is NOT occupied.");
          curCol -= 1;
        }
      }
      return curCol+1;
    }
  }

  int getTopDest(Tile tile) {
    // See getRightDest(), same logic
    if (tile.isAtTopEdge()) {
      //println("Tile at ["+str(tile.rowPos)+", "+str(tile.colPos)+"] is at top edge.");
      return tile.rowPos;
    } else {
      //println("Tile at ["+str(tile.rowPos)+", "+str(tile.colPos)+"] is NOT at top edge.");
      int curRow = tile.rowPos - 1;
      while (curRow >= 0) {
        //println("Checking tile at ["+str(tile.rowPos)+", "+str(curCol)+"]");
        if (grid.checkIfOccupied(curRow, tile.colPos)) {
          //println("Tile at ["+str(curRow)+", "+str(tile.colPos)+"] is occupied.");
          int topTileID = gridNum*curRow + tile.colPos;
          //Tile topTile = tiles[topTileID];
          Tile topTile = grid.peek(topTileID);
          if (tile.sameValue(topTile)) {
            //println("Tile at ["+str(topTile.rowPos)+", "+str(topTile.colPos)+"] has the same value.");
            return curRow; // ADDED +1 FOR TESTING
          } else {
            //println("Tile at ["+str(topTile.rowPos)+", "+str(topTile.colPos)+"] has different value.");
            return curRow+1;
          }
        } else {
          //println("Tile at ["+str(curRow)+", "+str(tile.colPos)+"] is NOT occupied.");
          curRow -= 1;
        }
      }
      return curRow+1;
    }
  }

  int getBottomDest(Tile tile) {
    // See getRightDest(), same logic
    //println("Moving tile at ["+str(tile.rowPos)+", "+str(tile.colPos)+"]");
    if (tile.isAtBottomEdge()) {
      //println("Tile at ["+str(tile.rowPos)+", "+str(tile.colPos)+"] is at bottom edge.");
      //println("return"+str(tile.rowPos));
      return tile.rowPos;
    } else {
      //println("Tile at ["+str(tile.rowPos)+", "+str(tile.colPos)+"] is NOT at bottom edge.");
      int curRow = tile.rowPos + 1;
      while (curRow <= 3) {
        //println("Checking tile at ["+str(curRow)+", "+str(tile.colPos)+"]");
        if (grid.checkIfOccupied(curRow, tile.colPos)) {
          //println("Tile at ["+str(curRow)+", "+str(tile.colPos)+"] is occupied.");
          int bottomTileID = gridNum*curRow + tile.colPos;
          //Tile bottomTile = tiles[bottomTileID];
          Tile bottomTile = grid.peek(bottomTileID);
          if (tile.sameValue(bottomTile)) {
            //println("Tile at ["+str(bottomTile.rowPos)+", "+str(bottomTile.colPos)+"] has the same value.");
            //println("return"+str(curRow));
            return curRow; // ADDED -1 FOR TESTING
          } else {
            //println("Tile at ["+str(bottomTile.rowPos)+", "+str(bottomTile.colPos)+"] has different value.");
            //println("return"+str(curRow-1));
            return curRow-1;
          }
        } else {
          //println("Tile at ["+str(curRow)+", "+str(tile.colPos)+"] is NOT occupied.");
          curRow += 1;
        }
      }
      //println("return"+str(curRow-1));
      return curRow-1;
    }
  }
}
The assignment for week 2 involves using for() and/or while() loops to create a work of art. I looked through the sources of computer arts and they are very fascinating. I particularly like this following art and decided to try and recreate it with Processing.
My workflow for this piece is as following:
Create the basic construction of grid-like squares (which makes good use of loops)
Add interaction by randomizing the movement of the squares according to mouse movement
Extra: experiment with colors
My final product is the following and the code can be found at the end of this post:
Basic construction
The grid-like foundation of the art is pretty straightforward and problem-free. I use two nested for() loops to draw the rectangles.
Interactive movement
To create the randomized movements of the squares, I make extensive use of the random() function.
Randomizing the shifting of the squares (moving slightly in the horizontal and vertical direction) is also straightforward, but I ran into an issue when trying to slightly rotate the squares. The rotate() function is usually used in tandem with translate() because the shape will be rotated relative to the origin. The problem is that translate() only gets reset after each loop of draw(), so when I want to rotate all of the squares within a single draw() loop, the positions of the squares are mixed up because they get translated further and further from the initial origin.
I found that a good solution to this issue is to use the pair of functions pushMatrix() and popMatrix(). Using these two functions to enclose translate() and rotate() ensures that the coordinate system is restored to its original state before the next square is drawn, making sure all the squares are correctly positioned and rotated.
I also want to have some user interaction with the art so that as the user moves the mouse around the canvas, the closest squares to the mouse will have greatest movements. For this, I use the dist() function to calculate how far a square is from the current mouse position and give each square a distFactor based on the calculated distance. This distFactor will then be used to calculate rotatingFactor and movingFactors to decide the movements of the squares. With this, the piece of art is finished.
Extra: Coloring
I add an extra function to the code so that when the user clicks on the canvas, coloring mode will be on and instead of black border with no fill, the squares will have no border and random colors. The coloring mode part has nothing to do with recreating the original art; I just want to experiment around with random() and colors.