Week 14 – Final Project Documentation

ORIGINAL CONCEPT

Our original idea was to create a set of friendship touch-lamps, where two lamps would be able to “communicate” with each other with the tap of a finger. Using p5 as our “remote controller”, each party would be able to choose the settings of the light they would like to send, ie. the color and the light patten. We wanted to include wireless communication in our project to stick with the vision that any two users, regardless of time, location, and proximity, would be able to communicate with that special someone through something that was visually compelling, and that the simple act of  sending lights to one another might foster some other type of communication.

IMPLEMENTATION

We believe that we stuck relatively closely to our original proposal, except that due to time and challenges with serial communication, we were not able to achieve this dual communication between two Arduino devices. Hence, although we were not able to achieve interaction from user to user, we were able to achieve interaction between user, lamp, and computer.

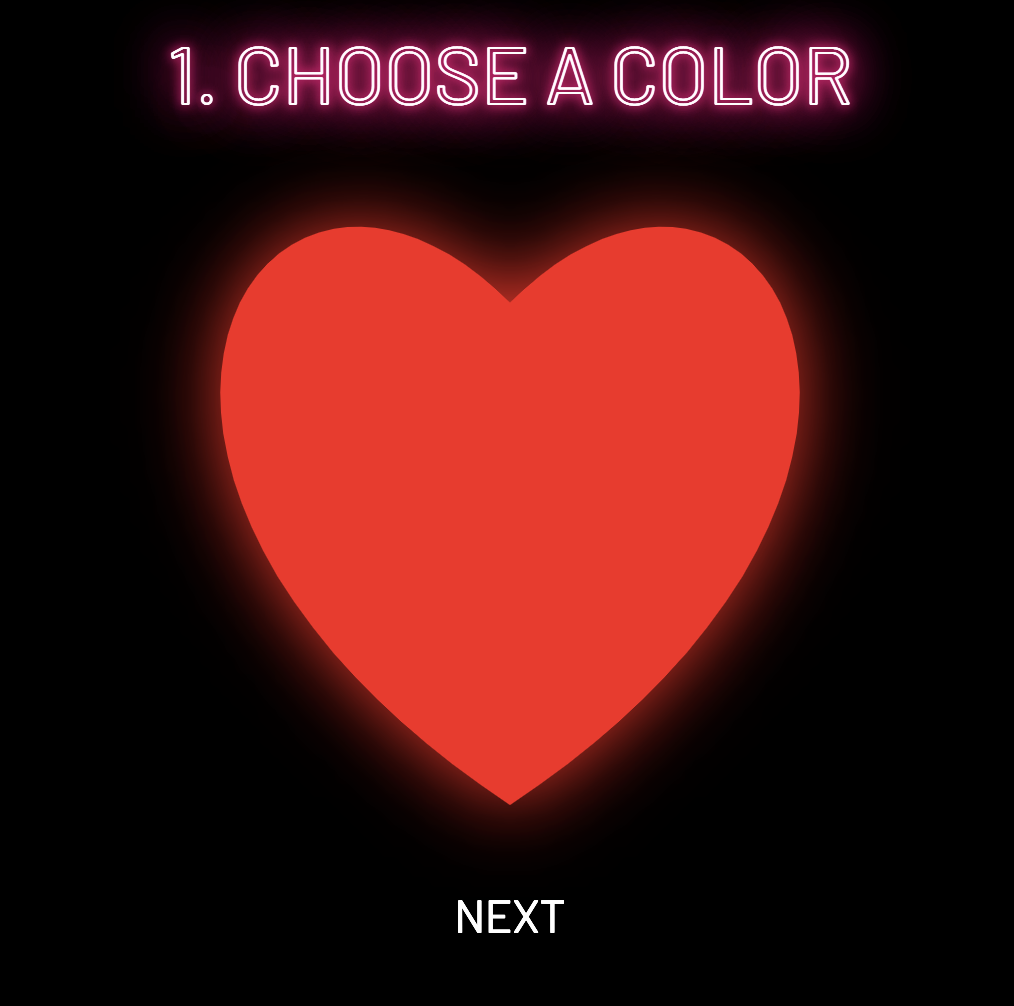
The conversation begins with the user interacting with p5. As mentioned above, our p5.js sketch acts as the “controller” of the lamp, providing animations and small game elements that make the programming more interesting. For example, in the second scene of the sketch, the user sees a heart flashing different colors in the center of the screen and is instructed to press the keyboard when the heart flickers to a color of their liking:

Additionally, in the following screen, the sketch displays 3 different light modes to choose from: flicker, wave, and pulse. above those 3 buttons is a corresponding icon that animates that is made to mimic the specific light mode:

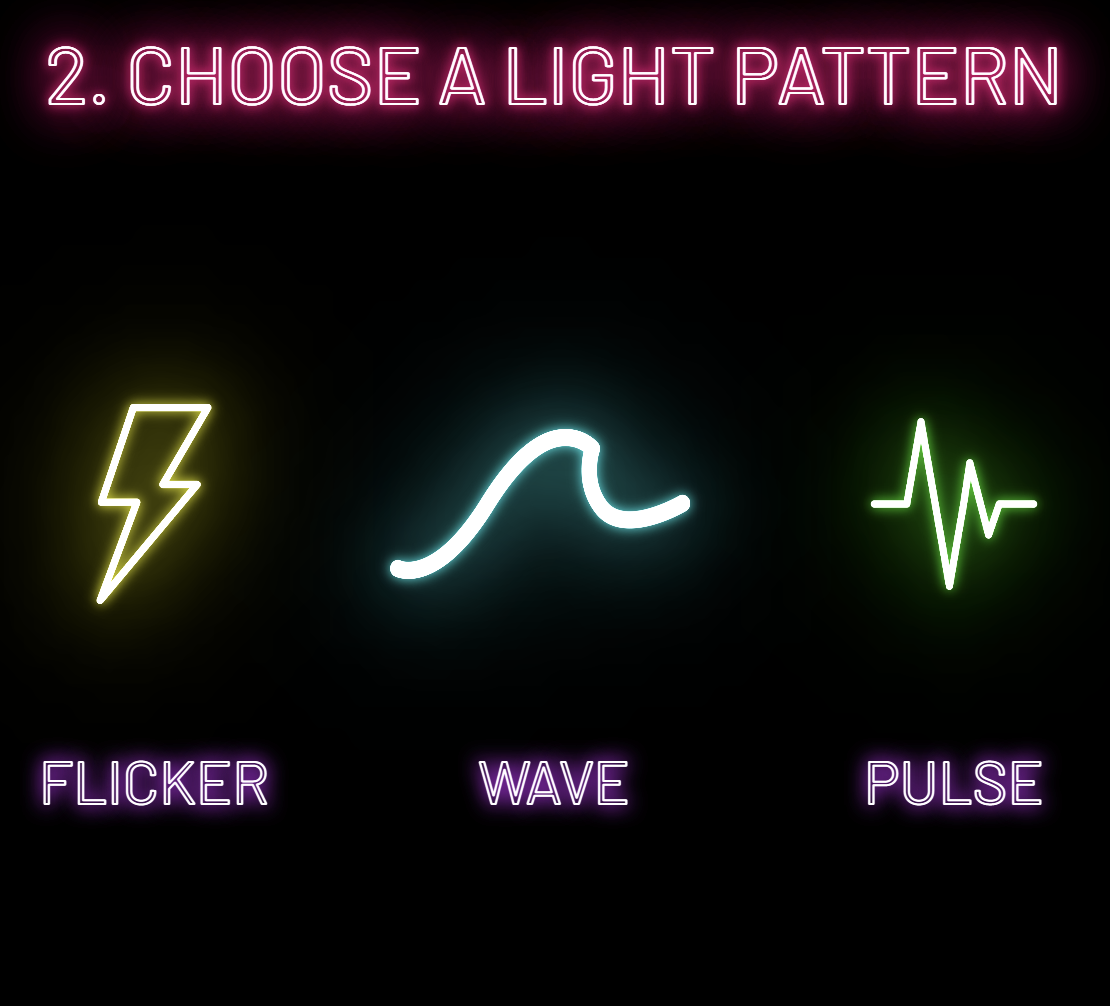
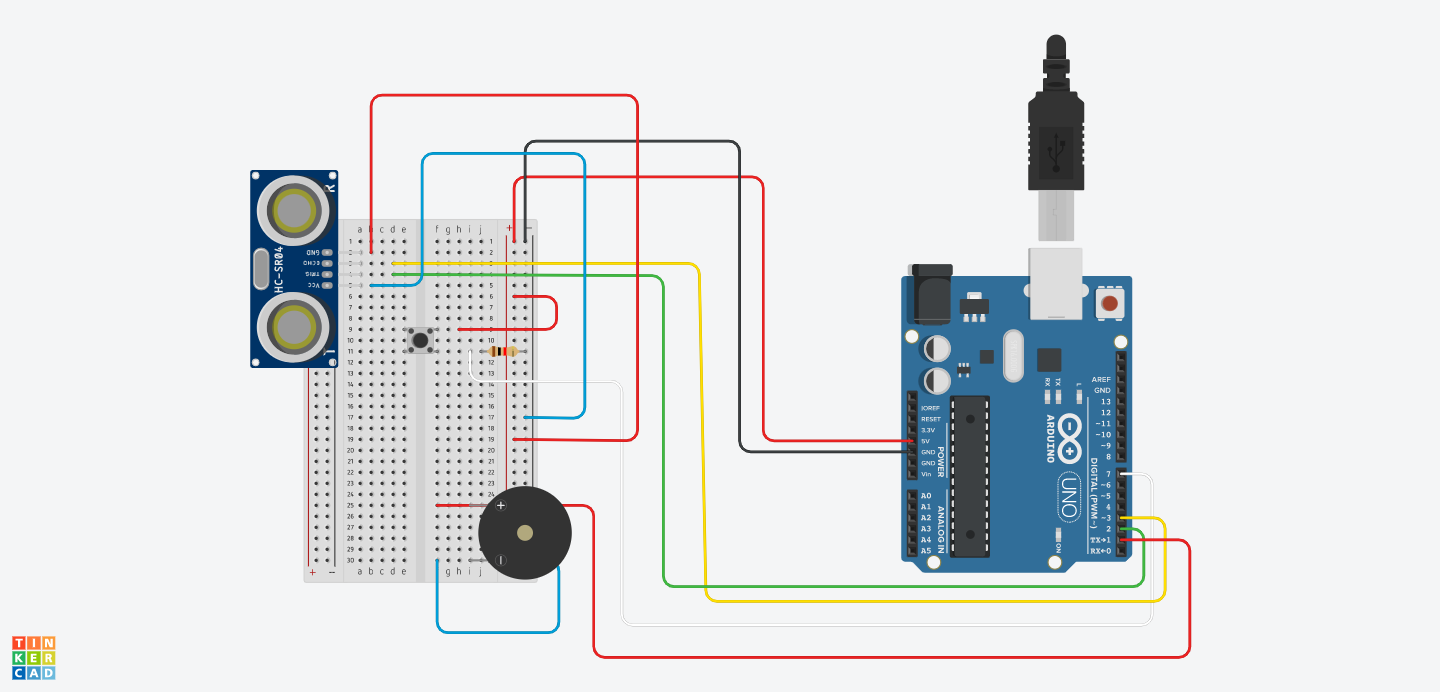
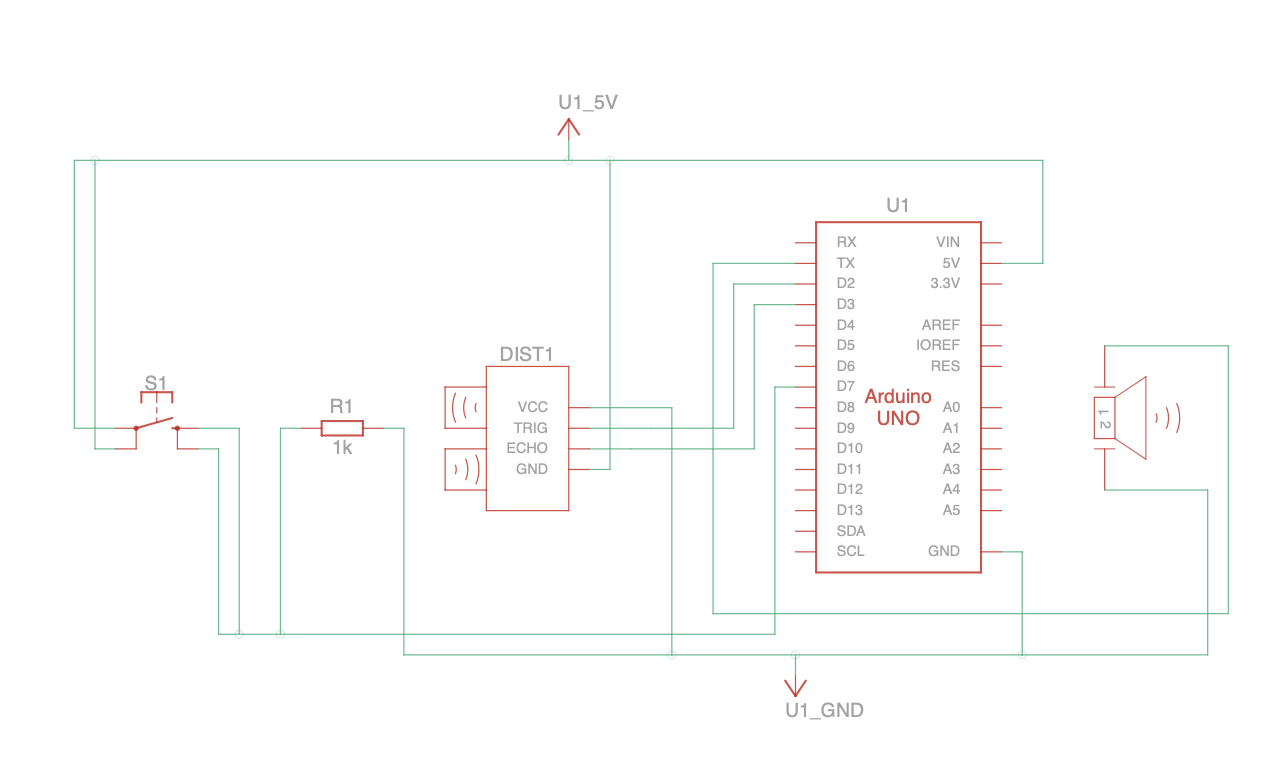
Throughout the p5 program, data about the user’s choices are held in three important variables: picker.color, lightMode, and inData. picker.color is an instance variable of the colorPicker class, which was coded to build the flashing heart described above. It is initially set to a null value and is set once the user presses any key to choose their color. Similarly, lightMode is a variable made to hold an integer of 0, 1, or 2 which correspond to flicker, wave, and pulse respectfully. Initially set to a null value, it becomes set when the user presses the flicker, wave, or pulse button in the screen described above. We chose to have lightMode hold an integer, though it is more confusing the the reader, makes it easier to send it as serial data. The inData variable contains the data sent from Arduino through the serial.read() function, and sends a 0 or 1, depending on whether the touch sensor on the lamp has been touched or not touched. This code from Arduino is shown below:

touched = digitalRead(TOUCH_SENSOR); 
  if ((touched == 1) && (sensorState == LOW)) { 
    sensorState = HIGH;
    Serial.write(sensorState); 
  } 

  if ((touched == 0) && (sensorState == HIGH)) { 
    sensorState = LOW;
}

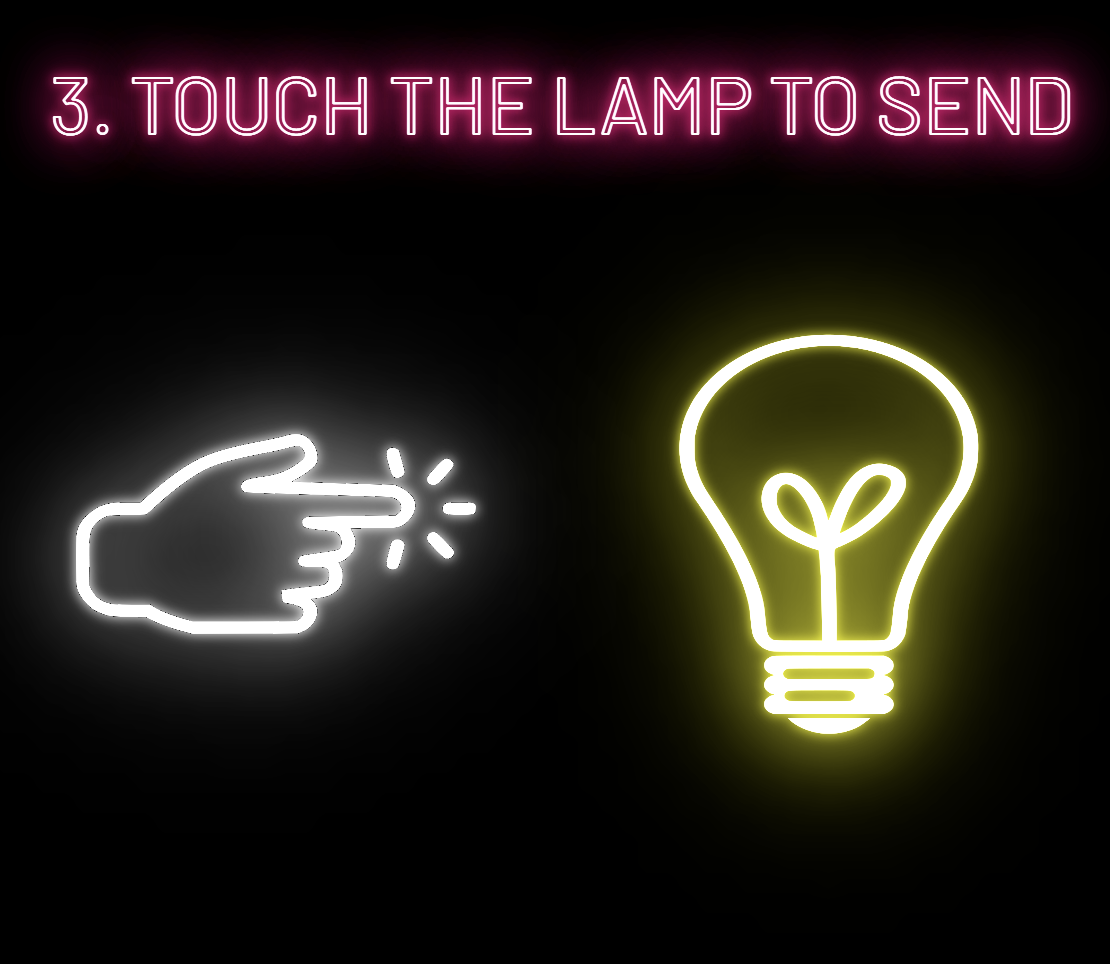
Finally, the conversation shifts between user-computer to user-lamp in the last screen of the p5 program (shown below), where it asks the user to touch the lamp in order to let p5.js know that it is “ready” to send the data to Arduino — “ready” meaning that inData is 1, the lightMode has been set, and picker.color has been set. The code that sends the serial data is also shown below:
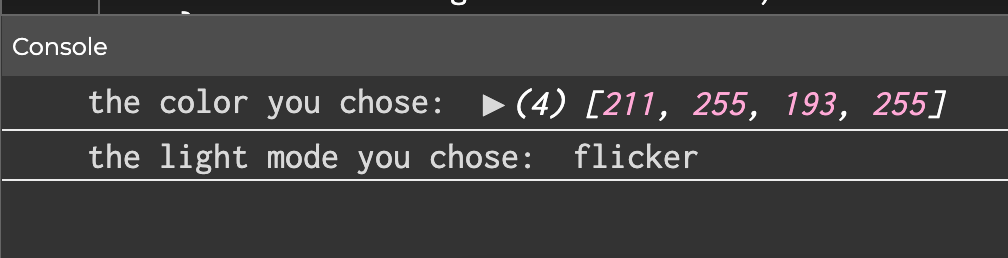
if (inData == 1) { 
  // console.log('the color you chose:', colorValue); 
  // console.log('the light mode you chose:', lightMode);
  console.log(inData); 
  let r = red(picker.color); 
  let g = green(picker.color); 
  let b = blue(picker.color);
  
  
  let sendToArduino = r + "," + g + "," + b + "," + lightMode + "\n";
  serial.write(sendToArduino);

Once the data is sent, the “control” of the entire system is handed over to our Arduino code, which is the code that actually displays the lights, completing the final part of the user-lamp conversation. First, after reading the data from p5, it parses the data and organizes it into variables that hold the red, green, and blue color values, as well as the light mode, similar to how it is organized in p5:

while(Serial.available()){
  sensorState = LOW; 
  R = Serial.parseInt();
  G = Serial.parseInt();
  B = Serial.parseInt();
  //lightMode = Serial.read();
  lightMode = Serial.parseInt();

  if(Serial.read() == '\n'){
    Serial.write(0);
  }
}

Then, it uses those variables to create the different light modes (described in more detail in the previous posts):

  if (lightMode == 2){
  // WAVY
  //turn pixels to green one by one with delay between each pixel
  for (int pixel = 0; pixel < NUM_PIXELS; pixel++) { // for each pixel
    NeoPixel.setPixelColor(pixel, NeoPixel.Color(R, G, B)); // it only takes effect if pixels.show() is called
  
    NeoPixel.show();   // send the updated pixel colors to the NeoPixel hardware.
    NeoPixel.clear();
    
    delay(100); // pause between each pixel
  }

  // turn off all pixels for two seconds
  NeoPixel.clear();
  NeoPixel.show(); // send the updated pixel colors to the NeoPixel hardware.
  delay(10);     // off time
}

if (lightMode == 1) { 
// FLICKERING:
  //turn on all pixels to red at the same time for two seconds
  for (int pixel = 0; pixel < NUM_PIXELS; pixel++) { // for each pixel
    NeoPixel.setPixelColor(pixel, NeoPixel.Color(R, G, B)); // it only takes effect if pixels.show() is called
  }
  NeoPixel.show(); // send the updated pixel colors to the NeoPixel hardware.th
  delay(1000);     // on time

  // turn off all pixels for two secondse
  NeoPixel.clear();
  NeoPixel.show(); // send the updated pixel colors to the NeoPixel hardware.
  delay(500);     // off time
}

if (lightMode == 3){
  //PULSING   
  uint16_t j;

  for (j = 0; j < 255; j++) {
    for (int pixel= 0; pixel < NUM_PIXELS; pixel++) {
      NeoPixel.setPixelColor(pixel, R, G, B);
      NeoPixel.setBrightness(j); 
    }
    NeoPixel.show();
    delay(20);
  }

  for (j = 255; j > 0; j--) {
    for (int pixel = 0; pixel < NUM_PIXELS; pixel++) {
      NeoPixel.setPixelColor(pixel, R, G, B);
      NeoPixel.setBrightness(j); 
      }
    NeoPixel.show();
    delay(20);
    Serial.println(j);
    }
  delay(100);
  //make sure to set all pixels back to full brightness for the other modes 
   for (int pixel = 0; pixel < NUM_PIXELS; pixel++) { 
    NeoPixel.setBrightness(255); 
  }
}

Note that once the lights are displayed, the data being written out to p5 is that the lamp is not-touched and is ready for the next round of data to be collected from p5. The user has the option to stop there, or can repeat the “cycle” as many times they wish by clicking the “send another” button in p5.

WHAT WE’RE PROUD OF

Something we like about our system that we think enhances the experience is the attention to detail and aesthetic of the p5 sketch. We chose the name “Distance makes the Heart and Glow Fonder” because it is not only a cute play on words, but also keeps with our neon theme. We also wanted all of our text and images to have flickering effect and a glowing effect (reference:  https://www.youtube.com/watch?v=iIWH3IUYHzM) to mimic real life neon signs and lights. Also, we felt that adding animations to the screen that shows the light modes not only made it more visually compelling but more intuitive for the user, given that the instructions of the program are minimal.

Though none of us have much experience with building, we wanted to push ourselves beyond the Arduino board we were given and try our best to make a lamp that didn’t look so obviously “Arduino”. Overall we are very happy with how it turned out, considering the time and resources we had. Everything we used to build it was made out of scrap materials found in the lab, and each part of the lamp is detachable by velcro, making it extremely easy to access the wiring and adjust things if needed.

FUTURE IMPROVEMENTS

In terms of the physical lamp, it would be nice to completely cover the wiring at the bottom with more acrylic panels. Perhaps remaking it using a different glue will also help get rid of the fogging happening on the current model.

In terms of our code, we would like to carry out our initial vision and create two lamps that can communicate with each other, and perhaps even have them communicate wirelessly.

DEMO

Below are some demo videos of our project:

Contribution to the project:

– I spent time working on the serial communication used to transmit messages from p5js to the Arduino.

– I spent time working on the Arduino code in implementing the various modes of light of the lamp.

– Worked together in constructing the lamp

– Worked together to document and compile the blog posts

– Worked together on bugs and last minute challenges

Week 13 – Final Project Progress (Phoebe & Fuad)

CONCEPT

As of this week, we had some tweaks to the concept of our whole idea. The idea will now center on connecting two people and two lamps to a single computer. This week has been filled with a range of challenges that have put our knowledge of Arduino and p5js to the test. Integrating a touch sensor to send data from Arduino to p5js and collecting and transmitting several bytes of information from p5js to Arduino are some examples of the operations that fall under this category. Among the concept adjustments we made was to use regular wire serial communication between Arduino and p5js rather than relying on the use of a bluetooth module, which would have made the project more interesting.

PROGRESS 

At the moment we are struggling with successfully sending RGB values from p5js to Arduino and eventually displaying them on the LED strip. As of now, when we transmit specified color values from p5js to Arduino, they are displayed on the LED strip as intended. However, only the color white is projected on the LED strip when we send any other RGB values. We started by doing a number of comprehensive tests to rule out the possibility that the issue could be with the serial transmission. The only remaining hypotheses for the bugs that we are still investigating are if the problem could be caused by using the jpg color wheel to determine color values or whether there are more mechanisms involving how Arduino interacts with LED strips that we need to comprehend. The below is a compilation of test-related videos:

SOLUTION

After several hours of debugging, we found that using an image to pick the color just wasn’t working.  We determined our hypothesis to be correct – that the issue was the values being sent by p5.js.

The mouse position was taking pixels from the original image and it was not being remapped to the resized and re positioned image we had in our code, even after applying the map function and several iterations of repositioning/resizing the image. We believe that the example used ( link ) to create the color picker worked because the image IS the canvas, which is not the case for ours.

We decided on a new way for the user to select the color, which would be by having an object that flashes a different color every few seconds where the user can then press a key to “freeze” the object on the selected color. In our updated sketch, all possible colors have been predetermined by us, though the process of choosing the color is more engaging now.

After making this change, the values sent to Arduino were actually representative of the color that was chosen when pressing a key, and the color that is displayed on the LED’s is now accurate. However, this did not solve the issue of the lights not looping.


Week 12 – Final Project Proposal (Phoebe & Fuad)

CONCEPT

In our last post we had come up with a game for our final project. After some further brainstorming, we thought it would be fun to try something other than a game, considering that this is what we did for our midterms. We thought about making an interactive system that could be experienced by multiple people at the same time. Our idea for the project is now to create a touchable “friendship lamp.” The basic idea is that we will build two lamps using two Arduino boards and LED strips. Each light will be equipped with different settings that can change the light pattern and color. These settings will be able to be manipulated within a program on p5.js, accessed on separate computers by the two users. After one user chooses the settings of their light, they then touch their lamp to send that light to the other user’s lamp. Communication between the two users can be simultaneous and there is no limit to the amount of times they can send each other messages. 

THE ROLE OF P5.js 

The sketch on p5.js will be a simple program with a few screens that allows the user to control the light they will send. They will be able to choose any color from a color wheel, and they will be able to choose from 3 different light modes: flicker, wave, and pulse. The choices made by the user will be stored by the program, and p5 will then send this data to the board of the other person’s lamp. However, data is not sent until some feedback is received from Arduino, explained in detail in the following section. 

THE ROLE OF ARDUINO 

A touch sensor and an LED strip would both be included in the Arduino circuit. When touched, the touch sensor transmits a signal to p5js, enabling p5js to transfer data to the Arduino board. Since p5js will be sending data about the color and pattern that the LED strip should light up in, the Arduino board receives this data and turns the light on as requested by the user.

HOW THEY COMMUNICATE 

As for the method of communication (serial mode) between the Arduino and p5js, we are still employing wires to transfer data back and forth at the time. However, because the two lamps and users in our original concept must be distanced from one another, we are exploring and, ideally, planning to include Bluetooth modules or, perhaps, an esp32 on our board to help with wireless communication between the two platforms.

PROGRESS 

We knew that we weren’t going to be able to have cross communication between two users without wireless Arduino boards, and that we would not be able to implement the touching aspect without an actual tactile sensor. Hence, our plan for this week was to finalize our idea and begin assembling the different components of the system separately. The p5 program is almost complete, with an exception to the code that will send the data to the wireless Arduino board. The sketch is shown below:

At the end of the program, the console prints out the data that would theoretically be sent to Arduino. Including the color value and the light mode. Also, because we do not have the tactile sensor yet, the light is “sent” figuratively by just pressing any key in the third step. 

For the Arduino component, we built our strips of 10 LED’s for each lamp and connected them to a board and focused on simply creating three different light modes that could be controlled within the Arduino code, separate from p5. The code that demonstrates how the various light modes are used to enable a flicker, wavy, or fading effect on the LED strip is provided below:

void loop() {
  NeoPixel.clear(); // set all pixel colors to 'off'. It only takes effect if pixels.show() is called
  NeoPixel.show();


  // WAVY
  //turn pixels to green one by one with delay between each pixel
  for (int pixel = 0; pixel < NUM_PIXELS; pixel++) { // for each pixel
    NeoPixel.setPixelColor(pixel, NeoPixel.Color(0, 255, 0)); // it only takes effect if pixels.show() is called
    // if(pixel > 0)
    // {
    //   NeoPixel.show();   // send the updated pixel colors to the NeoPixel hardware.
    //   NeoPixel.clear();
    // }
    NeoPixel.show();   // send the updated pixel colors to the NeoPixel hardware.
    NeoPixel.clear();
    
    delay(100); // pause between each pixel
  }

  // turn off all pixels for two seconds
  NeoPixel.clear();
  NeoPixel.show(); // send the updated pixel colors to the NeoPixel hardware.
  delay(2000);     // off time


  // FLICKERING:
  //turn on all pixels to red at the same time for two seconds
  for (int pixel = 0; pixel < NUM_PIXELS; pixel++) { // for each pixel
    NeoPixel.setPixelColor(pixel, NeoPixel.Color(255, 0, 0)); // it only takes effect if pixels.show() is called
  }
  NeoPixel.show(); // send the updated pixel colors to the NeoPixel hardware.
  delay(500);     // on time

  // turn off all pixels for two seconds
  NeoPixel.clear();
  NeoPixel.show(); // send the updated pixel colors to the NeoPixel hardware.
  delay(500);     // off time

  //PULSING
  brighten();
  darken();
}


// 0 to 255
void brighten() {
  uint16_t i, j;

  for (j = 0; j < 255; j++) {
    for (i = 0; i < NeoPixel.numPixels(); i++) {
      NeoPixel.setPixelColor(i, 0, 0, j);
    }
    NeoPixel.show();
    delay(10);
  }
  //delay(100);
}

// 255 to 0
void darken() {
  Serial.begin(9600);
  uint16_t i, j;

  for (j = 255; j > 0; j--) {
    for (i = 0; i < NeoPixel.numPixels(); i++) {
      NeoPixel.setPixelColor(i, 0, 0, j);
    }
    NeoPixel.show();
    delay(10);
    Serial.println(j);
  }
  delay(100);
}

Finally, a demo of the different modes is displayed below:

Final Project Proposal

By: Fuad & Phoebe

INSPIRATION

For our final project, we were interested in making another game, but instead of a more action-based game, one that was a subtle, calming, yet visually pleasing game. We discussed the mobile game I Love Hue, which is a puzzle type game that tasks the player with organizing a grid of tiles of different colors into a gradient. We also discussed the meaning of good interaction design and how to create a system whose parts were meaningful, intentional, and effective.  Something that was simple, with few “gadgets,” and minimalistic but visually pleasing animations were two things we wanted to incorporate. As such, we came up with a “color matching” game.

CONCEPT

Our color matching game consists of a series of “levels”, where each level displays a two squares side by, one square being the “target” color, and the other being the “test” square that the player must manipulate to match the target color. The player will be able to manipulate the color of the square by turning potentiometers on the Arduino board, each that correspond with the red, green, and blue values of the target color. The player will have a set amount of time to adjust the color of the test square and is scored based on how close the match is to the target color.

What Arduino will do 

As mentioned above, Arduino will provide the means for manipulating the color onscreen. Each potentiometer will be mapped to a value of 0 to 255, corresponding to RGB values. Other than perhaps clicking a key to start the game, the player shouldn’t need to use the keyboard or mouse.

What p5.js will do 

The sketch will provide almost all visuals of the game. However, we thought it would be interesting to include red, green, and blue LED’s on our board, whose brightness would change according to how close the user was to the values of the target color. Hence, the sketch would also communicate back to Arduino, adjusting the brightness of the LED’s.

Week 11: Serial Communication Exercises

Exercise 1

Extending the potentiometer example demoed in class, we created a smiley ball that bounces horizontally across the screen whose velocity was dependent on the value of the potentiometer. Inside our Arduino code, we write the value of the potentiometer as serial output to the p5.js sketch: 

void loop() {
// put your main code here, to run repeatedly:
 int potentiomenter = analogRead(A0); 
 int mappedPot = map(potentiomenter, 0, 1023, 0, 255); 
 Serial.write(mappedPot); 
delay(100);

The corresponding breadboard is shown below: 

[image]

Inside our p5.js sketch, we created our smiley ball by making a simple Circle class with an x and y position and a move() method. The move method() doesn’t change the ball’s y position, as it remains constant along the horizontal axis height/2, but it does update the x position, which is calculated using the variable inData – the value of the potentiometer read from Arduino. A snipped of the code is shown below: 

class Circle {
constructor(x, y, d) {
this.x = x;
this.y = y;
this.d = d;
}
move() {
if (this.x<=50) {x = 1;}
else if (this.x>=550) {x =-1;}


let y;


if (inData==undefined) {
y=0;
} else {
y = inData;
}


this.x+=(y/20)*x;
}

Finally, a demo of the final product is shown below: 

Exercise 2

We thought that the first exercise was rather bland in terms of visuals, so for this exercise we wanted our p5.js sketch to be more interesting. We made the connection of a sun rising and falling to the brightness of an LED, hence our sketch shows a sun against a mountain landscape that can “rise” and “fall” by pushing the up and down arrow keys. As the sun “rises”, the sky changes to a bright magenta color, and when the sun “falls”, the sky deepens to a dark blue color. We achieved this by having the sun’s y position (also built from the Circle class of Exercise 1) determined the rgb values of the background, as demonstrated in the following code: 

function draw() {
background(300-c.y, 100-c.y, 100+c.y);
c.display();
c.move();


var rightBrightness = map(c.y, height, 0, 0, 255);

outData = rightBrightness; // setup the serial output
serial.write(outData); // write to serial for Arduino to pickup

This seamless gradient effect then corresponds to the brightness of an LED on our Arduino board. 

[image]

The sun’s y position is stored as outData, which is then sent to Arduino. Inside our Arduino code, we map the incoming value to a scale of 0 to 255 and use that value to analog write the LED brightness. A snippet of this code is shown below: 

void loop() {
if (Serial.available() > 0) { // see if there's incoming serial data
incomingByte = Serial.read(); // read it
led2brightness = map(incomingByte, 0, 255, 0, 255); // map the input value to the brightness for second LED
} else { }
analogWrite(ledPin, led2brightness); // write the brightness to the led pin 2


}

Finally, a demo of the finished product is shown below:

Exercise 3 

For the final exercise, we had to use bidirectional serial communication, which basically involved controlling a p5js sketch with an Arduino and tweaking the p5js sketch to affect the arduino. On the arduino, we used a distance sensor to affect the change of wind in p5js to make the ball move. Depending on the ball’s velocity, we programmed the p5js sketch so that an LED will turn on each time the ball bounces.

if (pos.y > height-mass/2) {
    velocity.y *= -0.9;  // A little dampening when hitting the bottom
    pos.y = height-mass/2;
    bounces+=1; 
    outData = "H"; 
    serial.write(outData); 
    console.log(outData); 
  }

The corresponding breadboard is shown below: 

[image]

Every time the ball strikes the platform, which occurs with the increment of the bounce counter, the program inside the p5js sketch sends “H” signals to the arduino. The Arduino then receives the H signals and activates the LED. The duration and distance variables in our Arduino code return the sound wave travel time in microseconds and the distance is the duration divided by two, respectively. The distance is next transmitted to the p5js sketch, which receives it as “indata” in p5js. A portion of the code is displayed below: 

void loop() {
  if (Serial.available() > 0) { // see if there's incoming serial data
    incomingByte = Serial.read(); // read it
    //Serial.println(incomingByte); 
    if (incomingByte == 'H') {    // if it's a capital H (ASCII 72),
      digitalWrite(LED, HIGH); // turn on the LED
      delay(100); 
      digitalWrite(LED, LOW); 
    }
  }
  //Clears the trigPin condition
  digitalWrite(trigPin, LOW);
  delayMicroseconds(2);
  // Sets the trigPin HIGH (ACTIVE) for 10 microseconds
  digitalWrite(trigPin, HIGH);
  delayMicroseconds(10);
  digitalWrite(trigPin, LOW);
  // Reads the echoPin, returns the sound wave travel time in microseconds
  duration = pulseIn(echoPin, HIGH);
  // Calculating the distance
  distance = duration * 0.034 / 2; // Speed of sound wave divided by 2 (go and back)
  // Displays the distance on the Serial Monitor
  Serial.write(distance); 
  //delay(1); 
}

Finally, a demo of the final product is shown below: 

(The images and videos of this post were lost with one of our colleagues phone that got damaged in water and never recovered.)

Pauline, Fuad, and Phoebe


Week 10: Musical Instrument

Concept

We wanted to make a device that allows artists to simulate high-hats in drill beats according how they bob their heads. We realized that sound engineers move their body in a unique way. We used an ultrasonic sensor and novel equation to track this movement and produce a drill beat with a correlated frequency.

Code & Schematic

We used an ultrasonic sensor to obtain distance measurements, a switch to implement a function to introduce delay and slow the sound down.  Also the inspiration for the code to produce a melody was inspired by Prof. Michael Shiloh’s implementation.

We used these inputs to make a device that produces a sound continuously sampled and responds to the distance of the user from the sensor.

Here are the schematics for the circuit implementation:

#include "pitches.h"
#define echoPin 2 
#define trigPin 3 

int pushButton = 7;
const int sPin = 1;
int melody[] = {
  NOTE_C4, NOTE_G3, NOTE_G3, NOTE_A3, NOTE_G3, 0, NOTE_B3, NOTE_C4
};

int noteDurations[] = {
  4,4,5,4,5,4,5
};

unsigned long currentNoteStartedAt = 0;

int thisNote = 0;

int millisToNextNote = 0;

int currentLedState = LOW;
unsigned long currentLedStateStartedAt = 0;
long ledDelay = 100;


long duration;
int distance; 

void setup() {
  pinMode(trigPin, OUTPUT); 
  pinMode(echoPin, INPUT); 
  Serial.begin(9600); 
  
  pinMode(pushButton, INPUT);
}
void loop() {
  
  digitalWrite(trigPin, LOW);
  delayMicroseconds(2);
  digitalWrite(trigPin, HIGH);
  delayMicroseconds(10);
  digitalWrite(trigPin, LOW);
  
  duration = pulseIn(echoPin, HIGH);
 
  distance = duration * 0.034 / 2; 
    unsigned long currentMillis = millis();

  if (currentMillis - currentNoteStartedAt >= millisToNextNote) {

    int noteDuration = 1000 / noteDurations[thisNote];

    tone(3, melody[thisNote], noteDuration);
    millisToNextNote = log10(distance) * 1300;
    currentNoteStartedAt = currentMillis;
    thisNote++;

   
    if ( thisNote >= 8 ) {
      thisNote = 0;
    }
  }

  
  if (currentMillis - currentLedStateStartedAt >= ledDelay) {

   
    if (currentLedState == LOW) {
      currentLedState = HIGH;
    } else {
      currentLedState = LOW;
    }
    currentLedStateStartedAt = currentMillis;
  }

  int buttonState = digitalRead(pushButton);
  if (buttonState==true){
    Serial.println(buttonState);
    delay(100);}

}

Result / Future improvements

We wanted to implement a loudness altering function to the piezo speaker and tested the schematic on tinker cad as well, however during the implementation it did not seem to work out. Some improvements that could made are the ability to give the user more flexibility with what sounds to choose.

Week 9: Analog & digital sensors

Concept

For this assignment we were required to get information from at least one analog sensor and at least one digital sensor (switch), and use this information to control at least two LEDs, one in a digital fashion and the other in an analog fashion, in some creative way. At first I thought of doing a distance-related project using the ultrasonic sensor, but I decided to stick to my previous project on moisture detection to try and make it better. So for this assignment I incorporated a digital sensor (switch) and more LEDs for different scenarios.

Code

The coding aspect of the implementation was a bit challenging as it involved a lot of trial, observation and error.  A snippet of the code below shows how the LEDs change color based on amount of moisture detected.

void loop() {
  int low = 350, high = 100, water, pepsi;
  bool status = false;
  int sensorValue = analogRead(A0);
  if(digitalRead(7)==1)
    { digitalWrite(6, HIGH);
    if(sensorValue < 550)
     digitalWrite(5, HIGH);
    else
     digitalWrite(5, LOW);
   if(sensorValue > 550)
     digitalWrite(4, HIGH);
   else
     digitalWrite(4, LOW);}

Result / Future improvements

The original idea was to create a demo of an instrument that can measure moisture of say the area where a tree should be planted. If the there isn’t enough moisture the yellow LED turns on indicating that the area is dry. If there is optimal moisture levels for the tree to be planted then the green LED turns on. The blue LED is controlled by the digital sensor to allow electricity to pass and flow throughout the circuit. In the video below, the green towel has been moisturized with water and the orange one is the dry one. The original idea was to implement the digital switch as a toggle switch, which when clicked stays on until clicked again. However, this proved to be very complicated and couldn’t implement it in the end.

Week 8 : Hands-free Switch

Concept

For this assignment we were required to get creative with creating an unusual switch. At first I thought of using sanitizer spray in the concept of the switch, but later on I decided to stick with water.

Circuit

The circuit makes use of a moisture sensor that allows electricity to pass through depending on whether there is moisture or not, in this case water. So when the sensor is dipped inside the water, the switch goes off, and when taken out the LED turns on again.

Result


Midterm Project – Final Version (Man Vs Tree)

Concept

Phew! That was one hell of a ride for sure. For my midterm project, I have created a shooting game, with a forestry theme. The name (Man Vs Tree) is inspired by the Netflix show (Man Vs Bee) starred by the famous Mr.Bean lol. Basically the project started off as an idea of creating a whole ecosystem of different enemies to our environment and catalysts to global warming. However as challenges grew and came in different forms, I finally decided to implement the current theme, which is simple yet meaningful. Man Vs Tree is about a player, which is an apple tree, protecting its forest against loggers by attacking them with apples. As more enemies die, they spawn power-ups as ozone health. The enemy loggers shoot dynamites and axes at the tree, and once all lives are finished, the tree dies and the game is lost.

Code

The coding for the game was indeed a great hustle. A lot of time was spent in thinking about the mechanics of different aspects such as collisions, arrays, level implementation, speed optimization, and many more concepts. Even more time was spent testing the game and making sure there were as few bugs as possible and that all the logic implemented was working as it was supposed to. Below is a snippet of the game class, showing the display method of the game class.

display_game() {
    //condition for displaying actual gameplay when game has started
    if (this.gameStarted && this.gameOver == false && this.gameWon == false) {
      image(this.bg_img, 0, 0, 600, 600);
      
      this.player.display();

      //loop for displaying all enemies in enemy array
      for (let i = 0; i < this.enemies.length; i++) {
        this.enemies[i].display();
      }

      //loop for displaying all projectiles in enemyprojectiles array
      for (let i = 0; i < this.enemyProjectiles.length; i++) {
        this.enemyProjectiles[i].display();
        
        //logic for player and enemyprojectile collision detection, player then takes damage
        if (this.enemyProjectiles[i].used == false && this.enemyProjectiles[i].collision(this.player)) {
          this.player.hit(10);
        }
      }

      //loops through enemyprojectiles array and pops any projectiles which have already collided
      for (let i = 0; i < this.enemyProjectiles.length; i++) {
        if (this.enemyProjectiles[i].used == true) {
          this.enemyProjectiles.splice(i, 1);
          break;
        }
      }

      //loops through enemy array and pops any enemies with health less than zero
      for (let i = 0; i < this.enemies.length; i++) {
        if (this.enemies[i].health <= 0) {
          this.enemies.splice(i, 1);
          break;
          
          //logic for score reduction if enemy reaches beyond screen height, and pops enemy from array
        } else if (this.enemies[i].y > 650) {
          this.enemies.splice(i, 1);
          this.score -= 10;
          break;
        }
      }

      //loops through playerprojectiles array and displays them
      for (let i = 0; i < this.playerProjectiles.length; i++) {
        this.playerProjectiles[i].display();

        //detects collision btn playerprojectiles and enemies, then enemy takes damage
        for (let j = 0; j < this.enemies.length; j++) {
          //Check if the projectile collides with any enemy
          if (
            this.playerProjectiles[i].used == false &&
            this.playerProjectiles[i].collision(this.enemies[j])
          ) {
            this.enemies[j].hit(10);
          }
        }
      }

      //loops through ozone powerups array, displays them, and detects collision with player
      for (let i = 0; i < this.ozone.length; i++) {
        this.ozone[i].display();
        if (
          this.ozone[i].used == false &&
          this.ozone[i].collision(this.player)
        ) {
          this.ozone[i].give_health();
        }
      }

      //pops ozone powerup from array once collected by player 
      for (let i = 0; i < this.ozone.length; i++) {
        if (this.ozone[i].used == true) {
          this.ozone.splice(i, 1);
          break;
        }
      }

      this.show_score();

      //logic controlling time in the game
      if (frameCount % 60 == 0) {
        this.timer += 1;
      }


Reflections / Improvements

Overall , I am proud of myself and the general implementation of the code. However, of course there could further improvements that could be made such as having variety of enemies, more visual effects such as floods maybe or rain. Codewise, there was quite some hardcoding which could’ve been implemented more elegantly, and made the game more efficient and easy to understand. Watching that progress starting from scratch to coming across those bugs that you would spend hours, sometimes days on, and seeing the final version of the game gives me great joy, one I can not describe.

Midterm Progress – Week 5

Concept

For my midterm project, I would like to work on a cool shooting game. However, I am yet to decide on the theme or path it should take. I was thinking about having a global warming theme where there could be say enemies to global warming spawning randomly and you need to take them down. As for the main character it could be say humans or plants. As far as the theme is concerned I would still like to keep myself flexible and see which ideas come on the way. As of now simple implementation of the objects have started being implemented using basic shapes, for example the circle drawn can move throughout the screen using AWSD keys.

Code

I have started implementing the logic of the game using basic shapes. As I progress, I shall incorporate images, sounds, and animations where possible to make the game more interesting and interactive. So far among the most difficult challenges I have faced were the logic to some parts of the game implementation such as the movement and restrictions of the shape within the canvas. I also faced a challenge with inheritance of classes for which I spent a considerable amount of time but haven’t figured out yet.

update() {
    this.y += this.vy;
    this.x += this.vx;
    
     //Input control for movement
    if (this.key_handler.a) {
      this.vx = -this.control_speed;
    } else if (this.key_handler.d) {
      this.vx = this.control_speed;
    } else {
      this.vx = 0;
    }

    if (this.key_handler.w) {
      this.vy = -this.control_speed;
    } else if (this.key_handler.s) {
      this.vy = this.control_speed;
    } else {
      this.vy = 0;
    }
    
    // print('x = ' + (this.x));
    // print('y = ' + (this.y));
    // print('r = ' + (this.radius));
    
    //Restricting movement to screen bounds
    if (this.x - this.radius < 0) {
      this.x = this.radius;
    }
    if (this.x + this.radius > SCREEN_WIDTH) {
      this.x = SCREEN_WIDTH - this.radius;
    }
    if (this.y - this.radius < 0) {
      this.y = this.radius;
    }
    if (this.y + this.radius > SCREEN_HEIGHT) {
      this.y = SCREEN_HEIGHT - this.radius;
    }
  }

Reflections / Improvements

I am looking forward to implementing a lot of things, from the start and end windows, to the score counter and display, audio and other visual effects. I am also looking forward to learning more about classes and inheritance of classes in p5js as it will make the code more efficient and easier to navigate.