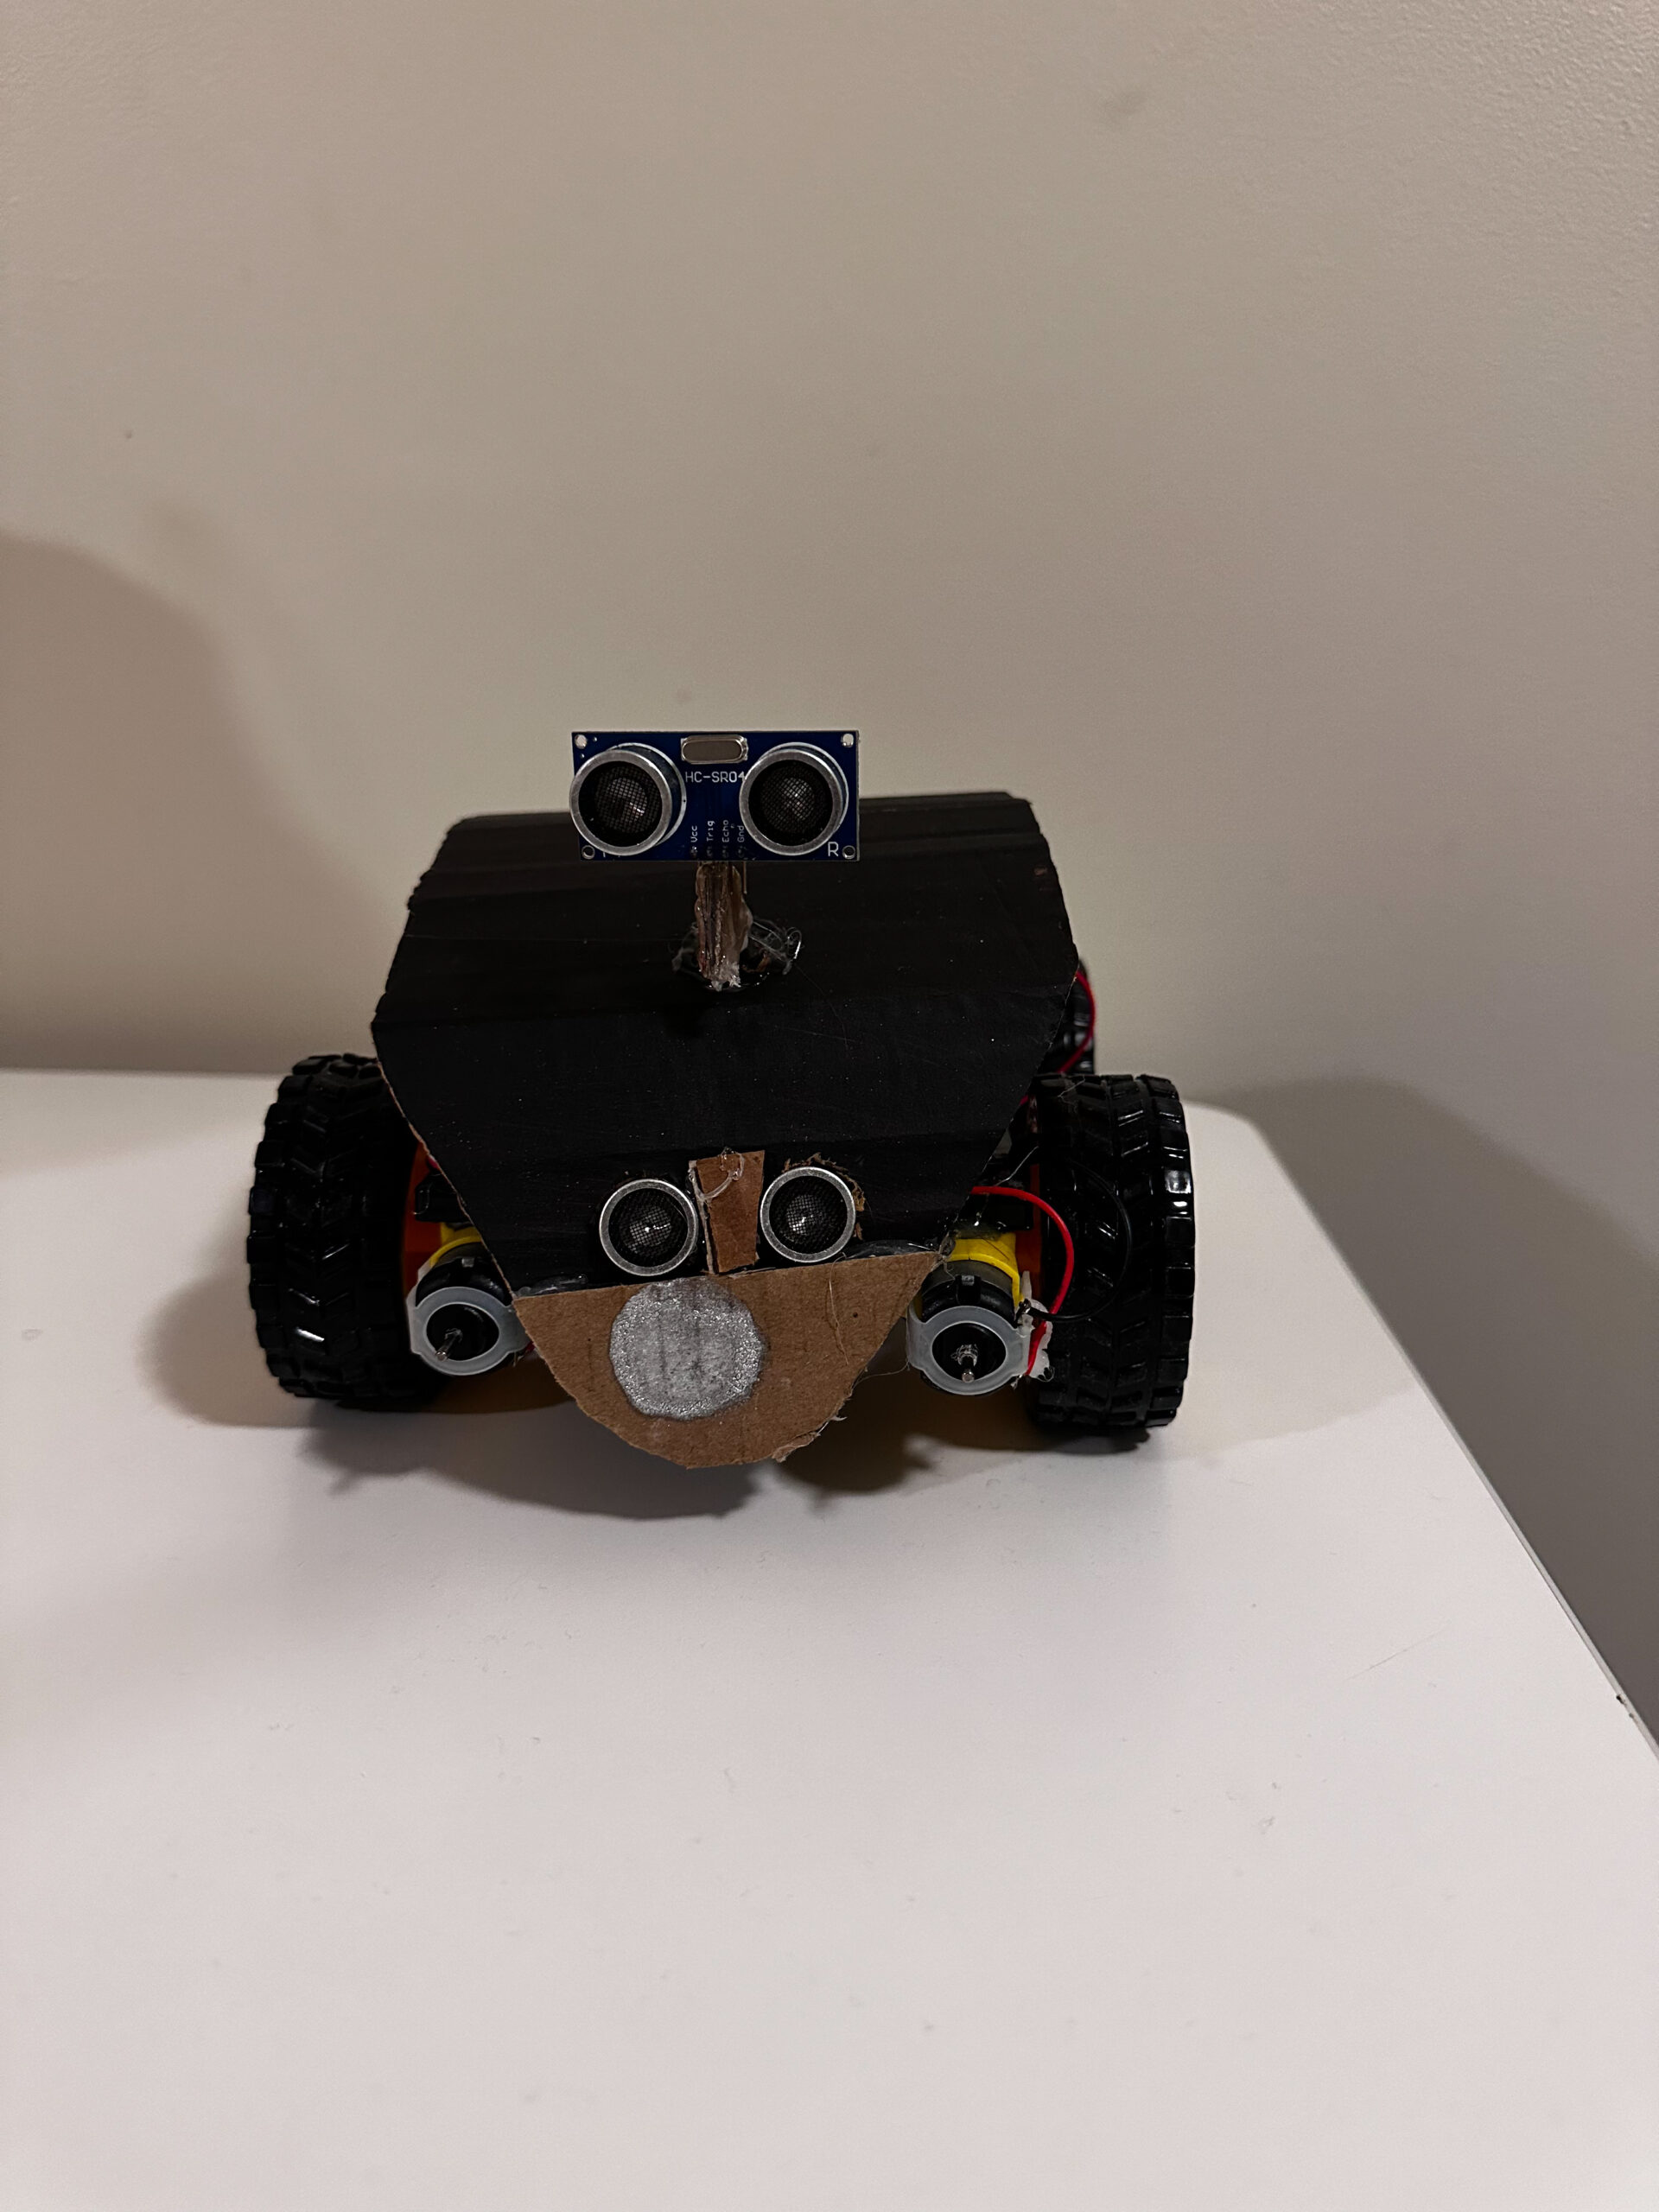
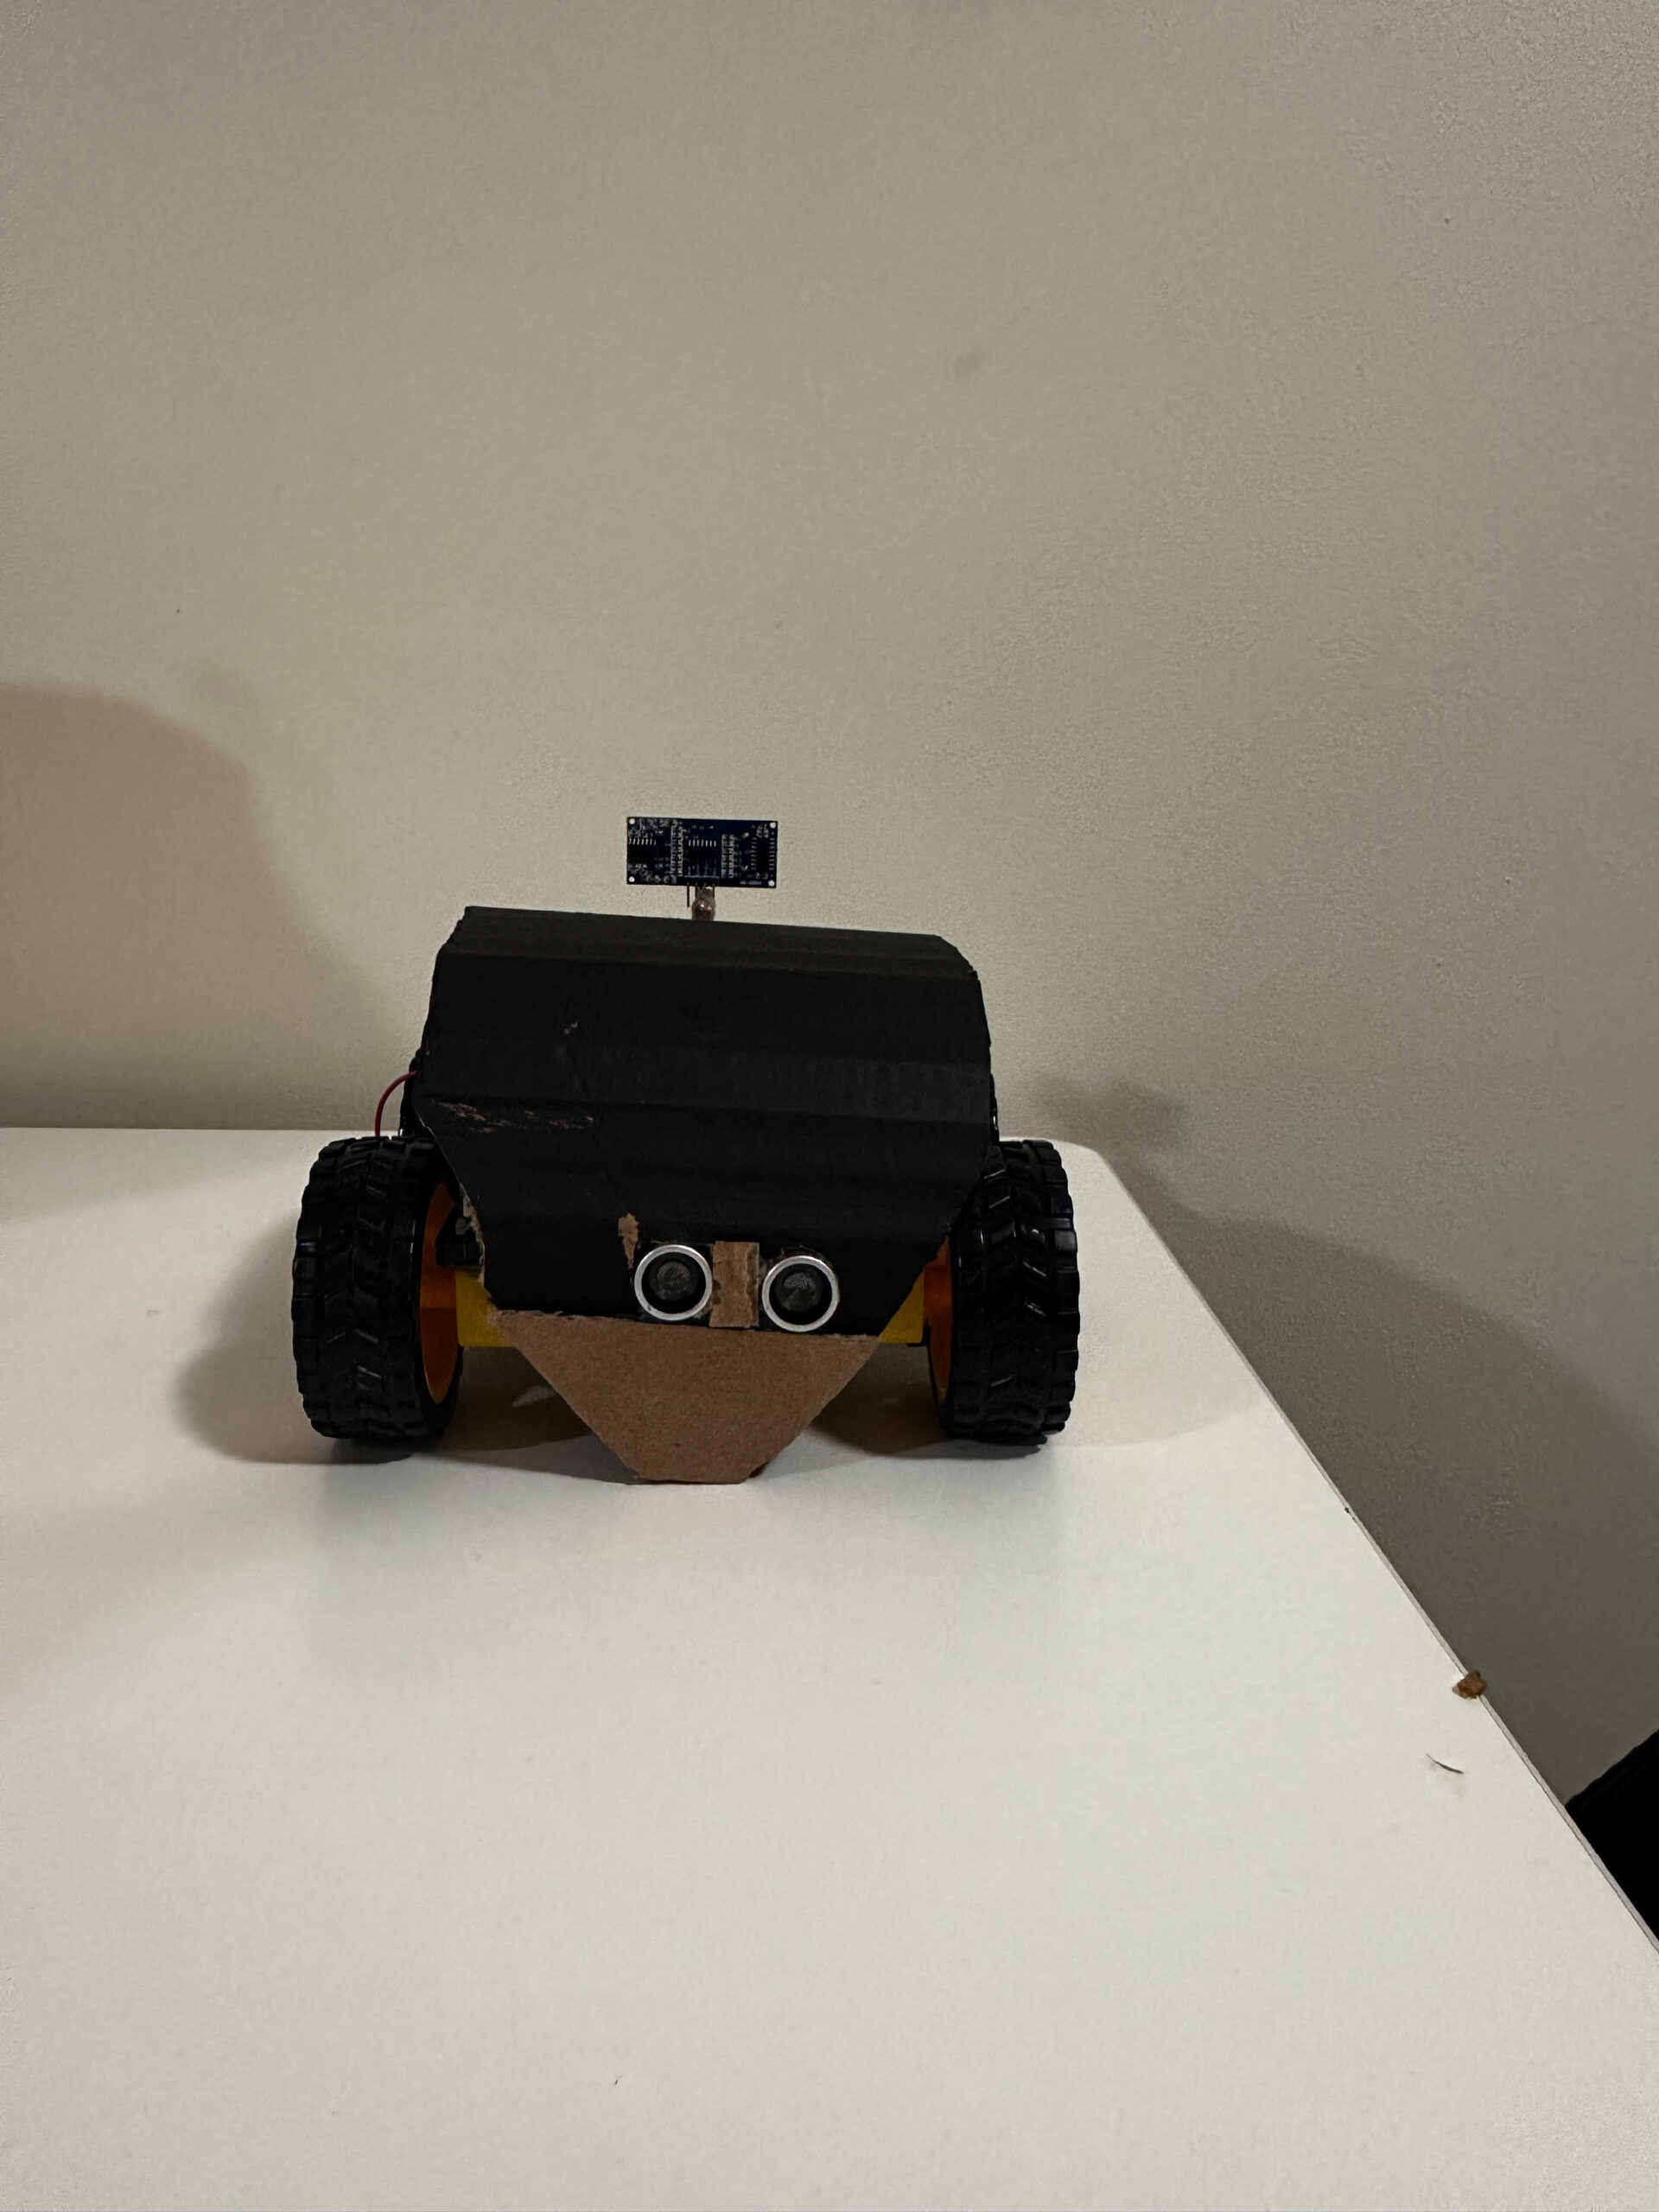
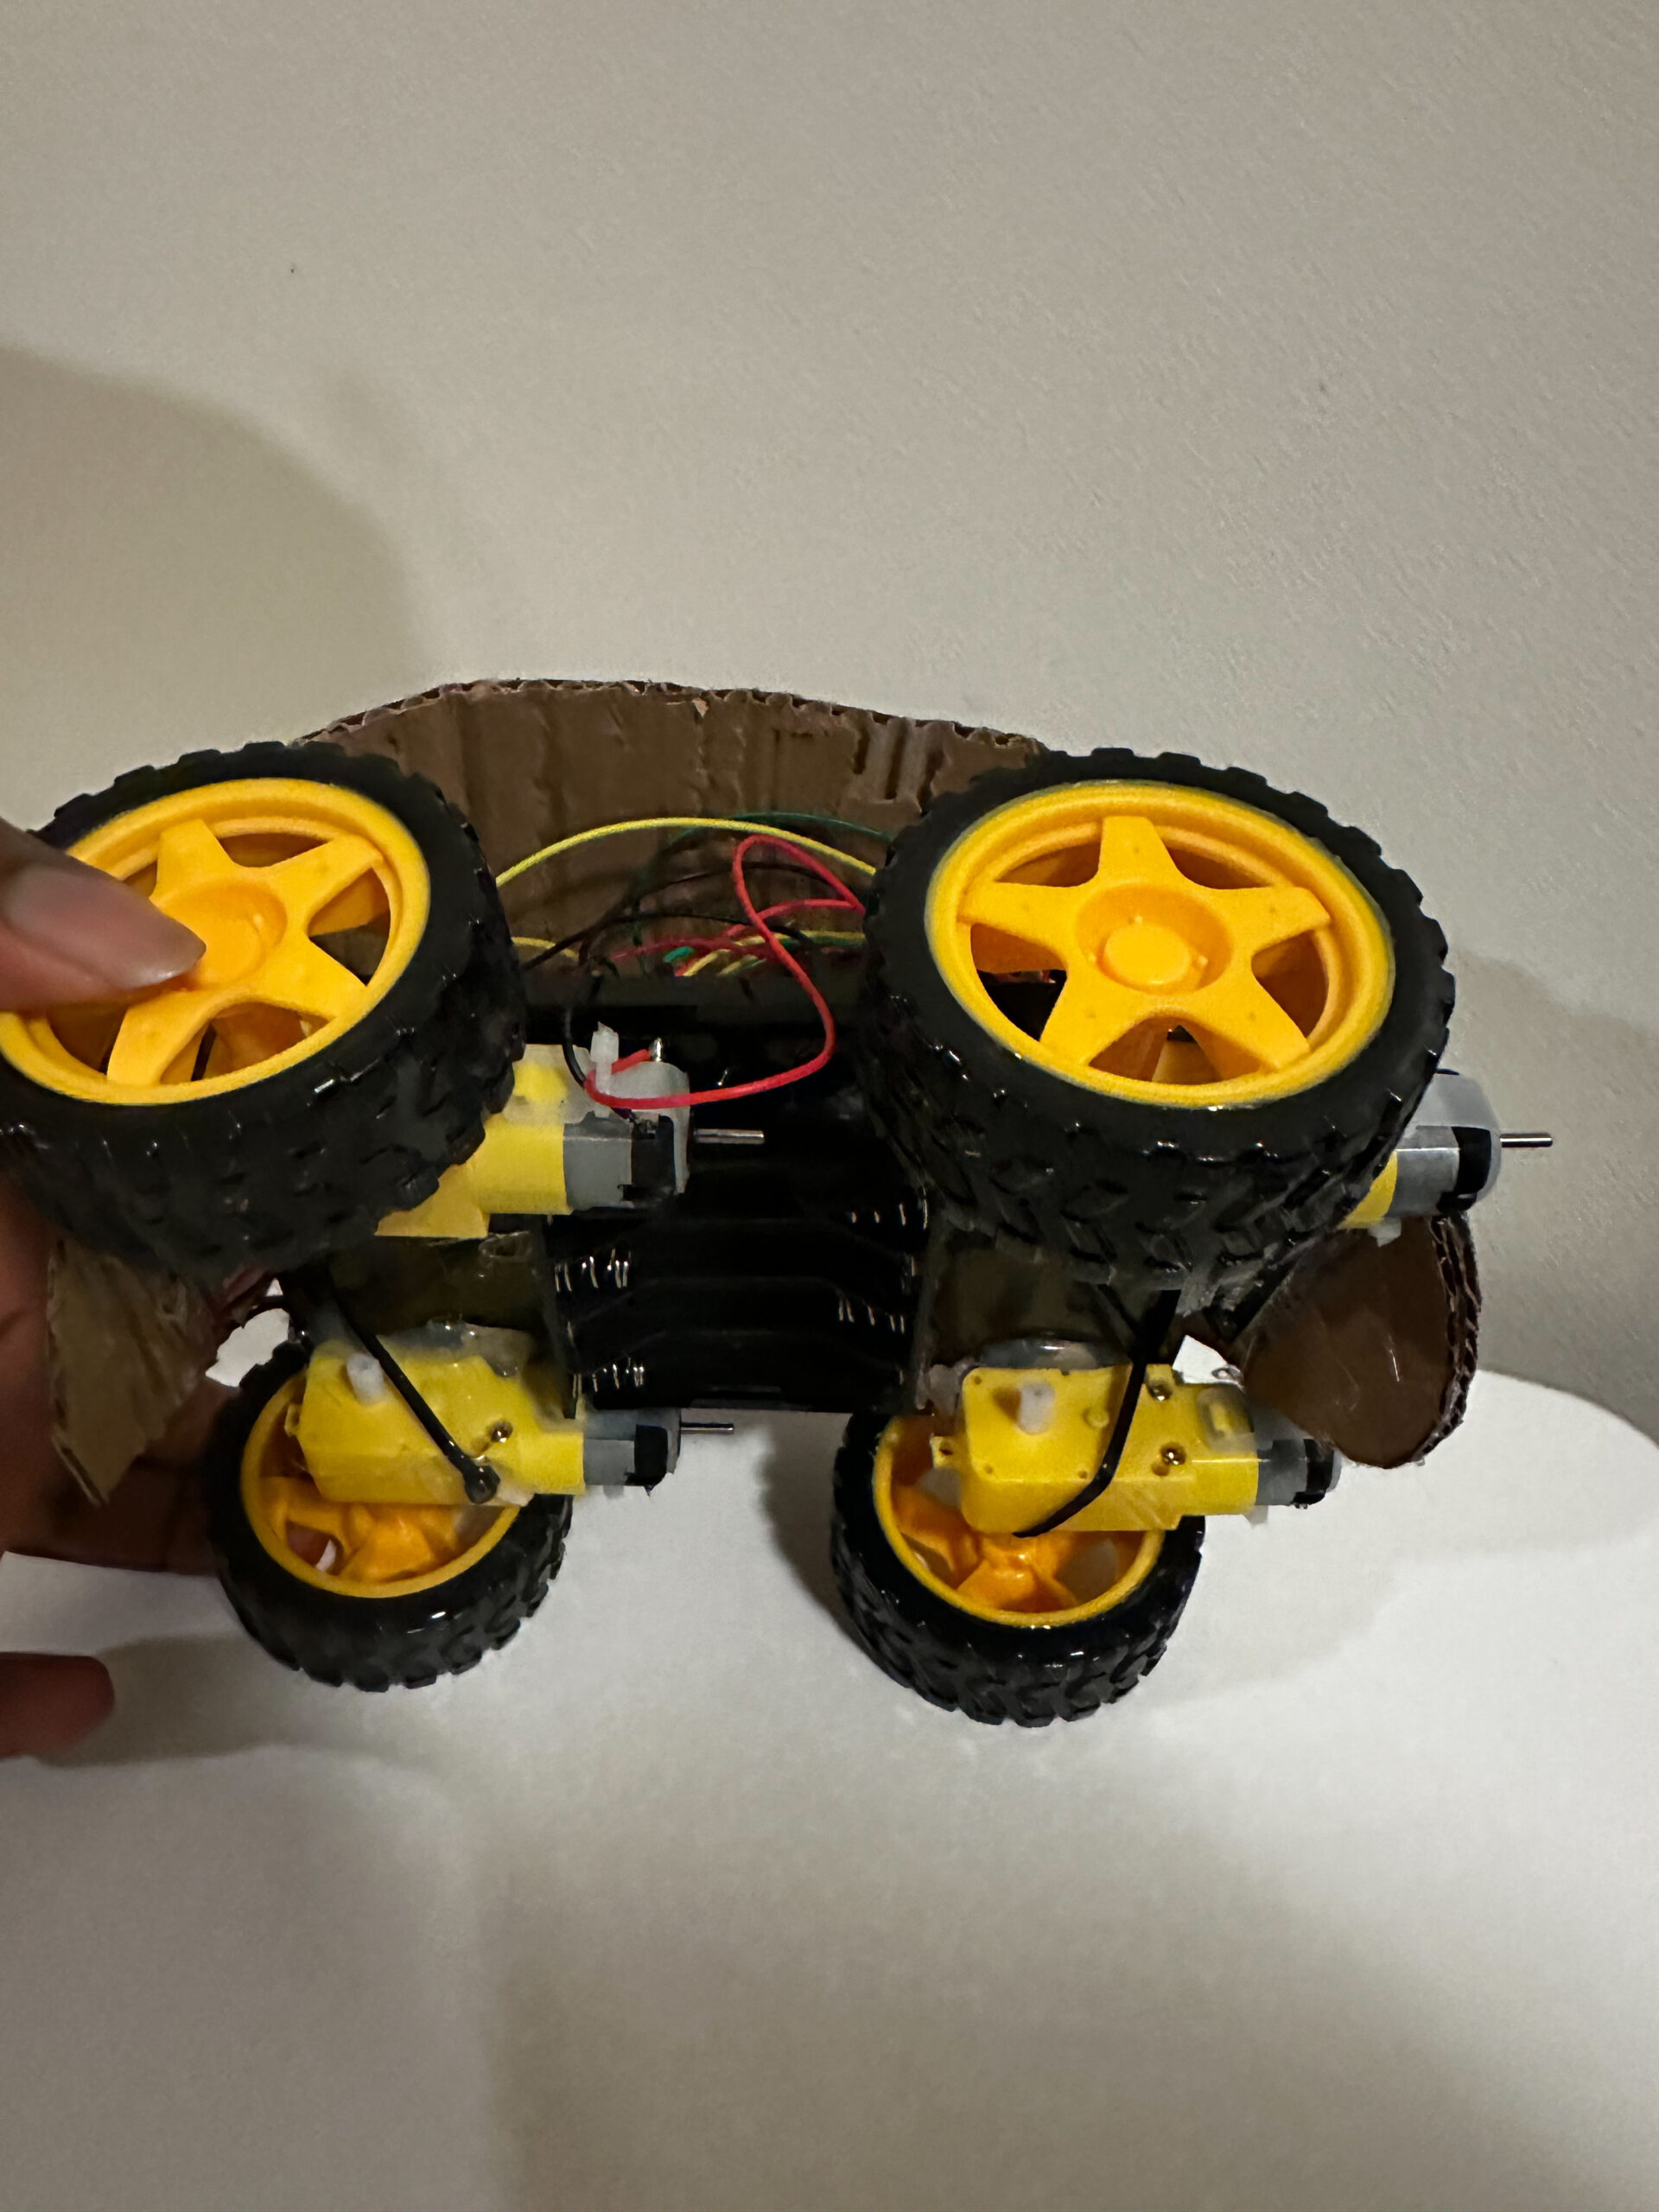
Concept:
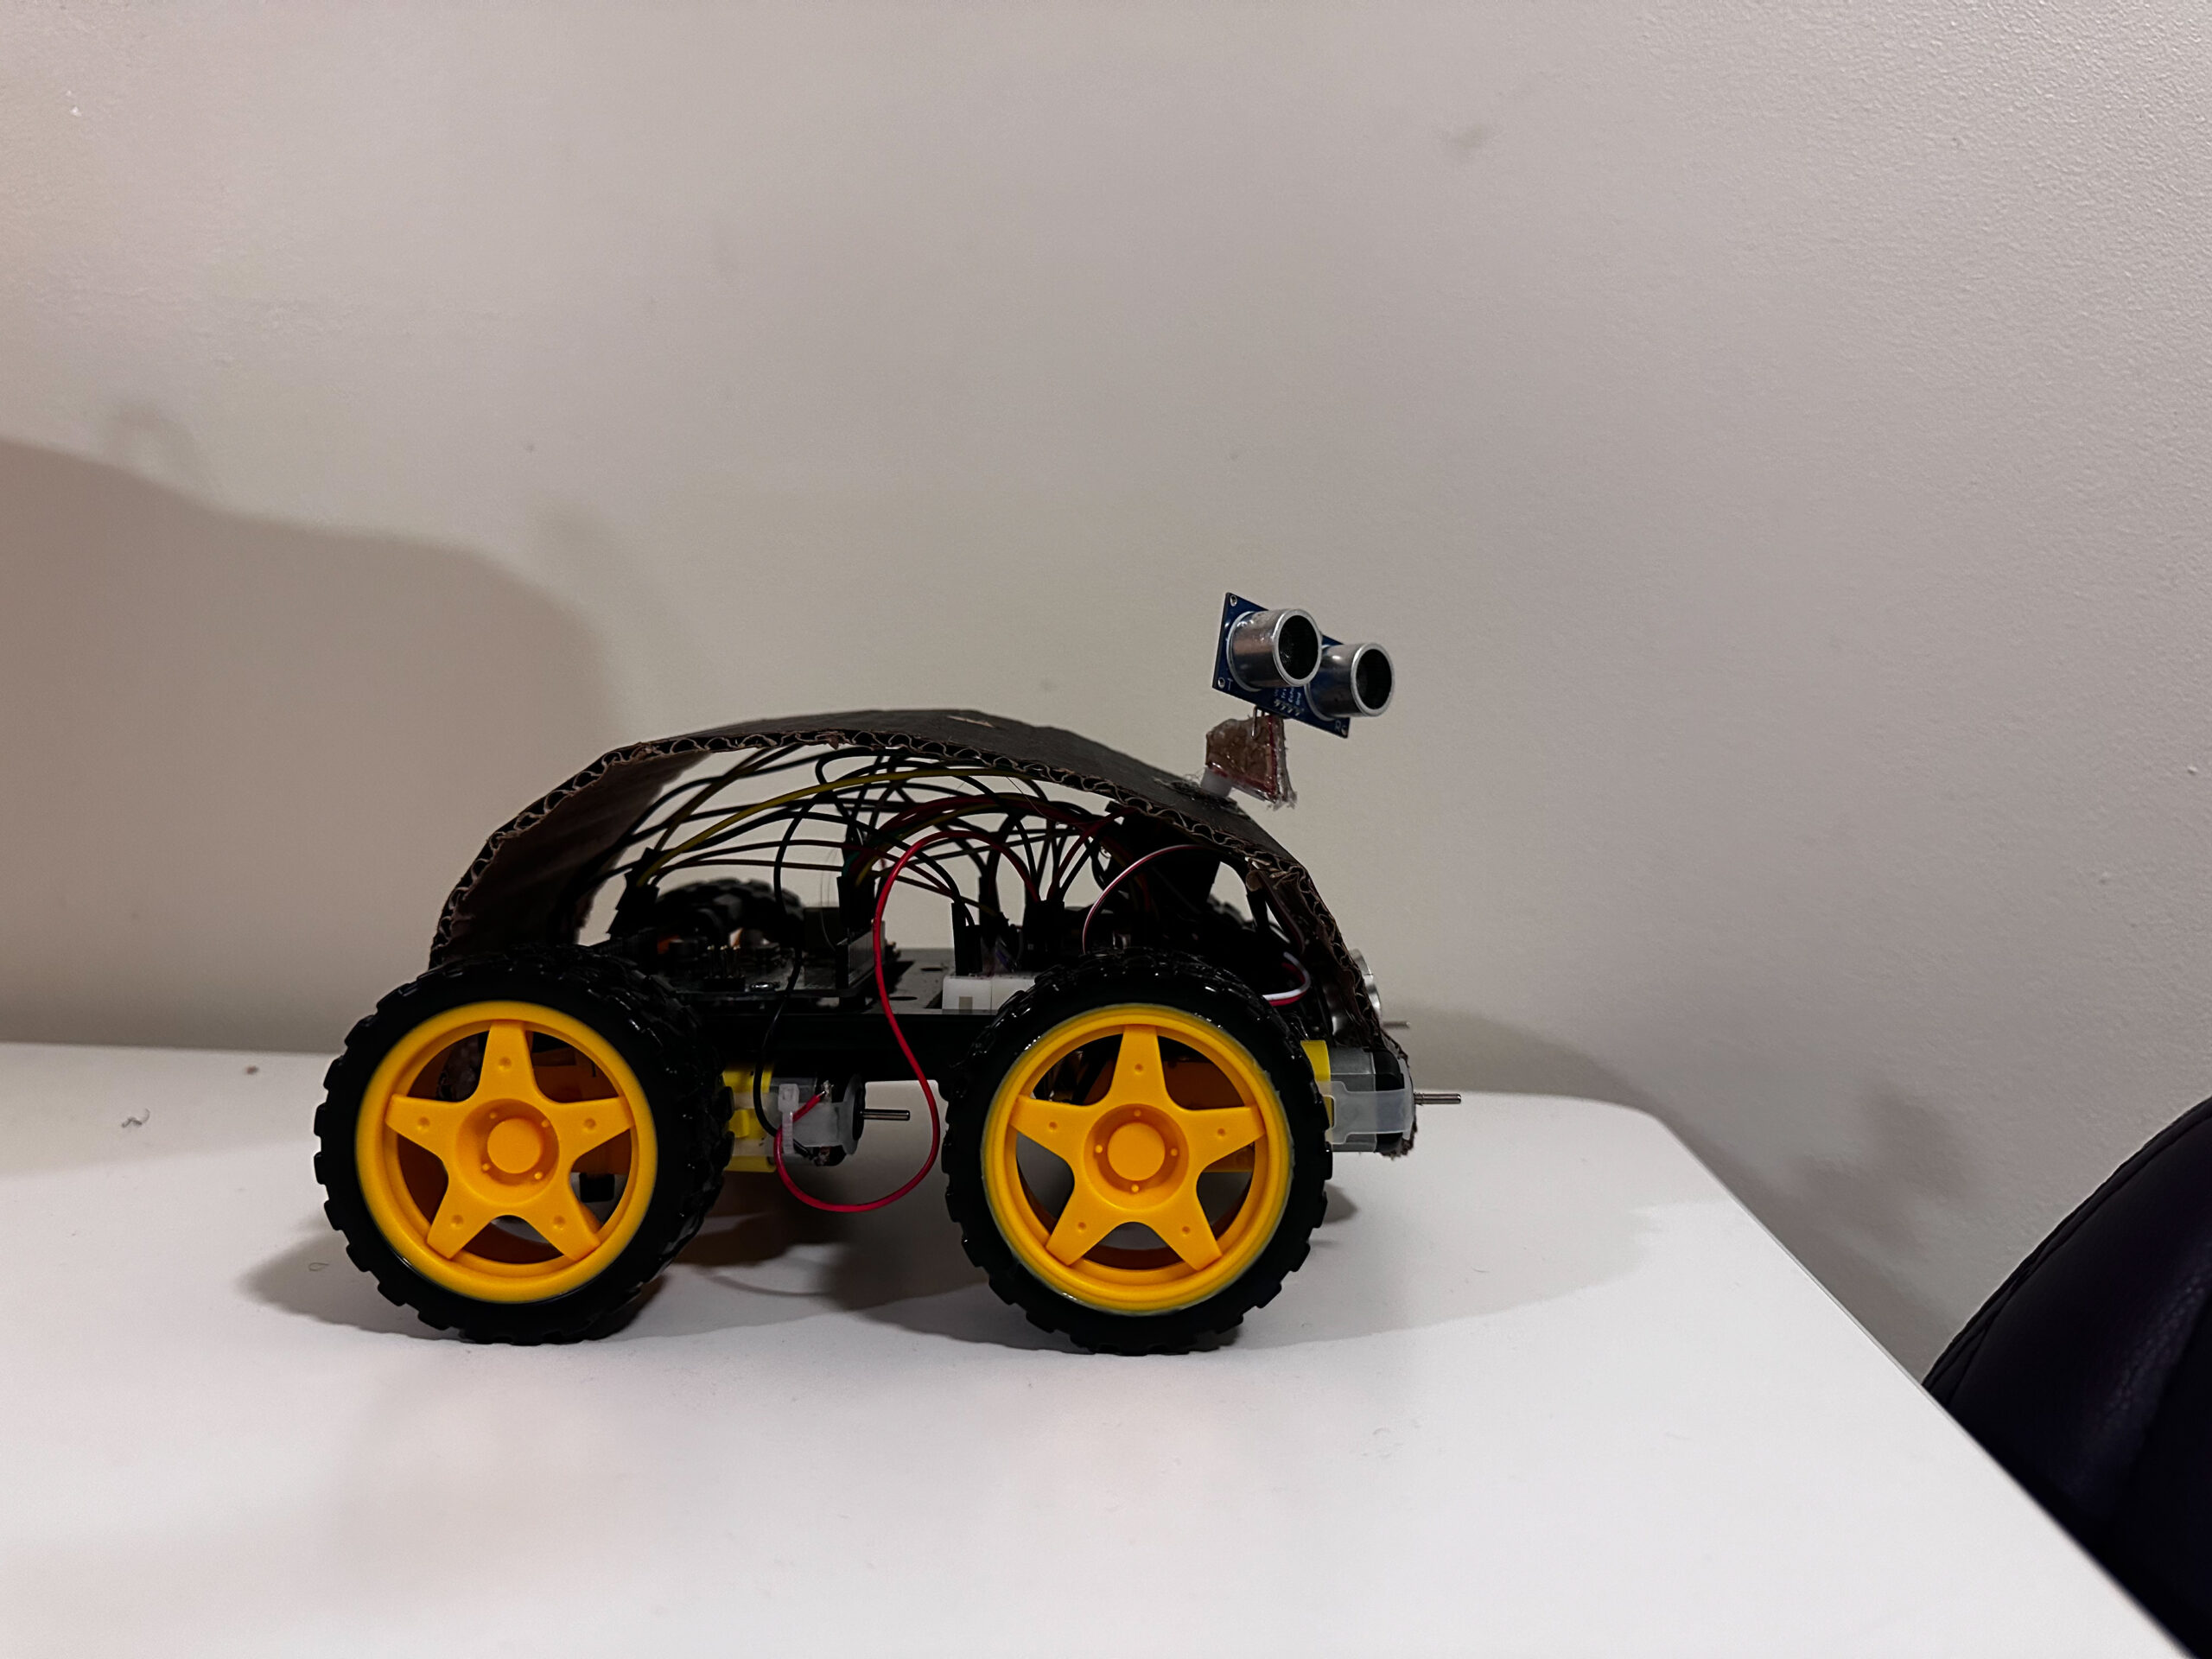
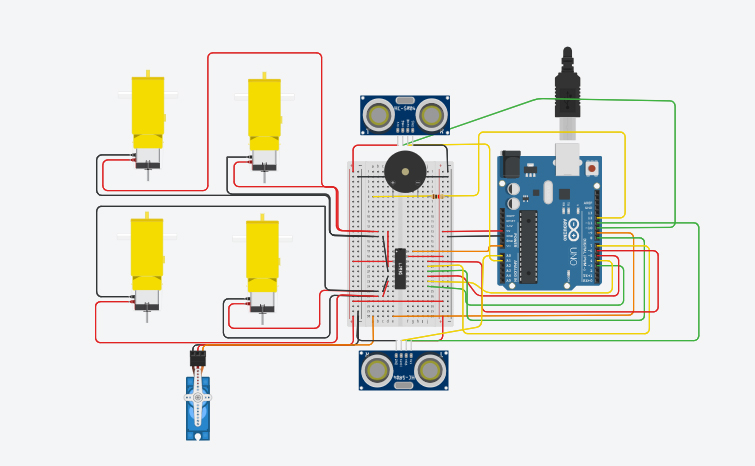
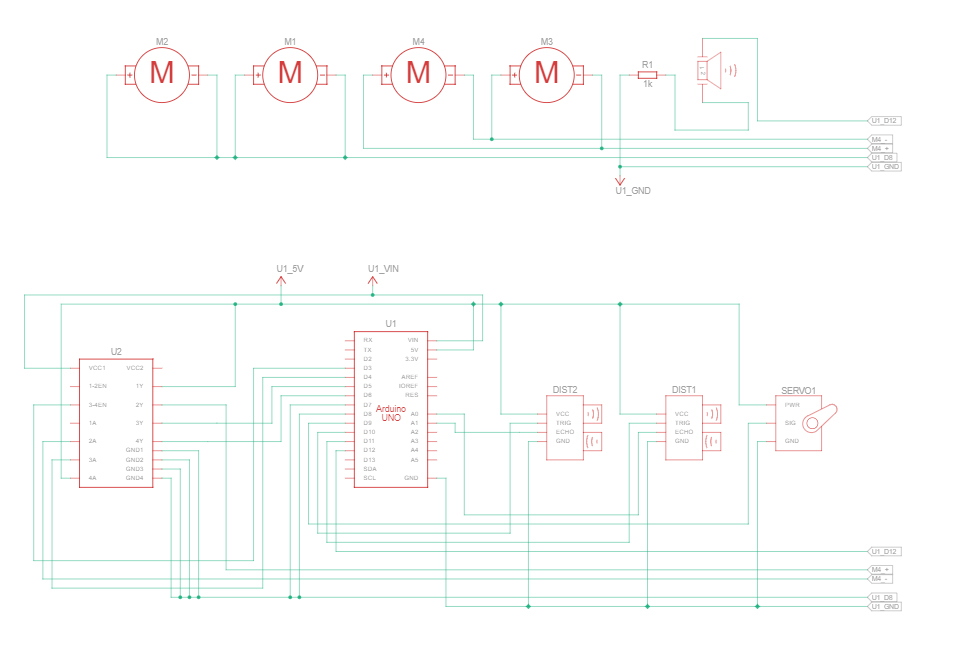
The idea was to create a bot that can be controlled with hand movement using machine learning with the P5.ml library. The P5 sketch has an in-car design with the steering wheel and the Arduino comprises 4dc motors, two ultrasonic sensors, and some LEDs.
Interactive Design:
For user interactivity, I decided to use the P5.js. The computer video webcam helps the machine learning library to detect the movement of the user’s hand and map these movements to the size of the canvas. This information is used to control the steering wheel, which controls the Arduino.
Arduino Code:
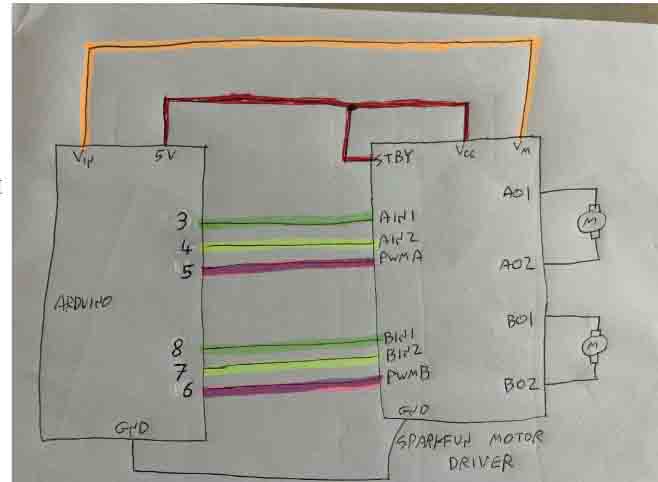
For the Arduino aspect, the motors are controlled using switch cases. The Arduino receives cases from the P5 sketch and based on those cases, the Arduino knows how to control the 4 DC motors. The Arduino uses the ultrasonic sensors to detect obstacles and sends this information to the P5 sketch to be viewed by the user.
#include <Servo.h>//include the Servo library/
#include <time.h>//include the time library for seeding random number

Servo myservo;//creating servo object

const int ain1Pin = 3;//setting pins for motor for left side which is connected in parallel
const int ain2Pin = 4;
const int pwmAPin = 5;

const int bin1Pin = 8;//setting pinf for motor for right side
const int bin2Pin = 7;
const int pwmBPin = 6;

const int trigPin1 = 11;//setting pins for front ultrasonic sensor
const int echoPin1= A0;//I used A0 pin cause I didnt have space...Please pardon me
const int trigPin2 = 10;//setting pins for back ultrasonic sensor
const int echoPin2 = A1;//here too

const int warningbuzzer=12;//setting the buzzer to 12
//servo motor
const int headmovePin=9;//setting the servo motor pin to 9

int wallstop=0;//initializing the obstacle detection

unsigned long previousMillis = 0;//setting millis to 0
const long interval = 5000;//setting interval for the millis


void setup() {
  myservo.attach(headmovePin);//pass the servo pin to the servo library

  randomSeed(time(NULL));//seed random number using the current time

  pinMode(ain1Pin, OUTPUT);//setting the pins as output and input
  pinMode(2, OUTPUT);//light checker
  pinMode(ain2Pin, OUTPUT);//motor pin
  pinMode(pwmAPin, OUTPUT); // not needed really
  pinMode(bin1Pin, OUTPUT);
  pinMode(bin2Pin, OUTPUT);
  pinMode(pwmBPin, OUTPUT); // not needed really
  // Start serial communication so we can send data
  // over the USB connection to our p5js sketch
  pinMode(trigPin1, OUTPUT);
  pinMode(echoPin1, INPUT);
  pinMode(trigPin2, OUTPUT);
  pinMode(echoPin2, INPUT);
  pinMode(warningbuzzer, OUTPUT);

  Serial.begin(9600);//setting the serial band

  while (!Serial.available()) {
    digitalWrite(LED_BUILTIN, HIGH); // on/blink while waiting for serial data
    Serial.println("0,0"); // send a starting message
    delay(300);            // wait 1/3 second
    digitalWrite(LED_BUILTIN, LOW);
    delay(1000);//delay for a second
  }
}

void loop() {
  wallstop=crushstop();
  //When the serial is detected do this
  while (Serial.available()) {//while the serial connection exists
    digitalWrite(LED_BUILTIN, HIGH); // led on while receiving data
    wallstop=crushstop();//update the wallstop from the crush function
    unsigned long currentMillis = millis();//set current millis

    if (currentMillis - previousMillis >= interval) {
      // save the last time you blinked the LED
      previousMillis = currentMillis;
      movehead();//if the interval is reached, move the head
    }
    int movement = Serial.parseInt();//get the movement case from p5
   if (Serial.read() == '\n') {//when we read a new line,
     switch(movement){//execute the following commmands based on the case
      case 0://no movement
        analogWrite(pwmAPin, 0);
        digitalWrite(ain1Pin, HIGH);
        digitalWrite(ain2Pin, LOW);
        analogWrite(pwmBPin, 0);
        digitalWrite(bin1Pin, LOW);
        digitalWrite(bin2Pin, HIGH);
      break;
      case 1://forward
        analogWrite(pwmAPin, 255);
        digitalWrite(ain1Pin, LOW);
        digitalWrite(ain2Pin, HIGH);
        analogWrite(pwmBPin, 255);
        digitalWrite(bin1Pin, HIGH);
        digitalWrite(bin2Pin, LOW);
      break;
      case 2://reverse
        analogWrite(pwmAPin, 255);
        digitalWrite(ain1Pin, HIGH);
        digitalWrite(ain2Pin, LOW);
        analogWrite(pwmBPin, 255);
        digitalWrite(bin1Pin, LOW);
        digitalWrite(bin2Pin, HIGH);
      break;
      case 3://right front
        analogWrite(pwmBPin, 255);
        digitalWrite(bin1Pin, HIGH);
        digitalWrite(bin2Pin, LOW);
      break;
      case 4://left front
        analogWrite(pwmAPin, 255);
        digitalWrite(ain1Pin, LOW);
        digitalWrite(ain2Pin, HIGH);
      break;
      case 5://right back
       analogWrite(pwmBPin, 255);
        digitalWrite(bin1Pin, LOW);
        digitalWrite(bin2Pin, HIGH);
      break;
      case 6://left back
        analogWrite(pwmAPin, 255);
        digitalWrite(ain1Pin, HIGH);
        digitalWrite(ain2Pin, LOW);
      break;
      default://if not case is gotten within our expected range, stop
        analogWrite(pwmAPin, 0);
        digitalWrite(ain1Pin, HIGH);
        digitalWrite(ain2Pin, LOW);
        analogWrite(pwmBPin, 0);
        digitalWrite(bin1Pin, LOW);
        digitalWrite(bin2Pin, HIGH);
      break;
     }
      delay(5);
      Serial.println(wallstop);//send the detection to p5

    }
  }

}

int crushstop(){//this function returns 1 when an obstacle is ahead and 2 when an obstacle is behind
  int wallstop=0;//initialize wallstop
  digitalWrite(trigPin1, LOW);
  delayMicroseconds(2); //basically shooting beems and using the time it takes to bounce back to calculate distance
  digitalWrite(trigPin1, HIGH);
  delayMicroseconds(10);
  digitalWrite(trigPin1, LOW);
  // Time it takes for the pulse to travel back from the object long
  int duration1 = pulseIn(echoPin1, HIGH);
  // Universal conversion of time into distance in cm
  int distance1 = duration1 * 0.034 / 2;//divided by two beause its a two way thing

  digitalWrite(trigPin2, LOW);
  delayMicroseconds(2);
  digitalWrite(trigPin2, HIGH);
  delayMicroseconds(10);
  digitalWrite(trigPin2, LOW);
  // Time it takes for the pulse to travel back from the object long
  int duration2 = pulseIn(echoPin2, HIGH);
  // Universal conversion of time into distance in cm
  int distance2 = duration2 * 0.034 / 2;
  if(distance1<5){//if collision is detected behind, send 2
    wallstop=2;
    tone(warningbuzzer,2000);//play the tone
    delay(5);
  }
  else if(distance2<5){
    wallstop=1;//if collision is detected infront, send 1
    tone(warningbuzzer,2000);//play the tone
    delay(5);
  }
  else{
    wallstop=0;
    noTone(warningbuzzer);//if nothing is detected dont play a tone
  }
  return wallstop;//return this info
}

void movehead(){
  myservo.write(random(0, 180));//move the head to a random number between 0 and 180
  delay(15);
}
P5.js:
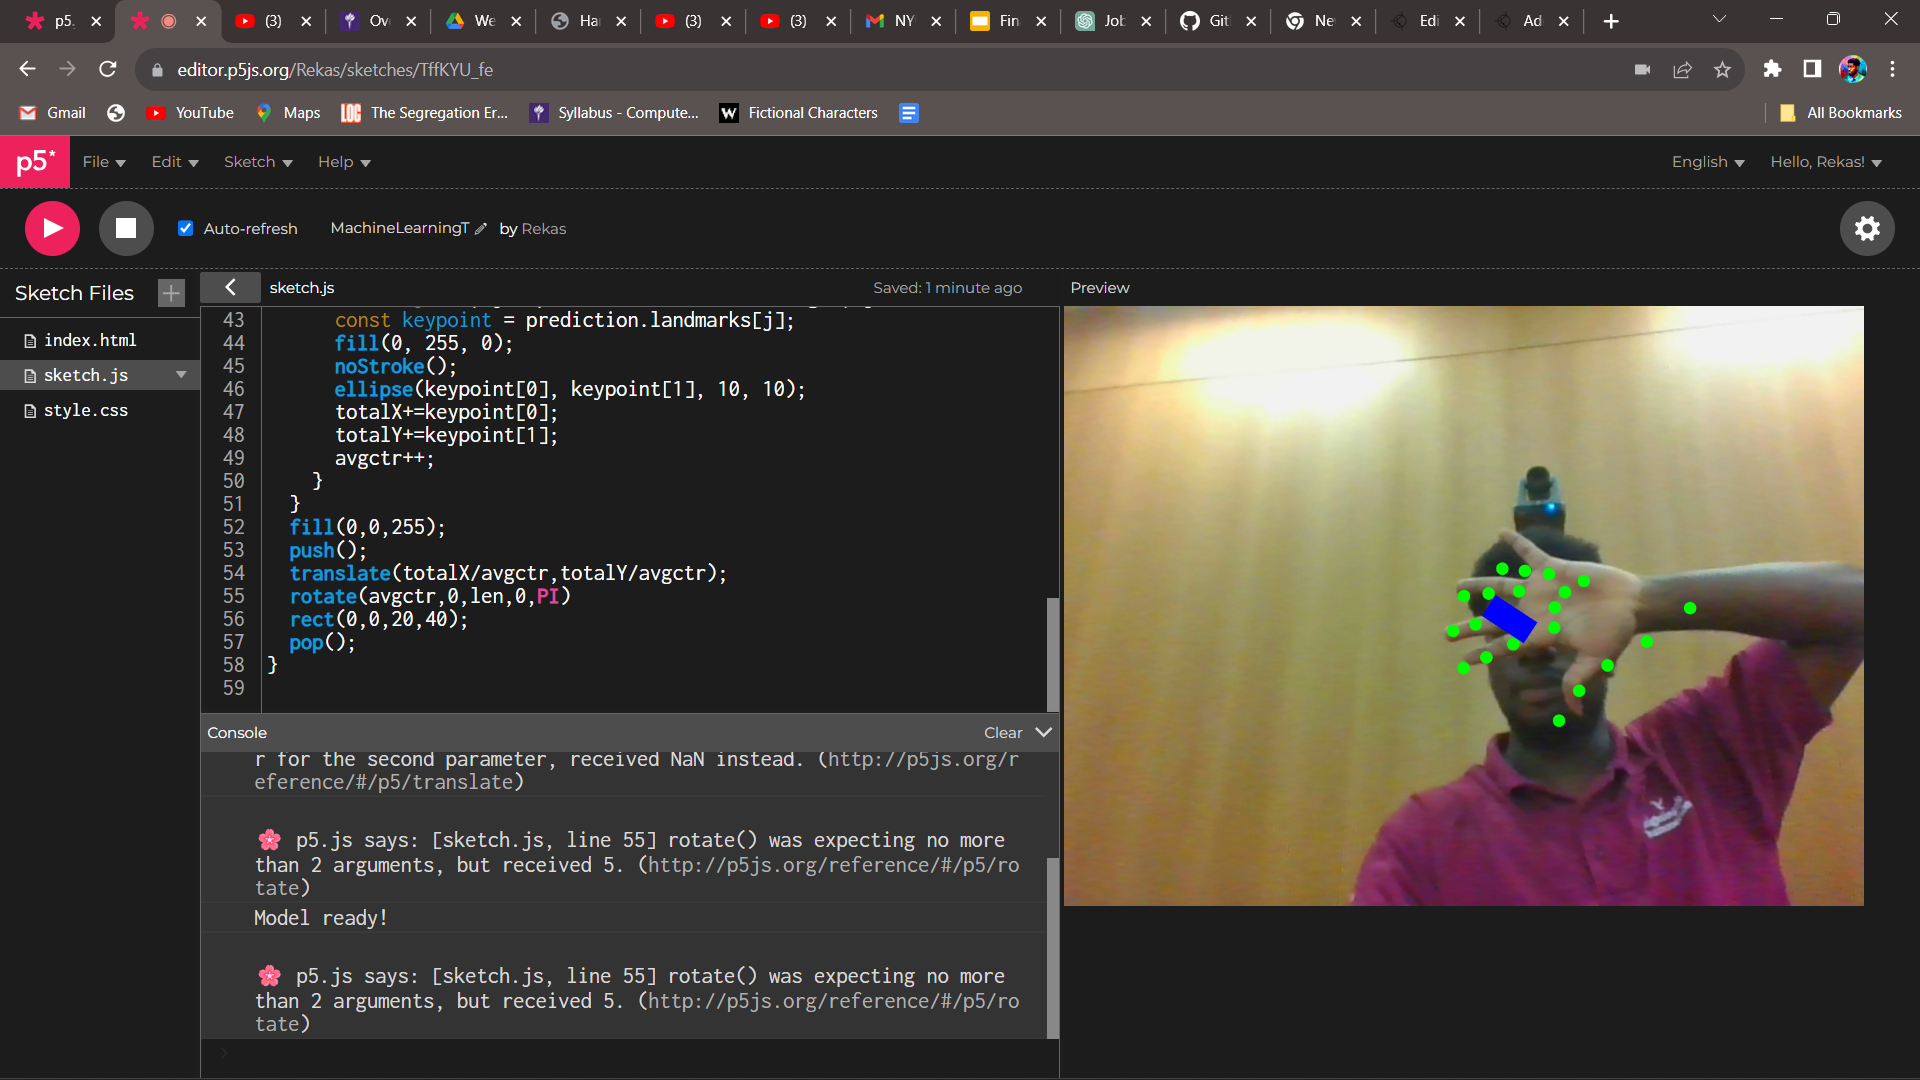
For this part, the P5.js sketch receives the user hand positions info from the P5.ml library and maps it to get its corresponding points on the canvas. After, these values are averaged and the average-X value is used to control the steer’s left or right turn. The average-Y value is used to control the forward and backward movement. Based on this cases are developed and sent to the Arduino for execution of tasks.
The P5 sketch is divided into five parts
Serial connection:
This part is responsible for connecting the Arduino to the P5 sketch and since its not my code I will not post it
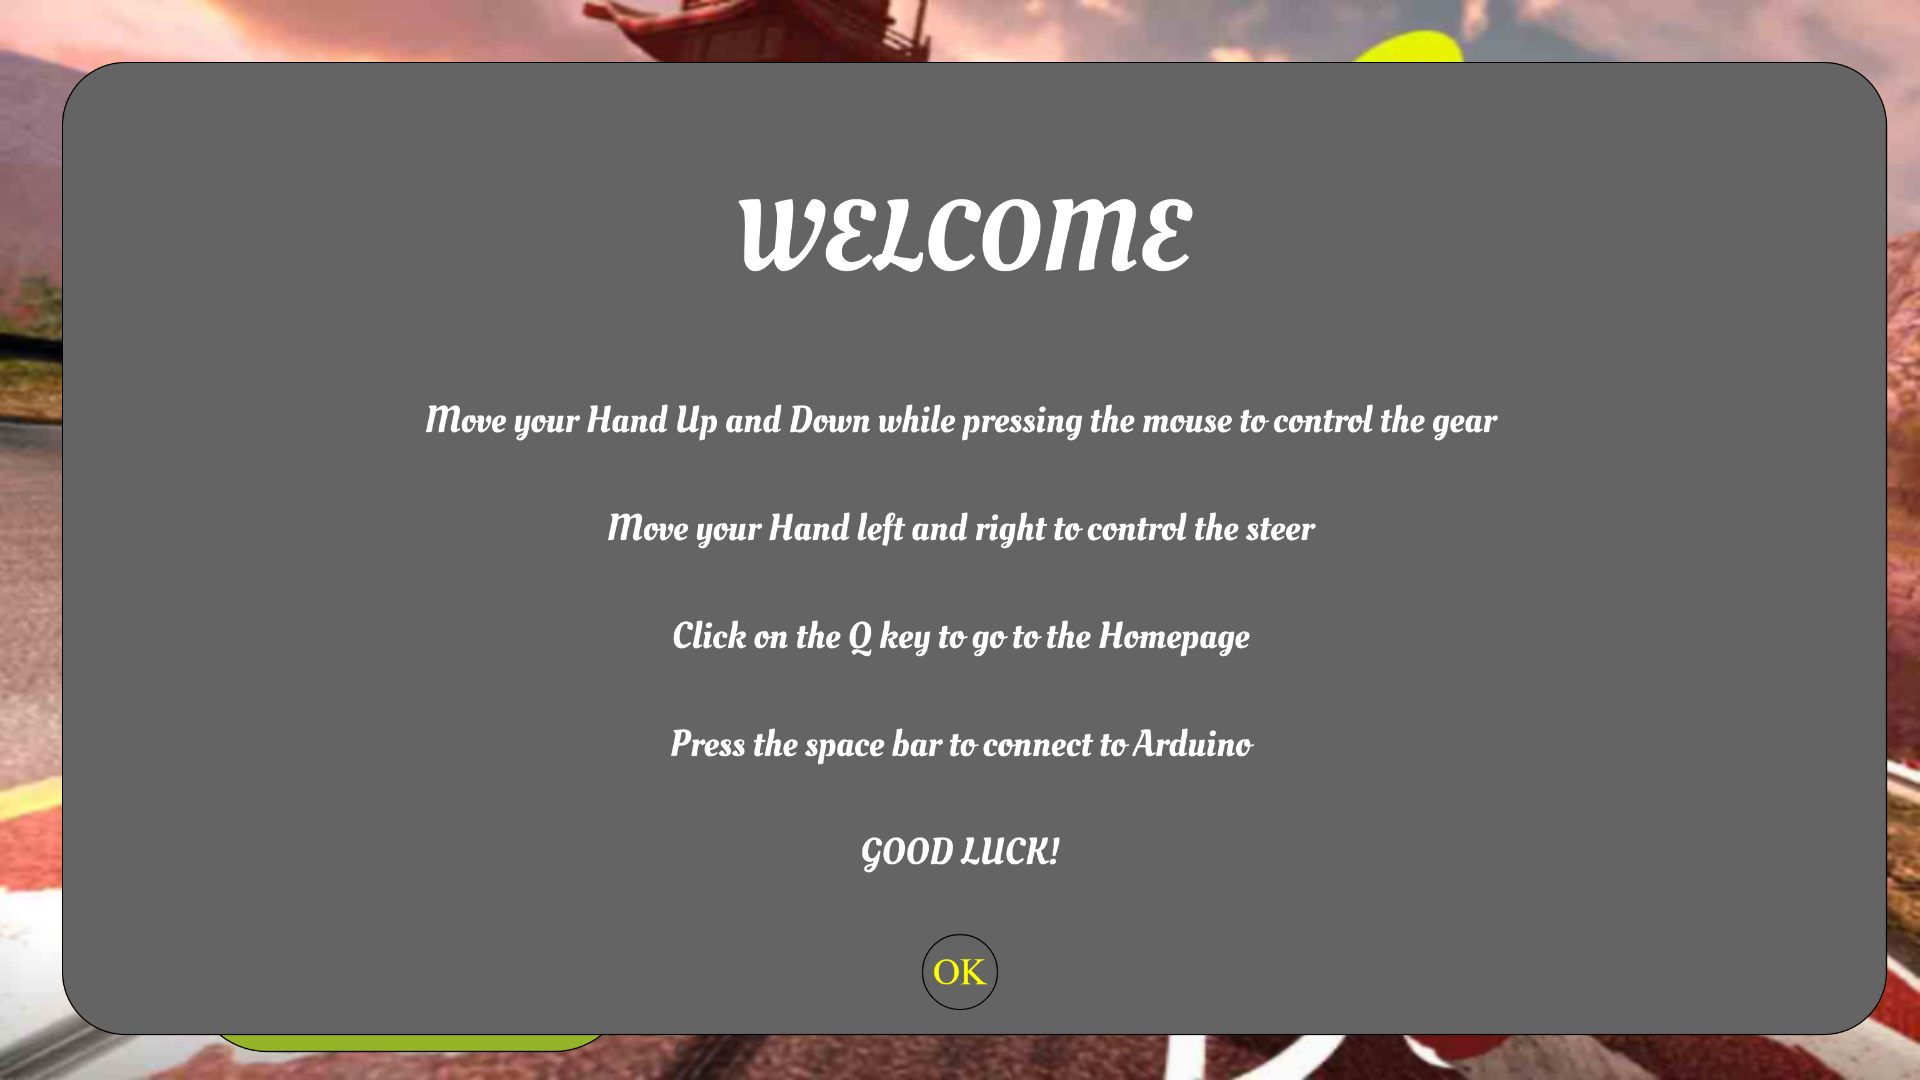
Intro Page:
The next part is the intro page. Is welcomes the user into the project and also gives some info to the user about how to use the vehicle. I made the background picture myself using photoshop and then I added some buttons and sounds
class ipage{
  constructor(IB,S1,S2,F1,F2){//receive all needed variables as in images and sound
    this.BG=IB;//the background
    this.S1=S1;//sound
    this.playbool=false;//boolean to start game
    this.helpbool=false;//boolean to open help page
    this.F2=F2//font
  }
  show(){//this shows the designs in the page
    this.BG.resize(windowWidth,windowHeight);//resize the introimage
    image(this.BG,0,0);//displaying background
    textAlign(CENTER);
    this.createhelp();//calling the help function for the help page
    this.playbox();//calling the playbox button function
    if(this.helpbool){//if the helpbool is true display the help page
      this.helppage();
    }
    return this.playbool;//this returns true if the play button is pressed
  }

  playbox(){//this function displays the start button
    rectMode(CORNER);
    fill(150,180,40);
      if(mouseX>windowWidth*0.1&&mouseX<(windowWidth*0.1)+350&&mouseY>windowHeight*0.8&&mouseY<(windowHeight*0.8)+150){
      fill(150,0,0);//creating the hover effect
    }
    if(mouseX>windowWidth*0.1&&mouseX<(windowWidth*0.1)+350&&mouseY>windowHeight*0.8&&mouseY<(windowHeight*0.8)+150&&mouseIsPressed&&!this.helpbool){
      S2.pause();// the play is pressed, play pause the background music
      this.S1.play();//playing the start button pressed sound
      this.playbool=true;//sets the playboolean to true
    }
    rect(windowWidth*0.1,windowHeight*0.8,350,150,60);//drawing the start button
    fill(0);
    textFont(F1);
    textSize(90);
    textAlign(CENTER);
    text("Start",windowWidth*0.1+180,windowHeight*0.8+110);
  }
  createhelp(){
    fill(100);
    if(dist(mouseX,mouseY,windowWidth*0.9,windowHeight*0.1)<=30){
      fill(60);//create hover effect
    }
    if(dist(mouseX,mouseY,windowWidth*0.9,windowHeight*0.1)<=30&&mouseIsPressed){
      this.helpbool=true;//set boolean to open help page
    }
    circle(windowWidth*0.9,windowHeight*0.1,60);//these following code just creates the help button
    fill(255,255,0);
    textSize(30);
    textFont(NORMAL);
    text("?",windowWidth*0.9,windowHeight*0.1+10);
  }
  helppage(){
    fill(100);
    rect(50,50,windowWidth*0.95,windowHeight*0.9,50);
    textFont(this.F2);
    fill(255);
    textSize(80);
    text('WELCOME',windowWidth*0.5,windowHeight*0.25);
    textSize(30);
    text('Move your Hand Up and Down while pressing the mouse to control the gear',windowWidth*0.5,windowHeight*0.4);
    text('Move your Hand left and right to control the steer',windowWidth*0.5,windowHeight*0.5);
    text('Click on the Q key to go to the Homepage',windowWidth*0.5,windowHeight*0.6);
    text('Press the space bar to connect to Arduino',windowWidth*0.5,windowHeight*0.7);
    text('GOOD LUCK!',windowWidth*0.5,windowHeight*0.8);
    fill(100);
    if(dist(mouseX,mouseY,windowWidth*0.5,windowHeight*0.9)<=30){
      fill(60);//create hover effect
    }
    if(dist(mouseX,mouseY,windowWidth*0.5,windowHeight*0.9)<=30&&mouseIsPressed){
      this.helpbool=false;//set boolean to close help page
    }
    circle(windowWidth*0.5,windowHeight*0.9,60);//these following code just creates the ok button
    fill(255,255,0);
    textSize(30);
    textFont(NORMAL);
    text("OK",windowWidth*0.5,windowHeight*0.9+10);

  }
}

Help Page:
This page is just to give the user info about the game and wish them luck as they embark on the Journey.
the code is found in the intro class and the page is controlled with the use of Boolean variables.
Dashboard:
Coming into the main page, the Dashboard shows the gearbox and the collision screen that alerts the user when the user is close to an obstacle.
class dash{//this class prints the dashboard, the gear and the detection screen
  constructor(dashY){
    this.Y=dashY;//the Y coordinate to which the dashboard is drawn
    this.movementFB=0;//the front and back movement counter
    this.gearY=0;//this controls the gearmovement
  }
  showdash(){
    push();//creating the dashboard
    strokeWeight(5)//set stroke weight to 5
    fill(193, 154, 107);//fill with brown
    beginShape();//we draw the dashboard
    curveVertex(0,this.Y);
    curveVertex(0,this.Y);
    curveVertex(windowWidth/2,this.Y-50);//creating the curve look
    curveVertex(windowWidth,this.Y);
    curveVertex(windowWidth,windowHeight);
    curveVertex(0,windowHeight);
    curveVertex(0,this.Y);
    curveVertex(0,this.Y);
    endShape();
    pop();
  }
  showgear(gearY){//this function shows the gear
    this.gearY=gearY;//capies value of the gearY from handpose
    rectMode(CENTER);//set rectange mode
    textSize(50);
    fill(0);//fill with black
    rect(windowWidth*0.5,this.Y+110,150,300,50);
    if(mouseIsPressed){//if the mouse is pressed means gear is being controlled
      if(this.gearY<windowHeight*0.35){
        this.movementFB=1;//set gear to drive
      }
      else if(this.gearY>windowHeight*0.5){
        this.movementFB=2;//set gear to reverse
      }
      else{
        this.movementFB=0;//set gear to P
      }
    }
    textAlign(CENTER);//align text to center
    textSize(50);
    fill(0,128,0);//fill with green
    switch(this.movementFB){
      case 0:
        text('P',windowWidth*0.5,this.Y+110);//p for parking
        break;
      case 1:
        text('D',windowWidth*0.5,this.Y+110);//D for drive
        break;
      case 2:
        text('R',windowWidth*0.5,this.Y+110);//R for reverse
        break;
    }
    textAlign(LEFT);
    textSize(12);
    return this.movementFB;//return the gear movement info
  }
  showScreen(wallstop){//this shows the detection
    rectMode(CENTER);
    textSize(50);
    textAlign(CENTER);
    fill(0);
    rect(windowWidth*0.75,this.Y+110,500,300,50);//create screen
    fill(128,0,0);//fill the text with red
    if(wallstop==1){//if the front ultrasonic sensor is the one sensing
      text('OBJECT',windowWidth*0.75,this.Y+50);
      text('DETECTED',windowWidth*0.75,this.Y+130);
      text('AHEAD',windowWidth*0.75,this.Y+210);
    }
    else if(wallstop==2){//if the back ultrasonic is the one sensing
      text('OBJECT',windowWidth*0.75,this.Y+50);
      text('DETECTED',windowWidth*0.75,this.Y+130);
      text('BEHIND',windowWidth*0.75,this.Y+210);
    }
    else{
      fill(0,128,0);//fill the text with green
      text('No',windowWidth*0.75,this.Y+50);
      text('OBJECT',windowWidth*0.75,this.Y+130);
      text('DETECTED',windowWidth*0.75,this.Y+210);
    }
    textAlign(LEFT);
    textSize(12);
  }
}
In order to show the gear box info it gets info from the poseNet calculations done in the sketch and for the collision screen it uses info from the ultrasonic sensors.
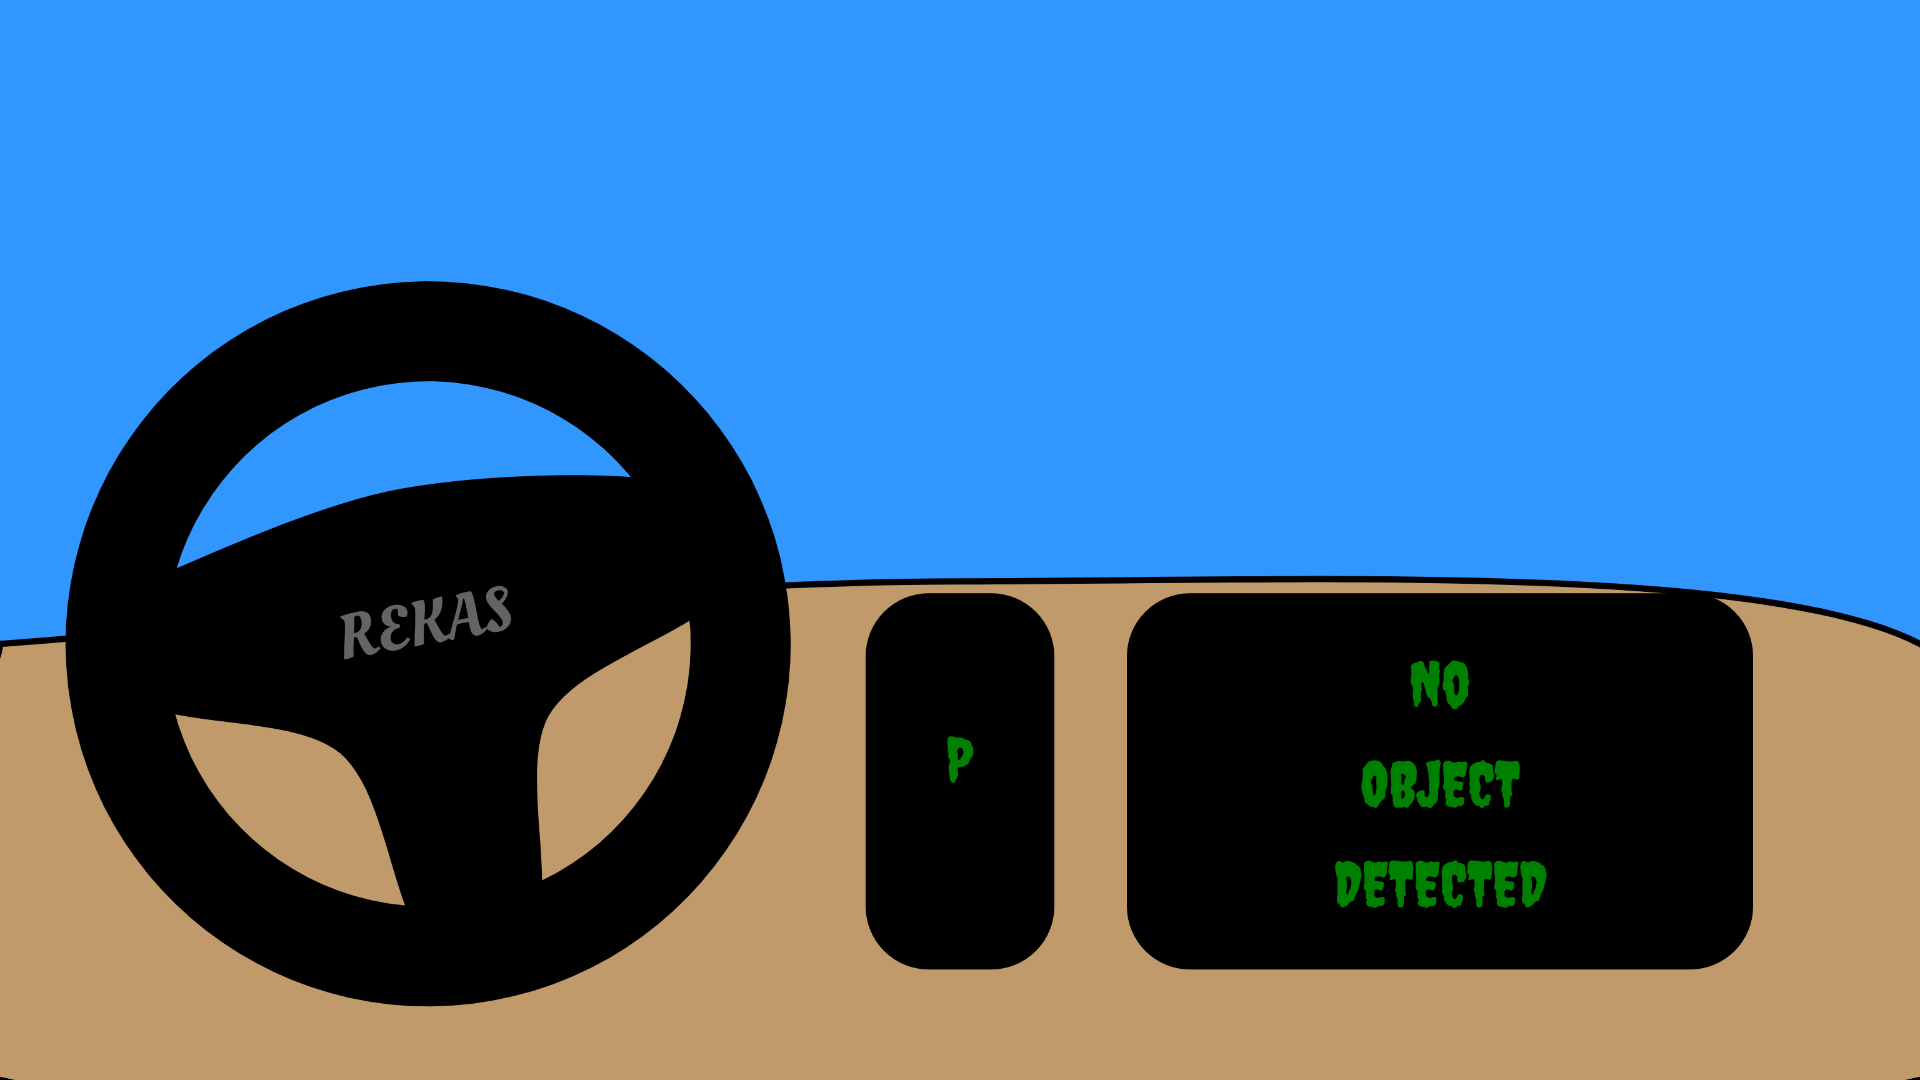
The Steering wheel:
Though also part of the Dashboard, this is a separate class because it controls the left and right movement using info from the other parts. That is, is uses info from the gear box and collision screen. It is not a picture downloaded from somewhere but a hand coded diagram.
class Steer{//this class creates the steer and controls the car movement front and back
  constructor(ctr,F2,X=windowWidth/3,Y=windowHeight/2){//takes the steerX,the font and the position for the steer to be placed
    this.angle=0;//equate the angle to 0
    this.X=X;//set the X and Y for the placement of the steering wheel
    this.Y=Y;
    this.ctr=ctr;
    this.movementLR=0;//create this Left right variable to store the movement
    this.F2=F2;
  }
  show(ctr){//takes steer x
    this.ctr=ctr;//update the ctr with steerX
  push();//designing the steering using stack so that it can be rotated entirely at once
  translate(this.X,this.Y);//making the orijin these
  rotate(this.angle);//causes the rotation
  noFill(0);
  strokeWeight(80);
  rectMode(CENTER);
  circle(0,0,500);
  fill(0);
  stroke(0);
  strokeWeight(12);
  beginShape();
  curveVertex(-230,-80);
  curveVertex(-230,-80);
  curveVertex(0,-120);
  curveVertex(230,-80);
  curveVertex(230,0);
  curveVertex(80,70);
  curveVertex(40,230);
  curveVertex(-40,230);
  curveVertex(-80,70);
  curveVertex(-230,0);
  curveVertex(-230,-80);
  curveVertex(-230,-80);
  fill(0);
  endShape();
  fill(100);
    noStroke()
  textSize(50)
    textAlign(CENTER);
  textFont(this.F2);
  text('REKAS',0,0);//steering wheel/car brand
  pop();
    if(this.ctr>0&&this.ctr<windowWidth){//while the value is within our range
  this.angle=map(this.ctr,0,windowWidth,-PI/2,PI/2);//update angle based on this
  }
  }
  steerTurn(movementFB,wallstop){//this function controls the turning of the steer
    if(this.angle<-PI/7.5&&movementFB==1&&wallstop!=1){
        this.movementLR=4;//front left
      }
      else if(this.angle<-PI/7.5&&movementFB==2&&wallstop!=2){
        this.movementLR=6;//back left
      }
      else if(this.angle>=-PI/7.5&&this.angle<-PI/8){
        this.movementLR=0;//to prevent bugs
      }
      else if(this.angle>=-PI/7&&this.angle<PI/8&&movementFB==1&&wallstop!=1){
        this.movementLR=1;//move straight ahead
      }
      else if(this.angle>=-PI/7&&this.angle<PI/7&&movementFB==2&&wallstop!=2){
        this.movementLR=2;//reverse
      }
      else if(this.angle>=PI/7&&this.angle<PI/5){
        this.movementLR=0;//yeah
      }
      else if(this.angle>=PI/5&&movementFB==1&&wallstop!=1){
        this.movementLR=3;//front right
      }
      else if(this.angle>=PI/5&&movementFB==2&&wallstop!=2){
        this.movementLR=5;//back right
      }
      else{
        this.movementLR=0;//dont move
      }
    return this.movementLR;
  }
}
Sketch:
This is the last part that kind of sums everything up. This is where all the other components come together to produce this artwork. This is also where the poseNet functions and full screen Functions are declared.
let mySteer;//variable going to store steer object
let myDash;//gonna store the dashboard object
let handpose;//gonna store posenet object
let video;//gonna store video object
let predictions = [];//gonna store set of predictions from posenet
let steerX=300;//gonna store the average x coordinate of the hand
let gearY=250;//gonna store the average y coordinate of the hand
let movementLR=0;//gonnna store the left and right movement
let movementFB=0;//gonna store the front and back movement

let wallstop=0;//gonna store the obstacle detection
let steercontrol=0;//gonna control steer to make it feel smooth

let IntroBackground;//intropage background
let S1;//sound 1(button)
let S2;//sound 2
let F1;
let F2;
let introp;//gonna store intropage object
let introbool=true;//going to control the intropage display
let gamebool=false;//going to control the mainpage display

function preload(){
  //in this preload function we will load all the uploads we need before we even start the game.
  IntroBackground=loadImage("intro1.jpg");//this is for the background
  S1=loadSound("button.mp3");//these sets are for the sounds
  S2=loadSound("msound.mp3");
  F1=loadFont("font1.ttf");//these sets are for the fonts
  F2=loadFont("font2.ttf");

}

function setup() {
  createCanvas(windowWidth, windowHeight);
  video = createCapture(VIDEO);//capture video using camera
  video.size(width, height);//set the size of the video to that of the screen
   steercontrol=windowWidth/2//set the steercontrol for smoothness
  handpose = ml5.handpose(video);//get posenet from the video feed using the ml library

  // This sets up an event that fills the global variable "predictions"
  // with an array every time new hand poses are detected
  handpose.on("predict", results => {
    predictions = results;
  });

  // Hide the video element, and just show the canvas
  video.hide();
  introp=new ipage(IntroBackground,S1,S2,F1,F2);//create intropage object
  mySteer=new Steer(steerX,F2,windowWidth*0.5,windowHeight*0.85);//create steer object
  myDash=new dash(windowHeight*0.85);//create dashboard object
  S2.loop();//start playing the sound but with loop property
}

function draw() {
  if(introbool){//if the introbool is true show intropage
    gamebool=introp.show();//update gamebool from intro.show function
    if(gamebool){introbool=false;}//if the gamebool is true,set intro to false
  }
  else{
    background(50,150,255);
  myDash.showdash()//show the dash
  drawKeypoints();//call this function for geting info from the video hand detection
  movementFB=myDash.showgear(gearY);//update the front back movement from the showgear function
  movementLR=mySteer.steerTurn(movementFB,wallstop);//update the leftright movement from the steerturn function
  if(steerX>0&&steerX<windowWidth){//if the steerX is within the range we want
    mySteer.show(steerX);//show the steer with this value
    steercontrol=steerX;//update the steercontrol incase we stop getting data
  }
  else{//if the steerX is not in our range,
    if(steercontrol<windowWidth/2-5){steercontrol+=10;}//using our steercontrol,slowly move the steer to the center
    else if(steercontrol>windowWidth/2+5){steercontrol-=10;}
    mySteer.show(steercontrol);
  }
  myDash.showScreen(wallstop);//show the screen with the wallstop getten form the Arduino
  }
}
function keyPressed() {//if spaebar is pressed connect to arduino
  if (key == " ") {
    // important to have in order to start the serial connection!!
    setUpSerial();//connect to arduino
  }
}
function readSerial(data) {


  if (data!=null){//if the data is not null
    //////////////////////////////////
    //READ FROM ARDUINO HERE (handshake)
    //////////////////////////////////
    wallstop= int(trim(data));
    //////////////////////////////////
    //SEND TO ARDUINO HERE (handshake)
    //////////////////////////////////
    let sendToArduino = movementLR + "\n";
    writeSerial(sendToArduino);
  }

}
function drawKeypoints() {
  let totalX=0;//set variable to store the sum of the x coordinates of all the predictions
  let totalY=0;//same for y
  let avgctr=0;//set a counter to count the predictions
  let len=0;//I dont use len here but i was experimenting somthing
  for (let i = 0; i < predictions.length; i += 1) {
    const prediction = predictions[i];
    len=predictions.lenght*prediction.landmarks.length;
    for (let j = 0; j < prediction.landmarks.length; j += 1) {
      const keypoint = prediction.landmarks[j];
       totalX+=windowWidth-map(keypoint[0],0,video.width,0,windowWidth);//map the points to our window size and sum it
      totalY+=map(keypoint[1],0,video.height,0,windowHeight);
      avgctr++;//increase this too
    }
  }
  steerX=totalX/avgctr;//update steerX with the average of X
  gearY=totalY/avgctr;//same for Y but with average of Y
}
function windowResized() {
  resizeCanvas(windowWidth, windowHeight);//resize the canvas to go to fullpage
}

function keyTyped() {
  // $$$ For some reason on Chrome/Mac you may have to press f twice to toggle. Works correctly on Firefox/Mac
  if (key === 'f') {
    toggleFullscreen();//if f is pressed, show fullpage
  }
  if(key==='q'){//if q is pressed go to h=intro page
    if(introbool==false){
      introbool=true;
      introp.playbool=false;
      S2.play();
    }
  }
  // uncomment to prevent any default behavior
  // return false;
}

// Toggle fullscreen state. Must be called in response
// to a user event (i.e. keyboard, mouse click)
function toggleFullscreen() {
  let fs = fullscreen(); // Get the current state
  fullscreen(!fs); // Flip it!
}
Rekas Bot:
My inspiration for this project comes from my zeal to use the ml library in p5 and I had fun developing this.
Model: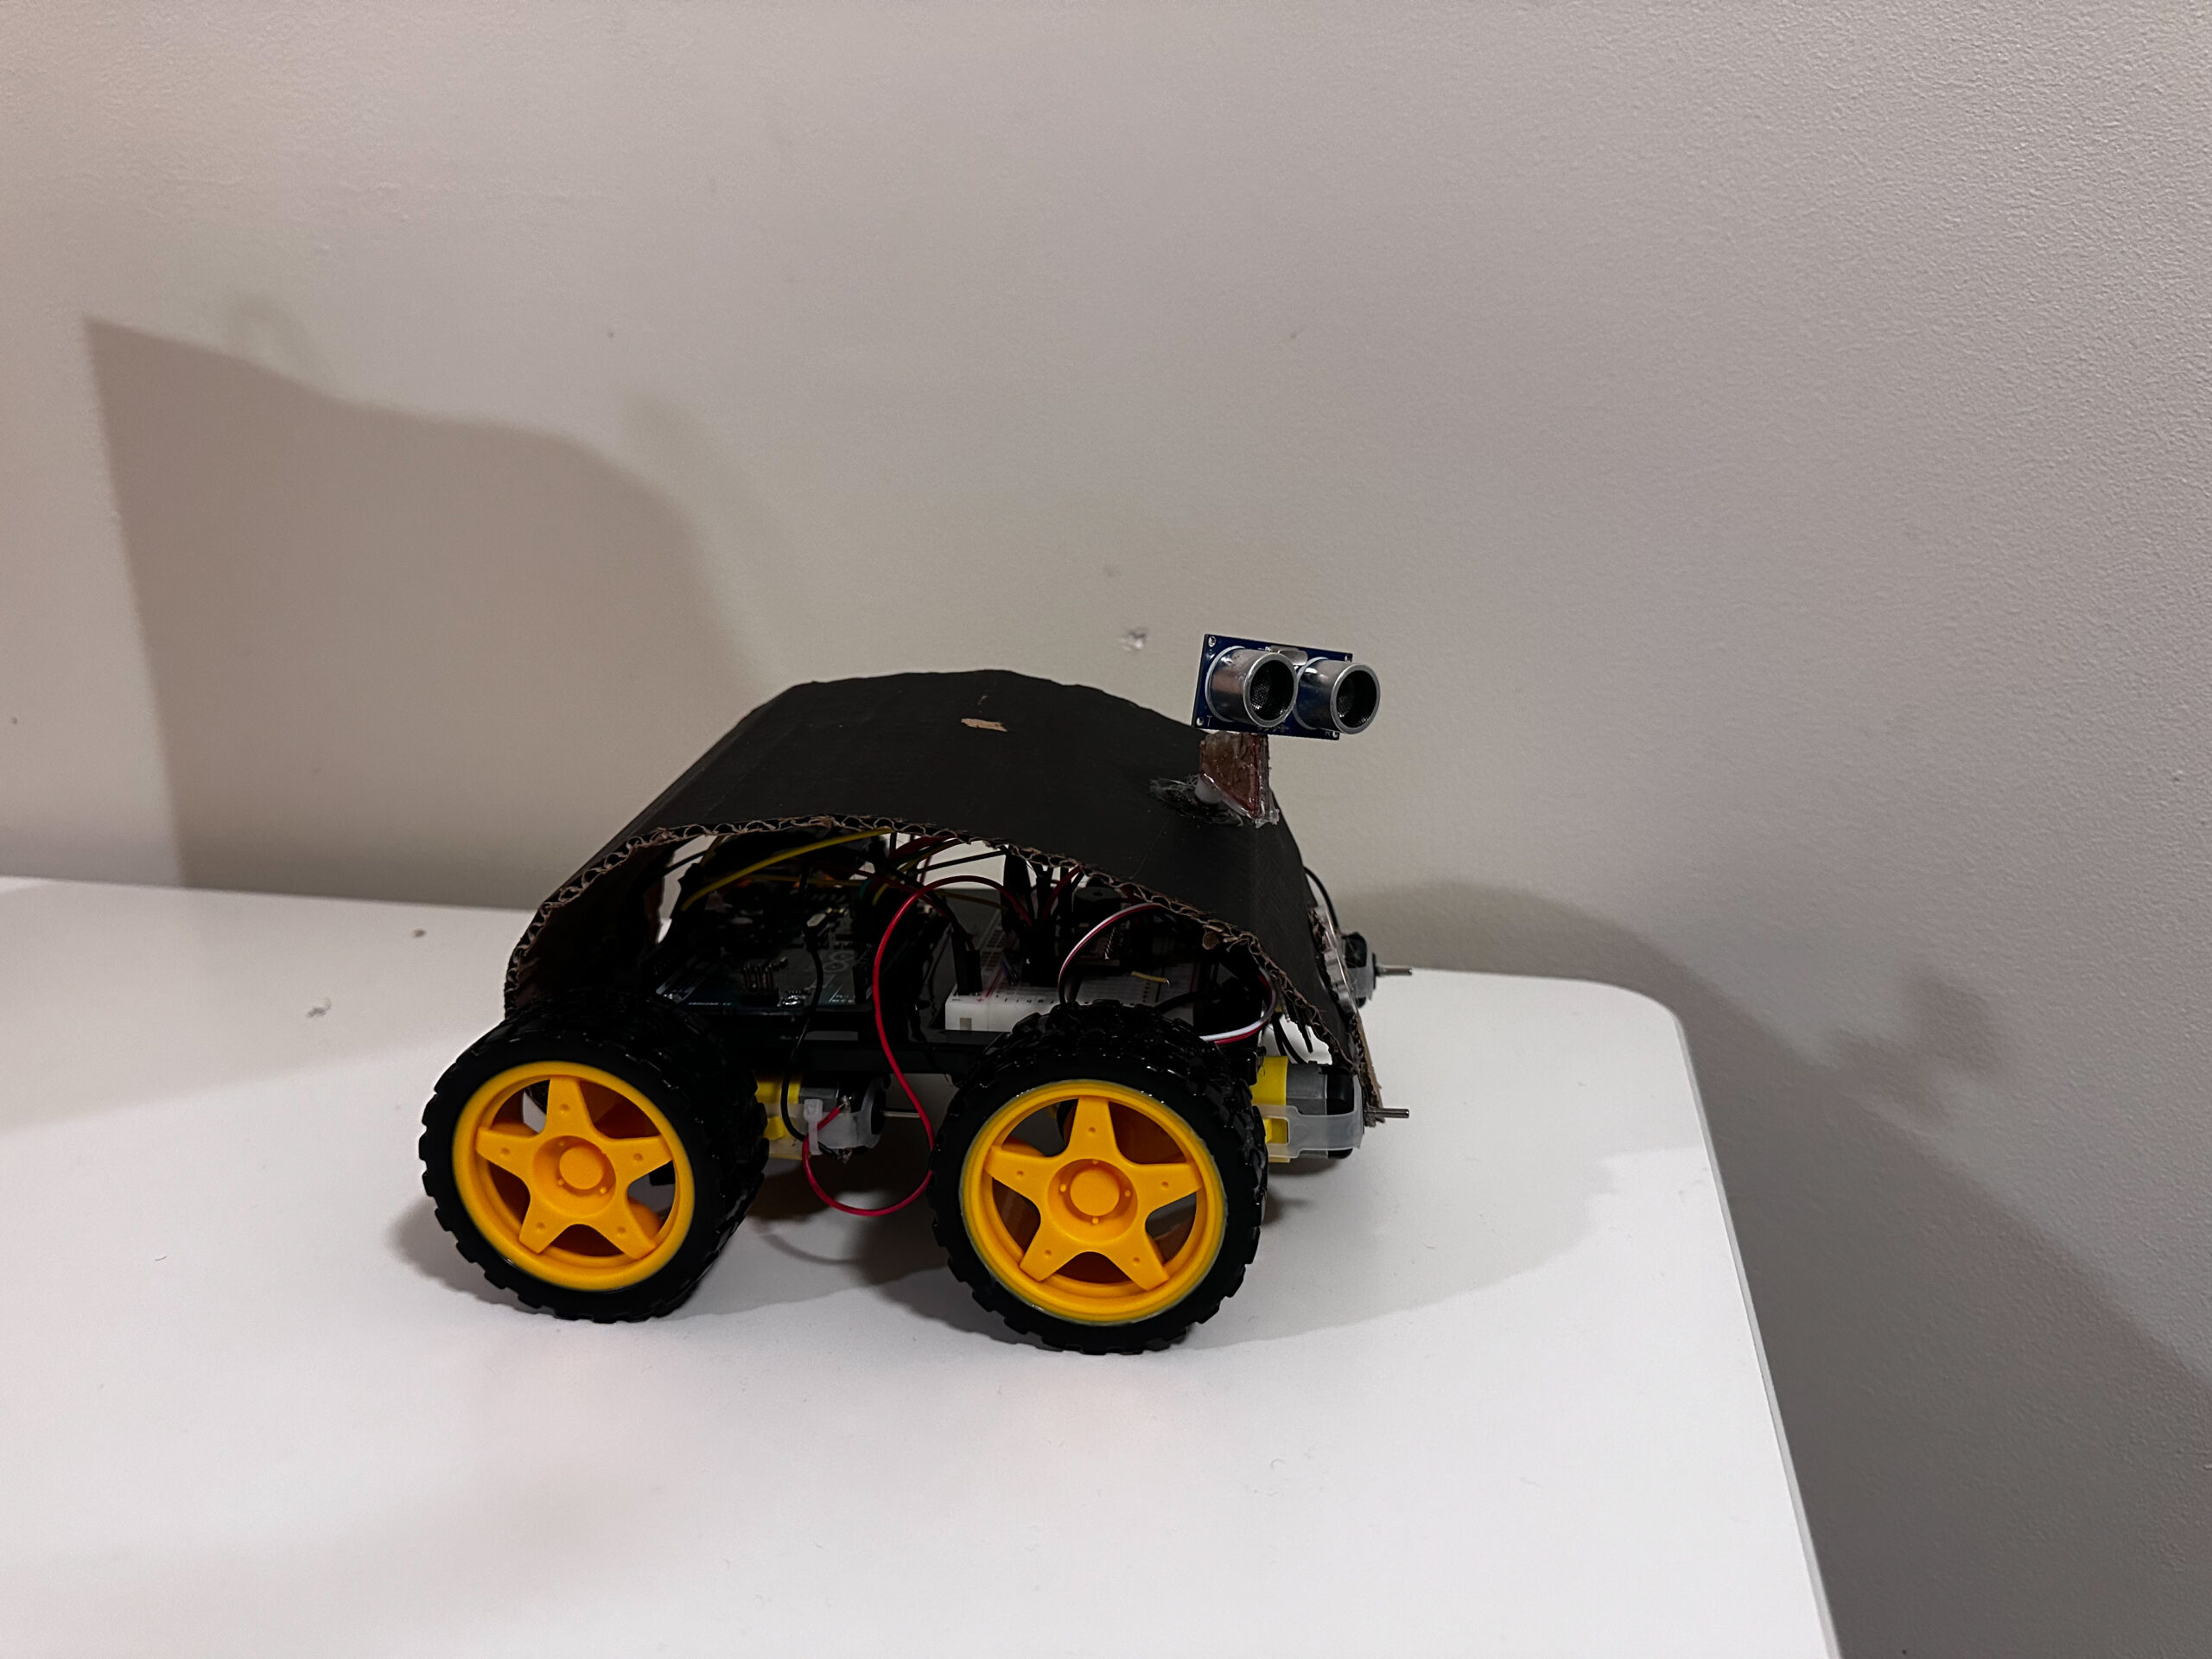
Test Video:
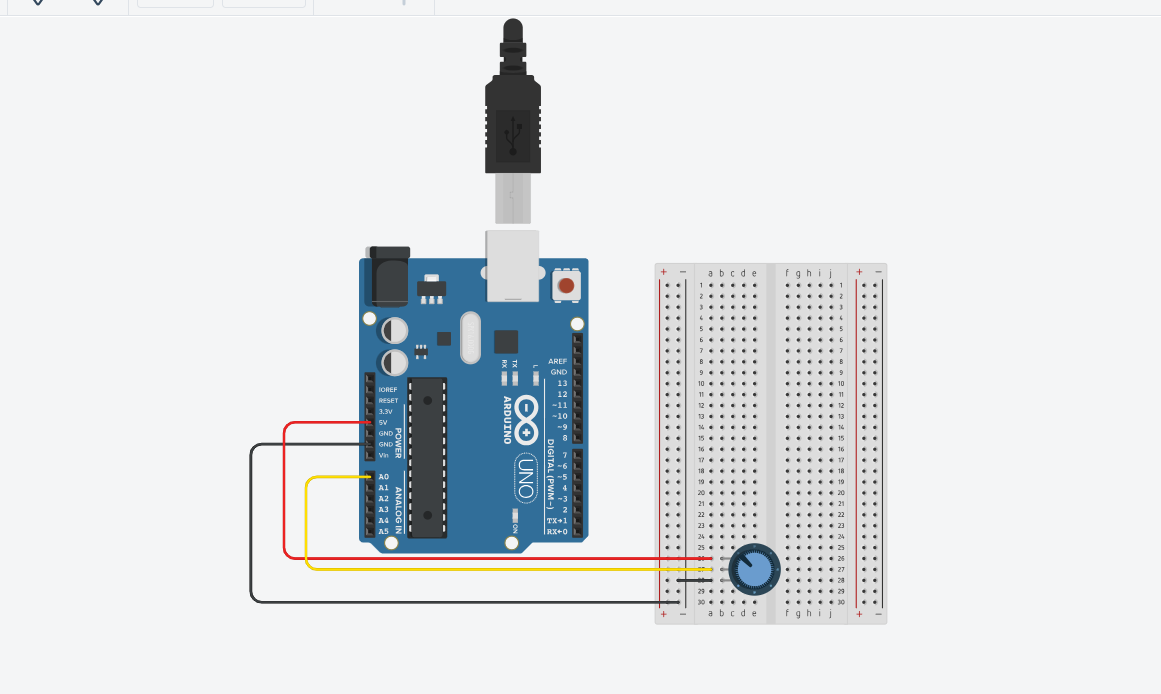
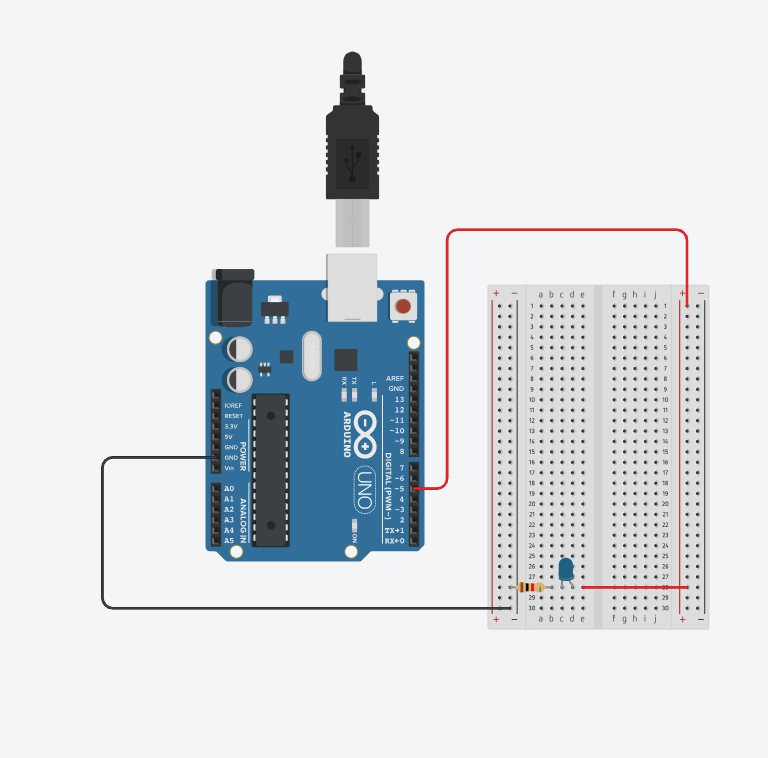
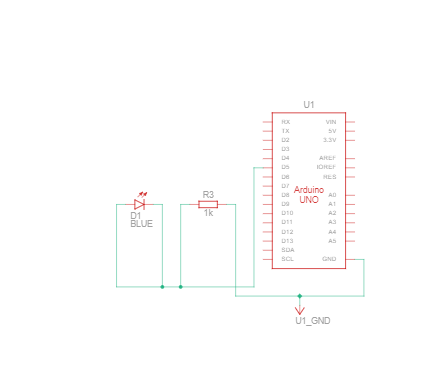
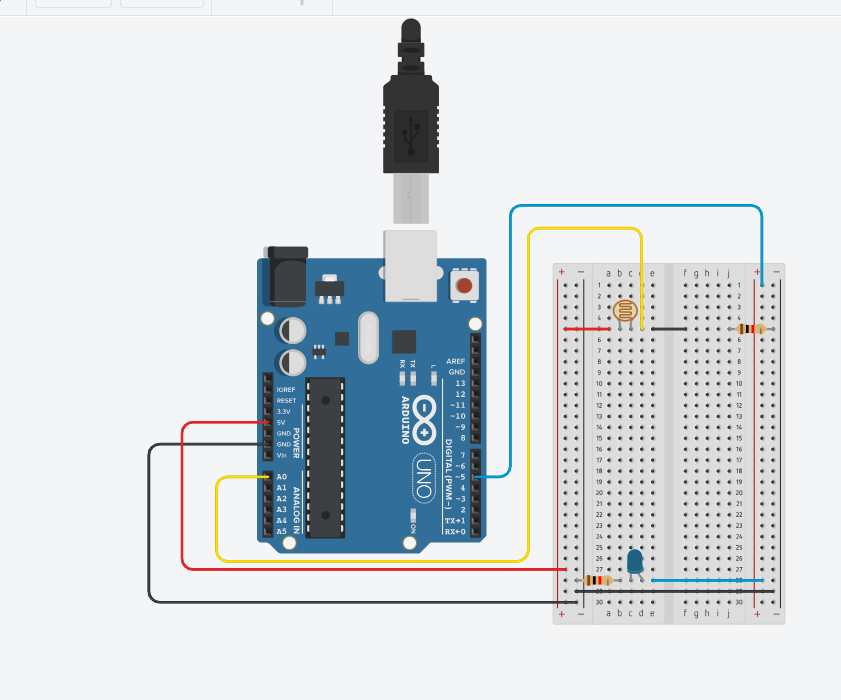
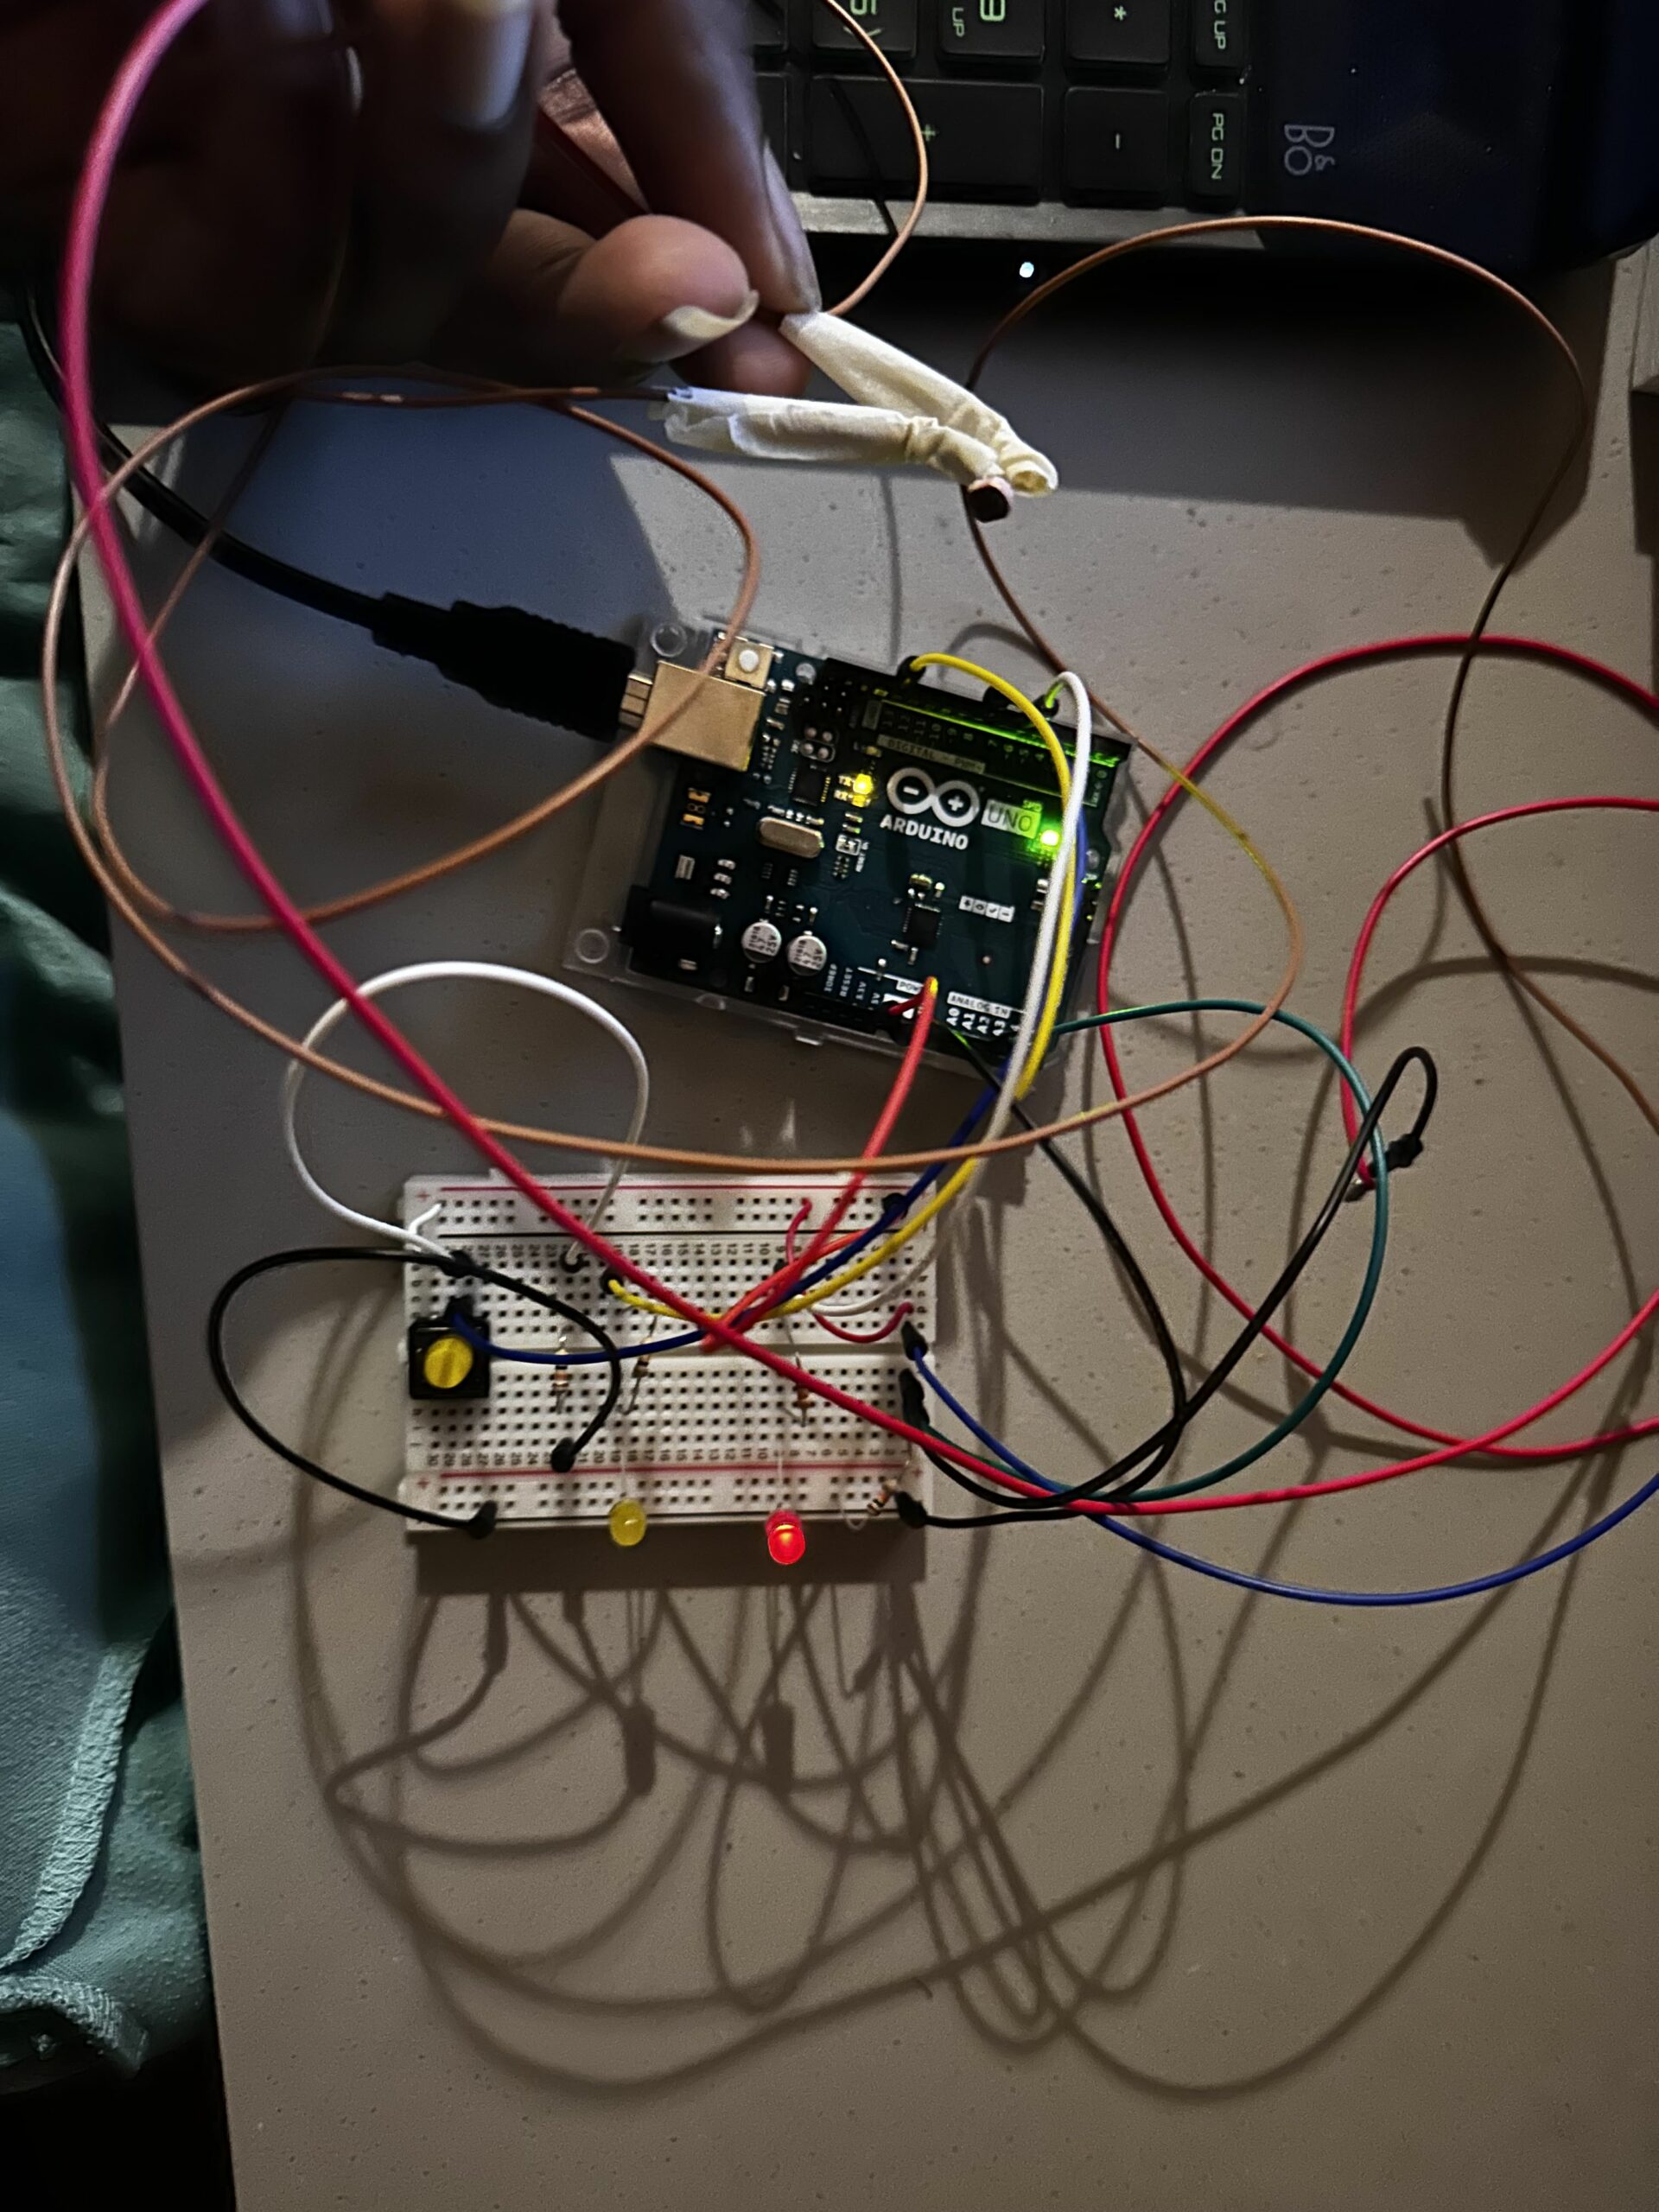
Arduino Circuit Diagram:
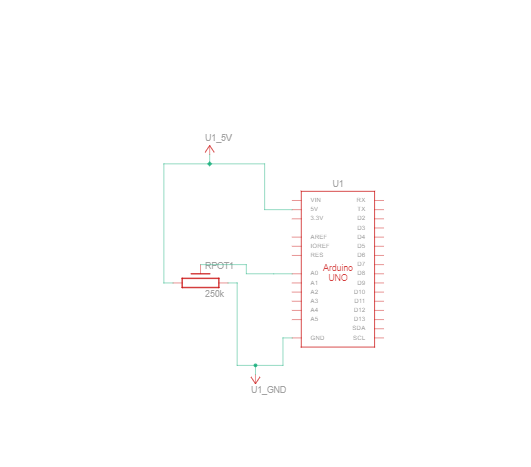
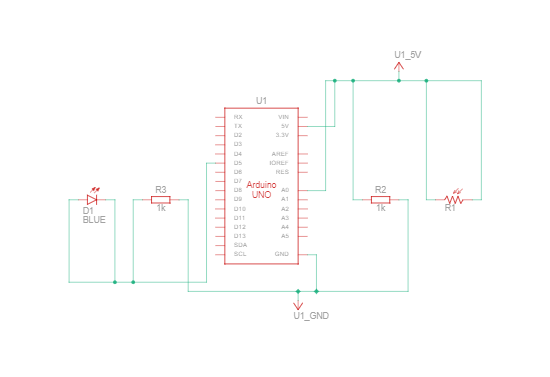
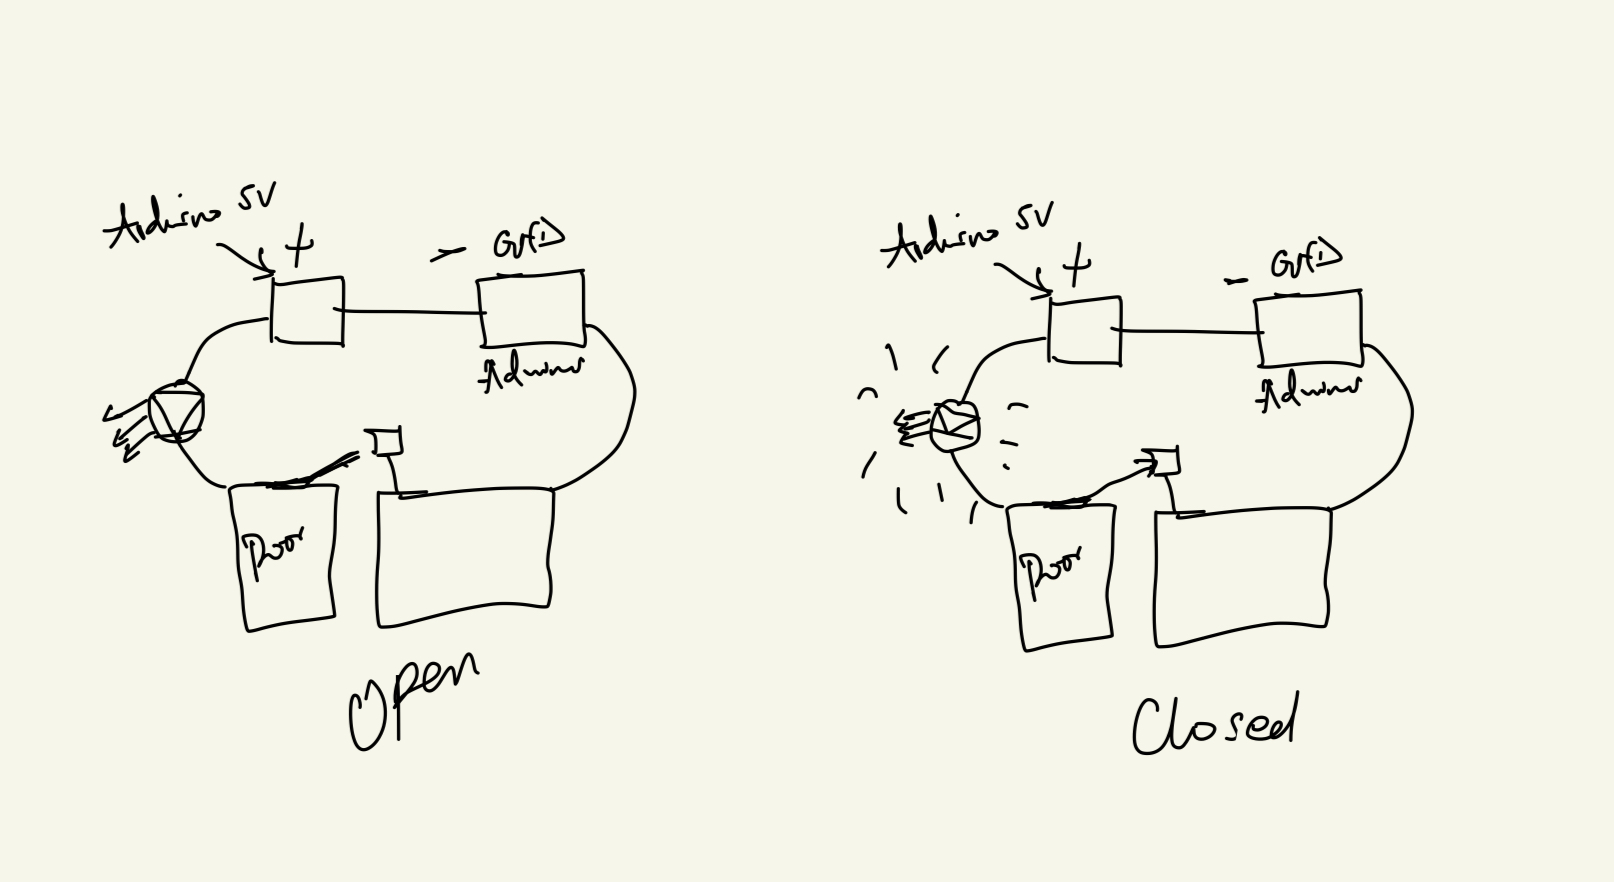
Schematic Diagram:
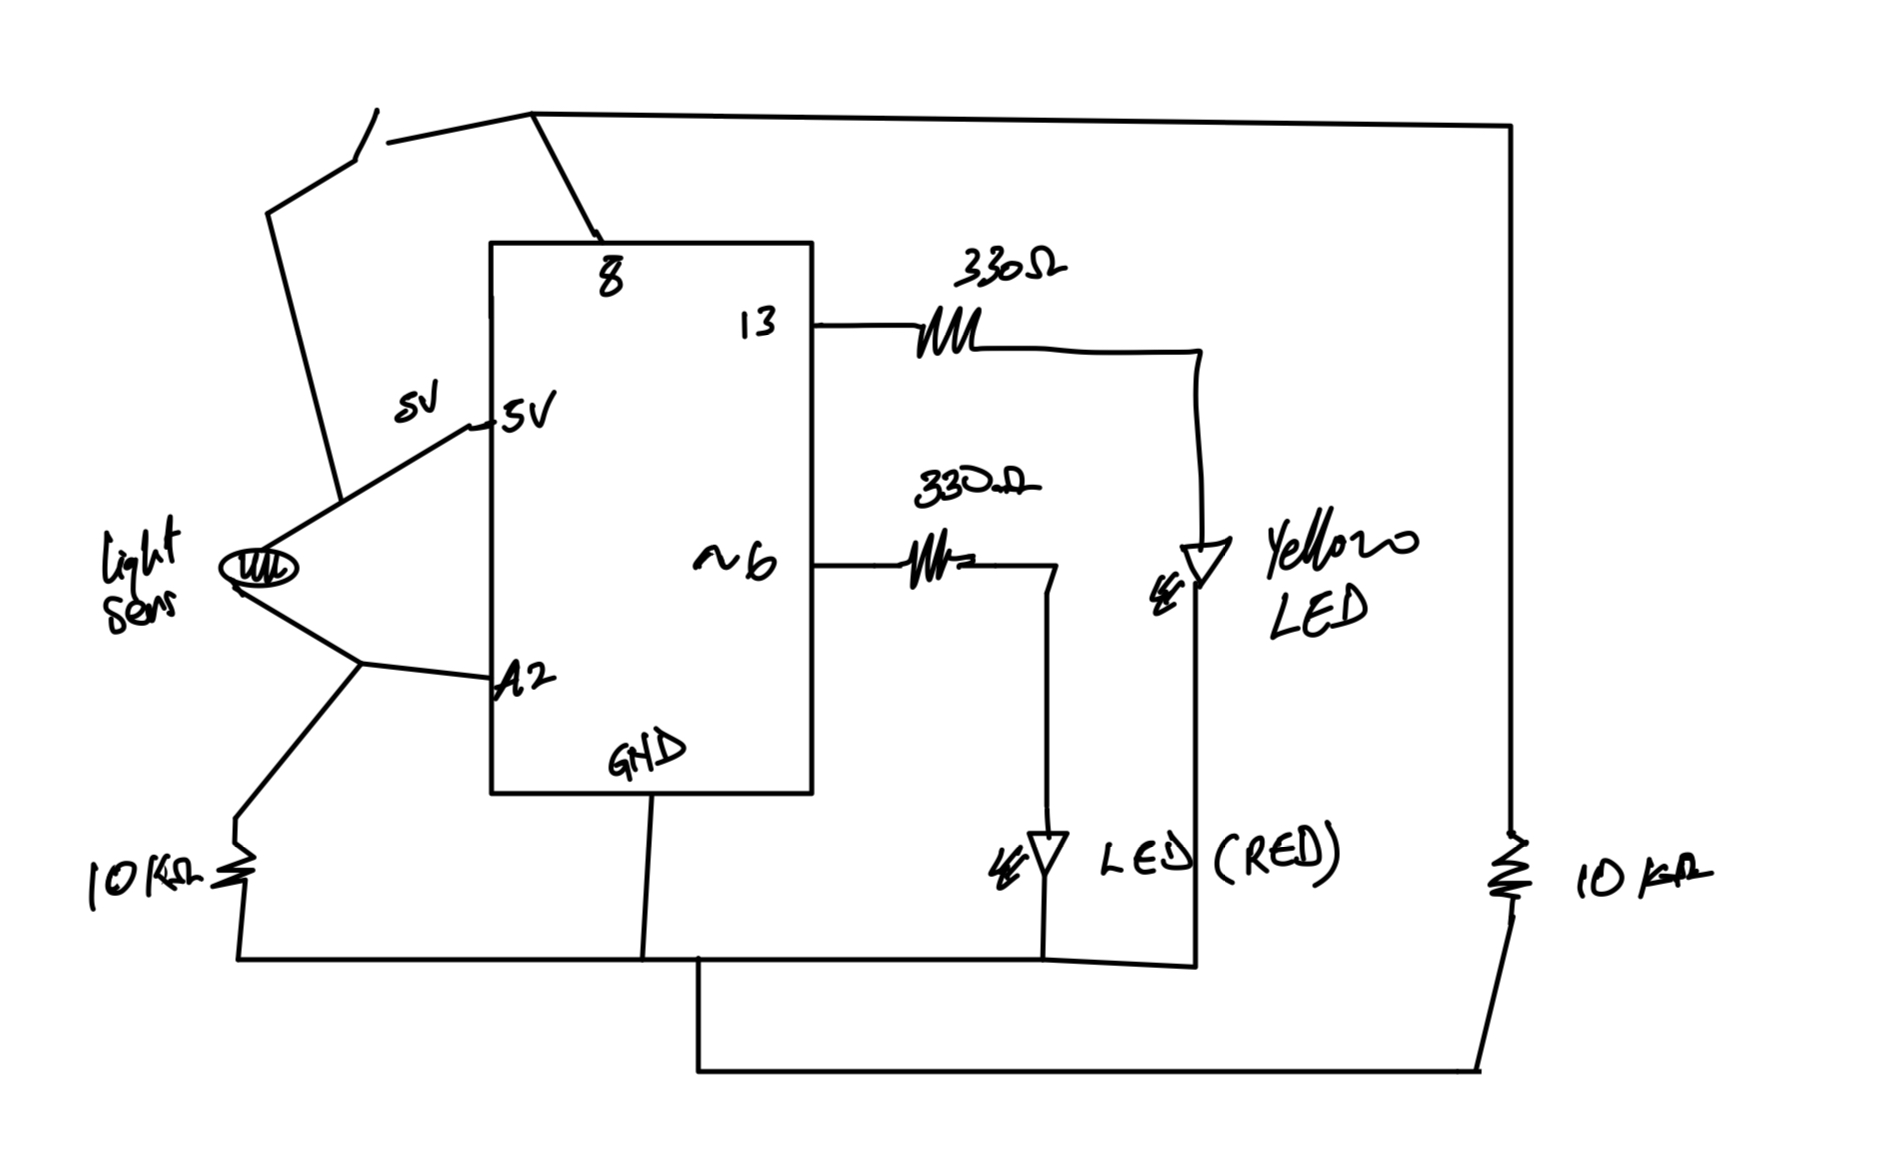
Clarification on the Schematic motor drawing:
 By Aya Riad
Future Improvements:
I Tried to implement Bluetooth but I was not able to because it kept on failing even though I had connected and set up everything right so I wish to be able to find a way to make this connection more reliable and also I plan to make the machine learning more reliable in future.
IM Showcase:
So just before the showcase started, I added one line of code which made the bot move randomly as though it had life.
if(introbool){//if the introbool is true show intropage
    gamebool=introp.show();//update gamebool from intro.show function
    movementLR=int(random(0,6));//do random stuff
    if(gamebool){introbool=false;}//if the gamebool is true,set intro to false
  }
I am really proud of this last decision.
and when you want to drive it, it stops the random movements.
Thank you.