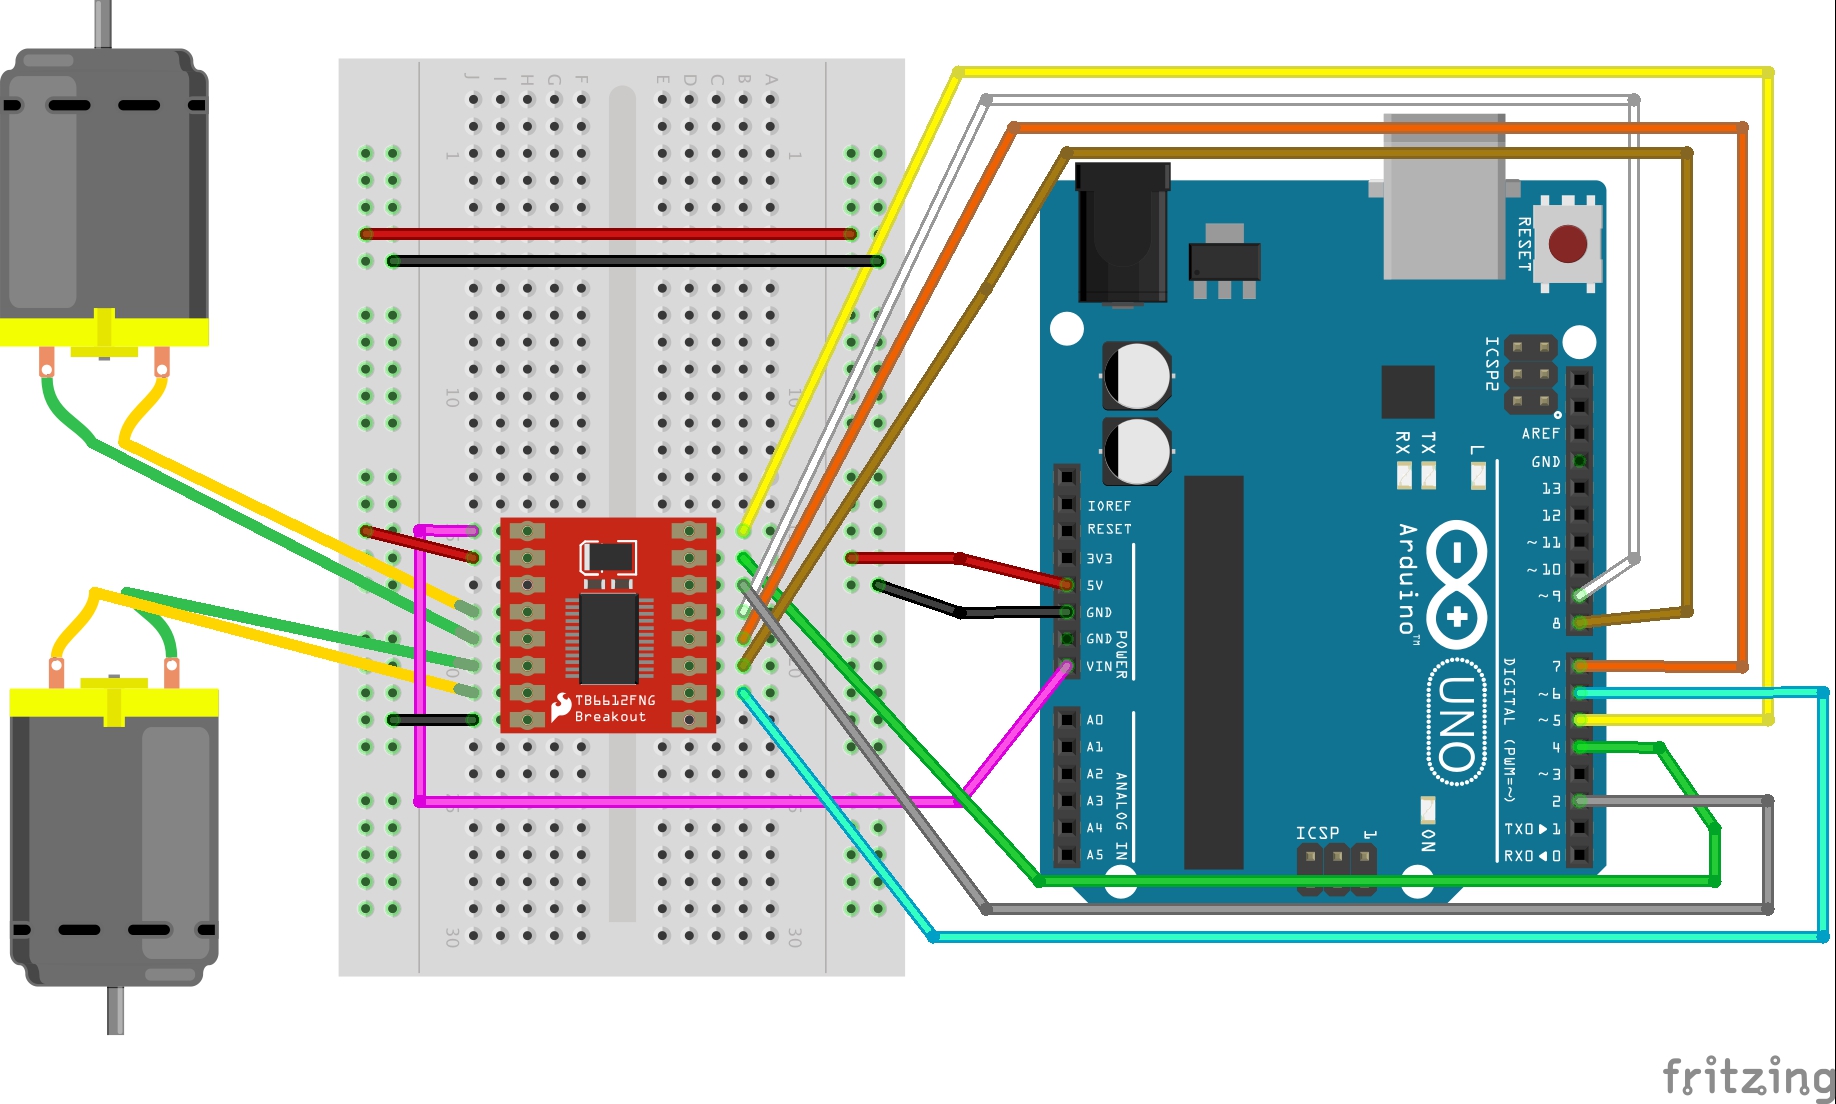
Download the library here: TB6612FNG ARDUINO LIBRARY, or grab the latest version from Sparkfun’s GitHub repository. Once the library is installed, open the example code included in the Library through the Arduino IDE’s examples.
Transistor/diode
You would use the same set up with a diode and transistor for a solenoid as well.
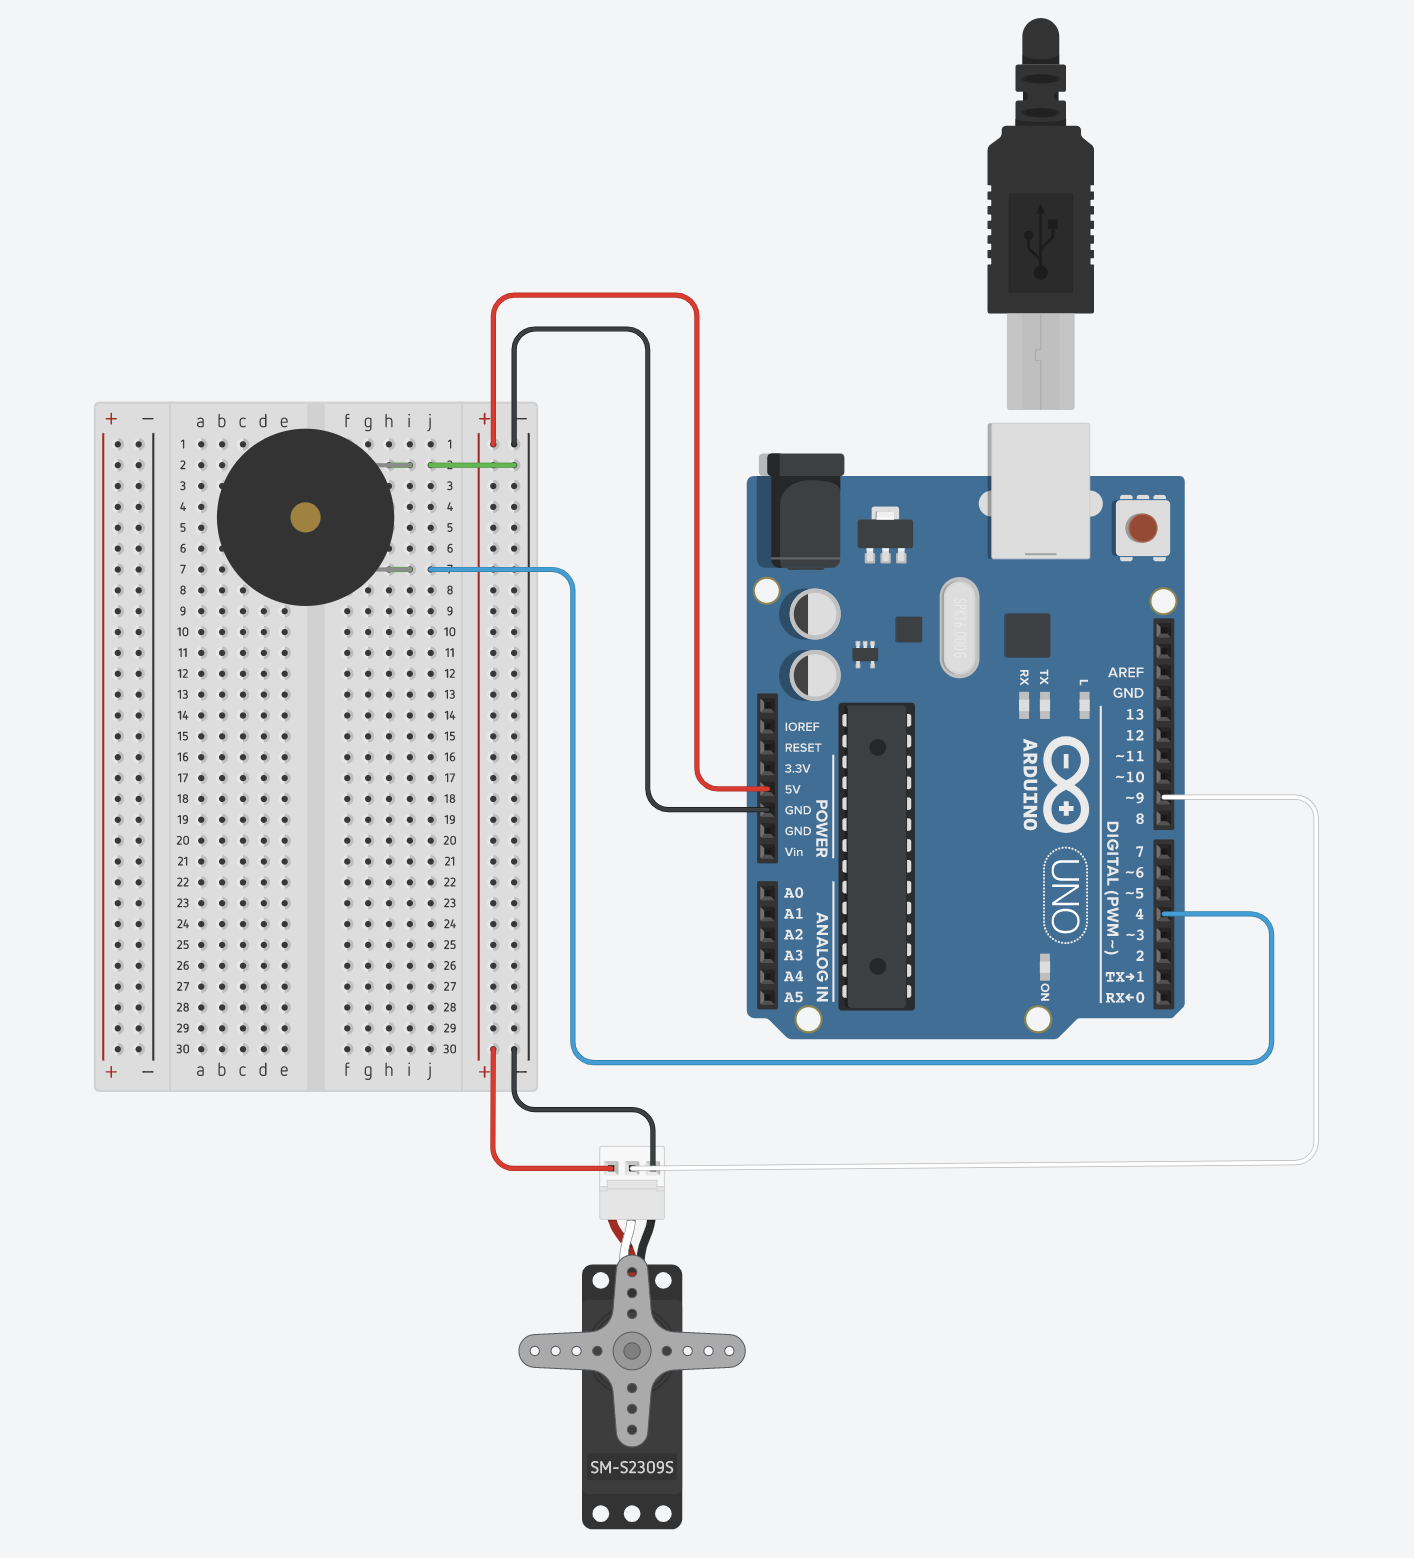
#include <Servo.h>
#include "pitches.h"

Servo servo;
int servoPos = 100;
int whichNote = 0;
int notes[10] = {NOTE_C4, NOTE_D4, NOTE_E4, NOTE_F4, NOTE_G4, NOTE_A4, NOTE_B4, NOTE_C5, NOTE_D5, NOTE_E5};
int durations[10];

void setup() {
  servo.attach(9);
  pinMode(3, OUTPUT);
  Serial.begin(9600);

  // set the durations with a random coinflip
  for (int i = 0; i < 10; i++) {
    int coinFlip = random(2);
    if (coinFlip == 0)
      durations[i] = 8;
    else
      durations[i] = 4;
  }
}

void loop() {
  int val = analogRead(A0);

  // the rate is 1 second divided by the duration of the note
  int rate = 1000 / durations[whichNote];

  // get the current time
  unsigned long currentTime = millis();

  // trigger a note
  if (currentTime % rate == 0  ) {
    tone(4, notes[whichNote], random(100, 400));
    whichNote = random(10);
    delay(1);
  }

  // do the servo at half speed
  if (currentTime % (rate * 2) == 0  ) {
    servoPos = 50;
    servo.write(servoPos);
  }

  // else if not triggereing the servo, then every 10 milliseconds move the servo arm back a little bit
  // can't do it every frame as that is too fast for the servo
  else if (currentTime % 10 == 0) {
    servoPos -= 1;
    servo.write(servoPos);
  }
}
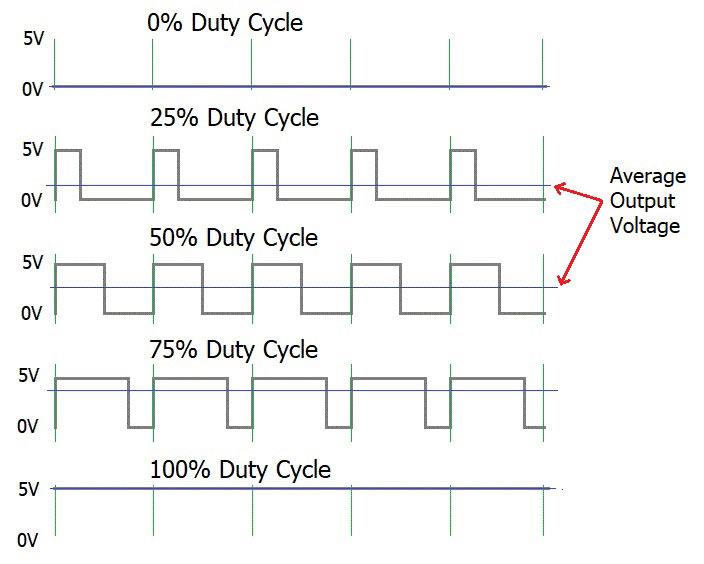
Timer0 – used for millis(), micros(), delay() and PWM on pins 5 & 6
Timer1 – used for Servos, the WaveHC library and PWM on pins 9 & 10
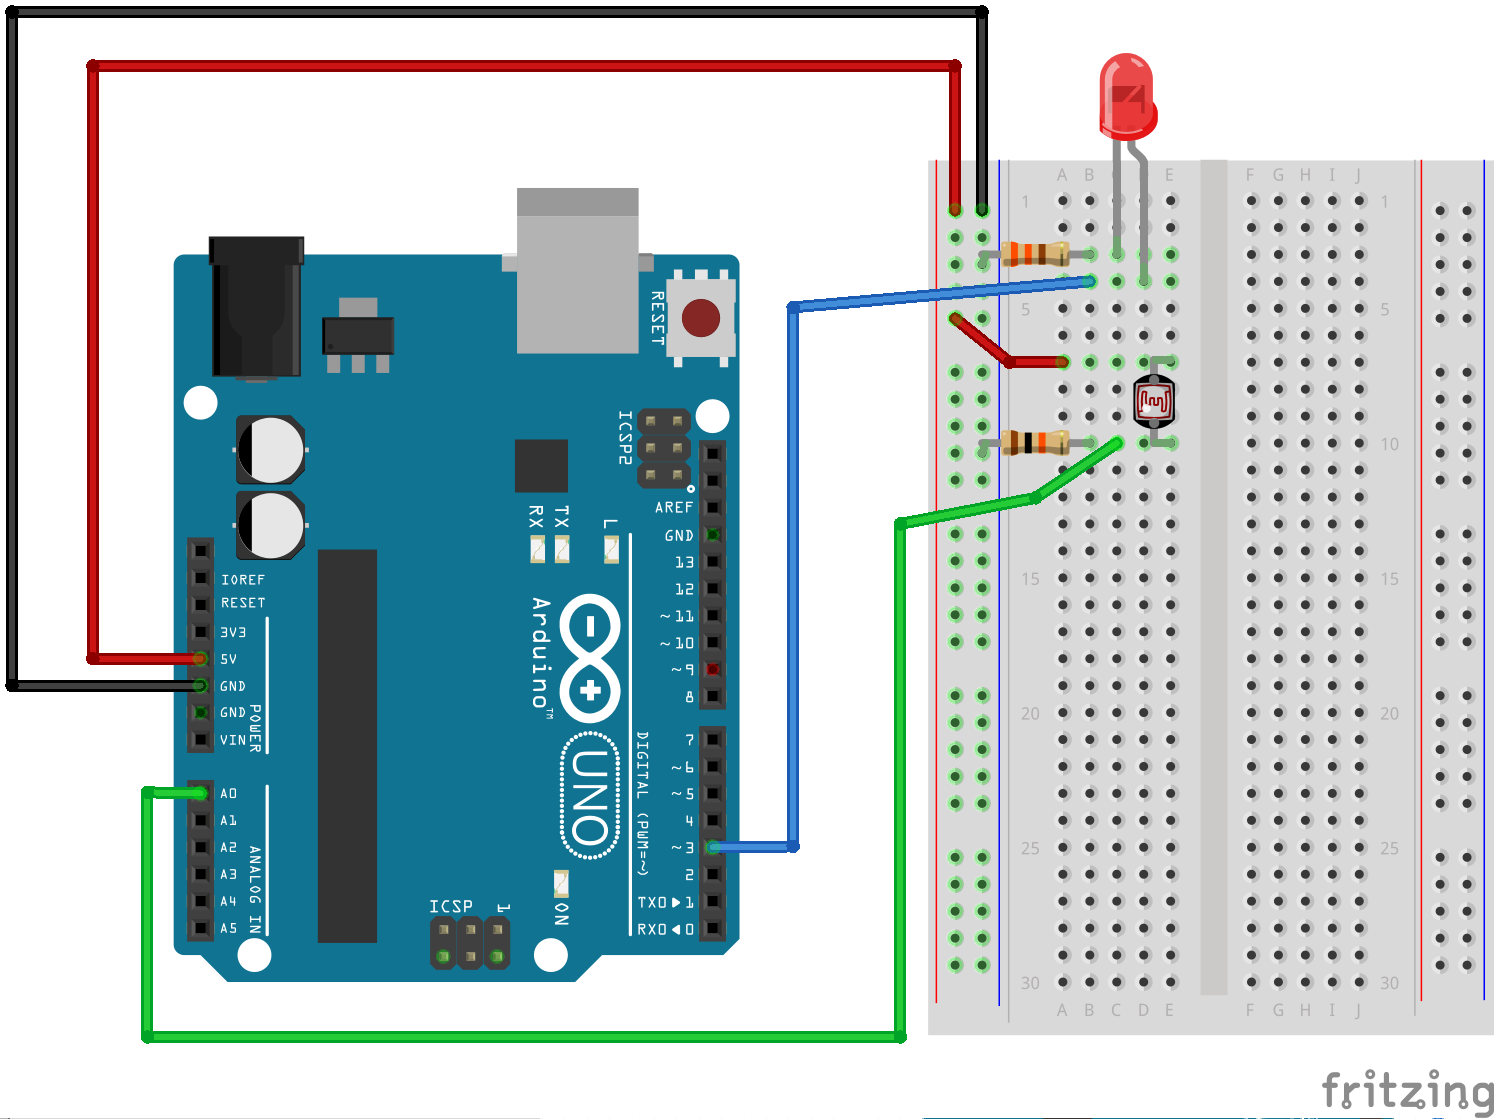
const int ledPin = 2;
bool ledState = LOW;

// a really longer number with no + or - sign
unsigned long toggleTime = 0;
int triggerInterval = 500;

void setup() {
  pinMode(ledPin, OUTPUT);
  Serial.begin(9600);
}

void loop() {
  // read the analog input
  int knobValue = analogRead(A0);
  // map that input to a range appropriate for our use
  // in this case, we take the range of the photocell and map it to millis between 10 & 500
  // this is the blink interval for the LED
  triggerInterval = map(knobValue, 190, 860, 10, 500);

  // print out the original value and the mapped value on the same line
  Serial.print(knobValue);
  Serial.print(" ");
  Serial.println(triggerInterval);

  // if the current time (millis) is more than the exact time when we are supposed to toggle
  if (millis() > toggleTime) {
    // flip the LED to the opposite of what it was
    ledState = !ledState;
    // set the next time the LED should toggle
    // to the current time + whatever the blink interval amount of time is
    toggleTime = millis() + triggerInterval;
  }

  // turn the LED on or off based on the ledState vaviable
  digitalWrite(ledPin, ledState);
}
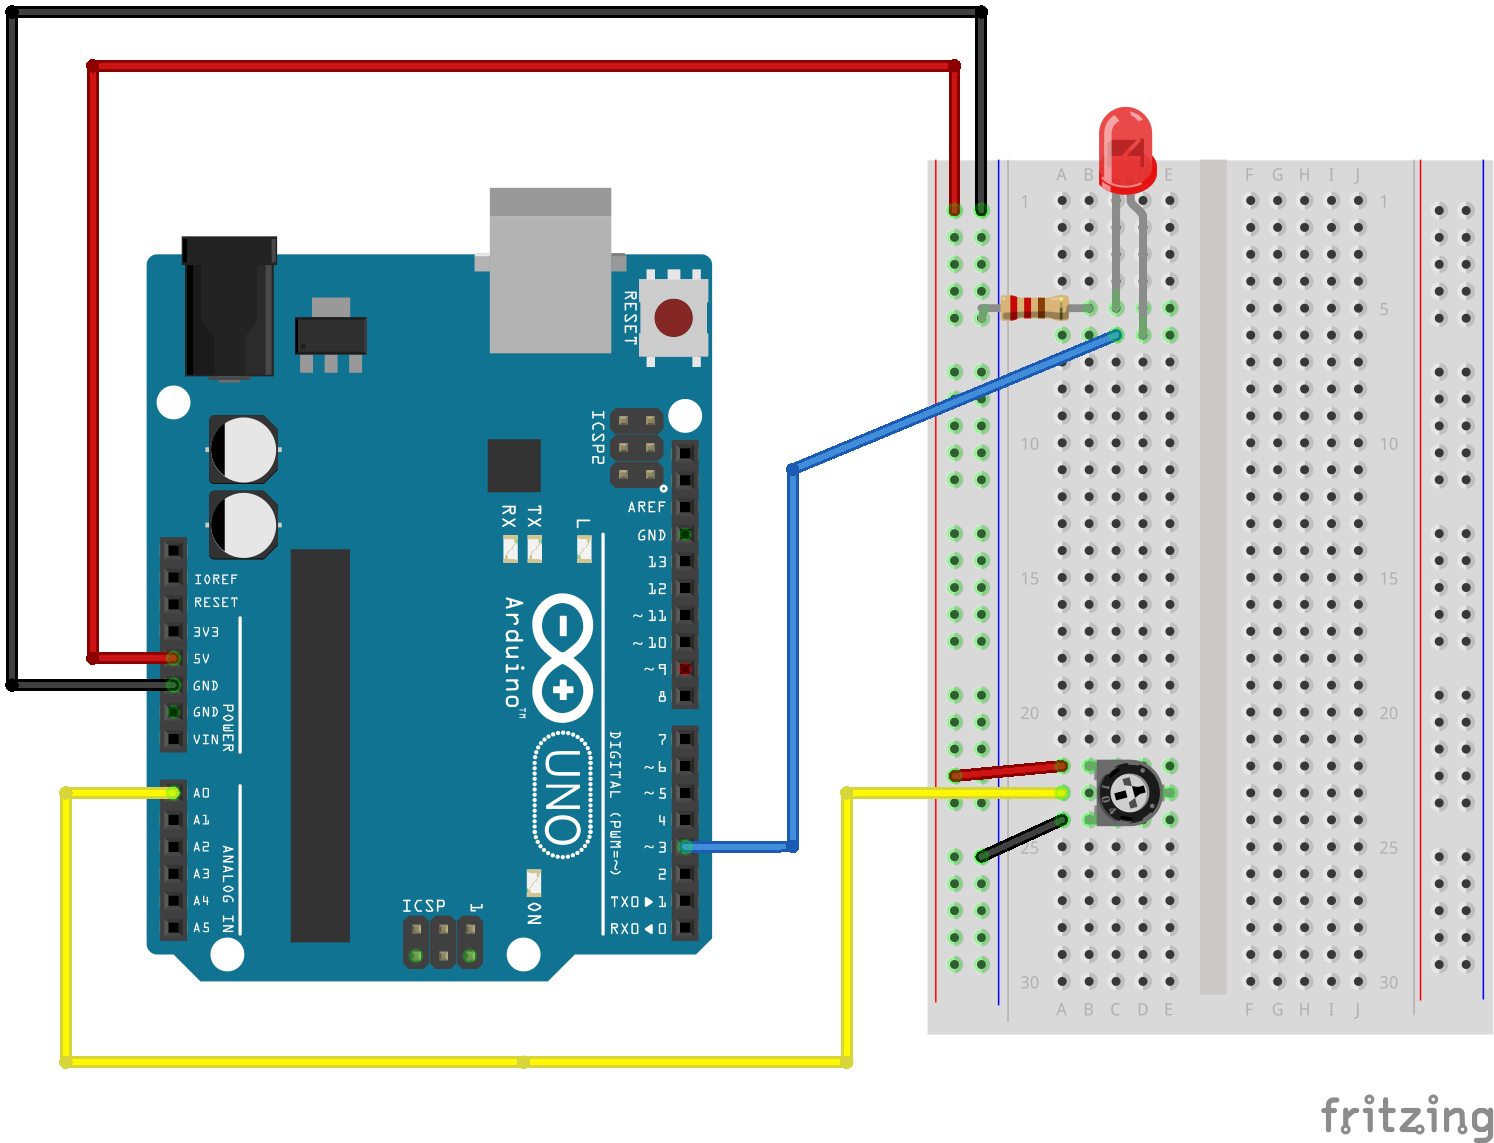
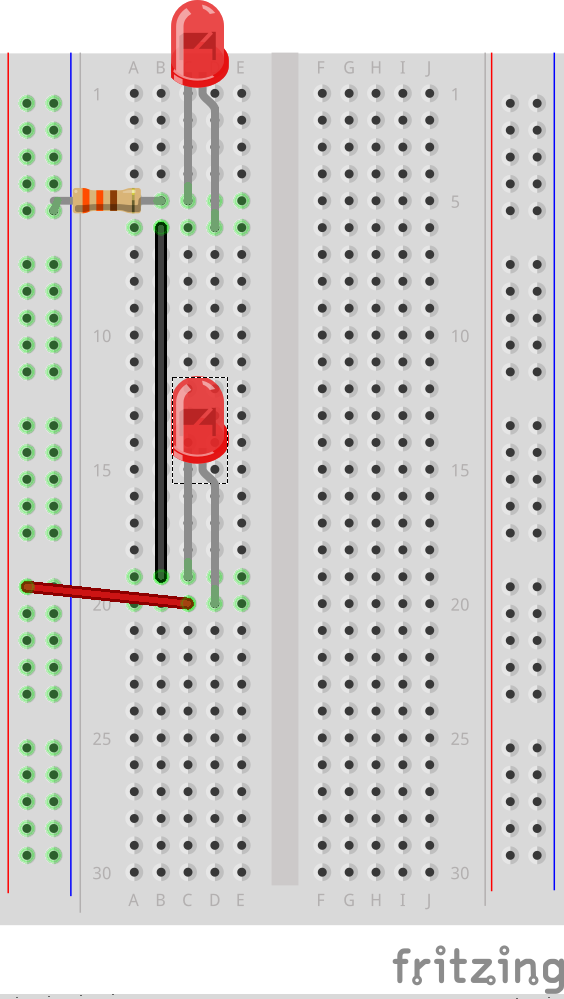
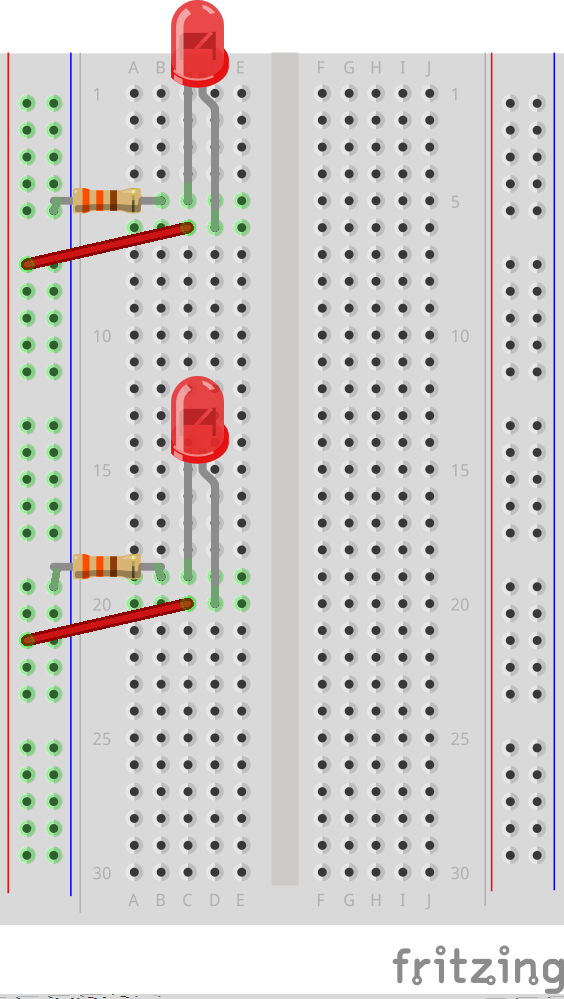
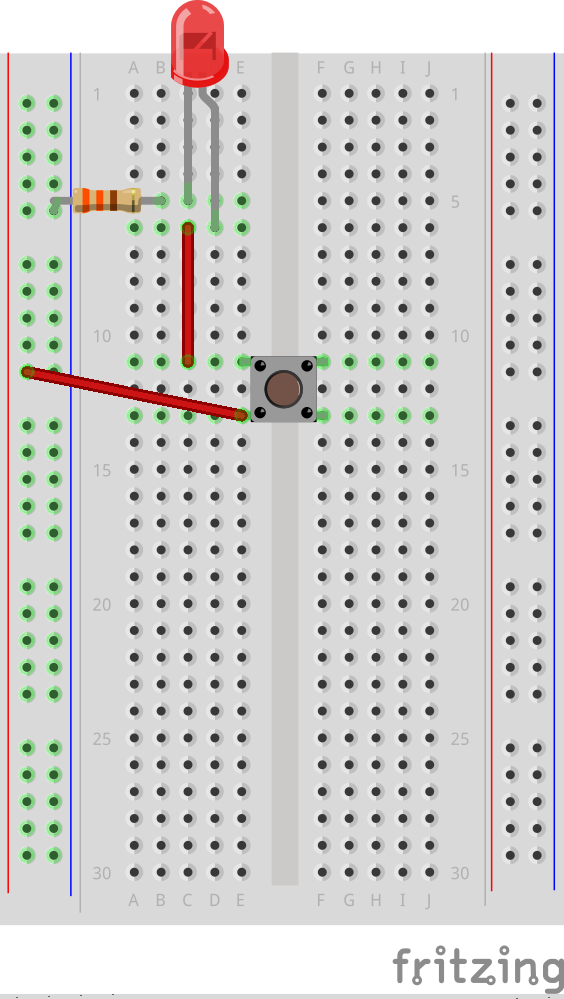
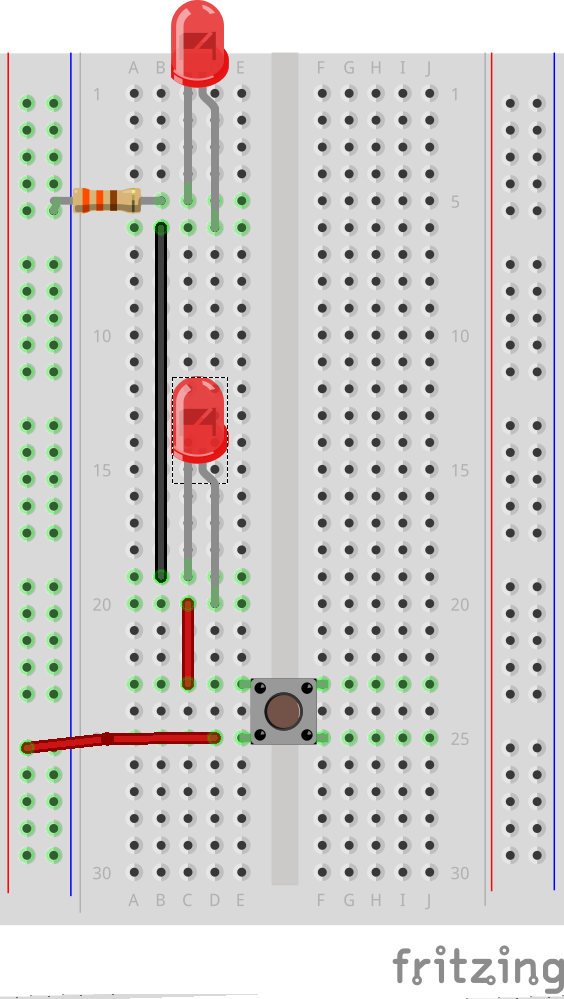
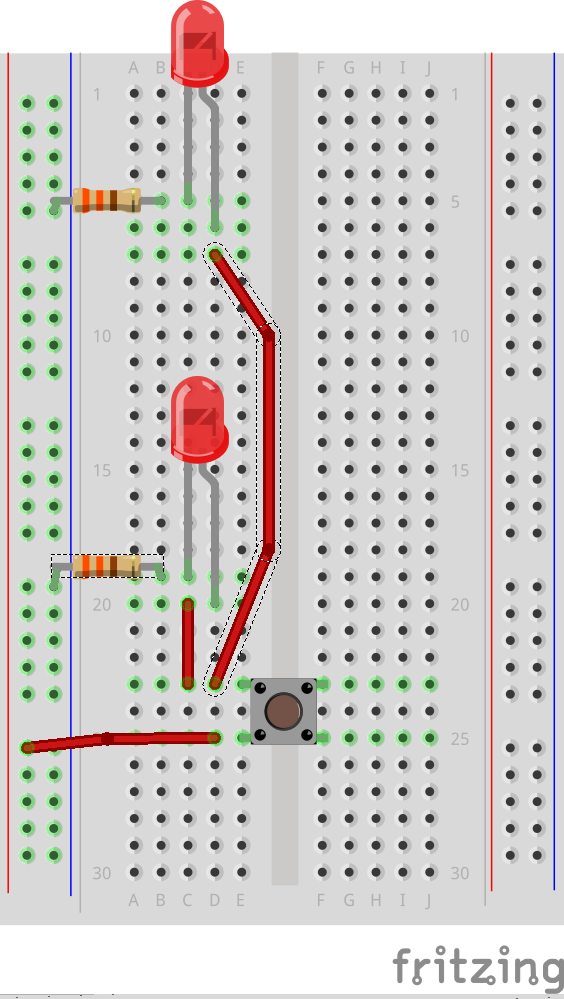
Digital Read a button on pin 2 and digital write an LED on pin 3:
Remember to include a 330 ohm resistor for the LED and a 10k ohm pull down resistor to ground for the button.
int buttonPin = 2;
int ledPin = 3;
int ledState = LOW;
int prevButtonState = LOW;

void setup() {
  // set pin modes
  pinMode(ledPin, OUTPUT);
  pinMode(buttonPin, INPUT);
  // needed in order to start serial communication
  Serial.begin(9600);
}

// PSUEDO CODE:
// check if button is currently pressed
// if button is pressed then check to see if it was pressed during the last frame too
// (we need to remember our button state)
// if button is bressed and previous button is not pressed then flip our LED state

 void loop() {
  // check to see what state our button is in, and store that information
  int currentButtonState = digitalRead(buttonPin);

  // if the button is currently being prssed down, AND during the last frame is wasn't pressed down
  if (currentButtonState == HIGH && prevButtonState == LOW) {
      // flip the LED state
      if (ledState == HIGH){
        ledState = LOW;
      } else if (ledState == LOW){
        ledState = HIGH;
      }
  }
  // if you want to print out the LED state
//  Serial.println(ledState);

  // set our LED to turn on and off according to our variable that we flip above
  digitalWrite(ledPin, ledState);

  //we need to remember the state of our button for the next time through LOOP
  prevButtonState = currentButtonState;
}
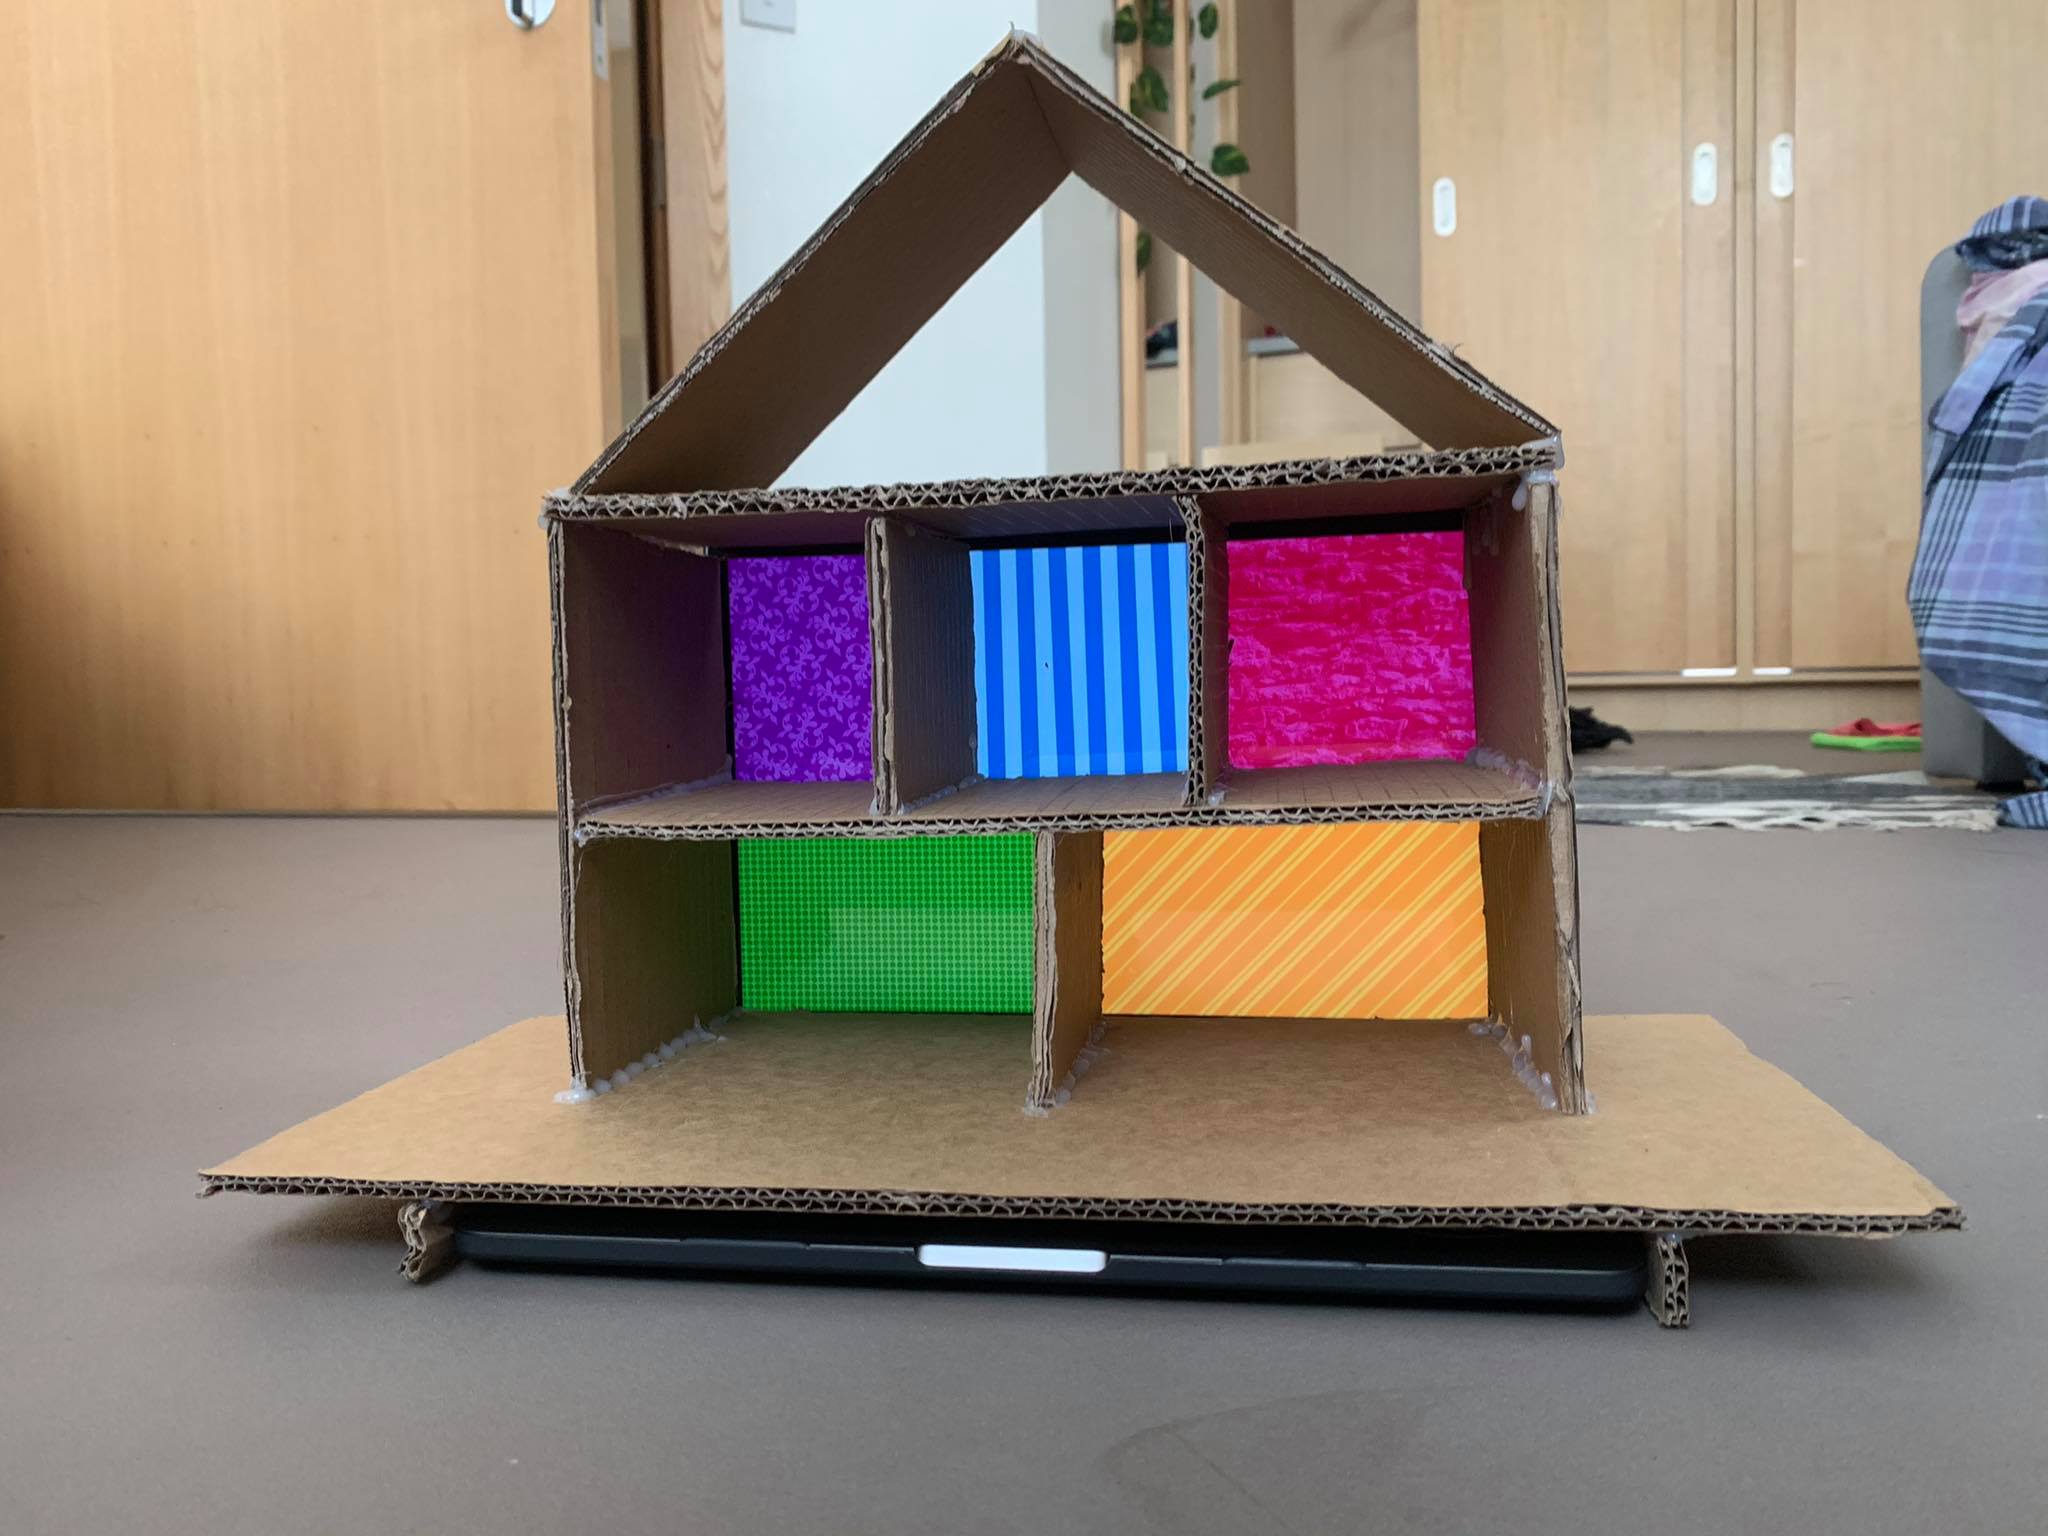
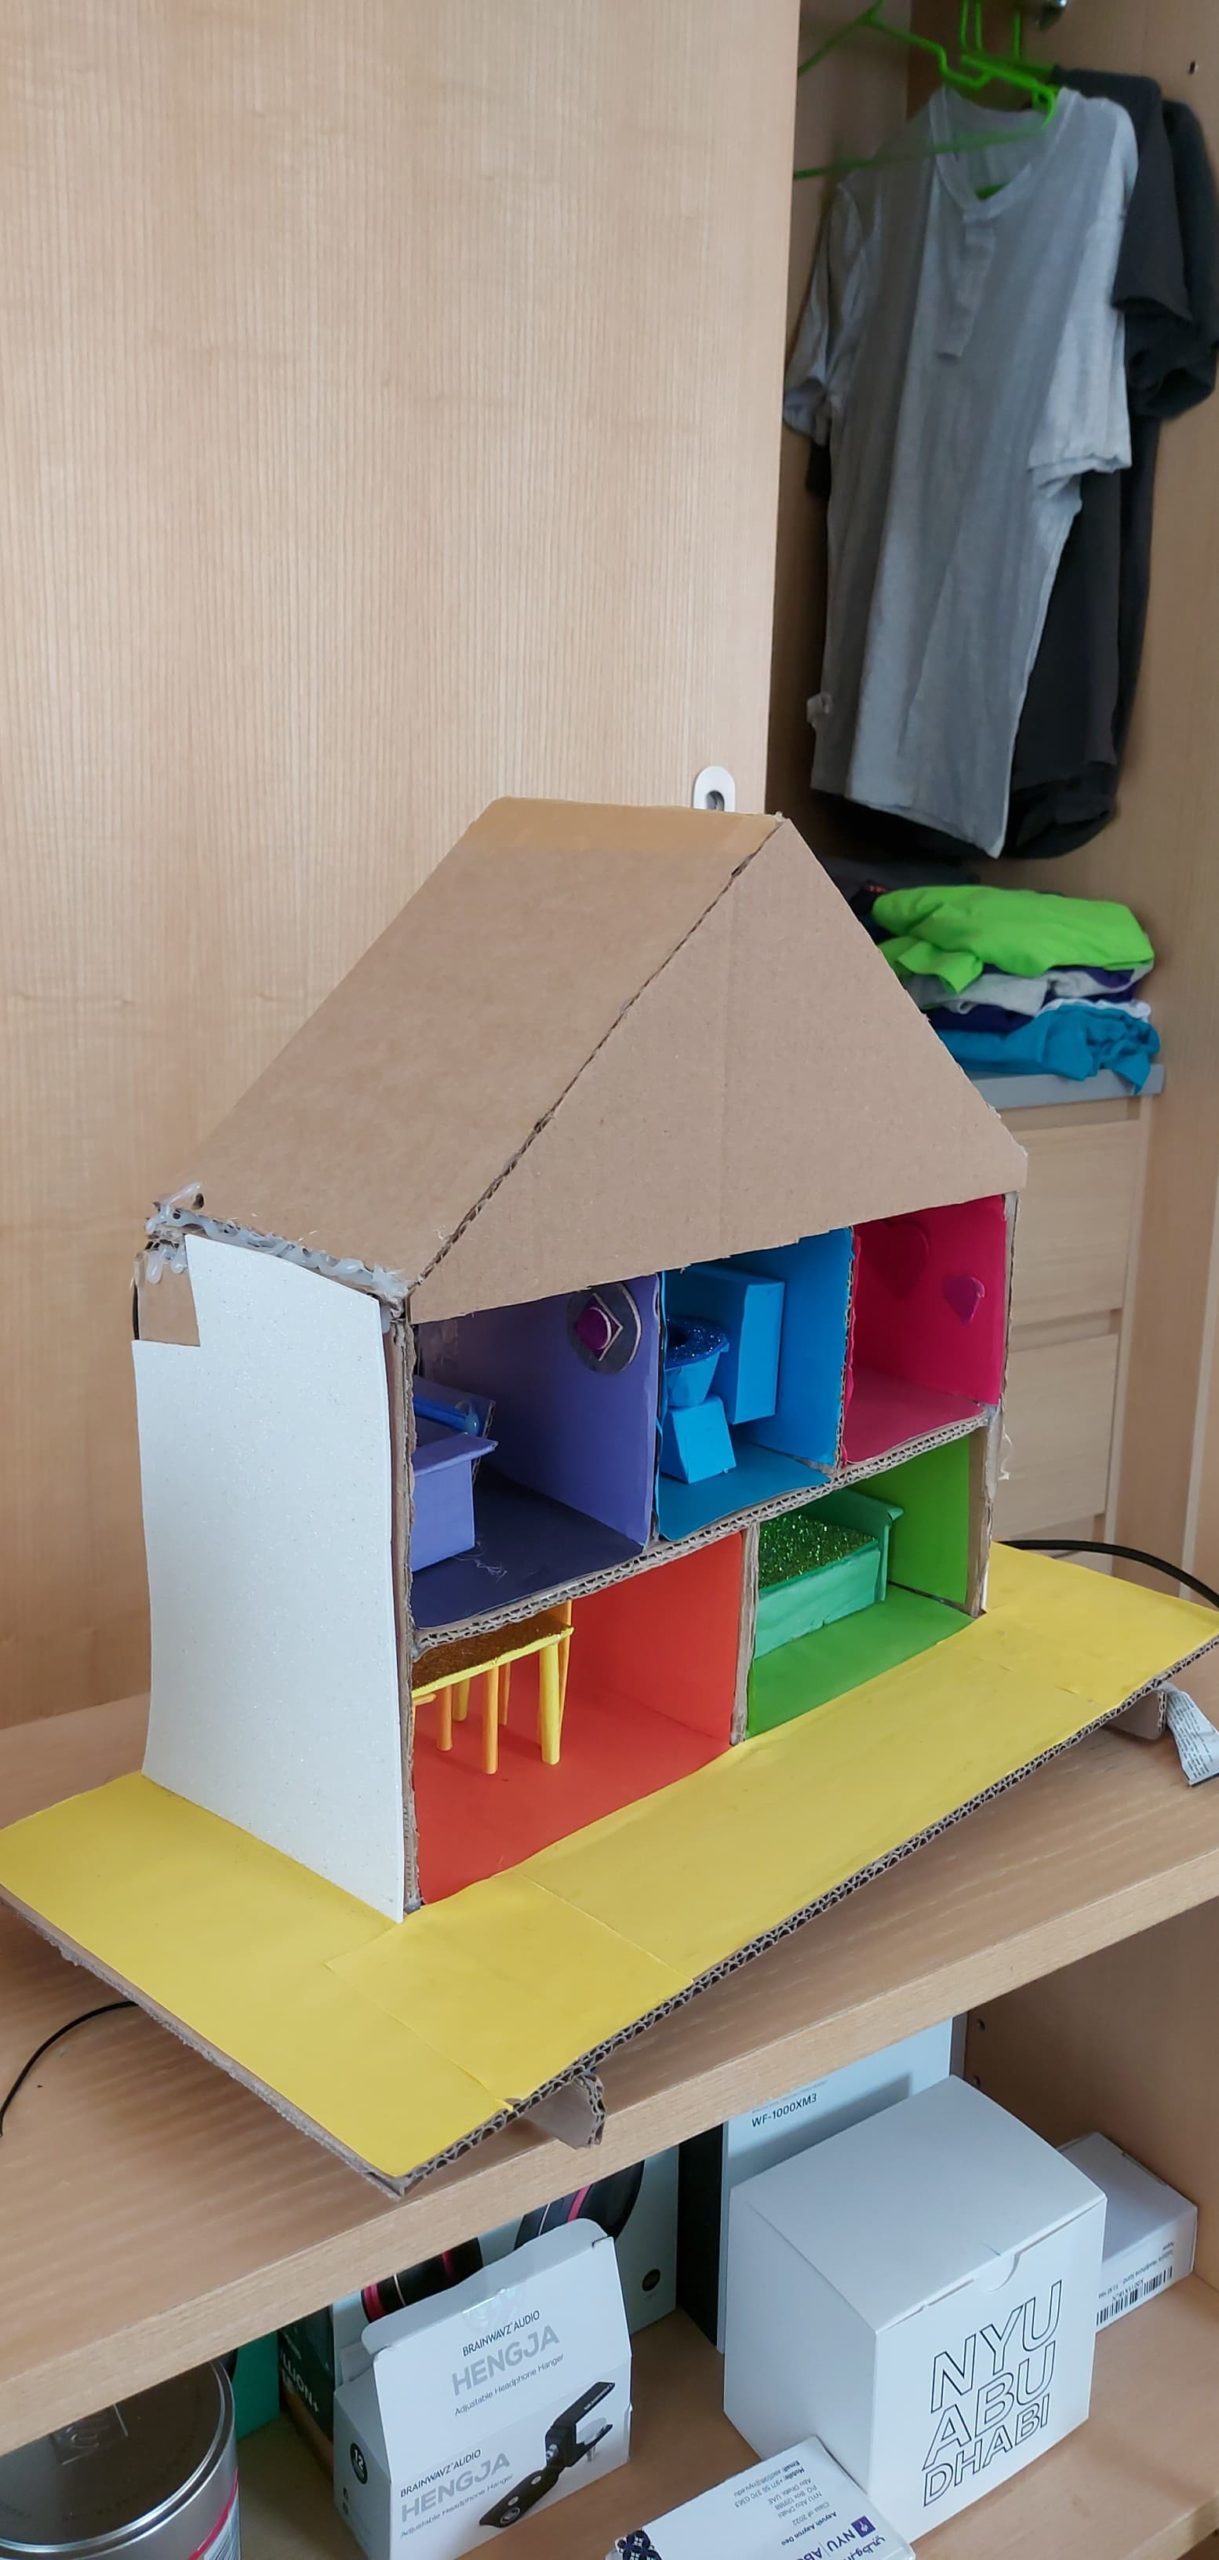
For our final project we made an interactive dollhouse. From our final project proposal we made a few changes to the interaction for the house.
CONCEPT:
For each room in our house, we wanted a functionality and a type of interaction.
We initially wanted to have multiple interactions for every room as well as have virtual tasks that one could complete in processing. However, given the time constraints, this was not very feasible. As such we decided to pivot.
Currently, the user can interact with the dollhouse by placing a doll at the front of the room. When the doll is placed in front of the room the lights in the room turn on and the display [currently a computer screen] will display wallpaper and play one form of media, either a video, audio, or both depending on the room. Each room consists of three LEDs connected in series to avoid running multiple long wires to the breadboard.
PROCESS:
Our process included a lot of side-by-side physical and technical work.
The first steps were to create a physical dollhouse, which was made out of cardboard and measured to fit exactly on a laptop, to make the background the screen of it. For the coding, we worked on being able to separately trigger each part on the screen that corresponds to the room, and we did this with buttons.
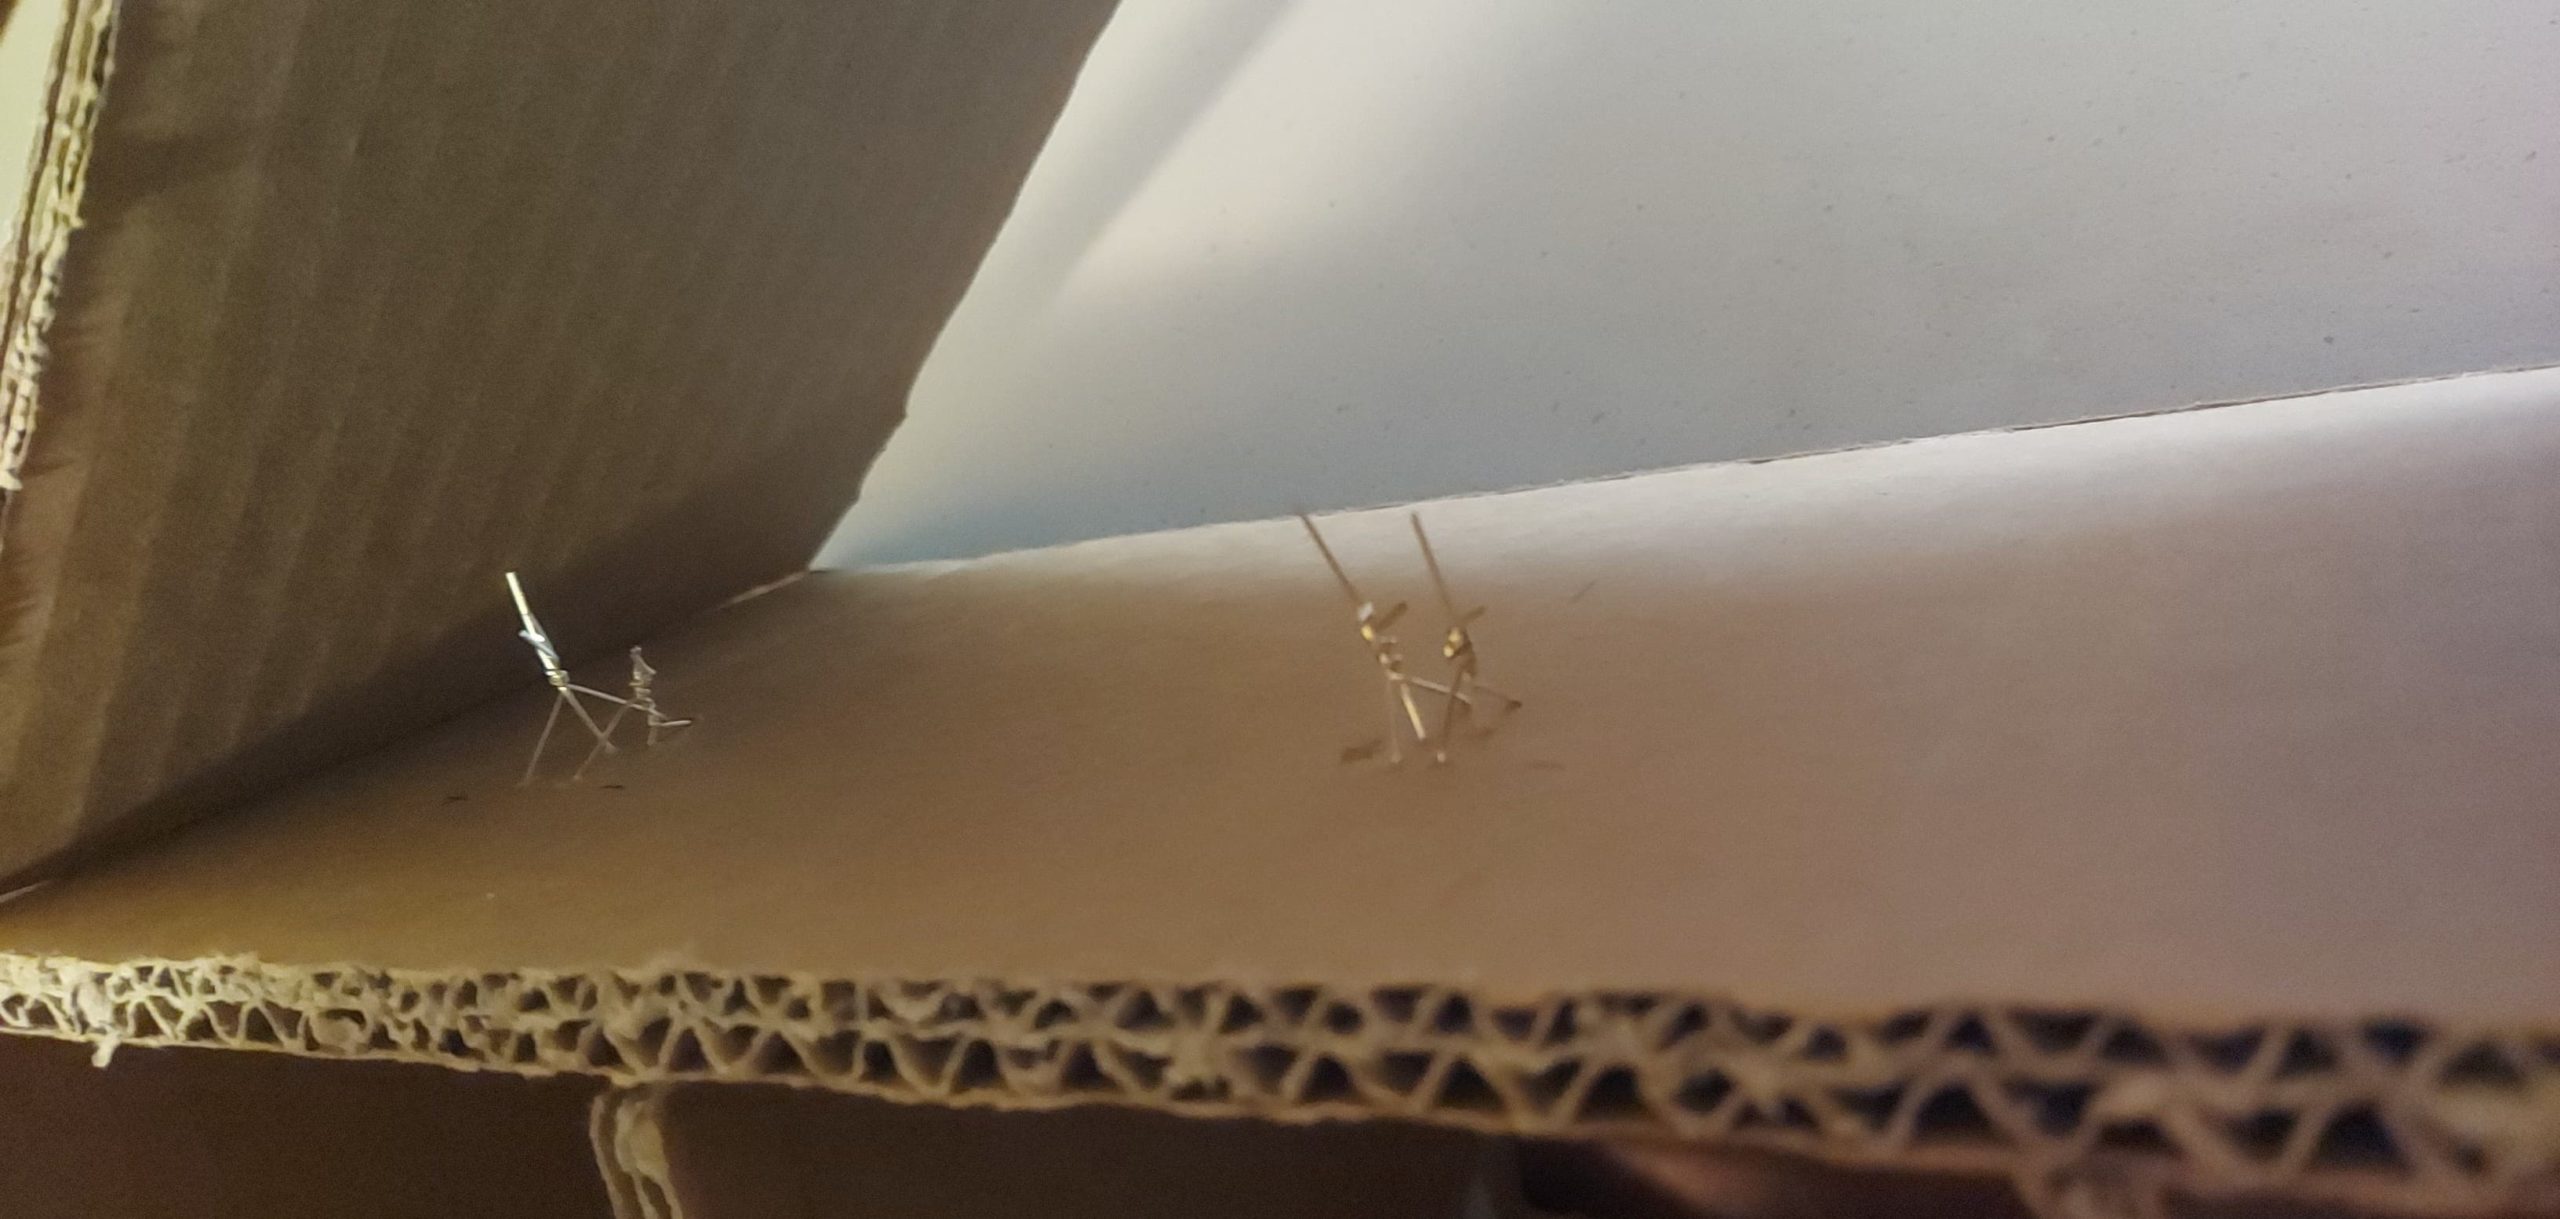
how the Leds were fit into the cardboard
Next, the dollhouse was fit with LEDs and pressure sensors. To do this, we needed longer wires — from Aayush’s Circuit Breakers class– and to solder the wires together to connect them to the breadboard. We also used pressure sensors from Suzan’s Sensors Body and Motion class, which was perfect for the main room trigger. We wanted to have some additional functionalities, such as a button for the doorbell, a physical game room, and a button to switch between sceneries on the balcony, however were limited with equipment, so settled for that. At this point, there was also time spent on creating the furniture for the dollhouse, like couches, chairs, tables, and beds.
Next, we had to put it all together. Once we met more and discussed, we decided to let go of the idea of a physical game, and instead created a bathroom, where the sensor triggers a flush. At this point, we worked on the software functionalities of each room; such as playing the sounds or movies, as well as software design and illustrations, and physical refinements like the wallpaper, wall decor, and tidying up the wires.
We placed all the wires and Arduino in the attic of the house and covered the attic from the front. We also decorated the house more and cleaned it up.
Rooms:
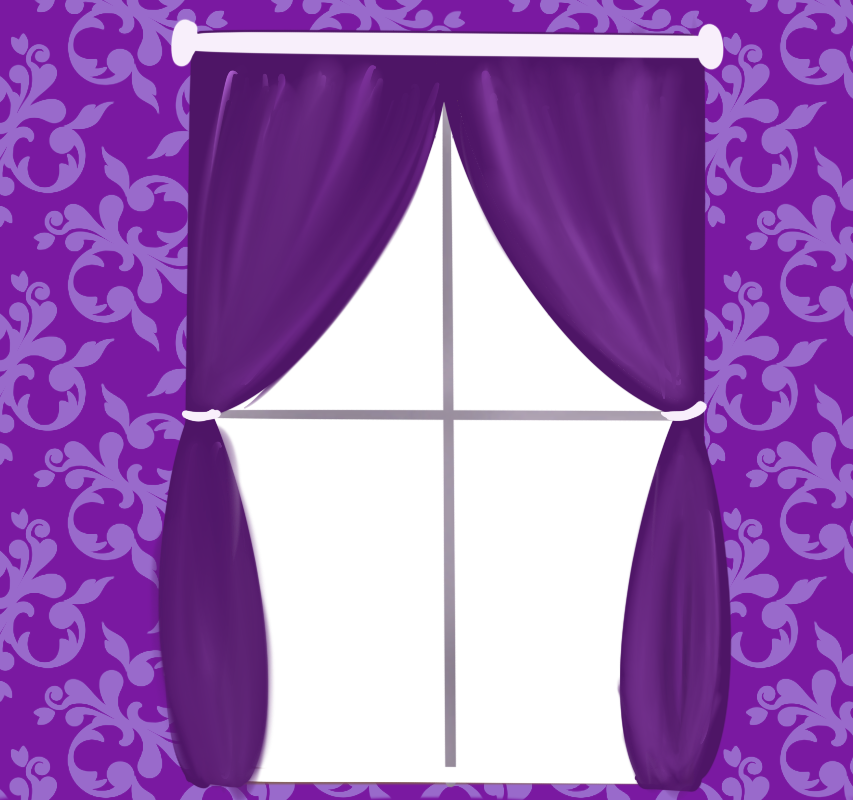
Balcony:
balcony with a hollow window
When triggered, music is played on loop because of the piano, and the view is a moving scenery. This was created by layering the hand-drawn png illustration with an animated scenery found on youtube, creating the window look.
Bathroom:
The bathroom plays a flushing noise once when you enter.
Bedroom:
Same as the balcony room, the illustration is a png layer on top of the video found on youtube, with the dimensions of the window being empty.
Living Room:
This room plays a TV in the background, the video of choice being Happy, by pharell williams
Dining room:
animated dining room
This is playing a small gif, (which we converted to a movie), of the smoke on the pot moving, just to show that there is a movement happening.
Each room was paired with 3 LED’s that light up upon entry.
Almost complete!
OBSTACLES:
Thankfully, we didn’t encounter any big obstacles, but some things that were not the smoothest.
Running the wires was a bit difficult to manage
We had a soldering accident when trying to connect a sensor to a wire, and burnt the sensor
Some of the furniture (like the toilet or the piano) was difficult to figure out how to create
Adding the video to processing
We initially had a 15 second long flush, and couldn’t shorten it on processing, so we had to find another flush audio
REFLECTION:
We are really happy with how this finally turned out, and even joke about creating a start up. We wish we could have added more interactions and functionalities, and also a doll, but are happy with it anyway.
This is a simple to play Trivia game for children. There are Ten questions with only two choices ; A OR B.
To pick A the child must press the Green Button and to pick B he press the Red button. If the child gets the answer correct, they will automatically move on to the next question. If the child gets the answer wrong, they would be taken to a page that tells them they are wrong and that they must press r to go back and start again.
Once the kids get to the end of the game, the will be congratulated on making it to the end and given the option to play again.
Process: For the arduino we started out by testing the buttons using LED lights the LED lights when pressed were supposed to turn on there was difficulty getting them to work I connected some of them wrong but once I figured that out I moved on to finding the best serial code 4 this game. We worked with send multiple to processing and send byte to processing.
I had some difficulty trying to make that work and I ended up mixing and matching codes
After asking I found out that the code that I should be using is handshake
Handshake had some problems because it wasn’t obvious that I had to have arduino send something back from processing after further inspection that was solved.
I was finally able to use the buttons on my game for processing.
Creating the game was not very difficult are used images for the children to be more amused by and I kept the questions simple since I knew this is a kids game I did not want to make it very difficult on the children to solve this but at the same time I give them options that were very close and alike hoping it could create a little confusion for the child.
Arduino took me a very long time to work with and that was with a lot of help eventually everything came together so here’s my final product
For the final project I wanted to go with the arcade vibe of Arduino and create a game.
With simple controls in the form of the potentiometer the game relies on the player controlling a bird, which wants to fly high into the air. On its way, the bird encounters stormy clouds, which it should avoid at all cost. Also, to reward the bird on its adventure, it will encounter some delicious smaller birds, which work as the scoring mechanism for the game.
As the player will collect more points, the animation frequency will increase making the game progressively harder and harder.
To add some spice to the game I introduced a SLOW TIME button, which significantly decreases the animation frequency.
The projects seemed a bit daunting with all the vertical animations and ways of achieving top quality responsiveness from Arduino kit. I smoothed out the potentiometer values and used a single button to control the flow of the game as well as the SLOW MODE.
In my project Arduino provided the input for the bird control. The bird movement was mapped from the potentiometer, which fits the role perfectly. In addition to that, the slow mode button provided a mechanism for slowing down vertical transitions.
The processing layer was responsible for displaying the game as well as the logic. It takes the potentiometer value from Arduino and displays the bird on an according position. It also takes care of the slow mode triggers from the button.
The main challenge of the project was working with all the animations as they change throughout the game. I couldn’t just change the frameRate of the game, as that would case sudden drops in frameRate, rather than make the transition smooth. Therefore I worked around that by introducing the bgFreq which stands for background frequency. That variable controlled the speed at which all the pieces of UI were moving on the screen, depending on the gameScore.
During user testing I played a lot with different parameters of the game. The bird speed, as well as the cloud speed. As discussed in the class I decided on making the bird speed uniform and same as that of the background. That makes it easier for the user to predict the future position of the bird and plan their moves ahead more efficiently, increasing the strategical aspect of the game. The clouds on the other hand vary in speed, adding an extra layer of difficulty to an already difficult game. Arcade games never were easy, so I believe that choice of adding extra difficulty to my game was crucial.
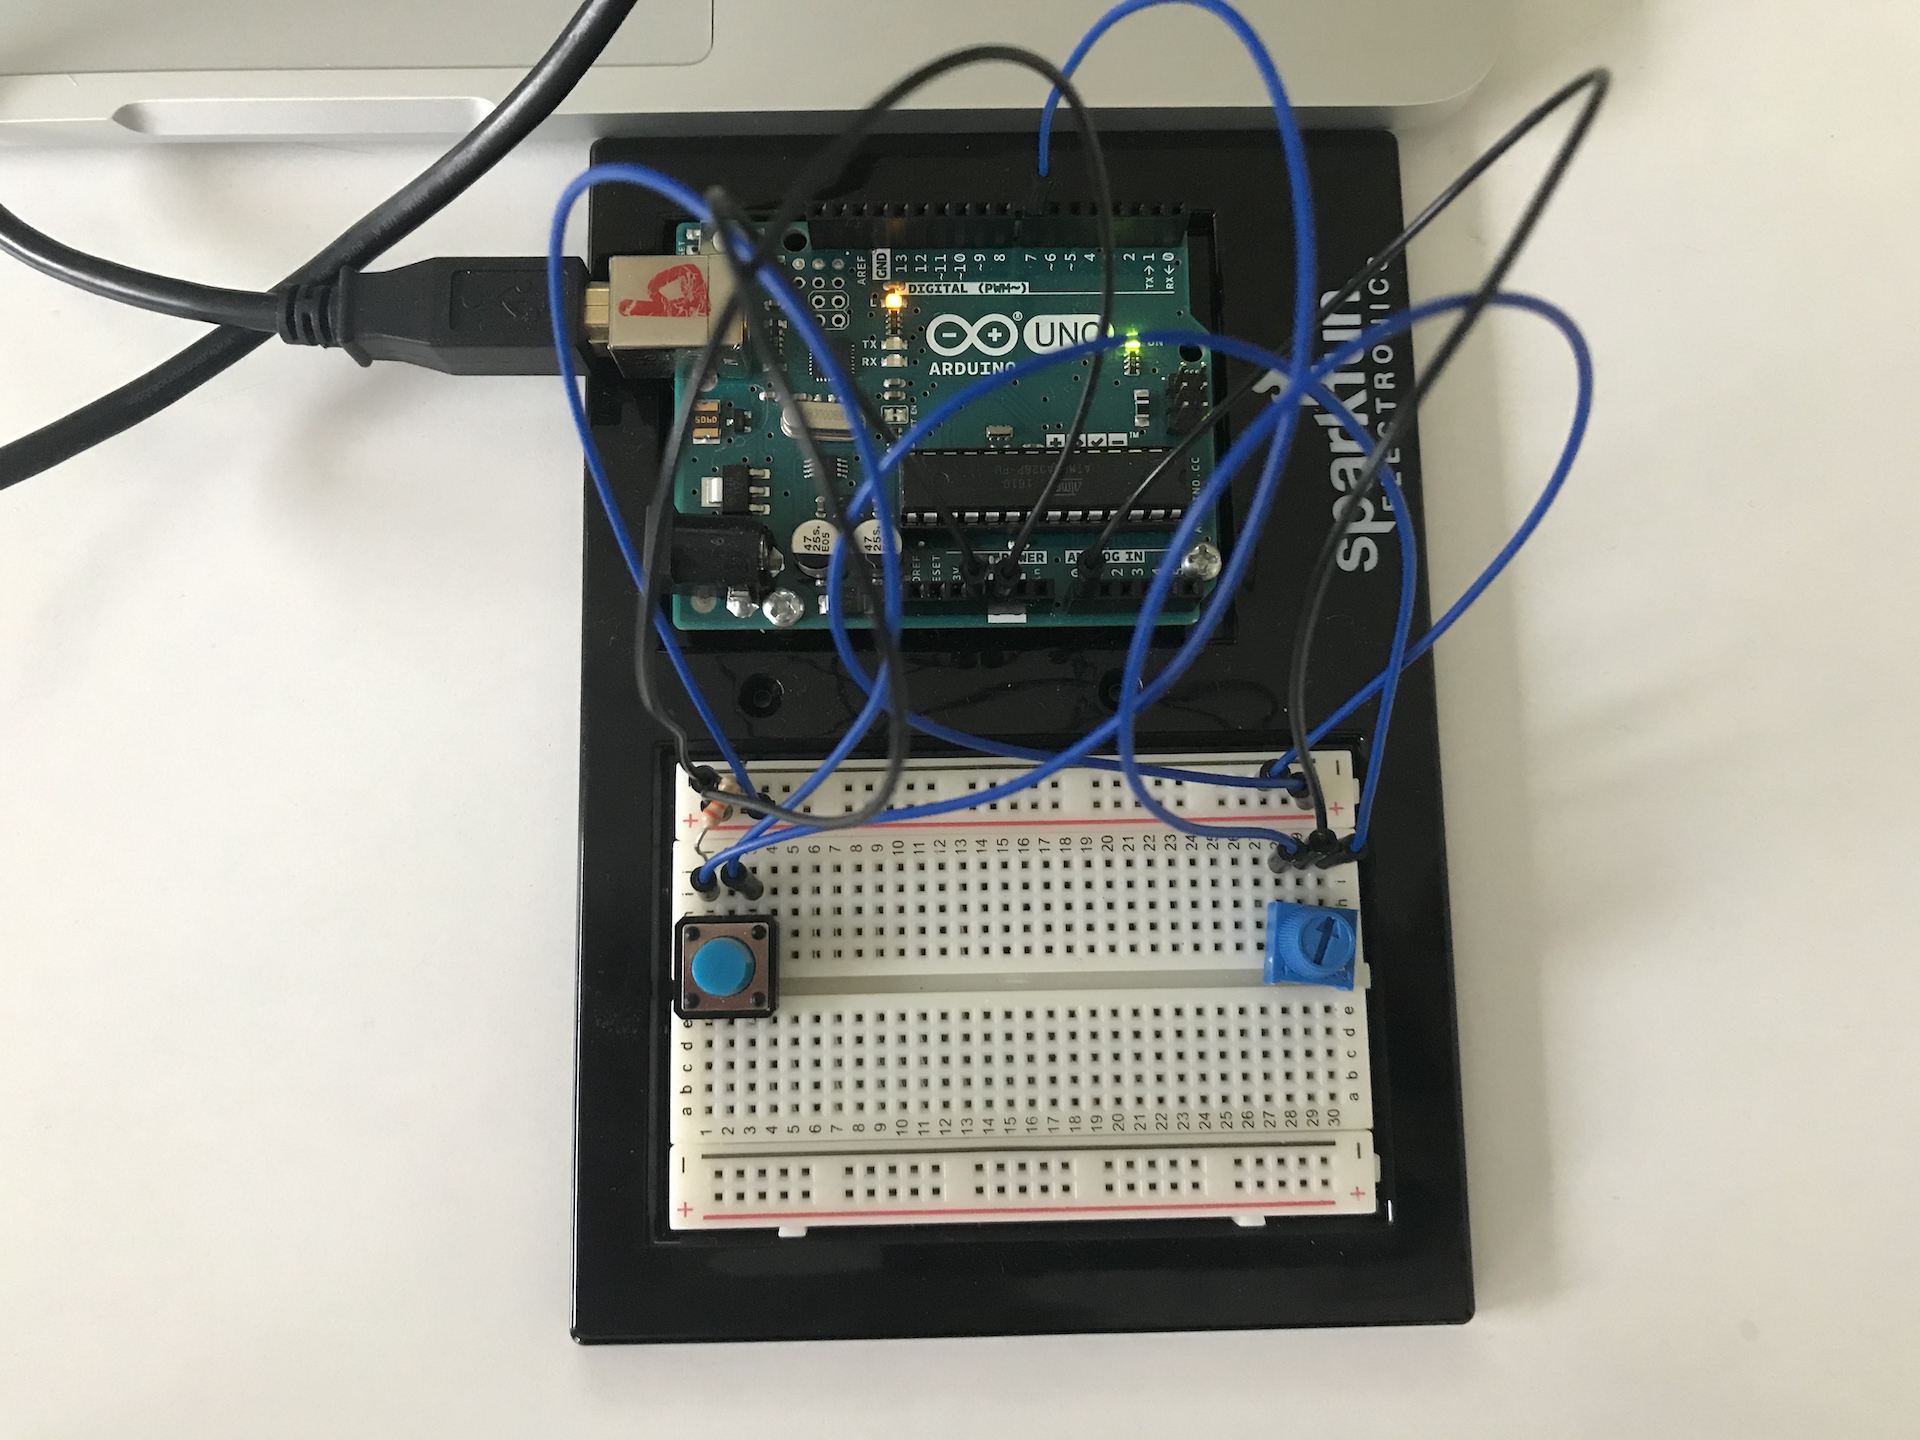
The Arduino setup of the final work:
Footage of actual gameplay:
At last, here is a link to my project if you wanted to play with it yourself:
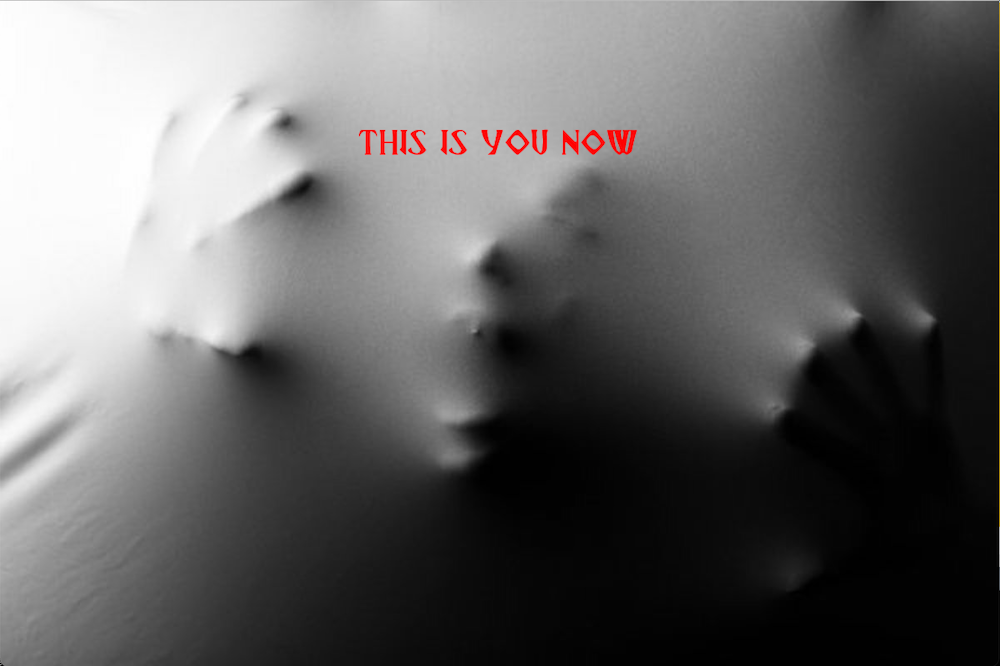
When I was in 10th grade, I really got into ghost-busting shows. The thrill of seeing people go to renowned places of horror was amazing. Especially when none of it had anything to do with me, as I sit comfortably in my couch.
One of the devices that caught my attention appears in the show Buzzfeed Unsolved. When the hosts Ryan Bergara and Shane goes into places that are suspected to have entities, they open a sound-making device called the “spirit box”. The spirit box allegedly goes through multiple radio channels at a rapid pace, producing a sort of white noise. In this white noise, it is believed that ghost and entities would be able to make some sort of sound to communicate with the living
Specifics
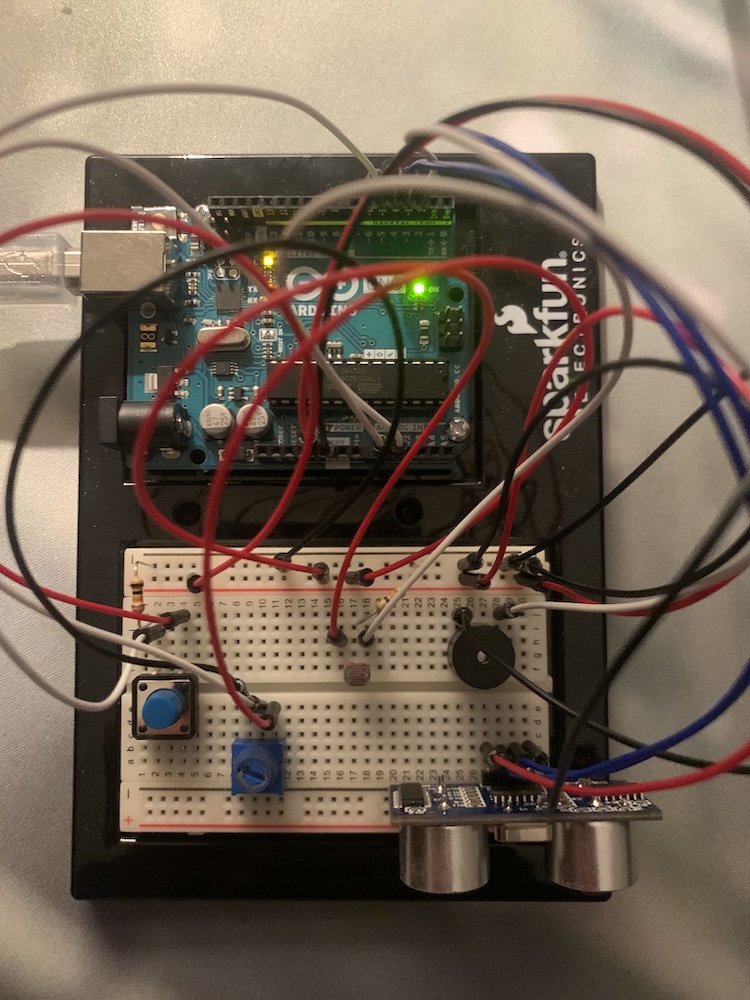
For my project, I wanted to make a device that mimics what the spirit box does, adding some additional features. The system is composed of an Arduino and my laptop (processing). On the Arduino, there are two systems.
The detection system includes a photoresistor and an ultrasonic distance sensor. When the user walks into a haunted place, the photoresistor will notice the light getting darker, giving it an indication that there is a possibility for ghost activity. Then, the distance sensor will detect whether the user is close to a corner, wall, or object. These are all areas that are likely to have paranormal activity. There is also a piezo disk on the Arduino. While detecting, the piezo disk will inconsistently beep. There’s no particular use for it, just to add tension and mimic the original spirit-box.
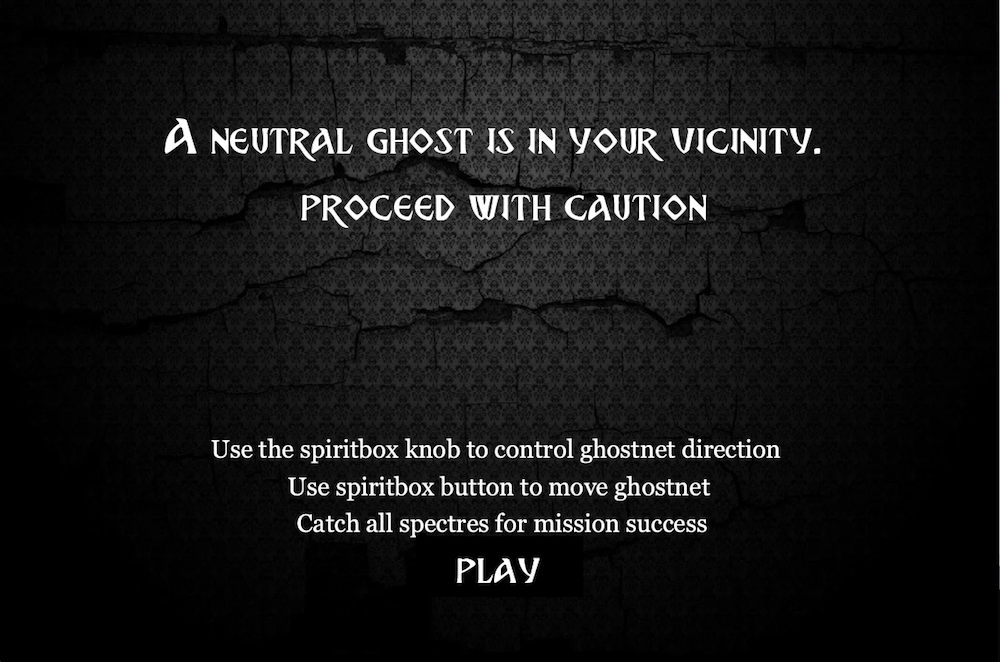
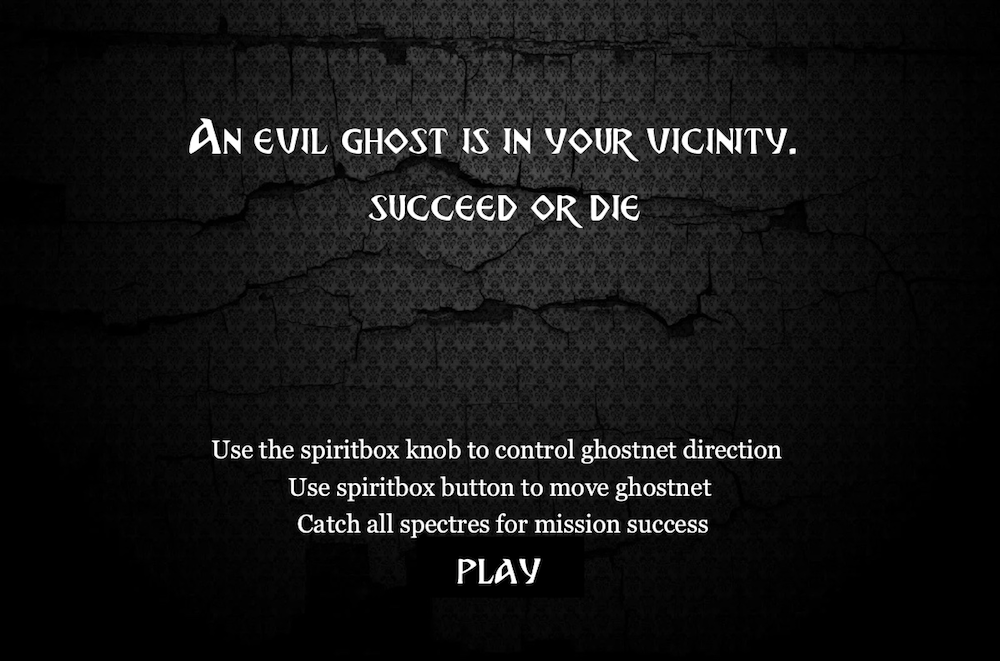
Once an activity is detected, the box sends the signal to the controlling centre (laptop/processing). The box is able to detect what type of ghost it is as well. A good one, a neutral one, or an evil one.
On processing, there is a “game” that is used to “release” the ghost from its half-dead state. The game difficulty varies based on the type of ghost. The game also utilizes the second system on the Arduino, the “control system”. This is composed of a knob (potentiometer) and a button.
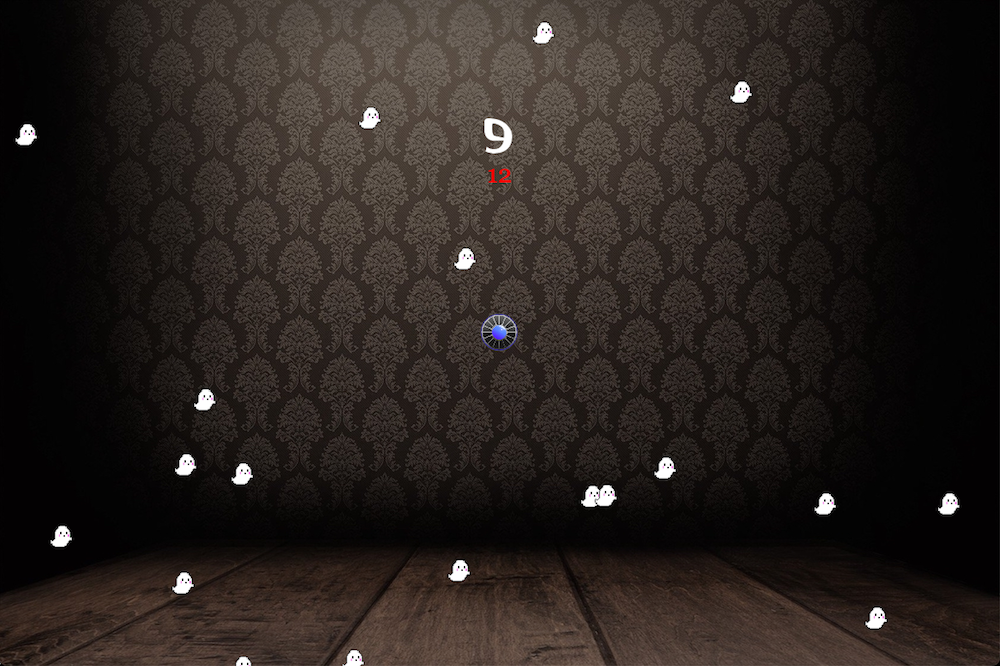
The Game
The Game layouts look like this
Good ghost:
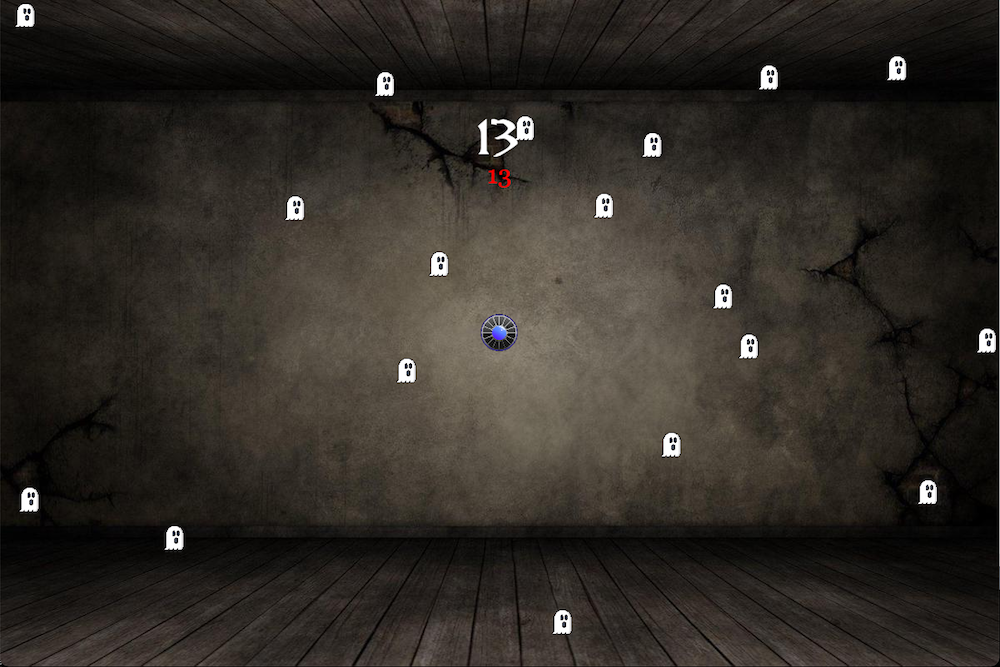
Neutral ghost:
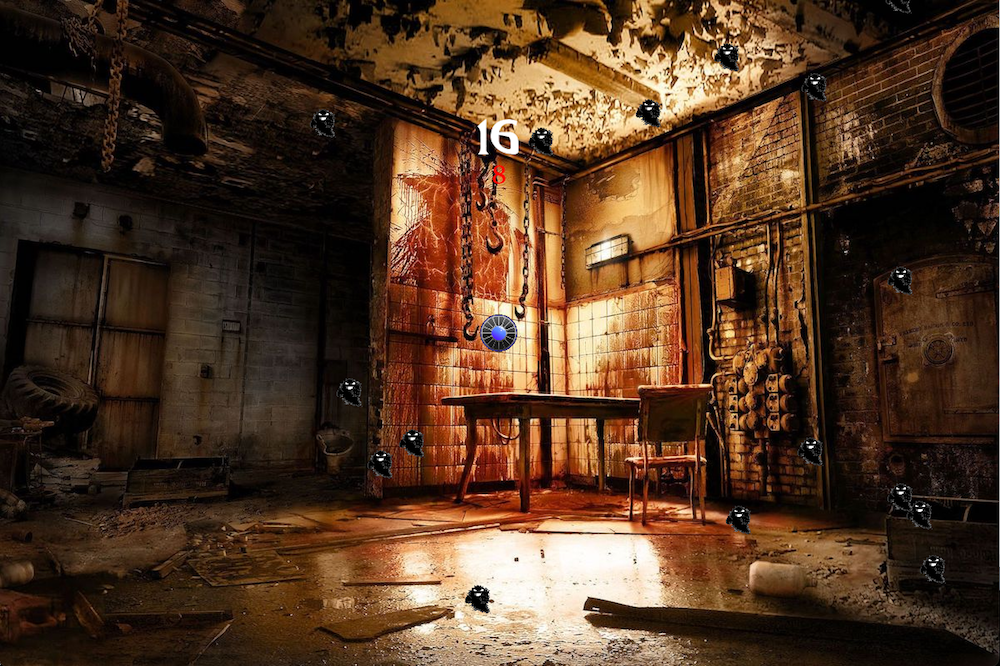
Evil ghost:
The disk in the middle is a “ghostnet”. To control the ghost net, the players use the “control system” on the Arduino. The knob controls direction, and the button controls move or stop. There are 20 spectres every time a ghost is caught, and the number of spectres required to be caught depends on the “evilness” of the ghost. A certain amount of time is given to the players to finish this task, and a red countdown is displayed on the screen. A count for spectres left to catch is also displayed on the screen in white.
Success Screen (Jacob’s your boss):
Fail Screen:
Arduino Layout
Pitfalls and Future Improvements
One of the main troubles that I ran into was the control system for the game. The knob and the buttons were a bit hard to use for the game. Although I originally intended for the controls in the game to be harder, I had to lower the difficulty holistically to account for the difficult control system.
Another difficulty and potential improvement was the mobility of the system. To use the system, the user has to bring a laptop, while taking care of the wire between the Arduino and the computer. For future purposes, the connection between the platforms could be made wireless.
Game Demonstration
Detection Demonstration
Full Code
Arduino
#include "pitches.h"

int piezo = 2;
bool piezoState = false;
int trig = 3;
int echo = 4;
int button = 5;
int buttonState = 0;
int prevButton = 0;
long timer;
int timerlength = 100;
int degree;

//ghost types
bool good = false;
bool neutral = false;
bool evil = false;
int ghostType = 0;

int ghost = 0;

void setup() {
  Serial.begin (9600);
  Serial.write(0);
  timer = millis() + timerlength;
  pinMode(trig, OUTPUT);
  pinMode(echo, INPUT);
  pinMode(button, INPUT);

}

void loop() {


  int knobValue = analogRead(A1);

  buttonState = digitalRead(button);

  Piezo();
  if (good == false && neutral == false && evil == false){
    Evaluate();
  }
  else{
    noTone(piezo);
    knobValue /= 4;
    degree = map(knobValue, 0, 255, 0, 12);
    Serial.print(degree);
    Serial.print(',');
    Serial.println(buttonState);
  }
}

void Evaluate() {
// For Distance
  int time;
  int distance;

  digitalWrite(trig, HIGH);
  delay(0.01);
  digitalWrite(trig, LOW);

  time = pulseIn(echo, HIGH);

//  speed of sound = 343 m/s = 0.0343 cm/µs
//  distance = time * speed
  distance = time * 0.0343 / 2;
//  Serial.print(distance);
//  Serial.println(" cm");

// For brightness
  int brightness = analogRead(A0);

//overall evaluation
  if (millis()%10 == 1 && (Serial.available()>0)){
//    Serial.println("here");
    if (brightness <= 40 && brightness > 30 && distance <= 30 && distance > 20){
      ghost = random(1, 101);
      if (ghost < 2){
        good = true;
            Serial.write(ghost);
      }
    }
    if (brightness <= 20 && brightness > 10 && distance <= 20 && distance >10){
      ghost = random(1,101);
      if (ghost = 1){
        good = true;
            Serial.write(ghost);
      }
      if (ghost = 2){
        neutral = true;
            Serial.write(ghost);
      }
    }
    if (brightness <= 10 && distance <= 10){
      ghost = random(1,101);
      if (ghost == 1){
        good = true;
            Serial.write(ghost);
      }
      if (ghost == 2){
        neutral = true;
            Serial.write(ghost);
      }
      if (ghost == 3){
        evil = true;
            Serial.write(ghost);
      }
    }
  }
}


void Piezo() {
  if (good == false && neutral == false && evil == false){
    if (millis() > timer){
      tone(piezo, C5);
      timer = millis() + timerlength;
    }
    else if (millis() == timer){
      noTone(piezo);
    }

  }
}
Processing
Main code
import processing.serial.*;
Serial myPort;

import processing.sound.*;
SoundFile die;
SoundFile music2;


PFont font;

//images
PImage bg;
PImage bg1;
PImage bg2;
PImage bg3;
PImage good;
PImage neutral;
PImage evil;
PImage net;

//values:
int ghost = 0;
boolean go = false;
int ndegree = 0;
int fire = 0;
boolean win = false;

//objects:
Net n1;
Spectre[] spectre;                        //initializing all the spectre
int count = 20;
int livecount;


void setup(){
  size(1200,800);

  printArray(Serial.list());
  String portname=Serial.list()[3];
  println(portname);
  myPort = new Serial(this,portname,9600);

  bg = loadImage("bg.jpeg");
  bg1 = loadImage("bg1.jpg");
  bg2 = loadImage("bg2.jpg");
  bg3 = loadImage("bg3.jpg");
  good = loadImage("good.png");
  neutral = loadImage("neutral.png");
  evil = loadImage("evil.png");
  net = loadImage("net.png");

  die = new SoundFile(this, "die.mp3");
  music2 = new SoundFile(this, "music2.mp3");

//initializing objects
  n1 = new Net(width/2, height/2);
  spectre = new Spectre[count];
  int index = 0;
  for (int x = 0; x < count; x++) {
      spectre[index++] = new Spectre(random(0, width), random(0, height), 40, 40);
  }

  for (int i =0; i<count;i++){                     //spectre speed initializing
     spectre[i].xSpeed = random(-2,2);
     spectre[i].ySpeed = random(-2,2);
  }
       music2.loop();
}


void draw(){
  background(0);
  //detection phase
  if (ghost == 0){
    font = createFont("BreatheFire-65pg.ttf", 60);
    textFont(font);
    textAlign(CENTER);
      text("detecting . . .", width/2, 350);
  }

  //detected
  if (ghost != 0){
    menu();

  }
  if (go == true){
    game();
    checkwin();
  }

}


void game(){
  if (ghost == 1){
    background(bg1);
  }
  if (ghost == 2){
    background(bg2);
  }
  if (ghost == 3){
    background(bg3);
  }
  n1.display();
  n1.move();
  n1.checkEdges();
  for (Spectre spectre : spectre) {
    spectre.display();
    spectre.collision();
    spectre.update();
    spectre.checkEdges();
  }
  font = createFont("BreatheFire-65pg.ttf", 60);
  textFont(font);
  textAlign(CENTER);
  text(livecount, width/2, 185);
}


void menu(){
  if (go == false){
    background(bg);
    fill(255);
    font = createFont("BreatheFire-65pg.ttf", 60);
    textFont(font);
    textAlign(CENTER);
    if (ghost == 1){
      text("A kind ghost is in your vicinity. \n set it free", width/2, 185);
      count = 10;
    }
    if (ghost == 2){
      text("A neutral ghost is in your vicinity. \n proceed with caution", width/2, 185);
      count = 15;
    }
    if (ghost == 3){
      text("An evil ghost is in your vicinity. \n succeed or die", width/2, 185);
      count = 20;
    }
    livecount = count;
    font = createFont("Georgia", 40);
    textFont(font, 30);
    text("Use the spiritbox knob to control ghostnet direction \n Use spiritbox button to move ghostnet \n Catch all spectres for mission success", width /2, 550);
    stroke(0);
    fill(0);
    rectMode(CENTER);
    rect(width/2, 680, 200, 72);
    fill(255);
    textFont(font, 60);
    font = createFont("BreatheFire-65pg.ttf", 42);
    textFont(font);
    textAlign(CENTER);
    text("PLAY", width/2, 700);
    if (mouseX>=(width/2 - 100)  & mouseX<=(width/2 + 100) & mouseY>=650 & mouseY<=720){
      stroke(255);
      noFill();
      rect(width/2, 680, 200, 72);
      if (mousePressed){
          go = true;
          music.stop();
      }
    }
  }
}

void checkwin(){
  if (livecount < 1){
    win = true;
    background(bg);
    fill(255);
    font = createFont("BreatheFire-65pg.ttf", 60);
    textFont(font);
    textAlign(CENTER);
    text("mission success \n report back to Jacob", width/2, 185);
    myPort.write(int(win));
  }
}


void serialEvent(Serial myPort){
  if (ghost == 0){
    ghost = myPort.read();
  }
  else if (ghost != 0){
    String s=myPort.readStringUntil('\n');
    s=trim(s);
    if (s!=null){
      int values[]=int(split(s,','));
      if (values.length==2){
        //println(values);
        ndegree = values[0];
        fire = values[1];
      }
    }
  }
  myPort.write(0);
}
Ghost Net Class
class Net {

  float x;
  float y;
  float diameter;
  int score;
  float xSpeed;
  float ySpeed;

  Net(float tempX, float tempY) {
    x = tempX;
    y = tempY;
    diameter = 45;
    score = 0;
  }

  void display() {
    imageMode(CENTER);
    image(net,x,y,diameter,diameter);
  }

  void move() {
    xSpeed = -(cos(ndegree) * 3);
    ySpeed = - (sin(ndegree) * 3);
    if (fire == 1){
      x += xSpeed;
      y += ySpeed;
    }
  }

  void checkEdges() {
    if (y>height) {
      ySpeed = -ySpeed;
    }
    if (y<0) {
      ySpeed = -ySpeed;
    }
    if (x>width) {
      xSpeed = -xSpeed;
    }
    if (x<0) {
      xSpeed = -xSpeed;
    }
  }
}
Spectre Class
class Spectre {
  float x;
  float y;
  float w;
  float h;;
  float xSpeed, ySpeed;
  boolean caught = false;

  Spectre(float tempX, float tempY, float tempW, float tempH) {
    x = tempX;
    y = tempY;
    w = tempW;
    h = tempH;
    xSpeed = ySpeed = 0;
  }

  void display() {
    if (caught == false){
      if (ghost == 1){
        image(good, x, y, w, h);
      }
      if (ghost == 2){
        image(neutral, x, y, w, h);
      }
      if (ghost == 3){
        image(evil, x, y, w, h);
      }
    }
  }

  //collision function for when players catch the right and wrong spectre
  void collision() {
    if ((n1.x - n1.diameter < x && x < n1.x + n1.diameter) & (n1.y - n1.diameter < y && y < n1.y + n1.diameter)){

        x = -50;
        y = -50;
        caught = true;
        livecount --;
        die.play();

    }
  }

  void update(){
    x += xSpeed;
    y += ySpeed;
  }

  void checkEdges() {
    if (y>height) {
      ySpeed = -ySpeed;
    }
    if (y<0) {
      ySpeed = -ySpeed;
    }
    if (x>width) {
      xSpeed = -xSpeed;
    }
    if (x<0) {
      xSpeed = -xSpeed;
    }
  }
}
As you might remember, we jumped between a few ideas, and after brainstorming with Aaron and long conversations among each other, we decided on an idea. When we started, it was a bit vague, but the more progress we made the more everything made sense and became clearer.
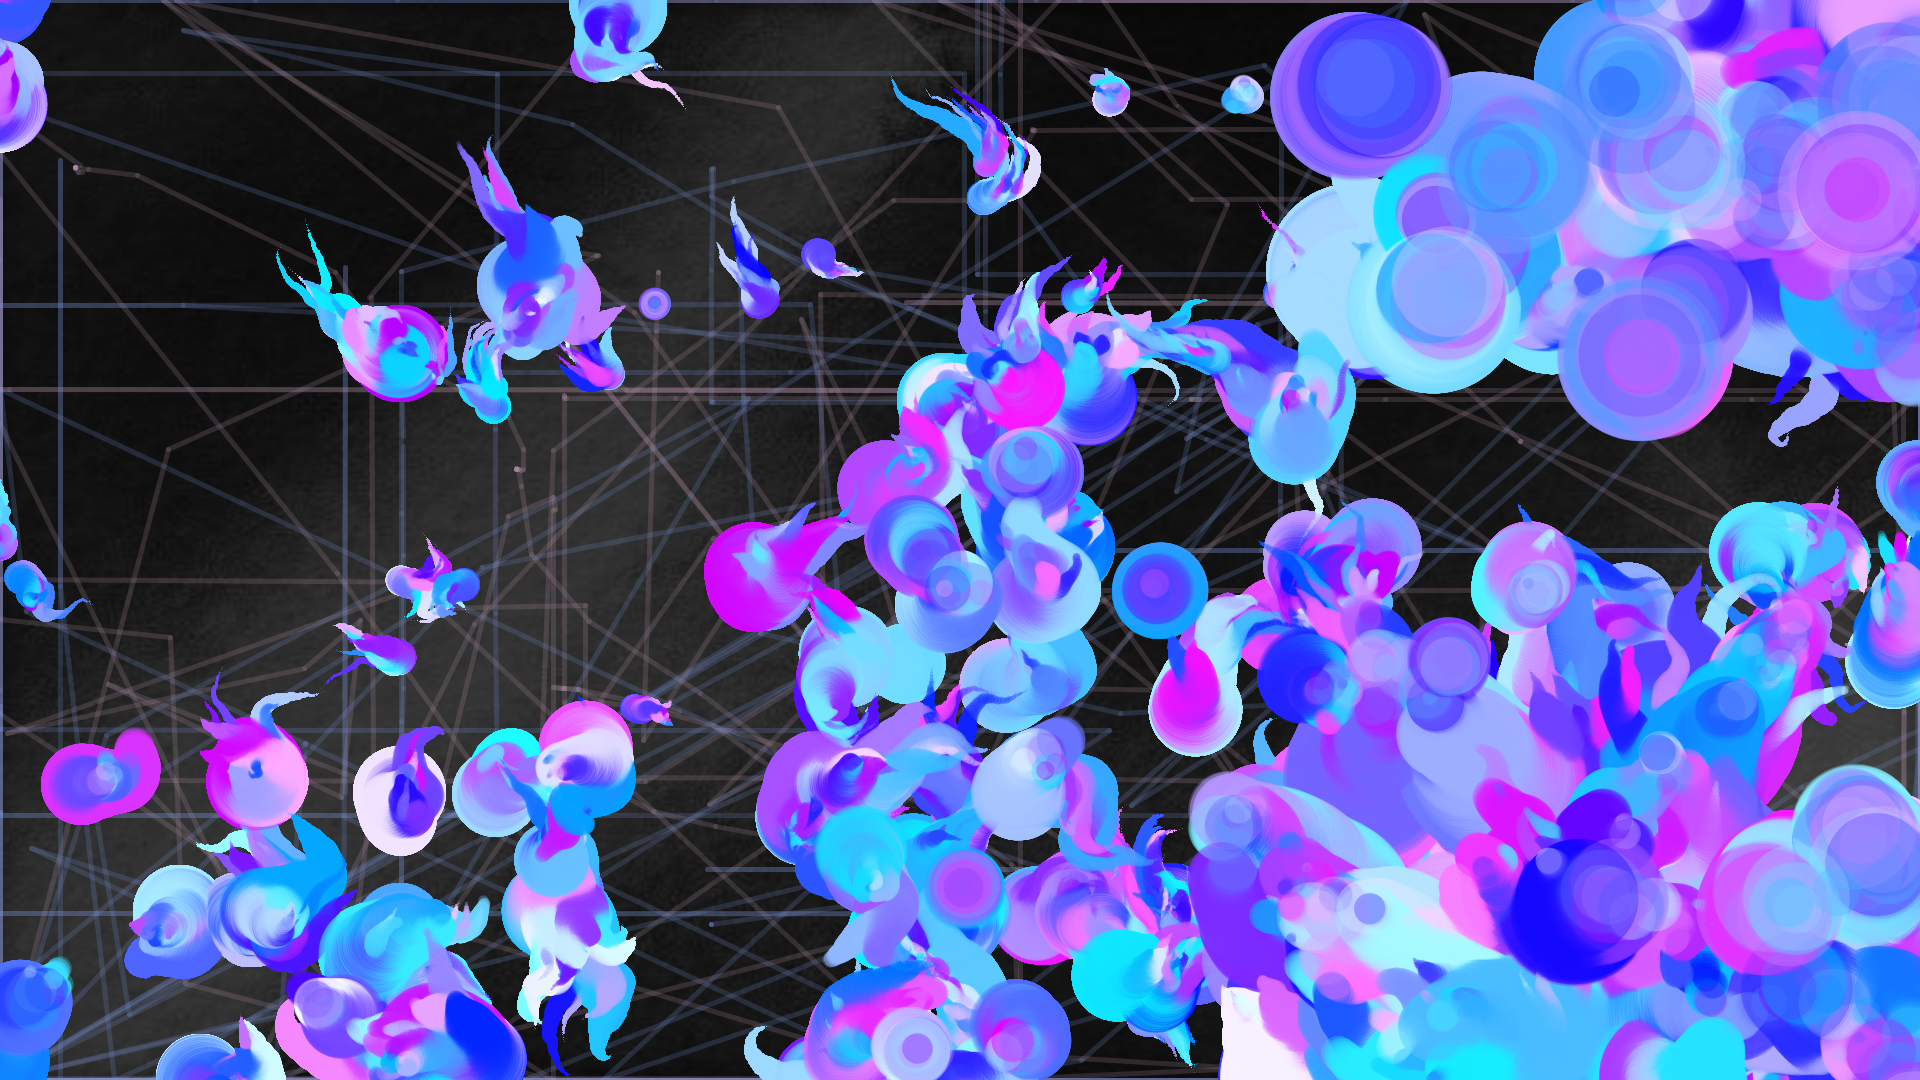
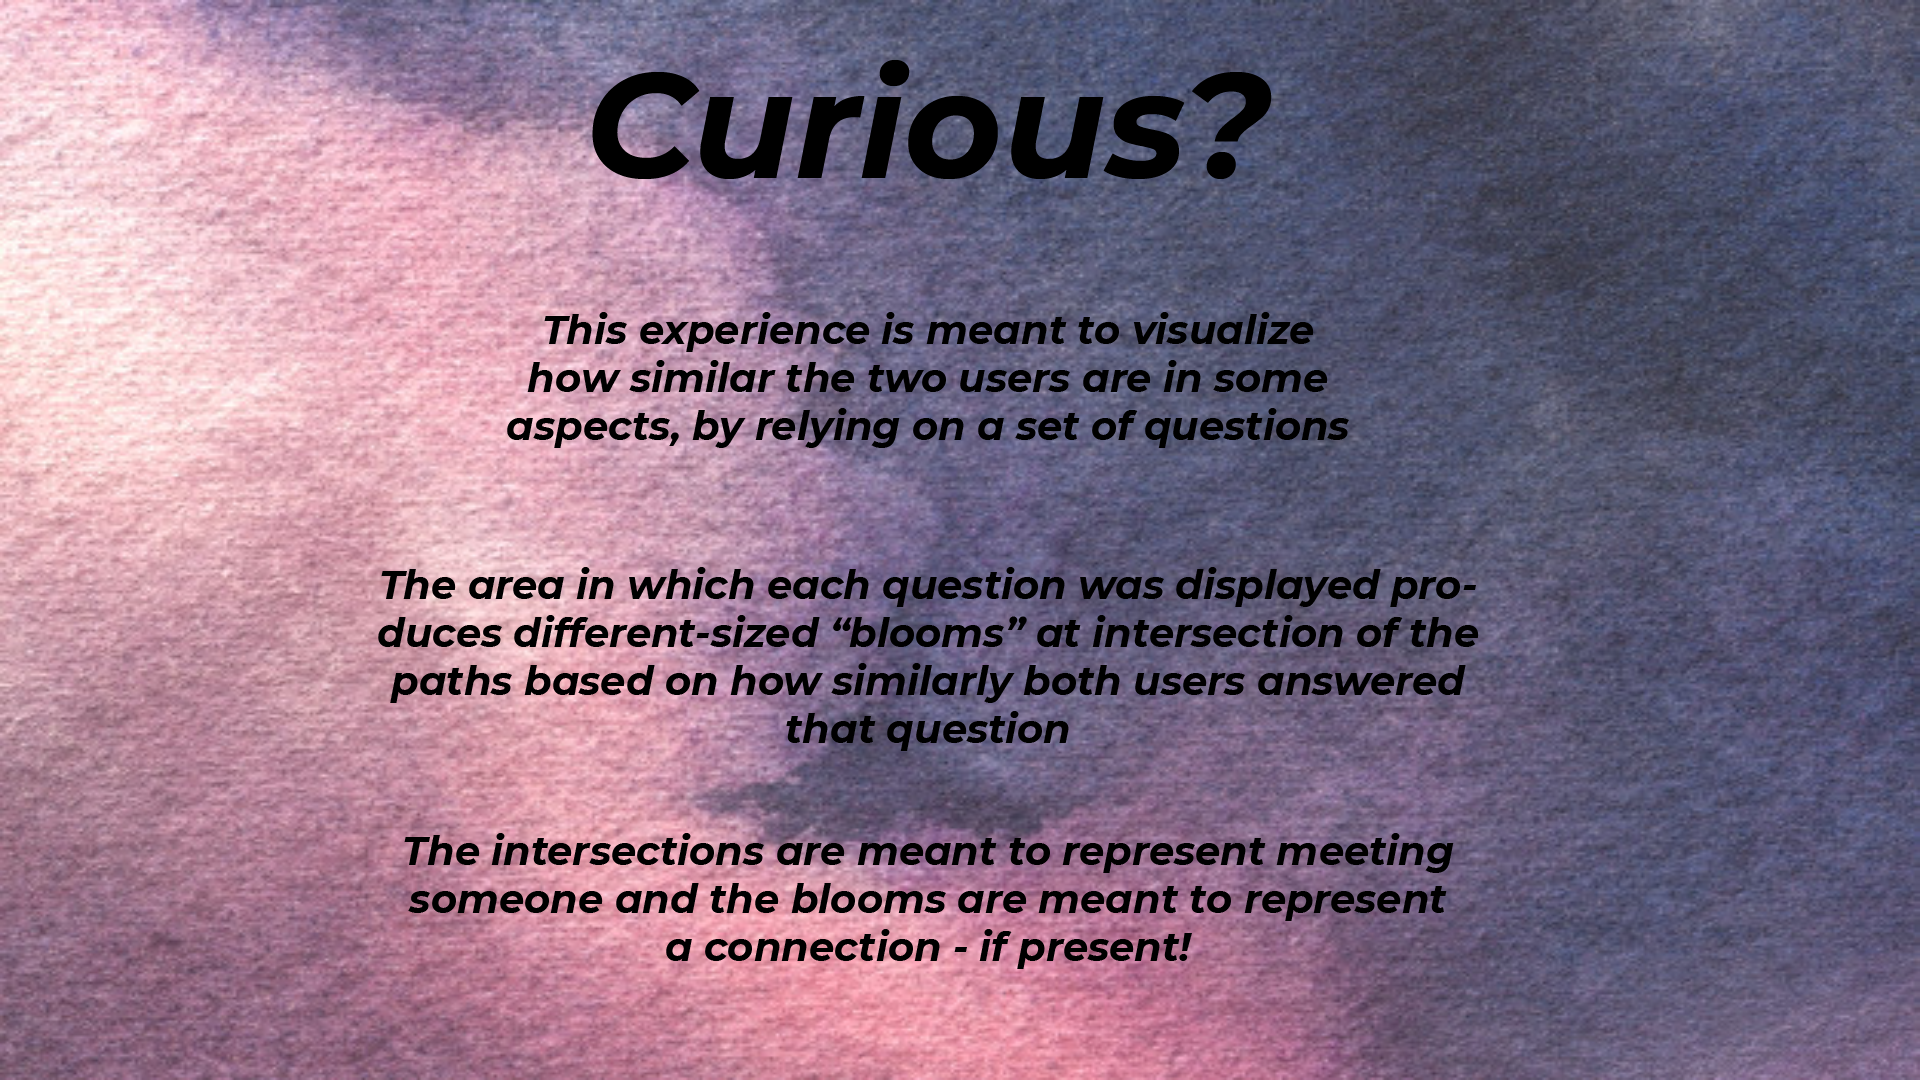
So, our project is an experience in which two users answer questions that are meant to explore how similar these users are to each other by mapping the data from their answers onto the screen and then visualizing it gradually as users interact with the set-up. This visualization happens when users’ traces intersect in the area of a question where they answered similarly to reflect connection. The “bloom” we used to resemble connection differs based on how close the answers were, making it the most dramatic when users have the exact same answer.
This final idea ended up reminding us of a lot of things that we find fascinating and enjoy:
The concept of an etch-a-sketch
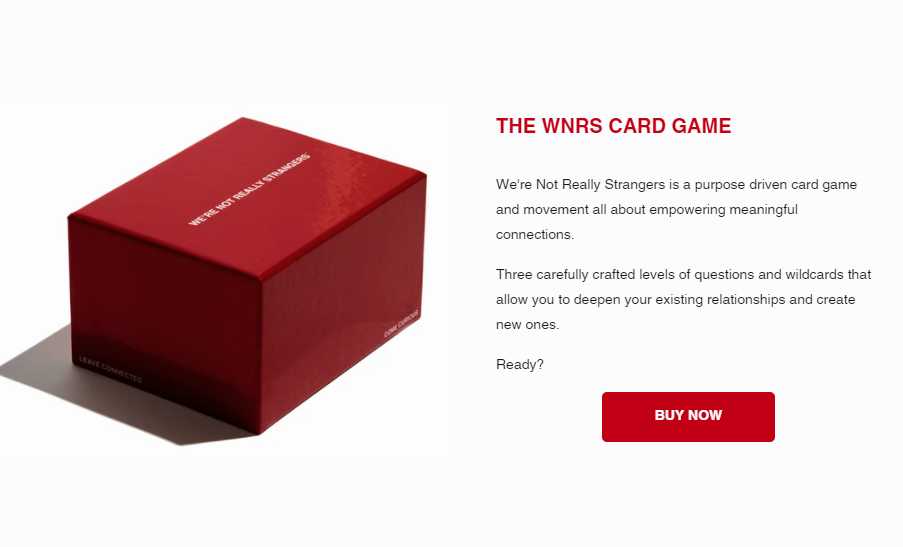
A card game called “We are Not Really Strangers”
Colors!!
Human connection
The Experience
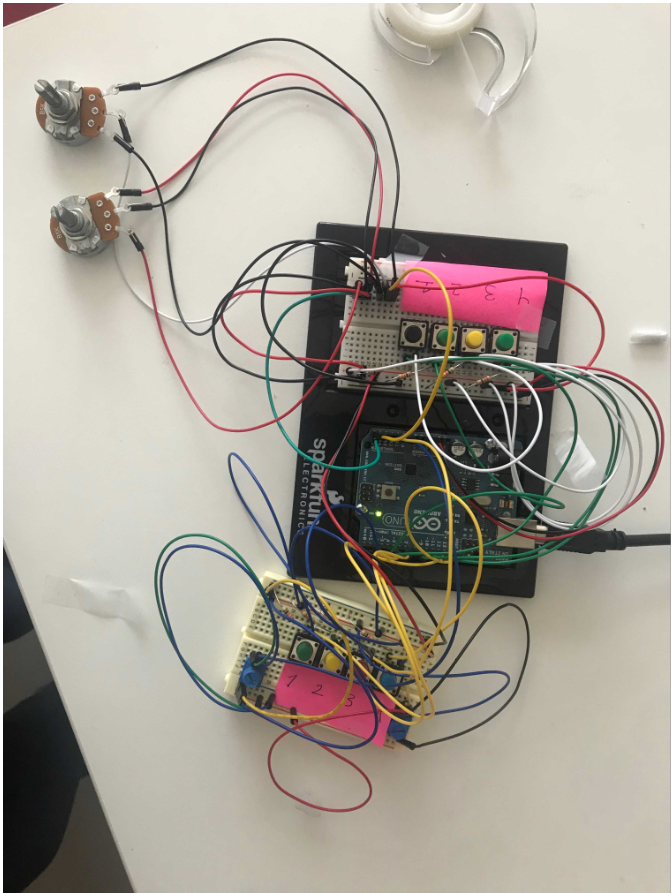
To take you through our game, we will demonstrate our Arduino set-up and the three different screens that make up our experience:
For Arduino, we wanted to have two different “stations” for each user. Each user on their breadboard has 4 buttons (reflecting Strongly disagree, disagree, agree, strongly agree for answering questions), and two potentiometer knobs for the etch- a – sketch.
Although finding pieces was an initial struggle, people on campus were generous enough to lend us some pieces — especially Amina! Shout out to you :-).
As you can see we had to work with the larger potentiometers, which initially caused a glitch due to loose wires, but then when taped down they worked just fine.
As for the code, we used an ascii handshake to send one button reading and the 4 values from the potentiometers in a comma-separated string, which we trimmed, divided and casted in processing. For the buttons, we gave each button a unique value so we can indicate the answer chosen in processing (rather than just depending on 0 and 1).
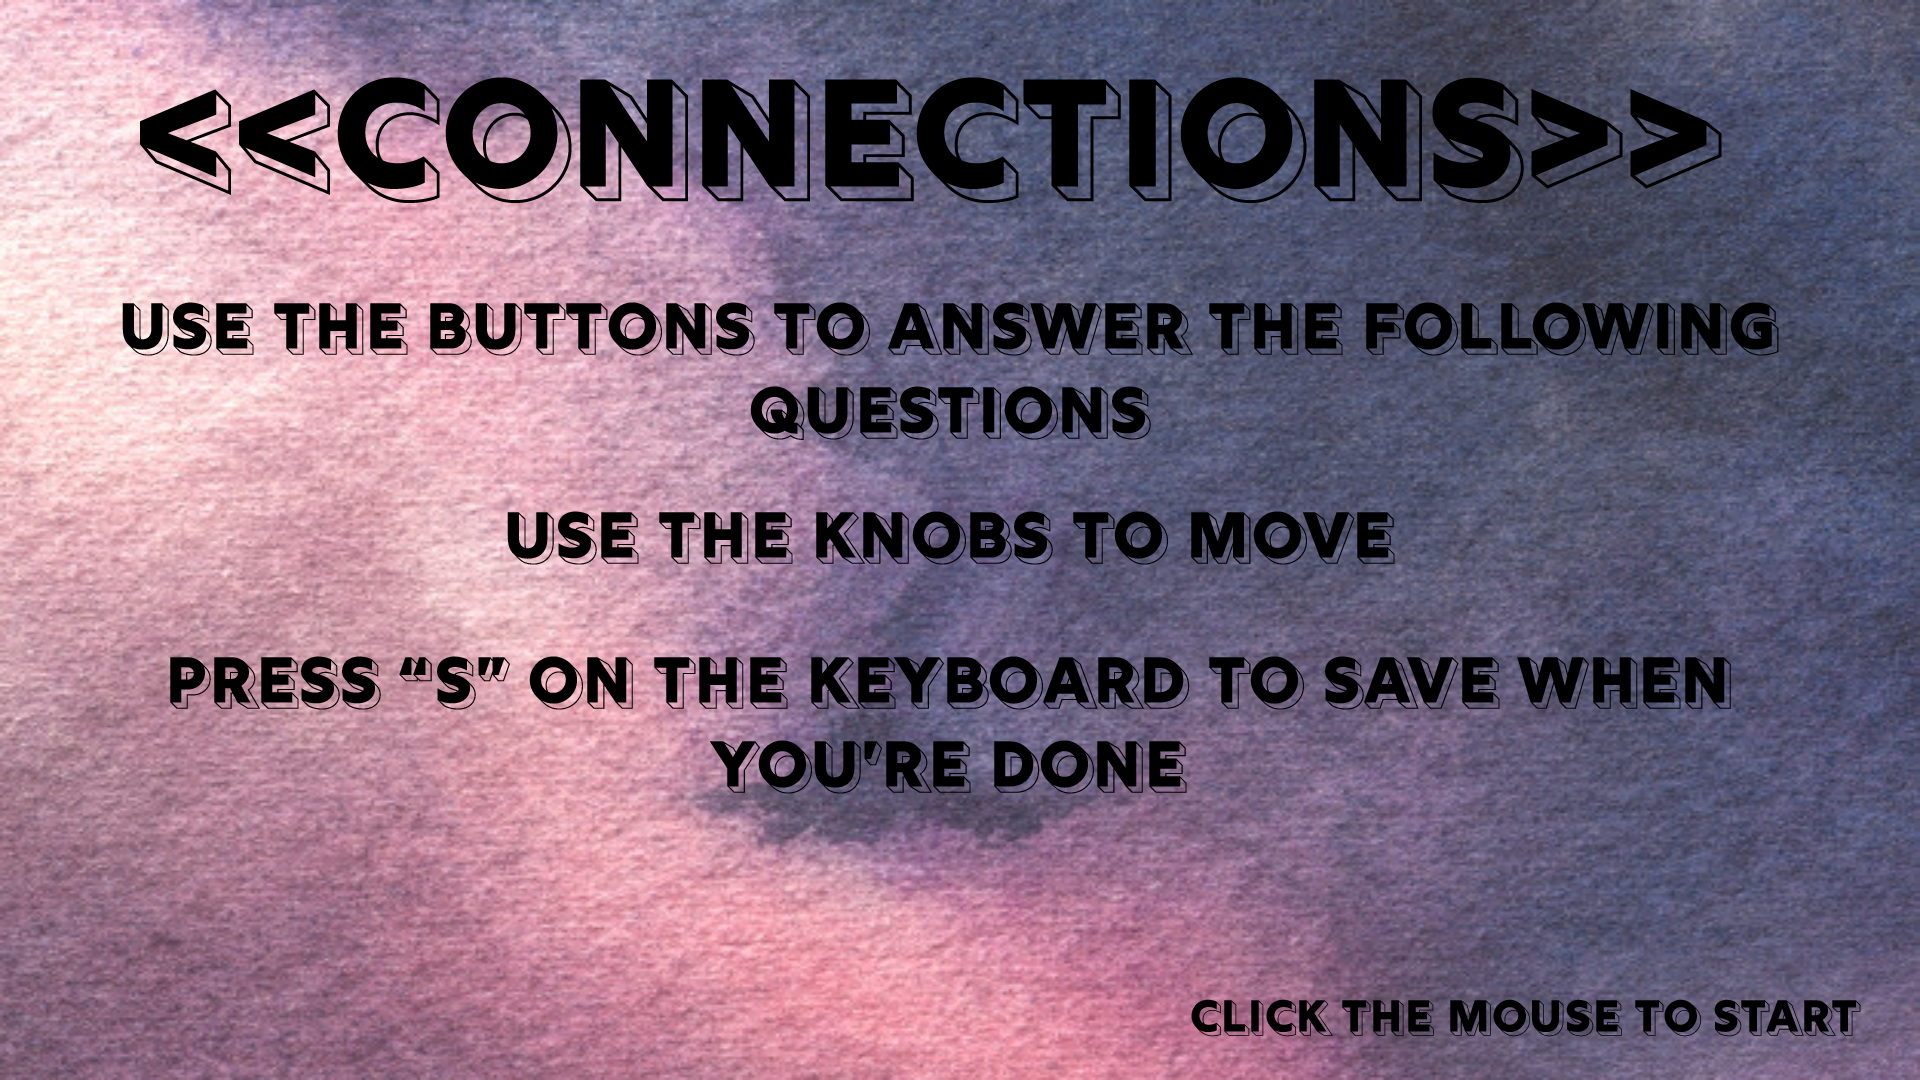
Start Screen: we wanted to offer the users some quick pointers before they start. Here, we tried our best not to spoil what’s going to happen afterward but communicate all the needed information.
2. Question Screen: Here, all the questions display in a grid, one after the other. When both users answer, the next question appears, and all answers are recorded and the answer difference between them calculated. This answer difference becomes the measure of their similarity that affects the blooming.
3. Drawing screen: Here, users use the potentiometer knobs to move around the screen, if they intersect in an area where answer difference = 0, they will see a dramatic explosion of color happen in front of them. This explosion will be smaller for answer difference 1 and 2, and non-existent for answer difference 3.
4.End Screen:
This appears after the users “save” their sketch and it explains the concept to them.
Some Main Features in the Code + Key Challenges during Implementation
Questions:
We had a question class, which creates class objects in a grid that we display one by one as users answer. This class includes the text display, variables to record user answers, the variable to calculate answer difference, and booleans to check if the question has been answered.
The Traces:
In the beginning, we were just trying the code using the keyboard, and we were drawing points. We were moving the point one pixel at a time. We, later, realized that this wouldn’t work with the potentiometers. It was also causing way too much discontinuity in the traces. To slightly fix this, and get a better effect overall, we started recording the lastX and lastY read by the potentiometers, and drawing lines from (lastX, lastY) to (currentX,currentY) instead of points.
Collisions
One of the main issues we ran into was detecting collisions between the traces.
There was a lot to think about in order to only detect valid collisions.
We needed to compare the color of pixels in two different PGraphics layers, each one containing the trace of one user. Whenever a pixel location is colored in both of the layers, a collision is detected.
However, we also needed to keep track of collision locations so that a collision wouldn’t be detected twice in the same location.
Since the strokeWeight of the traces is larger than just 1 pixel, and the lines are not just at 90-degree angles (they can be as squiggly as your heart desires) we also needed to check if a collision has already happened within a radius close to the current collision detected.
The bloom
For the bloom, it took us a while to figure out what we wanted it to look like. We ended up using code we found on OpenProcessing (credits go to the post https://www.openprocessing.org/sketch/486216 ), as our base. We struggled a bit to incorporate it into our code, but we tweaked parts of it and changed some parameters to get it to work with our idea.
User Test:
Testing this experience with people actually tied our concept together, it suddenly made much more sense when we saw how the users went about it and their reactions. For example, in the case of the video above, after the users read through the end screen their reactions were something like: “oh! This is a painting about our friendship”, then discussing their answers and how similar and different they are, and then asking if they could print it. Although we tested it with friends, we think this could be a great conversation starter for two strangers!
Future Improvements
Perhaps adding more questions or delving deeper with what we ask could be an interesting improvement to this experience, adding more meaning to it. Furthermore, in terms of the Arduino setup, we really wanted to make it more appealing and better divided, however, the limitations made it a bit difficult to make it look neater.
Finally, if we had more chances to user test we would’ve definitely been able to reveal details in the user experience that could be enhanced.
import processing.serial.*;
Serial myPort;

PGraphics user1, user2, blooms;
ArrayList<Integer[]> collisions;
int c_index = -1;
IntList collisionLocations;
Question[] questions;

int screen = 0;

int questionNumber = 0;
int Answer = 0;
int currentU1Answer = 0;
int currentU2Answer = 0;

String timestamp;

int qCols = 3;
int qRows = 3;

//int goingThruQs = 0;

int x;
int y;
int lastX;
int lastY;

int x2;
int y2;
int lastX2;
int lastY2;

float a, b, c, d, e, f ;

PImage traceBg;
PImage questionBg;
PImage startScreen;
PImage endScreen;

void setup() {


  background(0);
  fullScreen();
  println(width + " " + height);
  String portname = Serial.list()[2];
  myPort = new Serial (this, portname, 9600);
  myPort.clear();
  myPort.bufferUntil('\n');

  collisionLocations = new IntList();

  x = 0;
  y = height/2;
  lastX = 0;
  lastY = height/2;
  x2 = width;
  y2 = height/2;
  lastX2 = width;
  lastY2 = height/2;


  questions = new Question[qCols*qRows];


  int questionIndex = 0;
  for (int r2 = 0; r2 < qRows; r2++) {
    for (int c2 = 0; c2 < qCols; c2++) {

      questions[questionIndex] = new Question( questionIndex, c2*640, r2*360);

      questionIndex +=1;
    }
  }
  collisions = new ArrayList();
  user1 = createGraphics(width, height);
  user2 = createGraphics(width, height);
  blooms = createGraphics(width, height);
  pts = new ArrayList<Particle>();

  traceBg = loadImage("bg2darker.jpg");
  startScreen = loadImage("startScreen.png");
  questionBg = loadImage("bg.jpg");
  questionBg.resize(width, height);
  endScreen = loadImage("endScreen.png");
}

void draw() {

  if (screen == 0) {
    image(questionBg, 0, 0, width, height);
    image(startScreen, 50, 50 );
  }

  if (screen == 1) {
    questions[questionNumber].display();
    goingThroughQuestions(questionNumber);
    if (questions[questionNumber].user1Answered && questions[questionNumber].user2Answered && questionNumber < 8 ) {
      questions[questionNumber].answerDifference = abs(questions[questionNumber].user1Answer - questions[questionNumber].user2Answer);
      println(questions[questionNumber].answerDifference);
      questionNumber += 1;
    }
    if (questionNumber == 8 && questions[questionNumber].user1Answered && questions[questionNumber].user2Answered) {
      questions[questionNumber].answerDifference = abs(questions[questionNumber].user1Answer - questions[questionNumber].user2Answer);
      image(traceBg, 0, 0, width, height);
      screen = 2;
    }
  }
  if (screen == 2) {


    stroke(183,150,172,50);
    strokeWeight(5);

    line(x, y, lastX, lastY);
    user1.beginDraw();
    user1.stroke(255);
    user1.strokeWeight(5);
    user1.line(x, y, lastX, lastY);
    user1.endDraw();

    lastX = x;
    lastY = y;
    stroke(120,150,220, 50);
    strokeWeight(5);

    line(x2, y2, lastX2, lastY2);
    user2.beginDraw();
    user2.stroke(255, 0, 0);
    user2.strokeWeight(5);
    user2. line(x2, y2, lastX2, lastY2);
    user2.endDraw();

    lastX2 = x2;
    lastY2 = y2;

    //image(user1, 0, 0);
    //image(user2,0,0);
    user1.loadPixels();
    user2.loadPixels();

    for (int i=0; i<width; i++)
    {
      for (int j=0; j<height; j++)
      {
        if ( user1.get(i, j) == color(255) && user2.get(i, j) == color(255, 0, 0) &&!exists(i, j) && !existsInRadius(i, j))

        {
          Integer[] c= {i, j};
          collisions.add(c);
          collisionLocations.append(location(c[0], c[1]));
          c_index += 1;
          yes = true;
        }
      }
    }


    blooms.beginDraw();
    blooms.smooth();
    blooms.colorMode(HSB);

    blooms.rectMode(CENTER);
    if (c_index > -1)
    {
      bloomValues(questions[collisionLocations.get(c_index)].answerDifference);
      //blooms.ellipse(collisions.get(i)[0], collisions.get(i)[1], diameter, diameter);
      if (a != -1 && b != -1 && c != -1 && d != -1 && e != -1 && f != -1) {
        drawcool(blooms, collisions.get(c_index)[0], collisions.get(c_index)[1], a, b, c, d, e, f);
      }
    }

    blooms.endDraw();
    image(blooms, 0, 0);
  }
  if (screen == 3) {
    image(questionBg,0,0);
    image(endScreen,50,50);
  }
}


void goingThroughQuestions(int i) {
  //answer is not zero only when a button has been pressed
  if ( Answer == 1 || Answer == 3 || Answer == 5 || Answer == 7) { //if one of these buttons is pressed then it's the first user
    if (!questions[i].user1Answered) {  // if the question hadn't been answered already
      questions[i].user1Answer = currentU1Answer; //assign the user 1 arduino variable to the user1 question variable
      questions[i].user1Answered = true;
      //println("user 1 " + questions[i].user1Answer);
      //not sure if the following 2 lines make sense, to me it's like restarting and waiting for a new button press
      currentU1Answer = 0;

      Answer = 0;
    }
  }
  if ( Answer == 11 || Answer == 13 || Answer == 15 || Answer == 17) {
    if (!questions[i].user2Answered) {
      questions[i].user2Answer = currentU2Answer;
      questions[i].user2Answered = true;


      currentU2Answer = 0;

      Answer = 0;
    }
  }
}


void serialEvent(Serial myPort) {
  String s=myPort.readStringUntil('\n');
  s=trim(s);
  if (s!=null) {
    int values[]=int(split(s, ','));
    if (values.length==5) {
      Answer = (int)values[0];
      x=(int)map(values[1], 0, 1023, 0, width);
      y=(int)map(values[2], 0, 1023, 0, height);
      x2=(int)map(values[3], 0, 1023, 0, width);
      y2=(int)map(values[4], 0, 1023, 0, height);
    }
  }
  if (Answer != -1) {
    if (Answer == 1 || Answer == 3 || Answer == 5 || Answer == 7) {
      currentU1Answer = Answer;
    }
    //second set of buttons for user 2
    if (Answer == 11 || Answer == 13 || Answer == 15 || Answer == 17) {
      currentU2Answer = Answer - 10 ;
    }
  }
  myPort.write('0');
}

//function to check if collision already exists in array
boolean exists(int x, int y)
{
  for (int i=0; i<collisions.size(); i++)
  {
    if (collisions.get(i)[0]==x && collisions.get(i)[1]==y)
    {
      return true;
    }
  }
  return false;
}


//function to check if collisions exists in radius
boolean existsInRadius (int x, int y)
{
  for (int i=0; i<collisions.size(); i++)
  {
    if (sq(collisions.get(i)[0] - x) + sq(collisions.get(i)[1] - y) <= 20*20)
    {
      return true;
    }
  }
  return false;
}

//function to check in which question's "area" the collision happened in
int location(int x, int y) {
  int qIndex = 0;
  for (int r2 = 0; r2 < qRows; r2++) {
    for (int c2 = 0; c2 < qCols; c2++) {
      if (x >= c2*640 && x <= (c2+1)*640 && y >= r2*360 && y <= (r2+1)*360) {
        return qIndex;
      }

      qIndex +=1;
    }
  }
  return -1;
}

//function to take parameters for the bloom based on the answer difference
void bloomValues(int diff) {
  if (diff == 0) {
    //lifespan
    a = 70; //80;
    b = 150;  //120;

    //decay
    c = 0.7;
    d = 0.99;
    //weightRange
    e = 60;
    f = 180; //120;
  } else if (diff == 2) {
    //lifespan
    a = 55;
    b = 80;
    //decay
    c = 0.63;
    d = 0.9;
    //weightRange
    e = 20;
    f = 100;

  } else if (diff == 4) {
    //lifespan
    a = 30;
    b = 65;
    //decay
    c = 0.63;
    d = 0.83;
    //weightRange
    e = 8;
    f = 35;

  } else if (diff == 6) {
    a = b = c = d = e = f = -1;
  }
}

void keyPressed() {
  if (key == 'S' || key == 's') {
    timestamp = year() + nf(month(), 2) + nf(day(), 2) + "-"  + nf(hour(), 2) + nf(minute(), 2) + nf(second(), 2);
    saveFrame(timestamp+".png");
    screen = 3;
  }
}

void mouseClicked(){
 screen = 1;
}
Bloom Class
ArrayList<Particle> pts;
boolean yes;
int coolingTime;

void drawcool(PGraphics pg, Integer x, Integer y, float a, float b, float c, float d, float e, float f) {
  pg.beginDraw();
  if (yes)
  {
    for (int i=0;i<10;i++) {
      Particle newP = new Particle(x, y, i+pts.size(), i+pts.size(), a,b,c,d,e,f);
      pts.add(newP);
    }

  }
  for (int i=0; i<pts.size(); i++) {
    Particle p = pts.get(i);
    p.update();
    p.display(pg);
  }

  for (int i=pts.size()-1; i>-1; i--) {
    Particle p = pts.get(i);
    if (p.dead)
    {
      pts.remove(i);
    }

  }
  coolingTime++;
  stop();
  //yes = false;
  pg.endDraw();
}

void stop(){
  if (coolingTime>1)
  {
    yes = false;
    coolingTime = 0;
  }
}

//CLASS
class Particle{
  PVector loc, vel, acc;
  int lifeSpan, passedLife;
  boolean dead;
  float alpha, weight, weightRange, decay, xOffset, yOffset;
  color c;
  float a, b,cc,d,e,f;

  Particle(float x, float y, float xOffset, float yOffset, float thisa , float thisb , float thisc, float thisd, float thise ,float thisf){
    loc = new PVector(x,y);
    a = thisa;
    b = thisb;
    cc = thisc;
    d = thisd;
    e = thise;
    f = thisf;

    float randDegrees = random(360);
    vel = new PVector(cos(radians(randDegrees)), sin(radians(randDegrees)));
    vel.mult(random(1));

    acc = new PVector(0,0);
    lifeSpan = int(random(a, b)); //HERE IS HOW LONG THE ANIMATION IS (timewise)
    decay = random(cc, d); //HERE IS HOW FAR IT GOES
    c = color (random(255), random(255), 255, 75);
    weightRange = random(e,f);//random(5,90); //HERE IS THE SIZE

    this.xOffset = xOffset;
    this.yOffset = yOffset;
  }

  void update(){
    if(passedLife>=lifeSpan){
      dead = true;
    }else{
      passedLife++;
    }

    alpha = float(lifeSpan-passedLife)/lifeSpan * 70+50;
    weight = float(lifeSpan-passedLife)/lifeSpan * weightRange;

    acc.set(0,0);

    float rn = (noise((loc.x+frameCount+xOffset)*0.01, (loc.y+frameCount+yOffset)*0.01)-0.5)*4*PI;
    float mag = noise((loc.y+frameCount)*0.01, (loc.x+frameCount)*0.01);
    PVector dir = new PVector(cos(rn),sin(rn));
    acc.add(dir);
    acc.mult(mag);

    float randDegrees = random(360);
    PVector randV = new PVector(cos(radians(randDegrees)), sin(radians(randDegrees)));
    randV.mult(0.5);
    acc.add(randV);

    vel.add(acc);
    vel.mult(decay);
    vel.limit(3);
    loc.add(vel);
  }

  void display(PGraphics pg){

    pg.beginDraw();
    pg.strokeWeight(0);
    pg.stroke(0, alpha);
    pg.point(loc.x, loc.y);

    pg.strokeWeight(weight);
    pg.stroke(c);
    pg.point(loc.x, loc.y);
    pg.tint (255,125);
    pg.endDraw();
  }
}
Question Class
class Question {
  //variables to store input answers


  PImage image;


  int user1Answer;
  int user2Answer;
  int answerDifference;
  //question location (corresponding to area on screen)
  int x;
  int y;
  int coverX = 0;
  //question box dimensions (it could be something that we design and upload to processing(?))
  int w = 640;
  int h = 360;

  int c = 255; //alpha

  int questionNumber;

  String questionText;


  boolean user1Answered = false;
  boolean user2Answered = false;

  boolean sameAnswer;

  Question(int tempQNumber, int tempX, int tempY) {
    questionNumber = tempQNumber;
    x = tempX;
    y = tempY;
    image = loadImage("question"+(questionNumber+1)+".png");


  }


  void display() {

   //background(0);
   image(questionBg,0,0);
    fill(0);
    //noStroke();
    stroke(255);
    image(image,x, y);
    fill(255);
    //textSize(40);
    //text(questionText, x+w/4, y+h/4);

  }


}