Final Project

Final Project – juicy jackpot

Concept:

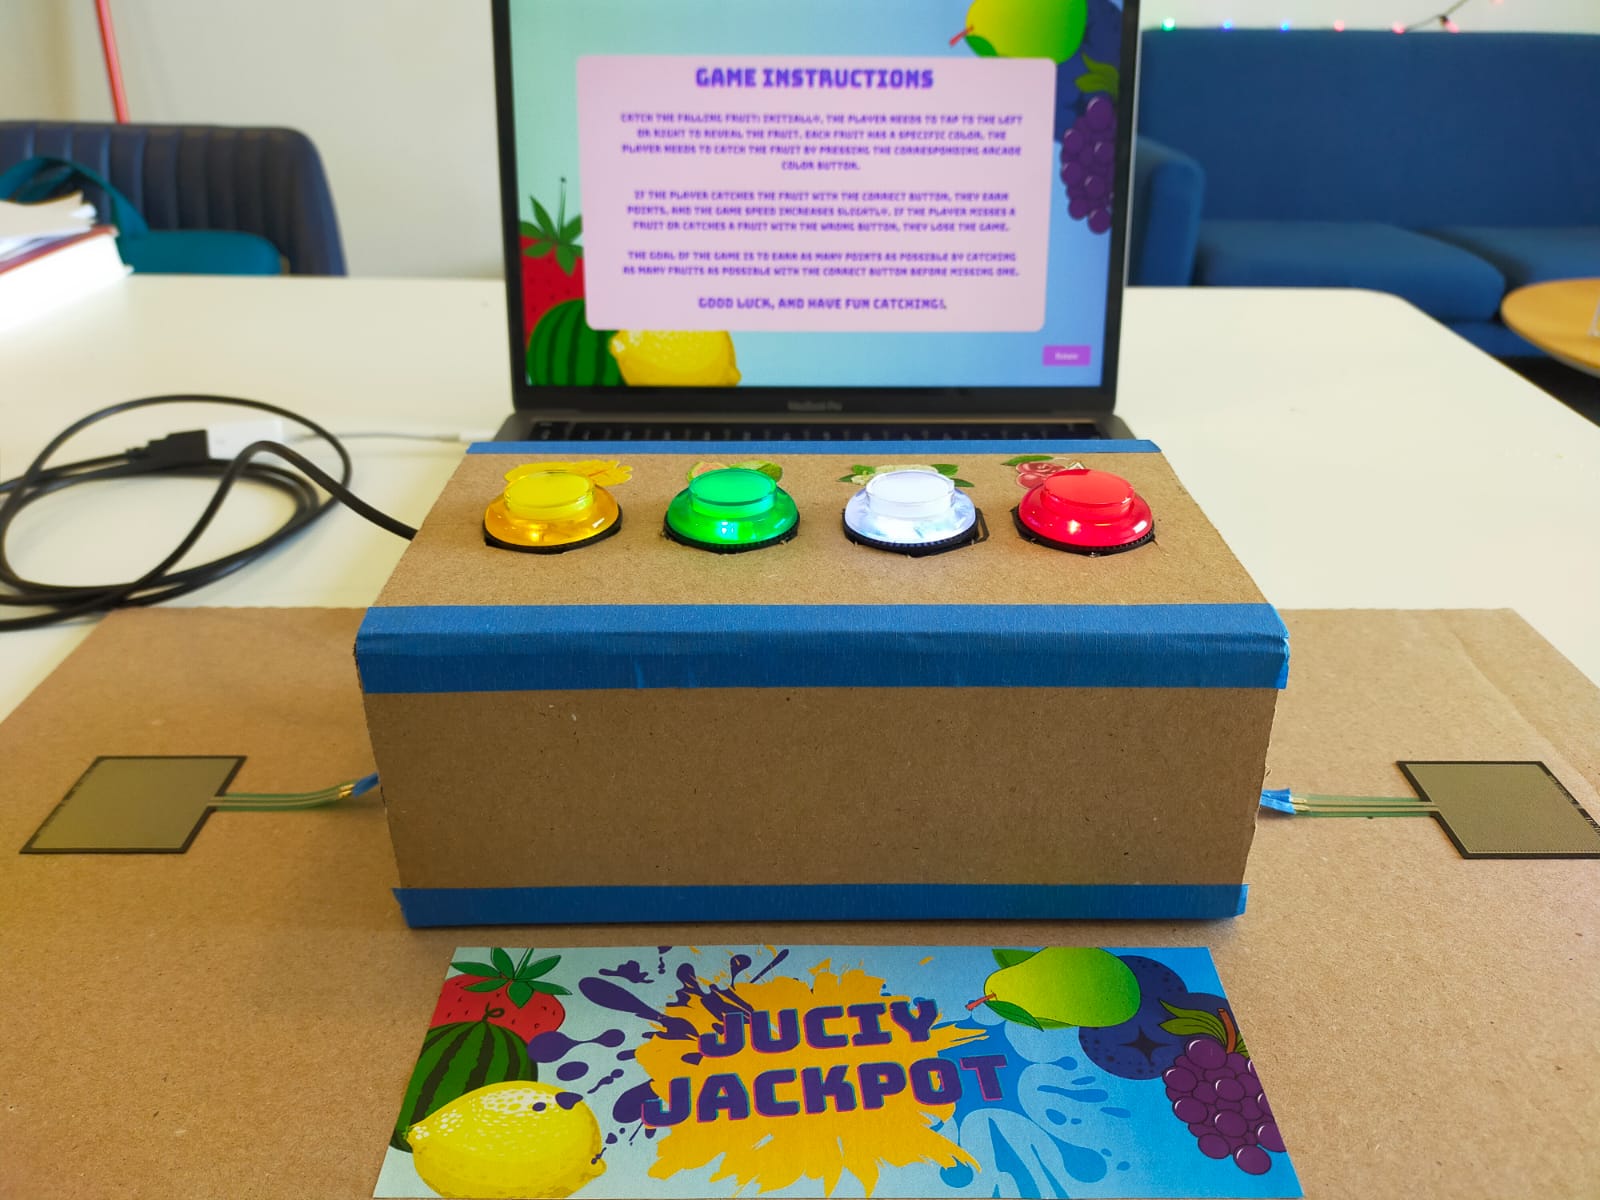
The game I have designed is an engaging and interactive experience, incorporating elements from classic games such as piano tiles, paddle catch, and reaction time games. The central theme of the game is simple yet delightful – players are tasked with discovering hidden fruit and must catch the correct fruit to earn points and progress through the levels. As the game proceeds, the speed of play increases, demanding rapid reflexes and quick decision-making from players to succeed. To uncover the hidden fruit, players must stay alert and swiftly respond to left or right signs, then press the correct arcade button to capture the fruit they seek. The game promises a thrilling and immersive experience, testing players’ skills and keeping them captivated as they strive to achieve the highest score possible.

Implementation:

Building and executing the entire setup for my project was a challenging task, but I am thrilled with the results. I decided to use two force sensors to track left and right movements and four arcade buttons to represent the different fruits. These force sensors typically provide values ranging from 0 to 1023, and while I initially mapped them using Arduino code, it became complicated to send so many values over serial communication. So, I resorted to mapping the values in p5js, which proved to be a more effective solution.

Using this setup, I was able to receive values from both force sensors and the arcade buttons over serial communication. While soldering the force sensors, I encountered some issues with the values changing, but I was able to remap them successfully. If the value is above 100 for one sensor, it’s pressed, and for the other, it’s above 500.

To make the game more engaging, I randomly assigned the fruits and direction arrows. Initially, I had planned to implement a piano tiles-style game with increased complexity, but that wouldn’t allow users to play completely. So, I opted for a randomly falling catch game instead. I first tested the collision and mapping of objects with keyboard keys and then proceeded with mapping them with the Arduino reading.

During testing, I faced a lagging issue while storing all mapped values in an array after splitting the string from the Arduino. However, I was able to resolve this issue by using separate variables, simple if-else statements, and increasing the frame rate.

Mapping the values for the force sensors and arcade buttons to their respective fruits and direction arrows was a crucial step, and I am particularly proud of how well it turned out. Overall, I am pleased with the final result and excited to continue improving the game in the future.

p5js code:

link: https://editor.p5js.org/Sanjana-Nambiar/sketches/-JxDz5psg

Arduino code:

//declaring all the port pins as const int
const int yellow = 13;
const int green = 11;
const int blue = 9;
const int red = 7;

const int left = A3;
const int right = A1;

void setup() {
  //serial port activation 
  Serial.begin(9600);

  //declare the switches as digital input devices
  pinMode(yellow, INPUT_PULLUP);
  pinMode(green, INPUT_PULLUP);
  pinMode(blue, INPUT_PULLUP);
  pinMode(red, INPUT_PULLUP);

  pinMode(left, INPUT);
  pinMode(right, INPUT);
}

void loop() {
  String arrow;
  String fruit;
  String message;

//printig the values from the left and right sensors 
  int sensor1 = analogRead(left);
  int sensor2 = analogRead(right);

  Serial.print(sensor1);
  Serial.print(",");
  Serial.print(sensor2);
  Serial.print(",");

//since the arcade buttons are pullup buttons 
//they are high when it isnt pressed.
  if(digitalRead(yellow) == HIGH)
    {Serial.print("0,");}
  else 
    {Serial.print("1,");}

  if(digitalRead(green) == HIGH) 
    {Serial.print("0,");}
  else 
    {Serial.print("1,");}

  if(digitalRead(blue) == HIGH)
    {Serial.print("0,");}
  else 
    {Serial.print("1,");}

  if(digitalRead(red) == HIGH) 
    {Serial.println("0");}
  else 
    {Serial.println("1");}

}
User testing:

During the user testing phase, my game was tested by Saamia and Moeez, who found the game instructions to be simple and straightforward. However, they encountered a minor issue when distinguishing between the fruit colors. The confusion arose from the white berry and guava fruits, which shared a similar color scheme. To address this issue, I took the feedback on the board and included pictures of the fruits at the front of the box. This small change resolved the confusion, and the testers were able to play the game smoothly. Overall, the user testing phase yielded positive results, and the feedback provided by Saamia and Moeez allowed me to make an improvement to the game that enhanced the user experience.

Future improvements and reflections:

Looking toward the future, there are several areas where this game could be improved to make it even more engaging and exciting for players. One possibility is to add more layers of complexity to the game. For example, rather than just catching the fruit, players could be required to perform additional tasks before the fruit is revealed. This could include completing a pattern or sequence of movements or even solving simple puzzles. Additionally, the game could be made into a two-player mode, where players compete against each other to catch the most fruit or avoid the most obstacles. This could be accomplished by adding a second set of sensors and buttons or even incorporating motion-tracking technology to track players’ movements in real-time.

Overall, I am very proud of the mapping part of the game, where the sensors and buttons were effectively mapped to the fruits and arrows for catching them. With further development, this game has the potential to become a popular and entertaining addition to the world of physical gaming.


Week 12 – Final project proposal

COLOUR FALL

Concept:

The theme for the final project is to have a simple color catch game. For the final project, I wanted something unique but still interactive. This game is inspired by many games like the piano tiles or the falling catch game. So the game is to catch the respective colors before it falls down with the respective colors. To add difficulty to the game, there will be a blinking level in the game, and the color will blink till it stabilizes to catch.

Arduino:

For this game, I will be using many big Arcade buttons, along with small buttons for navigation, such as the instructions page or the start page. I plan to use arcade buttons or force sensors for the color-matching functionality.

P5.js:

The P5 js code will be responsible for the aesthetics of the game. It will have the GameState controlling the different screens of the game. It will display the scores of players at the end of the battle for the next revenge!


week-15 exercise + final idea

Exercise 1: The value obtained from the potentiometer makes the ellipse in p5 move on the horizontal axis, in the middle of the screen, and nothing on Arduino is controlled by p5.

p5.js

let rVal = 0;
let xPos = 0;
let rad = 50;


function setup() {
  createCanvas(400, 400);
  textSize(18);
}  

function draw() {
  background(255);

  if (!serialActive) {
    text("Press Space Bar to select Serial Port", 20, 30);
  } else {
    text("Connected", 20, 30);
    
    xPos = map(rVal, 0, 900, 0, 400);
    // Print the current values
    text('rVal = ' + str(rVal), 20, 50);
    ellipse(xPos, 200, rad, rad);
    text('xPos = ' + str(xPos), 20, 70);

  }
  
}

function keyPressed() {
  if (key == " ") {
    // important to have in order to start the serial connection!!
    setUpSerial();
  }
}


function readSerial(data) {
  ////////////////////////////////////
  //READ FROM ARDUINO HERE
  
  if (data != null) {
    
    let fromArduino = split(trim(data), ",");

    if (fromArduino.length == 1) {
      rVal = fromArduino[0];
    }

    //////////////////////////////////
    //SEND TO ARDUINO HERE (handshake)
    //////////////////////////////////
    let sendToArduino = 1 + "\n";
    writeSerial(sendToArduino);
  }
}

Arduino

void setup() {
  Serial.begin(9600);
  //pinMode(LED_BUILTIN, OUTPUT);

//start the handshake
  while (Serial.available() <= 0) {
    //digitalWrite(LED_BUILTIN, HIGH);
    Serial.println("0,0"); // send a starting message
    delay(300);
    //digitalWrite(LED_BUILTIN, LOW);
    delay(50);

  }
}

void loop() {
  // wait for data from p5 before doing something
  while (Serial.available()) {
     //digitalWrite(LED_BUILTIN, HIGH);
    int isMoving = Serial.parseInt();
    if (Serial.read() == '\n') {
      int photoVal = analogRead(A0); 
      delay(5);
      Serial.println(photoVal);
   }
  }
  //digitalWrite(LED_BUILTIN, LOW);
}

Exercise 2: Change the LED brightness by moving the ellipse on p5.js left or right.

let left = 0;
let right = 0;
let brightness = 0;
let rad = 50;

function setup() {
  createCanvas(400, 400);
  textSize(18);
}  

function draw() {
  background(255);

  if (!serialActive) {
    text("Press Space Bar to select Serial Port", 20, 30);
  } else {
    text("Connected", 20, 30);

    //the x position of the cirlce will control the brightness of the LED
    xPos = mouseX;
    ellipse(xPos, 200, rad, rad);
    brightness = map(xPos, 0, 400, 0, 255);
    brightness = int(brightness);
    
    // Print the current values
    text('Brightness = ' + str(brightness), 20, 60);
    text('xPos = ' + str(xPos), 20, 90);

  }
  
}

function keyPressed() {
  if (key == " ") {
    // important to have in order to start the serial connection!!
    setUpSerial();
  }
}


function readSerial(data) {
  ////////////////////////////////////
  //READ FROM ARDUINO HERE
  ////////////////////////////////////
  
  if (data != null) {
    
    let fromArduino = split(trim(data), ",");
    if (fromArduino.length == 1) {
      // we're not getting input from arduino
    }
    //////////////////////////////////
    //SEND TO ARDUINO HERE (handshake)
    //////////////////////////////////
    let sendToArduino = brightness + "\n";
    writeSerial(sendToArduino);
  }
}

Arduino

int ledPin = 5;

void setup() {
  Serial.begin(9600);
  pinMode(LED_BUILTIN, OUTPUT);
  pinMode(ledPin, OUTPUT);
  // start the handshake
  while (Serial.available() <= 0) {
    digitalWrite(LED_BUILTIN, HIGH); // on/blink while waiting for serial data
    Serial.println("0,0"); // send a starting message
    delay(300);            // wait 1/3 second
    digitalWrite(LED_BUILTIN, LOW);
    delay(50);
  }
}

void loop() {
  // wait for data from p5 before doing something
  while (Serial.available()) {
    digitalWrite(LED_BUILTIN, HIGH); // led on while receiving data
    int brightness = Serial.parseInt();
    if (Serial.read() == '\n') {
      delay(5);
      Serial.println("1");
    }
    analogWrite(ledPin, brightness);
  }
  digitalWrite(LED_BUILTIN, LOW);
}

Exercise 3: Alter the gravity wind example to make the LED light up and turn off every time the ball bounces , and control the wind using potentiometer.

p5.js

let velocity;
let gravity;
let position;
let acceleration;
let wind;
let drag = 0.99;
let mass = 50;

function setup() {
  createCanvas(640, 360);
  noFill();
  position = createVector(width/2, 0);
  velocity = createVector(0,0);
  acceleration = createVector(0,0);
  gravity = createVector(0, 0.5*mass);
  wind = createVector(0,0);
}

function draw() {
  background(255);
  
  if (!serialActive) {
    text("Press Space Bar to select Serial Port", 20, 30);
  } else {
    applyForce(wind);
    applyForce(gravity);
    velocity.add(acceleration);
    velocity.mult(drag);
    position.add(velocity);
    acceleration.mult(0);

    fill(0);
    ellipse(position.x, position.y, mass, mass);
    if (position.y > height - mass / 2) {
      velocity.y *= -0.9; // A little dampening when hitting the bottom
      position.y = height - mass / 2;
      isBouncing = 1;
    } else {
      isBouncing = 0;
    }
  }
}

function applyForce(force){
  // Newton's 2nd law: F = M * A
  // or A = F / M
  let f = p5.Vector.div(force, mass);
  acceleration.add(f);
}


function keyPressed() {
  if (key == " ") {
    // important to have in order to start the serial connection!!
    setUpSerial();
  } else if (key == "ENTER") {
    mass = random(15, 80);
    position.y = -mass;
    velocity.mult(0);
  }
}

function readSerial(data) {
  if (data != null) {
    // make sure there is actually a message
    // split the message
    let fromArduino = split(trim(data), ",");
    // if the right length, then proceed
    if (fromArduino.length == 1) {
      // only store values here
      // do everything with those values in the main draw loop
      let potValue = int(fromArduino[0]);
      
      //change the wind based on the potentiometer value
      wind.x = map(potValue, 0, 900, -5, 5);
    }

    //////////////////////////////////
    //SEND TO ARDUINO HERE (handshake)
    //////////////////////////////////
    let sendToArduino = isBouncing + "\n";
    writeSerial(sendToArduino);
  }
}

Arduino

int ledPin = 5;
const int potPin = A0;

void setup() {
  Serial.begin(9600);
  pinMode(LED_BUILTIN, OUTPUT);
  pinMode(ledPin, OUTPUT);
  pinMode(potPin, INPUT);
  
  // start the handshake
  while (Serial.available() <= 0) {
    digitalWrite(LED_BUILTIN, HIGH); // on/blink while waiting for serial data
    Serial.println("0,0"); // send a starting message
    delay(300);            // wait 1/3 second
    digitalWrite(LED_BUILTIN, LOW);
    delay(50);
  }
}

void loop() {
  // wait for data from p5 before doing something
  while (Serial.available()) {
    digitalWrite(LED_BUILTIN, HIGH); // led on while receiving data
    digitalWrite(ledPin, LOW);
    int isBouncing = Serial.parseInt();
    if (Serial.read() == '\n') {
      int potValue = analogRead(potPin);
      delay(5);
      Serial.println(potValue);
    }
    // Set LED brightness based on whether bouncing.
    if (isBouncing == 1) {
      digitalWrite(ledPin, HIGH);
    } else {
      digitalWrite(ledPin, LOW);
    }
  }
  digitalWrite(LED_BUILTIN, LOW);
}

Final Project Idea

Concept

For the final project, me and Sanjana are thinking of creating a Virtual Fruit Ninja. We want to take the concept of this mobile game to the next level by creating an immersive and interactive game experience allowing players to slice fruits virtually with their hands! The following project and our love for the game fruit ninja is the inspiration for this project: (https://naziafakhruddin.medium.com/gesture-controlled-flower-art-with-ml5-js-posenet-and-p5-js-61b98fa3fc68)

For this project, we are thinking of using the ml5 library, built on top of Tensor.js, and the PoseNet function to accurately track the position of the player’s hand in real time through the camera video. The goal is to create a seamless integration between the player’s hand movements and a virtual sword or blade in the game, simulating the experience of slicing real fruits with a knife.

The game mechanics will be intuitive and engaging. Players can wave their hands across the screen to slice the fruits as they appear, and the PoseNet function will accurately track their hand movements in real time, providing precise and responsive slicing actions. We will also leverage p5.js to create visually appealing graphics and animations, creating an engaging game environment that enhances the overall gameplay experience.

Challenge

One of the main challenges of this project will be optimizing the game’s performance to ensure smooth gameplay and minimize latency. We will need to carefully understand the output of the PoseNet model and use the information to update the virtual sword’s position and orientation in real-time.

PIANO

Concept:
After going over several examples of musical instruments that we could create using the specified digital and analog sensors, Sanjana Nambiar and I decided to settle on the old but gold piano. The concept behind our project is simple and straightforward: our piano will consist of 8 buttons that will correspond to piano tiles and the buzzer will play a corresponding musical note when the user presses one of the eight switch buttons. We integrated an analog input to our project by getting the value from the potentiometer and mapping it to one of the four octaves. Based on this mapping, the button will play different variations of the same note i.e. A or a or a’ or a’’. Below is the illustration of the four octaves that we used and the corresponding notes and frequencies.

Code:

// arduino-equivalent frequencies of the musical notes for each tile of the piano
// each note is stored in a list consisitning of three other notes of  different pitch
int T_C[4] = {65, 130, 262, 523};
int T_D[4] = {73, 147, 294, 587};
int T_E[4] = {82, 165, 330, 659};
int T_F[4] = {87, 175, 349, 698};
int T_G[4] = {98, 196, 392, 784};
int T_A[4] = {110, 220, 440, 880};
int T_H[4] = {123, 247, 493, 988};
int T_c[4] = {130, 262, 523, 1046};

//names of each tile and the corresponding digital  pins
const int A = 11;
const int C = 5;
const int D = 6;
const int E = 7;
const int F = 8;
const int G = 10;
const int H = 12;
const int c = 13;

const int Buzz = A0;

void setup()
{
  Serial.begin(9600); 

  //declare the switches as digital input devices
  pinMode(C, INPUT);
  pinMode(D, INPUT);
  pinMode(E, INPUT);
  pinMode(F, INPUT);
  pinMode(G, INPUT);
  pinMode(A, INPUT);
  pinMode(H, INPUT);
  pinMode(c, INPUT);
}

void loop()
{
  //read the analog input from the potentiometer
  int potPosition = analogRead(A3);

  //map that input to the the value in the range 0-4
  potPosition = map(potPosition, 0, 1023, 0, 4);
  Serial.println(potPosition);

  //value 4 is just a dummy value that will be used to detect the end of the potentiometer, 
  //so when we get value 4 from the poentiometer, we treat it as 3
  if(potPosition == 4){ potPosition = 3; }

  //play the correspondting tone for each of the 8 swithces
  while(digitalRead(C) == HIGH){ tone(Buzz,T_C[potPosition]); }
  while(digitalRead(D) == HIGH){ tone(Buzz,T_D[potPosition]); }
  while(digitalRead(E) == HIGH){ tone(Buzz,T_E[potPosition]); }
  while(digitalRead(F) == HIGH){ tone(Buzz,T_F[potPosition]); }
  while(digitalRead(G) == HIGH){ tone(Buzz,T_G[potPosition]); }
  while(digitalRead(A) == HIGH){ tone(Buzz,T_A[potPosition]); }
  while(digitalRead(H) == HIGH){ tone(Buzz,T_H[potPosition]); }
  while(digitalRead(c) == HIGH){ tone(Buzz,T_c[potPosition]); }

  noTone(Buzz);
}

Schematic:

Demo:

Future Improvements

Since we were limited in the use of sensors that we could use, our piano doesn’t really look like a real-world piano. So, one of the improvements we could make is to create a separate portable piano i.e. a cardboard piano covered with aluminum foil or equipped with force sensors, and adapt our code to play the same sounds when the corresponding tile will get pressed. We could also work on implementing the logic to handle the case when two tiles are pressed simultaneously.


Brightness blinker

Concept & Method
In this assignment, I am using two LEDs, one switch (digital), and one slider potentiometer (analog). The switch controls the entire circuit, and the potentiometer controls the brightness of the LEDs.

Implementation

Code:

#define LED_PIN 3 
#define BUTTON_PIN 7
#define POTENTIO_PIN A1

byte lastButtonState = HIGH;
bool LEDOn = true;

void setup()
{
  pinMode(LED_PIN, OUTPUT);
  pinMode(BUTTON_PIN, INPUT_PULLUP);
}

void loop()
{
    byte buttonState = digitalRead(BUTTON_PIN);
    if (buttonState != lastButtonState) 
    {
      lastButtonState = buttonState;
      
      if (buttonState == HIGH) { // button has been released
        LEDOn = ! LEDOn;
      }
   }
  
  if (LEDOn) {
    int potentiometerValue = analogRead(POTENTIO_PIN);
    int brightness = map(potentiometerValue, 0, 1023, 0, 255);

    analogWrite(LED_PIN, brightness); 
    delay(100);                      // delay is in milliseconds
    analogWrite(LED_PIN, LOW);       // turn LED off (0V)
    delay(100);
  }
  else {
    digitalWrite(LED_PIN, LOW);
  }
}


Creative switch

Concept & Method:
I wanted a creative outcome along with a creative switch, so I made a LED hairband for the teddy with a hair straightener as a switch. So I used aluminum foil to make the connections. The tongs of the hair straightener act as a switch that can be operated by stepping on it.

Reflection:
This assignment was definitely one of the most interesting assignments. It made me think of all the possible ways to utilize the materials available but, at the same time, be creative.

Lovers Meet

Concept
For this project, I was inspired by a game called “Barbie bike styling ride,” so much so that I wanted to replicate it. So along with creating a game for my midterm project, I wanted to live those cute childhood memories and enjoy making this game. The game is themed behind the famous love story we have all heard about, Romeo and Juliet. So the task of the game is to help Romeo reach Juliet with the highest number of scores, crossing all the obstacles in his way to reach his love.

Code and project explanation
Coding and making this project required first to lay down the code’s structure and how I would like to manage the different screens of the game. At the start of the game’s making, I was trying to understand the most efficient way to structure code and organize the different images and the media being imported. I use the variable gameState to keep track of the different screens (the start screen, the game screen, the difficulty screen, the instructions screen, and the end screen) in the display. Then to structure everything more easily, I divided the code into different files, which include: “screens.js,” “player.js,” “obstacles.js.”, and “functions.js.” I am really proud of the button function, the arrangement of my code, the jumps of the character, and the scorekeeping.

the screen setup

function startScreen() {
  image(start_pg, 0, 0, width, height);
  button("Start", "#B667E6", 3*width/4-150, 3*height/4-50, 120, 30, 5 )
  button("Instructions", "#B667E6", 3*width/4-150, 3*height/4-10, 120, 30, 5 )
  button("Difficulty", "#B667E6", 3*width/4-150, 3*height/4+30, 120, 30, 5 )
}

function instructionScreen(){
  image(instruction_pg, 0,0, width,height);
  button("Return", "#B667E6", width-150, height-50, 120, 30, 5 );
}

function difficultyScreen(){
  image(difficulty_pg, 0,0, width,height);
  
  button("Return", "#B667E6", width-150, height-50, 120, 30, 5 );
  
  button("EASY", "#B667E6", 50, 150, 155, 100, 25 );
  button("MEDIUM", "#B667E6", 225, 150, 155, 100, 25 );
  button("HARD", "#B667E6", 400, 150, 155, 100, 15 );
}

function gameScreen() {
  // Draw game background image
  background(0);
  
  image(game_pg, v1, 0, width, height);
  image(game_pg, v2, 0, width, height);
  
  v1 -= game_speed;
  v2 -= game_speed;
  
  if(v1 < -width) { v1 = width;} 
  if(v2 < -width) { v2 = width;}
  
  if (random(1) < 0.005) {
    obs.push(new Obstacles(width, height - 50, 50, 50));
  }

  for (let ob of obs) {
    ob.move();
    ob.show();

    if (p.hits(ob)) {
      gameState = "endScreen"
    }
    else{
       score += 1;
    }
    
    if(ob.x +ob.w<0){
      obs.splice(ob)
    }
  }
  p.show();
  p.move();
  if (keyIsDown(32)) {
    p.jump();
  }
}

function endScreen(){
  image(end_pg, 0,0, width,height);
  button("Restart", "#B667E6", width-150, height-50, 120, 30, 5 );
  textSize(50); // set text size
  fill(255); // set text color
  text("SCORE:", 450, 220); 
  text(score, 450, 270); 
  
}

The player class

class Player {
    constructor() {
      this.r = 200; //size of the image
      this.x = 50;
      this.y = height - this.r;
      this.vy = 0; //velocity with which it goes up
      this.gravity = 1; //gravity with which it comes down
    }
  
    jump() {
      //jump only if its in the ground
      // if (this.y == height - this.r){
        this.vy = -25; //velocity with which it jumps
       // }
    }
  
    hits(obs) {
      let x1 = this.x + this.r * 0.5;
      let y1 = this.y + this.r * 0.5;
      let x2 = obs.x + obs.w * 0.5;
      let y2 = obs.y + obs.h * 0.5;
      return collideCircleCircle(x1, y1, this.r, x2, y2, obs.w);
    }
  
    move() {
      this.y += this.vy; //reduces the height inturn makes the player move upwards
      this.vy += this.gravity; //adding gravity so that it comes down
      this.y = constrain(this.y, 0, height - this.r); 
    }
  
    show() {
      image(player, this.x, this.y + 50, this.r, this.r);
    }
  }


Problems faced and Areas of improvement
One of the most crucial problems that I ran into was making to make the player jump. At first, I was using the keyPressed function, but then it wasn’t working because it was not getting referenced in the draw directly, so I used the keyIsDown to perform the same; this indeed is a minor error, but it took a lot of time to debug this down. Mostly I faced difficulties in the starting regarding the logistics of the game and how to build it, but once we had a structure built up in mind, then it was easy to build.

This project can be extended to make it more realistic with the player and the obstacle in a more 3D version. We could also add more features to the set up of the game with functions and buttons to mute the volume or have different levels.

Midterm Game

Introduction: Inspiration
For this project, I wanted to build something simple but, at the same time, attractive to create. As children, my sister and I used to play this game called “Barbie bike stylin ride” so much that it was our favorite. So along with creating a game for my midterm project, I wanted to live those cute childhood memories and enjoy making this game.

Concept
This is a simple rescue game. So the game is called Romeo and Juliet. As the game suggestes the main character our Romeo has to pass through all the obstacles and reach his Julliet. The obstacle course is mainly a bike ride but I’m also thinking of implementing a flying mode as well.

Future implementations
For now the project is just in the initial phase and I have to implement the buttons for playing the game, and for the instructions. I am thinking of either having different levels or increasing the speed of the game as the time increases. So the score for the game will according to the highest time the player is able to stay in game.

Most Frightening part
The collision detection is the most difficult part so far according to me.

ASCII Art

Introduction:
For this assignment, I was inspired by the ASCII art in front of the IM lab, so I tried to create such generative art.

Coding and Process
For the process, I first started looking into different possible projects that could be done using data visualization and generative texts. I really found this project of drawing images through different ASCII characters. So at first, I had to learn what is a pixel array, understand how it works, and use it to give different colors to the letters at one pixel. Once I understood how it worked, then it was me just experimenting around and playing with texts.

Final Project

Reflection and future improvements
For future purposes, I can have something interactive and live and could engage with the audience.

Audio Wave

Introduction:
For this assignment, I wanted to explore how to use sound in p5js and learn how to use object-oriented programming creatively. While exploring my options, I found some ways to do audio visualization, which I found pretty interesting, and then I went on to explore.

Coding and Process
First of all, I learned how to import sounds, use them, and their different functions. Then I familiarized myself with the syntax of object-oriented programming and how to use the classes in p5js. For practice, I tried to make bouncy particles and add features. So, after learning everything, I explored different ways to create audio visualization and took inspiration from the following pictures to recreate an audio-responsive wave with particles around it. Then I learned to use FFT objects and the different functions related to them. It took me time to understand how this works, but the result paid off, I believe.


The part of the code I am proud of is the waveform and how the particles respond to the audio.

let wave = fft.waveform(); //Returns an array of amplitude values (between -1.0 and +1.0)
stroke(random(255), random(255), random(255));

fft.analyze();
amp = fft.getEnergy(20, 200); //Returns the amount of volume at a specific frequency, using which we could use to control the behaviour of particle and thier responsiveness

strokeWeight(2);
beginShape();
//to built the waveform so we use the applitudes and that we got before and then use this to make the wave
for (let i = 0; i <= width; i++) {
  let index = floor(map(i, 0, width, 0, wave.length / 2));
  let x = i;
  let y = wave[index] * 100 + height / 2;
  vertex(x, y);
}
endShape();

let p = new Particle(2);
particles.push(p);

//creates the particle around the wave form
for (let i = 0; i < particles.length; i++) {
  if (!particles[i].edge()) {
    particles[i].move(amp > 100);
    particles[i].show();
  } else {
    particles.splice(i, 1); //if the particle is out of the space then delete it from the array
  }

Final Project

Here’s my code!

Reflection and future improvements

I really enjoyed doing this assignment and exploring my options. The project could be improved by adding more layers or by making a circular waveform and adding more details.