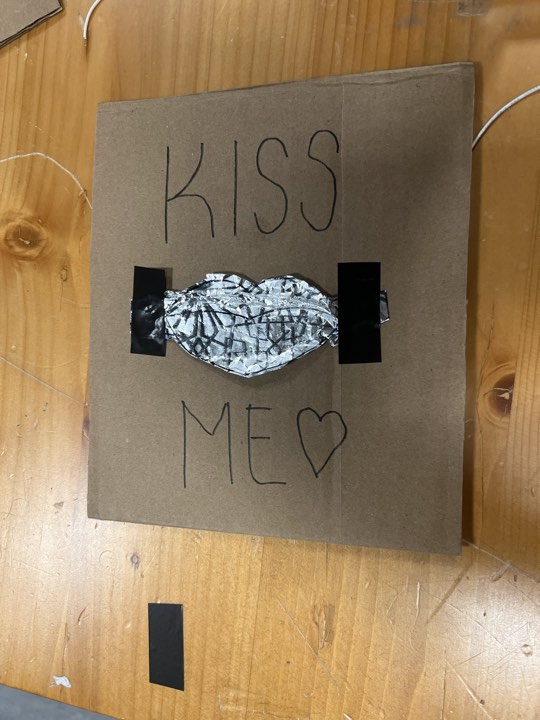
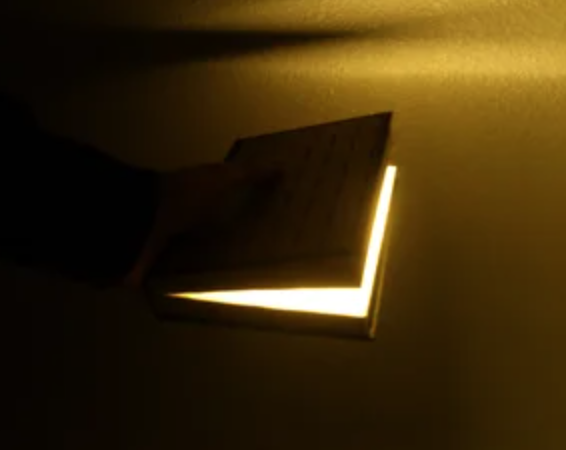
Assignment 5: iPad Switch

Concept

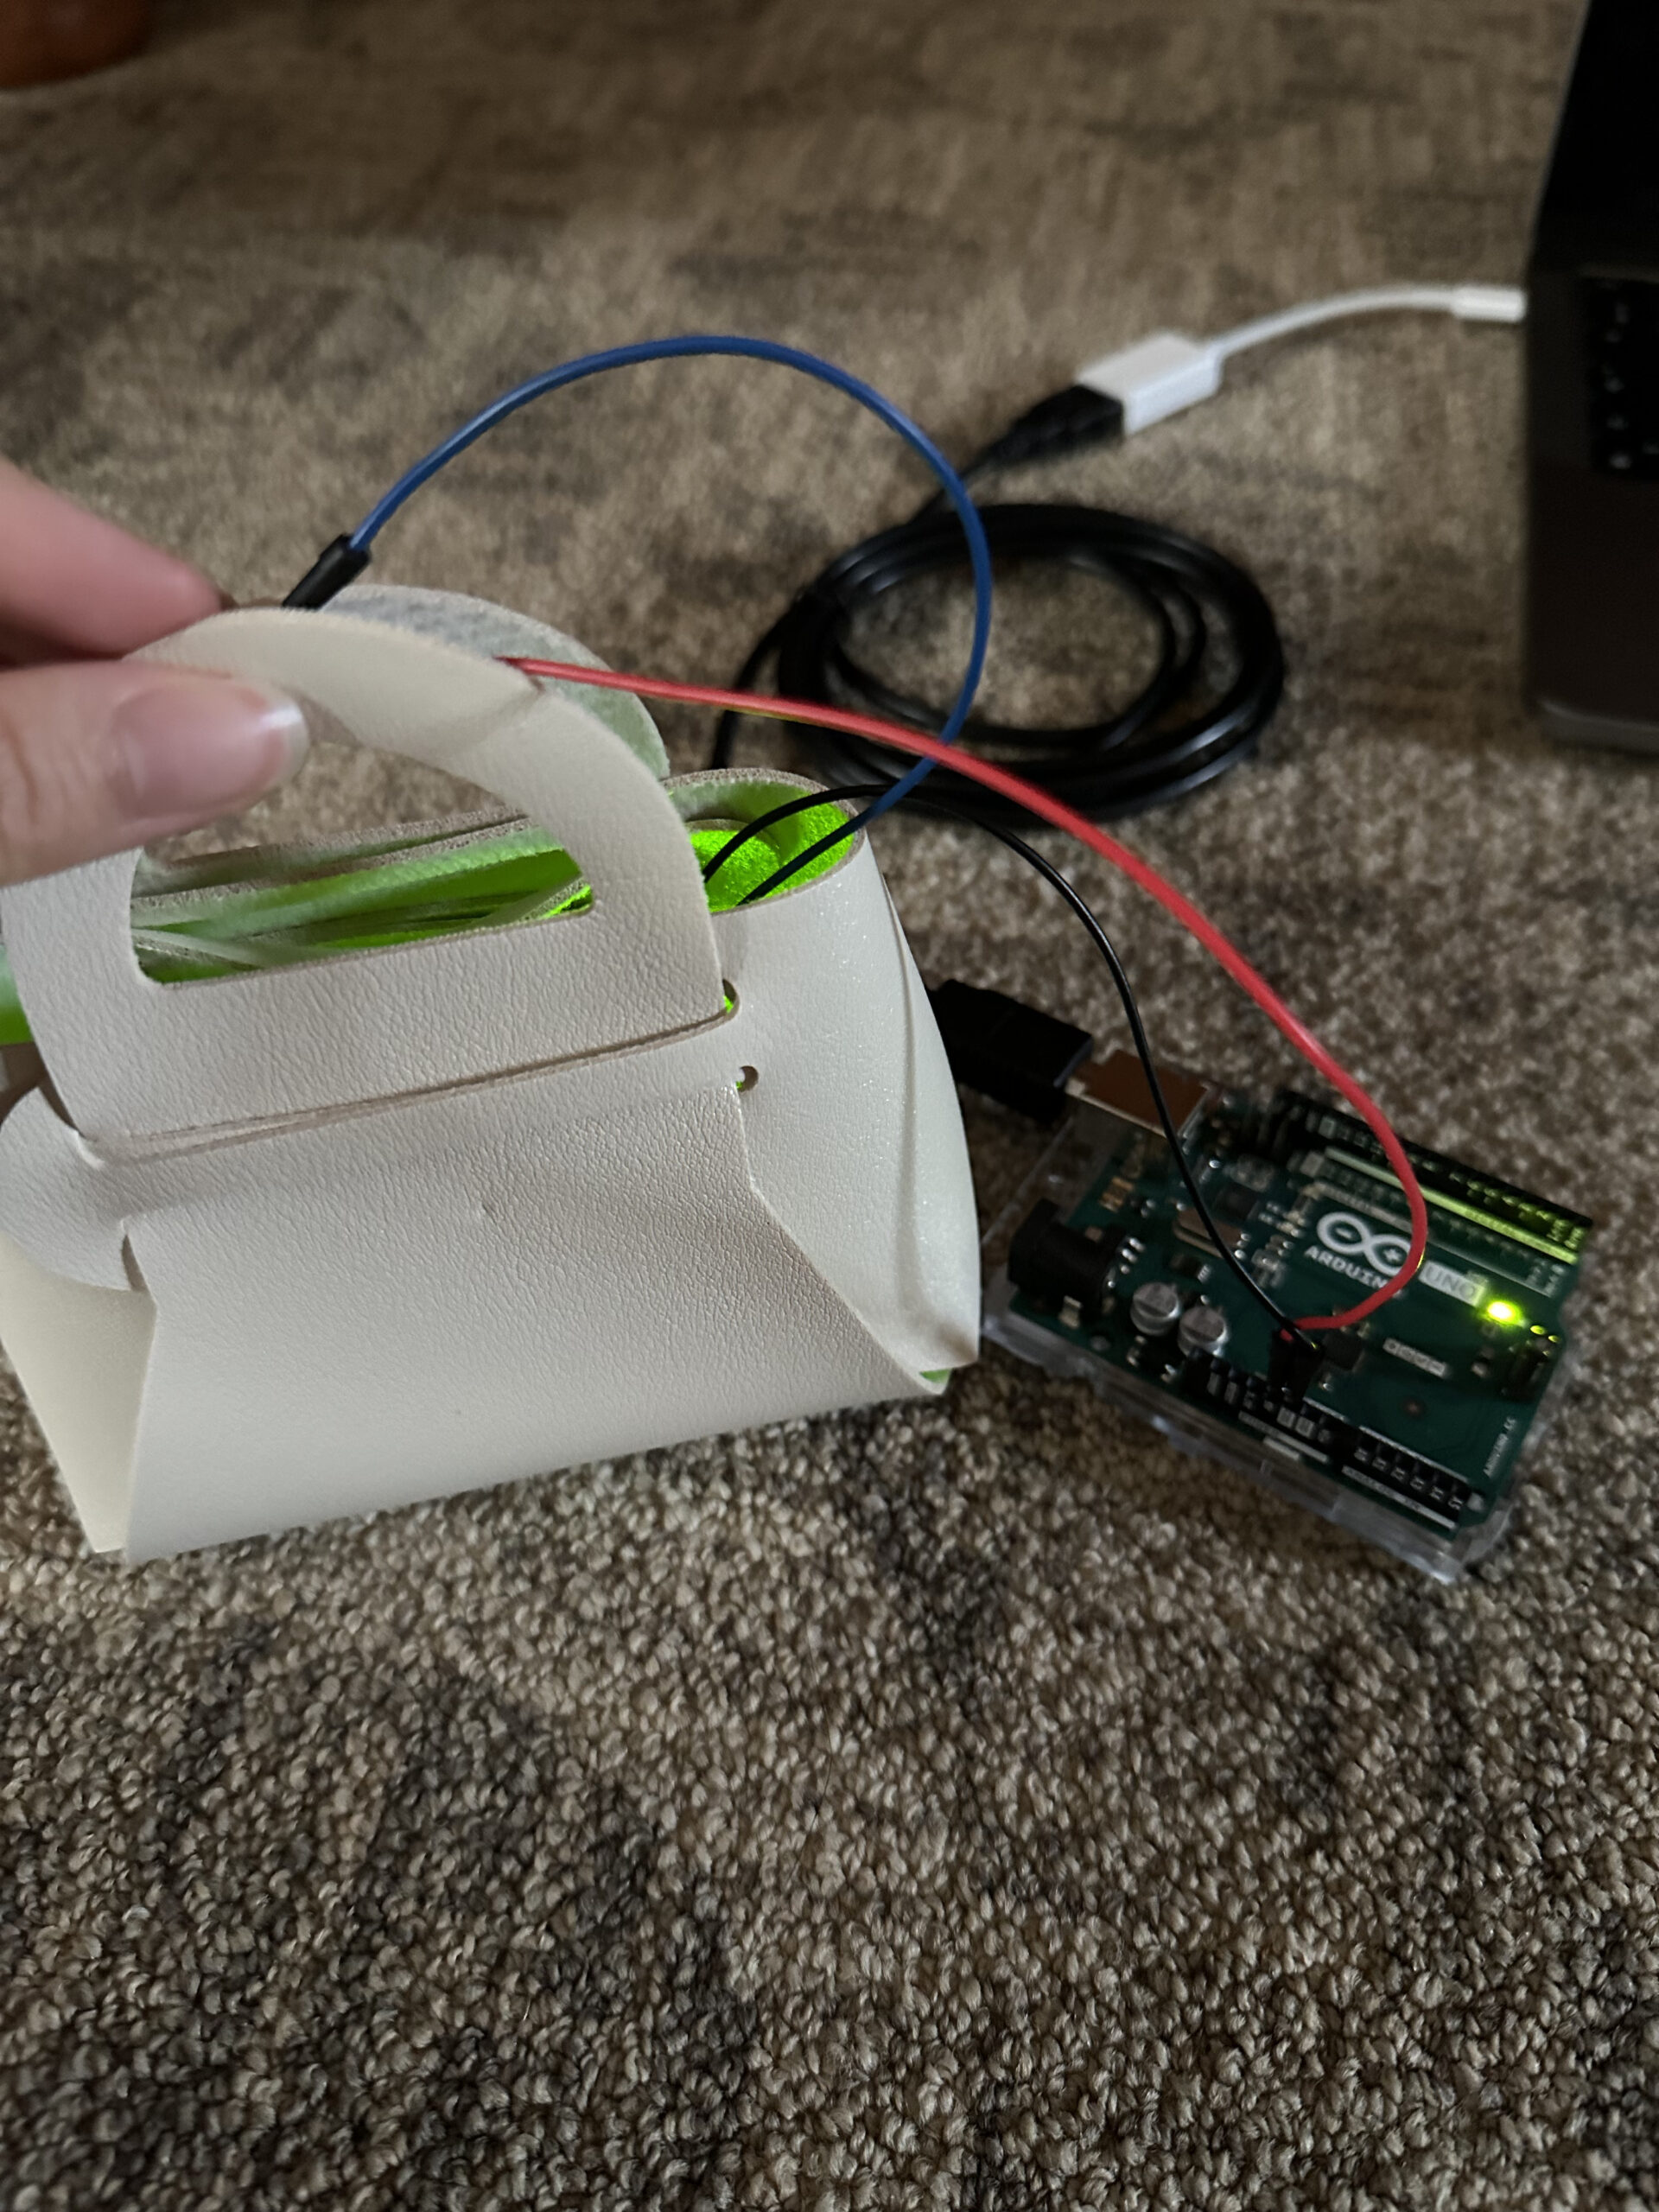
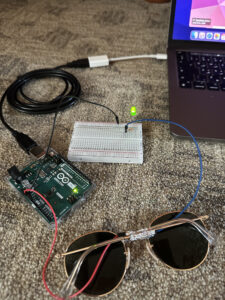
Considering myself, I realized that people spend too much time on their electrical devices such as phone, tablet, and laptop. To encourage people to stop using their devices for unnecessary time, I created a circuit that turns the LED on when the user closes the iPad case. I intentionally used green light because green symbolizes a sign of “good” and I wanted to make the user feel good about himself when he stops using his iPad.

Process

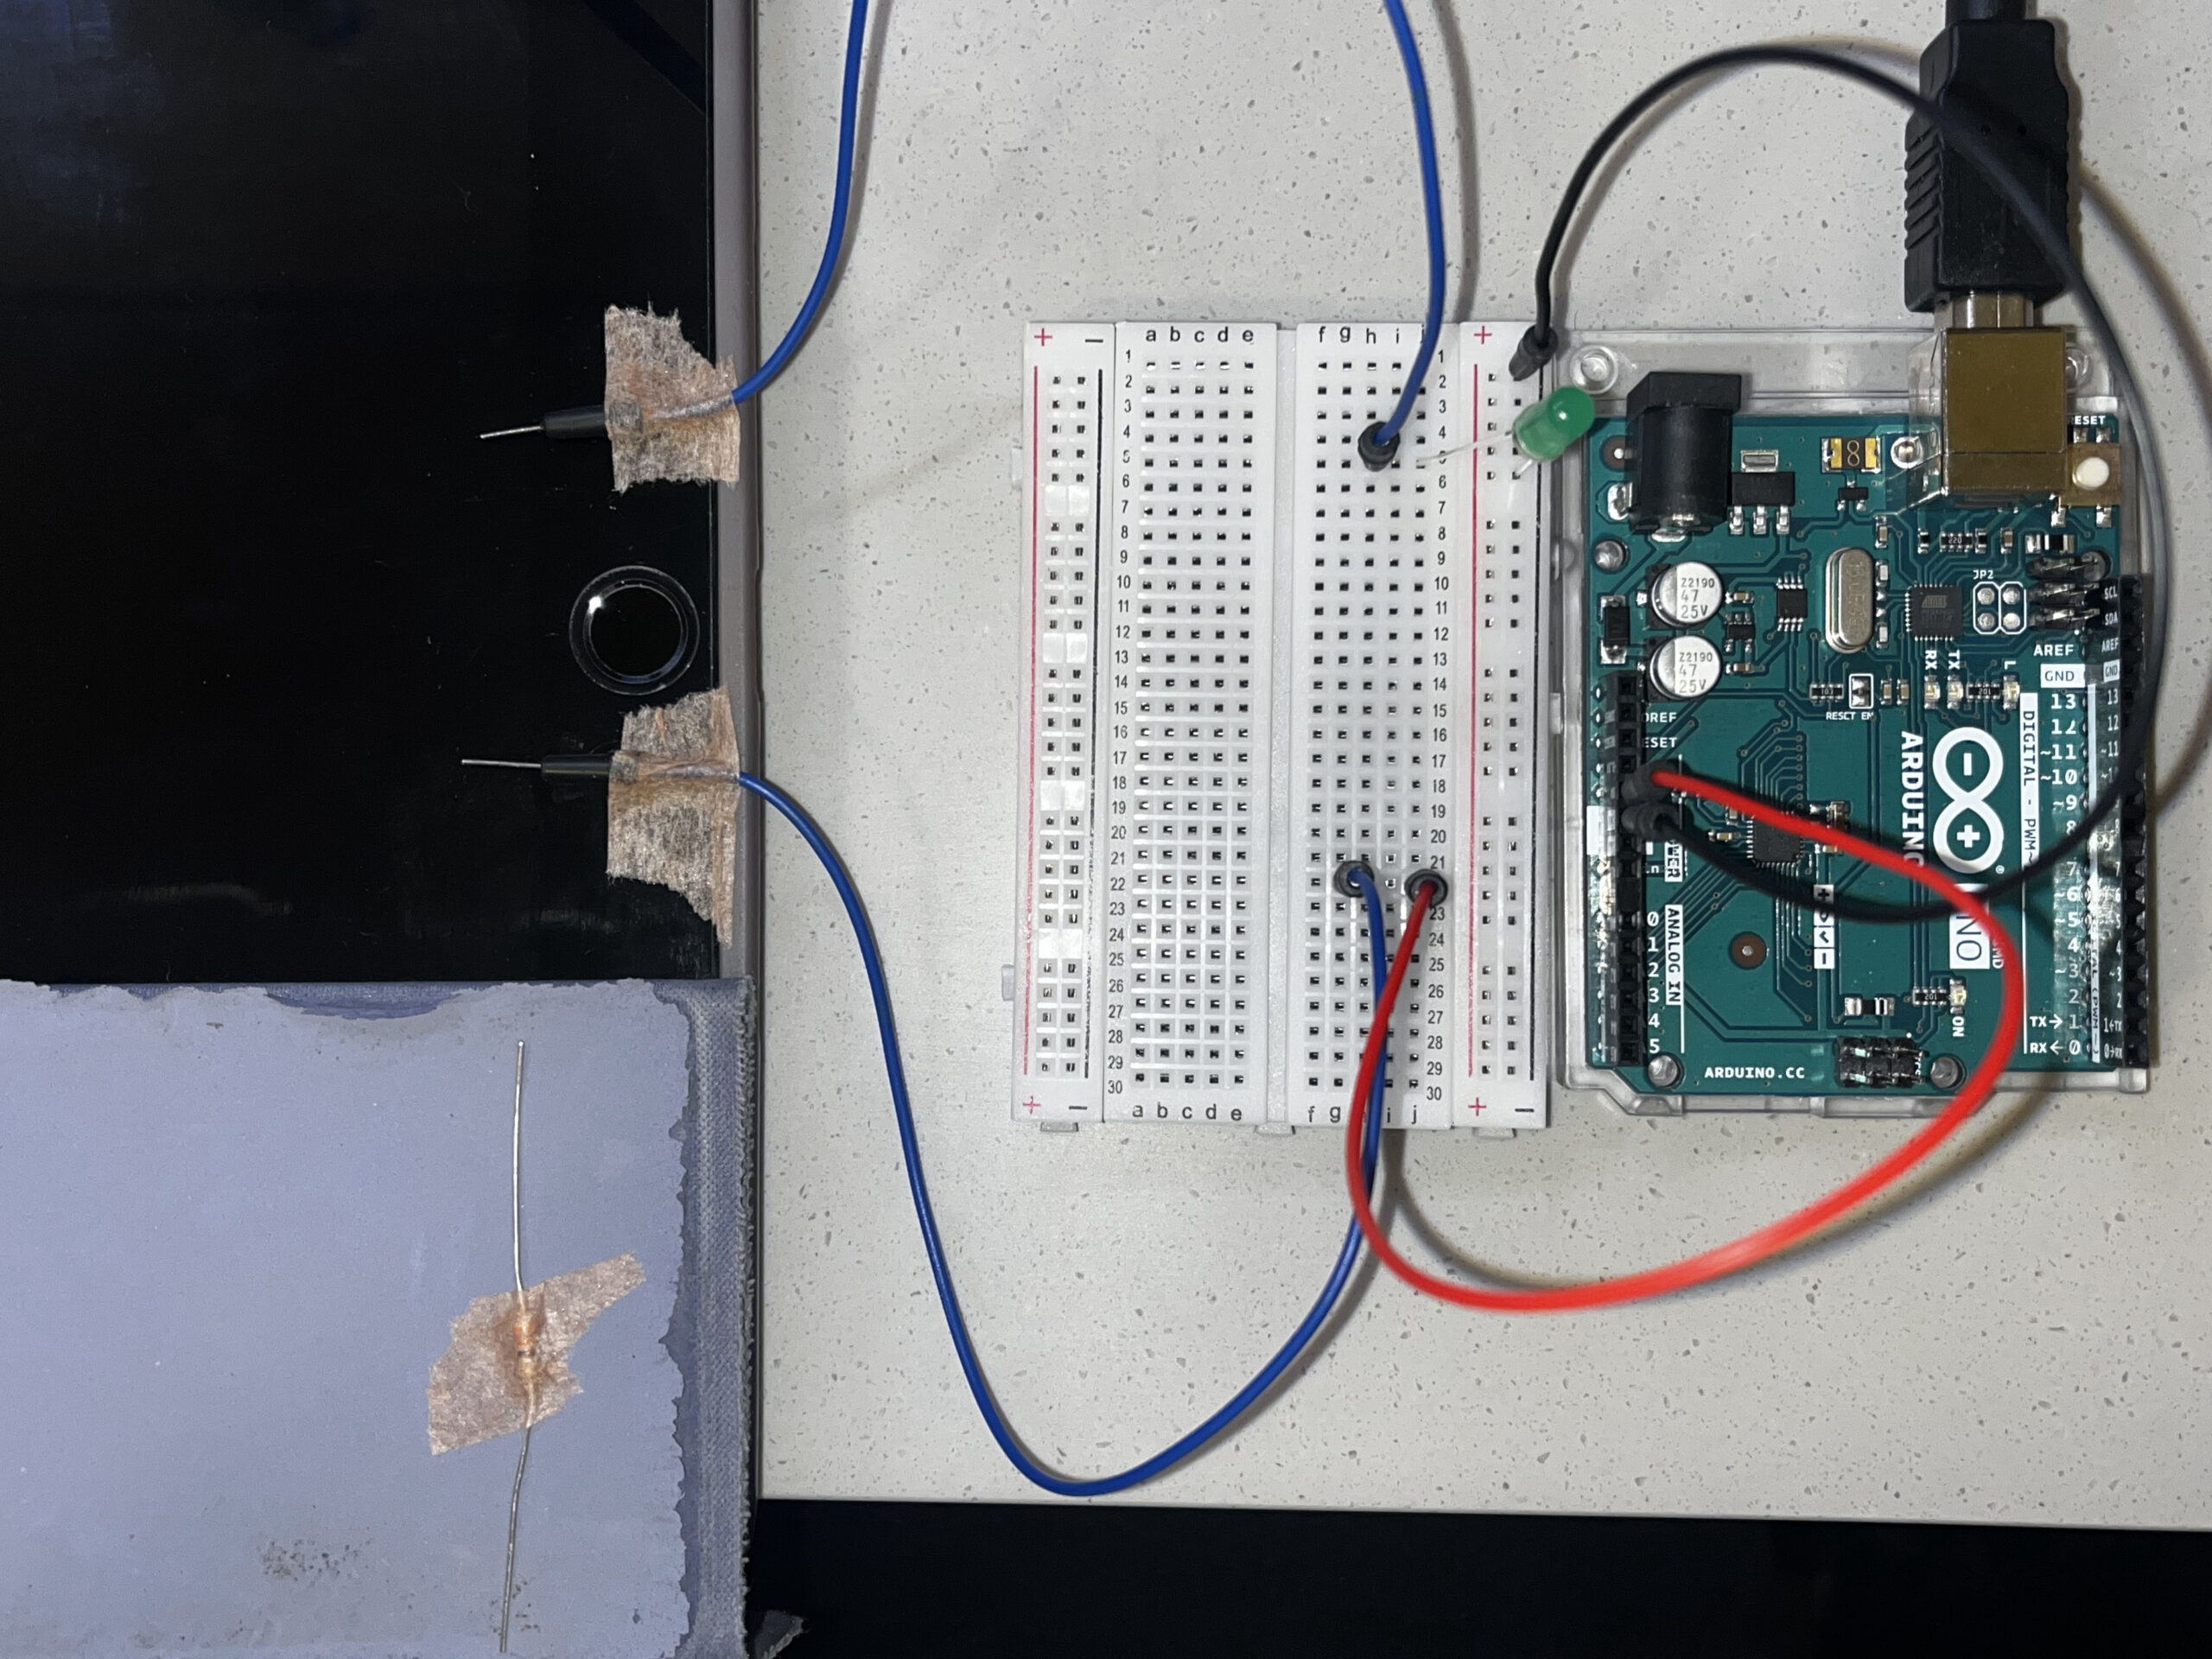
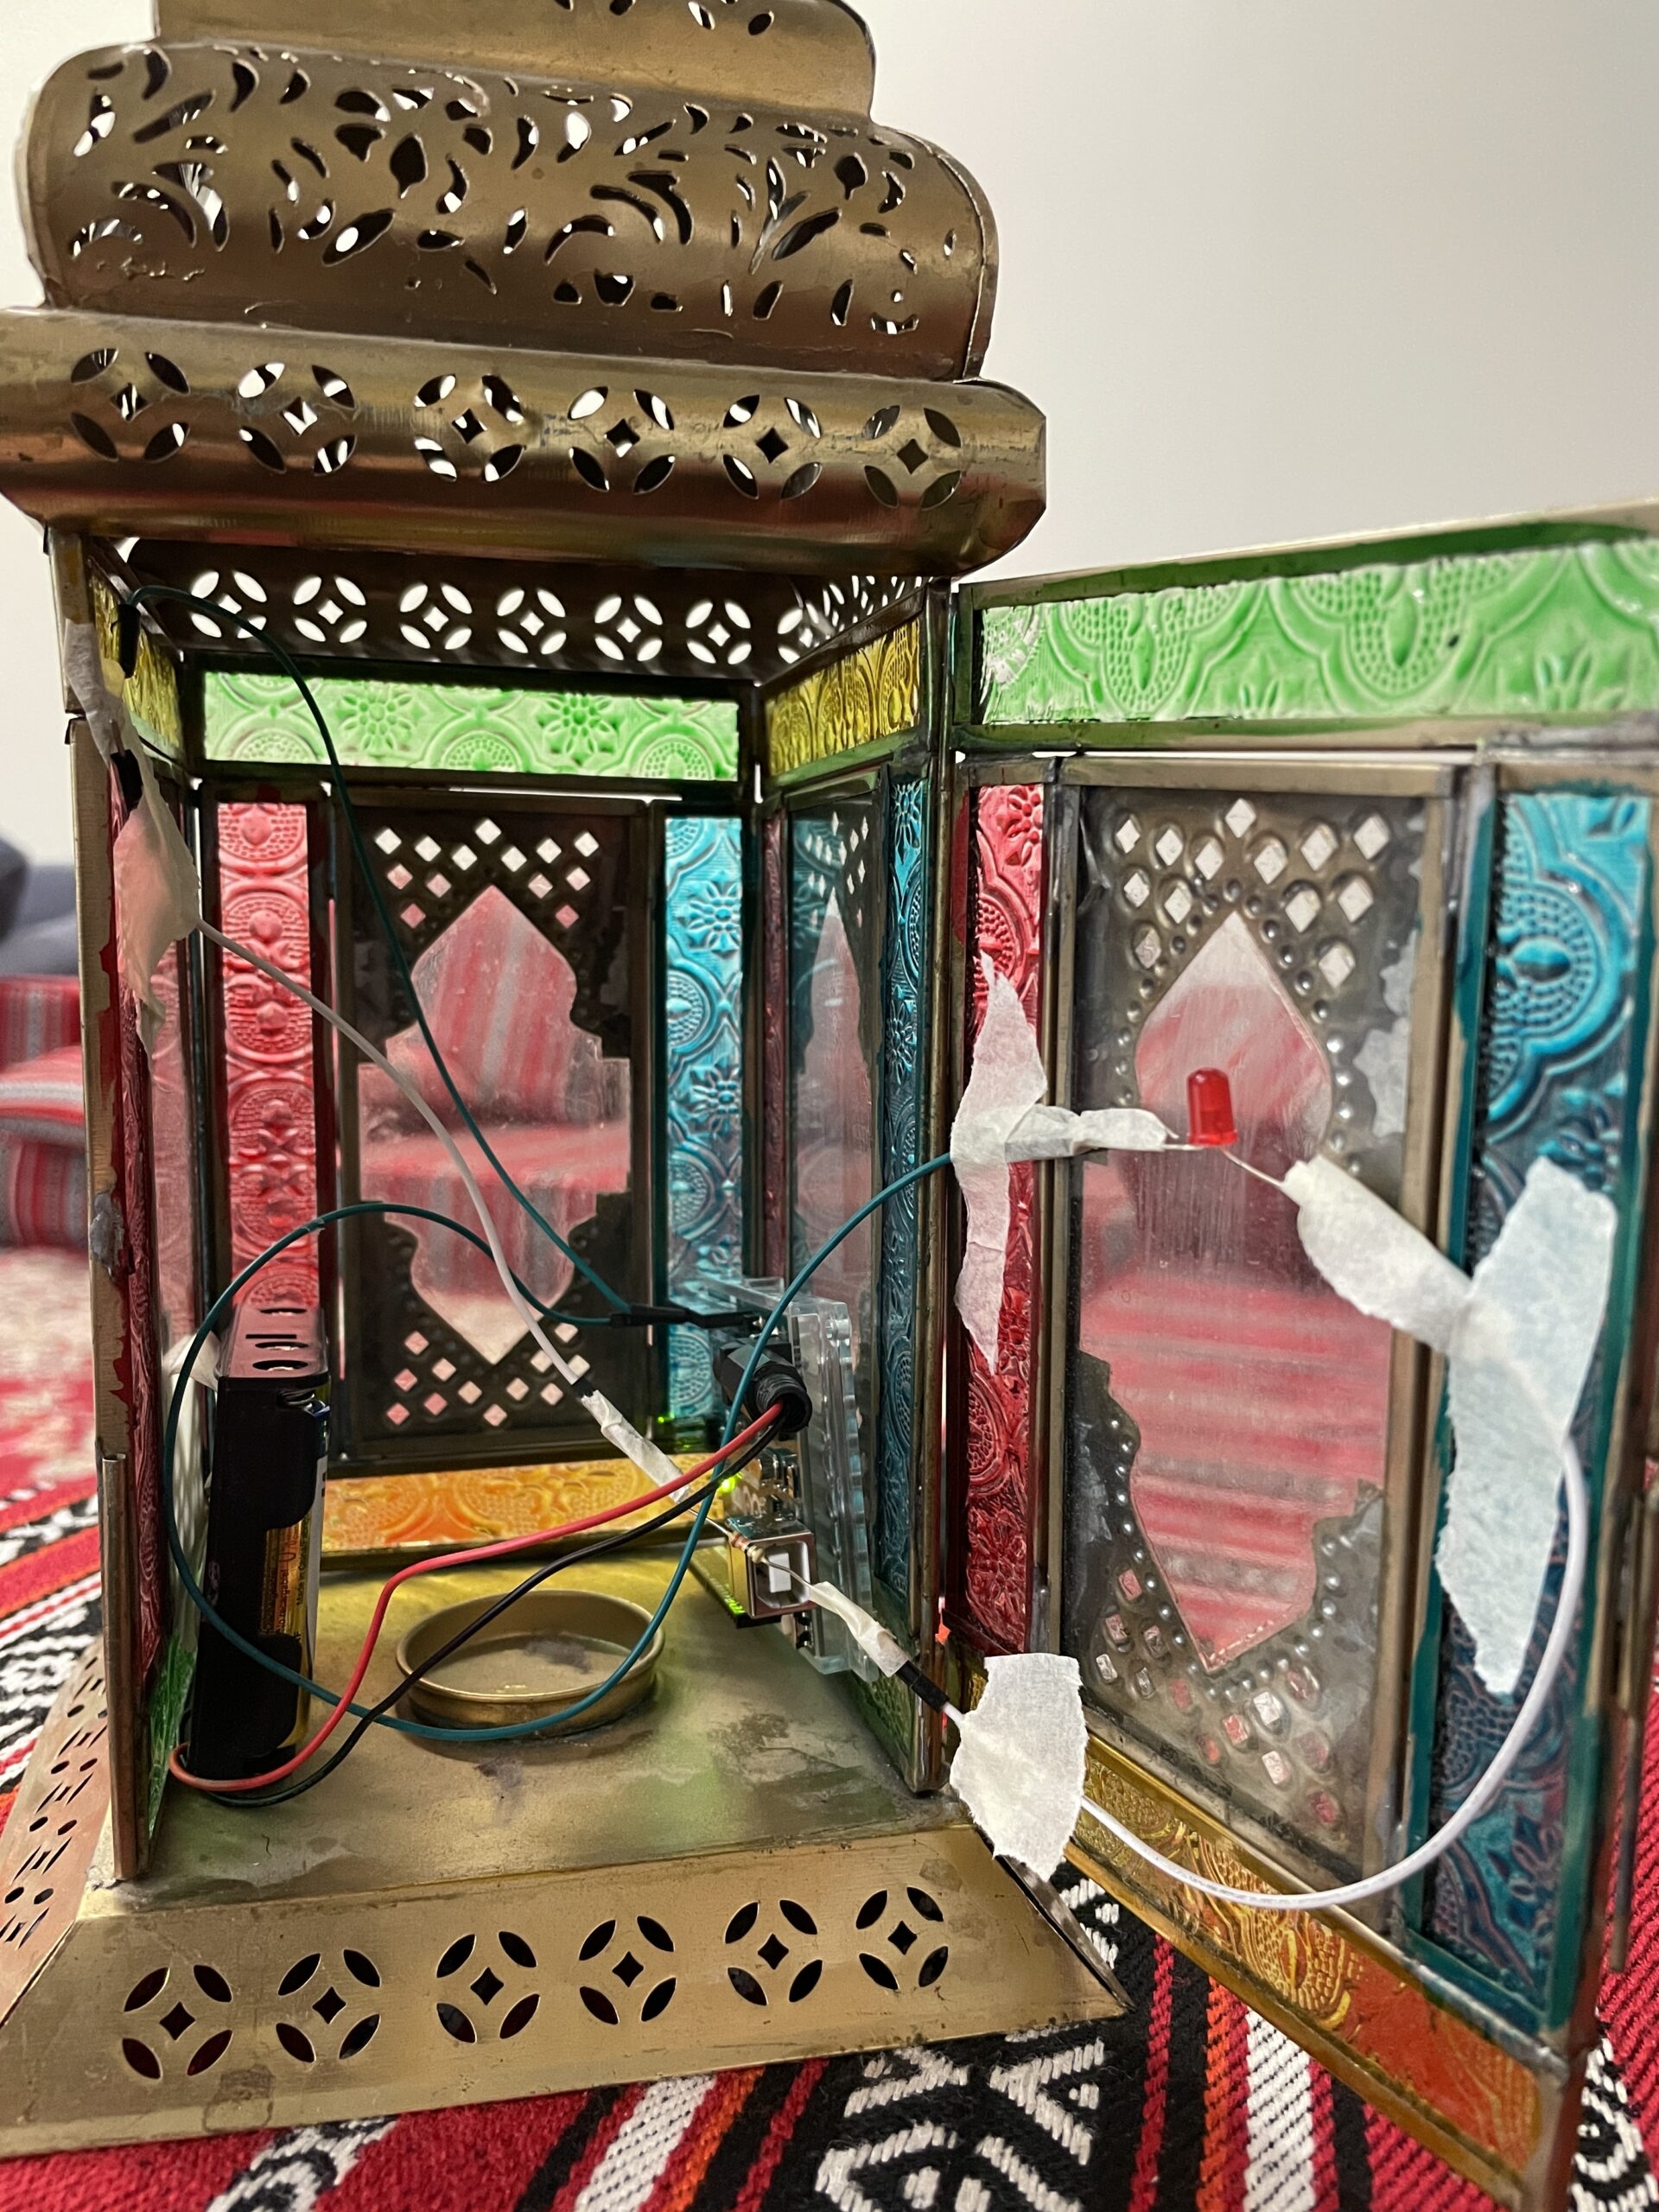
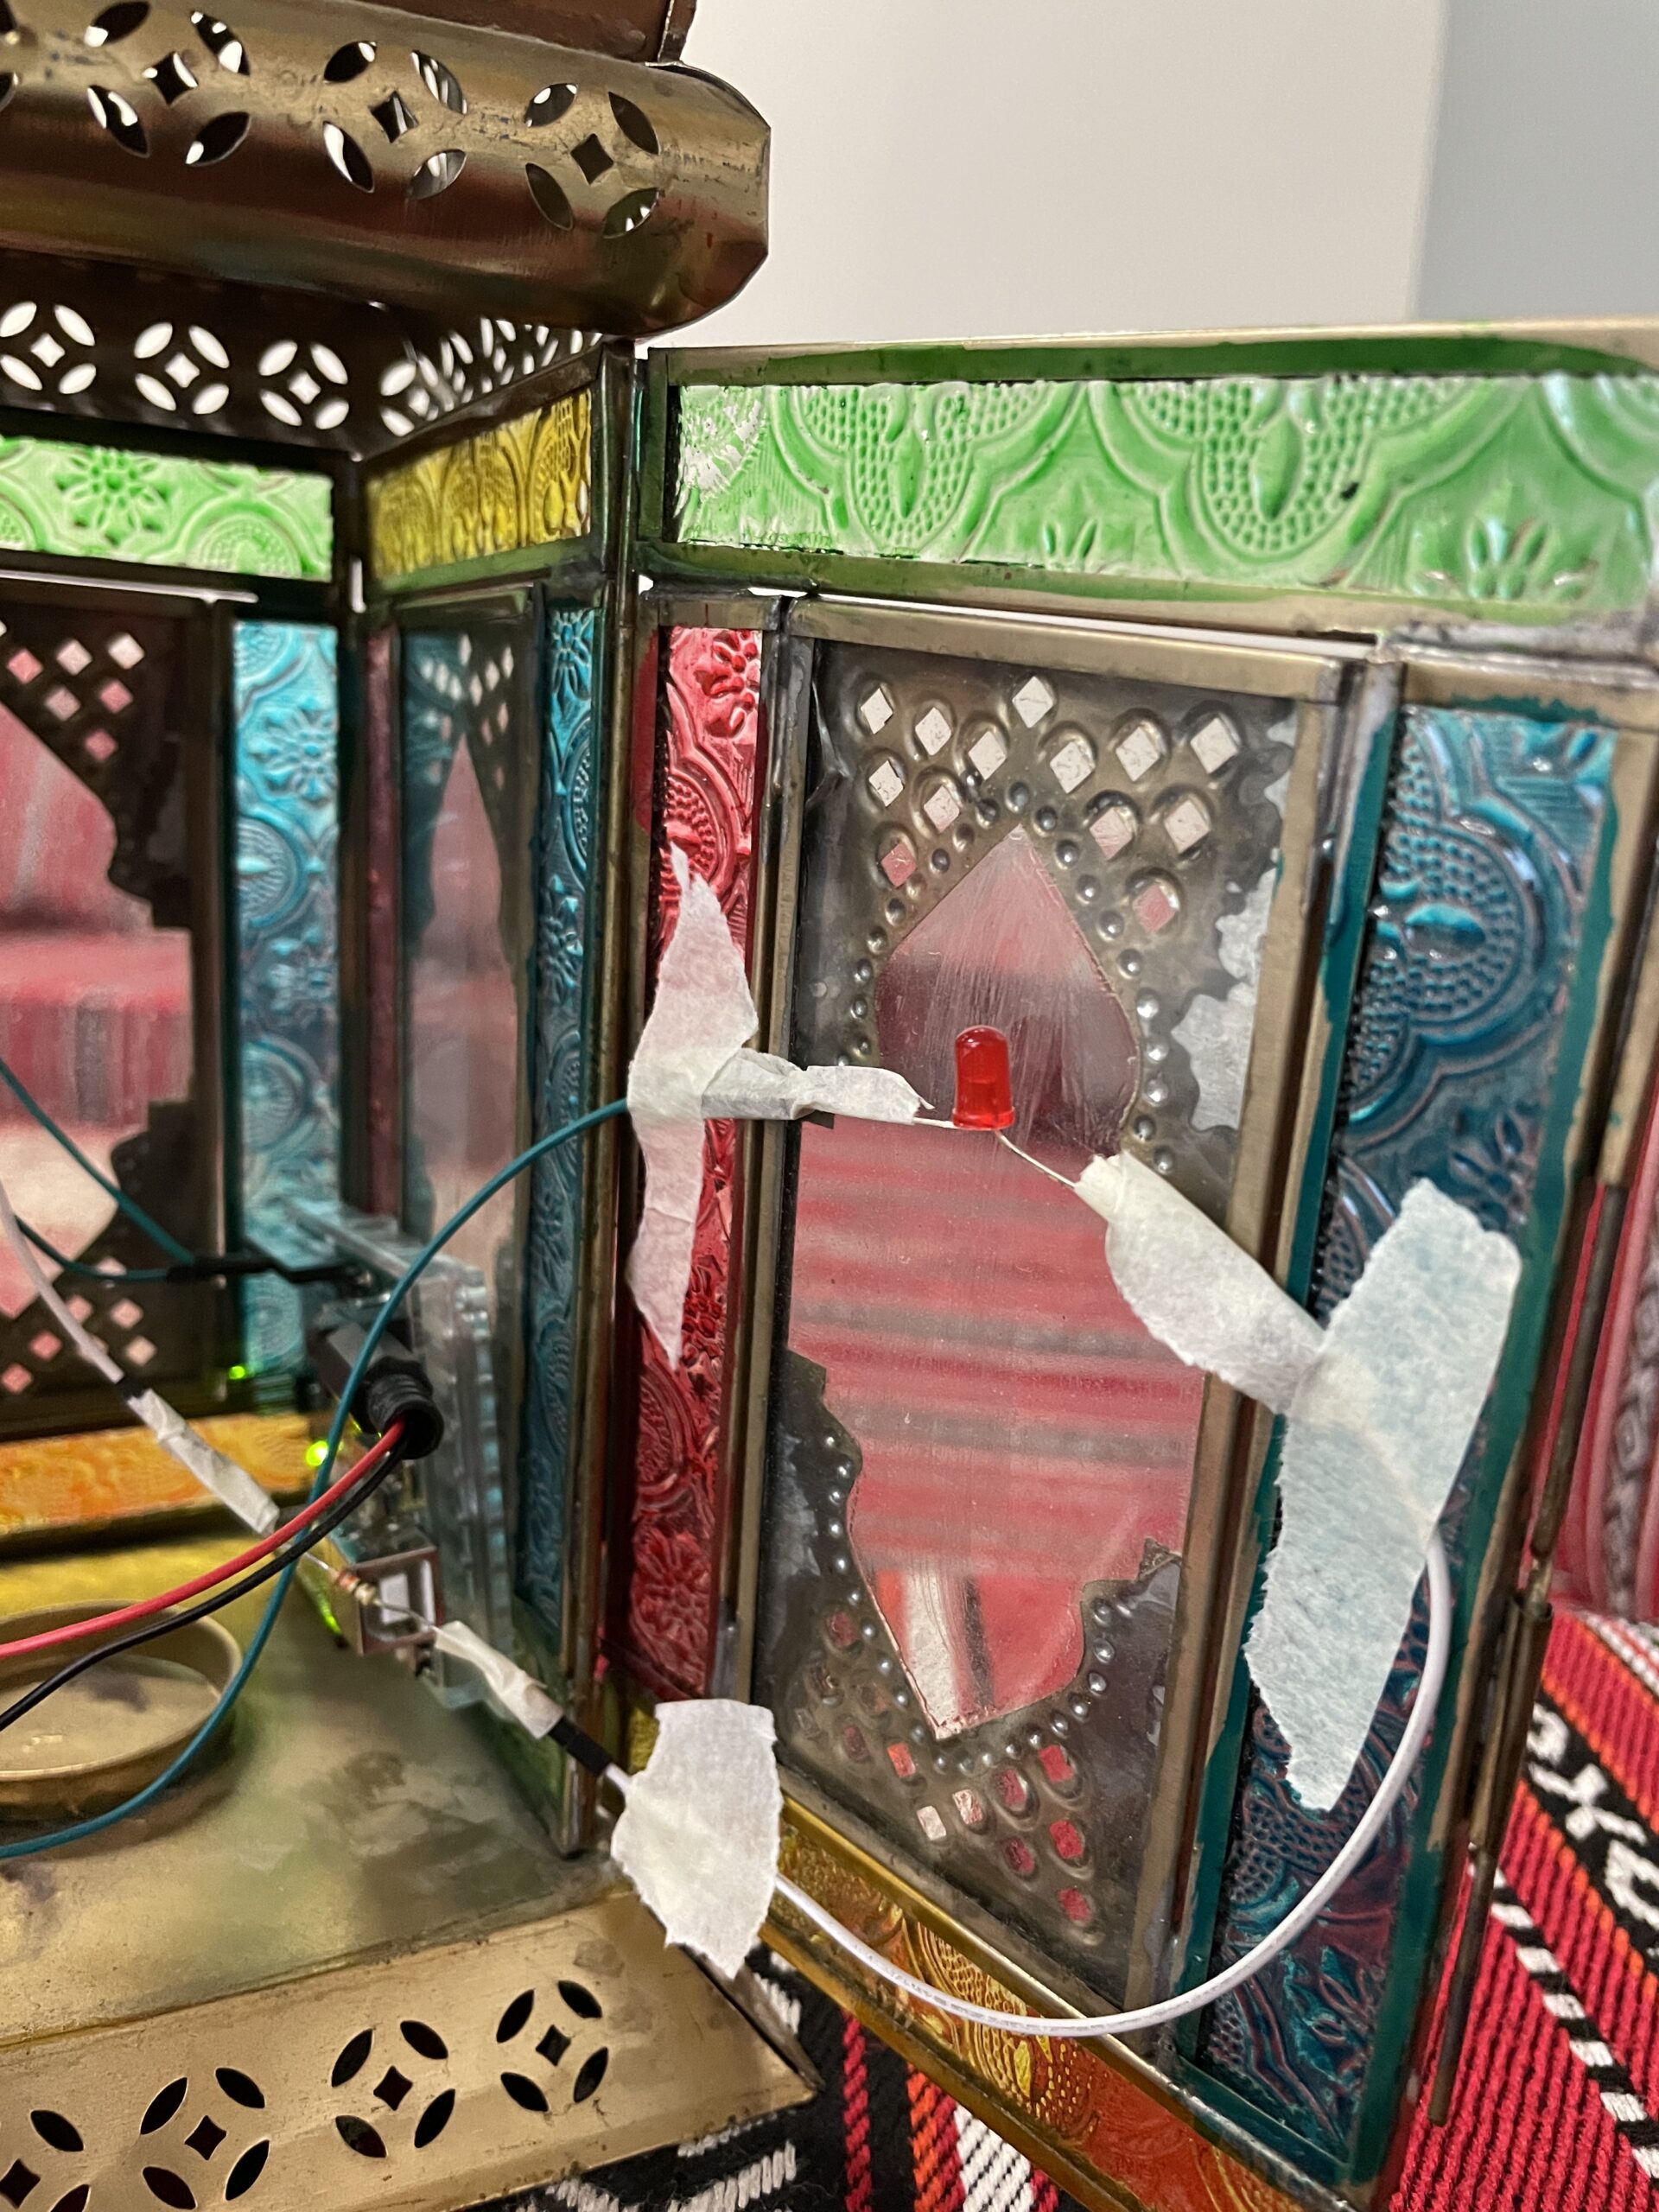
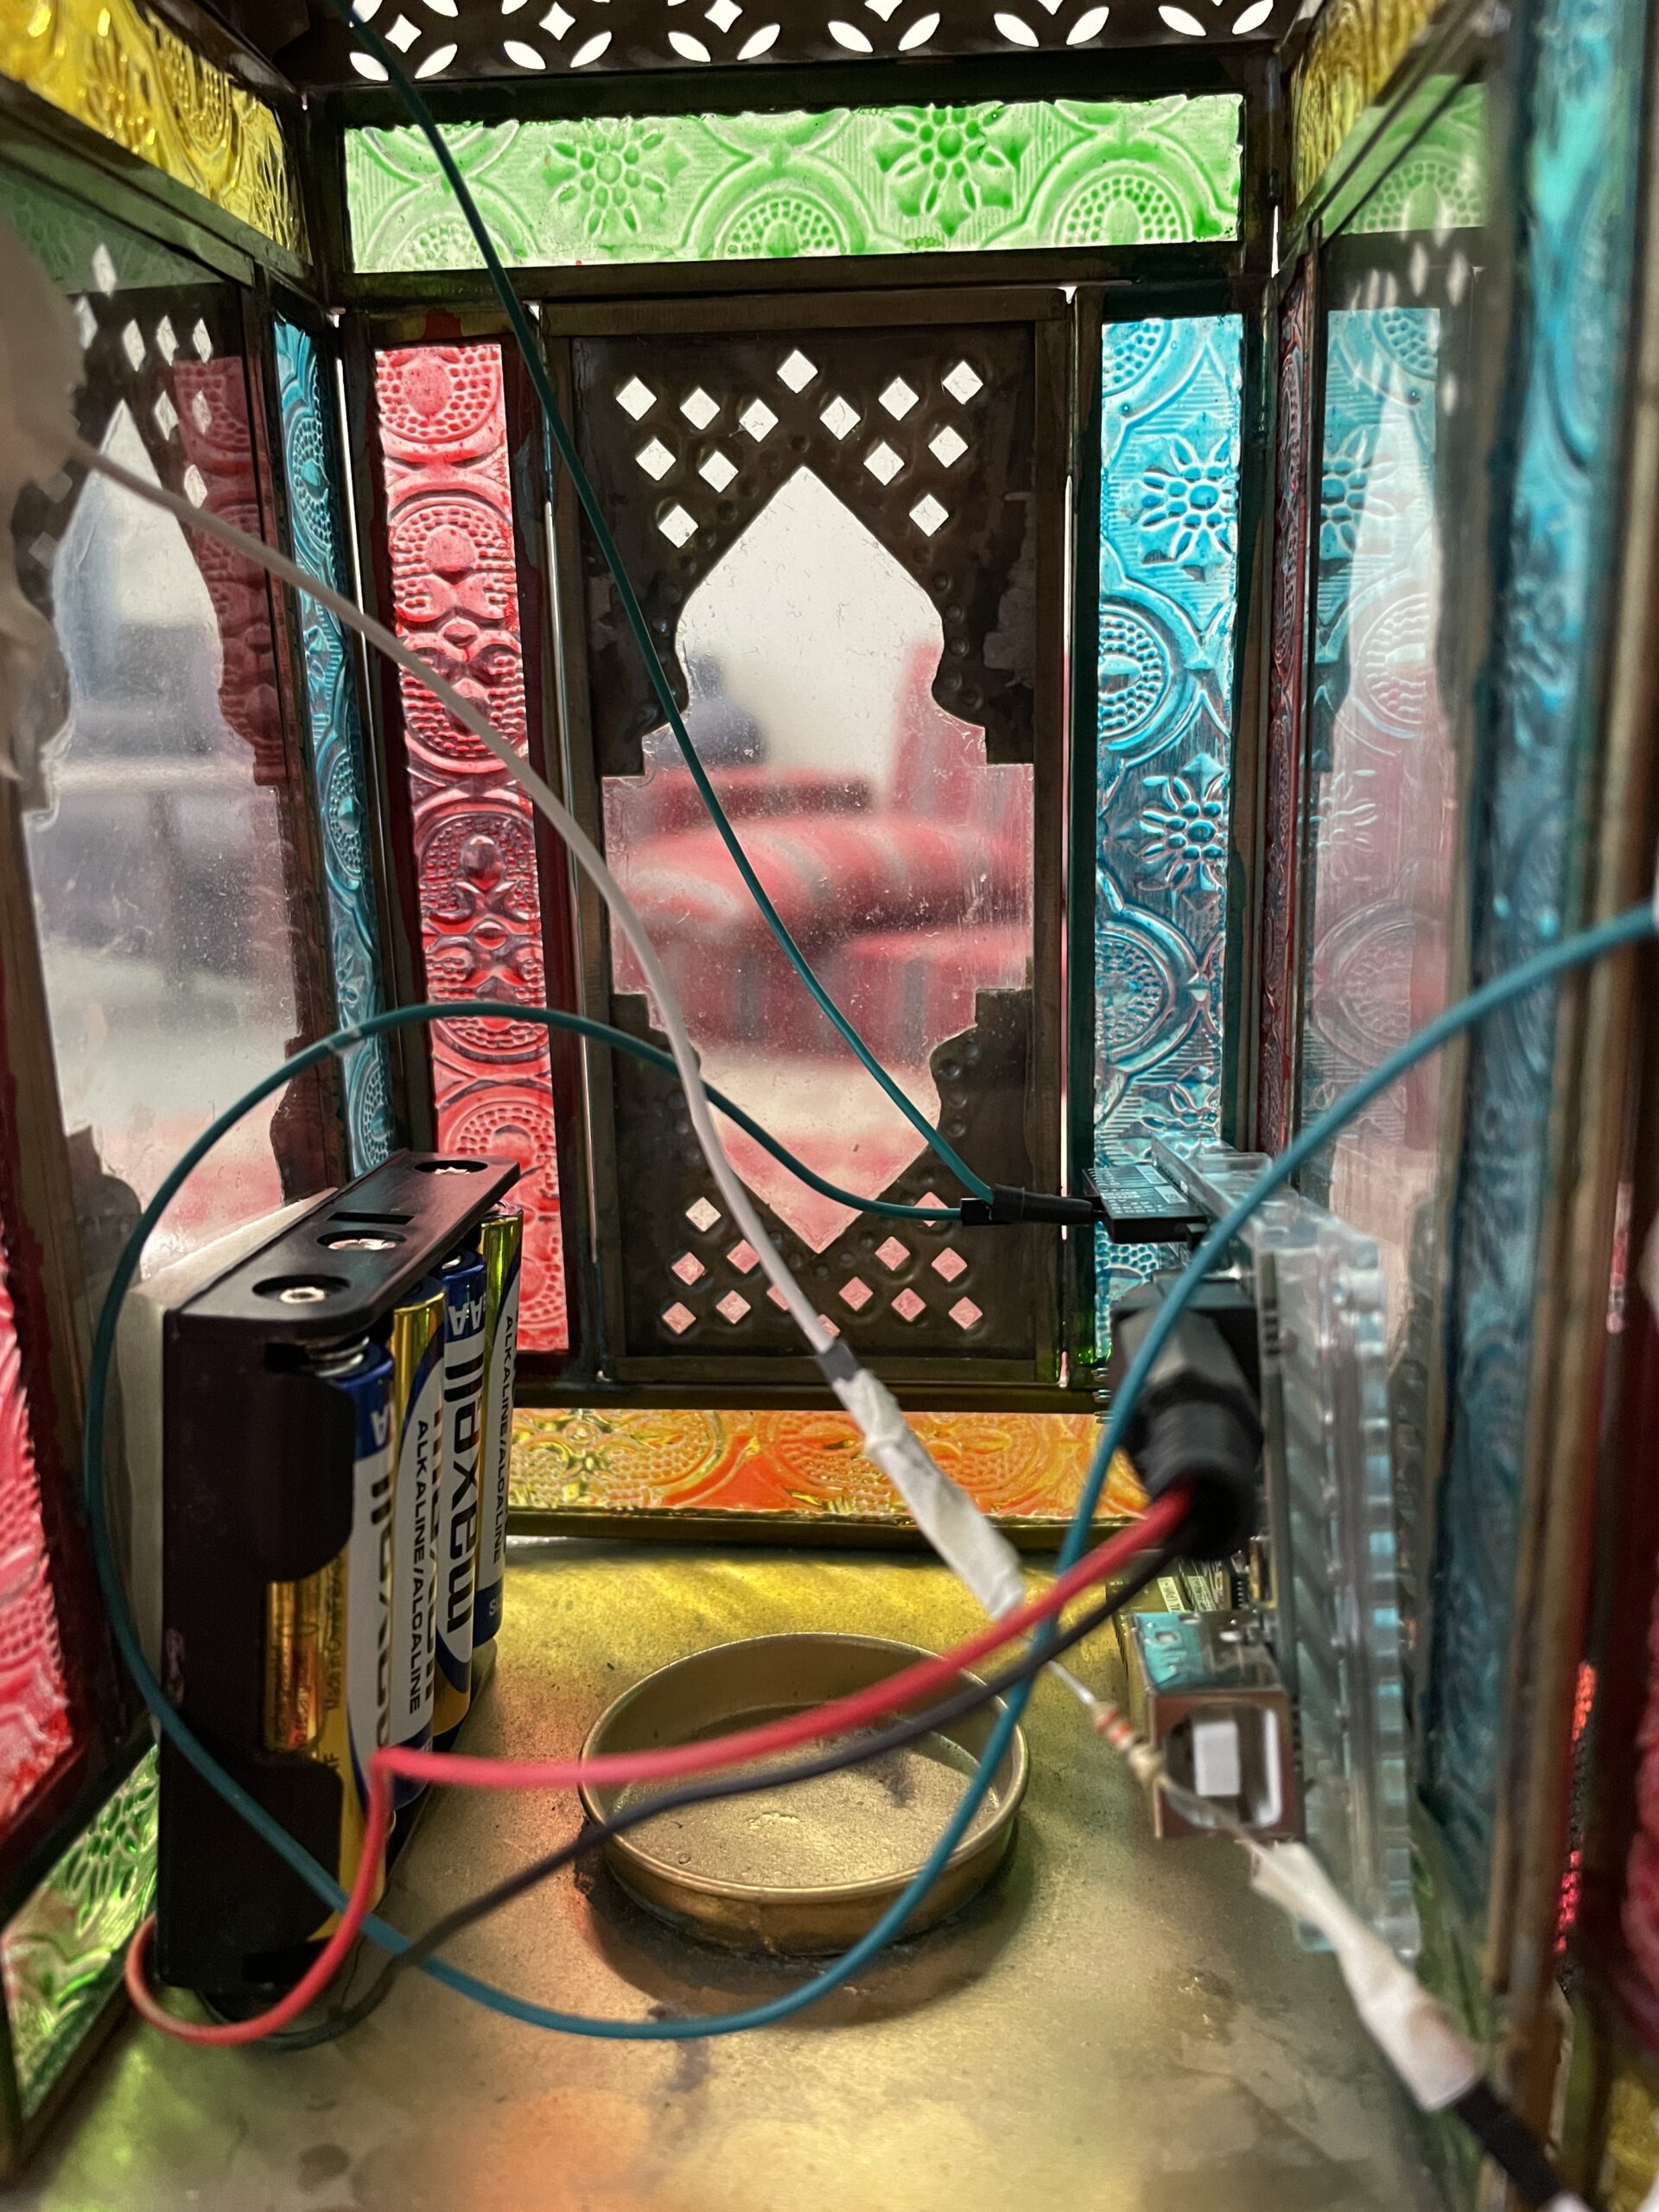
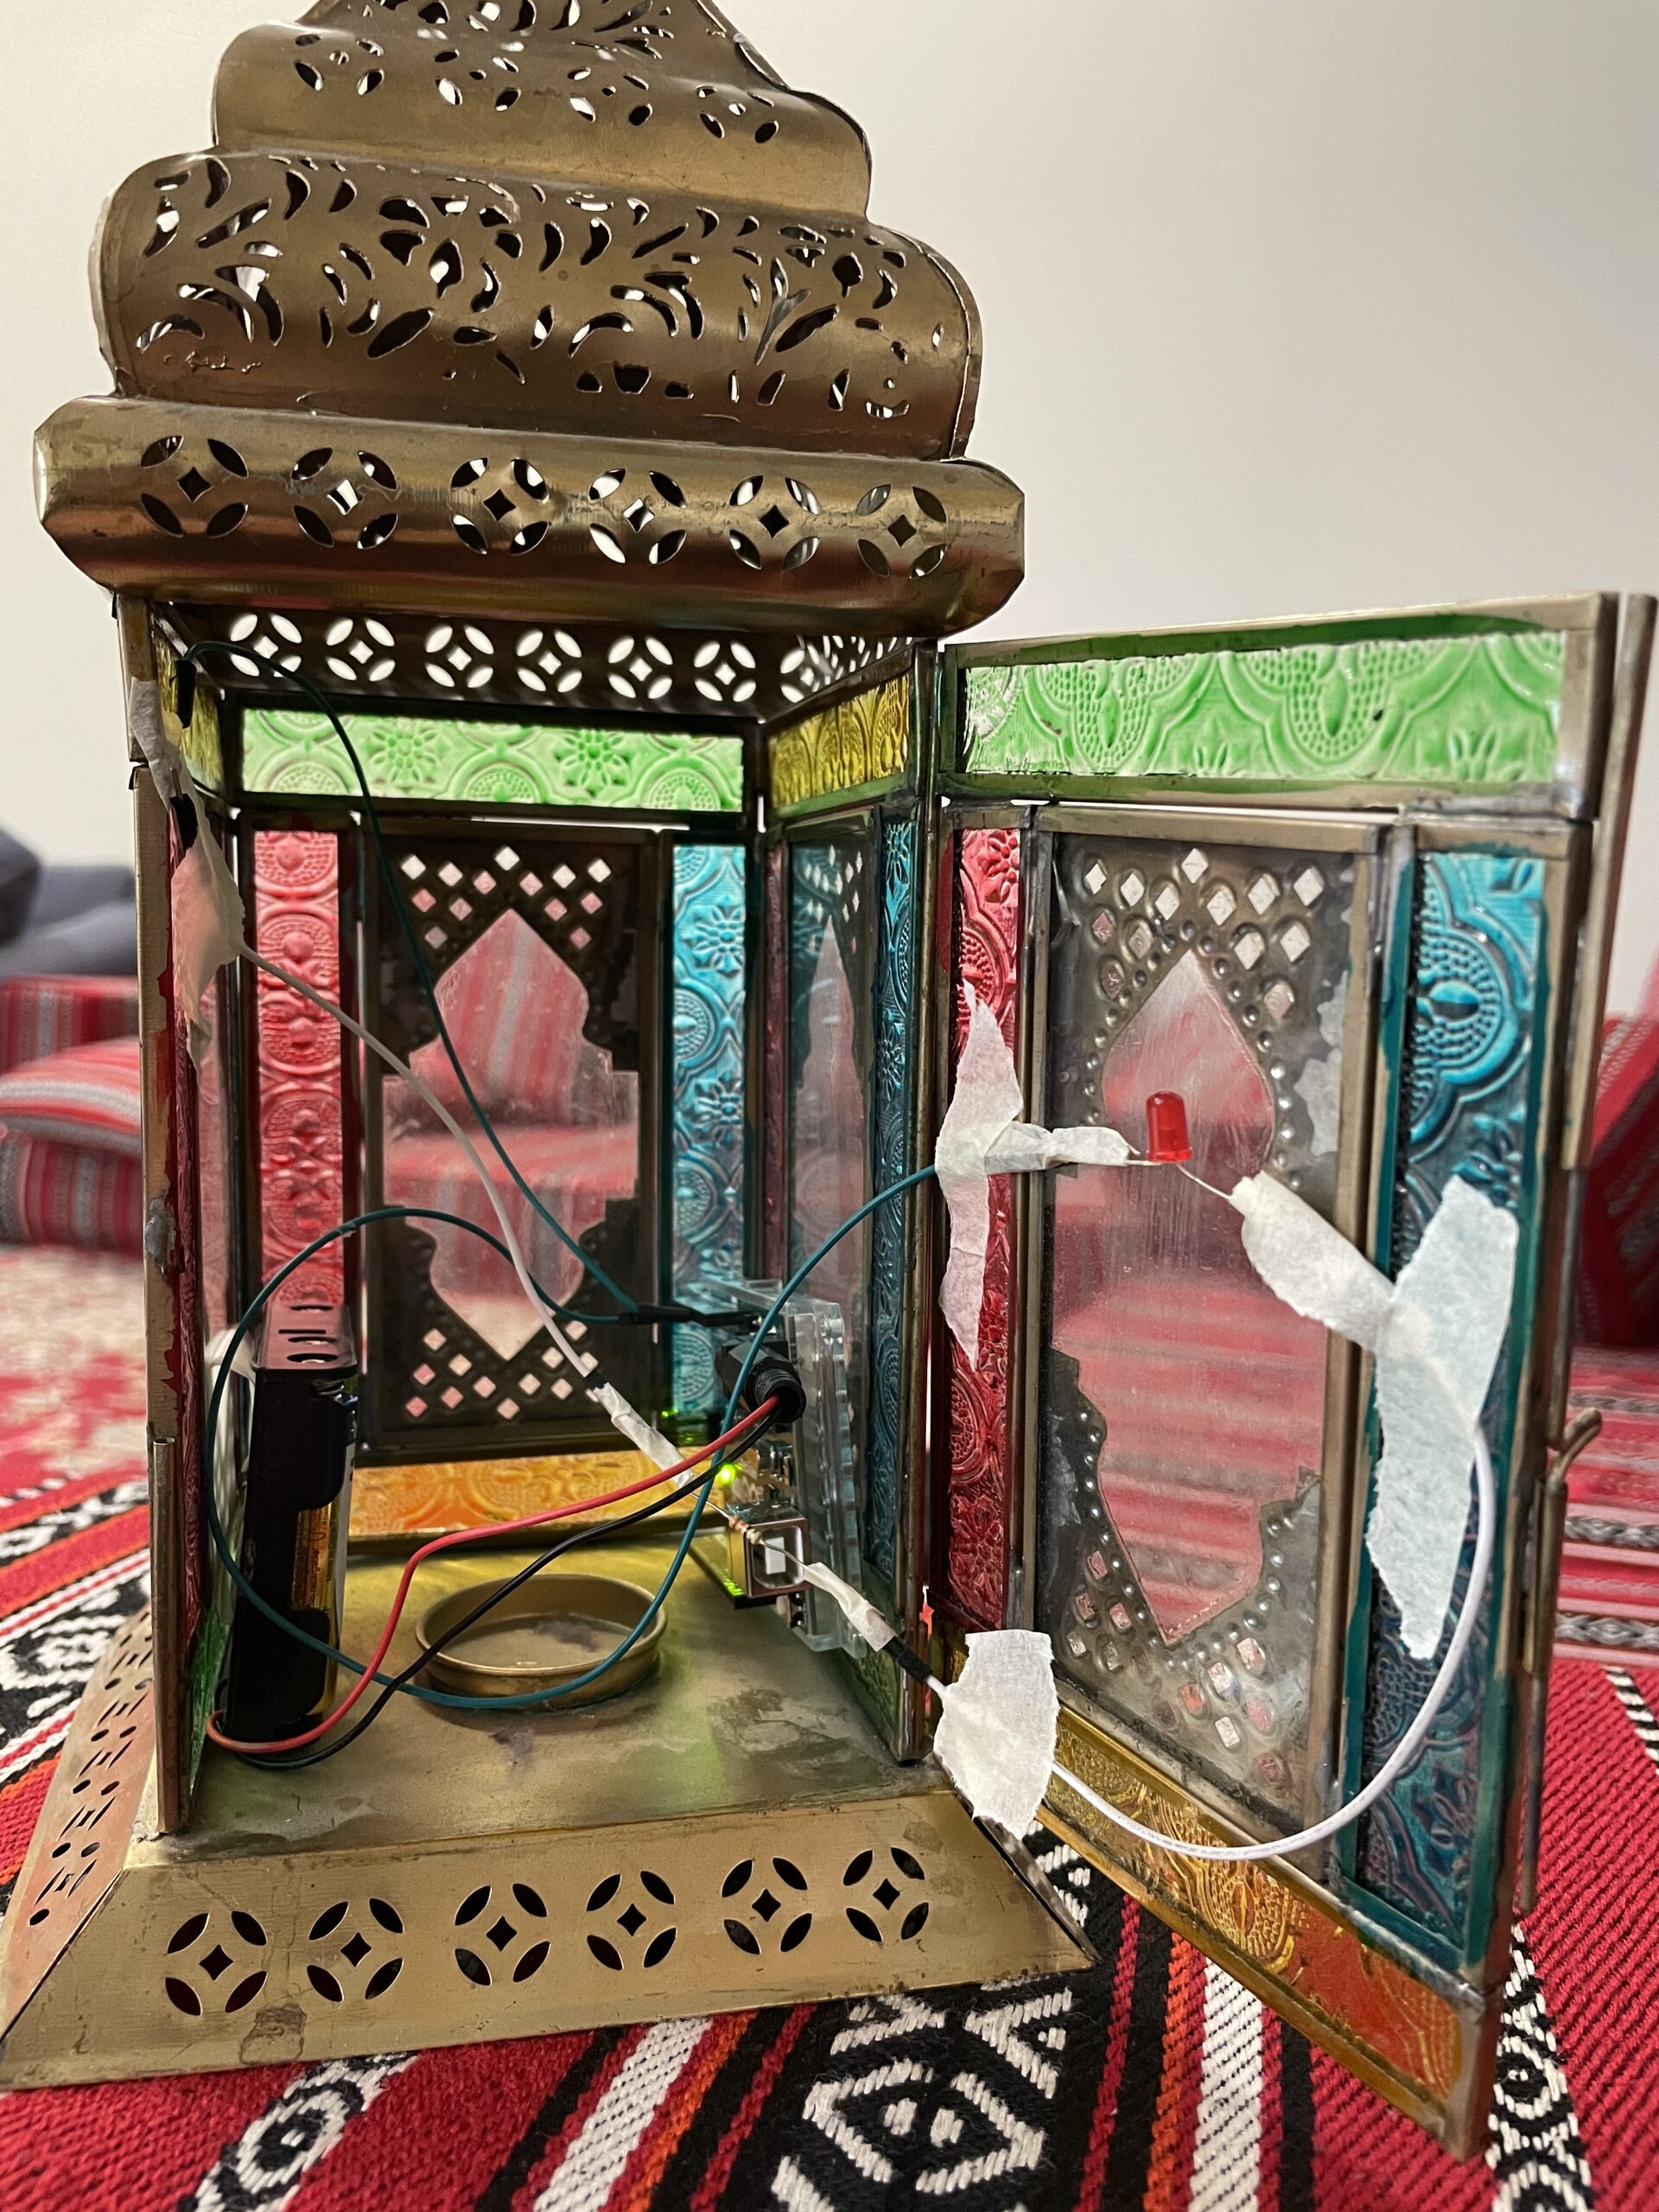
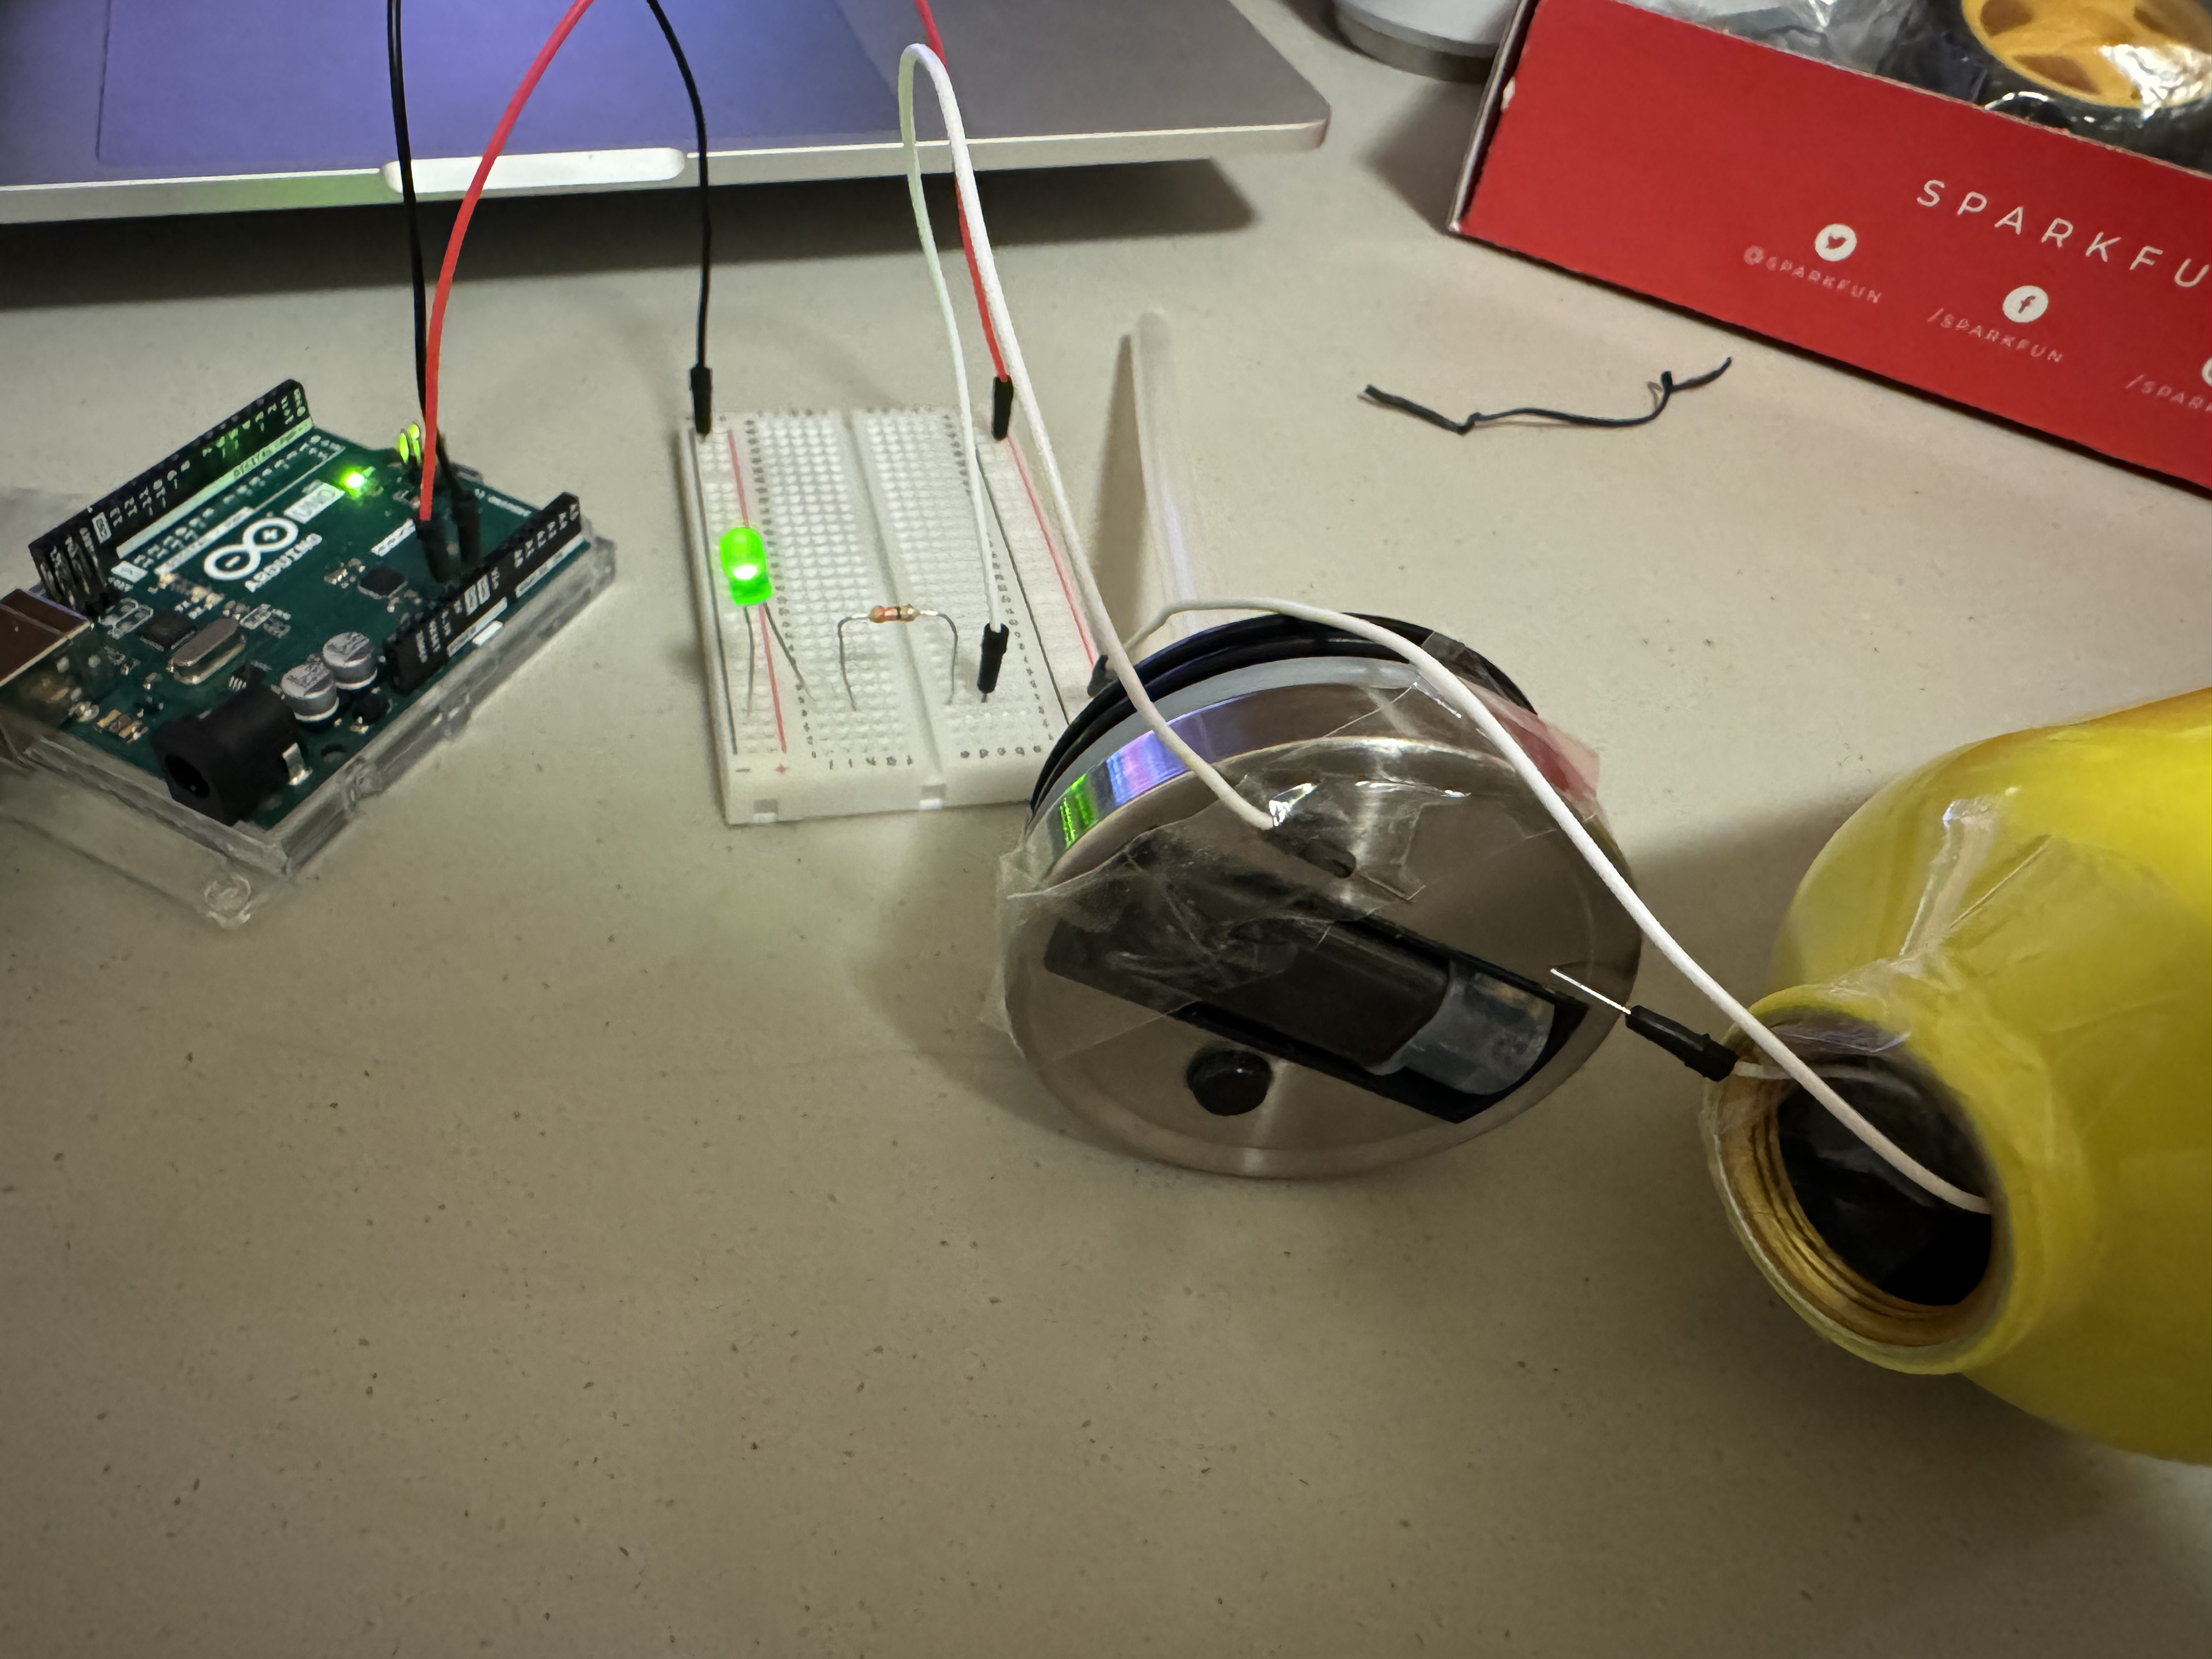
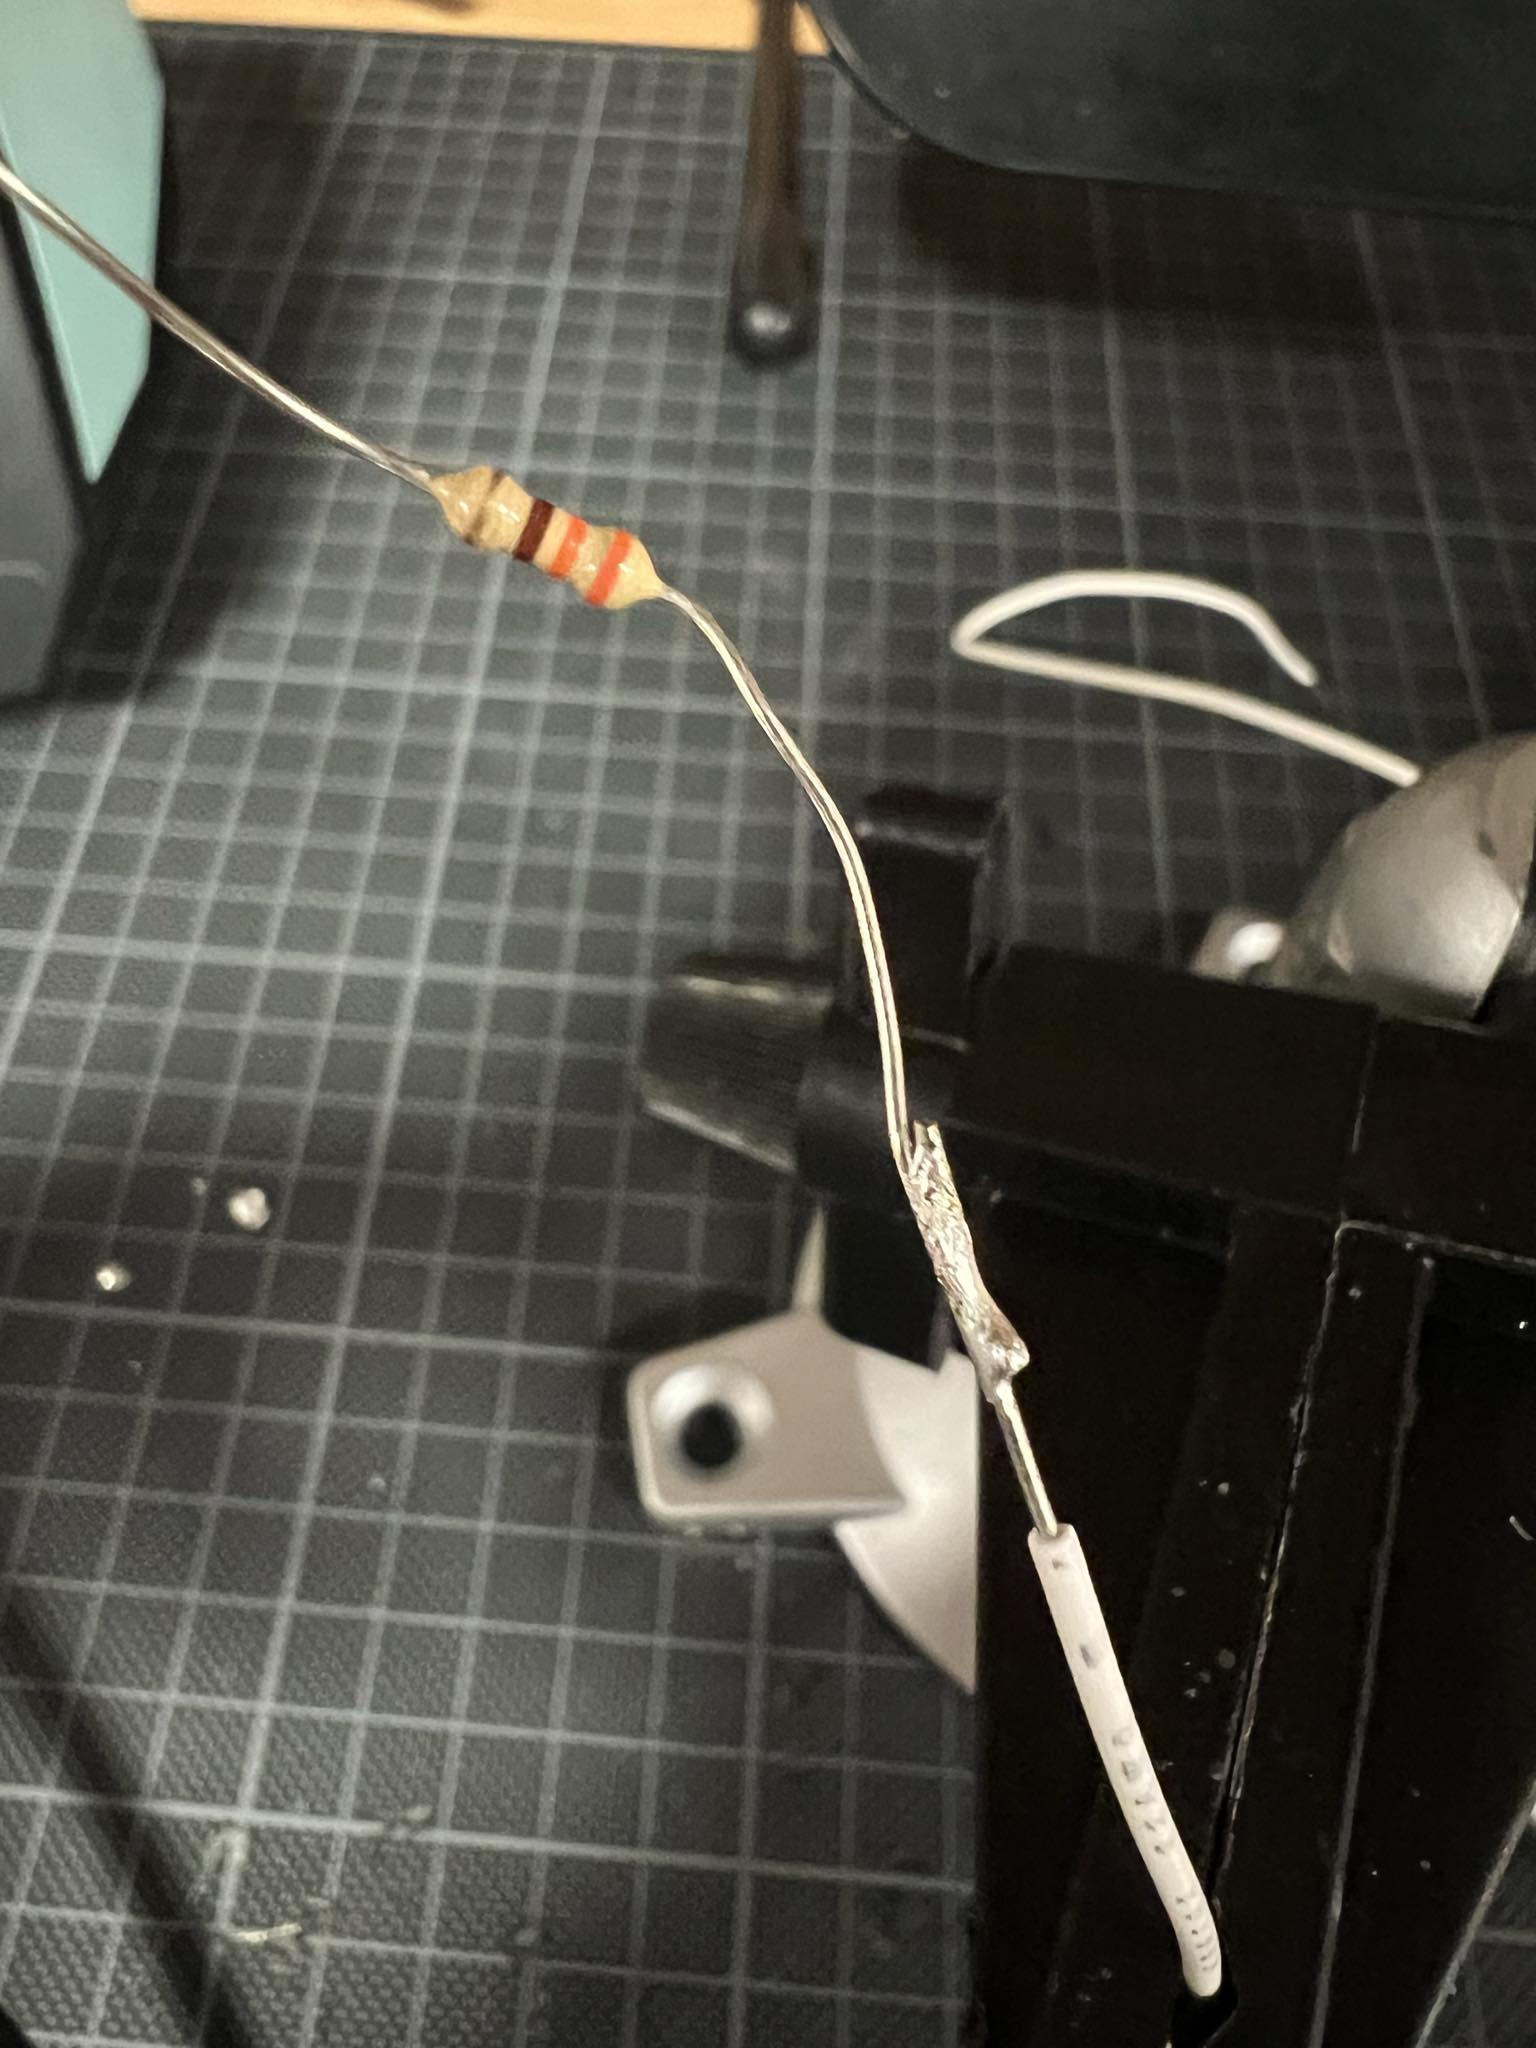
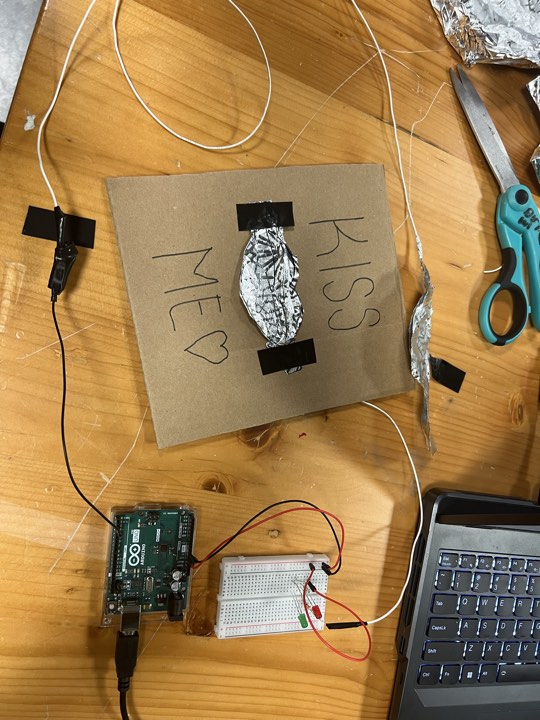
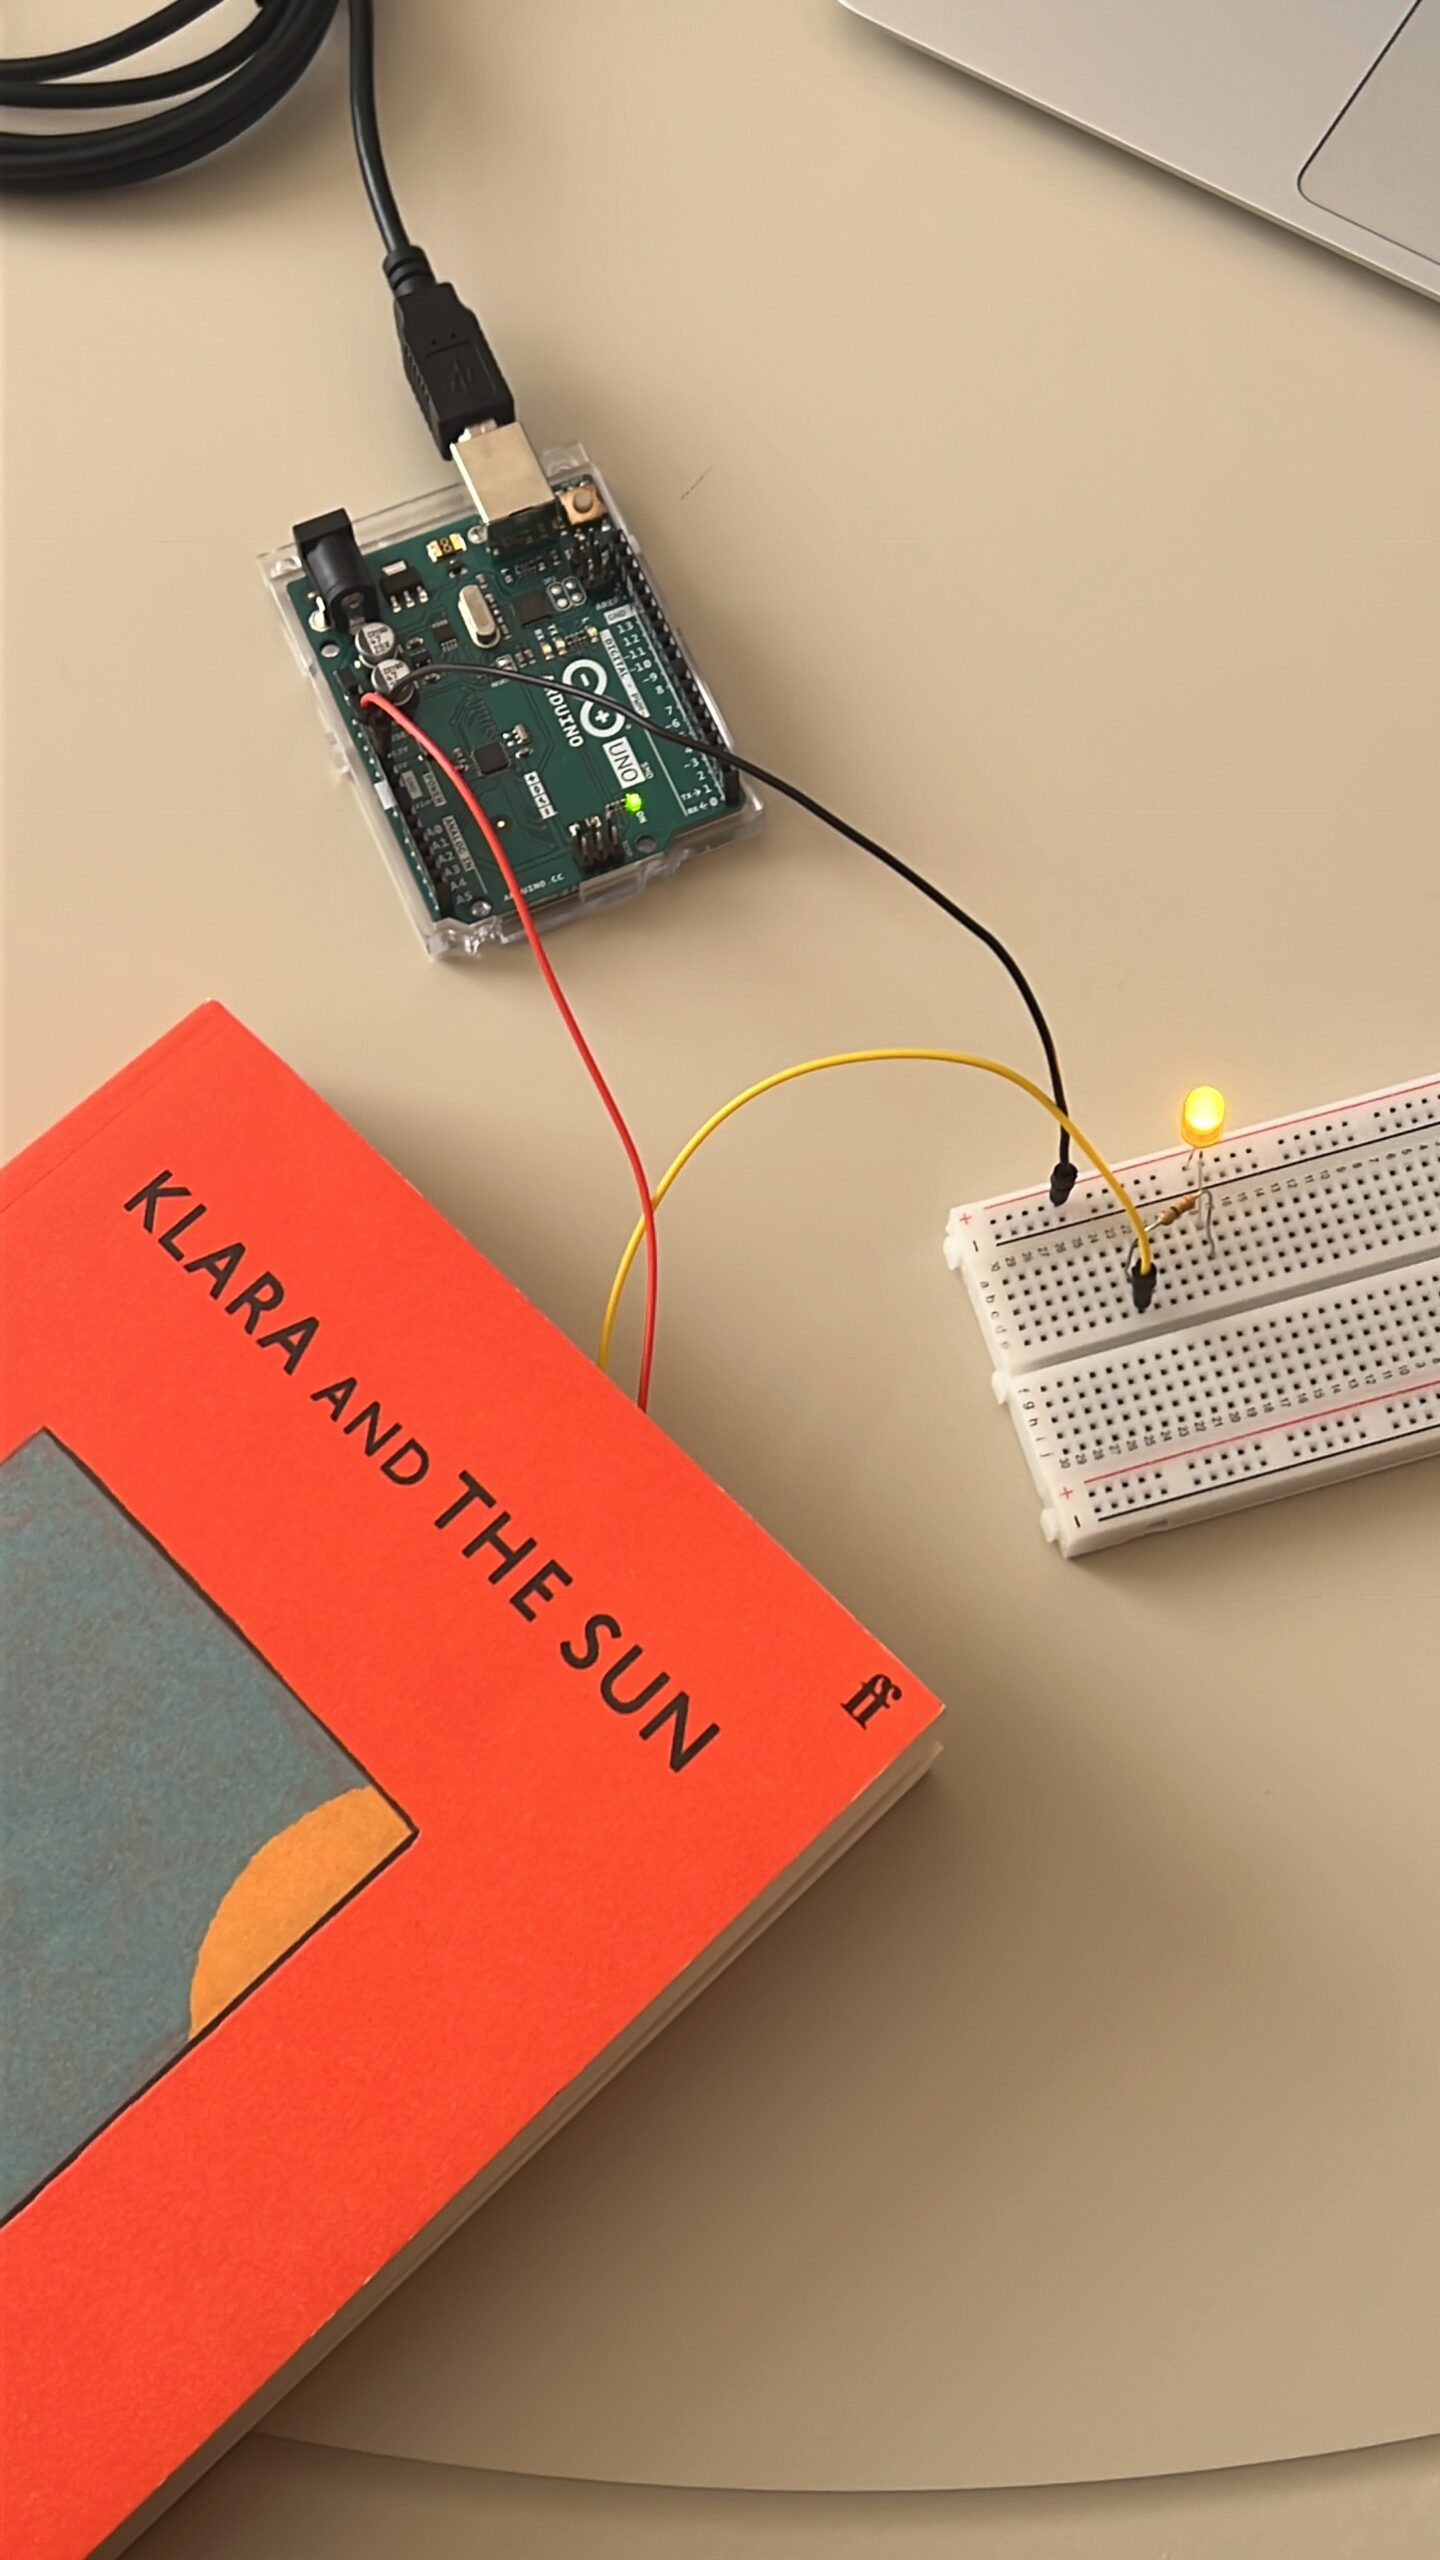
Figuring out the the path of the current was not difficult but constructing the circuit was. I had to attach the resistor to the iPad case and two jumper wires. Locating the position of the resistor and the jumper wires on the iPad was slightly challenging because I had to find the exact position where the jumper wires and the resistor would meet. But once this was established, everything else was easy to accomplish.

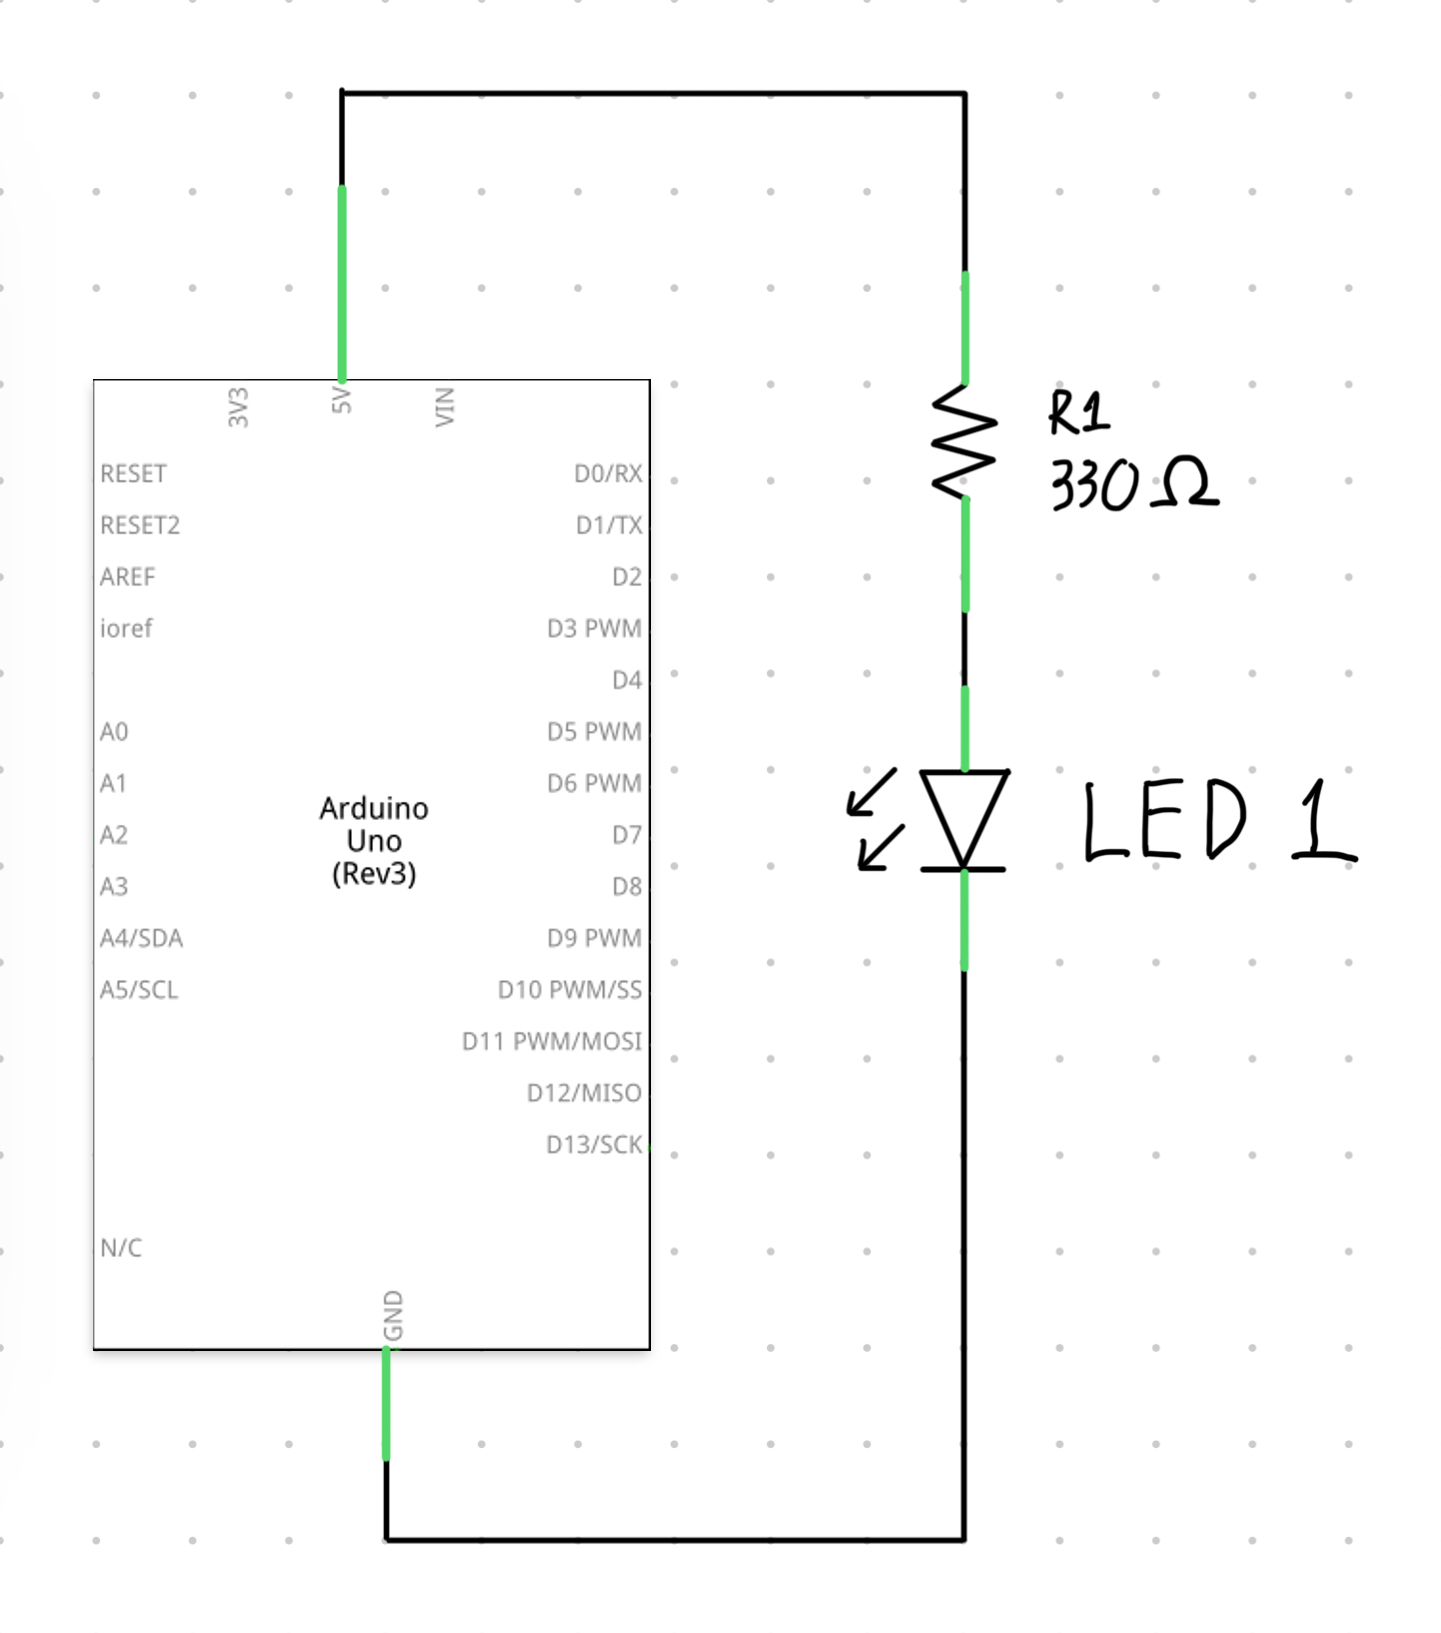
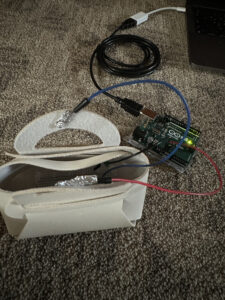
The flow of the circuit looks like this: 5V – jumper wire – resistor – jumper wire – LED – GND. I tried to minimize the number of jumper wires and make a very simply circuit. I am satisfied with the design of the circuit and although it is simple, the circuit maintains to turn the LED on when the resistor and jumper wires come in contact.

The video below shows how the iPad Switch works.

iPad Switch

The picture below shows the circuit in more detail.

Reflection

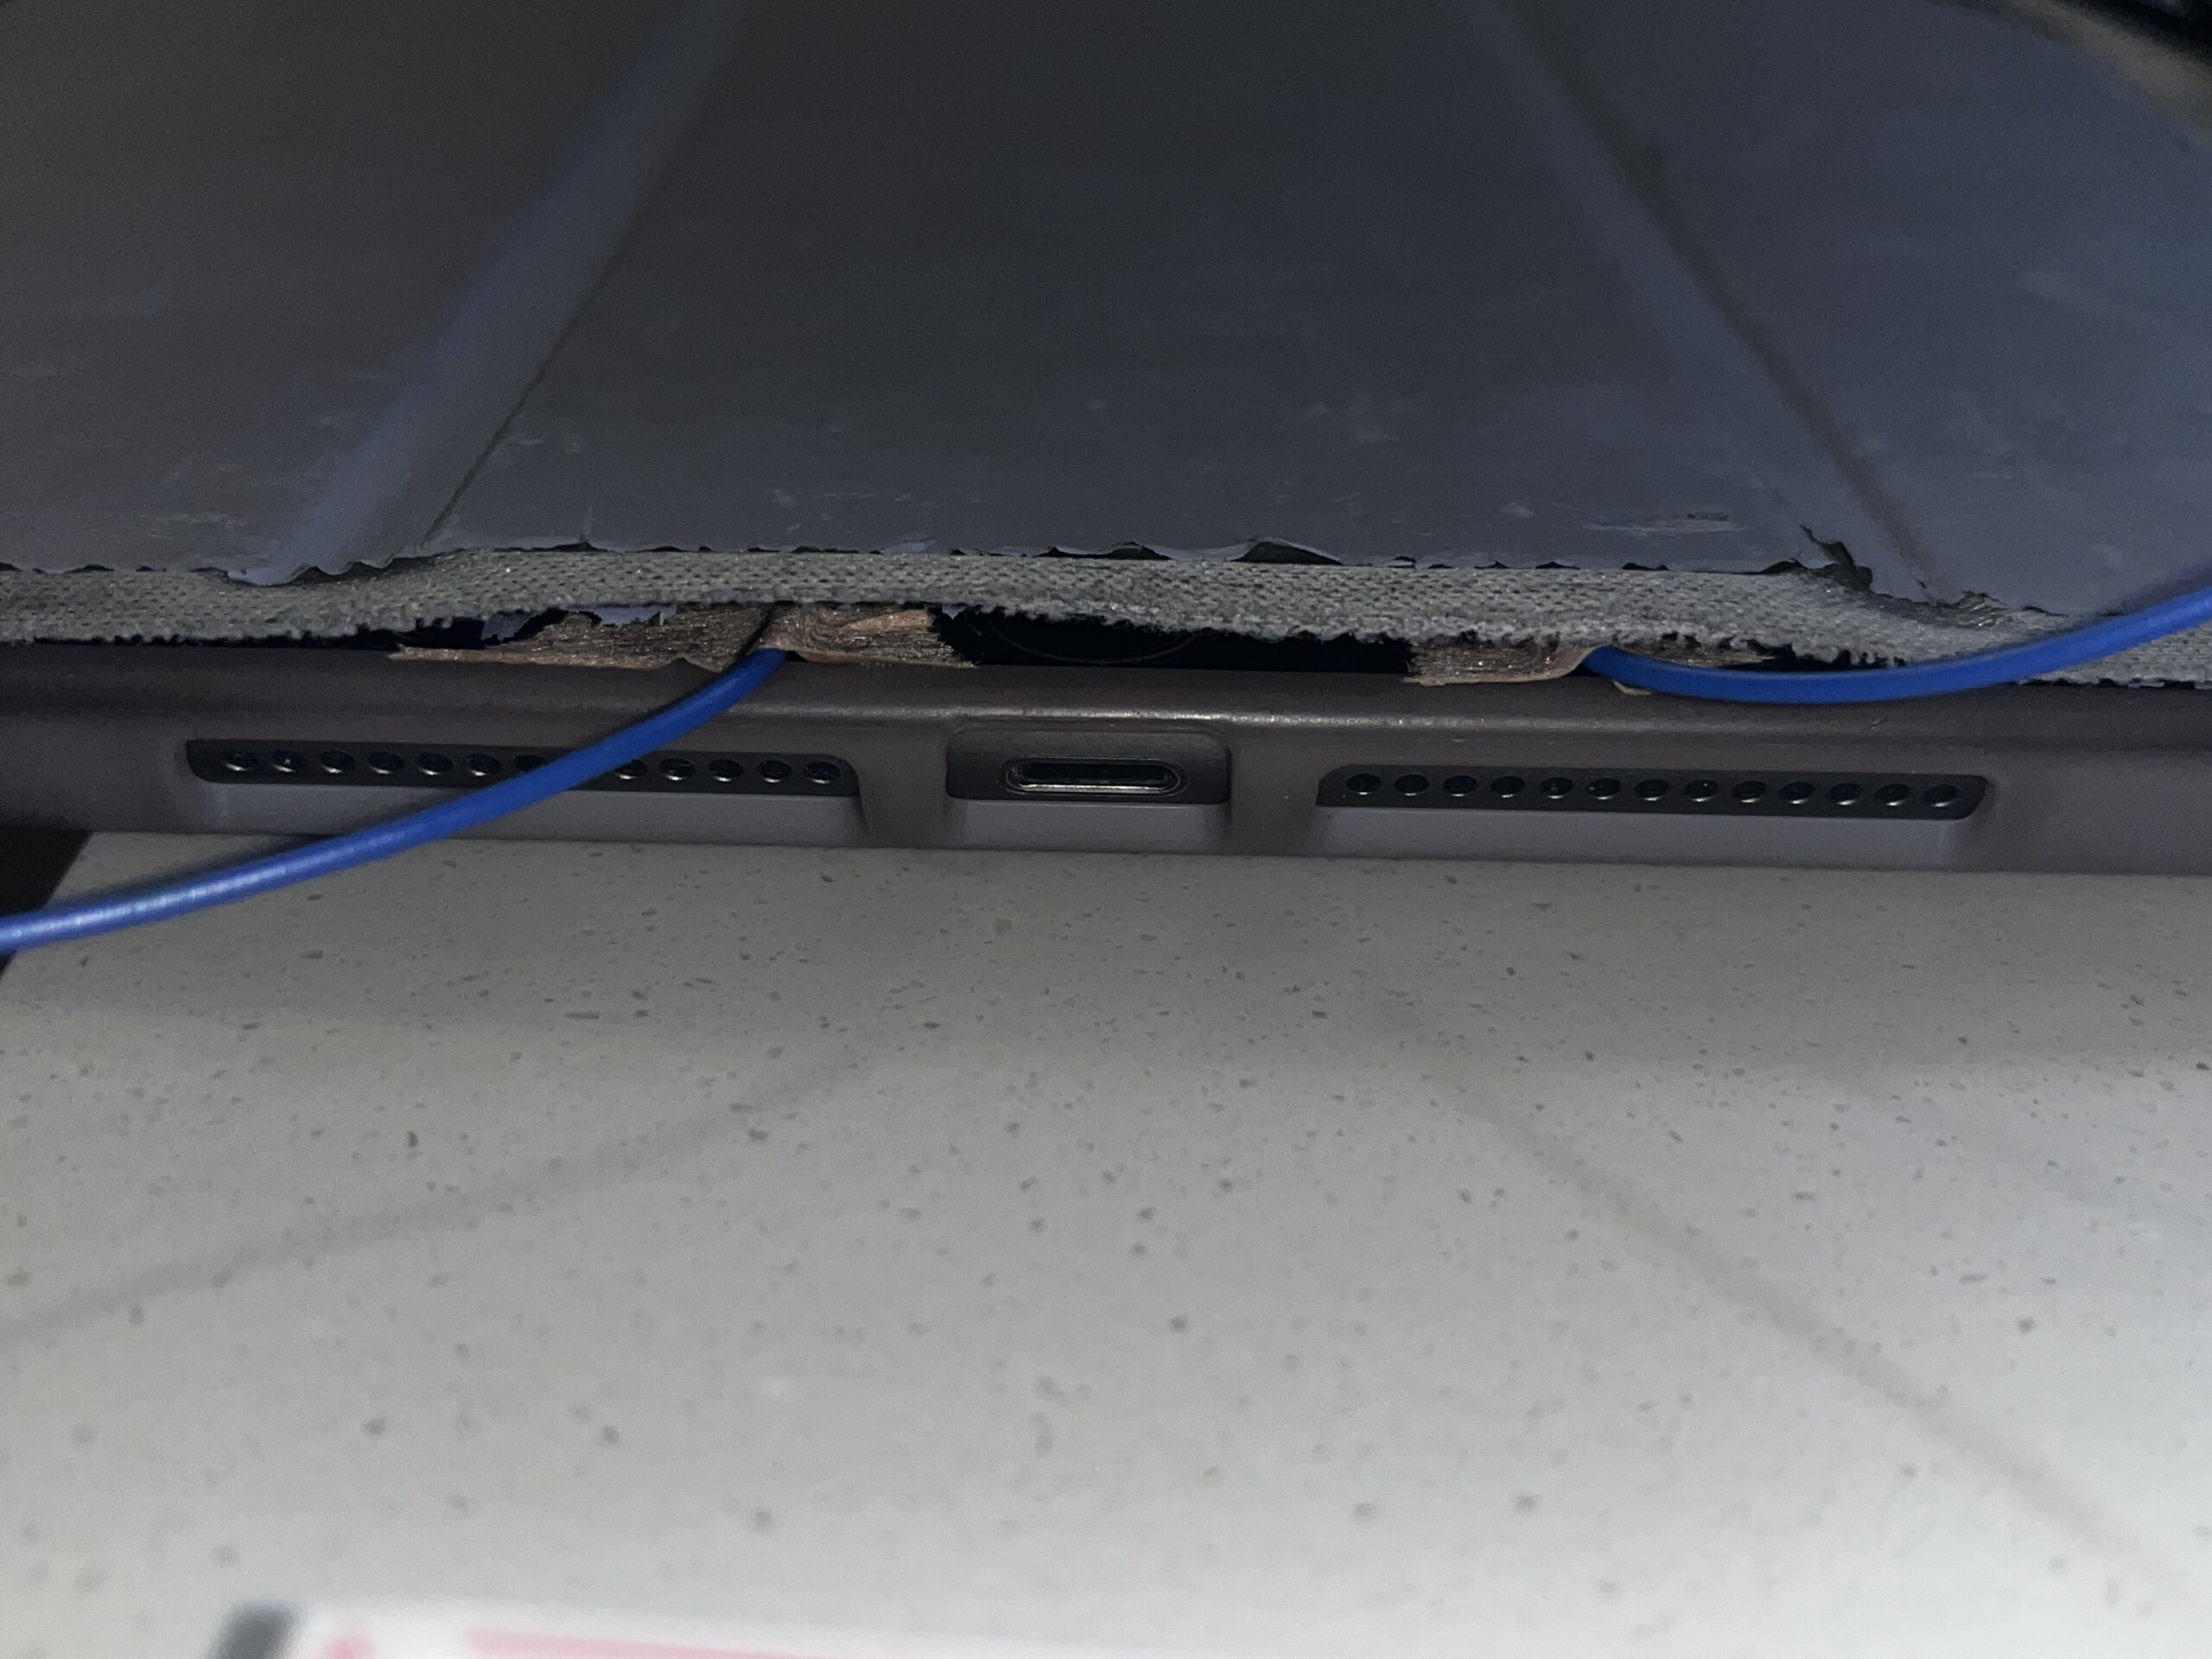
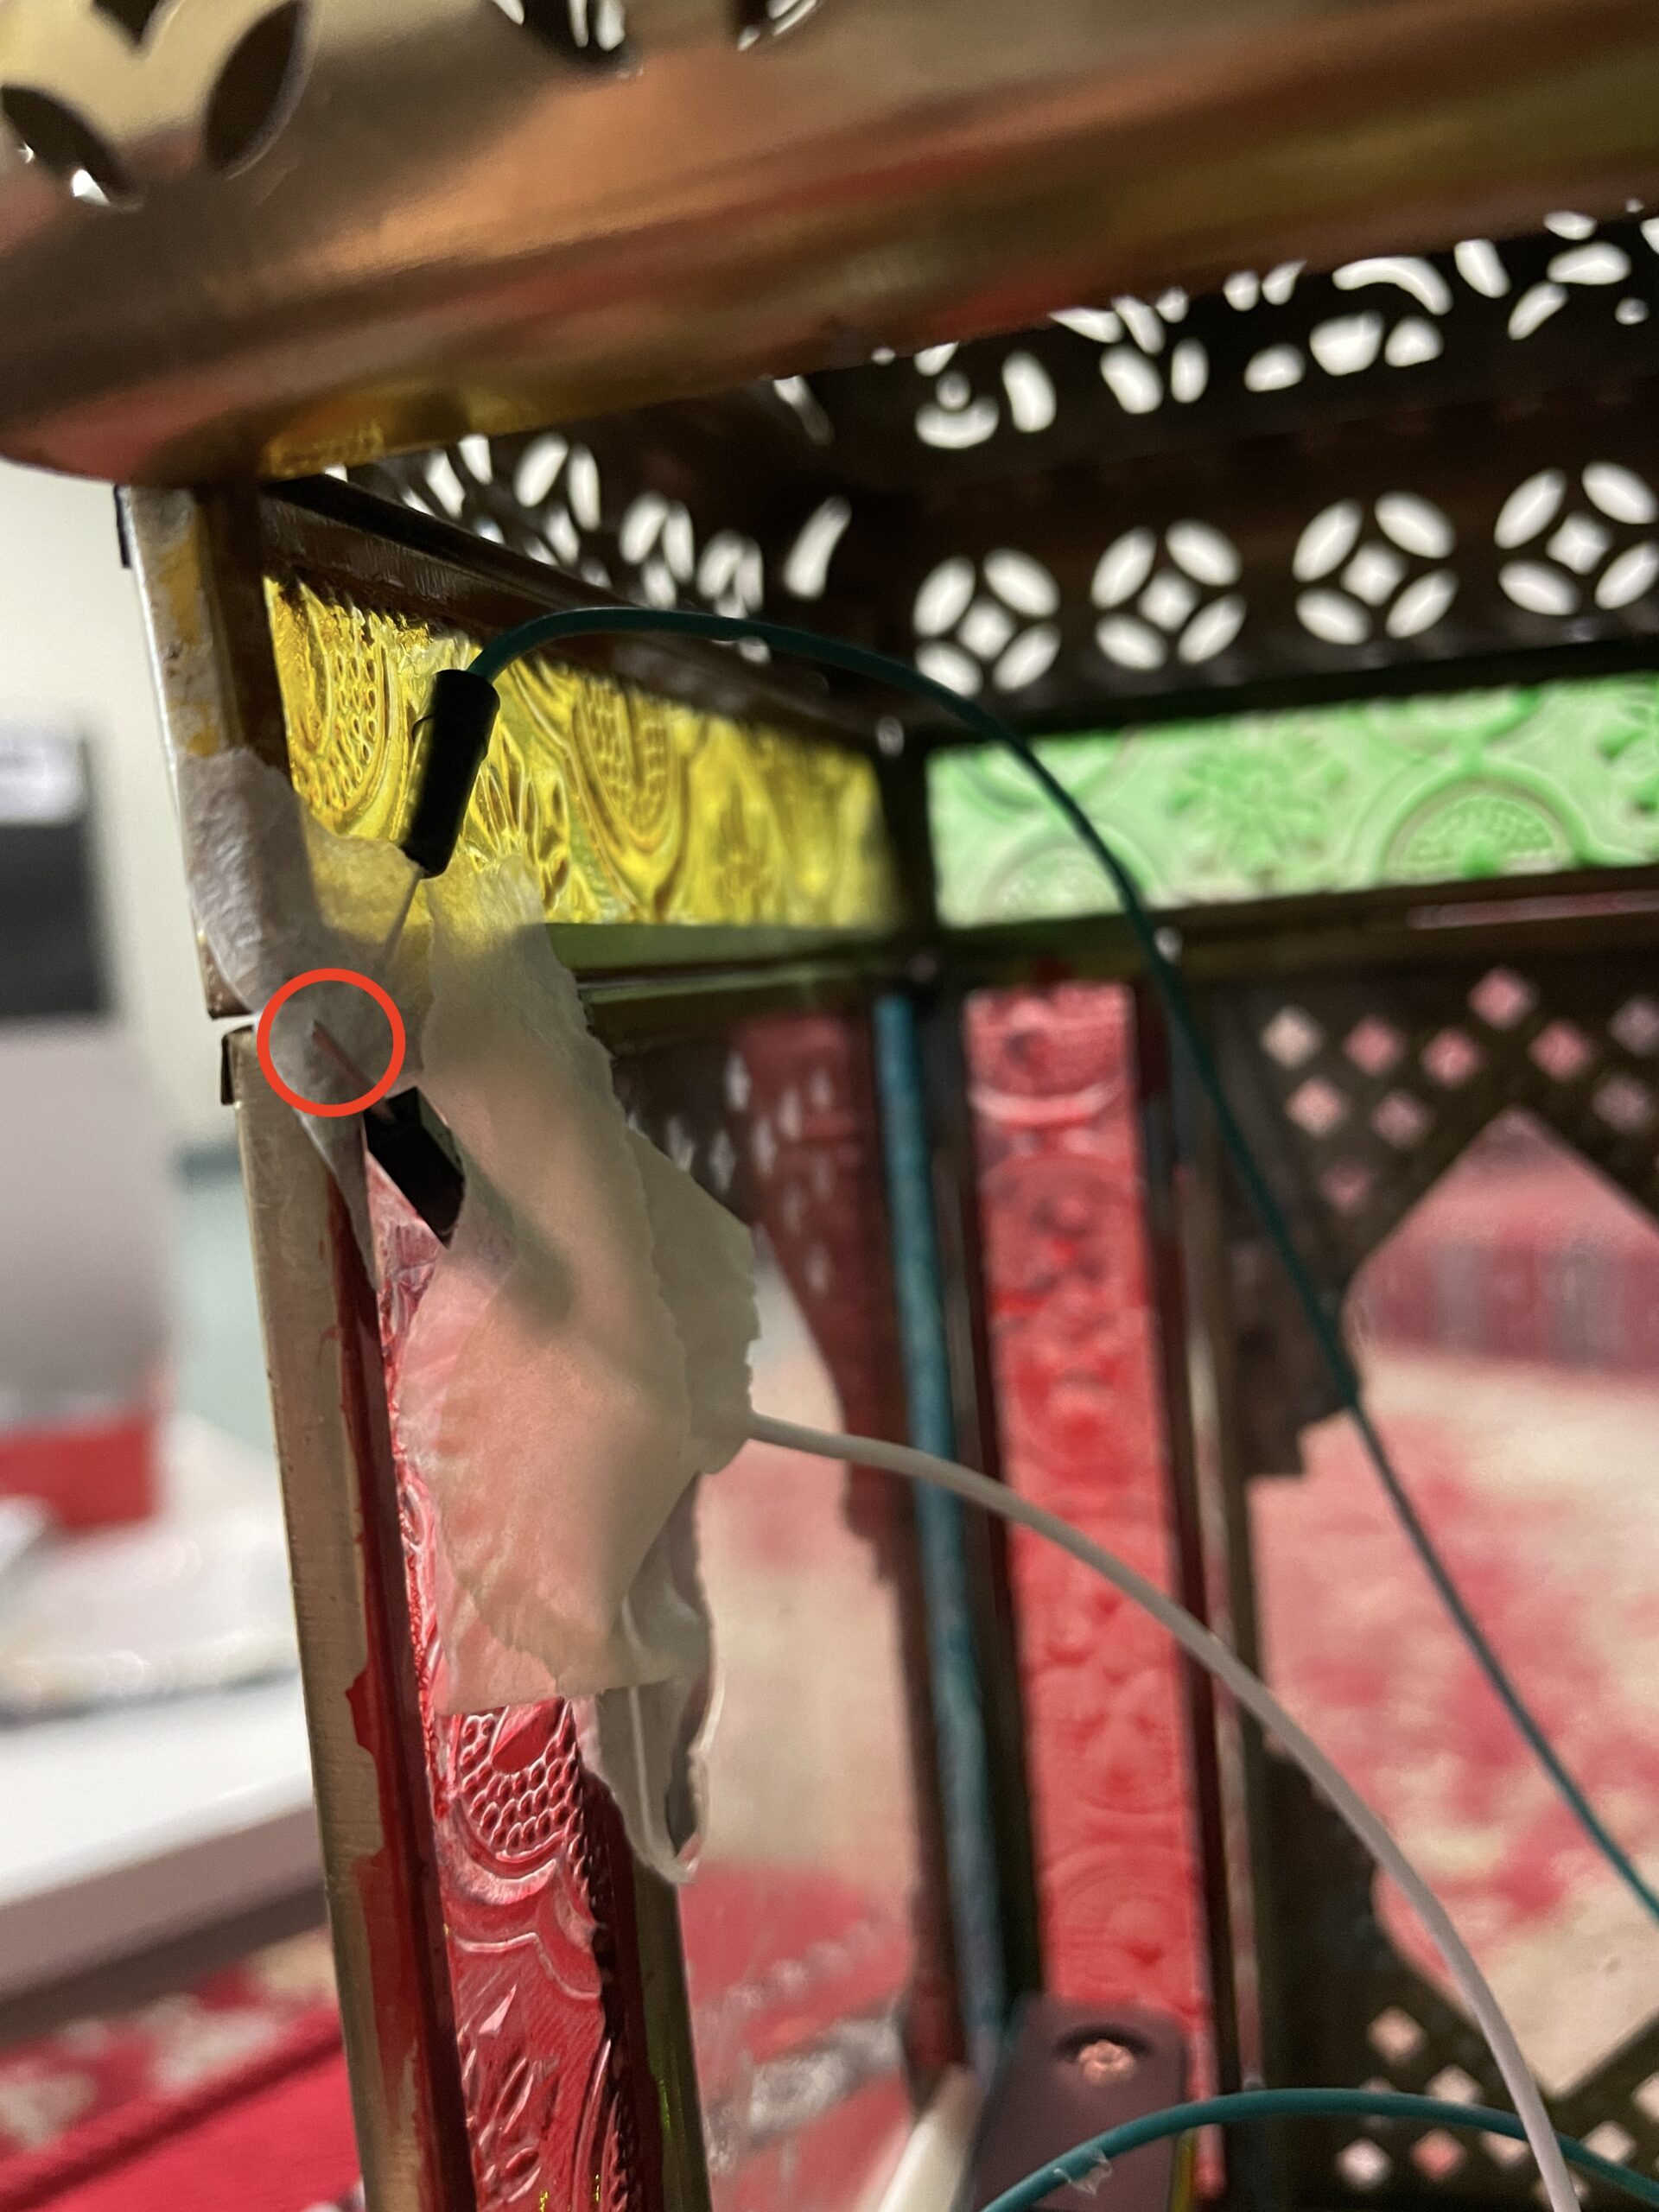
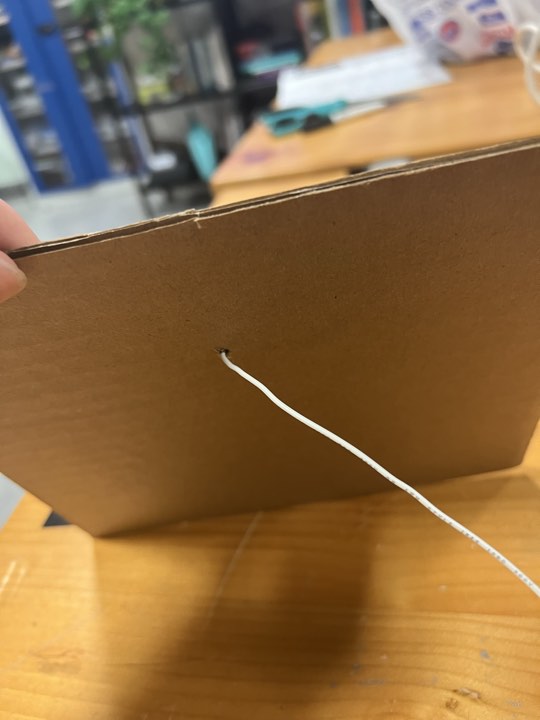
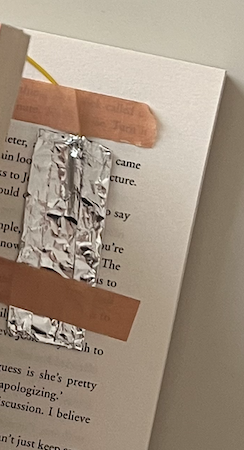
One thing I do want to point out is that due to the gap between the iPad case and the iPad itself, I have to initially press on the case cover to let the resistor and the jumper wires come in contact. I wanted the LED to turn on immediately when the case is closed but unfortunately taping the jumper wires created a gap between the case cover and the iPad. However, when the case cover is slightly pressed, the LED turns on and functions well.

Also, technically I am still using my hands to turn the LED on. So for future improvement, I would like to figure out ways I could eliminate the use of hands to turn the LED on.

The picture below shows the gap between the case cover and the iPad.


Luke Nguyen – Week 9 Assignment – Lantern


Concept & Inspiration:

It’s during Ramadan and I wanted to capture the spirit and create something inspired by the month. I was working in the majlis room available in the Baraha area in C2 and I found this lamp stashed in the room corner. When I picked it up and opened the door, I noticed there was no light inside. It gave me the idea of putting a light in there with this assignment.

Circuit:


Demo:

Since the requirement of the assignment is creating an unusual switch that uses no hand, I thought of the idea that when the door is closed, the light will turn on. The body of the lamp besides the glass is made of metal material so it should transmit electricity almost everywhere on the surface. Taking advantage of this, I rigged the circuit inside the lamp and arranged of the placement of 2 jumper wires so that when the lamp’s door is closed, the circuit is closed and the LED will turn on thanks to the current running through it.

I created the entire circuit outside of the lamp, estimated the number of jumper wires I would need, then rigged/taped the circuit inside later though.

Challenges and reflections:

Initially, I planned to attach the 2 jumper wires in a way that when the door is closed, they would close the circuit. But that was not possible all the time because of the tape. So I took advantage of the material which the surface of the lamp is made of instead. The point is as long as their is a current running through the LED. Other than that, taping the entire circuit inside the lamp took a little bit of time because the space was too small for my hands, but I managed to do it.

Week 9: Blow Switch

“A switch is nothing more than a mechanism to bring two pieces of conductive material together and separate them. ” Since we are not allowed to use hands, I wanted to make a switch that works using a movement of an object through wind. Which is why I thought that I would stick one wire to a some conductor, and other wire would touch the conductor by moving to it.

The following materials were needed:

  • 330-ohm resistor
  • 1 LED light
  • Jumper wires
  • Breadboard
  • Arduino board
  • Scotch tape

Process:

First, I taped on of the wires connecting to the breadboard to an iron top of a cup. Then, I taped another wire that is connected to the breadboard to the hole of a round bottle (the object that would move by blowing). So, by blowing on the horizontal bottle in the direction of the iron top of the cup, the wires touch this conductor, therefore turning the LED on.

Video Link:https://youtube.com/shorts/U-Gy1GvoFjY?feature=share

Reflection:

I had a hard time brainstorming about ways to not utilize my hands and finding suitable conductors. I had different conductors than the ones I used in mind, but maybe because of the material itself, the LED was blinking dimly, so I had to change them. I expected taping process to be difficult considering the wires have to be put in place, but thanks to the conductor having a big surface area, it was not as difficult as I imagined.

Week 9: Glasses & bag switch

This assignment allowed me to think creatively of how to make an LED light turn on without using a proper switch or button. I went about it in two ways, one is by closing and opening sunglasses and another is by using the bag handles/straps. For both cases, I placed the breadboard inside the bag to give a “glow in the dark bag” effect.

I placed aluminum foil, for both the glasses and the bag, to connect the two wires (from the breadboard which connects to the LED and from the 5V pin) to light up the LED.


Video of the glasses:
Video

Overall, I enjoyed doing this assignment as it made me understand the concepts more by doing my own project. I am looking forward to experimenting more with the Arduino and creating cool things.

Extremely weird kissing switch!

My main motivation came from Professor Aaron. Professor wanted us to be weird so I decided to be as weird as I can and decided to make a kissing switch 🙂

It started of with the ideation where I took inspiration from one of the videos we were shown in class where a guys connected cables with aluminum foil to his face and his face moved with the sound. That way I decided that one part would be attached to the face and one part would be placed on a cardboard pad.

With some sketchy soldering I soldered the Arduino cables to longer ones so that the kissing pad can be more accessible from a distance:

Here is how the kissing pad looks like:

Finally when everything was connected, I wanted the lights to blink in the tempo of a heartbeat when a kiss occurs. So naturally I searched up on Google what is the heartbeat of a person that is kissing. The answer was: 100. Let’s implement that into our code:

void heartbeatLED() {
  // Calculate the duration of one beat in milliseconds
  int beatDuration = 60000 / 100; // 100 beats per minute

  // Half of the beat duration for on and off phases
  int phaseDuration = beatDuration / 2;

  // Blink the LED with heartbeat rhythm
  for (int i = 0; i < 100; i++) { // Blink for 100 heartbeats
    digitalWrite(led0, HIGH); // Turn the LED on
    delay(phaseDuration); // Wait for the on phase
    digitalWrite(led0, LOW); // Turn the LED off
    delay(phaseDuration); // Wait for the off phase
  }
}

Finally, this is how everything looks connected together (practical presentation of how it works will be shown in class):

Video Demonstration:

I also arranged the lights in a heart formation whilst still thinking of how to make a “casing” in heart shape to make it look more pretty.

Overall I really liked exploring the Arduino for the first time and really tried to make something weird and push myself out of my comfort zone. I’m really excited for what is about to come 🙂

Week 9: Diver Switch

Concept:

Before starting anything else, I  contemplated what I would like to use as an “electrical conductor” that will enable the flow of electricity. At first, I was thinking about utilizing aluminum foil in my project. However, unfortunately, I could not find any aluminum foil in the IM lab. So, I used salt water as my conductor. Looking at the cup of salt water, I suddenly thought of a “diver”. And I decided to work on this project with the concept of “diver”. I wanted to make the switch to be activated when the diver dives into the cup of salt water. However, since we are allowed to use our hands, I thought that it would be really interesting to make the users use their elbows to turn on the light. 

To bring this concept to life, I utilized the following materials: 

  • 330-ohm resistor
  • 1 LED light 
  • Jumper wires
  • Cup of salt water
  • Breadboard
  • Arduino board
  • Cable tie 
  • Duct tape
  • Scotch tape 

By combining these elements, I came up with a very cute and responsive switch design that allows users to let the diver dive into the water and turn on the light. 

Process: 

First of all, I made a simple circuit with four wires applying what we have learned from the class. Then, I unplugged the other end of the wire that is connected to the resistor and the other end of the wire that is connected to the LED light. Then, I attached the unplugged ends to the hand of the “diver”. So that when the diver dives into the water, the ends of these wires will also meet the water. And the water, working as a conductor, will connect these wires, ultimately enabling the LED light to be turned on as the circuit will be closed.


Light on 

Then, off!

Video of the project: 

Reflections 

As usual, I enjoyed doing this assignment. I barely have any experience using Arduino Uno, so this was my first time making a project using Arduino Uno. There were no particular difficulties in figuring out how to make the switch work. However, it took me quite a while to figure out what concept I should do to make my “unusual switch” both unique and cute. Also, it was quite hard for me to find a method to utilize other parts of the body to turn on the switch as I could not think of other body parts for switching off something. I think I could improve this project idea by letting more LED lights turn on when the diver dives in as if the LED lights are the audience looking at the diver. This way, I think my project could be more interesting and fancy. 

Week 8 Response

While reading the articles, it was challenging to find a link between the ideas due to the different design contexts discussed: Norman’s focus on emotional interaction with design and objects, versus McMillan’s article on Margaret Hamilton’s significant contributions to the Apollo mission. However, both narratives highlight the importance of innovative thinking and emotional engagement in creating technologies that are not only functional but also meaningful and intuitive for users. Adding to this, the concept discussed earlier in the semester, that design should be self-explanatory, resonates here. For example, Norman might argue that a well-designed object or interface naturally guides the user on how to interact with it, reducing the need for extensive instructions or training. Hamilton’s software, by being robust and error-tolerant, exemplifies this principle on a technical scale, ensuring astronauts could rely on it under the most extreme conditions without needing to understand its complexities.

Week 8a Reading Response

Now after having read both articles I realize how little beauty is appreciated in how productive it will make us. What I mean is that most people, myself included wouldn’t have thought that by getting a nicer looking laptop or by being in a more aesthetically appealing place that we could be more productive. However, not necessarily productive in general. The first author emphasized that positive affect (the experience of positive emotions, or feelings) could allow for broadened thinking, and make people more willing to disregard minor difficulties, and that positive affect is linked with a more aesthetically appealing design. That is not to say that all designs should focus on aesthetics. In a rocket or a plane for example, it is important that the design focus more on function so as to make it as easy as possible to complete simple tasks and not be distracted.

In the reading about the Apollo program I found it interesting how those in charge felt that because they had because “they were trained to be perfect” it meant that they wouldn’t make any mistakes. I wasn’t sure why they would think that. Personally, I don’t believe that they believed that they were perfect, instead I think those in charge thought that it would just be very unlikely that a mistake would happen, and maybe they just didn’t want to deal with adding any redundancies/error detection. Ultimately, the problem was that human-centered design wasn’t taken seriously.

As I was reading both articles I thought about the things I use around me. I’m not sure if this relates but I found that I am more willing to use something if its aesthetically appealing or just made me feel good in general. I’ll give an example: I was more willing to write notes or draw after buying a pen which feels nice to write with or if the notebook I’m using looks nice. Or, its easier for me to write code/debug if the environment around me makes me feel better. For example, being in bed is more comfortable than being in a public environment in my opinion.

W9 Assignment- Magical Book Switch ✨🔮🃏

When we were given this assignment, I was conflicted with how I was supposed to go about it. I knew I wanted to create something simple, not overly complex due to the fact that I was still getting used to using the different elements of physical computing we learned in class. After days of brainstorming, I came up with the idea of a “magical” book switch, in which the LED lights up when the book is shut and turns off when opened. This idea came about when I was reading a book called Klara and the Sun, which prompted me to reminisce about similar books and movies that I used read and watch growing up. A concept that kept reoccurring in all these books and movies is the glowing book, which you can see below:

This concept is the main inspiration behind my switch assignment. It is through allowing the closed book to light the LED up and turn it off when it is opened that this assignment resembles the concept I initially Imagine.

Progress and Assembly

I created a circuit using a yellow LED, wire, a book and aluminium foil, all of which are interconnected with one another. I first started off by connecting the red wire to the 5v pin (I will elaborate on its significance in a bit) and the black wire to the ground pin on the arduino board. I then connected the black wire to the positive part of the breadboard, which is the same part where the LED’s negative pole sits. The LED’s positive pole is on the terminal strip of the breadboard. On the same line as the LED’s positive pole, I placed a 330-ohm resistor to help reduce the flow of the circuit as a whole to ensure that the current passing through does so in safe limits. On the other end of the resistor, I placed another wire to be attached to the book. However, to ensure that the LED actually lights up, I needed conductive material. In the case of this assignment, I used aluminium foil. I created 2 rectangle with my foil and made sure that there was space to attach the wires. I made each wire have their own individual piece of foil. I then taped the foil covered wires to corresponding pages of books.

You can see this below:

The primary goal of this setup was to make the LED light up when both wires touch one another when the book is closed.

In the image below, you can see the full circuit in action:


Video of Circuit: 

https://youtube.com/shorts/PoatHJr2I3I

Reflections

I really enjoyed the process of building and putting this assignment together. I genuinely believe that it helped me get more practice in using the concepts we learned this past week. It allowed me to see how I can take the things we learned and apply it to something from my imagination. I definitely feel more comfortable using the arduino board and its different elements. In terms of improvements, I would have loved to add some element of interactivity. Maybe something that would allow the user to engage with the circuit in order to make the LED light up. Other than that, I actually am happy with the final result and cannot wait to use the board to create more elaborative and complex circuits!

Week 8a Reading Response

Attractive Things Work Better” by Donald A. Norman

One key question this reading raises for me is about finding the right balance between usability and aesthetics in design. Norman argues that while usability is extremely important, especially for tools used in stressful situations, aesthetics and emotional appeal also play a vital role that designers should not ignore. But he cautions against veering too far into just making things “pretty” at the expense of functionality. This tension between utility and beauty is an age-old debate in design circles, and Norman seems to be staking out a middle ground position. I’m left wondering where exactly that line should be drawn and how designers can best integrate those two priorities harmoniously.

Norman’s discussion of how positive and negative affect can influence cognitive processing styles was thought-provoking to me. The idea that negative emotions like anxiety tend to induce a depth-first, focused cognitive style while positive emotions promote a breadth-first, creative processing mode was new to me. His examples, like being able to walk easily across a plank on the ground versus being fearful of doing so high up, illustrated this vividly. It made me reflect on the emotional states that different product designs might evoke in users and how that could impact their ability to understand and utilize the design effectively.


Her Code Got Humans on the Moon—And Invented Software Itself

It makes me wonder about all the other underrecognized women who made pioneering contributions to early computing and coding during an era when it was an extremely male-dominated field. How many other “founding mothers” were there whose stories have gone untold?

The narrative surrounding the Apollo computer’s hardware, especially how its memory was intricately hand-woven into copper wires by a team dubbed the “Little Old Ladies,” struck me.  The physicality and manual labor involved in producing this early digital memory seem almost quaint compared to today’s silicon memory chips, and it is quite difficult to imagine how it would look. But it’s a powerful reminder of how software was so revolutionarily abstract during that era—lines of code inscribed into physical materials to control machinery. The leap of imagination required to conceptualize and construct software systems is fascinating.

I was reminded of the film Hidden Figures and the stories it told about the African American women “computers” at NASA who did crucial mathematical calculations for the space program. While their roles were more analog data processing rather than software programming, there are parallels in how these marginalized groups were instrumental to NASA’s achievements yet rendered nearly invisible by societal prejudices of the time. Both highlight how institutional blindspots caused pioneering technical work by minorities and women to be overlooked and undervalued for decades.