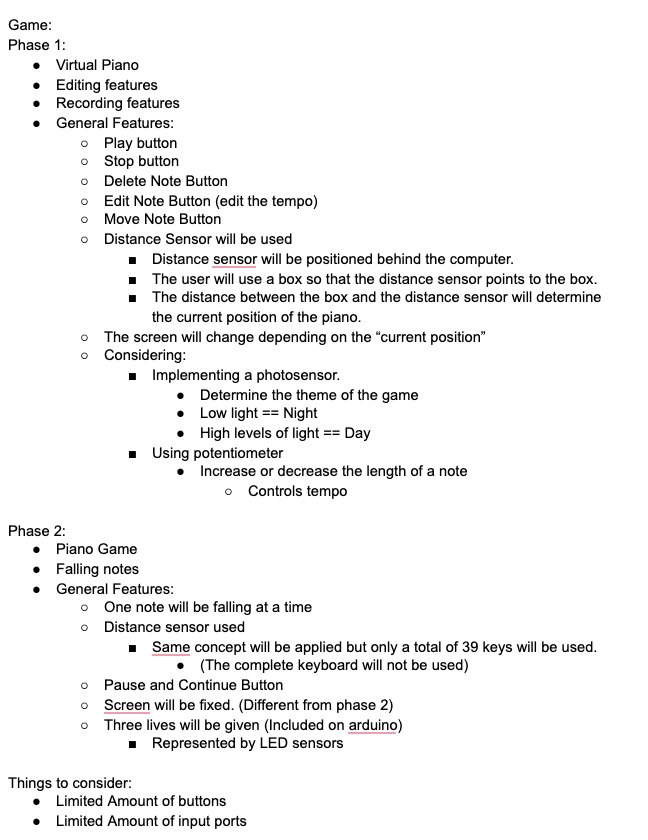
Final Project Documentation

Concept:

This consisted of creating a final project for the class that would combine both Arduino and Processing to create an Interactive game or application. 

Idea:

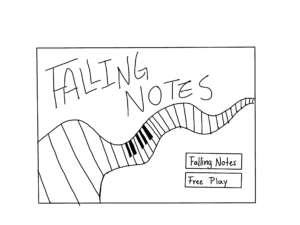
My initial idea consisted of creating an application that would have two principal phases. The first phase would be an interactive free play piano where the user could explore and play the piano as they wish. This first phase would include features such as recording something and playing the record. The second phase would consist of a game where a piano would be shown and notes would be falling. The user would have to press (or play) the piano according to the falling notes. However, unfortunately, the first phase of the game took me a lot of time and effort that I was unable to work on the second phase. In the end, my project consisted of a music instrument application with additional features.

Process:

Initially, I worked on creating a basic platform for the piano. First I decided to solely focus on the processing part and therefore I started by creating a piano where keys from the keyboard represented the tiles from the piano. After, I focused on the design of the piano (basic design) implementing the shape functions in Processing.

Then one of the main components of my project was the sound files uploaded. I found files online and downloaded them. However, while doing my project, I realized the files needed to be edited to improve the sound and functionality of my instrument. Then I focused on learning about the minim library within Processing which helped me with making the sound files work.

After finishing with the files, I started working on the additional features. These features took me more time than I expected. The features I included were recording a note, stop recording, deleting notes from the record, adding notes to different parts of the record, and playing the record. The recording part was complicated because I wanted to implement a way to allow for various notes to be recorded in one part and played at the same time. I was able to do this by using a 2-D array where one dimension would represent the part being played and the other would represent the note being played. After implementing these various features, I focused on possible areas of improvement. One example was a self-updating array where an array would be resized onc


e the number of notes passed the capacity of the array.

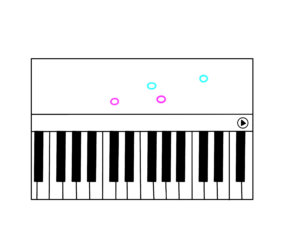
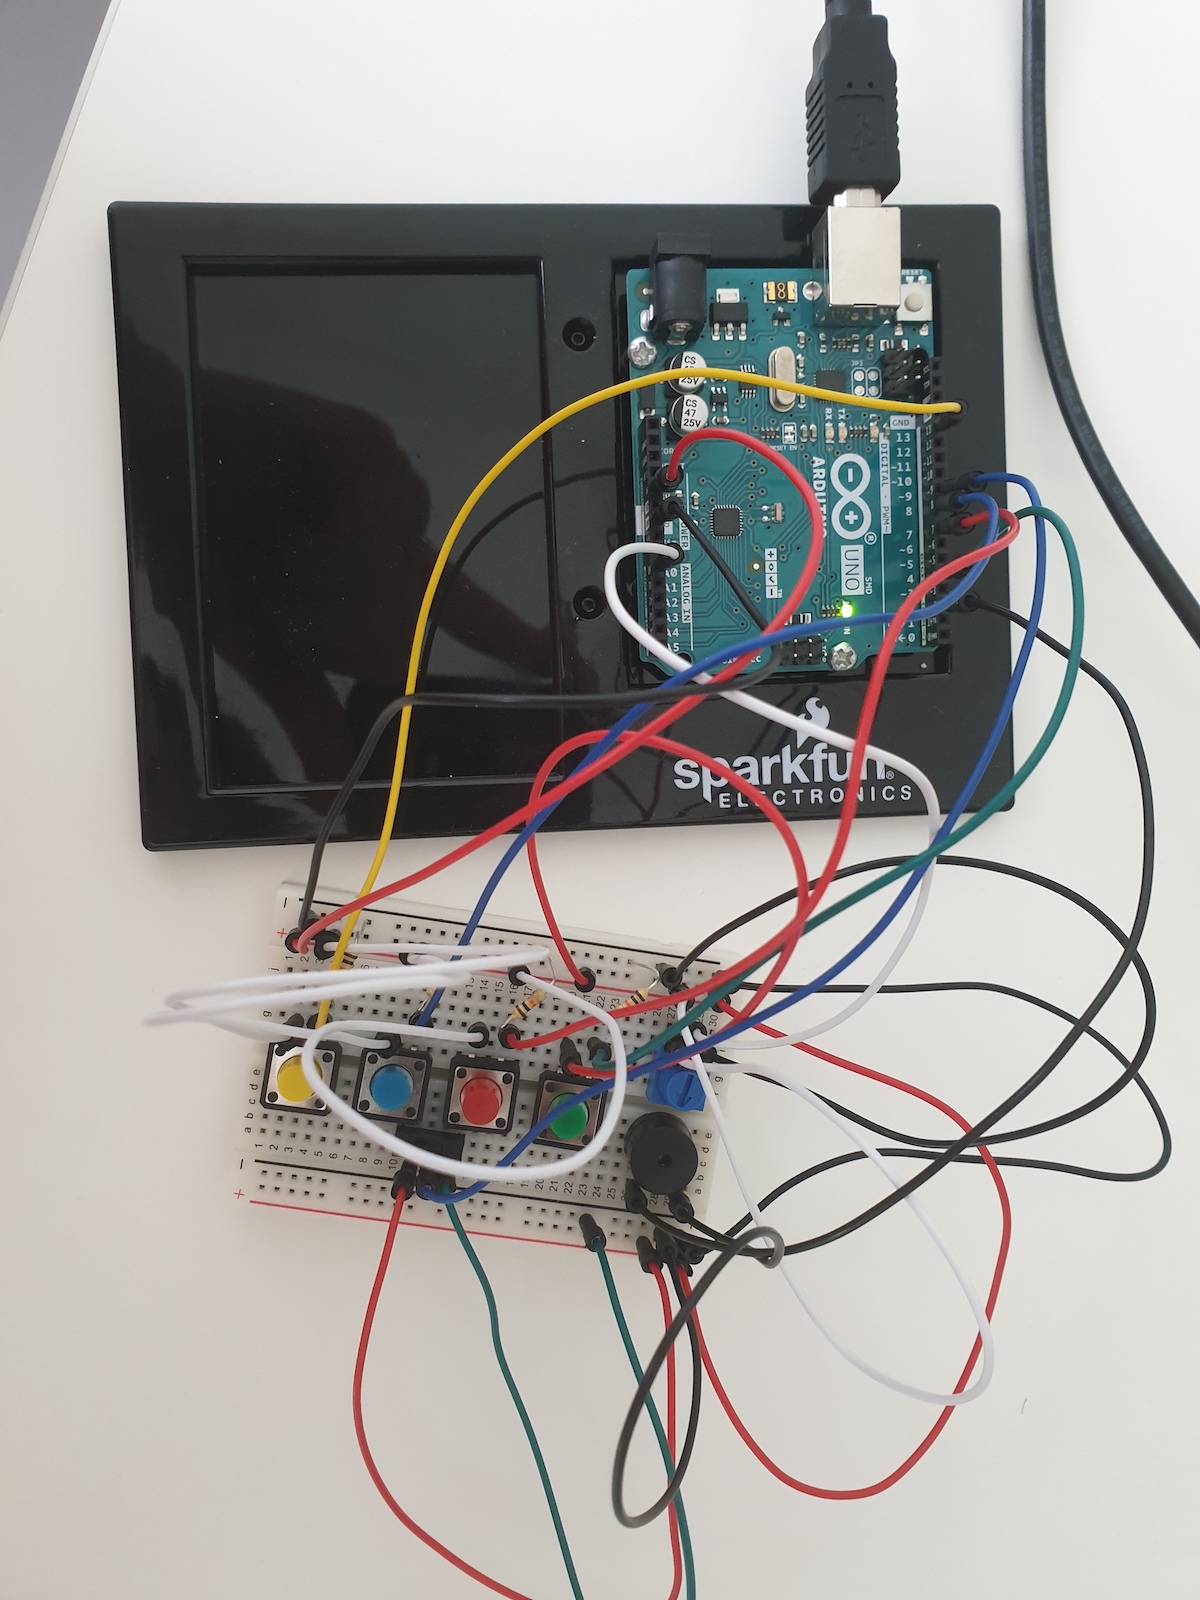
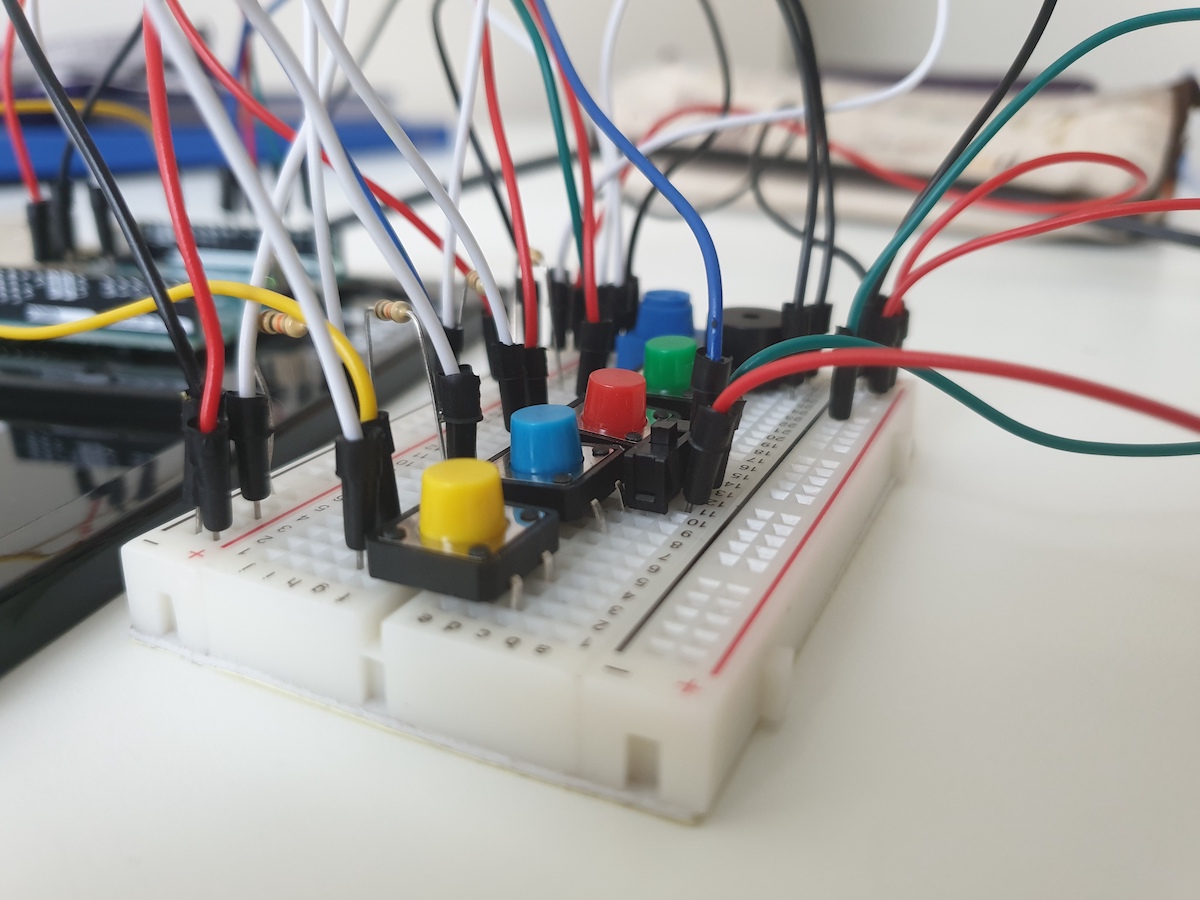
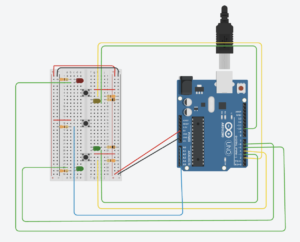
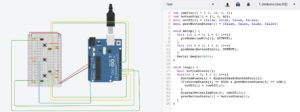
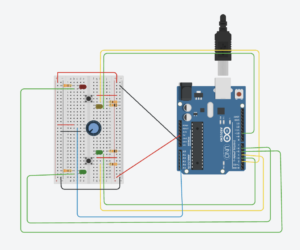
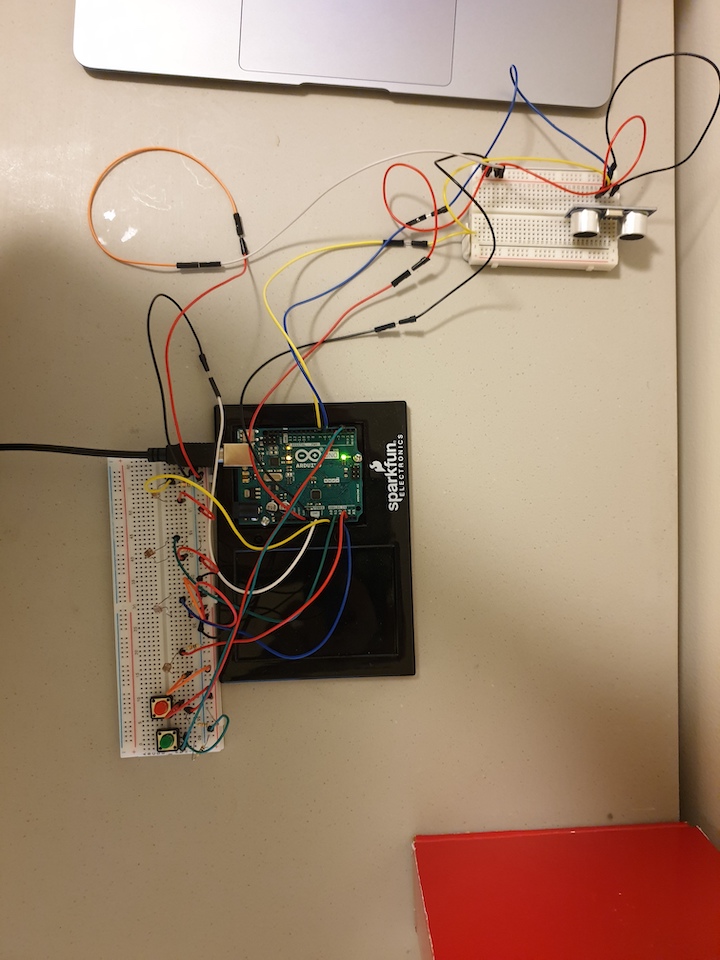
Then, I started focusing on connecting the Arduino and implementing the Arduino board. I used simple features from the Arduino but they certainly did add great ways to make the application interactive. The parts I used were the photocells, buttons, and the distance measuring device.  I was just able to get a total of 4 photocells. These represented the tiles in the piano. Because I wanted to create a full piano and using only 4 notes did not help, I decided to use the distance measuring device. According to the distance measured, the piano would be changing location and therefore this would affect the notes being played by the tiles. Finally, the buttons were used to access the recording and playing part. One of the buttons recorded and stopped recording while the other played the recorded file. I could not add another button to represent the deleting part but this part can be performed with a keyboard key.

Finally, I focused on the design of the piano because I did not want to keep the application with basic rectangles and circles. I decided to draw and create all the designs including the tiles and backgrounds. This was done with several applications including Procreate, Affinity Designer, and Adobe Illustrator. 

Challenges

One of the main challenges encountered was in the sound files part. The files were really large in size and included parts that were not entirely necessary. Therefore I had to crop and edit some of the files because some of them were around a minute long. For notes on a piano, I did not need an entire minute. Since I wanted to shorten the file size and duration, I had to edit a total of 88 sound files in GarageBand. While doing the project I also realized that the beginning parts also needed to be edited. This was because, for the sound files, the actual sound did not start right away at the beginning of the file. This made several of my notes sound as if the application was lagging since the sound would be performed seconds after the tile was played.

Another challenge I encountered was with the part for the tiles. Since the piano consists of black and white tiles positioned differently across the piano. I had to create a way to recognize if a tile was black or white and according to this change the position of the tiles. This was challenging because although the piano tiles follow a pattern, the pattern is really complicated. For example, a pattern consists of 7 white tiles with 5 black tiles with black tiles separated as 2 and 3 tiles. 

Finally, another main challenge I encountered was in the part where I had to connect the Arduino and Processing. I was not completely confident in using both together and therefore it took me some time to figure out some of the parts to connect this. 


Areas of Improvement

There were several parts that I wanted to improve in my project. First, I want to possibly add new features to the free play piano. Some of the features in the piano are not functioning perfectly as I wanted although they are functioning. For example, for the selection of a specific part to add a note, this has to be selected AND deselected to be able to select another part. Also, I wanted to create a part where I could print or pop up a message for certain errors. For example, each “part” in the piano cannot contain more than 6 notes that are played at the same time. I wanted to print a message to represent this part when a user would try to record more than 6 notes in the same “part”. Another area of improvement was implementing the deleting button in the Arduino as mentioned in the Process part. 


How the App works

  • The first part includes the initial part where the user must press the start button to begin the application
  • The 4 photocells represent 4 tiles in the piano. The keys to be played are represented by colored lines around the tile. 
  • The red button is used to Start Recording. Once it is pushed, it must be pushed again to stop recording.
  • The Green button is used to play the record.
  • The distance measuring device represents the position of the keys represented by the photocells. When this device is altered, the position will be changed on the screen accordingly.
  • A user can select a specific part within a record to add a note in the part. To select another part, the user must deselect the previous part
  • A user can delete several notes at the same time by selecting the notes and pressing the ‘l’ key on the keyboard.
  • A user can also travel through the recording by using the ‘q’ and ‘w’ keys. The ‘q’ key is used to move the note part to the left while the ‘w’ key is used to move the key part to the right. 

Conclusion

I was very proud to see my project completed because I dedicated a lot of time and effort to this. The code of the application resulted to be much longer and challenging than I expected. I really liked this project because I think it really represents my work. Starting from the ideas, the sound files, and the design, all components were created or edited by me. Although I could not implement my second idea, I really liked how the project turned out to be. I think it also includes an interactive part through the use of photocells and the distance measuring device. Overall, I really enjoyed working on this project and although it took me much more time and effort than I expected I think I was able to learn new skills and improve certain techniques within coding in general and applications such as Arduino and Processing.

Code Files:

IM_Final_Arduino


Week 14 Final Progress.

Summary:

For this week’s progress, the original plan was to accomplish at least 70% of the production of the project without counting the aesthetic part. However, while working on the project, there were several challenges that I encountered and currently, about 50% of the project is completed. I have started and almost completed the general function of the piano and also started implementing basic features that do not take that much time.

Progress:

import ddf.minim.*;
import processing.sound.*;
Game game;
String filename;
Minim minim;
AudioPlayer[] notes = new AudioPlayer[89];
int phase = 0;


void setup()
{
  size(910, 700);
  minim = new Minim(this);
  for (int i = 1; i < 89; i++){
      filename =  i + ".mp3";
      notes[i] = minim.loadFile(filename);
  }
  game = new Game(notes);
}

void draw(){
  game.drawGame();
  if(keyPressed)
  {
    if(key == 'd')
    {
      println('d');
      game.play0(); 
    }
    else if(key == 'f')
    {
      println('f');
      game.play1();
    }
    else if(key == 'g')
    {
      println('g');
      game.play2();
    }
    else if(key == 'h')
    {
      println('h');
      game.play3();
    }
    
  }
}


void keyPressed()
  {
    if(key == CODED)
    {
      if(keyCode == RIGHT)
      {
        game.moveright();
      }
      else if(keyCode == LEFT)
      {
        game.moveleft();
      }
      else if(keyCode == 'd')
      {
        println("here");
      }
      else if(key == 'f')
      {
        println("here");
      }
      else if(key == 'g')
      {
        println("here");
      }
      else if(key == 'h')
      {
        println("here");
      }
    }
  }
  
  void mouseClicked()
  {
    game.mouseClicked();
  }
class Game{
  Tile[] tilearray = new Tile[89];
  int screenx, screeny;
  int numoftiles = 89;
  Minim minim;
  AudioPlayer[] notes;
  int screenPosition;
  int whitekeys = 0;
  int blackkeys = 0;
  int screen = 0;
  int screenvelo = 120;
  int position = 0;
  Tile[][] notearray = new Tile[22][4];
  boolean isrecording;
  int phase = 0;
  Record record = new Record();
  
  Game(AudioPlayer[] sound){
    notes = sound;
    for( int i = 1; i < numoftiles; i++){
      if(i == 2 || (i - 5)%12 == 0 || (i - 7)%12 == 0 || (i - 10)%12 == 0 || (i - 12)%12 == 0 || (i - 14)%12 == 0)
      {
        tilearray[i] = new Tile(i, notes[i], 1, blackkeys);
        blackkeys++;
      }
      else{
        tilearray[i] = new Tile(i, notes[i], 0, whitekeys);
        whitekeys++;
      }  
    }
    int j = -1; 
    int k = 0;
    for(int i = 1;  i < numoftiles; i++)
    {
      if( (i-1)% 4 == 0)
      {
        j++;
      }
      k = (i - 1)%4;
      notearray[j][k] = tilearray[i];
    }
  }
  
  void moveright()
  {
    if(screen < 2540)
    {
      println(screen);
      position++;
      screen += screenvelo;
      for( int i = 1; i < numoftiles; i++)
      {
        tilearray[i].position(screen);
      }
    }
  }
  
  void moveleft()
  {
    if(screen > 0)
    {
      screen -= screenvelo;
      position--;
      for( int i = 1; i < numoftiles; i++)
      {
        tilearray[i].position(screen);
      }
    }
  }
  
  void play0()
  {
    notearray[position][0].playtile();
  }
  
  void play1()
  {
    notearray[position][1].playtile();
  }
  
  void play2()
  {
    notearray[position][2].playtile();
  }
  
  void play3()
  {
    notearray[position][3].playtile();
  }
   
  void indicators()
  {
    color c = color(255, 0, 0);
    for(int i = 0; i < 4 ; i++)
     {
       notearray[position][i].indicator(c);
     }
  }
  
  void startrecord()
  {
    if(isrecording == false)
    {
      isrecording = true;
    }
  }
 
  void mouseClicked()
  {
    
  }
   
  void drawGame()
  {
    for( int i = 1; i < numoftiles; i++){
      tilearray[i].drawtile();
    }
    indicators();
  }
}
class NotePlay{
  float posx, posy;
  AudioPlayer sound;
  boolean isSelected;
  int posinarray;
  
  NotePlay(AudioPlayer note, int position)
  {
    sound = note;
    posinarray = position;
  }
  
  void playNote()
  {
    stroke(255); //Change to yellow or other color
    sound.play(0);
    stroke(0);
  }
  
  
  void drawNote()
  {
   //circle();
  }
 
}
class Record{
  int size, capacity;
  NotePlay[] record;

  
  Record()
  {
    capacity = 20;
    size = 0;
    record = new NotePlay[capacity];
  }
  
  void addNote(AudioPlayer sound)
  {
    if(size + 1 == capacity)
    {
      capacity *= 2;
      NotePlay[] copy = new NotePlay[capacity];
      for( int i = 0; i < size; i++)
      {
        copy[i] = record[i];
      }
      record = copy;
    record[size] = new NotePlay(sound, size);
    size++;
    }
  }
  
  void deleteNote(int position)
  {
    
  } 
}
class Tile{
  float type, number;
  float x, y;
  float tilew, tileh;
  AudioPlayer sound;
  AudioPlayer[] notes = new AudioPlayer[88]; 
  int keytype;
  color c;
  float xposition;

  
  Tile(int num, AudioPlayer note, int type, int xpos){
    keytype = type;
    if(keytype == 0)
    {
      tilew = 65;
      x = xpos * tilew;
      tileh = 330;
      c = color(255);
      
    }
    else
    {
      if(xpos == 0)
      {
       tilew = 50; 
       x = xpos + (tilew/2);
      }
      else
      {
        tilew = 50; 
        if(xpos%5 == 1)
        {
          x = 3 + 7*(xpos/5);
          
        }
        else if(xpos%5 == 2)
        {
          x = 4 + 7*(xpos/5);
          
        }
        else if(xpos%5 == 3)
        {
          x = 6 + 7*(xpos/5);
          
        }
        else if(xpos%5 == 4)
        {
          x = 7 + 7*(xpos/5);
        }
        else if(xpos%5 == 0)
        {
          x = 8 + 7*((xpos/5)-1);
          //println(x);
        }
        //x++;
        x *= 65;
        x -= tilew/2;
        println(x);
        
      }
      tileh = 250;
      c = color(100);  
    }
    y = 300;
    sound = note;
    xposition = x;
  }
  
  void playtile(){
    if( game.isrecording == true)
    {
      game.record.addNote(sound);
    }
    sound.play(0);
  }
  
  void position(int screenposition){
    xposition = x - screenposition;
  }
  
  void indicator(color c1)
  {
    stroke(c1);
    noFill();
    rect(xposition, y, tilew, tileh);
  }
  
  void drawtile(){
    stroke(0);
    fill(c);
    rect(xposition, y, tilew, tileh);
  }
}

Progress Work:

I have started working on the general look of the piano. Also, I have implemented the basic functions of a piano such as playing the notes and traveling through the piano. The files for the notes have been all uploaded. The selection for the notes being played has also been implemented. Finally, I have been working on creating the recording feature of the piano.

Challenges:

For this week’s progress, the main challenge was finding and uploading the files for each note. This process took me much longer than I expected. The process required work for more than one day. This was because I could not find files for piano notes. When I finally did, the files required editing. I edited (cropped, change format). This process was much longer because I had to edit a total of 88 files. Another challenge I faced was ordering the tiles to resemble the form of a piano. This part is not 100% accomplished but it is only missing one part. This process required calculation for the position of the keys because pianos have both white and black keys and are distributed unevenly throughout.

Plan:

My plan for accomplishing this project on time includes finishing the technical aspect for this Friday. (All coding in Processing and Arduino). Then work on the aesthetic part on Saturday and Sunday so that I can accomplish finishing this project on time.

Week 13 Final Project Progress

Summary:

For this week, I decided to work on planning for my project and organizing my thoughts to see if my project was achievable. Honestly, I did not. had much time this week to start the coding part of my project so I decided to think about what different things I should implement.

Game:

My game mainly consists of two parts. The first part will be a free piano play where the user can record, edit, delete, move notes to compose a musical piece. The second part of the game is an actual game where notes will be falling above piano tiles and the user must push the button representing the tile. For this game, I had decided to only implement buttons and the potentiometer to control the position of the piano. However, after Prof. Aaron’s suggestion about making it more interactive, I decided to implement additional features. I will be using the ultrasonic sensor and a box to represent the position of the user in the piano instead of the potentiometer. I will also use additional features such as the photosensor, LED lights, and buttons.

Progress for this week.

For this week basically, I created sketches of what my goal for my final project is. I created sketches for the basic look of the game for both phase 1 and phase 2. I also organized my thoughts and wrote down what I thought was necessary for the game. I created a document where I wrote about what different classes were needed to create this project. I also created a brief sketch of what my initial screen should look like.

Conclusion and Reflection:

Honestly, this week I could not accomplish much on my project. I am proud that I organized my thoughts and started thinking about how Arduino and Processing should interact as well as planning what the general game should look like. I am not satisfied with this week’s progress and therefore I plan on working much more this week. For this week, my plan is to accomplish the first phase of the game and have good progress on the second part so that I can work on the aesthetic part of the game next week.


Preliminary Concept for Final Project

Concept:

Recreate a piano game using both processing and Arduino. I would like to create a piano interface that would be visually available on the screen of the computer through processing. The input from the user would be through the Arduino where pushing differing buttons will play different notes and the potentiometer will allow accessing different parts of the piano. The visual part of the piano would also change according to the position of the potentiometer.

Specific Features:

I would like to implement two main modes for the game.

  1. The first mode would be a free piano play. Basically, this game mode will allow the user to explore through the piano. Record what is played and edit a final composition.
  2. The second mode would be more like a game where the user will have to play the notes according to what the screen displays. Basically, the game will consist on notes(balls) falling on specific notes to which the user must push a specific button to resemble he/she playing that specific note. The game will also include lives which will be recorded by led lights on the Arduino. The user will lose a life if he/she pushes the incorrect button or fails to push it on time.

This idea was inspired from a game called Smule on the iPad/iPhone

Week 11 (3 Tasks)

Task 1:

Arduino:

//int left = 0;
//int right = 0;
int brightness = 0;

void setup() {
  Serial.begin(9600);
  Serial.println("0,0");
  pinMode(2, OUTPUT);
  pinMode(5, OUTPUT);
}
 
void loop() {
  while (Serial.available()) {
    right = Serial.parseInt();
    left = Serial.parseInt();
    if (Serial.read() == '\n') {
      digitalWrite(2, right);
      digitalWrite(5, left);
      int sensor = analogRead(A0);
      delay(1);
      int sensor2 = analogRead(A1);
      delay(1);
      Serial.print(sensor);
      Serial.print(',');
      Serial.println(sensor2);
    }
  }
}

Processing:

import processing.serial.*;
Serial myPort;
int xPos=0;
int yPos=0;
boolean onOff=false;
boolean onOff2=false;


void setup(){
  size(960,720);
  printArray(Serial.list());
  String portname=Serial.list()[3];
  println(portname);
  myPort = new Serial(this,portname,9600);
  myPort.clear();
  myPort.bufferUntil('\n');
}
 
void draw(){
  background(255);
  ellipse(xPos,yPos,30,30);
  if (mousePressed){
    if(mouseX<=width/2)
      onOff2=true;
    else
      onOff=true;
  }else{
    onOff=onOff2=false;
  }
}
 
void serialEvent(Serial myPort){
  String s=myPort.readStringUntil('\n');
  s=trim(s);
  if (s!=null){
    println(s);
    int values[]=int(split(s,','));
    if (values.length==2){
      xPos=(int)map(values[0],0,1023,0, width);
      yPos=(int)map(values[1],0,1023,0, height);
    }
  }
  myPort.write(int(onOff)+","+int(onOff2)+"\n");
}

Task 2

Arduino:

int right = 0;
int brightness = 0;

void setup() {
  Serial.begin(9600);
  Serial.println("0,0");
  pinMode(2, OUTPUT);
  pinMode(5, OUTPUT);
}
 
void loop() {
  int sensor2 = analogRead(A1);
  Serial.println(sensor2);
  while (Serial.available()) {
    brightness = Serial.parseInt();
    if (Serial.read() == '\n') {
      analogWrite(5, brightness);
      int sensor = analogRead(A0);
      delay(1);
      int sensor2 = analogRead(A1);
      delay(1);
      Serial.print(sensor);
      Serial.print(',');
      Serial.println(sensor2);
    }
  }
}

Processing:

import processing.serial.*;
Serial myPort;
int xPos=0;
int yPos=height/2;
boolean onOff=false;
boolean onOff2=false;
int brightness = 0;


void setup(){
  size(960,720);
  printArray(Serial.list());
  String portname=Serial.list()[3];
  println(portname);
  myPort = new Serial(this,portname,9600);
  myPort.clear();
  myPort.bufferUntil('\n');
}
 
void draw(){
  background(255);
  ellipse(xPos,yPos,30,30);
  if (mousePressed){
    if(mouseX<=width/2)
      onOff2=true;
    else
      onOff=true;
  }else{
    onOff=onOff2=false;
  }
//Brightness is added
  brightness = (int)map(mouseX, 0, width, 0, 255);
}
 
void serialEvent(Serial myPort){
  String s=myPort.readStringUntil('\n');
  s=trim(s);
  if (s!=null){
    println(s);
    int values[]=int(split(s,','));
    if (values.length==2){
      xPos=(int)map(values[0],0,1023,0, width);
      yPos=(int)map(values[1],0,1023,0, height);
    }
  }
  myPort.write(int(onOff)+","+int(onOff2)+"\n");
  myPort.write(int(brightness)+"\n");
}

As mouse moves to right, brightness increases.

Task 3

Arduino:

int right = 0;

void setup() {
  Serial.begin(9600);
  Serial.println("0,0");
  pinMode(2, OUTPUT);
  pinMode(5, OUTPUT);
}
 
void loop() {
  int sensor2 = analogRead(A1);
  Serial.println(sensor2);
  while (Serial.available()) {
    brightness = Serial.parseInt();
    if (Serial.read() == '\n') {
      analogWrite(5, brightness);
      int sensor = analogRead(A0);
      delay(1);
      int sensor2 = analogRead(A1);
      delay(1);
      Serial.print(sensor);
      Serial.print(',');
      Serial.println(sensor2);
    }
  }
}

Processing:

import processing.serial.*;
Serial myPort;
PVector velocity;
PVector gravity;
PVector position;
PVector acceleration;
PVector wind;
float drag = 0.99;
float mass = 50;
float hDampening;
boolean onOff=false;
boolean onOff2=false;


void setup() {
  printArray(Serial.list());
  String portname=Serial.list()[3];
  println(portname);
  myPort = new Serial(this,portname,9600);
  myPort.clear();
  myPort.bufferUntil('\n');
  size(640,500);
  noFill();
  position = new PVector(width/2, 0);
  velocity = new PVector(0,0);
  acceleration = new PVector(0,0);
  gravity = new PVector(0, 0.5*mass);
  wind = new PVector(0,0);
  hDampening=map(mass,15,80,.98,.96);
}

void draw() {
  background(255);
  if (!keyPressed){
    //wind.x=0;
    velocity.x*=hDampening;
  }
  applyForce(wind);
  applyForce(gravity);
  velocity.add(acceleration);
  velocity.mult(drag);
  position.add(velocity);
  acceleration.mult(0);
  ellipse(position.x,position.y,mass,mass);
  if (position.y > height-mass/2) {
      velocity.y *= -0.9;  // A little dampening when hitting the bottom
      position.y = height-mass/2;
      onOff = true;
    }
  else{
    onOff = false;
  }
}
  
void applyForce(PVector force){
  // Newton's 2nd law: F = M * A
  // or A = F / M
  PVector f = PVector.div(force, mass);
  acceleration.add(f);
}

void keyPressed(){ //LEFT AND RIGHT ARE NOT USED ANYMORE
  if (key==' '){
    mass=random(15,80);
    position.y=-mass;
    velocity.mult(0);
  }
}

void serialEvent(Serial myPort){
  String s=myPort.readStringUntil('\n');
  s=trim(s);
  if (s!=null){
    println(s);
    int values[]=int(split(s,','));
    if (values.length==2){
      wind.x=(int)map(values[0],490,800,-1, 1);
    }
  }
  myPort.write(int(onOff)+"\n");
}

Week 11: Musical Instrument

Description:

This project consisted of creating a musical instrument using Arduino

Idea:

My initial idea was to create a piano with various features. I was thinking of using four buttons to resemble the piano keyboard, using the photoresistor to control the volume, use a knob to “travel through the keyboard” or change the keys played in the button, and using the bell curve technique when playing the buttons. However, I realized I had no method of controlling the volume emitted, and therefore I could not implement the photoresistor and the bell curve technique I had in mind. After careful thought, I decided to implement the buttons for the keyboard, the knob to change the keys, and a recorder that registers what has been played.

Challenges:

The first challenge I encountered was with the buttons themselves. I had to try for more than an hour to make the buttons work. However, I later realized that the real problem was in the physical Arduino instead of the code. Another problem I faced was with the recording part. I could manage to record the notes being played but the problem was that the notes were recorded 5-6 times each. I could solve this problem by allowing each button to play only once at a time. The problem was fixed but with the cost of not being able to play the same note more than one time in a row.

Process

For this project, first I started working with the physical Arduino. I connected all the buttons and the speaker. Then I started coding and attempted at creating and producing sounds through the speaker whenever a button was pressed. The speaker was making only two sounds and was making them continuously so I worked on solving this problem. I realized the problem was with the physical Arduino so I had to solve this problem first. Then I implemented the knob to play different parts of the piano. I stored the notes in a 2D array where there were 22 columns representing multiple parts of the piano and controlled by the knob, and 4 rows controlled each by a button. After this was working I tried to use a switch to power on or power off the piano. It worked and then I tried to use the recording part. This was accomplished by storing the notes played into a single array and then playing this array when the switch is changed to “off”.

#include "pitches.h"


const int buttonPin[4] = {13, 8, 7, 4};
bool prevButtonState[4] = {LOW, LOW, LOW, LOW};
const int tonePin = 2;
const int knobPin = A0;
int powerswitch = 9;
int button= 5;
int replay[100] = {};
int j = 1;
int prevbutton = 5;


long timer = 0;
int timerLength = 75;


//=======================================

int notes[22][4] = {{NOTE_B0, NOTE_C1, NOTE_CS1, NOTE_D1}, {NOTE_DS1, NOTE_E1, NOTE_F1, NOTE_FS1}, {NOTE_G1, NOTE_GS1, NOTE_A1, NOTE_AS1}, 
                    {NOTE_B1, NOTE_C2, NOTE_CS2, NOTE_D2}, {NOTE_DS2, NOTE_E2, NOTE_F2, NOTE_FS2}, {NOTE_G2, NOTE_GS2, NOTE_A2, NOTE_AS2}, 
                    {NOTE_B2, NOTE_C3, NOTE_CS3, NOTE_D3}, {NOTE_DS3, NOTE_E3, NOTE_F3, NOTE_FS3}, {NOTE_G3, NOTE_GS3, NOTE_A3, NOTE_AS3}, 
                    {NOTE_B3, NOTE_C4, NOTE_CS4, NOTE_D4}, {NOTE_DS4, NOTE_E4, NOTE_F4, NOTE_FS4}, {NOTE_G4, NOTE_GS4, NOTE_A4, NOTE_AS4},
                    {NOTE_B4, NOTE_C5, NOTE_CS5, NOTE_D5}, {NOTE_DS5, NOTE_E5, NOTE_F5, NOTE_FS5}, {NOTE_G5, NOTE_GS5, NOTE_A5, NOTE_AS5},
                    {NOTE_B5, NOTE_C6, NOTE_CS6, NOTE_D6}, {NOTE_DS6, NOTE_E6, NOTE_F6, NOTE_FS6}, {NOTE_G6, NOTE_GS6, NOTE_A6, NOTE_AS6}, 
                    {NOTE_B6, NOTE_C7, NOTE_CS7, NOTE_D7}, {NOTE_DS7, NOTE_E7, NOTE_F7, NOTE_FS7}, {NOTE_G7, NOTE_GS7, NOTE_A7, NOTE_AS7}, 
                    {NOTE_B7, NOTE_C8, NOTE_CS8, NOTE_D8}};


void setup(){
  for( int i = 0; i < 4; i++){
    pinMode(buttonPin[i], INPUT);
  }
  pinMode(tonePin, OUTPUT);
  pinMode(powerswitch, INPUT);
  Serial.begin(9600);
}


void loop(){
  bool buttonState[4];
  int knobValue = analogRead(knobPin);
  int mappedValue = map(knobValue, 0, 1023, 0 ,22);
  bool powerSwitchState = digitalRead(powerswitch);

  if(powerSwitchState == HIGH){
    delete replay;
    for(int i = 0; i < 4; i++){
    buttonState[i] = digitalRead(buttonPin[i]);
      if( buttonState[i] == HIGH && prevButtonState[i] == LOW){
        button = i;
        prevbutton = i;
        replay[j] = notes[mappedValue][button];
        prevButtonState[i] = buttonState[i];
        for (int a = 0; a < 4; a++){
          if(a == i){
            continue;
          }
          else{
            prevButtonState[a] = LOW;
          }
        }
        j++;
        break;
      }
      
      if(button < 5){
        tone(tonePin, notes[mappedValue][button], 300);
        
      }
      button = 5;
    }
  }
  //Serial.println("ENDENDEND");
  else if(powerSwitchState == LOW){
    for(int k= 1; k <= j; k++){
      delay(300);
      tone(tonePin, replay[k], 200);
    }
  }
  Serial.println(mappedValue);
}


Conclusion:

I had to spend a lot of time on this project and when I first started I did not have in mind the part of recording what is played. Overall I was very proud of the outcome of this project. I did not expect it to result in this. Specifically, the recording idea was the part that I liked the most. This project made me learn to always keep in mind the importance of the physical Arduino and always double-check if everything is connected well.


Week 9 : Digital and Analog

Description:

This project consisted of using creativity to implement a digital and an analog sensor in the Arduino to represent something.

Idea:

For this assignment, I decided to simulate a VAR system in soccer. The VAR stands for Video Assistance Referee and it is a system in soccer that checks for the repetition of a play. The main referee in the game can request a VAR check if he/she is not sure of a play. Humans are not perfect and referees make mistakes; therefore it is essential to implement the VAR in soccer games. However, this system was created recently. I remember a game in the World Cup 2014 where Mexico faced the Netherlands. Mexico lost the game 2-1 because of a play that conceded a penalty to the Netherlands. However, several repetitions demonstrated that a penalty should not have been awarded. If VAR had existed in this game, maybe the results would have been different.

Challenges:

For this project, the main challenge was understanding and working with Arduino code. Since I am not familiar with the functions in Arduino I faced several challenges trying to figure out what was wrong with my code. Also, another challenge was making sure everything in the Arduino was connected properly. I spent a lot of time figuring out why my code didn’t work and ended up realizing I had misplaced the wires when connecting the knob. Also checking for wires is a challenge because there is a lot of content in the breadboard and Arduino that it gets unorganized and confusing.

Process:

I first started using TinkerCad to simulate my project. First I connected what was necessary, then I replicated this image into the real breadboard and Arduino. After making sure everything was connected as planned I started coding. First, I wanted to use three buttons and one knob. My idea was to implement a button with the knob so that the knob would be working only if the button was pressed and would stop working if the button was pressed once again. After spending some hour trying to figure this out, I gave up and decided to use only one knob. For this reason, I had to use only one of the LEDs(red one) in the VAR which is controlled by the knob. After coding everything, I tried the code on the model I had on TinkerCad. If something was not working, then I checked my code and my model until the outcome gave me something I wanted. When I finally completed the model in TinkerCad I implemented the same exact thing on my breadboard and Arduino Code. Finally, I also edited and printed some images to represent the soccer match.


Conclusion:

Overall I had a lot of fun with this project. I think this assignment was very different from previous assignments because we actually got to work with something physical. Although I failed to accomplish my initial plan, I am proud of the final outcome. I really enjoyed working on this project, especially the part where I get to connect things in the Arduino and Breadboard. I think I have learned a lot and I have a better idea of how several concepts work in the Arduino.

int ledPin[4] = { 10, 3, 5, 6};
int buttonPin[3] = {2, 4, 12}; 
bool onOff[4] = {false, false, false, false};
bool prevButtonState[3] = {false, false, false};
int scoreMex = 0;
int scoreNed = 0;
int knobPin = A0;
int knobState = false;

void setup() {
  for( int i = 0; i < 4; i++){
    pinMode(ledPin[i], OUTPUT);
  }
  for( int i = 0; i < 3; i++){
    pinMode(buttonPin[i], OUTPUT);
  }
  pinMode(knobPin, INPUT);
  Serial.begin(9600);
}

void loop() {
  bool buttonState[3];
  int knobValue = analogRead(knobPin);
  int mappedValue = map(knobValue, 0, 1023, 0, 255);
  for(int i = 0; i < 2; i++){
    buttonState[i] = digitalRead(buttonPin[i]);
    if(buttonState[i] == HIGH && prevButtonState[i] == LOW){
      onOff[i] = !onOff[i];
      if( i == 0 && onOff[0] == true){
        scoreNed++;
        Serial.print("Netherlands Score");
      }
      if( i == 1 && onOff[1] == true){
        scoreMex++;
        Serial.print("Mexico Score");
      }
    }
    Serial.println("Netherlands\tMexico");
    Serial.println(scoreNed + "\t:\t" + scoreMex);
    digitalWrite(ledPin[i], onOff[i]);
    prevButtonState[i] = buttonState[i];
  }
  analogWrite(ledPin[3], mappedValue);
                      
}

Week 7: Midterm Project Sorting Game

Description:

This project consisted of creating a game for our midterm assignment. The game had to include several elements such as shapes, images, sound, text, an initial screen with instructions, and a way to restart the game when the game is lost or won.

Process:

Idea:

I had several ideas when I first started thinking about this assignment. One of my initial ideas was to work on the game I had been working on before in Week 3. The game consisted of a car trying to avoid obstacles by using the left and right arrow keys. However, I wanted to challenge myself and create a game from scratch. First, I thought about recreating an old retro game. Then I changed my mind to create a “Whack a Mole” game. Finally, I remembered a game I used to play when I was a child. This game was a mini-game from Mario Bros on the Nintendo called “Sort or Splode”. The game consisted of sorting different colored bombs into their own color platforms. If a bomb was not sorted on time it would explode and the game would be over. If a bomb was placed on the wrong platform, the game woul


d also be over. Since I was recreating a game, I decided to include the creativity part in the visual part of the game. I decided to create my own background and characters and base them on an NYU theme. The idea was to sort falcons and bobcats into different platforms that represent NYU and NYUAD. 

Initial Process:

Initially, I worked on creating a bomb class with its appropriate methods and attributes. Next, I focused on creating a game class with its methods and attributes. I also created a platform class but later realized that I did not need it. 

I first worked with simple shapes (circles) to see the movement of the bombs for my game. I had to create the release of the bombs first and create movement in them while making sure they do not pass the limits of the screen. After accomplishing the change of velocity direction whenever the circle touches a wall on the screen. Then I focused on adding platforms and making sure circles were also colliding and changing direction with the walls of the platform. Later, I focused on creating an array of bombs and creating instances of the class using the frameCount. 


After accomplishing the basic structure of the game, I focused on making different types of bombs and confirming they were placed on the correct platform. Later, I focused on identifying a game loss and finally speeding up the release of the bombs. 


The final process was making the initial screen and creating a way to start the game or see the instructions of the game. 


Using vectors:

When I first started working on the project, I started using individual variables for the velocity and position in the x and y-axis. However, after researching how to make objects collide, I became aware of the existence of a data type called PVector. After looking through the reference guide in Processing, I decided that using PVectors was much simpler than using different variables. Later, I got a better understanding in class when we worked on physics and coding. 


Designing part:

I decided to create my own designs for the background, initial screen, and characters. I first worked on creating the background. I decided to make the background look similar to the original game but with a different theme. The platform design was also inspired by the original platform design in the original game. For the characters, I first started by drawing a circle because I needed the characters to be based on a circle as I initially coded the game to recognize characters as circles. The characters, in this case, had a radius, and therefore designing them as circles were crucial to making the game work. The process of design was difficult because I had to create each element from scratch. For the characters, I only used real images for reference and the rest was completely designed by me.

Challenges:

There were several challenges I encountered while creating this game. Some of the major ones were:


Detecting the walls of the platform:

When I first started coding the collisions of the bombs and the platform, a part of the bomb was passing through the platform. I had difficulties in fixing this because every time I tried a different solution something wrong came up. For example, sometimes the bomb range was not covering all the space available, sometimes the bombs entered the platform and the game was ended, sometimes the change in direction of the bombs was not working. After several trials, I managed to fix this problem by looking through the code and figuring out what was wrong with the dimensions.


Detecting collisions between bombs:

When I first designed this game, I wanted to make collisions between the bombs so that when the player grabs a bomb, the mouse does not accidentally grab two objects at the same time. After some research in physics and collisions, I gave up on understanding this concept to implement so I decided to revert the velocity direction if a collision was detected. This was working fine at the beginning of the game but I realized problems when there were several instances of the bomb within the screen. Later, I changed the code of the game so that objects could overlap but the mouse could only grab one object at a time. This was the best solution I had approached. 

Design

The design process was more difficult than I first thought it would be. Creating the characters and calculating the spaces for the background was a challenge. I had to spend more time than I anticipated because sometimes the location of certain objects in backgrounds would not match with the code. There were also certain objects I created but did not use because I did not end up liking the background with such objects.


Conclusion:

I personally really enjoyed the creation of this game and I want to continue making it a better game. I spent a good amount of time making the code work and designing the visual part. At first, I thought it was a simple game to make but it actually ended up being more complicated than I thought it would be. The interaction of the game came out exactly as I wanted and I was satisfied with the visual part of the game. Still, there are certain parts that I would like to change in the future. First, the ending screens for the win and lose of the game are not visually appealing as I did not have the time to create a background for each. I also want to create a level system for the game in the future to make it more challenging. The game indicates a win after 90 bombs are sorted. Finally, one thing I would definitely implement is the part where a function calculates the time the bomb has not been sorted. Although there is a function that identifies if a bomb has not been sorted for a long time and ends the game, I would like to add something to have the player identify unsorted bombs such as making bombs blink or change color or size. Still, I think I am proud of the outcome of this project and I look forward to creating more game projects in the future. 

import processing.sound.*;
SoundFile sound;
int mode = 0; //Determines the mode of the background;
Game game;
Platform platform1, platform2;
boolean locked = false;
int score;
Screen screen;

void setup(){
  sound = new SoundFile(this, "soundfile.mp3");
  
  size(900, 600);
  frameRate(60);
  game = new Game();
  sound.loop(); //SOUND REQUIREMENT
}

void draw(){
  background(130);
  game.drawGame();
  
}
  
  
void mouseReleased(){
  game.checkrelease();
}
Bomb(){
    img[0] = loadImage("img1.PNG");
    img[1] = loadImage("img0.PNG");
    img[1].resize(60,60);
    img[0].resize(70,60);
    platformnum = 0;
    condition = 1;
    x = width/2;
    y = 40;
    velox = 0;
    veloy = random(1, 3);
    typecolor = (int)random(1, 3);
    typeplatform = typecolor;
    correctplat = typecolor;
    position = new PVector(x, y);
    velocity = new PVector(velox, veloy);
    radius = 40;
    plat1x = 0;
    plat2x = 600;
    platy = 150;
    platwidth = 300;
    platheight = 300;
    limitx1 = 300;
    limitx2 = width - 300;
    limity1 = 150;
    limity2 = height - 150;
    upperlimit = 0;
    if(typecolor ==1){
      colorbomb = color(98, 0, 246);
    }
    else if(typecolor == 2){
      colorbomb = color(255);
    }
  }
  
  
  //=========================================================
  void move(){
    
    position.add(velocity);
    
    if( position.x > width - radius/2 ) 
    {
     position.x = width - radius/2;
     velocity.x *= -1;
    }
    else if (position.x < radius/2)
    {
     position.x = radius/2;
     velocity.x *= -1;
    }
    else if (position.y > height - radius/2)
    {
     position.y = height - radius/2;
     velocity.y *= -1; 
    }
    else if (position.y < upperlimit + radius/2 )
    {
     position.y = upperlimit + radius/2;
     velocity.y *= -1;
    }
     
     
  }
  //=========================================================
  //Function used to keep track of time each bomb is on screen
  void updatetimeonscreen(){
    if(inplat == false){
      if(frameCount % 100 == 0){
        timeonscreen++;
      }
    }  
  }
  
  //=========================================================
  //Function to determine whether bomb should explode and game over should be called
  void explode(){
    //TO fill
    if(actualplat != 0){ // Determines whether a bomb is in the wrong platform
      if(actualplat != correctplat){
        gameover = true;
      }
    }
    else if(timeonscreen == 20){ //Determines whether a bomb has been for too long on screen
      gameover = true;
    }
  }
   
  void updatetint(){
    
    
  }
  //=========================================================
  //Function to detect collisions and change direction if collision is made
  void collision(Bomb b){
    //TO fill
    
    if(dist(position.x, position.y, b.position.x, b.position.y) < radius){
      velocity.x *= -1;
      velocity.y *= -1;
      b.velocity.y *= -1;
      b.velocity.x *= -1;
    }
  }
  
  //=========================================================
  //Function to determine whether bomb collides with a platform
  void collisionwithplatform()
  {
    
   if( ((position.x + radius + velocity.x > plat1x &&
   position.x - radius/2 + velocity.x < plat1x + platwidth) ||
   (position.x + radius/2 + velocity.x > plat2x &&
   position.x + velocity.x < plat2x + platwidth)) &&
   position.y + radius/2 > platy &&
   position.y - radius/2 < platy + platheight)
   {
     velocity.x *= -1;
   }
   
   if( ((position.x + radius/2 > plat1x &&
   position.x - radius/2 < plat1x + platwidth) ||
   (position.x + radius/2 > plat2x &&
   position.x < plat2x + platwidth)) &&
   position.y + radius/2 + velocity.y > platy &&
   position.y - radius/2 + velocity.y < platy + platheight){
   
     velocity.y *= -1;
   }
  }
  
  //=========================================================
  //Function indicating mouse released after mouse grabs bomb
  void release(){
    velocity.x = (random(0, 4)-2);
    tempvelox = velocity.x;
    tempveloy = velocity.y;
  }
  
  //=========================================================
  //Function setting the upperlimit after bomb is initially released
  void upperlimsetter(){
    upperlimit = 60;
  }
  
  //=========================================================
  //Function ton 
  void checkinplat(){
   if(position.x > radius &&
   position.x < limitx1 &&
   position.y > limity1 &&
   position.y < limity2){
     platformnum = 1;
     condition = 2;
     inplat = true;
     draggedbomb = 0;
     actualplat = 2;
     
   }
   else if(position.x > limitx2 &&
   position.x < width &&
   position.y > limity1 &&
   position.y < limity2){
     platformnum = 2;
     condition = 2;
     inplat = true;
     draggedbomb = 0;
     actualplat = 1;
   }   
  }
  
  //=========================================================
  void movementaftermouse(){
    if(releasedbymouse == true){ 
    velocity.x = tempvelox;
    velocity.y = tempveloy;
    releasedbymouse = false;
    draggedbomb = 0;
    controlledbymouse = false;
    }
  }
  
  //=========================================================
  void movementinplatform(){
    switch(platformnum){
      
      case 1:
        if( position.x > 300 - radius/2 ) 
        {
         position.x = 300 - radius/2;
         velocity.x *= -1;
        }
        else if (position.x < radius/2)
        {
         position.x = radius/2;
         velocity.x *= -1;
        }
        else if (position.y > limity2 - radius/2)
        {
         position.y = limity2 - radius/2;
         velocity.y *= -1; 
        }
        else if (position.y < limity1 + radius/2 )
        {
         position.y = limity1 + radius/2;
         velocity.y *= -1;
        }
        break;
        
      case 2:if( position.x > width - radius/2 ) 
        {
         position.x = width - radius/2;
         velocity.x *= -1;
        }
        else if (position.x < 600 + radius/2)
        {
         position.x = 600 + radius/2;
         velocity.x *= -1;
        }
        else if (position.y > limity2 - radius/2)
        {
         position.y = limity2 - radius/2;
         velocity.y *= -1; 
        }
        else if (position.y < limity1 + radius/2 )
        {
         position.y = limity1 + radius/2;
         velocity.y *= -1;
        }
        break;
    }
      
  }
  //=========================================================
  void updatescore(){
   if(inplat == true && scoreyes == 1){
     game.score++;
     scoreyes = 0;
     
   } 
  }
  
  //=========================================================
  void drawbomb(){
    if(controlledbymouse == true){
      position.x = mouseX;
      position.y = mouseY;
    }
    updatetimeonscreen();
    // Drawing the circles
    imageMode(CENTER);
    image(img[typecolor-1], position.x, position.y);
    move();
    explode();
    checkinplat();
    updatescore();
    if(position.y > 50 && position.y< 54){
       release();
    }
    if(position.y > 65){
      upperlimsetter();
    }
    switch(condition){
      case 1:
        collisionwithplatform();
        break;
      case 2:
        movementinplatform();
        break;
    }
    if(gameover == true){
      game.gameover = true;
    }
  }


}
class Game{
  Bomb bombarray[]; // Array storing the number of bombs
  int i; // Variable that counts the number of bombs created
  int velobombs; //Variable determining the velocity of creation of bombs
  int score = 0; //Variable containing the score of the game
  PImage[] background = new PImage[3]; // Array storing the images for backgrounds
  PImage buttons[];// Array storing images for buttons
  int condition; //Variable containing the 
  int backgroundimg;
  int casenum; //Case number for screen function.
  String scoretext;
  boolean gameover; // Variable to determine game over
  boolean gamewin; //Variable to determine game win
  int backgroundnum; // Background image index from array
  boolean restart = false; // variable to verify if restart of the game is allowed or not
  
  Game(){
    bombarray = new Bomb[100];
    i = 0;
    velobombs = 200;
    condition = 0;
    background[2] = loadImage("background2.png");
    background[1] = loadImage("background1.png");
    background[0] = loadImage("background0.png");
    casenum = 0;
  }

  //=========================================================
  //Function to create new bombs
  void createbomb(){
    bombarray[i] = new Bomb();
    i++;
  }
  
  //=========================================================
  //Function to check release of bombs if mouse is released
  void checkrelease(){
    for(int j=0; j < i; j++){
       if(bombarray[j].controlledbymouse == true){
         bombarray[j].controlledbymouse = false;
         bombarray[j].release();
         break;
       }
    }
  }
  
  //=========================================================
  //Function checking for bomb collision
  void checkcollisions(){
   for(int j=0; j < i; j++){
     for(int k=j+1; k < i; k++){
       bombarray[j].collision(bombarray[k]);
     }
   }
  }
  
  //=========================================================
  //Function to control the bomb if grabbed
  void controlbomb(){
    for(int j=0; j<i; j++){
      if(bombarray[j].controlledbymouse == true){
        break;
      }
      else if(bombarray[j].inplat == false){
        if(dist(mouseX, mouseY, bombarray[j].position.x, bombarray[j].position.y) < bombarray[j].radius/2){
           bombarray[j].controlledbymouse = true;
           break;
            }
         }
      }
  }  


  //=========================================================
  //Function to draw the Game
  void drawGame(){
    if(backgroundnum < 3){
      background(background[backgroundnum]);
    }
    
    if( i >= 89){
      gamewin = true;
    }
    
    //Controlling bombs
    if(mousePressed ){
      controlbomb();
    }
    
    //Screen with actual gameplay
    //Having bomb releases
    if(backgroundnum == 1){
      if(frameCount%(velobombs) == 0 && i <= 89 && gameover == false){
        createbomb();
      }
      
      //Make the release of bombs faster
      if(frameCount%1000 == 0){
       velobombs -= 10; 
      }
      
      for(int j=0; j < i; j++){
        bombarray[j].drawbomb(); 
      }
      //printing the score
      textSize(32);
      fill(0);
      text("Score: ", 50, 585);
      text(score, 150, 585);
      
      if(score >= 89){
        backgroundnum = 4;
      }
      
      if(gameover == true){
        backgroundnum = 3;
      }
    }
    
    // First Screen
    if( backgroundnum == 0 ){
      if(mouseX > 350 && mouseX < 550 && mouseY > 380 && mouseY < 430){
        noFill();
        stroke(255, 255, 0);
        rect(350, 380, 200, 50); //SHAPE REQUIREMENT
        if(mousePressed){
          backgroundnum = 1;
        }
      }
      else if(mouseX >350 && mouseX < 550 && mouseY >460 && mouseY < 510){
        noFill();
        stroke(255, 255, 0);
        rect(350, 460, 200, 50);
        if(mousePressed){
          backgroundnum = 2;
        }
      }
    }
      
    //Screen with Instructions
    if( backgroundnum == 2 ){
      if(mouseX > 700 && mouseX < 840 && mouseY > 480 && mouseY < 530 ){
        noFill();
        stroke(255, 255, 0);
        rect(700, 480, 140, 50);
        if(mousePressed){
          backgroundnum = 1;
        }
      }
    }
      
    //Screen with winning message
    if( backgroundnum == 3 ){
      background(51);
      textSize(48);
      fill(255);
      text("Game Over!", 340, 150);
      text("Press any key to restart the game", 70, 250); 
      restart = true;
    }
    
    //Screen with loosing message
    if( backgroundnum == 4 ){
      background(255, 204, 0);
      textSize(48);
      text("You won the game", 280, 200);
      text("Press any key to restart the game", 180, 250);
      restart = true;
    }
    
    if(restart == true){
      if(keyPressed){
        setup();
        sound.stop();
      }
    }
  }
  
}

The original game has music background from:

Summer Days by Roa https://soundcloud.com/roa_music1031 Creative Commons — Attribution 3.0 Unported — CC BY 3.0 Free Download / Stream: http://bit.ly/-summer-days Music promoted by Audio Library https://youtu.be/3wiksi3J_KI


ZIP FILE FOR CODE:

Midterm_RockHyungKang


Week 6 – Midterm Progress

Week 5: Midterm Progress

Description:

This week we documented the progress we have so far on the midterm assignment.

Idea:

For this assignment, I had several ideas to create a game. First I thought it would be interesting to continue my process from Week 3 on the car game and make it significantly better both aesthetically and technically. Then I came up with the idea of creating a Whack a Mole game. Finally, I decided to recreate my own version of a game I used to enjoy when I was a child. The game was a mini-game from Mario Bros on the Nintendo DS called “Sort or Splode”. The game consisted of two types of bombs appearing on the screen while the user is trying to sort the bombs in platforms according to their colors. If time passes and a bomb is not sorted, it explodes and the game ends. Also if the bomb is sorted into the wrong platform the player loses the game. 

*Image from Mariowiki.com (Sort or ‘Splode. Super Mario Wiki. https://www.mariowiki.com/Sort_or_%27Splode.)


Challenges:

I first thought this project was going to be difficult to recreate because I thought I needed a lot of classes and methods to complete it. The use of the mouse and the interaction between the bombs are major concerns I have. One of the main challenges I encountered was randomizing the movement of the bombs. When I first started working on the movement I realized all the circles were moving in the same direction always and I had to spend a good amount of time figuring out how to randomize such movements. Also, another challenge I have encountered which I have not yet figured out how to do is detecting collision between the bombs and changing movement and direction so that bombs do not overlap.


Process: 

For this project, I first started organizing the game into classes. I wrote down what classes I needed and the methods and attributes related to each class. This way I only need to fill in the methods and organize the classes to complete the game. Although there is a possibility that I will include more methods and attributes as the project progresses, this gave me a basic idea of where to start on the project. I worked on the creation of the bombs first because I consider it the main class of the game. For this time, I have completed the random movement and the initial part of instantiating a bomb object. The movement of the bombs also changes so that they do not pass into the platform. 

Conclusion:

Overall I do not have a lot of progress in the game and I acknowledge there is still a lot of work to be done. Still, I think I have enjoyed the process so far. Organization on the game has been improving and the use of Classes is less challenging at this point compared to other projects. There are still important steps to be completed including the creation of different interfaces for the initial page, instructions, game, game-ending. Also, I need to create the images myself so I further need to work on this part. 

class Bomb{
  float type;
  float posX, posY;
  float size;
  color colorbomb;
  float radius
  PImage img;
  float xvelo, yvelo;
  int xdirection, ydirection;
  float limitx1, limitx2, limity1, limity2;
  
  Bomb(){
    this.posX = width/2;
    this.posY = 50;
    this.radius = 20;
    this.xdirection = 1;
    this.ydirection = 1;
    xvelo = int(random(0,6)-3);
    yvelo = int(random(1,4));
    limitx1 = 200;
    limitx2 = width - 200;
    limity1 = 100;
    limity2 = height - 100;
    
  }
  
  void move(){
    
    this.posX = posX + (xvelo * xdirection);
    this.posY = posY + (yvelo * ydirection);
    
    if( posX < 0+radius || posX > width-radius)
    {
     this.xdirection *= -1;
    }
    
    if( posY < 0+radius || posY > height-radius)
    {
     this.ydirection *= -1;
    }
    
    if ( posX-(radius/2) < limitx1 && posY > limity1 && posY < limity2)
    { 
      this.xdirection *= -1;
      this.ydirection *= -1;
    }
    
    if ( posX+(radius/2) > limitx2 && posY > limity1 && posY < limity2)
    { 
      this.xdirection *= -1;
      this.ydirection *= -1;
    }
     
  }
  
  void explode(){
    //TO fill
    
  }
  
  void safe(){
    //TO fill
    
  }
  
  void collision(){
    //TO fill
  
  }
  
  void drawbomb(){
    fill(0, 135, 240);
    circle(posX, posY, radius);
    this.move();

  }


}
int mode = 0; //Determines the mode of the background;
Game game;
Platform platform1, platform2;

void setup(){
  size(960, 600);
  frameRate(60);
  game = new Game();
  platform1 = new Platform(1, color(255));
  platform2 = new Platform(2, color(75,0,130));
  
}


void draw(){
  background(130);
  game.drawGame();
  platform1.drawplat();
  platform2.drawplat();
class Game{
  Bomb bombarray[];
  int i;
  int velobombs; //Variable determining the velocity of creation of bombs
  
  Game(){
    bombarray = new Bomb[100];
    i = 0;
    velobombs = 50;
  }

  void createbomb(){
    bombarray[i] = new Bomb();
    i++;
  }
  
  
  void drawGame(){
    if(frameCount%(velobombs) == 0){
      createbomb();
    }
    
    for(int j=0; j < i; j++){
      bombarray[j].drawbomb(); 
    }
    
  }
  
}
class Platform{
  float Xpos, Ypos;
  color colorplat;
  float widthplat, heightplat;
  int platnum;
  
  Platform(int num, color colorp){
    widthplat = 200;
    heightplat = 400;
    Ypos = height/2 - heightplat/2;
    colorplat = colorp;
    
    if(num == 1){
      Xpos = 0;
    }
    else if(num == 2){
      Xpos = width-widthplat;
    }
      
    
  }
  
  void drawplat(){
    //rectMode(CENTER);
    fill(colorplat);
    rect(Xpos, Ypos, widthplat, heightplat);
   
  }


}


Week 4 – Data Visualization

Week 4: Data Visualization


Description:

This project consisted of creating a data visualization for some kind of data.

Idea:

For this assignment, I wanted to create some kind of visualization involving soccer. I really enjoy watching soccer and one of my favorite tournaments is the World Cup. Therefore I decided to do some research on the latest World Cup in Russia 2018. I initially liked the data involving goals for each country so I decided to collect such data on the official FIFA webpage. 

Challenges:

For this project, there was no major challenge for me. The only difficult process was collecting data and working with CSV files. One major example was when I was using colors. I had to manually put every single piece of data. Initially, I thought I could write the colors in RGB in one single cell. However, Processing failed to read the data as colors. Finally, I had to write every single RGB value in a separate cell. For the piechart, I tried to make it interactive by making it bigger once clicked and making it display the names of the players. Although I tried to use the rotate function and textAlign function, I failed to get the outcome I wanted.

Process: 

For this project, I first started collecting data. I used the official FIFA website to collect data such as matches played, goals scored, goals against, own goals, and penalty goals. After collecting such data I used Microsoft excel to write each country’s name and data. I tried different designs and positions until I liked the last one where I place all of the data at the bottom of the screen and show it in bar graphs. When I completed this, I decided to put some color. For the overall design, I used the official colors used in the Russia World Cup. Then I got the idea to represent each country’s uniform color along with the name. After being done with this, I realized that the screen looked somewhat empty. Later I decided to add two additional features. The first one was a pie chart involving the top thirteen goal scorers. The second one involved the number of World Cup wins by country. 


Conclusion:

Overall I had a lot of fun creating this project because it involved something I liked. Although it was tedious to work with a lot of data I think I got to practice a lot for this project. I used previous topics such as OOP and using text. Even though I failed to complete the part for the text, I was satisfied with the result. The project looks a little empty but I think I will keep working on it to fill it and make it more interactive. Although the project took me more time than expected, I feel I enjoyed investigating and creating this data visualization. Also compared to other projects, I think I have improved a lot in avoiding hardcoding.

Country[] countries;
PieChart[] players;
Winners[] winner;

PFont font;
Table table, table2, table3;
color red = color(211, 2, 8);
color gold = color(229, 198, 133);
color white = color(245, 238, 213);
color black = color(23,23,0);
color blue = color(1, 83, 134);
color blue2 = color(0, 116, 177);
int zoomindata = 0;

color[] colors= { red, gold, blue, black, blue2 };
String[] countryname = { "BRA", "GER", "ITA", "ARG", "FRA", "URU", "ENG", "ESP"};

void setup(){
 size(1400, 720); 
 loadData();
}

void draw(){
  font = createFont("Montserrat", 40);
  background(245, 238, 213);
  textSize(64);
  fill(153, 0, 0);
  rect(0,0,width, 80);
  rect(0,height-30,width, 30);
  fill(255);
  textAlign(CENTER);
  textFont(font);
  text("FIFA WORLD CUP RUSSIA 2018", width/2, 55);
  
  for(int i = 1; i < 33; i++){
    countries[i].drawData();
  }
  for(int i = 0; i < 14; i++){
    if(zoomindata == 0){
      players[i].drawData();
    }
    else if(zoomindata == 1){
      players[i].drawBigCircle();
    }
  }
   
  for(int i = 0; i < 8; i++){
    winner[i].drawData();
  }
}

 void loadData(){
    
    //array for bottom data
    table = loadTable("worldcup2018.csv");
    //array for piechart
    table2 = loadTable("piechart.csv");
    //array for winners
    table3 = loadTable("line_chart.csv");
    
    countries = new Country[table.getRowCount()];
    players = new PieChart[table2.getRowCount()];
    winner = new Winners[table3.getRowCount()];
    
    for (int i = 0;  i < table.getRowCount(); i++){
      TableRow row = table.getRow(i);
      String name = row.getString(0);
      float matchplay = row.getFloat(1);
      float goalfor = row.getFloat(2);
      float goalscore = row.getFloat(3);
      float goalagainst = row.getFloat(4);
      float pkgoal = row.getFloat(5);
      float owngoal = row.getFloat(6);
      int r1 = row.getInt(7);
      int g1 = row.getInt(8);
      int b1 = row.getInt(9);
      int r2 = row.getInt(10);
      int g2 = row.getInt(11);
      int b2 = row.getInt(12);
      color c1 = color(r1, g1, b1);
      color c2 = color(r2, g2, b2);
      countries[i] = new Country(41*i, name, matchplay, goalfor, goalscore, goalagainst, pkgoal, owngoal, c1, c2);
    }
    
    for (int i = 0; i < table2.getRowCount(); i++){
      TableRow row2 = table2.getRow(i);
      String player = row2.getString(0);
      float goal = row2.getFloat(1); 
      int colornum = i%5;
      float anglei = row2.getFloat(4);
      float anglef = row2.getFloat(3);
      players[i] = new PieChart(player, goal, colors[colornum], anglei*TWO_PI, anglef*TWO_PI);
    }
    
    for (int i = 0; i < table3.getRowCount(); i++){
      TableRow row3 = table3.getRow(i);
      //String country = row3.getString(0);
      float wins = row3.getFloat(1); 
      int colorbar = i%5;
      winner[i] = new Winners(i, countryname[i], wins, colors[colorbar]);
    }
    
 }

 void mousePressed(){
   if(mouseX > 1000 && mouseY < 500){
       zoomindata = 1;
   }
  }
  
 void mouseReleased(){
   zoomindata = 0;
   
 }
 
class Country{
  float posX, posY;
  String name;
  color color1, color2;
  float MP, GF, GS, GA, PG, OG;
  float spacebtwy, spacebtwx, widthbar, barheight;
  
  Country(float x, String n, float matches, float goalf, float goals, float goala, 
  float pkgoal, float owng, color c1, color c2){
    posX = x;
    posY = height - 50;
    spacebtwy = 5;
    spacebtwx = 5;
    name = n;
    MP = matches;
    GF = goalf;
    GS = goals;
    GA = goala;
    PG = pkgoal;
    OG = owng;
    widthbar = 5;
    color1 = c1;
    color2 = c2;
    barheight = 15;
  }
  
  void drawData(){
    textSize(16);
    noStroke();
    fill(255);
    text(name, posX+20, posY+40);
    fill(red);
    rect(posX+spacebtwx, posY-MP*barheight, widthbar, MP*barheight);
    fill(gold);
    rect(posX+2*spacebtwx, posY-GF*barheight, widthbar, GF*barheight);
    fill(blue);
    rect(posX+3*spacebtwx, posY-GS*barheight, widthbar, GS*barheight);
    fill(black);
    rect(posX+4*spacebtwx, posY-GA*barheight, widthbar, GA*barheight);
    fill(blue2);
    rect(posX+5*spacebtwx, posY-PG*barheight, widthbar, PG*barheight);
    fill(red);
    rect(posX+6*spacebtwx, posY-OG*barheight, widthbar, OG*barheight);
    fill(color1);
    rect(posX+5, posY, 15, 20);
    fill(color2);
    rect(posX+20, posY, 15, 20);
  }
  
}
class PieChart{
  float posX, posY;
  float percentage;
  float radius;
  float anglei, anglef;
  color colors;
  String name;
  
  
  PieChart(String player, float goal, color colorpie, float angle1, float angle2){
    posX = 1200;
    posY = 300;
    radius = 300;
    colors = colorpie;
    anglei = angle1;
    anglef = angle2;
    float num = goal;
    name = player;
    
  }
  
  void drawData(){
    fill(colors);
    arc(posX, posY, radius, radius, anglei, anglef);
  }
  
  void drawBigCircle(){
    fill(colors);
    arc(width/2, height/2, radius*2, radius*2, anglei, anglef);
    textSize(24);
    pushMatrix();
    translate(width/2, height/2);
    rotate((anglei+anglef)/2);
    fill(0);
    textAlign(RIGHT);
    text(name, 0, 0);
    popMatrix();
    
  }
  
}
class Winners{
  float posX, posY;
  float wins;
  color colors;
  String name;
  int barlength, barwidth;
  
  
  Winners(int position, String country, float number, color colorbar){
    posX = 70;
    posY = 40*position + 110;
    name = country;
    wins = number;
    colors = colorbar;
    barlength = 75;
    barwidth = 25;
    
  }
  
  void drawData(){
    fill(colors);
    rect(posX, posY, wins*barlength, barwidth);
    fill(0);
    textSize(18);
    textAlign(RIGHT);
    text(name, posX-5, posY+20);
  }
  
}