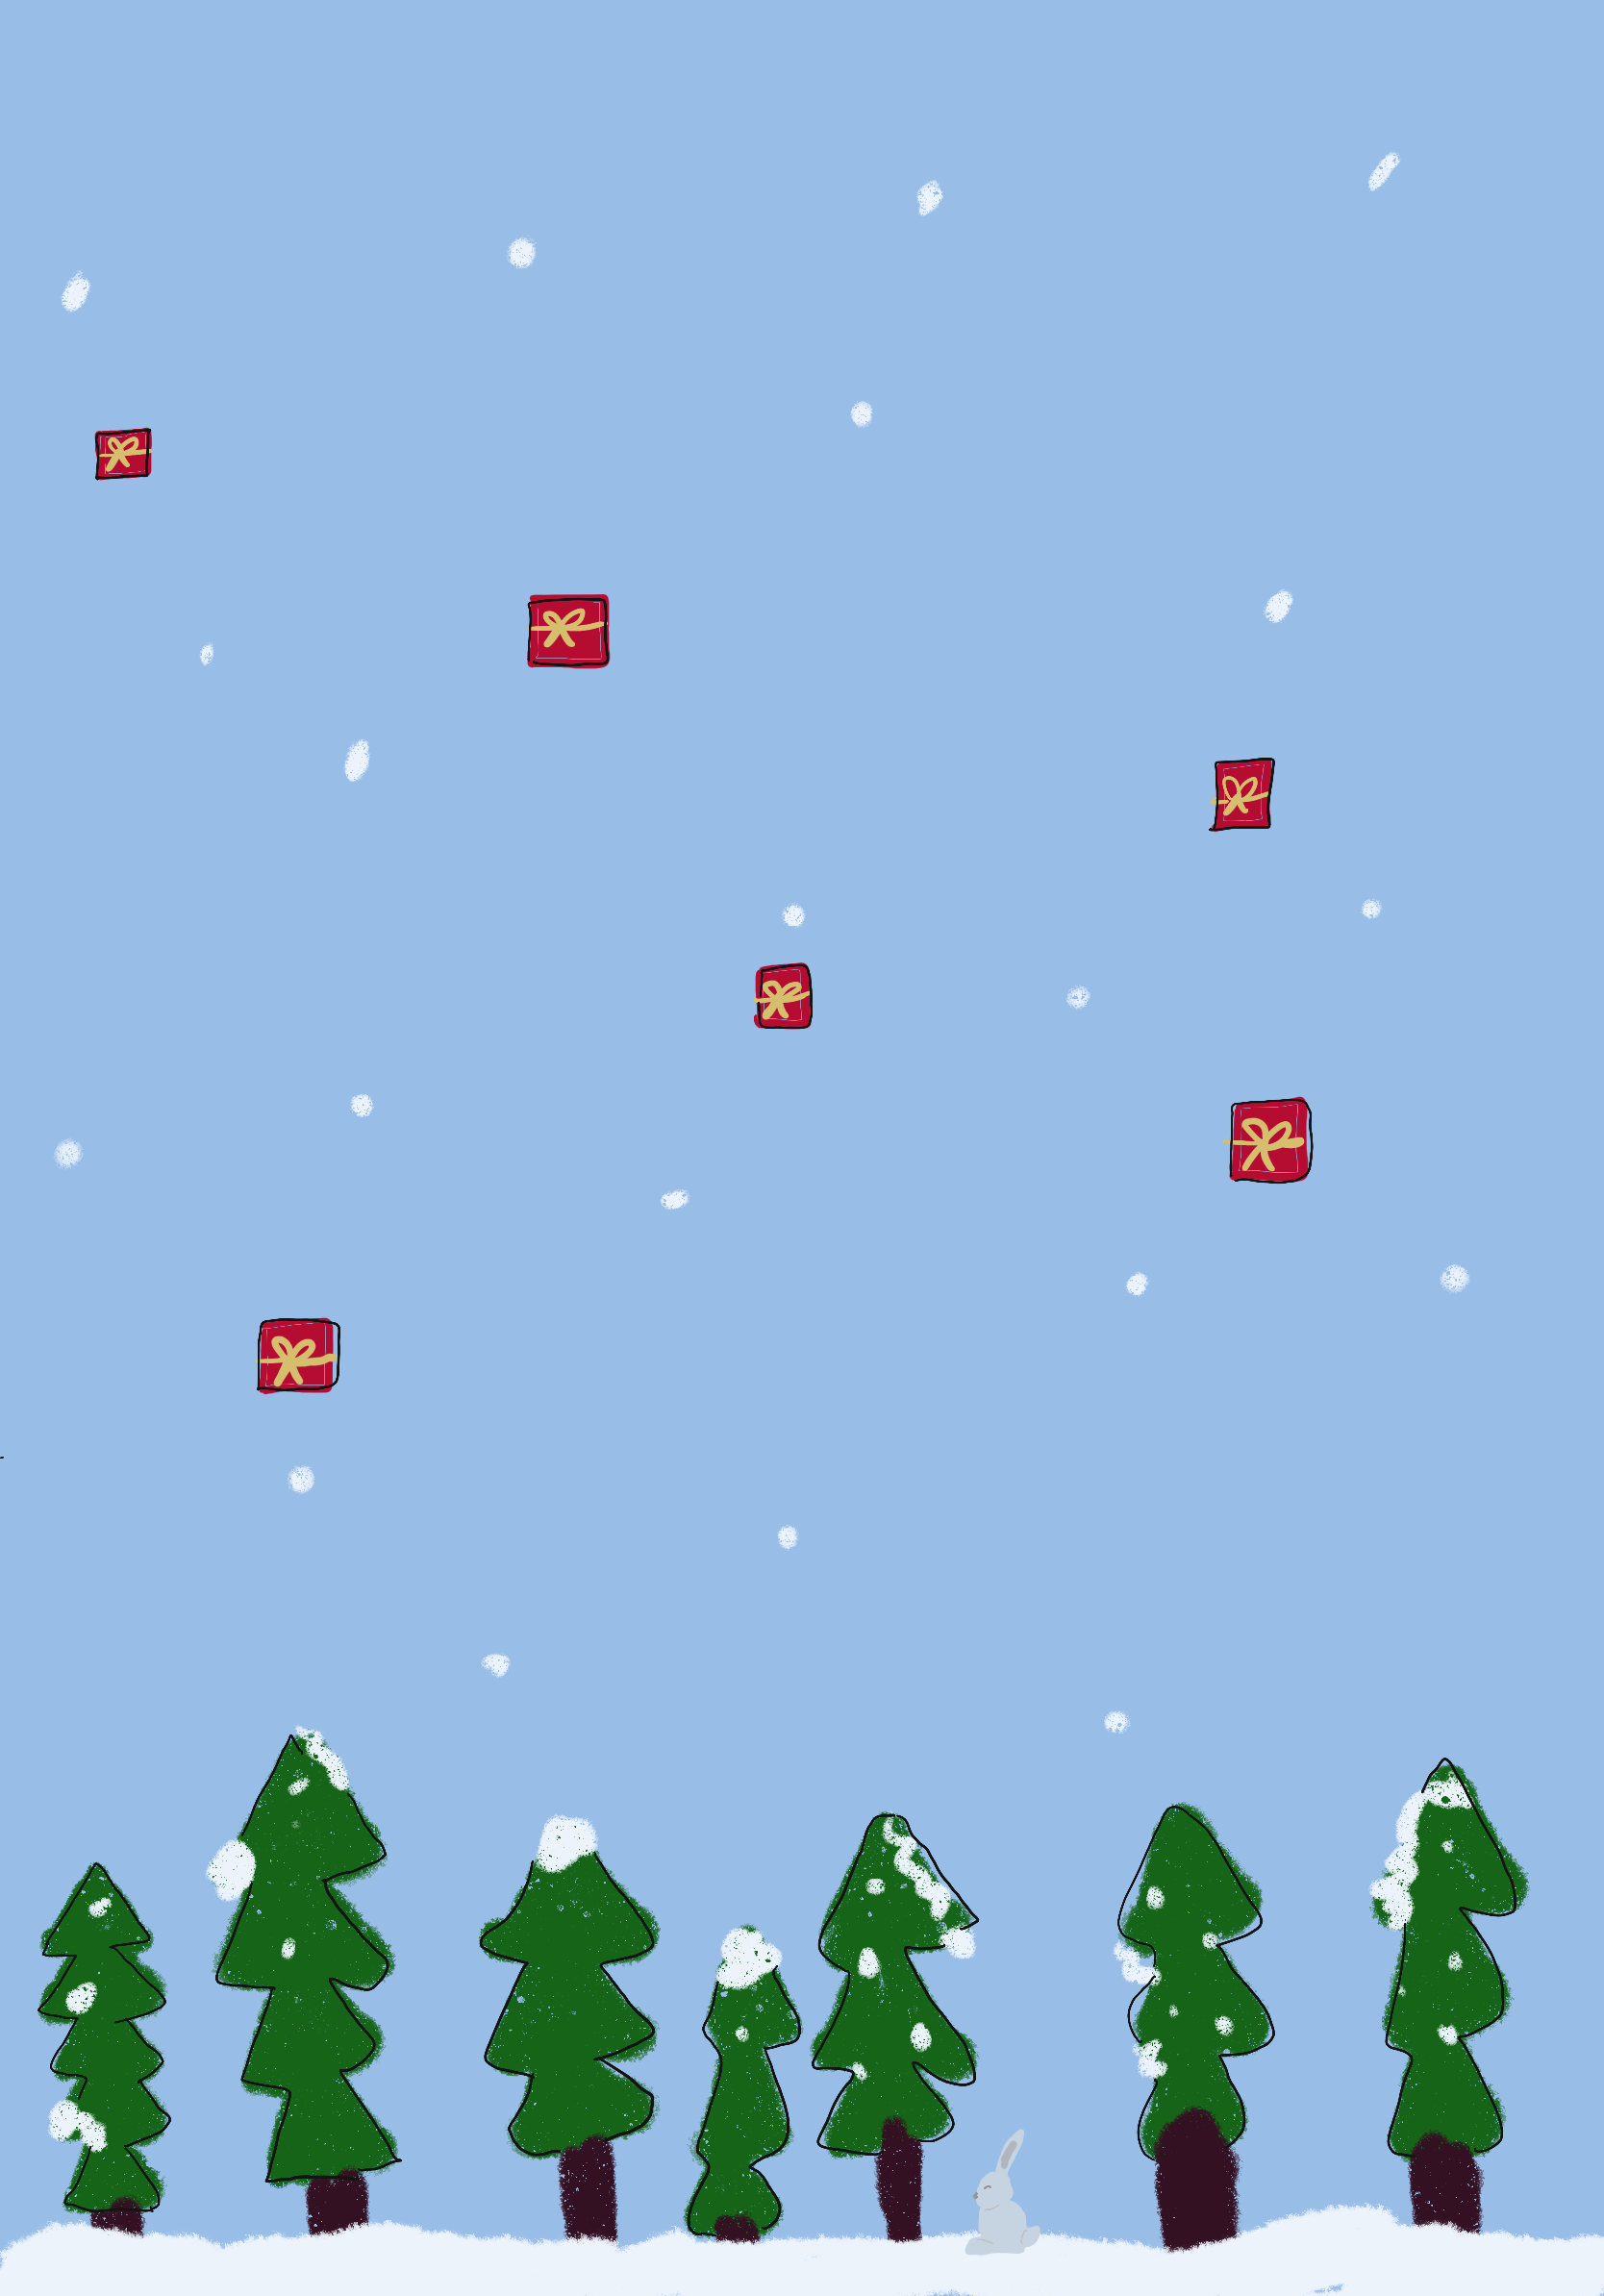
Concept
During my first semester, I made a game called “Galaxian” for one of my final projects. Galaxian was a classic, straightforward space shooting game where players could control the movement of a spaceship on screen across the x axis. Essentially, they could only use left and right arrow keys to move the ship in a different direction. The aliens on screen were static and the user had to shoot lasers at them to kill them.
The simplicity of Galaxian laid the groundwork for the birth of “Galaxian 2.0.” The initial project became a muse and inspired me to envision a more immersive and evolved gaming experience. In this sequel, I wanted to elevate the gaming dynamics with a physical controller.
User testing
link to video demonstration: https://youtu.be/hGPZssA0Q-Q
Since the menu contained all the necessary information, there wasn’t much explanation required from my end. However, a notable observation was that users often struggled to grasp the concept of a “moving” spaceship in the second level.
Following the initial user testing phase, two crucial insights emerged:
- It was essential to enhance the distinction between alien and spaceship lasers for better user comprehension.
- The second level needed adjustments to make it slightly easier.
P5js Code
let score = 0;
let spaceship;

//images and menus
let spaceshipImage;
let bg;
let gamewin;
let earthDestroy;
let shipDestroy;
let gamebg;
let tooSlow;

let laserSound;
let explosionSound;
let potVal = 450;
let shoot = 0;
let lastShootTime = 0;
let shootInterval = 200;
let startTime;
let gameDuration = 30 * 1000;
let isSerialConnected = false;
let lasers = [];
let level = 1;
let transitionScreenVisible;
let asteroids = [];
let asteroidSpeed = 2;
let damage = 0;
let maxDamage = 10;
let asteroidImage;

//LEVEL 2
let instructionsMenu;
let alienImage;
let aliens = [];
let alienSpeed = 2;
let alienLasers = [];
let aliensHitGround = 0;
let level2StartTime;

let bgMusic; // Background music

function preload() {
  spaceshipImage = loadImage("images/spaceship.png");
  asteroidImage = loadImage("images/asteroid.png");
  alienImage = loadImage("images/alien.png");
  bg = loadImage("images/bg.png");
  earthDestroy=loadImage("images/earthdestroy.png");
  shipDestroy = loadImage("images/spaceshipdestroy.png");
  instructionsMenu = loadImage("images/level2instructions.png");
  tooSlow = loadImage("images/tooslow.png");
  gamebg = loadImage("images/gamebg.png");
  gamewin = loadImage("images/gamewin.png");

  bgMusic = loadSound("sounds/bgmusic.mp3");
  laserSound = loadSound("sounds/shoot.mp3");
  explosionSound = loadSound("sounds/explosion.mp3");
}

function setup() {
  createCanvas(displayWidth,displayHeight);
  spaceship = new Spaceship();
  // Initialize aliens
  for (let i = 0; i < 3; i++) {
    let alien = new Alien();
    aliens.push(alien);
  }
  // Start playing background music
  // bgMusic.loop();
}
function draw() {
  background(25);
  // console.log(shoot);

  if (level === 1) {
    displayLevel1();
  } else if (level === 2) {
    if (transitionScreenVisible) {
      showLevelTransitionScreen(2);
    } else {
      displayLevel2();
    }
  }
}

function displayLevel1() {
  textSize(20);
  image(gamebg, width/2, height/2, width, height);
  if (isSerialConnected) {
    bgMusic.pause();
    let elapsedTime = millis() - startTime;
    let remainingTime = max(0, gameDuration - elapsedTime);

    // Check for collisions with user laser and asteroids
    for (let i = asteroids.length - 1; i >= 0; i--) {
      asteroids[i].display();
      asteroids[i].update();

      for (let j = lasers.length - 1; j >= 0; j--) {
        if (asteroids[i].hits(lasers[j])) {
          score++;
          asteroids.splice(i, 1); // Remove the asteroid
          explosionSound.play();
          lasers.splice(j, 1); // Remove the laser
        }
      }
    }

    // Generate new asteroids
    if (frameCount % 60 === 0) {
      let asteroid = new Asteroid();
      asteroids.push(asteroid);
    }

    spaceship.display();
    spaceship.update();
    updateLasers();

    fill(220);
    text("Score: " + score, 20, 30);
    text("Remaining Time: " + (remainingTime / 1000).toFixed(2) + "s", 20, 60);

    // Check if any asteroid hits the ground
    for (let i = asteroids.length - 1; i >= 0; i--) {
      if (asteroids[i].hitsGround()) {
        // console.log(damage);
      }
    }

    if (damage > maxDamage) {
      gameOver();
      return;
    }

    if (remainingTime <= 0) {
      gameOver();
    }

    // Check if the user hits a score of 10 to move to Level 2
    if (score >= 10) {
      transitionScreenVisible = true;
      level = 2;
      // showLevelTransitionScreen(2);
    }
  } else {
    // bgMusic.play();
    image(bg, 0, 0, width, height);

  }
}

function showLevelTransitionScreen(nextLevel) {
  // bgMusic.play();
  image(instructionsMenu, width/2, height/2, width, height);
}

function mousePressed() {
  if (transitionScreenVisible) {
    // Start the next level
    asteroids = []; // Clear the asteroids array
    score = 0; // Reset the score
    damage =0;
    startTime = millis(); // Restart the timer
    transitionScreenVisible = false; // Hide the transition screen
  }
}

function displayLevel2() {
  image(gamebg, width/2, height/2, width, height);
  fill(255);
  textSize(32);
  textAlign(CENTER, CENTER);

  // Check if it's the first frame of Level 2
  if (!level2StartTime) {
    level2StartTime = millis();
  }

  // Calculate elapsed time
  let elapsedTime = millis() - level2StartTime;
  let remainingTime = max(0, 30 * 1000 - elapsedTime);

  // Display timer & score
  textSize(20);
  text("Score: " + score, width / 2, 70 )
  text("Time: " + (remainingTime / 1000).toFixed(2) + "s", width / 2, 30);
  text("Alien Invasions: "+aliensHitGround, width/2, 50);

  // Check if the time is up
  if (remainingTime <= 0) {
    // text("Time's up!", width / 2, height / 2);
    gameOver();
    return;
  }

  // Update and display aliens
  for (let i = aliens.length - 1; i >= 0; i--) {
    aliens[i].update();
    aliens[i].display();

    // Check if the alien should shoot a laser
    if (random(1) < 0.01) {
      aliens[i].shootLaser(spaceship);
    }

    // Check if the alien has hit the ground
    if (aliens[i].y + aliens[i].height > height) {
      aliens.splice(i, 1);
      aliensHitGround++;
      console.log(aliensHitGround);

      // Check if more than 10 aliens hit the ground
      if (aliensHitGround > 100) {
        // text("Earth destroyed!!!1", 200, 200);
        gameOver();
        return;
      }
    }
  }

  // Check for collisions spaceship lasers with aliens
  for (let i = lasers.length - 1; i >= 0; i--) {
    for (let j = aliens.length - 1; j >= 0; j--) {
      if (lasers[i].hits(aliens[j])) {
        // Handle laser hit on aliens

        // score++;
        aliens.splice(j, 1); // Remove the alien
        explosionSound.play();
        lasers.splice(i, 1); // Remove the laser
        score++;

        // Check if the user wins the game
        if (score >= 10 && remainingTime > 0) {
          gameWin();
        }

        break; // Exit the inner loop after a collision is found
      }
    }
  }
  //check for collisions between aliens laser and the spaceship
  for (let i = alienLasers.length - 1; i >= 0; i--) {
    if (alienLasers[i].hits(spaceship)) {
      // Handle collision with spaceship

      // text(("detection!"), 100, 100);
      damage++;

      alienLasers.splice(i, 1); // Remove the alien laser
      if (damage > maxDamage){
        gameOver();
      }
    }
  }

  // Display and update alien lasers
  for (let i = alienLasers.length - 1; i >= 0; i--) {
    alienLasers[i].display();
    alienLasers[i].update();

    if (alienLasers[i].offscreen()) {
      alienLasers.splice(i, 1);
    }
  }

  // Check if there are no more aliens, then respawn a new set
  if (aliens.length === 0) {
    for (let i = 0; i < 3; i++) {
      let alien = new Alien();
      aliens.push(alien);
    }
  }

  spaceship.display();
  updateLasers();
  spaceship.updateLevel2();
}

function gameWin() {
  // Display the game win image or perform other actions
  image(gamewin, width / 2, height / 2, width, height);
  noLoop(); // Stop the draw loop to freeze the game
  mousePressed = restartGame;
}

class Asteroid {
  constructor() {
    this.radius = random(20, 40);
    this.x = random(this.radius, width - this.radius);
    this.y = -this.radius;
    this.hitGround = false; //track if the asteroid has hit the ground
  }

  display() {
    imageMode(CENTER);
    image(asteroidImage, this.x, this.y, this.radius * 2, this.radius * 2);
  }

  update() {
    this.y += asteroidSpeed;
  }

  hits(laser) {
    let d = dist(laser.x, laser.y, this.x, this.y);
    return d < this.radius + 2;
  }

  hitsGround() {
    if (this.y + this.radius > height && !this.hitGround) {
      damage++;
      this.hitGround = true;
    }
    return this.y + this.radius > height;
  }
}

class Spaceship {
  constructor() {
    this.width = 70;
    this.height = 70;
    this.x = width / 2 - this.width / 2;
    this.y = height - this.height;
    this.speed = 5;
    this.rotation = 0; // Initial rotation angle
  }

  display() {
    push();
    translate(this.x + this.width / 2, this.y + this.height / 2);
    rotate(radians(this.rotation));
    imageMode(CENTER);
    image(spaceshipImage, 0, 0, this.width, this.height);
    pop();
  }

  update() {
    if (keyIsDown(UP_ARROW)) {
      this.y -= this.speed;
    } else if (keyIsDown(DOWN_ARROW)) {
      this.y += this.speed;
    }

    // Ensure the spaceship stays within the bounds of the canvas height
    this.y = constrain(this.y, 0, height - this.height);

    // Map potVal from the range 0-1023 to -90 to 90 for rotation
    this.rotation = map(potVal, 966, 12, -90, 90);
    // FOR WHEEL: potVal, 966, 12, -90, 90

    // Check if enough time has passed since the last shoot
    if (shoot === 1 && millis() - lastShootTime >= shootInterval) {
      // Shoot a laser
      let laser = new Laser(
        this.x + this.width / 2,
        this.y + this.height / 2,
        this.rotation - 90
      );
      lasers.push(laser);
      lastShootTime = millis(); // Update the last shoot time
      // Play the laser sound effect
      laserSound.play();
    }
  }
  updateLevel2() {
    // Spaceship movement in the direction it is pointing
    this.rotation = map(potVal, 966, 12, -180, 180);
    let spaceshipDirection = p5.Vector.fromAngle(radians(this.rotation - 90)); // Subtract 90 to align with the forward direction
    this.x += spaceshipDirection.x * this.speed;
    this.y += spaceshipDirection.y * this.speed;

    // Ensure the spaceship stays within the bounds of the canvas
    this.x = constrain(this.x, 0, width - this.width);
    this.y = constrain(this.y, 0, height - this.height);

    // Check if enough time has passed since the last shoot
    if (shoot === 1 && millis() - lastShootTime >= shootInterval) {
      // Shoot a laser
      let laser = new Laser(
        this.x + this.width / 2,
        this.y + this.height / 2,
        this.rotation - 90
      );
      lasers.push(laser);
      lastShootTime = millis(); // Update the last shoot time
      // Play the laser sound effect
      laserSound.play();
    }
  }
}

class Alien {
  constructor() {
    this.width = 50;
    this.height = 50;
    this.x = random(width - this.width);
    this.y = -this.height;
    this.speedX = random(-1, 1) * alienSpeed;
    this.speedY = random(0.5, 1) * alienSpeed;
  }

  display() {
    imageMode(CENTER);
    image(
      alienImage,
      this.x + this.width / 2,
      this.y + this.height / 2,
      this.width,
      this.height
    );
  }

  update() {
    this.x += this.speedX;
    this.y += this.speedY;

    // Bounce off the walls
    if (this.x < 0 || this.x + this.width > width) {
      this.speedX *= -1;
    }

    // Wrap around vertically
    if (this.y > height) {
      this.y = -this.height;
      this.x = random(width - this.width);
      this.speedX = random(-1, 1) * alienSpeed;
      this.speedY = random(0.5, 1) * alienSpeed;
    }
  }
  shootLaser(spaceship) {
    // Calculate the angle between the alien and the spaceship
    let angle = atan2(spaceship.y - this.y, spaceship.x - this.x);

    // Shoot an alien laser in the calculated angle
    let alienLaser = new AlienLaser(
      this.x + this.width / 2,
      this.y + this.height / 2,
      degrees(angle)
    );
    alienLasers.push(alienLaser);
  }

  hits(laser) {
    let alienCenterX = this.x + this.width / 2;
    let alienCenterY = this.y + this.height / 2;

    // Check if the laser is within the bounding box of the alien
    return (
      laser.x > this.x &&
      laser.x < this.x + this.width &&
      laser.y > this.y &&
      laser.y < this.y + this.height
    );
  }
}

class AlienLaser {
  constructor(x, y, rotation) {
    this.x = x;
    this.y = y;
    this.speed = 5;
    this.rotation = rotation;
  }

  display() {
    push();
    translate(this.x, this.y);
    rotate(radians(this.rotation));
    stroke(0, 255, 0);
    strokeWeight(2);
    line(0, 0, 20, 0);
    pop();
  }

  update() {
    this.x += this.speed * cos(radians(this.rotation));
    this.y += this.speed * sin(radians(this.rotation));
  }

  offscreen() {
    return this.x > width || this.x < 0 || this.y > height || this.y < 0;
  }
  hits(spaceship) {
    let d = dist(
      this.x,
      this.y,
      spaceship.x + spaceship.width / 2,
      spaceship.y + spaceship.height / 2
    );
    return d < (spaceship.width + spaceship.height) / 4;
  }
}

class Laser {
  constructor(x, y, rotation) {
    this.x = x;
    this.y = y;
    this.speed = 10;
    this.rotation = rotation;
  }

  display() {
    push();
    translate(this.x, this.y);
    rotate(radians(this.rotation));
    stroke(255, 0, 0);
    strokeWeight(2);
    line(0, 0, 20, 0);
    pop();
  }

  update() {
    this.x += this.speed * cos(radians(this.rotation));
    this.y += this.speed * sin(radians(this.rotation));
  }

  offscreen() {
    return this.x > width || this.x < 0 || this.y > height || this.y < 0;
  }
  hits(alien) {
    let d = dist(
      this.x,
      this.y,
      alien.x + alien.width / 2,
      alien.y + alien.height / 2
    );
    return d < (alien.width + alien.height) / 4;
  }
}

function updateLasers() {
  for (let i = lasers.length - 1; i >= 0; i--) {
    lasers[i].display();
    lasers[i].update();

    if (lasers[i].offscreen()) {
      lasers.splice(i, 1);
    }
  }
}

function keyPressed() {
  if (key == " ") {
    // important to have in order to start the serial connection!!
    setUpSerial();

    isSerialConnected = true; // Update connection status
    startTime = millis(); // Start the timer when the connection is made
  }

  if (key === 'f' || key === 'F') {
    let fs = fullscreen();
    fullscreen(!fs);
  }
}

function readSerial(data) {
  // READ FROM ARDUINO HERE

  if (data != null) {
    let fromArduino = split(trim(data), ",");
    if (fromArduino.length == 2) {
      potVal = int(fromArduino[0]);
      shoot = int(fromArduino[1]);
      // console.log("val:");
      // console.log(shoot);
    }

    // SEND TO ARDUINO HERE (handshake)
    let sendToArduino = damage + "," + maxDamage + "\n";
    // console.log(damage);
    // console.log(maxDamage);
    writeSerial(sendToArduino);
  }
}
function gameOver() {
  noLoop(); // Stop the draw loop
  // Call a function from gameover.js to display the game over screen
  showGameOver();
}

// gameover.js

function showGameOver() {
//   // Implement your game over screen here
//   background(0); // Set background to black

//   fill(220);
  textSize(32);
  textAlign(CENTER, CENTER);
//   text("Game Over!", width / 2, height / 2 - 50);

  if (level===1){
    if (damage>maxDamage){
      image(earthDestroy, width/2,height/2, width, height);
      text("Your Score: " + score, width / 2, height-100);
    }
    else{
      image(tooSlow, width/2,height/2, width, height);
      text("Your Score: " + score, width / 2, height-100);
    }
  }

  else if(level ===2){
    if(aliensHitGround>10){ //greater than set value of invasions allowed
      image(earthDestroy, width/2,height/2, width, height);
      text("Your Score: " + score, width / 2, height-100);
    }
    else if(damage>= maxDamage){
      image(shipDestroy,width/2,height/2, width, height );
      text("Your Score: " + score, width / 2, height -100);
    }
    else{
      image(tooSlow, width/2,height/2, width, height);
      text("Your Score: " + score, width / 2, height-100);
    }
  }

  // Draw restart button
  fill(255);
  textSize(20);
  text("Click to Restart", width / 2, height -50);

  // Add event listener for the restart button
  mousePressed = restartGame;
}

function restartGame() {
  // Reload the page to restart the game
  location.reload();
}
Arduino code
const int ledPin = 2;  // Define the LED pin
const int ledPin2 = 3; // Define the LED pin
const int ledPin3 = 4; // Define the LED pin

void setup() {
  pinMode(ledPin, OUTPUT); // Set the LED pin as an output
  pinMode(ledPin2, OUTPUT); // Set the LED pin as an output
  pinMode(ledPin3, OUTPUT); // Set the LED pin as an output

  Serial.begin(9600);
  while (Serial.available() <= 0) {
    Serial.println("0,0");
    delay(300);
  }
}

void loop() {
  while (Serial.available()) {
    int damage = Serial.parseInt();
    int maxDamage = Serial.parseInt();
    if (Serial.read() == '\n') {
      // perform actions based on received data from p5
      int sensor = analogRead(A0);
      delay(5);
      int sensor2 = digitalRead(A1);
      delay(5);
      Serial.print(sensor);
      Serial.print(',');
      Serial.println(sensor2);

      // Check if damage is between 1 and 4
      if (damage <= 4) {
        digitalWrite(ledPin3, HIGH); // Turn on the LED at pin 3
      } else {
        digitalWrite(ledPin3, LOW); // Turn off the LED at pin 3
      }

      // Check if damage is between 5 and 7
      if (damage >= 5 && damage <= 7) {
        digitalWrite(ledPin2, HIGH); // Turn on the LED at pin 2
      } else {
        digitalWrite(ledPin2, LOW); // Turn off the LED at pin 2
      }

      // Check if damage is between 8 and maxDamage
      if (damage >= 8 && damage <= maxDamage) {
        digitalWrite(ledPin, HIGH); // Turn on the LED at pin 2
      } else {
        digitalWrite(ledPin, LOW); // Turn off the LED at pin 2
      }
    }
  }
}
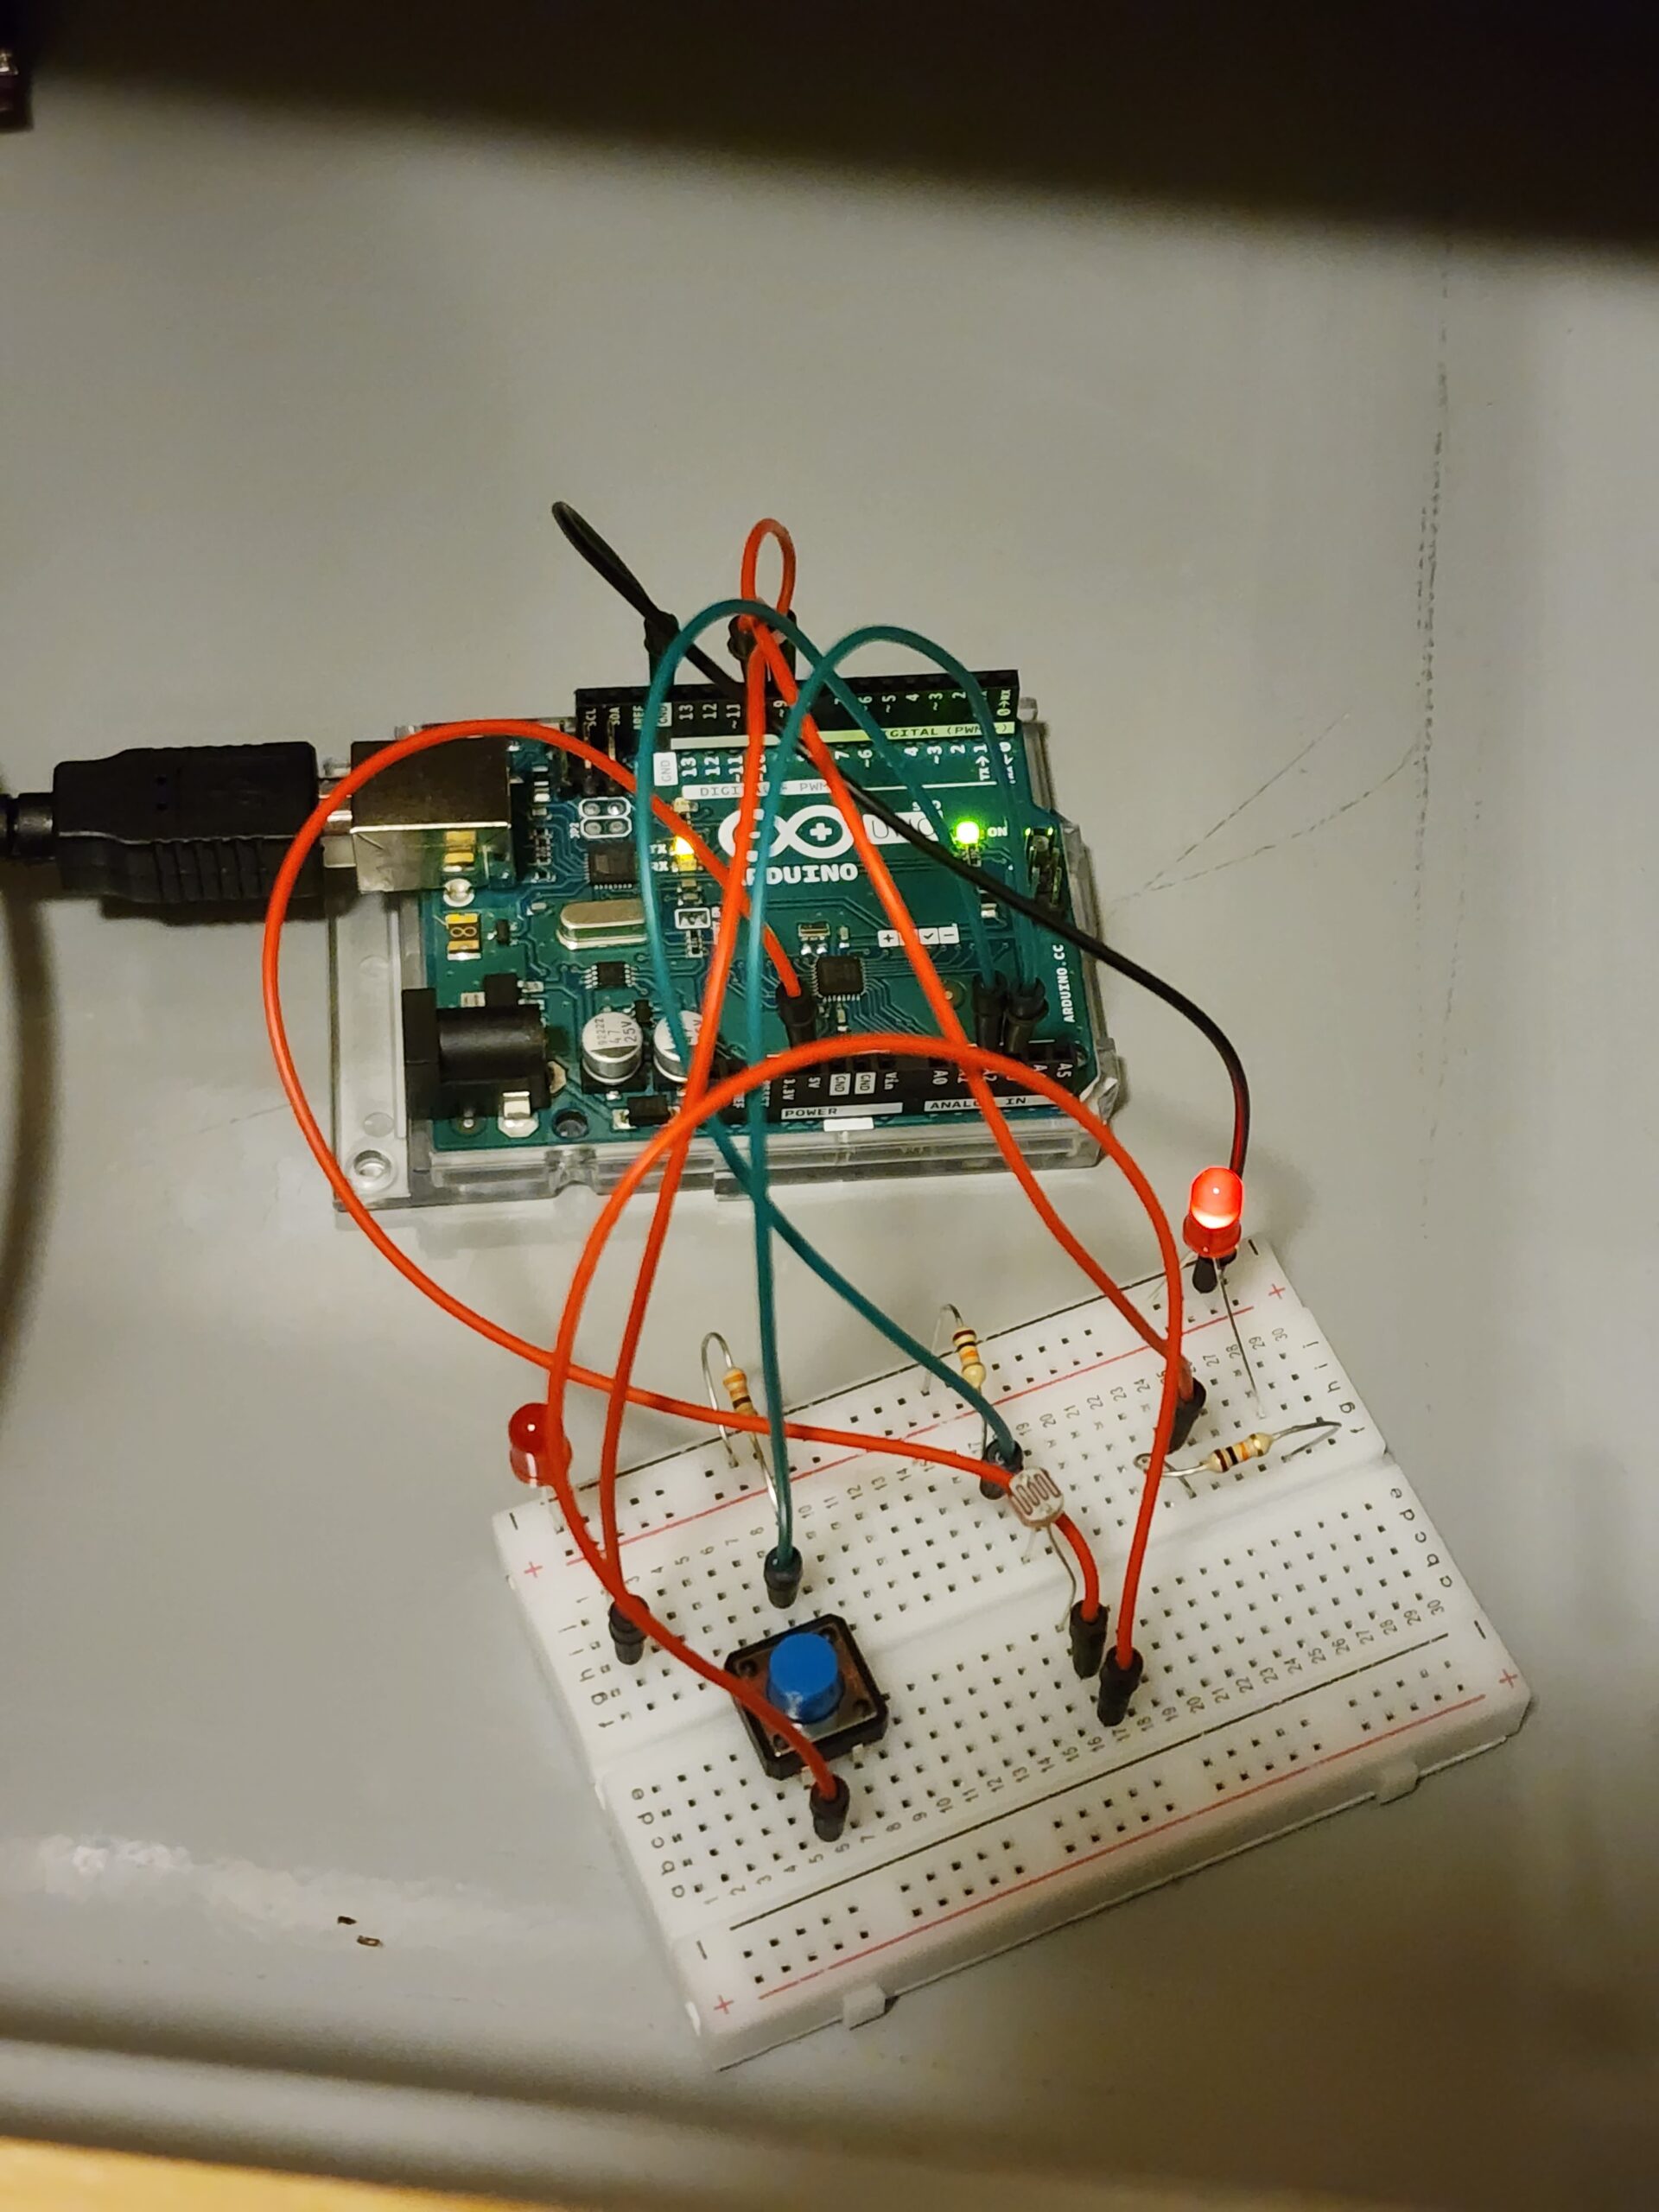
Arduino -> P5js:
Arduino sends the potentiometer (inside the steering wheel) values to p5js. The p5js code maps the values from the potentiometer meter to different rotation angles for the spaceship. In the first level, since the spaceship does not move around, the angle of rotation is limited to -90 to 90 degrees. In the next level since the spaceship moves continuously, it was important to ensure full rotation to allow movements in all direction. While implementing this, I realised since the steering wheel is a bit hard to move around and i found the minimum and maximum values for the potentiometer to be 12 – 966 therefore the mapping looks something like this:
this.rotation = map(potVal, 12, 966, -180, 180)
The switch button simply shoots a laser if the value sent from arduino is 1.
P5js -> arduino:
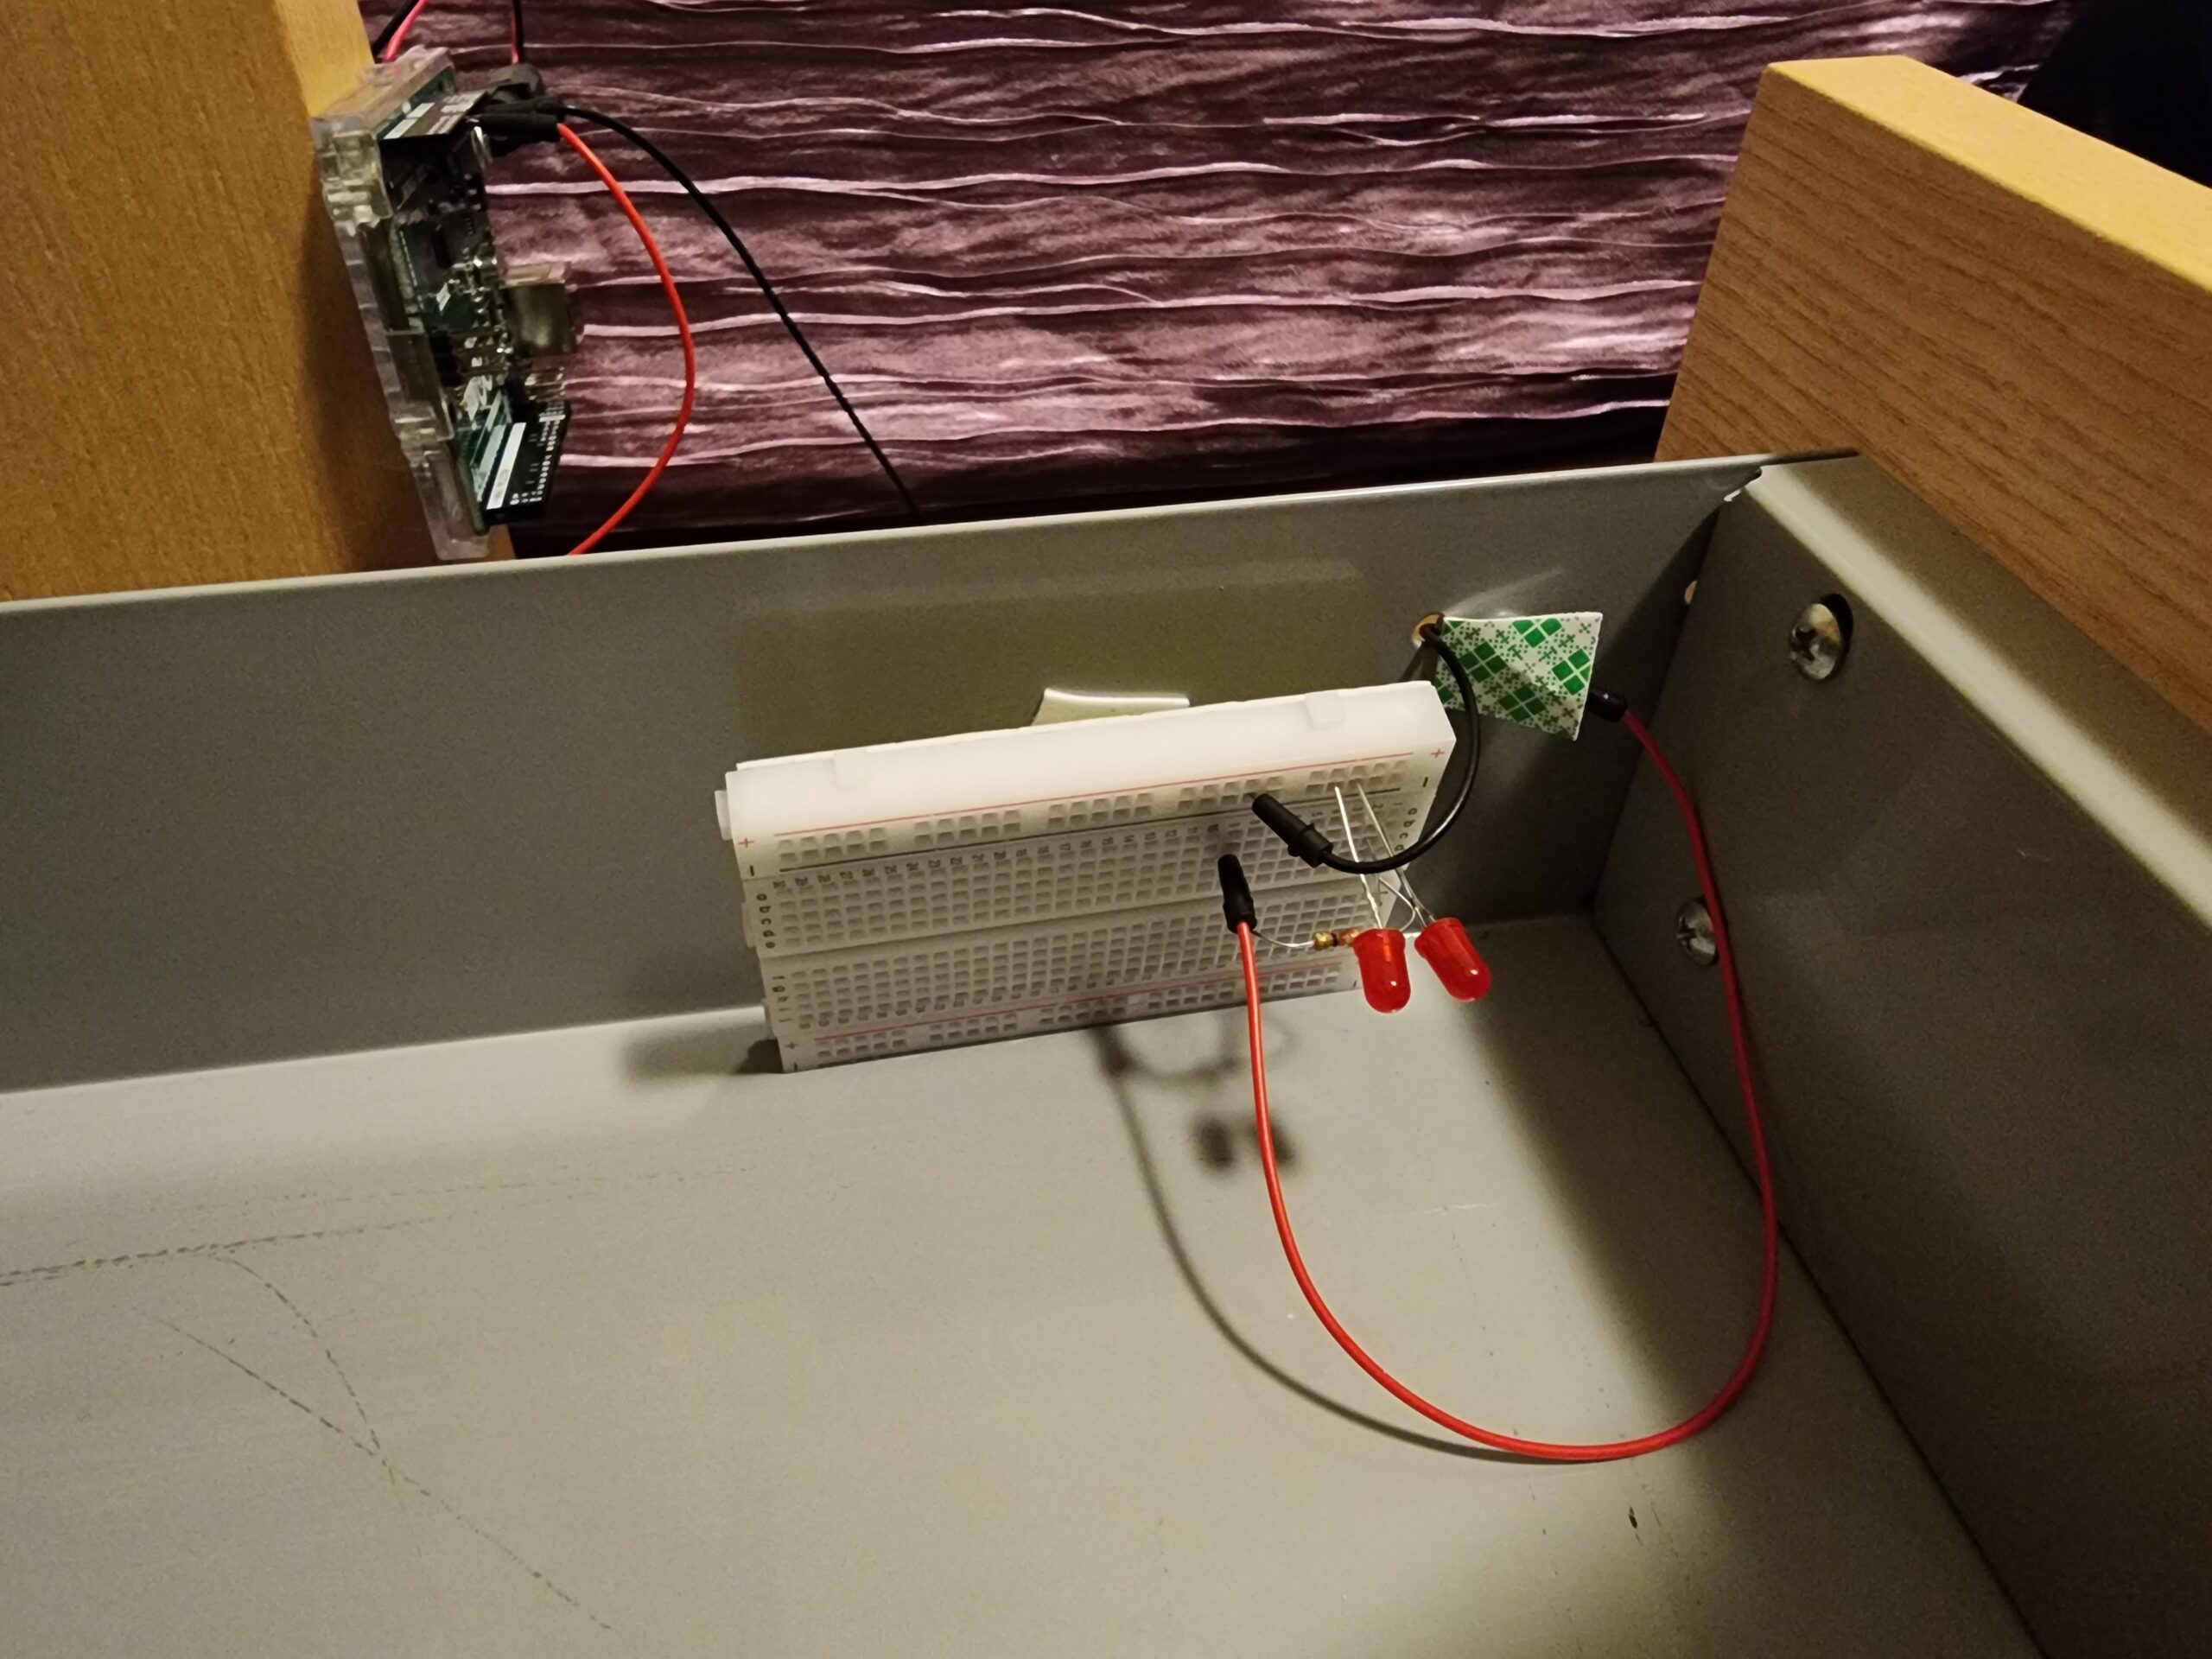
Additionally, I also added 3 leds health bars. P5js sends current “damage” to arduino and based on this value, the arduino code handles which led to light up using if conditions.
P5 sketch
Challenges
One of the challenges I faced was implementing the code for level 2 as I had to figure out how to ensure the aliens shoot in the direction of the moving spaceship. Initially, I had one lasers class that I was trying to use for both the spaceship and the aliens. I decided it would be a whole lot easier and cleaner if i made a separate class for aliens laser and that way implementing detection with the spaceship would be easier as well and it would be easier for users to differentiate between the two. With a separate alien laser class, I simply added a method that detects collision with the spaceship.
Another challenge for me was making the physical controller itself. I did not have any prior experience working with drills etc (other than the tool training) so it was a bit of a challenge at first. I also realised a lot of the led indicators were broken so I had to replace the LEDs in them myself.
Also, while working on the p5 code I realised it was possible for users to just simply hold the switch button to release a continuous stream of lasers so to prevent this from happening, i added the following condition:
// Check if enough time has passed since the last shoot
    if (shoot === 1 && millis() - lastShootTime >= shootInterval) {
      // Shoot a laser
      let laser = new Laser(
        this.x + this.width / 2,
        this.y + this.height / 2,
        this.rotation - 90
      );
      lasers.push(laser);
      lastShootTime = millis(); // Update the last shoot time
      // Play the laser sound effect
      laserSound.play();
    }
  }
I also wanted to add background music to the game but i tried using multiple sounds and they all gave me buffering issues so in the end, due to lack of time, i had to remove the background music. Although, background music would have been more interesting to include, I feel like the different sound effects were enough to make the game more engaging.
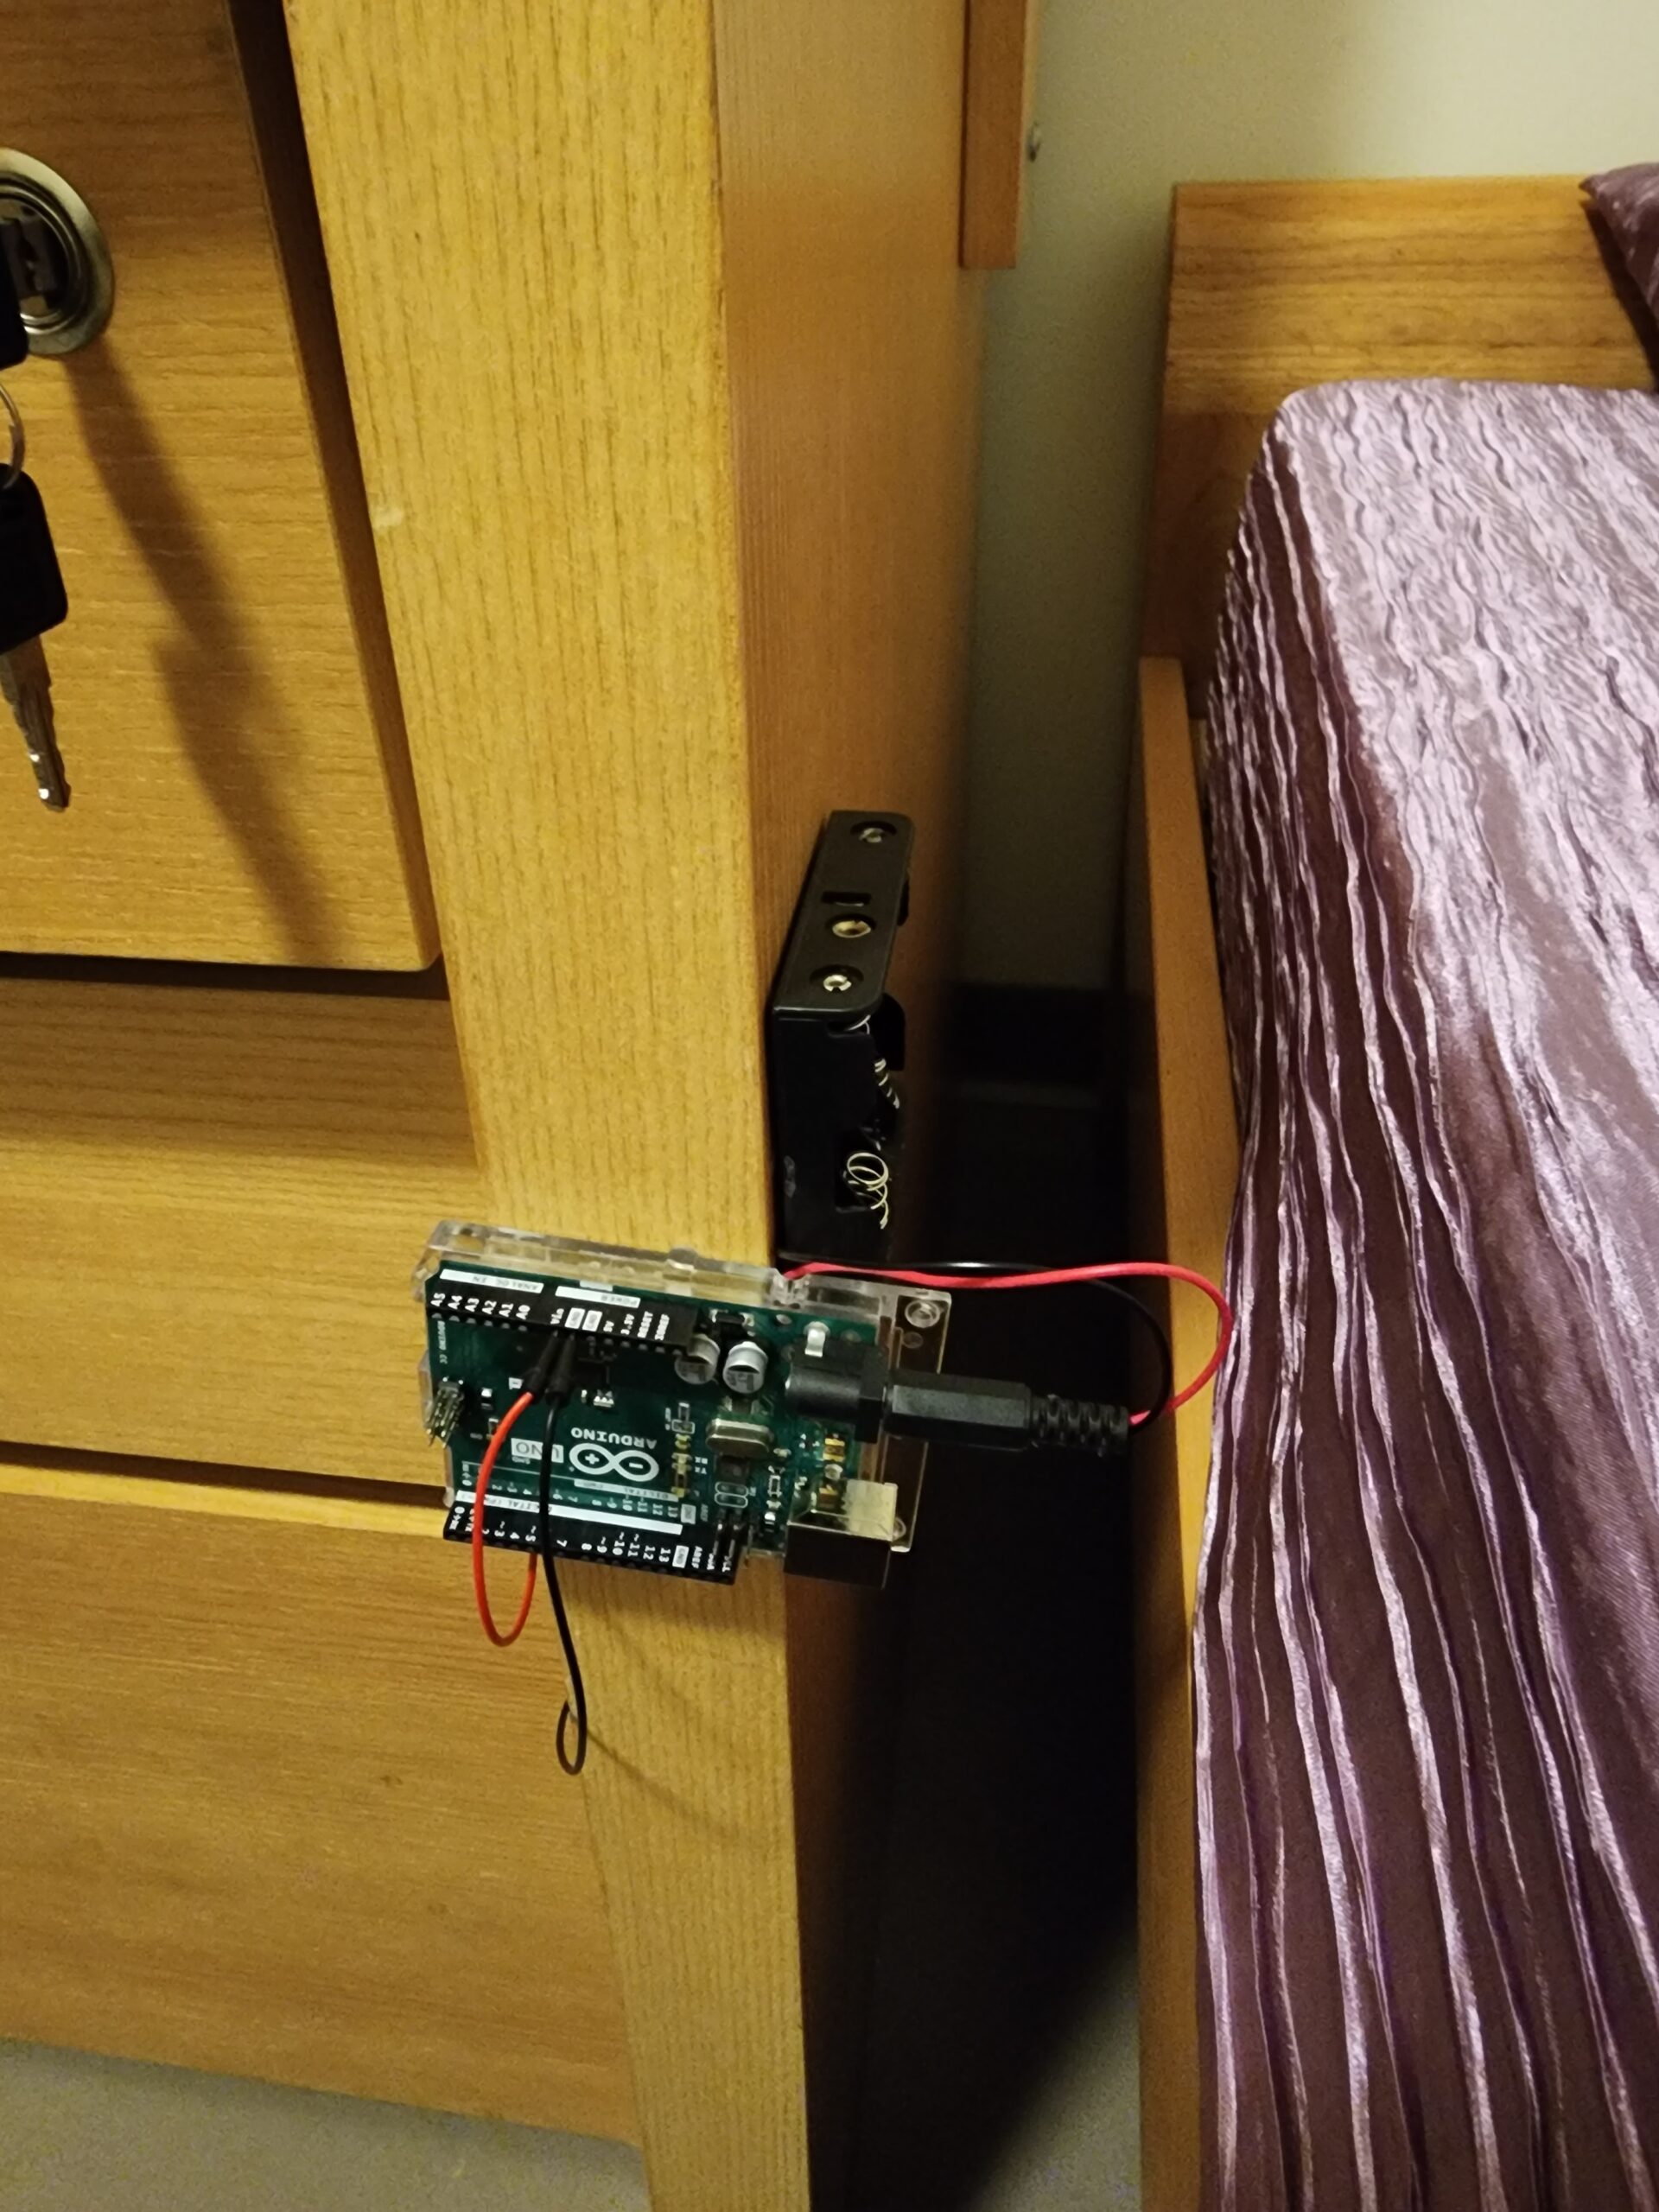
Physical design
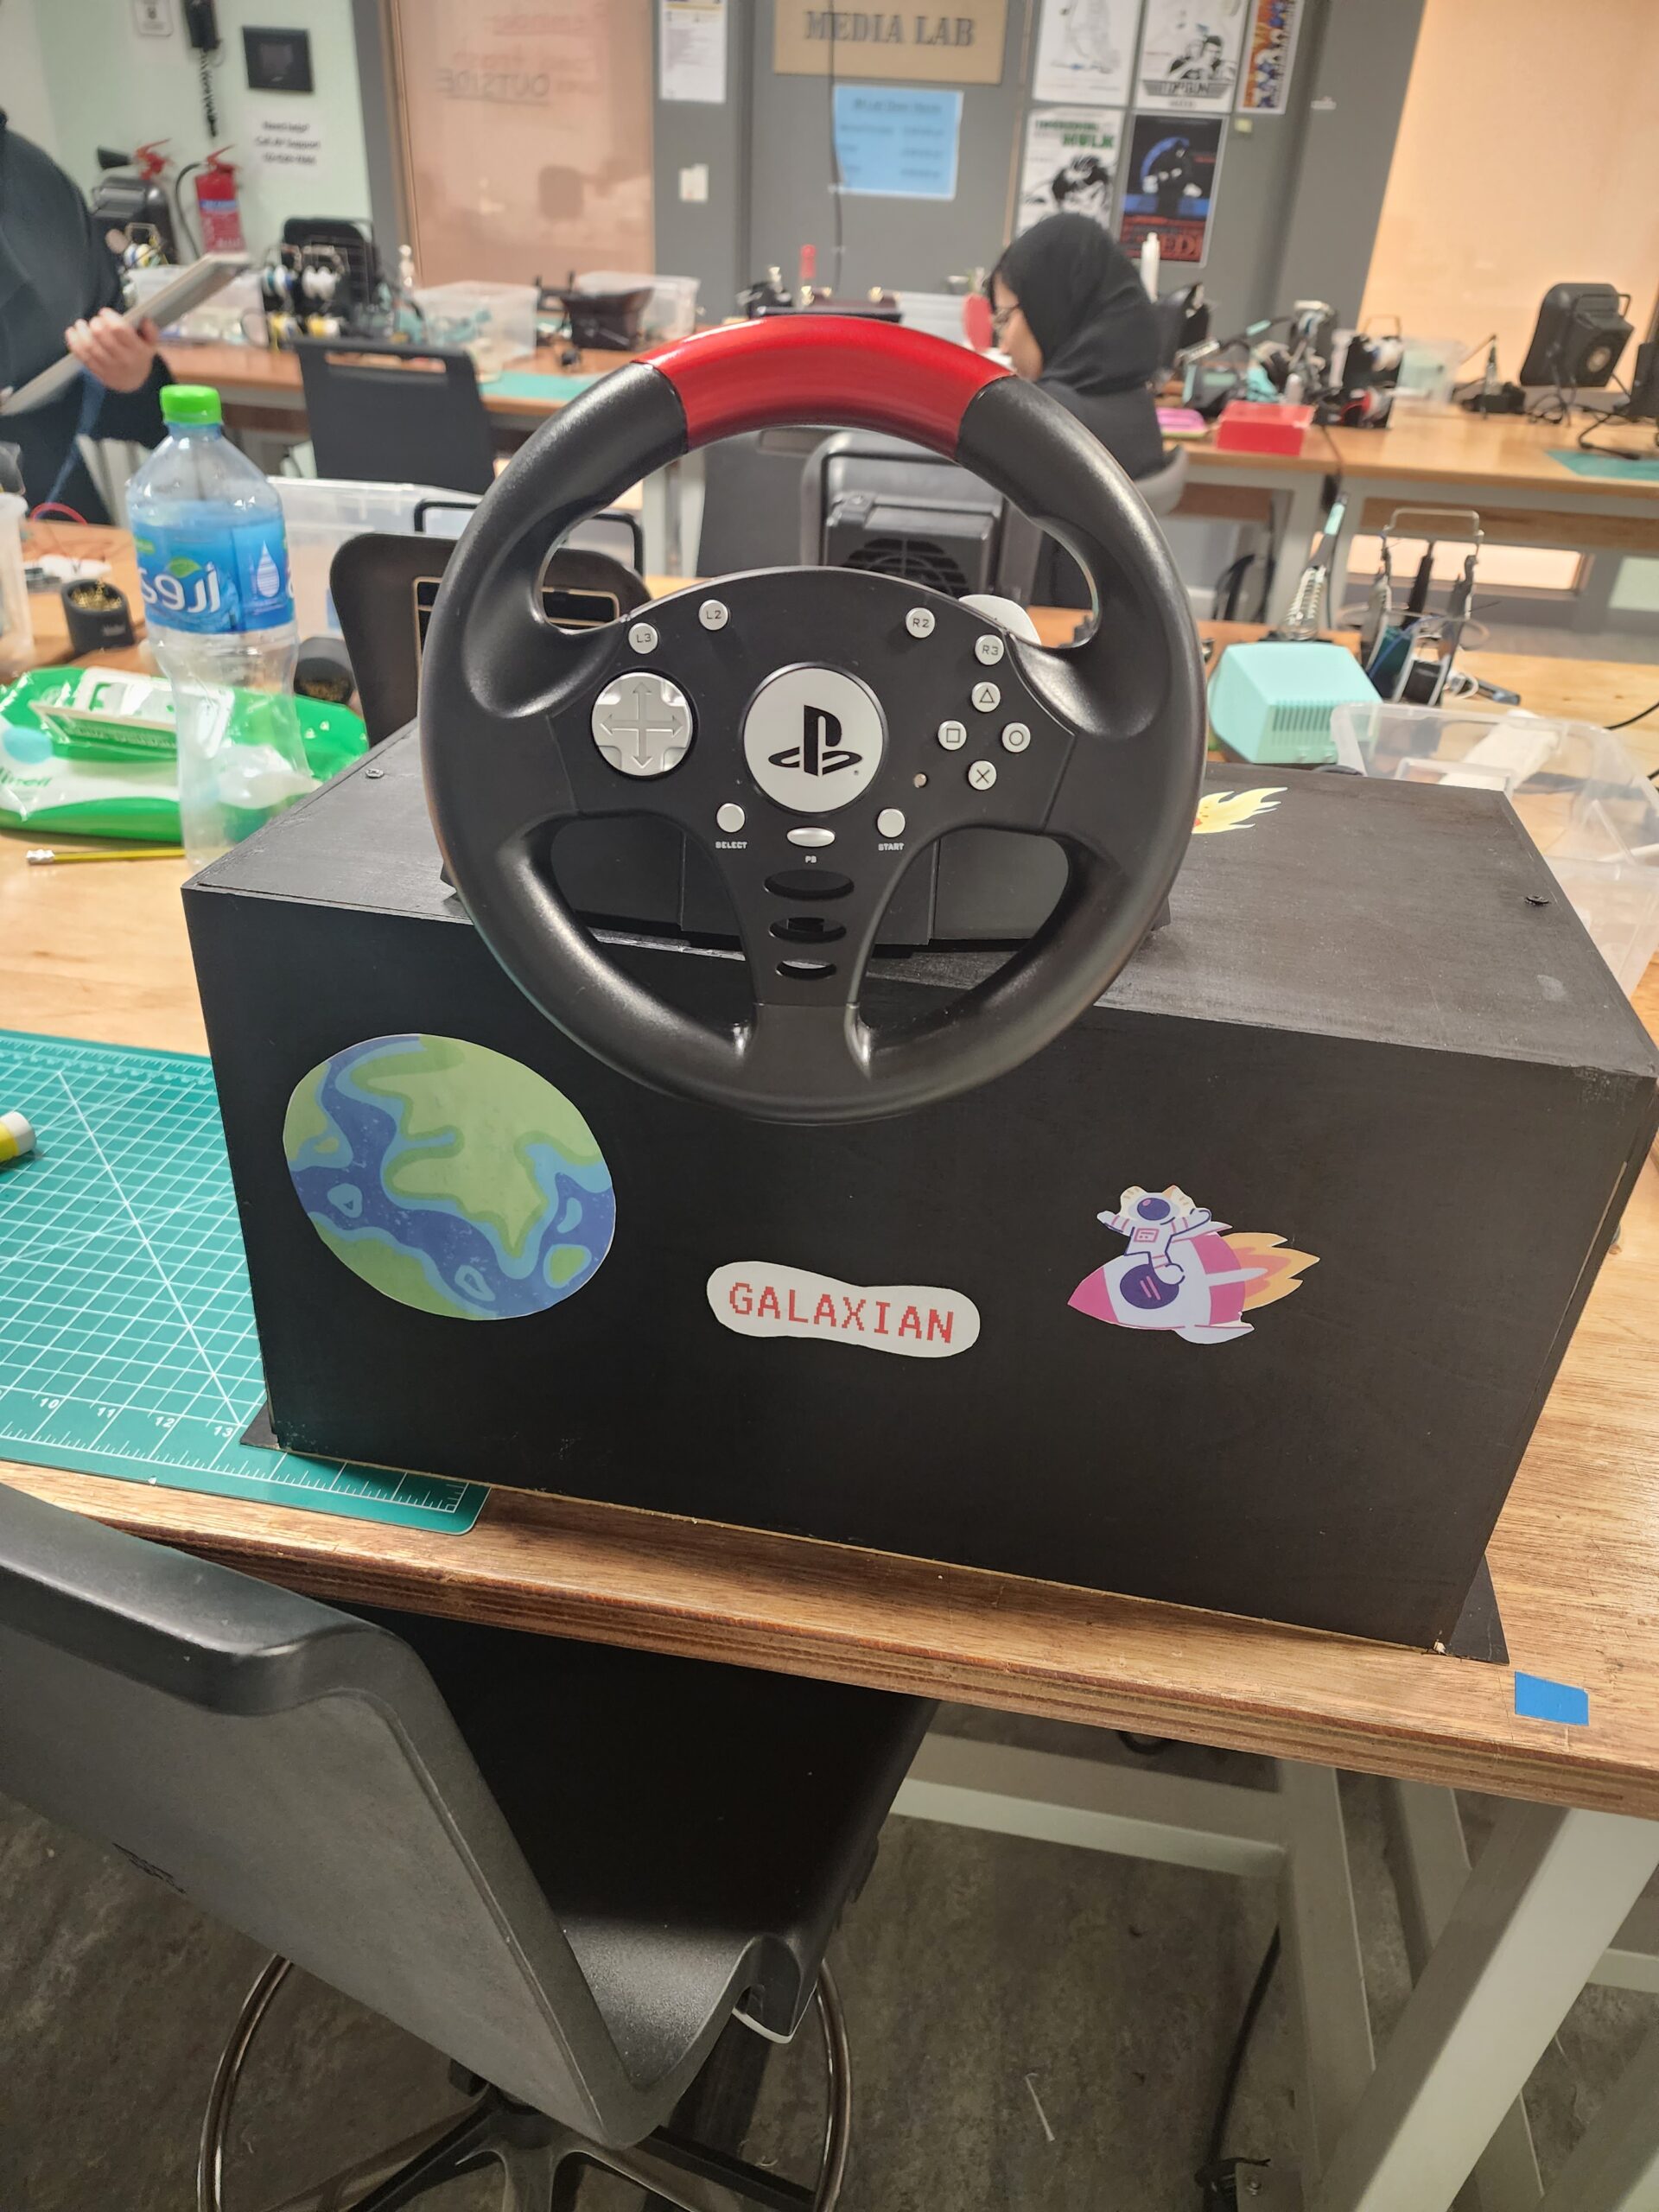
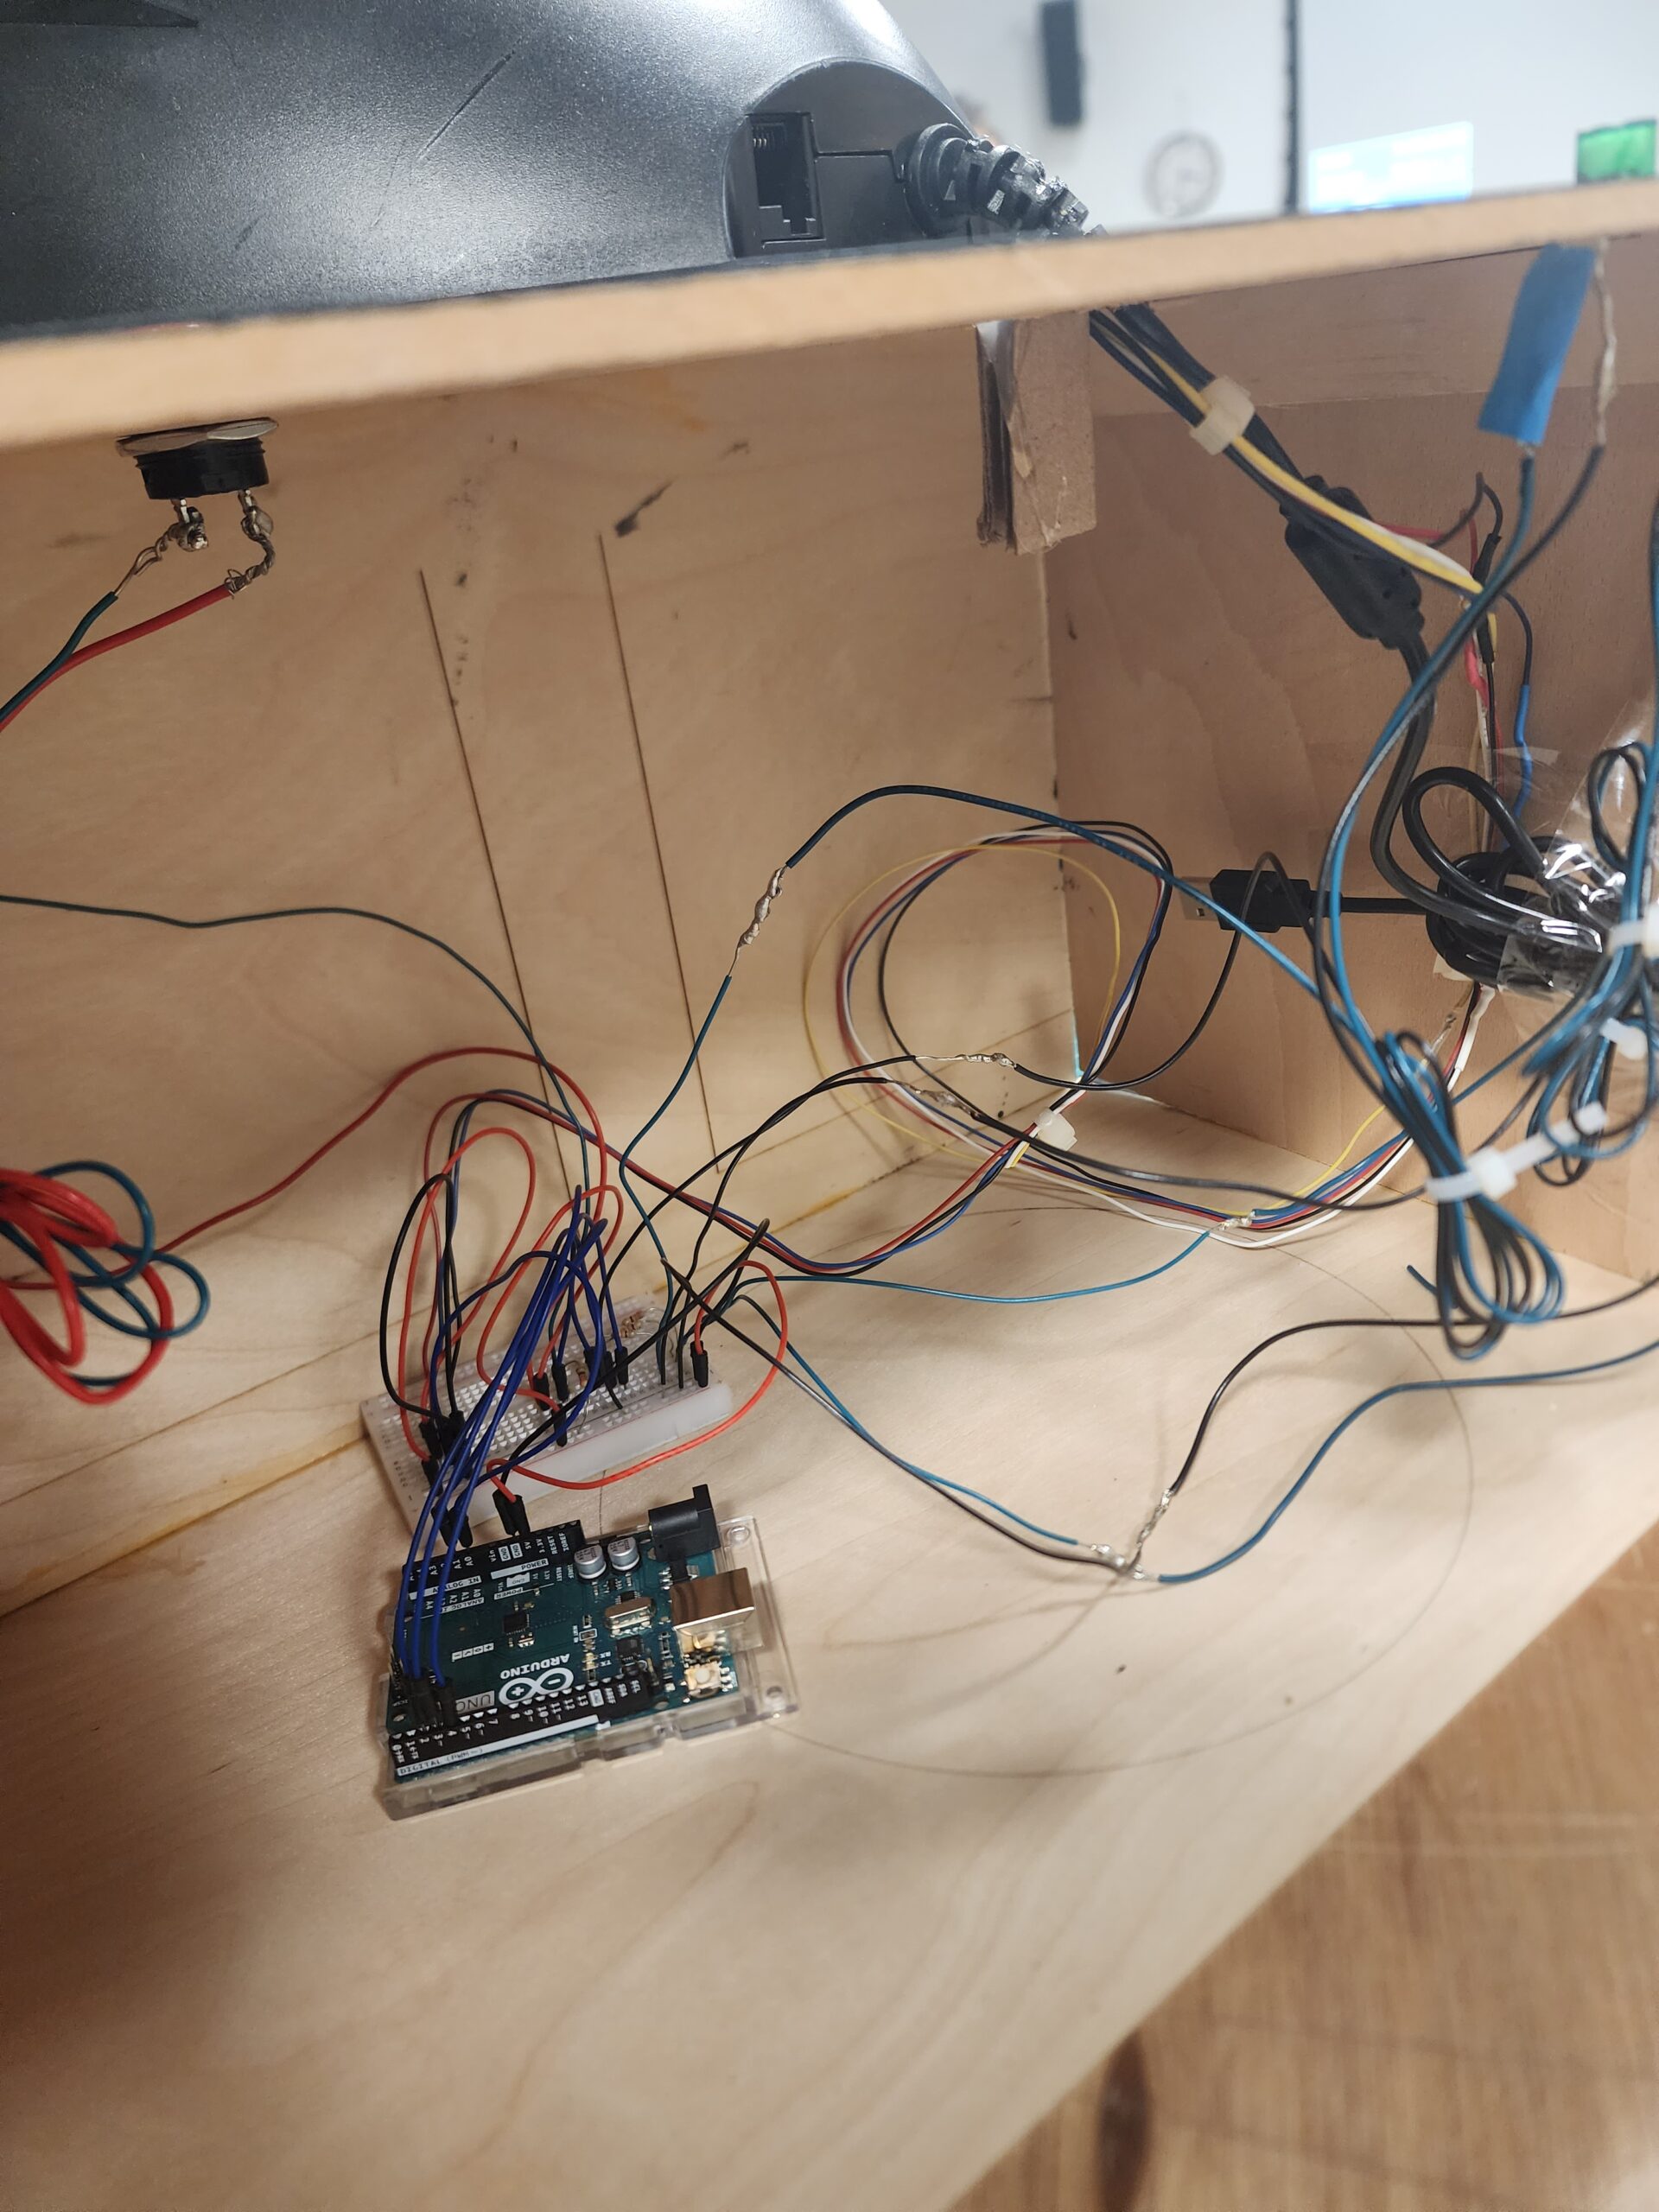
My initial plan was to build a steering wheel myself from scratch and somehow attach it to the potentiometer. Luckily, my professor Michael Shiloh had a spare steering wheel from an actual game that I could use. There is a potentiometer inside the wheel and so attaching it to the arduino was not much of a struggle. I drilled holes for the led health indicators and the switch button for shooting lasers. Since the the led indicators from the lab did not end up working, I soldered the LEDs and used glue gun to attach them to the different indicators.
I also hand painted the box black since the wheel itself was black and attached stickers to the box including the game logo to improve overall aesthetics.
Reflection
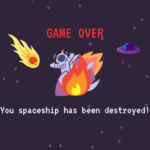
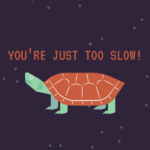
Overall, I am very satisfied with how everything turned out. I was able integrate communication between both p5 and arduino which was one my mail goals for the game. I’m also particularly proud of how the the physical controller turned out. I also paid a lot of attention to little details this time like designing different game over menus. There are 3 different ways one can lose: earth destroyed by asteroid/aliens, spaceship destroyed by aliens and not being able to finish in time, and there are different menus for each of them.
the game win menu which was a rare sight for everyone at the showcase:
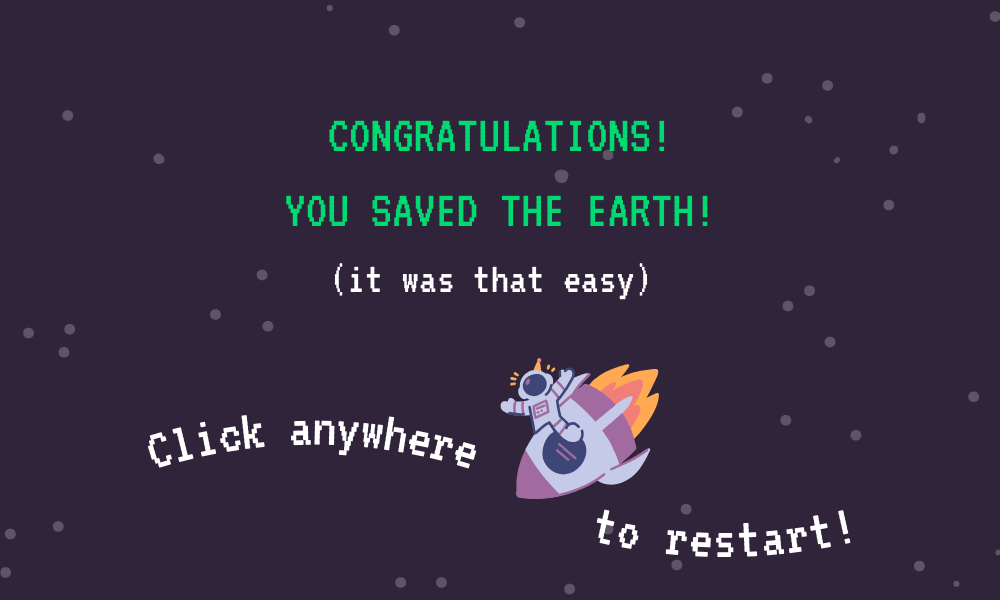
If I had more time on my hands, I would have added another level between level 1 and level 2 since a lot of people told me the transition between the two levels is quite huge. Since I did not have time to add another level, I decided to make the second level a bit easier by reducing the number of aliens one needs to destroy to win the game so a bunch of people were able to win the game at the showcase!