Describe your concept
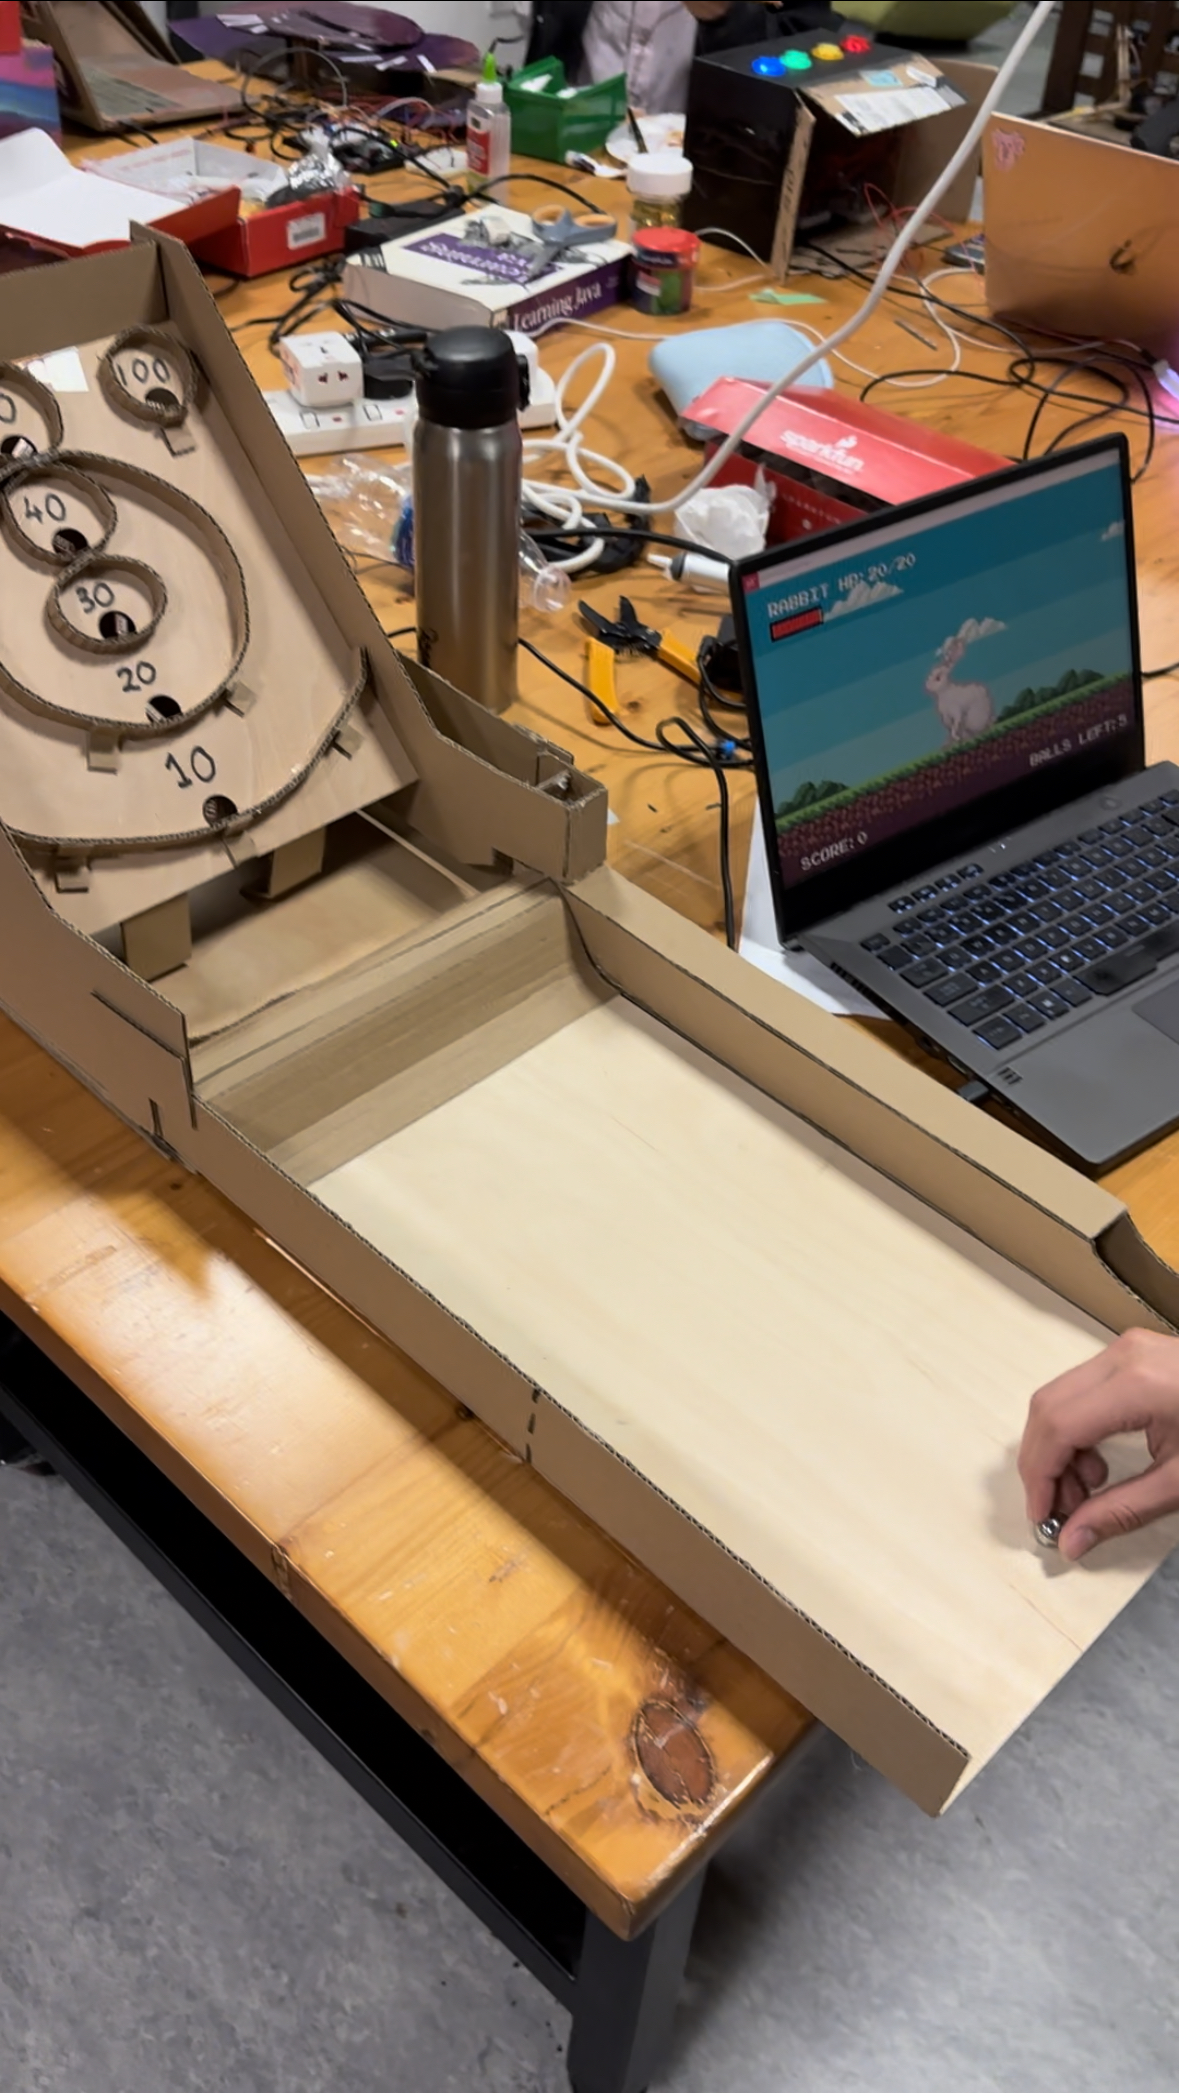
I wanted to make an arcade machine for my final project, and my initial idea was a pachinko machine. However, I pivoted away from that as I couldn’t think of a good way to integrate P5.js into that project, and decided to make Skeeball instead.
My project is basically skeeball, with a touch of an RPG battle concept, hence the very creative name ‘Skeeball Dungeon’. The player will have to fight 4 increasingly tougher opponents in P5.JS, and they the damage they do is equal to the amount of points they get in skeeball. For each opponent, they are given 5 balls, and they have to defeat the opponent in the number of given balls.
Include some pictures / video of your project interaction
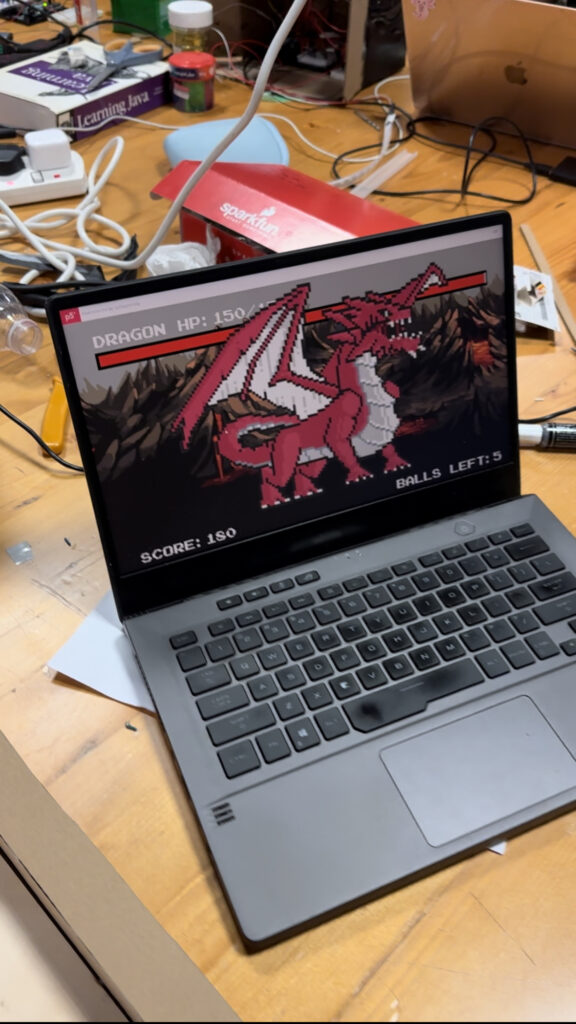 p5.js battle!
  skeeball !
Description of interaction design
The p5.js sketch is used to display instructions, showing high scores, visualizing the battles and hold the graphics. The Arduino is used to obtain information from the user playing Skeeball, detecting when a target has been hit and how many points was obtained.
Description of Arduino code and include or link to full Arduino sketch
The Arduino was used to detect when targets has been hit in the Skeeball physical component. To detect when a target has been hit, a flex sensor is used for each hole. When the ball passes through the hole, the Arduino pin input that is connected through the flex sensor-voltage divider circuit will have a lower/higher reading. This change is reading is then used to detect when a target has been hit.
Description of p5.js code and embed p5.js sketch in post
https://editor.p5js.org/ojmjunming/sketches/V0ARmZA70
The p5.js code holds all of the battle logic and the screens. A state system is used to transition between each different ‘screen’ to make the code more readable. e.g the first screen, instructions and more.
if (currentScene === "highScore") {
    highScoreScreen();
  } else if (currentScene === "instructions") {
    instructionScreen();
  } else if (currentScene === "battle") {
    renderBattleScreen();
  }
The code also keeps track of the health of the monster, the current monster, the score and the number of balls. The Arduino does not know how many balls are left, it only communicates the ball hits to p5.js. The p5.js sketch also maintains a top 5 list of high scores.
Description of communication between Arduino and p5.js
The Arduino will send a message of length 2 a single time when a target is hit. Otherwise, it sends a garbage message of length 1. The message contains the amount of points that was scored with that hit. The p5.js will continuously handshake with Arduino, most of the time the data is useless (when it’s length 1), and when the length is 2, it means that a target has been hit and the message will be processed, dealing damage to the monster equivalent to the points scored.
What are some aspects of the project that you’re particularly proud of?
There were some really interesting problems that I was proud of solving:
1) Constructing the Skeeball machine.
I originally planned to use the laser cutter to build the physical component, but the laser cutter only managed to cut out one piece before it started acting up. I waited 3 hours and the laser cutter was still not working. So, I pivoted to making it with cardboard and wood pieces, using tons of hot glue but it turned out to be surprisingly stable so I’m pretty proud of the machine itself as it took me a lot of time.
2) 7 flex sensors, but only 6 analog inputs on the Arduino Uno.
I was using flex sensors to detect target hits, but I had 7 targets/holes but only 6 analog inputs. Remembering that a digitalPin reads HIGH or LOW voltages (2.5-5V, 0-2.5V), I constructed a voltage divider with 30K resistors, so the analog reading teetered on the edge of 2.4-2.6V (480-530 analogInput) depending on the flex of the flex sensor. Knowing this, I was able to use a digitalPin to read the flex of the sensor ( the other sensors were read with a analogPin, which was much easier ). When the sensor is flexed, the reading would change from HIGH to LOW.
What are some areas for future improvement?
The skeeball machine could have been constructed better, as I did not have time to paint or decorate it well. The ball also sometimes gets stuck while it’s attempting to return to the start tray and you have to manually push it out. I also had to scrap an idea I had of detecting missed ball hits, as I wasn’t able to figure out how to attach a sensor for that, so in the future it would be nice to be able to include that in my game.

![Christmas Gift [Handmade DIY] Pinball Game Board Game Wooden Toy Handmade DIY - Shop jwoodgarden Wood, Bamboo & Paper - Pinkoi](https://cdn01.pinkoi.com/product/T3UQSb8D/5/640x530.jpg)