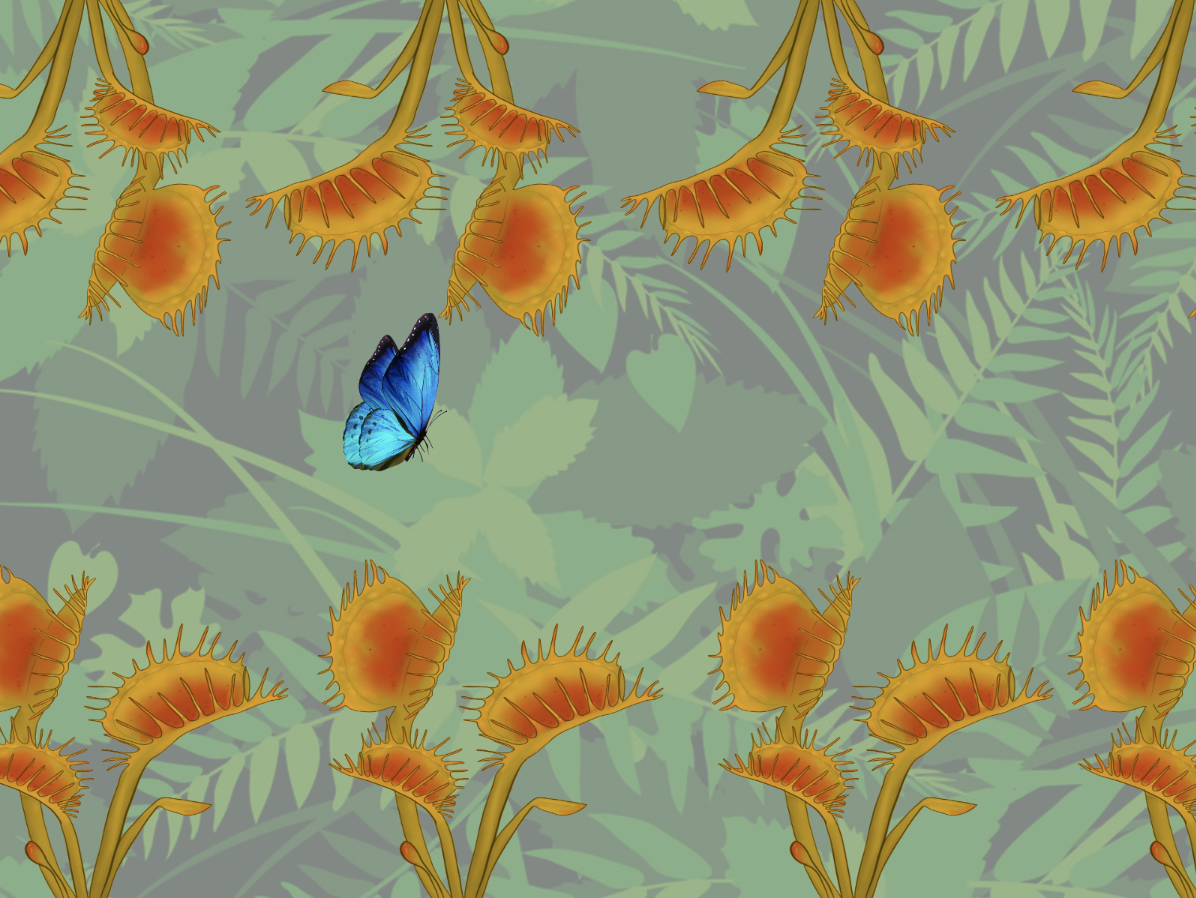
Butterfly Generative Art – Final Project

Idea 🦋

As planned, I wanted to incorporate my continuous butterfly theme. I had initially planned to make a butterfly catcher game however changed my concept/idea to butterfly generative art.

Process

p5.js
I began the process by working on the p5js code. I started with working on the butterfly using PI and then added in delta angle in order to add points and noise on the butterfly shape. I also added perlin noise to randomly generate smooth gradients and randomize the shape of the butterfly. I was able to animate the shape and make it look like the wings were flapping using sin and cos (I had to do some research and use online sources to help with this). Once this was sorted, I then played around with background, fill and stroke weight. I was able to remove the background, allowing the moving butterfly to leave behind an imprint which formed the design of a peony (the generate art aspect). I then played around with colors – I wanted to use a flex sensor to control changing colors of the art. Once all the p5js code and animating was sorted, which took the longest to do, I moved onto working on Arduino. Then I came back to the p5js code to insert code that allowed the color to change when the flex sensor was engaged.

p5js code 

// Z's 🦋 

//handshake 
let rVal = 0;
let alpha = 255;
let left = 0;
let right = 0;

//adding a dimension
let yoff = 0;

function setup() {
  createCanvas(600, 600);
  createCanvas(windowWidth, windowHeight);
}

function draw() {
  translate(width / 2, height / 2);
    //rotate(PI / 2);

    stroke(255);
    fill(rVal, 162, 245);
    strokeWeight(1);

  //delta angle - each side of butterfly is PI 
  //points
    let da = PI / 150;
  //noise value
    let dx = 0.04;
  
  //perlin noise
    let xoff = 0;
  
  //butterfly wings 
    beginShape();
    for (let a = 0; a <= TWO_PI; a += da) {
      
      //using perlin noise to randomize the shape of butterfly
        let n = noise(xoff, yoff);
        let r = sin(2 * a) * map(n, 0, 1, 50, 300);
      
      //make it look like the wings are flapping
        let x = sin (frameCount*0.01) * r * cos (a);
        let y = r * sin(a);
        if (a < PI) {
            xoff += dx;
        } else {
            xoff -= dx;
        }
      //continous shape 
        vertex(x, y);
      
      
    }
    endShape();

  //animating the butterfly 
    yoff += 0.01;
  
  // if (!serialActive) {
  //   text("Press Space Bar to select Serial Port", 20, 30);
  // } else {
  //   text("Connected", 20, 30);
  // }
  
  print(rVal);
}
  
  function keyPressed() {
  if (key == " ") {
    // important to have in order to start the serial connection!!
    setUpSerial();
  }
}

function mousePressed() {
  if (mouseX > 0 && mouseX < windowWidth && mouseY > 0 && mouseY < windowHeight) {
    let fs = fullscreen();
    fullscreen(!fs);
  }
}

function windowResized() {
  resizeCanvas(windowWidth, windowHeight);
}
  
  function readSerial(data) {
  //READ FROM ARDUINO HERE

  if (data != null) {
    // make sure there is actually a message
    // split the message
    let fromArduino = split(trim(data), ",");
    // if the right length, then proceed
    if (fromArduino.length == 1) {
      // only store values here
      // do everything with those values in the main draw loop
      rVal = fromArduino[0];
      //alpha = fromArduino[1];
    }
    
    //SEND TO ARDUINO HERE (handshake)
    //////////////////////////////////
   // let sendToArduino = left + "," + right + "\n";
    writeSerial("\n");
  }
}

Arduino

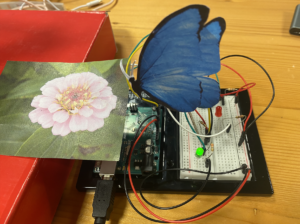
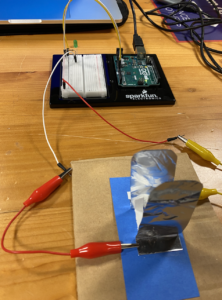
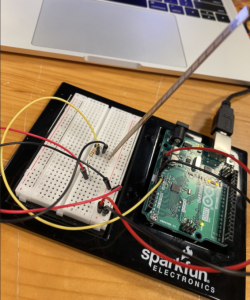
I started off wanting to use the ZX gesture sensor however was facing difficulty as it would often print random numbers, even when the wiring was done correctly. Then I tried using the distance sensor however the beam for that was limited, therefore I moved onto use a flex sensor. Once I settled on using a flex sensor, I wired up the board and had to test out the sensor to make sure it was printing values out well. I then soldered the flex sensors to wires so that they could be put into a glove. My idea was that when the hand would move (when glove is worn), the colors of the art (butterfly and peony design) would change according to the movement of the sensor.  I taped the flex sensor to a glove and then put another glove on top to make it look more seamless and aesthetically appealing.

Arduino code 

//Constants:
const int flexPin = A0; //pin A0 to read analog input

//Variables:
int value; //save analog value

void setup(){
  Serial.begin(9600);   //Begin serial communication
}

void loop(){
  value = analogRead(A0);         //Read and save analog value from potentiometer
  value = map(value, 180, 520, 0, 255);  //Map value 0-1023 to 0-255 (PWM)
  value = constrain(value, 0, 255);
  Serial.println(value);               //Print value

  // wait for data from p5 before doing something
  while (Serial.available()) {
    if (Serial.read() == '\n') {

    }
  }
}

Handshake 

Then I had to put together both p5js and Arduino through handshake and to start serial connection. I struggled with this part for a bit and realized how essential it is to have all the key part of the handshake code.

Final Result 

Overall I am happy with my final project. I am proud of how far I’ve come with coding, I started off the semester with no experience and am ending it having learnt a lot! I love how the project incorporates what I love – butterflies, flowers (peonies in particular) and uses my favorite colors (blue, purple and pink). In the future, I’d love to make more projects related to butterflies and potentially display them on a larger scale.

Serial Communication Exercises

Marium and I worked together in order to complete these tasks.

Exercise 1 – make something that uses only one sensor on Arduino and makes the ellipse in processing move on the horizontal axis, in the middle of the screen, and nothing on Arduino is controlled by processing

We made it so whenever the potientometer is rotated, the ball moves along the horizontal axis, in the middle of the screen.

Processing code:

let serial; // variable to hold an instance of the serialport library
let portName = "/dev/cu.usbmodem14501"; // fill in your serial port name here
let xPos=0;
let yPos=0;
let onOff=0;
function setup() {
  createCanvas(640, 480);
  serial = new p5.SerialPort(); // make a new instance of the serialport library
  serial.on("list", printList); // set a callback function for the serialport list event
  serial.on("connected", serverConnected); // callback for connecting to the server
  serial.on("open", portOpen); // callback for the port opening
  serial.on("data", serialEvent); // callback for when new data arrives
  serial.on("error", serialError); // callback for errors
  serial.on("close", portClose); // callback for the port closing
  serial.list(); // list the serial ports
  serial.open(portName); // open a serial port
}
function draw() {
  background(255);
  ellipse(xPos, yPos, 50, 50); // draw the circle
}
// get the list of ports:
function printList(portList) {
  // portList is an array of serial port names
  for (let i = 0; i < portList.length; i++) {
    // Display the list the console:
    print(i + " " + portList[i]);
  }
}
function serverConnected() {
  print("connected to server.");
}
function portOpen() {
  print("the serial port opened.");
}
function serialEvent() {
  // read a string from the serial port
  // until you get carriage return and newline:
  let inString = serial.readLine();
 
  //check to see that there's actually a string there:
  if (inString.length > 0) {
    let sensors = split(inString, ","); // split the string on the commas
    if (sensors.length== 2) {
      // if there are three elements
      
      xPos = map(sensors[1], 0, 1023, 0, width); // element 0 is the locH
      yPos = height/2; 
      // yPos = map(sensors[1], 550, 250, 0, height); // element 1 is the locV
    }
  }
  serial.write(onOff);
}
function serialError(err) {
  print("Something went wrong with the serial port. " + err);
}
function portClose() {
  print("The serial port closed.");
}

Arduino code:

void setup() {
Serial.begin(9600);
while (Serial.available() <= 0) {
Serial.println("0"); // send a starting message
delay(300); // 
}
}
void loop() {
while (Serial.available() > 0) {
// read the incoming byte:
int inByte = Serial.read();
int sensorValue = analogRead(A0);
Serial.println(sensorValue);
}
}

Exercise 2 – make something that controls the LED brightness from processing

We made it so when the mouse hovers on the left side of the canvas, the LED is dim and then the far right of the canvas is the brightest. It works in a gradient, so the point in the middle of the canvas is semi-bright.

Processing code:

let serial; // variable to hold an instance of the serialport library
let portName = "/dev/cu.usbmodem14501"; // fill in your serial port name here
let xPos = 0;
let yPos = 0;
let onOff = 0;
let brightness = 0; 
function setup() {
  createCanvas(640, 480);
  serial = new p5.SerialPort(); // make a new instance of the serialport library
  serial.on("list", printList); // set a callback function for the serialport list event
  serial.on("connected", serverConnected); // callback for connecting to the server
  serial.on("open", portOpen); // callback for the port opening
  serial.on("data", serialEvent); // callback for when new data arrives
  serial.on("error", serialError); // callback for errors
  serial.on("close", portClose); // callback for the port closing
  serial.list(); // list the serial ports
  serial.open(portName); // open a serial port
}
function draw() {
  background(255);
}
  
// get the list of ports:
function printList(portList) {
  // portList is an array of serial port names
  for (let i = 0; i < portList.length; i++) {
    // Display the list the console:
    print(i + " " + portList[i]);
  }
}
function serverConnected() {
  print("connected to server.");
}
function portOpen() {
  print("the serial port opened.");
}
function serialEvent() {
  // read a string from the serial port
  // until you get carriage return and newline:
  let inString = serial.readLine();
  
  brightness = mouseX;
  let mapped = map (brightness, 0, 640, 0, 255);
  serial.write(mapped);
}
function serialError(err) {
  print("Something went wrong with the serial port. " + err);
}
function portClose() {
  print("The serial port closed.");
}

Arduino code:

int ledPin = 5;
void setup () {
  Serial.begin(9600);
  pinMode(5, OUTPUT);
  while (Serial.available() <= 0) {
    Serial.println("0,0"); // send a starting message
    delay(300);              // wait 1/3 second
  }
}
void loop() {
  while (Serial.available() > 0) {
    // read the incoming byte:
   int inByte = Serial.read();
    analogWrite(ledPin, inByte);
    Serial.println("0");
  }
}

Exercise 3 – take the gravity wind example below and make it so every time the ball bounces one led lights up and then turns off, and you can control the wind from one analog sensor

We found this exercise the most difficult. We took it step by step by first ensuring we have all the important elements for serial communication, including changes in the index.html. Then we worked on getting the LED to light up when the ball bounces and then turn off. Then we worked on the wind part and controlling with the potentiometer.

Processing code:

let serial; 
let portName = "/dev/cu.usbmodem14401"; 
let velocity;
let gravity;
let position;
let acceleration;
let wind;
let drag = 0.99;
let mass = 50;
let bounce;
let xPos=0;
let yPos=0;
let onOff=0;
// for port connection and handshake 
function setup() {
  createCanvas(640, 360);
  serial = new p5.SerialPort(); // make a new instance of the serialport library
  serial.on("list", printList); // set a callback function for the serialport list event
  serial.on("connected", serverConnected); // callback for connecting to the server
  serial.on("open", portOpen); // callback for the port opening
  serial.on("data", serialEvent); // callback for when new data arrives
  serial.on("error", serialError); // callback for errors
  serial.on("close", portClose); // callback for the port closing
  serial.list(); // list the serial ports
  serial.open(portName); // open a serial port
  
  // get the list of ports:
function printList(portList) {
  // portList is an array of serial port names
  for (let i = 0; i < portList.length; i++) {
    // Display the list the console:
    print(i + " " + portList[i]);
  }
}
function serverConnected() {
  print("connected to server.");
}
function portOpen() {
  print("the serial port opened.");
}
function serialEvent() {
  // read a string from the serial port
  // until you get carriage return and newline:
  let inString = serial.readLine();
  //xPos = map(inString, 0, 1023, 0, width);
 
  //check to see that there's actually a string there:
  if (inString.length > 0) {
    xPos = map(inString, 0, 1023, 0, width);
  }
  serial.write(onOff);
}
function serialError(err) {
  print("Something went wrong with the serial port. " + err);
}
function portClose() {
  print("The serial port closed.");
}
  
  // code for the actual bouncing, wind, etc. 
  
  noFill();
  position = createVector(width/2, 0);
  velocity = createVector(0,0);
  acceleration = createVector(0,0);
  gravity = createVector(0, 0.5*mass);
  wind = createVector(0,0);
  bounce=map (mass,15,80,.80,.80);
}
function draw() {
  background(255);
  if (!keyPressed){
    
    console.log(xPos);
    velocity.x*=bounce;
  }
  
  wind.x = map(xPos, 0, width, -1, 1);
  
  applyForce(wind);
  applyForce(gravity);
  velocity.add(acceleration);
  velocity.mult(drag);
  position.add(velocity);
  acceleration.mult(0);
  fill(255);
  ellipse(position.x,position.y,mass,mass);
  
  
  if (position.y > height-mass/2 - 40) {
    if (velocity.y > 1) {
      serial.write(255);
    }
    
    if (position.y > height-mass/2) {
      velocity.y *= -0.9;  // A little dampening when hitting the bottom
      position.y = height-mass/2;
    }
  }
}
function applyForce(force){
  // Newton's 2nd law: F = M * A
  // or A = F / M
  let f = p5.Vector.div(force, mass);
  acceleration.add(f);
}
function keyPressed(){
  if (keyCode==LEFT_ARROW){
    wind.x=-1;
  }
  if (keyCode==RIGHT_ARROW){
    wind.x=1;
  }
  if (key==' '){
    mass=random(15,80);
    position.y=-mass;
    velocity.mult(0);
  }
}

Arduino Code:

void setup() {
  Serial.begin(9600);
  pinMode(5, OUTPUT);
  while (Serial.available() <= 0) {
    Serial.println("0,0"); // send a starting message
    delay(300);              // wait 1/3 second
  }
}
void loop() {
  while (Serial.available() > 0) {
    // read the incoming byte:
   int inByte = Serial.read();
   analogWrite(5, inByte);
    int sensorValue = analogRead(A0);
    Serial.print(sensorValue);
    Serial.println();
  }
}

Video 

https://youtube.com/shorts/fyPlnoR_qQQ

Final Project Ideas

This final project must incorporate both Arduino and p5js. I have a few ideas, here is one –

Idea: Game – Catch the Butterflies 

{yes my butterfly obsession continues…}

The game would be made in p5js, which would have/be a butterfly garden. A catcher, which would be controlled using the Arduino (using a motion detecting sensor), would be used to catch butterflies and avoid unrelated/harmful items. The catcher would be the user’s hand, wherever the hand moves, the catcher will move the same direction. The more butterflies the user catches, the more points they get. If unrelated items are touched, a point will be deducted. It will be a timed game: How many butterflies can you catch in 1 minute?  This is just a brief idea and there are many areas to think about, in terms of aesthetics, execution, etc.

Xylophone – Yesenia & Zaina

When we started thinking about a potential instrument to make we thought of a piano, xylophone or a guitar. We began by experimenting with different analog sensors including pressure/force sensors and piezo elements. We settled on making a xylophone using 4 pressure sensors so that each time the sensor is pressed, the buzzer would make a sound and at the same time a LED would light up (synced with when the note is pressed). Syncing the LEDs with the sensors is what we struggled with the most, we had the wiring as well as the code however we could not get it to work. 

First, we wired up the sensors & buzzer and wrote up the code to make each pressure sensor play a different note when pressed. 

We then wired up a button (digital sensor) with 4 different LEDs. We did these two steps independently in order to make sure each one worked well on its own. However, what we found most challenging was to combine the two circuits and codes to make the whole thing work altogether. We wanted (1) the buzzer to play sound when the pressure sensor was hit, (2) the LED to light up when the pressure sensor was hit and be off otherwise and (3) the button to enable the ON and OFF of the LEDs adding a light feature to the xylophone. 

#include "pitches.h"
#define FORCE_SENSOR_BLUE A0
#define FORCE_SENSOR_GREEN A1
#define FORCE_SENSOR_RED A2
#define FORCE_SENSOR_YELLOW A3

const int ledPinBlue = 7;
const int ledPinGreen = 2;
const int ledPinRed = 3;
const int ledPinYellow = 4;

const int buttonPin = 5;

bool onOff = HIGH;
byte prevButtonState = LOW;
bool blinking = false;

int notes [10] = {NOTE_C4, NOTE_D4, NOTE_E4, NOTE_F4, NOTE_G4, NOTE_A4, NOTE_B4, NOTE_C5, NOTE_D5, NOTE_E5};

void setup() { 
  Serial.begin(9600);
  
//  pinMode(ledPinBlue, OUTPUT);
//  pinMode(ledPinGreen, OUTPUT);
//  pinMode(ledPinRed, OUTPUT);
  pinMode(ledPinYellow, OUTPUT);
  pinMode(buttonPin, INPUT);
}

void loop() {

  byte buttonState  = digitalRead(buttonPin);
  Serial.println(buttonState);

  if (buttonState == HIGH && prevButtonState == LOW) {

    blinking = !blinking;
  }
  
  prevButtonState = buttonState;
  
  int analogReadYellow = analogRead(FORCE_SENSOR_YELLOW);
  int analogReadRed = analogRead(FORCE_SENSOR_RED);
  int analogReadGreen = analogRead(FORCE_SENSOR_GREEN);
  int analogReadBlue = analogRead(FORCE_SENSOR_BLUE);

  Serial.print(analogReadYellow);
  Serial.print(analogReadRed);
  Serial.print(analogReadGreen);
  Serial.print(analogReadBlue);// print the raw analog reading

  if (analogReadYellow > 100) {  
    Serial.println(" --> YELLOW ");
    tone (6, NOTE_C4, 200);
  }
  if (blinking == true){
    digitalWrite(ledPinYellow, HIGH);
    }
   else {
    digitalWrite(ledPinYellow, LOW);
    } 
    
  if (analogReadRed > 200) {   
    Serial.println(" --> RED ");
    tone (6, NOTE_D4, 200);
    pinMode(ledPinRed, HIGH);
    }
   else {
    digitalWrite(ledPinRed, LOW);
    } 
    
  if (analogReadGreen > 200) {   
    Serial.println(" --> GREEN ");
    tone (6, NOTE_E4, 200);
    pinMode(ledPinGreen, HIGH);
    }
   else {
    digitalWrite(ledPinGreen, LOW);
    } 

  if (analogReadBlue > 200) {   
    Serial.println(" --> BLUE ");
    tone (6, NOTE_F4, 200);
    pinMode(ledPinBlue, HIGH);
    }
   else {
    digitalWrite(ledPinBlue, LOW);
    }
}

We then spent time working on the aesthetics of the instrument. Using cardboard and paper we created the xylophone with a box underneath (where we planned to hide all the wires and breadboard). We made two mallets and had to make them heavy enough so that the sensors could detect the pressure. We also realized that by using the proper resistor (10k) the sensor was more sensitive and did not require for the mallet to be used with much force. Switching the sensors and the wires over to the cardboard box was very difficult as there are a lot of wires, but, what worked was checking the wiring for each sensor by attaching a spare sensor before attaching the wires to the sensor in the box, this was a quick and easy way to make sure it was working properly, before make it so that you can’t see where the wires are and if they’re touch. 

Final

https://youtube.com/shorts/9cNCOIGK0fQ

Z’s Butterfly is back!

Ideation 

I struggled a lot with coming up with a creative idea for this assignment. I thought about my love for butterflies and considered making something butterfly related (again). Initially I thought of making a glow in the dark butterfly which would light up in the dark. However, I was still unsure about this hence reached out to Prof. with my idea and he helped me navigate through a more creative idea. Using flex sensors (analog sensor), as the butterfly flies over to the Zinnia flower, the LED gets brighter and brighter (as the flex sensor bends). For context, adult butterflies land on these flowers to suck on some delicious nectar.  The button (digital sensor), when pressed, blinks red to indicate that the butterfly is about to approach the flower.

Implementation 

It took a while to figure out how to wire everything as I’m still wrapping my head around Arduino. I used online resources to help, I watched a ton of YouTube videos and tried to make sense of it. I first coded and wired the circuits for the flex sensors & LED1. I had to make sure I was using the right resisters for each component otherwise it would not work well. I also learnt that these sensors are very sensitive – I also tested this out by printing out the values in my code.

Once I got the flex sensor wired up, I coded and wired the circuit for the button & LED2. I then printed out my butterfly & flower, taped the butterfly onto the flex sensor and attached the flower image to a lollipop stick so it’s easier to hold. The coding for the flex sensor was relatively straightforward however the coding for the button was more complex (therefore I used an online resource to help me with this – https://forum.arduino.cc/t/how-to-make-a-led-light-stay-on-when-press-switch/195814/5). The code I was writing initially for the button would only light up the LED if the button was pressed continuously and I wanted the LED to stay on when the button was pressed and then switched off when the button was pressed again.

An issue I was facing was to get the flex sensor and button to work at the same time. I was able to get them to work individually however then had to make adjustments in my code in order to enable them both to work simultaneously.

Code

//for the button
const int ledPin2 = 2;
const int buttonPin = 5;

unsigned long timer = 0;
bool onOff = LOW;
byte prevButtonState = LOW;
bool blinking = false;

//for the flex sensor
const int ledPin1 = 3; 
const int flexPin = A0; 

int value;

void setup() {
  //for the flex sensors
  pinMode(ledPin1, OUTPUT); 
  Serial.begin(9600); 

//  //for the button 
  pinMode (ledPin2,OUTPUT); 
  pinMode (buttonPin,INPUT);
}

void loop() {
  //for the flex sensors 
  value = analogRead (flexPin); 
  Serial.println (value); 
  value = map (value, 550, 800, 0, 255); 
  //   value = map (value, 700, 900, 0, 255); 
  analogWrite(ledPin1, value); 
//  delay (100);
  
  //for the button which blinks the LED (code from class exercise)
    byte buttonState  = digitalRead(buttonPin);
  Serial.println(buttonState);
  
  if (buttonState == HIGH && prevButtonState == LOW) {
    blinking = !blinking;
  }
  prevButtonState = buttonState;
  if (blinking == true) {
    if (millis() > timer) {
      onOff = !onOff;
      timer = millis() + 250;
      digitalWrite(ledPin2, onOff);
    }
  } else {
    digitalWrite(ledPin2, LOW);
  }
}

The final piece 

Video 

Hands-Free Switch

Blow to connect


For this project, it took me a while to come up with an idea as we use our hands so often, every idea I imagined included hands in some way. Finally I decided to build something which would work when blowed on.

I began by making a simple circuit which would light up the LED, without a switch. I just used a resister, wires and the LED light. Then I detached one of the wires and added another wire in order to attach them both to alligator clips which would link to my project.

I ended up making a circuit which would light up the LED when two pieces of aluminium foil would touch (complete the circuit) through blowing from one side. The two pieces of foil are taped onto a piece of card and attached by alligator clips to the circuit.

In the future, if I was to recreate this concept along with code, I could incorporate sound each time the pieces of foil touch.


Midterm Game

Idea
As mentioned in my midterm progress post, for this game, I took inspiration from the game ‘Flappy Bird’ where you have to control the bird by not letting it touch the green pipes. I wanted to incorporate a similar concept therefore went with the idea of having to keep a butterfly away from the fly traps (as I love butterflies).

How Are &amp;#39;Flappy Bird&amp;#39; and &amp;#39;Candy Crush&amp;#39; Still Making So Much Money? - Pacific Standard
Original version of the game

Process & Implementation (step by step)
Step 1: I made a basic layout with shapes, butterfly and background.
Initially I had images of real traps however then changed these to rectangular shapes as it was becoming difficult in step 4 when I was working on the collisions.

Before


After

Step 2: I made a butterfly class and stored all its features then added movement and control of this movement through the keypressed function.
Step 3: Similarly, I made a trap class (the rectangles with curved edges which I made first but then changed to regular rectangles as the curved edged ones were not detecting collisions accurately) and stored its features such as width, spacing, height, color, etc. I generated random heights within certain limits so that they have appropriate spacing to allow the butterfly to fit through.
Step 4: Once all this was figured out, I had to check for collisions so that if the butterfly touched the traps, the color of the trap would change to indicate it has been hit (from white to red). This was one of the most difficult steps of the process.
Step 5: Once the trap is hit, I wanted the game to stop and show the game is over. Hence, I added on screen text to signify this.
Step 6: Then, I created and inserted a start-up instruction page using mode and switch mode within the draw function.
Step 7: I then created buttons to start and restart the game. I did this by going into the html and adding ‘dom’ to one of the lines of code.  To allow the buttons to work and restart the entire game, I had to make a game class to store the features I wanted. At first the buttons were very small and not as aesthetically appealing thus then played around with it in the style.css tab.

Before
After

Step 8: Next, I added a scoring system, which is placed on the bottom right of the screen.
Step 9: Lastly, I added instrumental sound in the background.

Reflection 
I am happy with how the game turned out and thoroughly enjoyed making it. Some parts were more difficult than others however taking it step by step really helped. I was able to apply skills used in class as well as learn how to do new things. For next time, I would like to have different levels of difficulty. Also, I would want the music to stop when game is over and then start playing again when the game is restarted. In addition, I would want to add a butterfly sprite so that each time the space bar is pressed, the butterfly flaps its wings.

My Game

  The buttons below the canvas do not show here.


Midterm Progress Report

Ideas & Inspiration

For this game, I took inspiration from the game ‘Flappy Bird’ where you have to control the bird by not letting it touch the green pipes. I wanted to incorporate a similar concept therefore went with the idea of having to keep a butterfly away from the fly traps (I love butterflies).

How Are &amp;#39;Flappy Bird&amp;#39; and &amp;#39;Candy Crush&amp;#39; Still Making So Much Money? - Pacific Standard
Original version of the game
My version of the game

Process & Implementation 

Once I decided that I wanted to use a butterfly and fly traps, I started  brainstorming what I wanted the aesthetic of the game to be, by choosing suitable images and a color scheme. Then, I did the basics of finding images I wanted to use for the game, preloading them into p5js and then playing around with their sizes, placement and size.

Then I was wondering what to do next as there was so much I wanted to do, so I noted down all the different functionalities I wanted and made a list. I decided to start off by making a butterfly class so that I could store all of its features such as width & height as well as what I want the velocity & gravity values to be (to actually make it move). I am currently working on getting the butterfly to bounce when the spacebar is pressed. I also made a class for the fly traps, which I need to continue working on however felt as though I should focus on working on the butterfly first and then the traps next.

What to work on next

  1. Get the butterfly to bounce, using the spacebar key
  2. Get the frame to move with random height fly traps.
  3. Have a start up screen which introduces the game with basic instructions on how to play.
  4. Maybe – have a sound for each time the spacebar is pressed
  5. Have a points system
  6. Have the fly traps go red once the butterfly touches them – I may have to hide a shape behind the butterfly to allow this to work well.

What I have so far –

Assignment 4 – Data Visualization

For this assignment I was keen to experiment with data and data visualization. There are so many ways data can be visualized and presented – I wanted to explore this. I began by looking up ways data can be visualized such as bar charts, pie charts, maps,  etc. I liked the look of bubble charts.

By using data found on trends.google.com about the number of types of flowers in different regions in the US, I decided to make a bubble chart. By using the preload function I loaded the data. Then within my for loop I drew the bubbles which had sizes according to their frequencies – bigger bubbles have a larger amount of types of flowers in their assigned region and smaller bubbles have less number of different types of flowers in their designated region. I wanted to visualize these at random locations thus used ‘const x = random(0, width);’ and ‘const y = random(0, height)’. However this caused an issue of overlapping bubbles – which is one of the biggest challenges I had. As shown below, the bubbles’ sizes to respond to their frequencies however there are many overlapping bubbles and many are cutting cut off of the canvas.

I wasn’t able to grasp how to solve this issue on my own hence watched many tutorials online such as Shiffman’s YouTube tutorials as well as used the p5.js references to help. Although I couldn’t completely apply the code Shiffman demonstrated, I was able to implement the logic. I had to make a bubbles array.  Also, I was able to avoid the bubbles getting cut off by declaring width and height and then implementing it into the code. Here it seems like the bubbles are getting cut off however on my canvas all the bubbles are within the frame of the canvas – https://editor.p5js.org/zainaiqbal/sketches/8jXV8InrS

In the future, I would like to work on reducing the spacing between the bubbles as well as increase their sizes so that the differences are more obvious – like they were in my code earlier (shown above). Every time I attempt to do this, my code crashes. Also, I would like to include a function where every time the mouse is pressed on the canvas, the canvas refreshes and so the arrangement of the bubbles change.

This is the final outcome –


Assignment 3 – Object-Oriented Programming

Initially I hard time coming up with ideas of what I wanted to do for this project. Sitting in my friend’s room, who is obsessed with space, I got inspired to make something space related. In addition, I wanted to experiment with inserting images into p5.js (using the ‘preload’ function)- this was definitely the most time consuming and trickiest part. I ended up realizing that the images I selected from google should actually have a transparent background, many of them seem like they do but it’s actually just a white and grey grid. So initially this is how the inserts would look like –

Once I tackled this issue, by downloading the images directly from websites, I inserted more images such as the rocket (that I wanted to launch). I figured out how to make more than one cloud appear (and control the size, position and lastly the movement of each one). I was then able to control the speed at which the clouds and rocket move – using ‘posXorY +=’ a value. I also played around with shapes (ellipses) but ended up not using them.

I then added the background of the sky as well as the little astronaut which is controlled by the curser (by inserting ‘mouseX, mouseY; into the line of code) which is there just for fun.

Another issue I ran into was with making the clouds reappear onto the screen in a loop form. This took me the longest to figure out.

I made a class which included a constructor which had the different features of my clouds such as the x and y positions, the speed at which they are moving and their width and heights. Then I was able to run this and move the clouds the way I wanted.

In the future, I’d like to make a game out of this concept. Also, I’d like to use arrays in my code – maybe for the clouds. Next time I would make this outer space so I could include shooting stars and different planets floating around.

This is the final outcome.