Concept
For the purposes of the Final Project of Introduction to Interactive Media, we were presented the challenging task of connecting Software and Hardware. To achieve this, our team of three members, Zunair, Ishmal, and Abraiz, decided to create a game using P5Js as it seemed like a de-stressing activity. We also wanted to bridge it with hardware by producing an Arcade Game Controller. This led us to the creation of PacXon Premium and its accompanying controller.
Pac-Xon Premium is a game that is based on Pac-Man, and it was inspired by one of our team member’s childhood favorites. We started with Pac-Xon Deluxe, the original game, which was fairly simple but had numerous levels of increasing difficulty. However, the gradual increase in difficulty may lead to repetitiveness and lack of challenge, even in the most difficult levels. We also noticed that the classic graphics of the game were outdated, so we decided to give it a modern touch and feel and create a revamped and customized version.
Initially, we thought that coding the game would be a simple task. However, as we delved deeper into the logic and technical requirements of even the smallest details, we realized that it would require a relatively complex algorithmic approach. Simple Object Oriented Programming and Javascript Basics were not enough to achieve our goal of making almost all objects interact with each other. We decided to make it a tile-based game to add to the complexity.
In summary, Pac-Xon Premium is an updated and customized version of Pac-Xon Deluxe, a game inspired by Pac-Man. We added a modern touch and feel to the classic graphics and produced a tile-based game with a complex algorithmic approach. The game features numerous levels with increasing difficulty and challenges players to think strategically to progress through the game.
Link & Video
While there is a need for a Joystick Controller to utilize the Arcade feel of the game, keyboard will just work fine with the W,A,S,D keys at this link.
To cater to the possibility of any issues with the code, we have also recorded a video of the Game with the Joystick Controller that we produced:
Hardware and its Pictures:
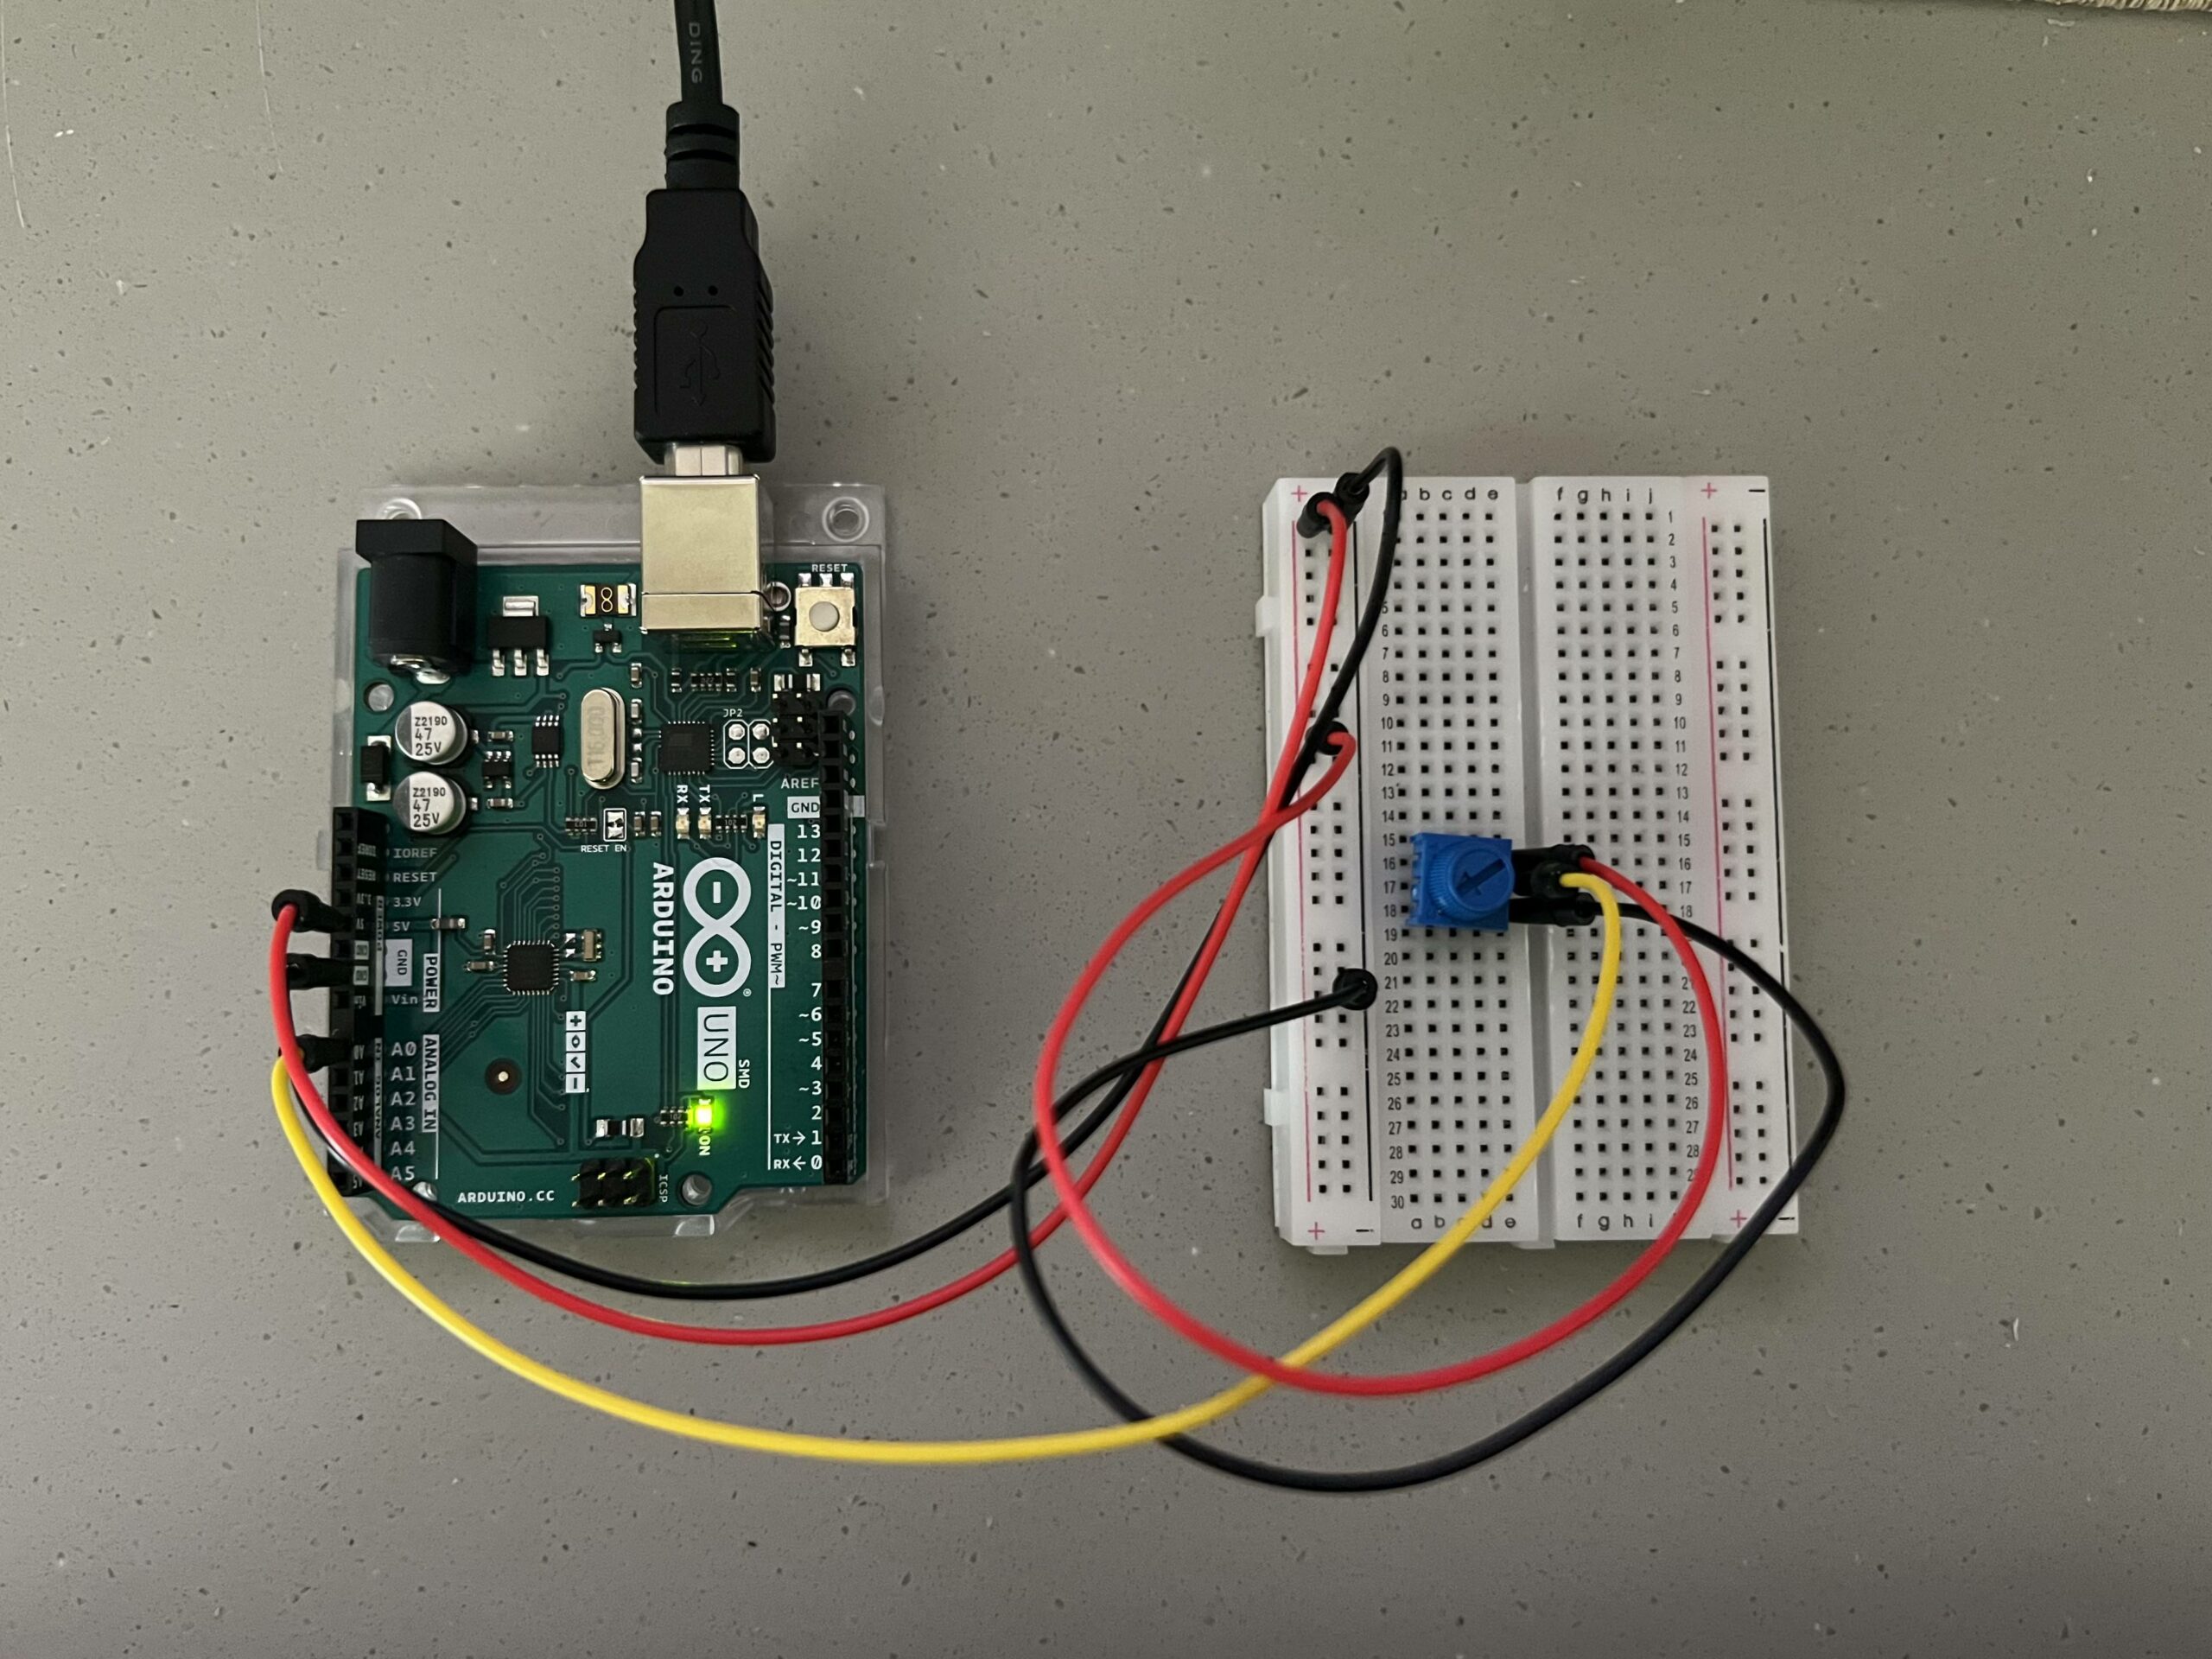
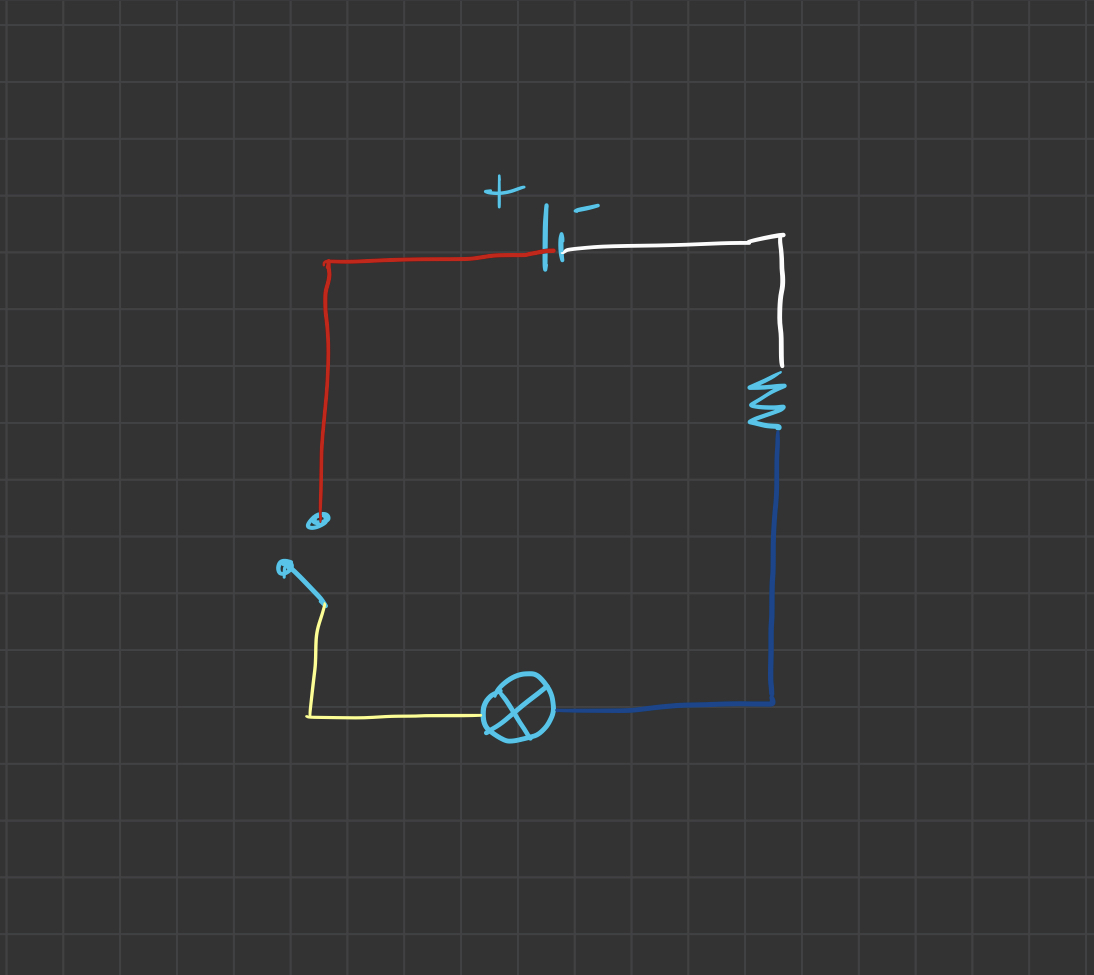
For producing the Arcade Controller, we started off by connecting the Arcade Joystick to a breadboard and Arduino, and connecting its movement to corresponding movements in the P5Js Sketch which can be seen in the following picture:
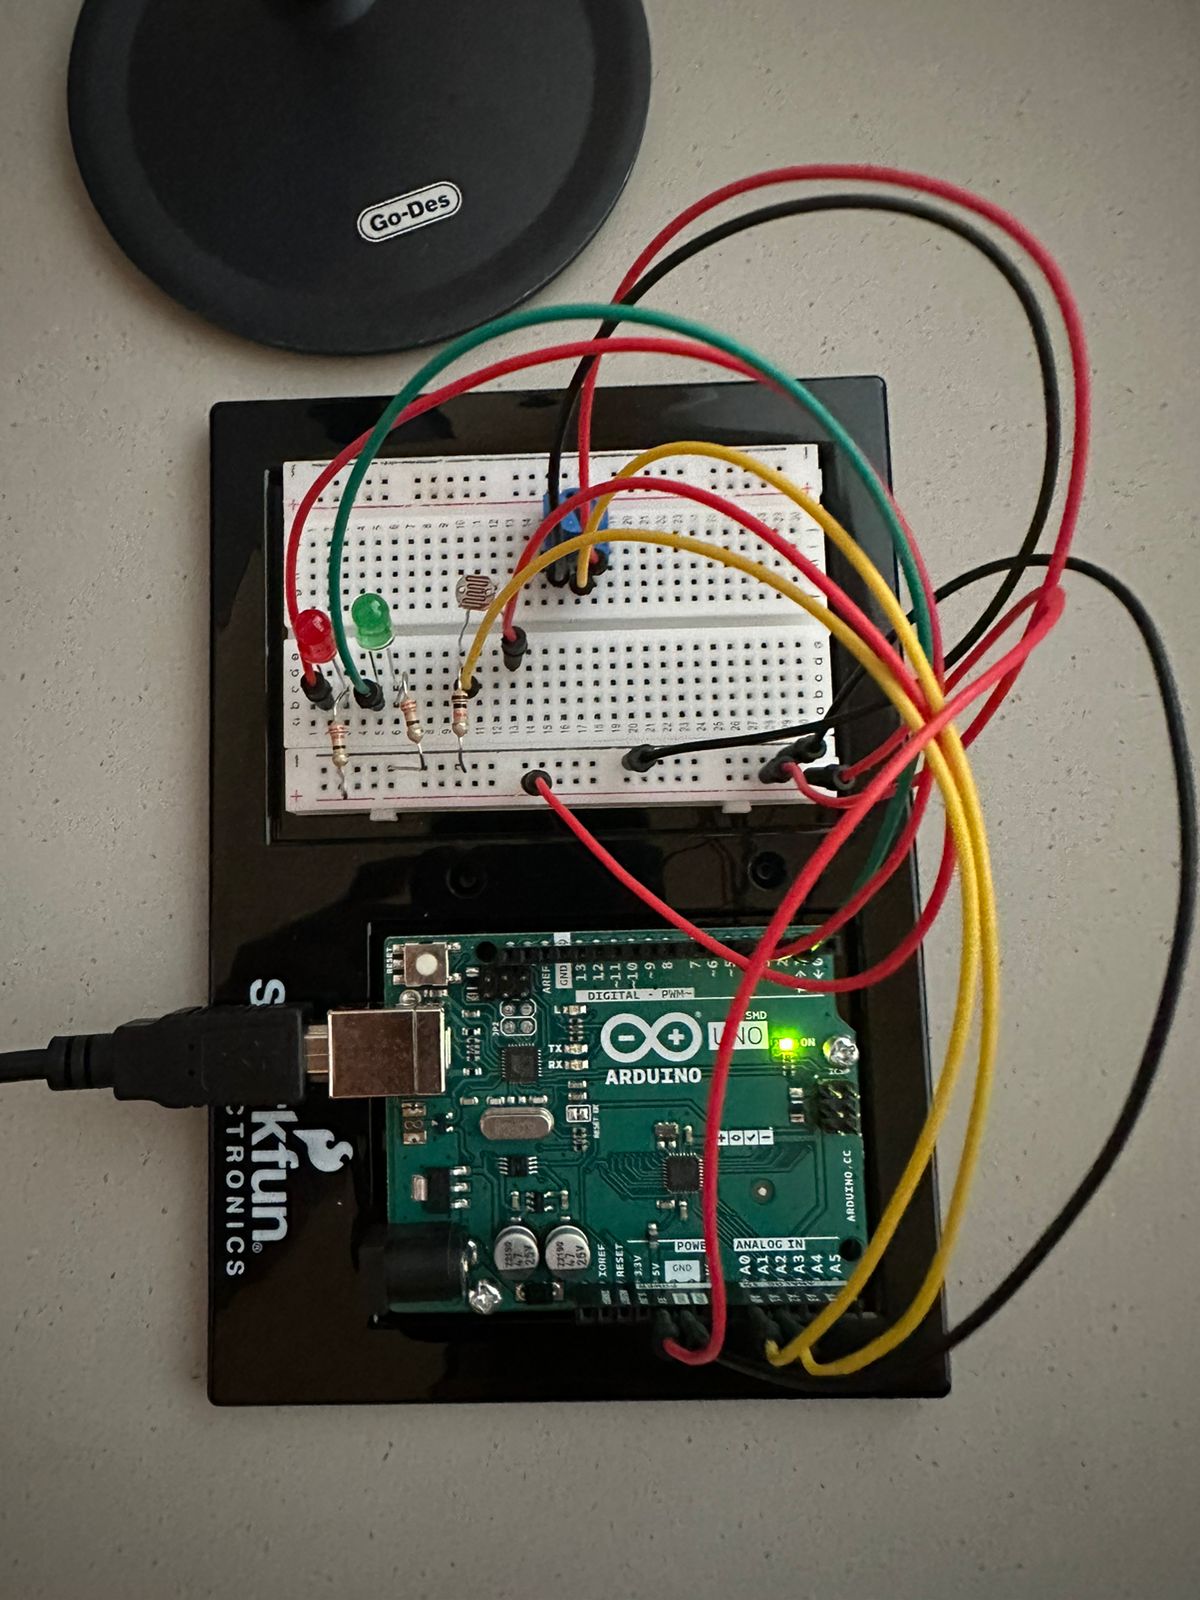
Then, moving on, we added another breadboard with 3 LED Bulbs that demonstrated lights and also a Vibration Motor that gave sense of a Haptic Feedback response when a person died, level was completed or some significant event happened.

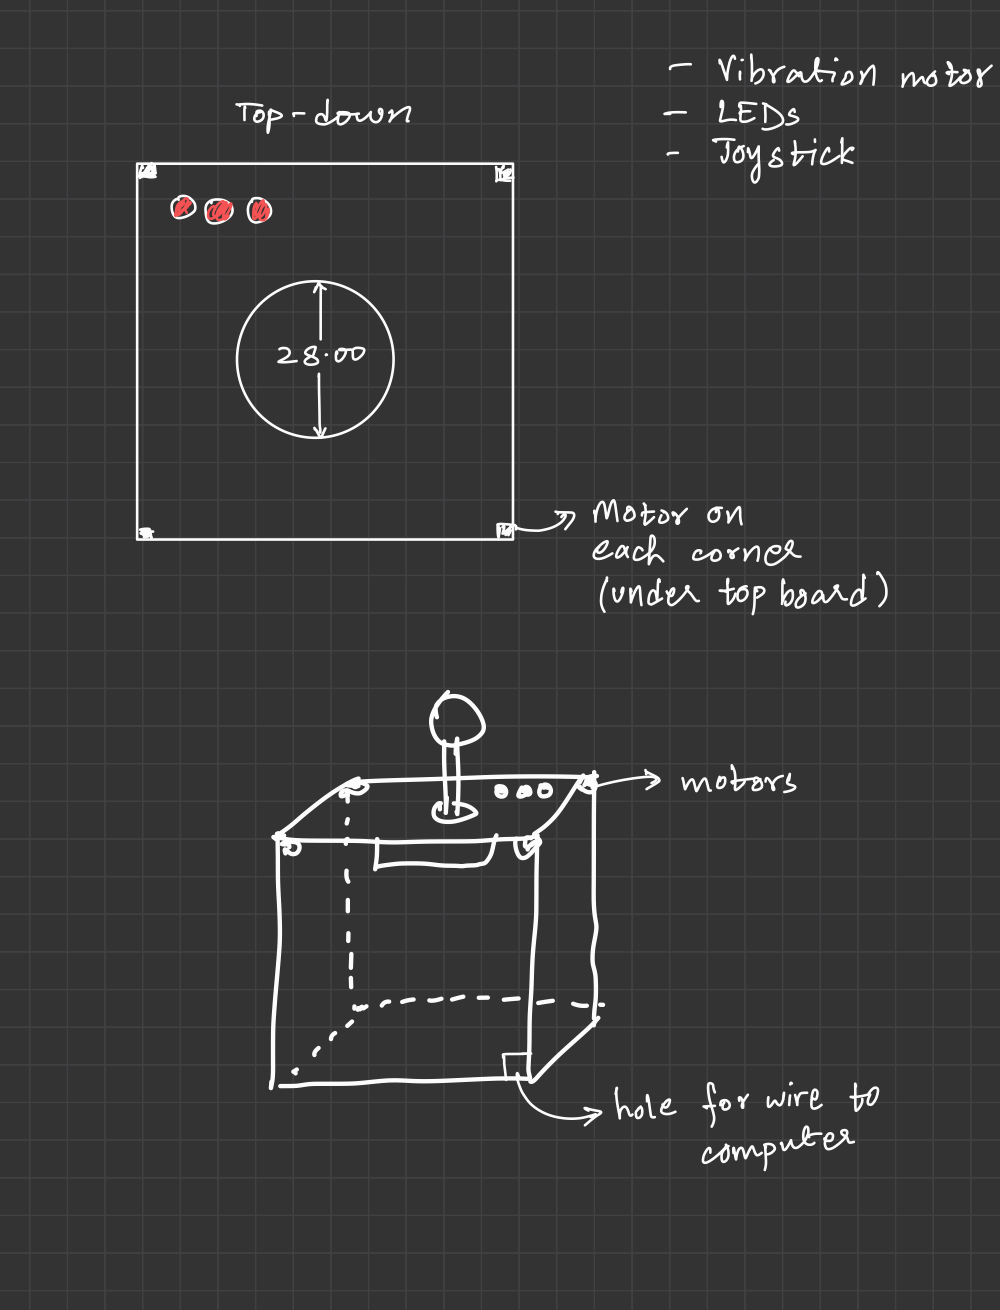
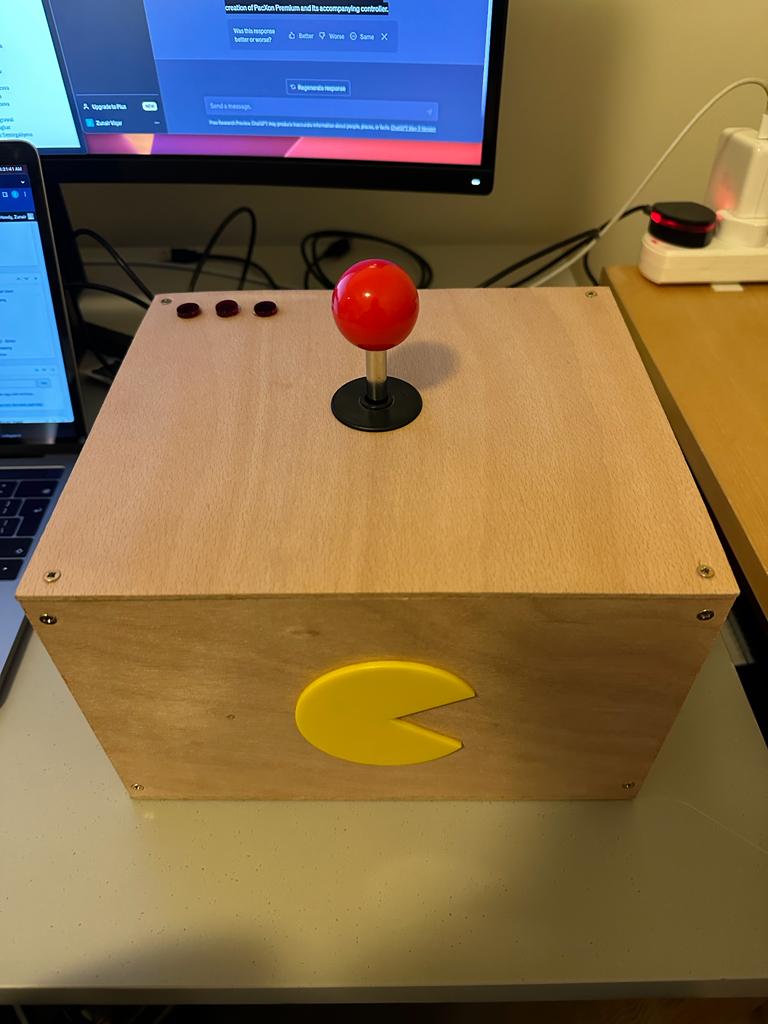
Then, to wrap the content of the Breadboard, we wanted a physically rigid controller, which was large enough to have the Joystick embedded, and also have LED lights and the Vibration Motor stuck inside. The box, in its initial stages, can be seen here:
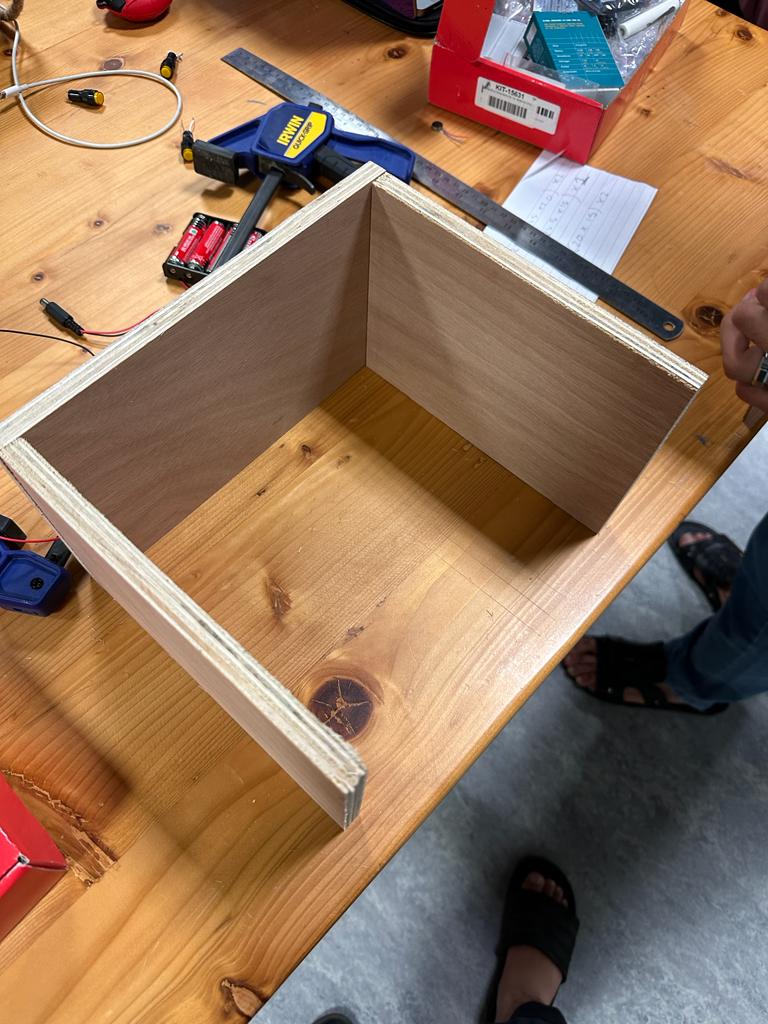
The box is open from one end for debugging purposes, and also does not sway away from the looks of it with the back side being the only open section. We decided to translate our solderless breadboard design onto a soldered breadboard to complete our hardware in a rigid fashion. This was then installed inside the box as can be seen below:
All in all, we produced a controller:
How it Works:
As you have already seen what the project is, let us explain the intricacies of how it was developed and its functionalities (code is added at the very end):
p5.js Description
As our first step, using Javascript, and particularly the p5 JS library, we started off with creating a 2D Array/ List which was technically mapped over the entire canvas, or rather drawn over the area of the canvas, such that each index in the 2D Array/ List represented a 20px by 20px box on the canvas of the game. Then we took an approach such that a value 1 at any index would draw a solid blue tile (20px by 20px) on the canvas at the position corresponding to the index of the 2D Array/ List. Similarly, if the value was to be 0, nothing was to be drawn and if the value was to be -1, a different blue tile representing a ‘line’ would be drawn instead. Then we created functions which handled the filling of the array and included functionalities like initializing the array borders at the beginning of the game and those that checked for if any values in the 2D Array were modified and matched a certain criteria for a tile to be drawn at that position, or even to map the values of the x and y coordinates on the canvas to the array position and the tile at that very location.
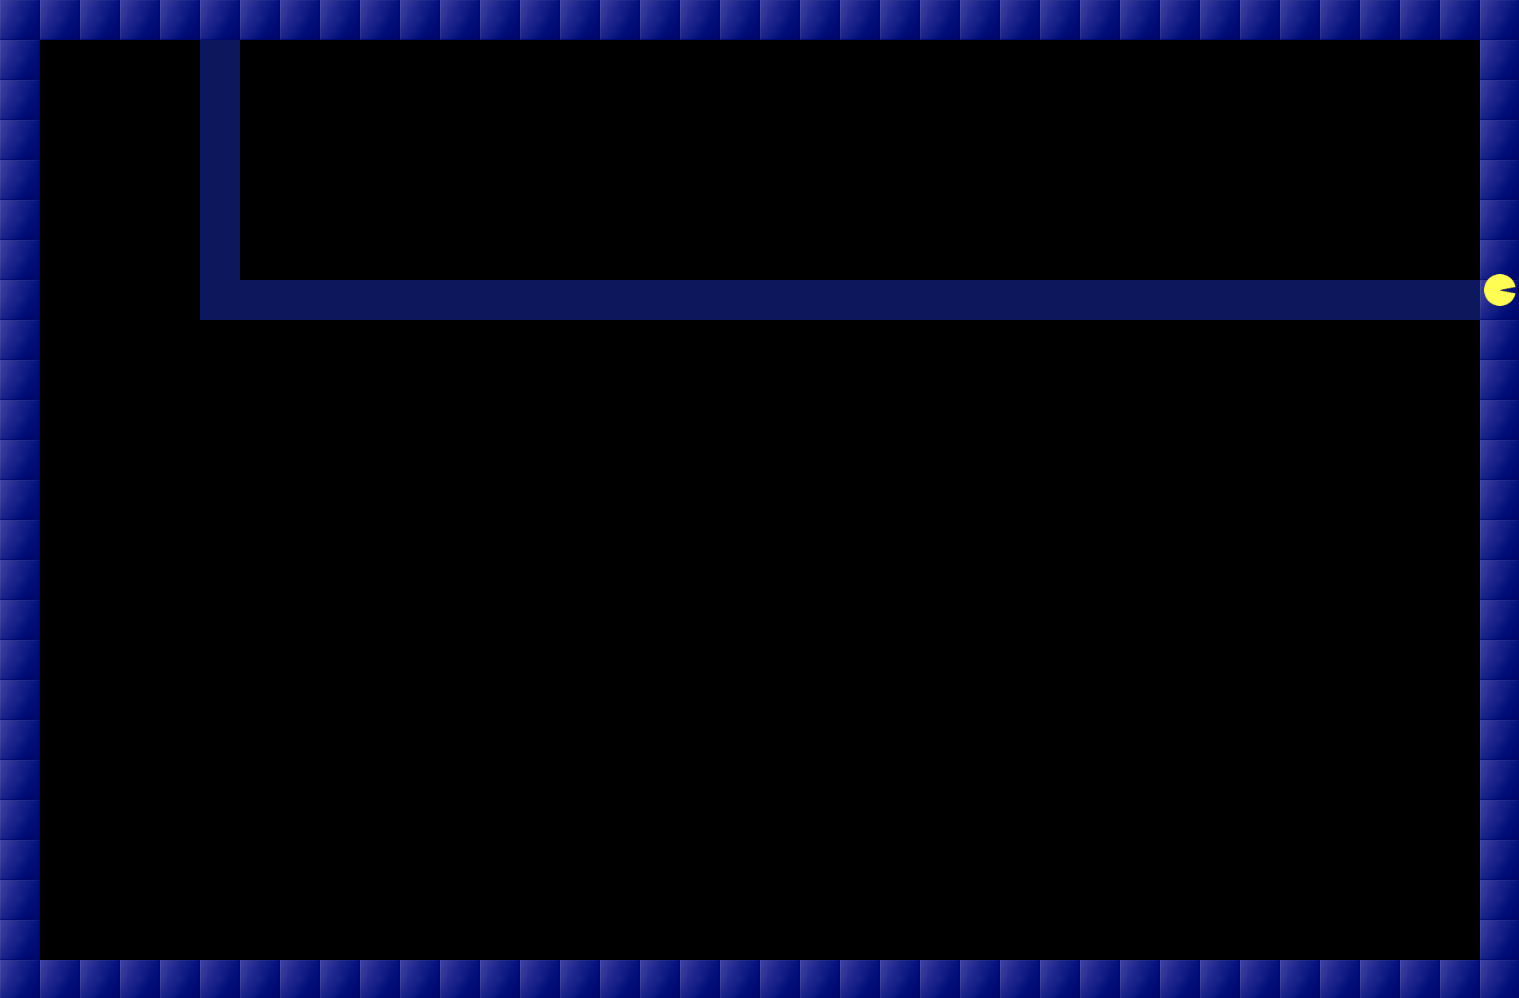
Once we were satisfied with the Array functionality, we started off with creating the Player Class that drew the user controlled character on the screen. This was the class that we found to be the most challenging, since we had to incorporate the functionality of an object of a Player class with its movement being in accordance with the functionality of the 2D Array. Drawing, and moving the player was very simple, however when we changed the direction of the Pac-Xon, it was causing the Pac-Xon to be moving between two different tiles as shown below:
In order to solve this problem, we created a rounding function that checks the player’s position and checks the tile, from the two tiles that it intersects, on which the majority of the player’s body lies and forces the player to be pushed or pulled onto that tile as it changes its direction. We tried other approaches, including the reduction of FrameRate or increasing the speed by the size of the tile, however both of them resulted in reduced game play quality.
Moving on, we allowed for the player to draw connecting lines between two solid blocks. This was done mainly by using the position of the tile that the player is present at and then checking whether the player is at an empty area or a solid position, and then drawing a ‘line’ tile if the condition is fulfilled. We extended this approach to allow for checking the next tile and ensuring the player does not bump into the line that is being formed, we also somewhat extended the same approach to ensure restrict the movements when the player is forming the line or is within the solid block region.
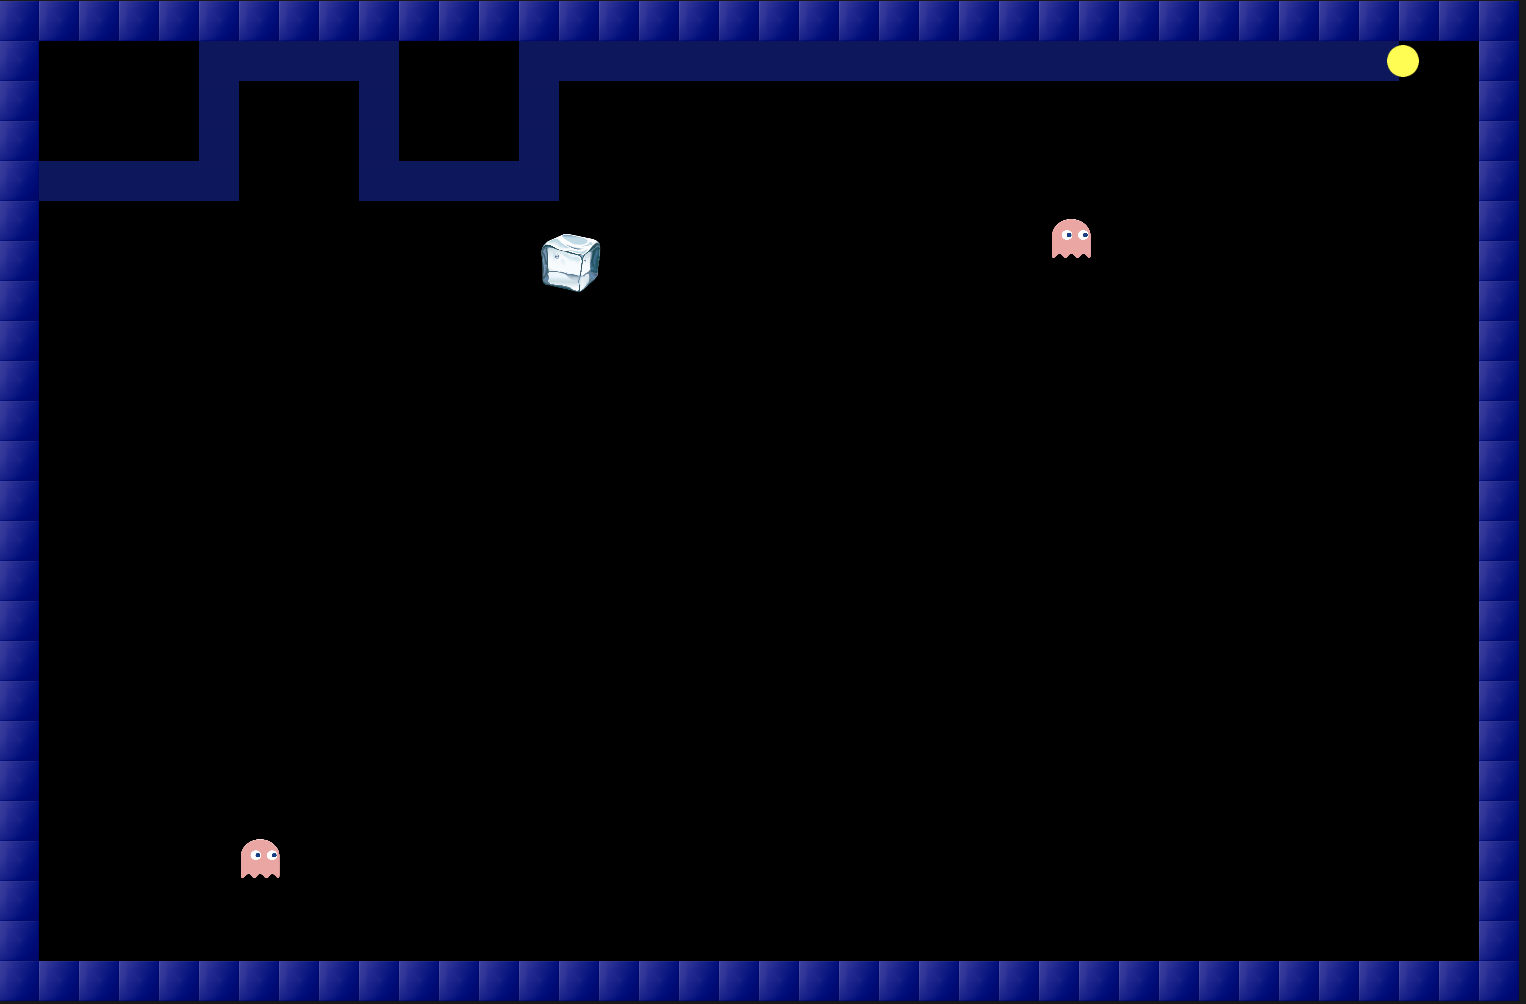
However, the most difficult part of the project was to fill the appropriate ‘boxes’, which are certain enclosed regions in the canvas when the line connects between two solid tiles. A demonstration of this is:
The complications with this was not only the procedure to fill the region, but in fact the considerations to take into account when filling this. A brief overview of them include that the region should not fill if the enemy is present inside of the region, or if multiple regions are created, all of the smallest ones should fill up, and only the largest one and/or the ones including the enemy should remain empty such that:
The approach to solve this was using the following algorithms:
– Flood Fill Algorithm
– Max Area of an Island (LeetCode Problem)
We used the Max Area of an Island Algorithm, which compares the areas of all the individual regions and finds out the maximum of those, and modified it to instead return x and y coordinates of each of the regions. We then used these coordinates to find the areas of all the regions, with an intermediary step checking if the enemy was present in any of the regions then to not take it into consideration, and then from those areas we excluded the maximum area and used all the other coordinates to fill the smaller areas. In this manner, we were able to achieve the desired result through extensively comprehending the complex recursive algorithms.
After this, we implemented the enemy classes where each type of enemy had a class that inherited from the main enemy class for the features that were common amongst all enemies. The movement of the enemies used a similar approach of checking the tiles around it and reversing its speed if it encountered the solid tile; this was then extended to allow some enemies to eat the solid tiles when they bounced off of them as well. The enemy class interacted with the Player class to check for collisions with the player.
Moving on, we incorporated the Powerups class, where the various power ups were placed at certain positions, like the bomb was to only show up in the region with the solid tiles. The power ups then interacted with the Player and Enemy class both, where either of them could use the power ups effect.
The last complex step was to incorporate the various screens with state variables at certain positions. It produced a lot of variables and seemed like a logic gate problem solved with boolean variables instead of gates. The changing of states and ensuring that the correct screen appears after one another was challenging to keep track of.
The final touches were to add sound, fix any bugs with interactions and movements or any logical errors in the algorithm. With all the effort put in, the end product seemed very satisfactory and came up together better than our initial expectations!
Arduino Description
While most of the complexity was in having the game come together in P5Js, there was a decent amount of effort put into the Hardware connection with p5Js. We wanted to ensure that the game runs fast, to allow for the intended smoothness but also communicates over a Serial connection with the Arduino.
Therefore, we incorporated the vibration of the motor without using any delays and instead making use of timestamp millis, similar to the concept of Blink Without Delay that was taught in class. Moreover, we had a short version of a State Machine in our Arduino code as well which allowed the light up of the number of LED bulbs in correspondence to the number of lives left. Also, the Arduino was keeping track of the point where the lives were lost in order to start the Vibration Motor on its own, without any particular signal from p5Js.
Interaction Design
All in all, as part of our interactive design, we can outline a couple of features:
– Makes use of joystick, keyboard, as well as gestures as input from the user to move the pacman character
– There are LED lights as well as HTML elements that display the lives and progress of the levels
– A particular vibration motor, as well as sound effects, that highlight the different events taking place
– Powerups in the game which can either be utilized by the player, or even the enemies!
– Packaged box controller to utilize a direct interaction with P5Js in real time
What are we proud of:
Overall, we are very proud to have completed a project that saw much attention at the Interactive Media Showcase, and received complements from individuals! It is good to have overcome the difficulties with P5Js, as well as Arduino to create something that looks complete, and at Bug free (at least as of now!). While the game seems simple, if you think of reproducing it, you will begin thinking of the complexities involved, and we are happy to have achieved what we have.
However, in particular, as Computer Science students, we are very glad to bring to life examples from Leetcode and programming competitions, into real life. We had always questioned the necessity for these type of questions and their relevance in the practical world, but we have a live example to showcase the relevance of these complex algorithms now.
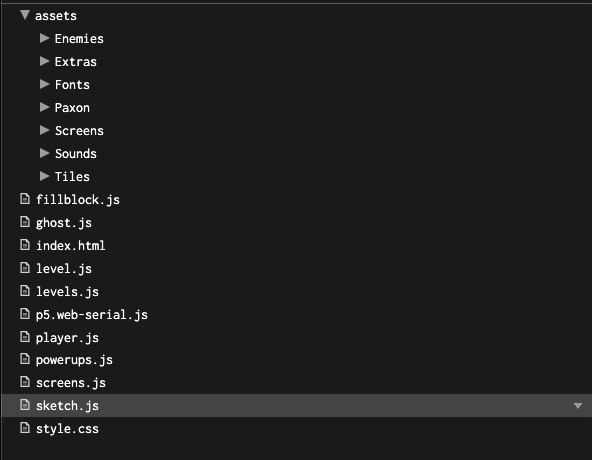
We are also particularly positive and happy about our code organization, commenting and file structure. The code is attached at the very end of this article to allow for better reading of content, however, the way all the images, sound files, and even the different pieces of code were divided into different files and organized for better understanding as well as debugging is something we really enjoyed doing. A quick glimpse into it can be seen below:
Moreover, it was very challenging to produce a detailed ‘menu’ in P5js. Therefore, we are particularly proud of having achieved that. It can be seen in the ‘Screens.js’ files below. This is an example of a very complex state machines, where images are shown depending on different click locations, which then only accepts clicks at certain different locations. For example, the ‘Start Game’ shows different levels which accepts clicks at different levels, and then there is a screen for completion or loss of each level, which then accepts click and then responds appropriately.
If you have played the game, you may have experienced the different types of enemies, or ghosts as we call them. These are created in run time through object oriented programming, as well as inheritance. There is a basic class for the Ghosts, and then there is an extension to it for the different types which builds upon the basic class. This is a proper utilization of the coding principles, and we are proud of having made use of this.
Lastly, as an added interactivity, we decided to use gestures. Initially, we had thought of this option to fail completely, however it did not turn out to be as bad if used very properly!
Difficulties:
In any programming assignment, as well as hardware work, there is always difficulties. The first one was faced by us when we replaced the LED Bulbs in our controller with the Bigger LED Bulbs that could be inserted more appropriately into our Box. These are the ones available in one of the hardware boxes in the IM Lab. However, turned out that they were not working at all with the resistor – and this was after it had been soldered and put together. So we had to improvise and replace them with regular LED bulbs, and then laser cut the red circles to cover the light. Since the brightness of the lights were not that good anyways, we used glue gun on them while sticking the acrylic circles to have a ‘spread’ effect.
Then comes something we have mentioned earlier, and it is the algorithmic complexities in our code where we initially did not know where to begin and were completely stuck. However, determination helped us through!
Another particular challenge that we faced was with a connection of the Vibration Motor while there was a Serial connection with p5Js already happening for the JoyStick. We are still not sure what had happened at then, but eventually, somehow, with trial and error it worked and we did not want to go back and debug the root cause!
Improvements:
We believe the hardware could have been developed further wherein there should be no need for a mouse, even to select the levels. However, this would prove to be very complex in an already complex state machines for the Screens. However, an addition of buttons on our controller box, to replace some functionality of the mouse, could have been a good prospect.
Moreover, improving the gesture control by utilizing more advanced models for detection could also be possible. This is something we could do as an improvement should we choose to take this project further!
Code:
The code is divided into different files, with each file performing the functionality that is intuitive to the name of the file. The files that we have are:
– sketch.js (Brings all functionalities together with setup() and draw())
– screens.js (The state machines for the ‘Menu’)
– player.js (For managing the functionality of the PacMan)
– ghost.js (Handles all the ghosts/enemies)
– levels.js (Outlines the different levels that there are)
– level.js (Manages the common functionalities of each level – player movement, etc)
– fillblock.js (The algorithms that were needed to fill the blocks of the 2D Array)
Each file is separately attached below:
sketch.js
// A 2D list to store the tiles for the game board
let level = [];
// Stores the images
let tile, movingTile, rightPacXon, leftPacXon, upPacXon, downPacXon;
// Variables to store the ghosts/enemies
let redGhost, blueGhost, yellowGhost, pinkGhost;
// Variables to store the powerups
let bomb, ice, bolt, slow;
// Array to store all the powerups
let powerups = [];
// Store the tilesize for use throughout
let tileSize;
// Keeping a track of the area of an enclosed regions
let count = 0;
// Storing the count for a certain region
let c1 = 0;
// Storing the maxArea
let mArea;
// Variables to store the areas, and the coordinates for filling the enclosed regions.
let sVals = [];
let pVals = [];
let areas = [];
let tc;
// Sertting the timer for the game and initializing it to 100
let timer = 100;
// declaring and initializing the levels to be kept track of
let levels = 1;
// For storing all the enemies in the list
let enemy = [];
// Keeping track of the x and y positions of the ghost
let ghostx, ghosty;
// Checking if level should be up or not and initializing to false;
let level_up = false;
// State variables to keep track of the screens
let gamestart;
let checkMenuclick;
let load_level;
let loadhowtoplay;
let selectcontrols;
let joystickActive;
let loadcontrolsscreen;
let checkhowtoplay;
let gamebegin;
let checkforselectlevel;
let checkforStart;
let checkfornextLevel;
let levelupscreen;
let endscreen;
let checkforretry;
let gamecomplete;
let checkforfinish;
let mylevel;
// Variables to store all the images
let level1;
let level2;
let level3;
let level4;
let level5;
let level6;
let main_image;
let controlscreens;
let controlscreensbackup;
let joystickselectedscreen;
let howtoplay;
let clicktostart;
let levelup;
let endimg;
let finish;
let returnto;
// Variables for gesture detection
let video;
let handPose;
let hands;
let gestureActive = "";
let getVideo;
let videoSet;
let gestureDirection;
// Variables to store all the sounds
let gameoversound, movingsound, clickedsound, collectionsound, collisionsound, levelupsound, movement, bg;
// Declaring and initializingthe counter and max counter to calculate the percentage and keep track for the preloader
let counter = 1;;
let maxCounter = 34;
// joysrick variables
let joystickInput = 0;

// Function for initiating the Gesture Detection
function modelReady() {
  console.log('hand pose loaded');
  handpose.on('predict', results => {
    // Storing the result based on hand gestures
    hands = results;
  });
}

// Pre Loading all the assets
// The updateCounter parameter is passed in each loadXYZ() function to call the updateCounter function for progressing the pre-loader
function preload() {
  // Loading the tiles to be drawn
  tile = loadImage('assets/Tiles/tile.png', updateCounter);
  movingTile = loadImage('assets/Tiles/movingTile.png', updateCounter);
  // Loading all Pac-Xon direction gifs
  rightPacXon = loadImage('assets/Paxon/right_paXon.gif', updateCounter);
  leftPacXon = loadImage('assets/Paxon/left_paXon.gif', updateCounter);
  upPacXon = loadImage('assets/Paxon/up_paXon.gif', updateCounter);
  downPacXon = loadImage('assets/Paxon/down_paXon.gif', updateCounter);
  // Loading all the Ghosts/ Enemies
  redGhost = loadImage('assets/Enemies/red-ghost.png', updateCounter);
  blueGhost = loadImage('assets/Enemies/blue-ghost.png', updateCounter);
  yellowGhost = loadImage('assets/Enemies/yellow-ghost.png', updateCounter);
  pinkGhost = loadImage('assets/Enemies/pink-ghost.png', updateCounter);
  // Loading all the screens
  main_image = loadImage('assets/Screens/home.gif', updateCounter);
  level1 = loadImage('assets/Screens/level1.png', updateCounter);
  level2 = loadImage('assets/Screens/level2.png', updateCounter);
  level3 = loadImage('assets/Screens/level3.png', updateCounter);
  level4 = loadImage('assets/Screens/level4.png', updateCounter);
  level5 = loadImage('assets/Screens/level5.png', updateCounter);
  level6 = loadImage('assets/Screens/level6.png', updateCounter);
  controlscreens = loadImage('assets/Screens/controls.png', updateCounter);
  joystickselectedscreen = loadImage('assets/Screens/joystick_selected.png', updateCounter);
  gestureselectedscreen = loadImage('assets/Screens/gestures_selected.png', updateCounter);
  howtoplay = loadImage('assets/Screens/howtoplay.png', updateCounter);
  clicktostart = loadImage('assets/Screens/clicktostart.png', updateCounter);
  levelup = loadImage('assets/Screens/levelcompleted.png', updateCounter);
  endimg = loadImage('assets/Screens/gameover.png', updateCounter);
  finish = loadImage('assets/Screens/congrats.png', updateCounter);
  returnto = loadImage('assets/Screens/returnmenu.png', updateCounter);
  // Loading all the powerups
  bomb = loadImage('assets/Extras/redbomb.png', updateCounter);
  ice = loadImage('assets/Extras/ice.png', updateCounter);
  bolt = loadImage('assets/Extras/lightning-bolt.png', updateCounter);
  slow = loadImage('assets/Extras/snail.png', updateCounter);
  // Loading all the sounds
  gameoversound = loadSound('assets/Sounds/gameover.mp3', updateCounter);
  movingsound = loadSound('assets/Sounds/movingsound.wav', updateCounter);
  clickedsound = loadSound('assets/Sounds/clicked.wav', updateCounter);
  collectionsound = loadSound('assets/Sounds/collection.wav', updateCounter);
  collisionsound = loadSound('assets/Sounds/collision.wav', updateCounter);
  levelupsound = loadSound('assets/Sounds/levelup.wav', updateCounter);
  bg = loadSound('assets/Sounds/bg.mp3', updateCounter);

}

function setup() {
  // initializing the canvas and storing a reference to it
  var canvasMain = createCanvas(760,500);
    // set the ID on the canvas element
  canvasMain.id("p5_mainCanvas");
  // set the parent of the canvas element to the element in the DOM with
  // an ID of "left"
  canvasMain.parent("#center");

  // initializing all the state variables for the screens
  gamestart = false;
  checkMenuclick = false;
  load_level = false;
  loadhowtoplay = false;
  loadcontrolsscreen = false;
  selectcontrols = false;
  gestureActive = false;
  getVideo = false;
  videoSet = false;
  joystickActive = false;
  gesturehighlight = false;
  joystickhighlight=false;
  controlscreensbackup = controlscreens;
  checkhowtoplay =  false;
  gamebegin = false;
  checkforselectlevel =  false;
  checkforStart = false;
  levelupscreen = false;
  checkfornextLevel = false;
  endscreen = false;
  checkforretry = false;
  gamecomplete = false;
  checkforfinish = false;
  // initializing the value of mylevels for the levels to be accessed.
  mylevel = 1;

  // making use of the local storage API and obtaining the stored value of the levels that were previously ever completed by the user
  let user_levels = window.localStorage.getItem('levelsCompleted');
  // Checking if there was any data stored,
  if (user_levels) {
    // If so, the data from the local storage is used, otherwised the above initalized value is used instead.
    mylevel = int(user_levels)
  }
  // Declaring the tilesize
  tileSize = 20;
  // Populates the 2D Array with 0s
  initializeLevel();

  // Places 1s at the borders of the 2D Array
  resetLevel();
  tc = 0;
  player = new Player();
  // powerup = new Powerup();

  // Evening out the perlin noise
  noiseDetail(24);
  // Looping the background music

  bg.loop();
  // Setting the volume of the background music to a minimal value
  bg.setVolume(0.3);


}

function draw(){
  // Gets the User's Video if the Gesture Option is selected
  if((getVideo == true)&& (videoSet==false)){
    video = createCapture(VIDEO);
    video.hide();
    const options = {};
    handpose = ml5.handpose(video, options, modelReady);
    videoSet = true;
  }
  if (gestureActive){
    getGestures();
  }
  // When this is false, the MENU or the Level Selection screen appears
  if(gamestart == false){
    // If this if false, the MENU Screen will appear, which it will initially
    if (load_level == false){
      // If the how to play screen is clicked, the menu screen is not shown and instead the how to play screen is shown in the else {
      // When the how to play screen is closed, the menu screen appears again as the variable becomes false
      if (loadhowtoplay == false && loadcontrolsscreen == false){
        // Clicks for the menu screen are detected
        checkMenuclick = true;
        // The Start Screen is shown
        StartScreen();
      }
      else if (loadhowtoplay == true){
        checkMenuclick=false;
        // The How To Play Screen is shown
        HowToPlayScreen();
        // Clicks for that screen are detected
        checkhowtoplay = true;
      }
      else if (loadcontrolsscreen == true){
        checkMenuclick=false;
        // The How To Play Screen is shown
        SelectControlsScreen();
        // Clicks for that screen are detected
        selectcontrols = true;

        if(serialActive==true){
          controlscreens = joystickselectedscreen;
        }
        if(gestureActive==true){
          getVideo = true;
          controlscreens = gestureselectedscreen;
        }
      }
    }
    // The Load Screen will appear instead of the Menu Screen
    else if(load_level == true){
      // When the load screen is loaded, the clicks for the Menu Screen are not detected
      checkMenuclick = false;
      // The Level Screen is showns
      LevelScreen();
      // Clicks for the Level Screen are detected after setting the next variable to true
      checkforselectlevel = true;
    }
  }
  // If the game start is true, the menu or any of the initial screens are not appearing
  else {
    // Fills the background with a black color
    background(0);
    // Draws the level, which in the first instance only draws the borders
    drawLevel();

    // If the game gets completed,
    if(gamecomplete == true){
      // The game complete screen is shown
      image(finish, 0, 0);
      // CLicks for that screen are detected
      checkforfinish = true;
    }
    else{
      // If the game ends
      if(endscreen == true){
        // The game end screen is shown and
        image(endimg, 0, 0);
        // Clicks for that screen are detected
        checkforretry =  true;
      }
      else{
        // If the level gets incremented,
        if(levelupscreen==true){
          // The level up screen is shown
          image(levelup, 0,0);
          // CLicks for that screen are detected
          checkfornextLevel = true;
        }
        else{
          // If the game has not begun yet, the click to start screen appears
          if(gamebegin==false){
            image(clicktostart, 0, 0);
            // Clicks for that screen are detected
            checkforStart = true;
          }
          if(gamebegin == true){
            // Shows the updated Lives on the HTML Page
            let window_score = document.getElementById('current_lives')
            window_score.innerHTML = player.lives;

            //player
            player.display();
            player.move();

            // If there is an existing powerup, it draws it in every frame and ensures the effect() function runs
            if (powerups.length > 0) {
              powerups[0].display();
              powerups[0].effect();
            }

            //Iterates through all the enemies and then displays and moves them
            for (let i = 0; i < enemy.length; i++){
              enemy[i].display();
              enemy[i].move();
            }

            // Shows the updated Progress on the HTML Page
            let window_progress = document.getElementById('current_progress')
            window_progress.innerHTML = completeLevel() + "%";


            // Shows the updated Levels on the HTML Page
            let window_level = document.getElementById('current_level')
            window_level.innerHTML = levels;


            // Makes the powerups appear after a certain time period and ensures only one powerup can appear at a time
            if (frameCount % 600 == 0 && powerups.length == 0) {
              // Adds a powerup to the list for powerups
              powerups.push(new Powerup())
            }

            // Shows the updated Timer on the HTML Page
            let window_timer = document.getElementById('current_timer');
            window_timer.innerHTML = timer + 's';
            // Decreases the timer every second until the timer is 0
            if (frameCount % 60 == 0 && timer > 0) {
              timer --;
            }
            // Calls the next level function to check if the level is complete, and if so, it increases the level
            nextLevel();
            // If the timer or the player lives become 0, the game ends!
            if (timer == 0 || player.lives == 0){
              // The timer and the lives are updated on the HTML Page
              let window_score = document.getElementById('current_lives')
              window_score.innerHTML = player.lives;
              let window_timer = document.getElementById('current_timer');
              window_timer.innerHTML = timer + 's';
              // The game end screen is trigerred
              endscreen = true;
              // The right image for the Pac Xon is loaded
              player.graphic = rightPacXon;
              // The direction and movement of the Pac-Xon is reset
              player.currKeyCode = 0;
              // The pacXon is repositioned at the first index of the array
              player.x = 0;
              player.y = 0;
              // reset player speed
              player.speed = player.pspeed;
              // The levels are reset
              // levels = 1;
              // powerups are emptied
              powerups = [];
              // The level is reset and only the borders are drawn
              resetLevel();
              // The lives of the player are reset
              player.lives = 3;
              // The timer is reset
              timer = 100;
              // The game over sound is played
              gameoversound.play();
              // The all levels function is called to choose the level
              allLevels();
            }

          }
        }
      }

    }
  }
}

function mousePressed(){
  // Checks for clicks on the Various screens
  if(checkMenuclick == true){
    StartScreenClick();
  }
  else if(checkhowtoplay == true){
    HowToPlayClick();
  }
  else if(selectcontrols == true){
    SelectControlsClick();
  }
  else if(checkforselectlevel == true){
    LevelScreenClick();
  }
  else if(checkforStart == true){
    gamebegin =  true;
  }
  // Checks for clicks on the level up screens
  if(checkfornextLevel == true){
    // If the next option is clicked, the screen disappears
    if(mouseX>400 && mouseX <495 && mouseY>325&& mouseY<363){
      levelupscreen = false;
      clickedsound.play();
      checkfornextLevel == false;
      checkMenuclick = false;
    }
    // If the menu is clicked, the menu screen appears
    else if(mouseX>250 && mouseX <345 && mouseY>325&& mouseY<363){
      levelupscreen = false;
      gamestart = false;
      load_level = false;
      checkforselectlevel = false;
      checkfornextLevel == false;
      checkMenuclick = false;
      clickedsound.play();
    }
  }
  // Almost the same thing happens for the Game over screen
  if(checkforretry == true){
    // If the retry option is pressed
    if(mouseX>400 && mouseX <495 && mouseY>325&& mouseY<363){
      endscreen = false;
      checkforretry =  false;
      checkMenuclick = false;
      clickedsound.play();
    }
    // Or if the menu option is pressed
    else if(mouseX>250 && mouseX <345 && mouseY>325&& mouseY<363){
      // endscreen = false;
      endscreen = false;
      gamestart = false;
      load_level = false;
      checkforselectlevel = false;
      checkforretry =  false;
      checkMenuclick = false;
      clickedsound.play();
    }
  }
  // Checks for clicks on the 'Return to Menu' button on the screen that shows up when the game is completed
  if(checkforfinish == true){
    // rect(279, 318, 190, 45);
    if(mouseX>279 && mouseX <469 && mouseY>318&& mouseY<363){
      gamestart = false;
      gamecomplete = false;
      load_level = false;
      checkforselectlevel = false;
      clickedsound.play();
    }
  }
}

// Update counter function used within preload
function updateCounter() {
  // increase our counter
  counter++;

  // use the counter to set the style on the '#progress_bar' div
  let progress_bar = document.querySelector('#progress_bar');
  // The percentage is calculated
  progress_bar.style.width = int(counter/maxCounter*100) + "%";
}

function getGestures(){
  if (hands && hands.length > 0) {
    for (let hand of hands) {
      let annotations = hand.annotations;
      let thumb = annotations.thumb;

      let tx = thumb[3][0];
      let ty = thumb[3][1];

      let thumbsup = true;
      let thumbsdown = true;
      let thumbsleft = true;
      let thumbsright = true;

      let parts = Object.keys(annotations);
      let count = 0;
      for (let part of parts) {
        for (let position of annotations[part]) {
          let [x, y, z] = position;

          if (part === 'thumb') {
            if (x < tx) {
              thumbsleft = false;
            } else if (x > tx) {
              thumbsright = false;
            }
          } else {
            if (y < ty) {
              thumbsup = false;
            } else if (y > ty) {
              thumbsdown = false;
            }
          }
        }
      }

      if (thumbsup) {
        console.log("UP");
        gestureDirection = "up";
      }
      else if (thumbsdown) {
        console.log("DOWN");
        gestureDirection = "down";
      }
      else if (thumbsleft) {
        console.log("RIGHT");
        gestureDirection = "right";
      }
      else if (thumbsright) {
        console.log("LEFT");
        gestureDirection = "left";
      }
    }
  }
}
screens.js
// Function to load up the MENU Screen
function StartScreen(){
  image(main_image, 0, 0);
  // Pauses the gif on the MENU Screen after 3 seconds
  if (frameCount % 180 == 0){
    main_image.pause();
  }
}
// Function to check for specific clicks on the MENU Screen
function StartScreenClick(){
  // Checks if the rectanglular area around the 'New Game' button is clicked
    if(mouseX>285 && mouseX <475 && mouseY>230&& mouseY<275){
      // Sets the variables for the Levels screen to appear
      load_level = true;
      // Ensures that the positions for the clicks on the MENU page are not being checked
      checkMenuclick == false;
      // Plays the click sound
      clickedsound.play();
    }
    // Checks if the rectanglular area around the 'How To Play' button is clicked
    if(mouseX>285 && mouseX <475 && mouseY>285&& mouseY<330){
      // Sets the variables for the How To Play screen to appear
      loadhowtoplay = true;
      // Ensures that the positions for the clicks on the MENU page are not being checked
      checkMenuclick == false;
      // Plays the click sound
      clickedsound.play();
    }
    // Checks if the rectanglular area around the 'More Games' button is clicked
    if(mouseX>285 && mouseX <475 && mouseY>340&& mouseY<385){
      // Sets the variables for the 'Select Controls' screen to appear
      loadcontrolsscreen = true;
      // Ensures that the positions for the clicks on the MENU page are not being checked
      checkMenuclick == false;
      // Plays the click sound
      clickedsound.play();
    }
}
// Function to load the How To Play screen image
function HowToPlayScreen(){
  image(howtoplay, 0, 0);
}
// Function to check if specific areas on the How to play screen have been clicked
function HowToPlayClick(){
    // Checks if the rectanglular area around the 'Return to Menu button is clicked
    if(mouseX>270 && mouseX <460 && mouseY>408&& mouseY<453){
      // Sets the variables to stop showing the how to play screen
      loadhowtoplay = false;
      // Does not check for click on the areas for the buttons on the how to play screen
      checkhowtoplay = false;
      // Plays the sound
      clickedsound.play();
    }
}

// Function to load the How To Play screen image
function SelectControlsScreen(){
  image(controlscreens, 0, 0);
}
// Function to check if specific areas on the How to play screen have been clicked
function SelectControlsClick(){
  // Checks if the rectanglular area around the 'Return to Menu button is clicked

  if(mouseX>155 && mouseX <340 && mouseY>265&& mouseY<360){
    print("JoyStick Clicked")
    // If a Serial Connection with the Arduino has not been established yet
    if(!serialActive){
      // Initiates the establishment of a Serial connection with the JoyStick
      setUpSerial();
    }
    gestureActive = false;
    joystickActive = true;
    // Plays the sound
    clickedsound.play();
  }

  if(mouseX>400 && mouseX <580 && mouseY>265&& mouseY<360){
    print("Gesture Clicked")
    gestureActive = true;
    joystickActive = false;
    // Plays the sound
    clickedsound.play();
  }

  if(mouseX>270 && mouseX <460 && mouseY>410&& mouseY<455){
    // Sets the variables to stop showing the how to play screen
    loadcontrolsscreen = false;
    // Does not check for click on the areas for the buttons on the how to play screen
    selectcontrols = false;
    // Plays the sound
    clickedsound.play();
  }
}

// Shows the appropriateimage according to the number of levels that are completed by a user.
function LevelScreen(){
  // Loads up the level one image if the user is on the first level
  if (mylevel == 1){
    image(level1, 0 ,0);
  }
  else if (mylevel == 2){
    image(level2, 0 ,0);
  }
  else if (mylevel == 3){
    image(level3, 0 ,0);
  }
  else if (mylevel == 4){
    image(level4, 0 ,0);
  }
  else if (mylevel == 5){
    image(level5, 0 ,0);
  }
  else if (mylevel == 6){
    image(level6, 0 ,0);
  }
  // Loads the overlayed image for the 'Return to Menu' option
  image(returnto, 0, 0);
}
// Function to check for any clicks on the Level Screen
function LevelScreenClick(){
    // Checks if the box around 'Return to Menu' is clicked
    if(mouseX>267 && mouseX <457 && mouseY>311&& mouseY<356){
      // Sets up the counters for any other clicks to happen to be false
      // Also sets the counters for the Level Screen to not be displayed anymore
      load_level = false;
      checkforselectlevel == false;
      clickedsound.play();
      checkhowtoplay = false;
      loadhowtoplay = false;
    }
    // The condition checks the number of levels 'unlocked' by the user and so allows for the appropriate number of them to be clicked by the user.
    if(mylevel >0){
      // Checks if the box around a specific level is clicked
      if(mouseX>118 && mouseX <193 && mouseY>215&& mouseY<293){
        // Plays the click sound
        clickedsound.play();
        // Initates the game by changing the state of the game
        gamestart = true;
        // Does not let the level screen to load again
        load_level =  false;
        // Does not allow for any click to work
        checkforselectlevel = false;
        // Sets the level to be displayed to be 1
        levels = 1;
        // Calls the function to load the appropriate enemies for that level
        levelOne();
      }
    }
    if(mylevel >1){
      if(mouseX>205 && mouseX <283 && mouseY>215&& mouseY<293){
        clickedsound.play();
        gamestart = true;
        load_level =  false;
        checkforselectlevel = false;
        levels = 2;
        levelTwo();
      }
    }
    if (mylevel >2){
      if(mouseX>290 && mouseX <368 && mouseY>215&& mouseY<293){
        clickedsound.play();
        gamestart = true;
        load_level =  false;
        checkforselectlevel = false;
        levels = 3;
        levelThree();
      }
    }
    if (mylevel >3){
      if(mouseX>375 && mouseX <453 && mouseY>215&& mouseY<293){
        clickedsound.play();
        gamestart = true;
        load_level =  false;
        checkforselectlevel = false;
        levels = 4;
        levelFour();
      }
    }
    if(mylevel >4){
      if(mouseX>460 && mouseX <538 && mouseY>215&& mouseY<293){
        clickedsound.play();
        gamestart = true;
        load_level =  false;
        checkforselectlevel = false;
        levels = 5;
        levelFive();
      }
    }
    if(mylevel >5){
      if(mouseX>545 && mouseX <623 && mouseY>215&& mouseY<293){
        clickedsound.play();
        gamestart = true;
        load_level =  false;
        checkforselectlevel = false;
        levels = 6;
        levelSix();
      }
    }
}

// This function will be called by the web-serial library
// with each new *line* of data. The serial library reads
// the data until the newline and then gives it to us through
// this callback function
function readSerial(data) {
  if (data != null) {
    console.log(data);
    joystickInput = data;
    let sendToArduino = player.lives + "\n";
    writeSerial(sendToArduino);
  }
}
player.js
//class to draw player
class Player {
  constructor(){
    // set player's position, lives, speed, graphic
    this.x = 0;
    this.y = 0;
    this.startMovingRight = false;
    this.startMovingDown = false;
    this.pKeyPress = 'None';
    this.moving = 'not moving';
    this.lives = 3;
    this.speed = 3;
    this.pspeed = this.speed;
    this.graphic = rightPacXon;
  }
  // display player
  display(){
    image(this.graphic, this.x, this.y, 20,20)
  }

  // move player
  move(){

    // set up middle of player positions
    this.middleX = this.x+tileSize/2;
    this.middleY = this.y+tileSize/2;

    // if a key is pressed
    // if (keyIsPressed==true){
      // when the first key of teh game is pressed, set previous key code
      if (this.pKeyPress == 'None'){
        this.pKeyPress = keyCode;
      }
      // if not first key press
      else {
        // set player to moving state
        this.moving = 'moving';
        // if the previous key press is not equal to the current keycode
        if (this.pKeyPress != this.currKeyCode){
          // prev key code = current
          this.pKeyPress = this.currKeyCode;
          // round the player's movement so it moves box to box only
          // round x position
          let roundx = this.x%20
          if (roundx !=0){
            if (roundx >= 10){
              this.x = this.x + (20 - roundx);
            }
            else if(roundx < 10){
              this.x = this.x - roundx;
            }
          }
          // round y position
          let roundy = this.y%20
          if (roundy !=0){
            if (roundy >= 10){
              this.y = this.y + (20 - roundy);
            }
            else if(roundy < 10){
              this.y = this.y - roundy;
            }
          }
        }
        // get the id of the tile where the middle if the player lies
        let pos = getTile(this.middleX, this.middleY);

        // if it is a solid tile
        if(pos == 1){
          // if keycode is right key (D)
          if (joystickInput ==4 || keyCode ==68 || gestureDirection == "right") {
            // set update keycode and change paxon graphic
            this.currKeyCode = 68;
            this.graphic = rightPacXon;
          }
          // if keycode is left key (A)
          if (joystickInput ==3 || keyCode ==65 || gestureDirection == "left") {
            // set update keycode and change paxon graphic
            this.currKeyCode = 65;
            this.graphic = leftPacXon;
          }
          // if keycode is up key (W)
          if (joystickInput ==2 || keyCode ==87 || gestureDirection == "up") {
            // / set update keycode and change paxon graphic
            this.currKeyCode = 87;
            this.graphic = upPacXon;
          }
          // if keycode is down key (S)
          if (joystickInput ==1 || keyCode ==83 || gestureDirection == "down") {
            // / set update keycode and change paxon graphic
            this.currKeyCode = 83;
            this.graphic = downPacXon;
          }
        }
        // If the playeer is moving and creating blocks in the empty space, basically 'drawing the line'
        else{
          // If the player is going left, it cannot move left
          if ((joystickInput ==4 || keyCode ==68 || gestureDirection == "right") && this.currKeyCode!=65) {
            this.currKeyCode = 68;
            this.graphic = rightPacXon;
          }
          // If the player is going right, it cannot move right
          if ((joystickInput ==3 || keyCode ==65 || gestureDirection == "left") && this.currKeyCode!=68) {
            this.currKeyCode = 65;
            this.graphic = leftPacXon;
          }
          // If the player is going down, it cannot move down
          if ((joystickInput ==2 || keyCode ==87 || gestureDirection == "up") && this.currKeyCode!=83) {
            this.currKeyCode = 87;
            this.graphic = upPacXon;
          }
          // If the player is going up, it cannot move up
          if ((joystickInput ==1 || keyCode ==83 || gestureDirection == "down") && this.currKeyCode!=87) {
            this.currKeyCode = 83;
            this.graphic = downPacXon;
          }
        }
      }

    // }
    // if current key code is 68 and x is less than the width, move right
    if (this.currKeyCode == 68 && this.x < width){
      this.x  += this.speed;
    }
    // if current key code is 65 and x is greater than 0, move left
    if (this.currKeyCode == 65 && this.x > 0){
      this.x  -= this.speed;
    }
    // if current key code is 87 and y is greater than 0, move up
    if (this.currKeyCode == 87 && this.y > 0){
      this.y  -= this.speed;
    }
    // if current key code is 83 and y is less than height, move down
    if (this.currKeyCode == 83 && this.y < height){
      this.y += this.speed;
    }

    // get id middle of tile
    let id = getTile(this.middleX, this.middleY);
    // declare next tile
    let nt;

    // Checks if the player is withing the empty space or is not in the border region
    if((this.middleX>20 && this.middleY>20 && this.middleX<width-20 && this.middleY<height-20)){
      // A few pixels to the right, left, up, and down are detected from the player
      this.sensorLeft = this.x-10;
      this.sensorRight = this.x+tileSize+10;
      this.sensorTop = this.y-10;
      this.sensorBottom = this.y+tileSize+5;

      // If the player is moving right, the next tile to the right of it is checked
      if(this.currKeyCode==68){
        nt = getTile(this.sensorRight,this.middleY);
      }
      // If the player is moving left, the next tile to the left of it is checked
      else if(this.currKeyCode==65){
        nt = getTile(this.sensorLeft,this.middleY);
      }
      // If the player is moving up, the next tile above of it is checked
      else if(this.currKeyCode==87){
        nt = getTile(this.middleX,this.sensorTop);
      }
      // If the player is moving down, the next tile below of it is checked
      else if(this.currKeyCode==83){
        nt = getTile(this.middleX,this.sensorBottom);
      }
    }
    // If the player comes into contact with the line that it is drawing itself
    if(nt == -1){
      // The position is reset
      player.x = 0;
      player.y = 0;
      // The graphic is reset
      player.graphic = rightPacXon;
      // The speed is reset
      player.currKeyCode = 0;
      // A life is lost
      player.lives -= 1;
      // Collision sound is played
      collisionsound.play();
      // The canvas is reset to borders only
      resetDrawing();
    }
    // If there is no tile at it's middle position
    else if (id == 0){
      // A blue tile for drawing the line is drawn
      modifyTile(this.middleX, this.middleY)
    }
    // If a  solid tile is encounter
    else if (id == 1) {
      solidTiles();
      // Checks if a line is created and gets completed.
      // It does this by checking if the player just got stopped
      if (this.moving == 'stopped'){
        // Then it changes the state of moving to be 'not moving' which means it hasnt started creating any lines
        this.moving = 'not moving';
        // Makes a deep copy of the level array
        var xyz = makeDeepCopy(level);
        // Gets all the positions of the enemies and then sets the
        // corresponding id in the Level array to be 2 to ensure that
         // the enemies are not being taken into account
        for (let i = 0; i < enemy.length; i++){
          // Makes sure that the yellow enemy is not taken into account
          if(enemy[i].type != "follow"){
            ghostx = int(enemy[i].middleX/tileSize);
            ghosty = int(enemy[i].middleY/tileSize)
            level[ghosty][ghostx] = 2;
          }
        }
        // Gets one coordinate from all the enclosed regions
        mArea, sVals = maxAreaOfIsland(xyz);
        // Gets a list of all the smaller regions' coordinates/ the ones to be removed
        let vals = smallerPair(sVals);

        // Resets the position where the enemies' corresponding positions were set to 2
        for (let i = 0; i < enemy.length; i++){
          if(enemy[i].type != "follow"){
            ghostx = int(enemy[i].middleX/tileSize);
            ghosty = int(enemy[i].middleY/tileSize)
            level[ghosty][ghostx] = 0;
          }
        }

        // Fills the level array, basically floods the enclosed region that meets the criteria
        for (let i = 0; i < vals.length; i++){
          fill_array(level, vals[i][0], vals[i][1], 1, 0);
        }
      }
    }
    // Contrains the x and y positions of the enemy to remain within the canvas width and onto the border tiles.
    this.x = constrain(this.x, 0, width-20);
    this.y = constrain(this.y, 0, height-20);
    }
  }
ghost.js
// The Ghosts class
class Ghost {
  // constructor to declare ghost x,y,graphic,speed
  constructor(){
    this.x = random(80, width-100);
    this.y = random(80, height-80);
    this.speedX = random(1, 3);
    this.speedY = random(1, 3);
    this.speed = 0.005;
    this.graphic = blueGhost;
    // previous speed so enemies can return to their original speed after being affected by powerups
    this.pspeedX = this.speedX;
    this.pspeedY = this.speedY;
    this.pspeed = this.speed;
  }

  // displays the enemy
  display(){
    image(this.graphic, this.x, this.y, 20,20);
  }

  // detects players collisions with walls, player and powerups
  collision () {
    // set up sensor positions
    this.sensorLeft = this.x-3;
    this.sensorRight = this.x+tileSize+3;
    this.sensorTop = this.y-3;
    this.sensorBottom = this.y+tileSize+3;
    this.middleX = this.x+tileSize/2;
    this.middleY = this.y+tileSize/2;

    // check the id of tiles in the 2d array at the sensor positions
    let id = getTile(this.middleX,this.middleY);
    let lid = getTile(this.sensorLeft,this.middleY);
    let rid = getTile(this.sensorRight,this.middleY);
    let uid = getTile(this.middleX, this.sensorTop);
    let bid = getTile(this.middleX, this.sensorBottom);

    // if enemies touch the walls (blue tiles), they bounce off
    // top sensor
    if (uid == 1) {
      if(this.type != "follow"){
        this.y += 3;
      }
      this.speedY *= -1;
      this.pspeedY *= -1;
    }
    // bottom sensor
    if (bid == 1) {
      if(this.type != "follow"){
        this.y -= 3;
      }
      this.speedY *= -1;
      this.pspeedY *= -1;
    }
    // left sensor
    if (lid == 1) {
      if(this.type != "follow"){
        this.x += 3;
      }
      this.speedX *= -1;
      this.pspeedX *= -1;
    }
    // right sensor
    if (rid == 1) {
      if(this.type != "follow"){
        this.x -= 3;
      }
      this.speedX *= -1;
      this.pspeedX *= -1;
    }
    // detects collision with the player
    this.playerCollision(rid, lid, uid, bid);
    // detects collision with the snail and ice powerups
    this.powerupCollision();

    // add special wall eating effect of wall collision
    // if enemy type is blue or red
    if (this.type == "eat" || this.type == "duplicate"){
      this.eat(rid, lid, uid, bid)
    }

  }
  // wall eating effect function for blue and red enemies
  eat(rid, lid, uid, bid) {
    // if right tile is a wall but not a border, delete tile
    if (rid == 1 && this.x < width-tileSize-30){
      deleteTile(this.sensorRight, this.middleY);
    }
    // if left tile is a wall but not a border, delete tile
    else if (lid == 1 && this.x > 30){
      deleteTile(this.sensorLeft, this.middleY);
    }
    // if top tile is a wall but not a border, delete tile
    else if (uid == 1 && this.y > 30){
      deleteTile(this.middleX, this.sensorTop);
    }
    // if bottom tile is a wall but not a border, delete tile
    else if (bid == 1 && this.y < height-tileSize-30){
      deleteTile(this.middleX, this.sensorBottom);
    }
  }
  // if enemy is blue, duplicate enemy when player comes in its radius
  duplicate() {
    // if player is within the radius of the enemy
    if (player.x >= this.x-40 && player.x <= this.x+60 && player.y >= this.y-40 && player.y <= this.y+60) {
      // this if condition is to ensure enemy only duplicates once even if the player stays in the radius
      if (this.dup == true){
        enemy.push(new BlueGhost());
        this.dup = false;
      }
    }
    // if player is out of the radius, and comes within it again, enemy can duplicate again
    else {
      this.dup = true
    }
  }
  // move the enemy by determining all collisions
  move() {
    this.collision();
    // pink enemy or red enemy bounces off walls
    if (this.type == "bounce" || this.type == "eat"){
      this.x += this.speedX;
      this.y += this.speedY;
    }
    // yellow enemy follows player
    else if (this.type == "follow"){
      let distX = player.x - this.x;
      let distY = player.y - this.y;

      this.x += this.speed * distX;
      this.y += this.speed * distY;
    }
    // blue enemy has a ring around it and it bounces
    else if (this.type == "duplicate"){
      noFill();
      stroke(0,255,255);
      ellipse(this.x + 10,this.y + 10, 100);
      this.duplicate();
      this.x += this.speedX;
      this.y += this.speedY;

    }
  }
  // if enemy collides with player
  playerCollision(rid, lid, uid, bid) {
    // if enemy comes in contact with "moving blue" tiles or the player itself
    if(lid == -1 || rid == -1 || uid == -1 || bid == -1 || dist(this.x, this.y, player.x, player.y) < 20){
      // play sound
      collisionsound.play();
      // reset player position, graphic, speed, lives
      player.x = 0;
      player.y = 0;
      player.graphic = rightPacXon;
      player.currKeyCode = 0;
      player.lives -= 1;
      // if it bounces off the left moving blue tiles and right tile is not equal to wall jump off 10 pixels to the right
      if (lid == -1 && rid != 1){
        this.x += 10;
      }
      // if it bounces off the right moving blue tiles and left tile is not equal to wall jump off 10 pixels to the left
      else if (rid == -1 && lid != 1){
        this.x -= 10;
      }
      // if it bounces off the top moving blue tiles and bottom tile is not equal to wall jump off 10 pixels to the bottom
      else if (uid == -1 && bid != 1){
        this.y += 10;
      }
      // if it bounces off the bottom moving blue tiles and top tile is not equal to wall jump off 10 pixels to the top
      else if (bid == -1 && uid != 1){
        this.y -= 10;
      }

      // if comes in contact with player, bounce in opposit direction if possible
      if (dist(this.x, this.y, player.x, player.y) < 20) {
        if (rid != 1 || rid != -1){
          this.x += 10;
        }
        else if (lid != 1 || lid != -1){
          this.x -= 10;
        }
        else if (uid != 1 || uid != -1){
          this.y -= 10;
        }
        else if (bid != 1 || bid != -1){
          this.y += 10;
        }

      }
      // if the lives of player are less than or equal to zero
      if (player.lives <= 0){
        // display lives in html
        let window_score = document.getElementById('current_lives')
        window_score.innerHTML = player.lives;
        // display lives in html
        let window_timer = document.getElementById('current_timer');
        window_timer.innerHTML = timer + 's';
        // display game over screen
        endscreen = true;
        // reset player lives
        player.lives = 3;
        // reset player speed
        player.speed = player.pspeed;
        // reset timer
        timer = 100;
        // reset powerups
        powerups = [];
        // remove the blue moving tiles
        resetLevel();
        // reset enemy array
        allLevels();
        // play sound
        gameoversound.play();
      }
      // else if player lives are not yet zero but collision with enemy occurs then just remove the blue moving tiles
      else {
          resetDrawing();
      }
    }
  }

  // detect enemy collsions with powerups
  powerupCollision() {
    // if powerup array is not empty
    // and the powerup is snail or ice
    if (powerups.length != 0 && (powerups[0].graphic == slow || powerups[0].graphic == ice)) {
      // if powerup collision with enemy
      if (dist(this.x, this.y, powerups[0].x, powerups[0].y) < 20) {
        // console.log("enemy touched ice/slow")
        // set previous frame
        this.pframe = frameCount;
        // if the power up is snail, decrease player's speed
        if (powerups[0].graphic == slow) {
          player.speed = 1;
        }
        // if power up is ice, freeze player
        else if (powerups[0].graphic == ice){
          player.speed = 0;
        }
        // stop displaying powerup and change its location to outside canvas
        powerups[0].disp = false;
        powerups[0].x=-100;
        powerups[0].y=-100;
        // play sound
        collectionsound.play();
      }
      // if current frame count - frame count when powerup was picked is 180 (3 sec)
      if (frameCount - this.pframe == 180){
        // return palyer's speed to normal and remove powerup from array
        console.log("return to normal")
        player.speed = player.pspeed;
        powerups.splice(0, 1);
        // this.pframe = 0;
      }

    }
  }
}

// pink ghost class, inherits ghost class
class PinkGhost extends Ghost{
  constructor(){
    super();
    this.speedX = random(1.5, 3);
    this.speedY = random(1.5, 3);
    this.graphic = pinkGhost;
    this.type = "bounce";
  }
}
// blue ghost class, inherits ghost class
class BlueGhost extends Ghost{
  constructor(){
    super();
    this.graphic = blueGhost;
    this.speedX = random(1.5, 3);
    this.speedY = random(1.5, 3);
    this.type = "duplicate";
  }


}
// red ghost class, inherits ghost class
class RedGhost extends Ghost{
  constructor(){
    super();
    this.graphic = redGhost;
    this.type = "eat";
  }
}
// yellow ghost class, inherits ghost class
class YellowGhost extends Ghost{
  constructor(){
    super();
    this.graphic = yellowGhost;
    this.type = "follow";
  }
}
levels.js
// calculate and return the percentage of solid tiles in the array
function completeLevel() {
    let count = 0
    let totalcount = 0;
    for (let i=1; i < (height/20) - 1; i++){
        for (let j=1; j < (width/20) - 1; j++){
          if (level[i][j] == 1){
            count += 1;
          }
        }
    }
    totalcount = ((count/828)* 100);
    return round(totalcount * 100) / 100;
}

// promotes player to next level
function nextLevel() {
    // completeLevel();
    // levelOne();
    if (completeLevel() >= 80) {
        // console.log(completeLevel())
        levelupsound.play();
        // increment level
        levels +=1;
        // if all 6 levels completed,
        if(levels>6){
            // game has been completed
            gamecomplete = true;
        }
        // else increment the number of levels unlocked
        else{
            // Checks if the current reached level has become greater than the user stored level
            if(mylevel < levels){
                mylevel +=1;
                // It then updates the local storage as well
                if(mylevel <7){
                    window.localStorage.setItem('levelsCompleted', mylevel);
                }
            }
        }
        // display lives in html
        let window_score = document.getElementById('current_lives')
        window_score.innerHTML = player.lives;
        // display lives in html
        let window_timer = document.getElementById('current_timer');
        window_timer.innerHTML = timer + 's';
        // resetLevel();
        player.x = 0;
        player.y = 0;
        // player.lives = 3;
        player.graphic = rightPacXon;
        player.currKeyCode = 0;
        // timer = 100;
        // allLevels();
        // levelupscreen = true;

        // display game over screen
        levelupscreen = true;
        // reset player lives
        player.lives = 3;
        // reset timer
        timer = 100;
        // reset player speed
        player.speed = player.pspeed;
        // reset powerups
        powerups = [];
        // remove the blue moving tiles
        resetLevel();
        // reset enemy array
        allLevels();
    }
}
// function which contains all levels
function allLevels() {
    // level 2
    if (levels == 2) {
        levelTwo();
    }
    // level 3
    else if (levels == 3) {
        levelThree();
    }
    // level 4
    else if (levels == 4) {
        levelFour();
    }
    // level 5
    else if (levels == 5) {
        levelFive();
    }
    // level 6
    else if (levels == 6) {
        levelSix();
    }
}

// level one enemy array declaration
function levelOne() {
    enemy = [];

    enemy.push(new PinkGhost());
    enemy.push(new PinkGhost());
}

// level two enemy array declaration
function levelTwo() {
    enemy = [];

    enemy.push(new PinkGhost());
    enemy.push(new PinkGhost());
    enemy.push(new RedGhost());
}

// level three enemy array declaration
function levelThree() {
    enemy = [];

    enemy.push(new PinkGhost());
    enemy.push(new RedGhost());
    enemy.push(new RedGhost());
    enemy.push(new YellowGhost());
}
// level four enemy array declaration
function levelFour() {
    enemy = [];

    enemy.push(new PinkGhost());
    enemy.push(new BlueGhost());
    enemy.push(new RedGhost());
    enemy.push(new RedGhost());
    enemy.push(new YellowGhost());
}

// level five enemy array declaration
function levelFive() {
    enemy = [];

    enemy.push(new PinkGhost());
    enemy.push(new RedGhost());
    enemy.push(new RedGhost());
    enemy.push(new BlueGhost());
    enemy.push(new YellowGhost());
    enemy.push(new YellowGhost());
}

// level six enemy array declaration
function levelSix() {
    enemy = [];

    enemy.push(new PinkGhost());
    enemy.push(new PinkGhost());
    enemy.push(new RedGhost());
    enemy.push(new RedGhost());
    enemy.push(new BlueGhost());
    enemy.push(new BlueGhost());
    enemy.push(new YellowGhost());
    enemy.push(new YellowGhost());

}
level.js
// set all the blue moving tiles when the player loses a life to black tiles when the game restarts
function resetDrawing() {
  for (let i=0; i < height/20; i++){
    for (let j=0; j < width/20; j++){
      if (level[i][j] == -1){
        level[i][j] = 0;
      }
    }
  }
}
// The following for loops populate the 2D list, level, dynamically and leaves it blank
function initializeLevel() {
  let rows = []
  for (let i = 0; i < height/20; i++){
    rows = []
    for (let j =0; j < width/20; j++){
      rows.push(0);
    }
    level.push(rows)
  }
}

// The following block populates the fixed borders of the board
function resetLevel() {
  for (let i=0; i < height/20; i++){
    for (let j=0; j < width/20; j++){
      level[i][j] = 0;
      if (i == 0 || i == height/20-1 || j == 0 || j == width/20-1 ){
        level[i][j] = 1;
      }
    }
  }
}

// function to draw the tiles
function drawLevel() {
  for (let r = 0; r < level.length; r++) {
    for (let c = 0; c < level[r].length; c++) {
      if(level[r][c] == 1){
        image(tile,c*20,r*20,20,20);
      }
      if(level[r][c] == -1){
        image(movingTile,c*20,r*20,20,20);
      }
    }
  }
}

// returns the id of the tile in the array
function getTile(x,y) {
  x = int(x/tileSize);
  y = int(y/tileSize);
  return level[y][x];
}
function getCoord(x,y) {
  x = int(x/tileSize);
  y = int(y/tileSize);
  return x,y;
}

// modifies the tile to a blue moving tile
function modifyTile(x,y) {
  x = int(x/tileSize);
  y = int(y/tileSize);
  level[y][x] = -1;
}
// deletes a tile
function deleteTile(x,y) {
  x = int(x/tileSize);
  y = int(y/tileSize);
  level[y][x] = 0;
}
// deletes multiple tiles when a bomb goes off
function deleteTiles(x,y){
  deleteTile(x,y);
  deleteTile(x-20,y);
  deleteTile(x+20,y);
  deleteTile(x,y-20);
  deleteTile(x,y+20);
  deleteTile(x+20,y+20);
  deleteTile(x-20,y+20);
  deleteTile(x,y+40);

}
// when the player reaches the border, tranform moving tiles to solid wall tiles
function solidTiles(){
  let maxRow = 0, maxCol=0;
  for (let r = 0; r < level.length; r++) {
    for (let c = 0; c < level[r].length; c++) {
      if(level[r][c] == -1){
        // When a tile is changed from -1 to 1, it means the player created a line so the moving variable of the player is set to stopped
        player.moving = 'stopped'
        maxRow = max(maxRow, r);
        maxCol = max(maxCol, c);
        level[r][c] = 1;
      }
    }
  }
}
fillblock.js
// A recursive function with inspiration from https://learnersbucket.com/examples/algorithms/flood-fill-algorithm-in-javascript/
// The following function fills an enclosed region, basically some values bordered on all four sides by certain other value,
// with the new values that are provided.
// It basically replicates how the paint bucket system works in photoshop.
// The function is supposed to be given coordinates of a point in the region.
function fill_array(level, r, c, newColor, current){
  // Checks if the values are out of bound
    if(r < 0){
        return;
    }
    // Checks if the values are out of bound
    if(c < 0){
        return;
    }
    // Checks if the values are out of bound
    if(r > level.length){
        return;
    }
    // Checks if the values are out of bound
    if(c > level[r].length){
        return;
    }
    // Checks if there is any enemy inside of the region, if so
    // it increases the area count by a large amount in order to flag interval
    // The value of 2 is placed wherever the enemies are present as this function executes.
    if(level[r][c] === 2){
        count = 10000;
        return;
    }
    // A different value is encountered
    if(level[r][c] !== current){
        return;
    }
    // Changes the value at the array index
     level[r][c] = newColor;
     // Count to keep track of the 'area' of an enclosed region.
     count = count + 1;
     // the function recursivly calls itself t ensure all the neigbors are filled.
     fill_array(level, r - 1, c, newColor, current);
     fill_array(level, r + 1, c, newColor, current);
     fill_array(level, r, c - 1, newColor, current);
     fill_array(level, r, c + 1, newColor, current);
     // Returns the 2D Array
     return level
};
// Function to check all the coordinate pairs that have smaller area
function smallerPair(values){
    // initialize two lists
    areas = [];
    pairs = [];
    let enemfound = false;
    // Loops over all the coordinates
    for (let i = 0; i< values.length; i ++){
      // Calls the fill array function ONLY TO COUNT the area of the region in which the point lies.
      fill_array(level,values[i][0], values[i][1], 3, 0);
      // Stores the count into a local variable
      c1 = count;
      // Calls the fill array function to reset the modified values back to normal in the level array
      fill_array(level, values[i][0], values[i][1], 0, 3);
      // updates the global variable count
      count = 0;
      // Checks if the enemy is present
      if(c1<1000){
        areas.push(c1);
        pairs.push(values[i]);
        // Marks the enemy to not be found
        enemfound = true;
      }
    }
    // If the previous condition was not passed, it means the enemy was present in this block.
    if(enemfound == false){
      // The index with the maximum value, an outlier wtih a value of 10000 is removed from the list
      maxA = max(areas)
      maxIndex = areas.indexOf(maxA);
      pairs.splice(maxIndex,1);
    }
    // returns the pairs by excluding the biggest of the regions
    return pairs;
};
// Inspired from the Leet Code Problem Solution: https://dev.to/seanpgallivan/solution-max-area-of-island-4njk
// It returns one coordinate in each enclosed region
function maxAreaOfIsland(grid) {
  // Sets the maximum area to be very high since we need to take the minimum
    let maxArea = 10000
    // Directions over which to check next
    let compass = [[-1, 0], [0, -1], [1, 0], [0, 1]];
    // Checks the previous row and previous columns
    let prow;
    let pcol;
    // An array to store all the coordinate values
    let smallVals = [];
    // Runs for the entire grid and calls the flood function if each value meets a certain criteria.
    for (let i = 0; i < grid.length; i++) {
        for (let j = 0; j < grid[i].length; j++) {
            if (grid[i][j] === 0) {
                flood([[i, j]])
            }
        }
    }
    // Another flood function built differently for checking the enclosed box
    return maxArea, smallVals
    function flood(stack) {
      // initializes the area
        let currentArea = 0
        while (stack.length) {
            let [row, col] = stack.pop()
            if (row < 0 || col < 0 || row >= grid.length || col >= grid[0].length || grid[row][col] === 1) {
                continue
            }
            // increases the area
            currentArea++
            grid[row][col] = 1
            prow = row;
            pcol = col;
            for (const direction of compass) {
                stack.push([row + direction[0], col + direction[1]])
            }
        }
        // Pushes the row and column onto the list
        smallVals.push([prow,pcol]);
        // Gets the minium of all areas.
        maxArea = Math.min(maxArea, currentArea)
    }
};
// Function to make a deep copy of a 2D Array
function makeDeepCopy(g) {
  // initializes a new list
  var gridCopy = [];
  // Runs for all the lists within the big list
  for (var x = 0; x < g.length; x++) {
    // initializes an intermediary/ temporary row
    var newRow = [];
    // Runs a loop for the length of each list within the bigger list
    for (var y = 0; y < g[x].length; y++) {
      // adds the values to the temporary row
      newRow.push(g[x][y])
    }
    // Pushes the copied row into the new bigger row
    gridCopy.push(newRow);
  }
  // returns a newly created 2D Array/ List with the old list.
  return gridCopy;
};
Arduino Code
// joystick ports
int dirUp = 7;
int dirDown = 6;
int dirRight = 5;
int dirLeft = 4;

// lives lights ports
int lives3Pin = 11;
int lives2Pin = 10;
int lives1Pin = 9;
int lives = 3;
int prevlives = 3;
int vibrate = 0;

// int lives, prevlives = 3;
int motorPin = 3; //motor transistor is connected to pin 10
int motorState = LOW;  // motorState used to set the Motor Vibration
unsigned long previousMillis = 0;  // will store last time LED was updated
const long interval = 1000;  // interval at which to blink (milliseconds)


void setup()
{
  pinMode( dirDown , INPUT);
  pinMode( dirUp , INPUT);
  pinMode( dirLeft , INPUT);
  pinMode( dirRight, INPUT);

  pinMode(motorPin, OUTPUT);
  Serial.begin(9600);

  while (Serial.available() <= 0) {
    digitalWrite(LED_BUILTIN, HIGH); // on/blink while waiting for serial data
    Serial.println("0"); // send a starting message
    delay(300);            // wait 1/3 second
    digitalWrite(LED_BUILTIN, LOW);
    delay(50);
  }
}

void loop(){

  while (Serial.available()) {
      prevlives = lives;
      lives = Serial.parseInt();
      if(prevlives != lives){
        vibrate=1;
      }

      if (Serial.read() == '\n') {
        if (digitalRead( dirDown ) == LOW ){
          Serial.println(1);
        }
        else if (digitalRead( dirUp ) == LOW ){
          Serial.println(2);
        }
        else if (digitalRead( dirLeft ) == LOW ){
          Serial.println(3);
        }
        else if (digitalRead( dirRight ) == LOW ){
          Serial.println(4);
          // digitalWrite(motorPin, HIGH); //vibrate
        }
        else {
          Serial.println(0);
      }

      if(vibrate == 1){
        unsigned long currentMillis = millis();
        if (currentMillis - previousMillis >= interval) {
          // save the last time you blinked the LED
          previousMillis = currentMillis;

          // if the LED is off turn it on and vice-versa:
          if (motorState == LOW) {
            motorState = HIGH;
          } else {
            motorState = LOW;
            vibrate=0;
          }

          // set the LED with the ledState of the variable:
          digitalWrite(motorPin, motorState);
        }
        // else{
        //   vibrate=0;
        // }
      }

      if (lives == 3) {
        digitalWrite(lives1Pin, HIGH);
        digitalWrite(lives2Pin, HIGH);
        digitalWrite(lives3Pin, HIGH);
      }
      else if (lives == 2) {
        digitalWrite(lives1Pin, HIGH);
        digitalWrite(lives2Pin, HIGH);
        digitalWrite(lives3Pin, LOW);
        // digitalWrite(motorPin, HIGH); //vibrate
      }
      else if (lives == 1) {
        digitalWrite(lives1Pin, HIGH);
        digitalWrite(lives2Pin, LOW);
        digitalWrite(lives3Pin, LOW);
      }
      else if (lives == 0) {
        digitalWrite(lives1Pin, LOW);
        digitalWrite(lives2Pin, LOW);
        digitalWrite(lives3Pin, LOW);
        // digitalWrite(motorPin, HIGH); //vibrate
      }

    }
    }

}