Final Project – Melody Masters

Concept

Melody Masters is a fun and interactive project that helps people explore and learn about music. It uses Arduino to let users interact with physical buttons  and p5.js to show visual and audio feedback on a screen. By pressing buttons, users can play sounds and see how melodies are made. The idea is to make learning music simple and enjoyable for everyone, whether they are just starting or love experimenting with music. Melody Masters makes learning about music feel like a fun and creative experience. Melody Masters challenges the user by collecting as much points as they can in a minute which helps them with coordinating the location of the note with the note itself. The game has a tutorial that explains where each letter is located so that the user can learn where each note is located. There is also an option for free play where the user can play whatever music they want.

How does it work?

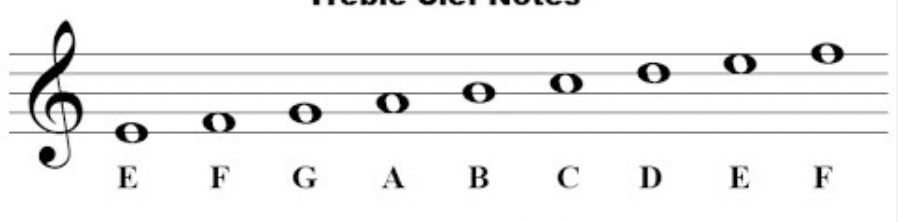
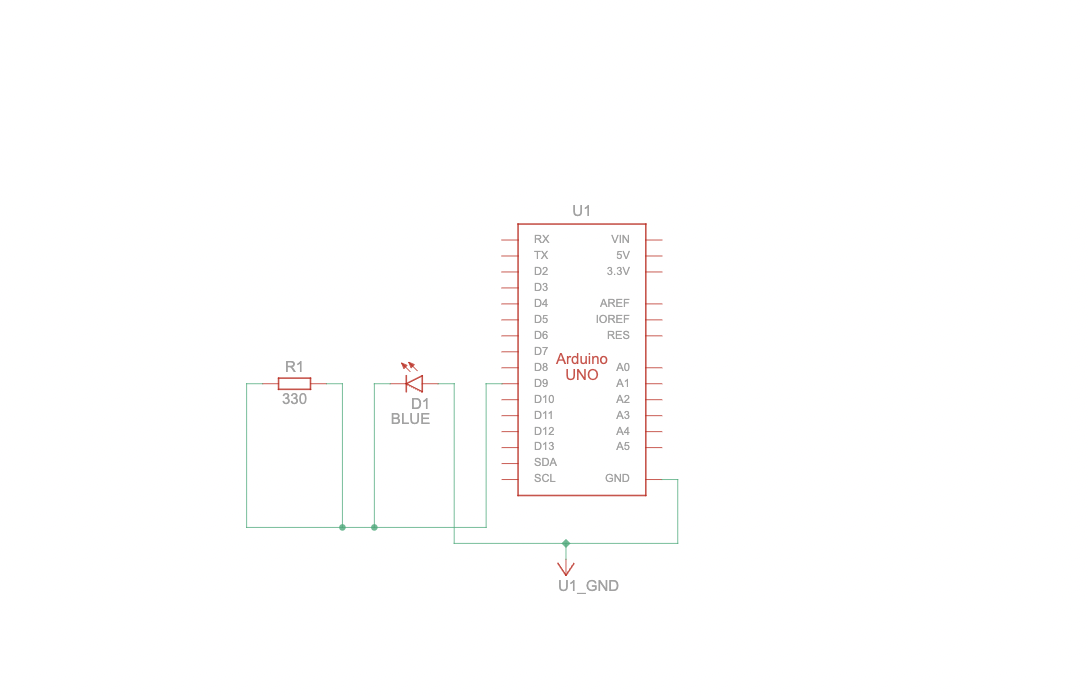
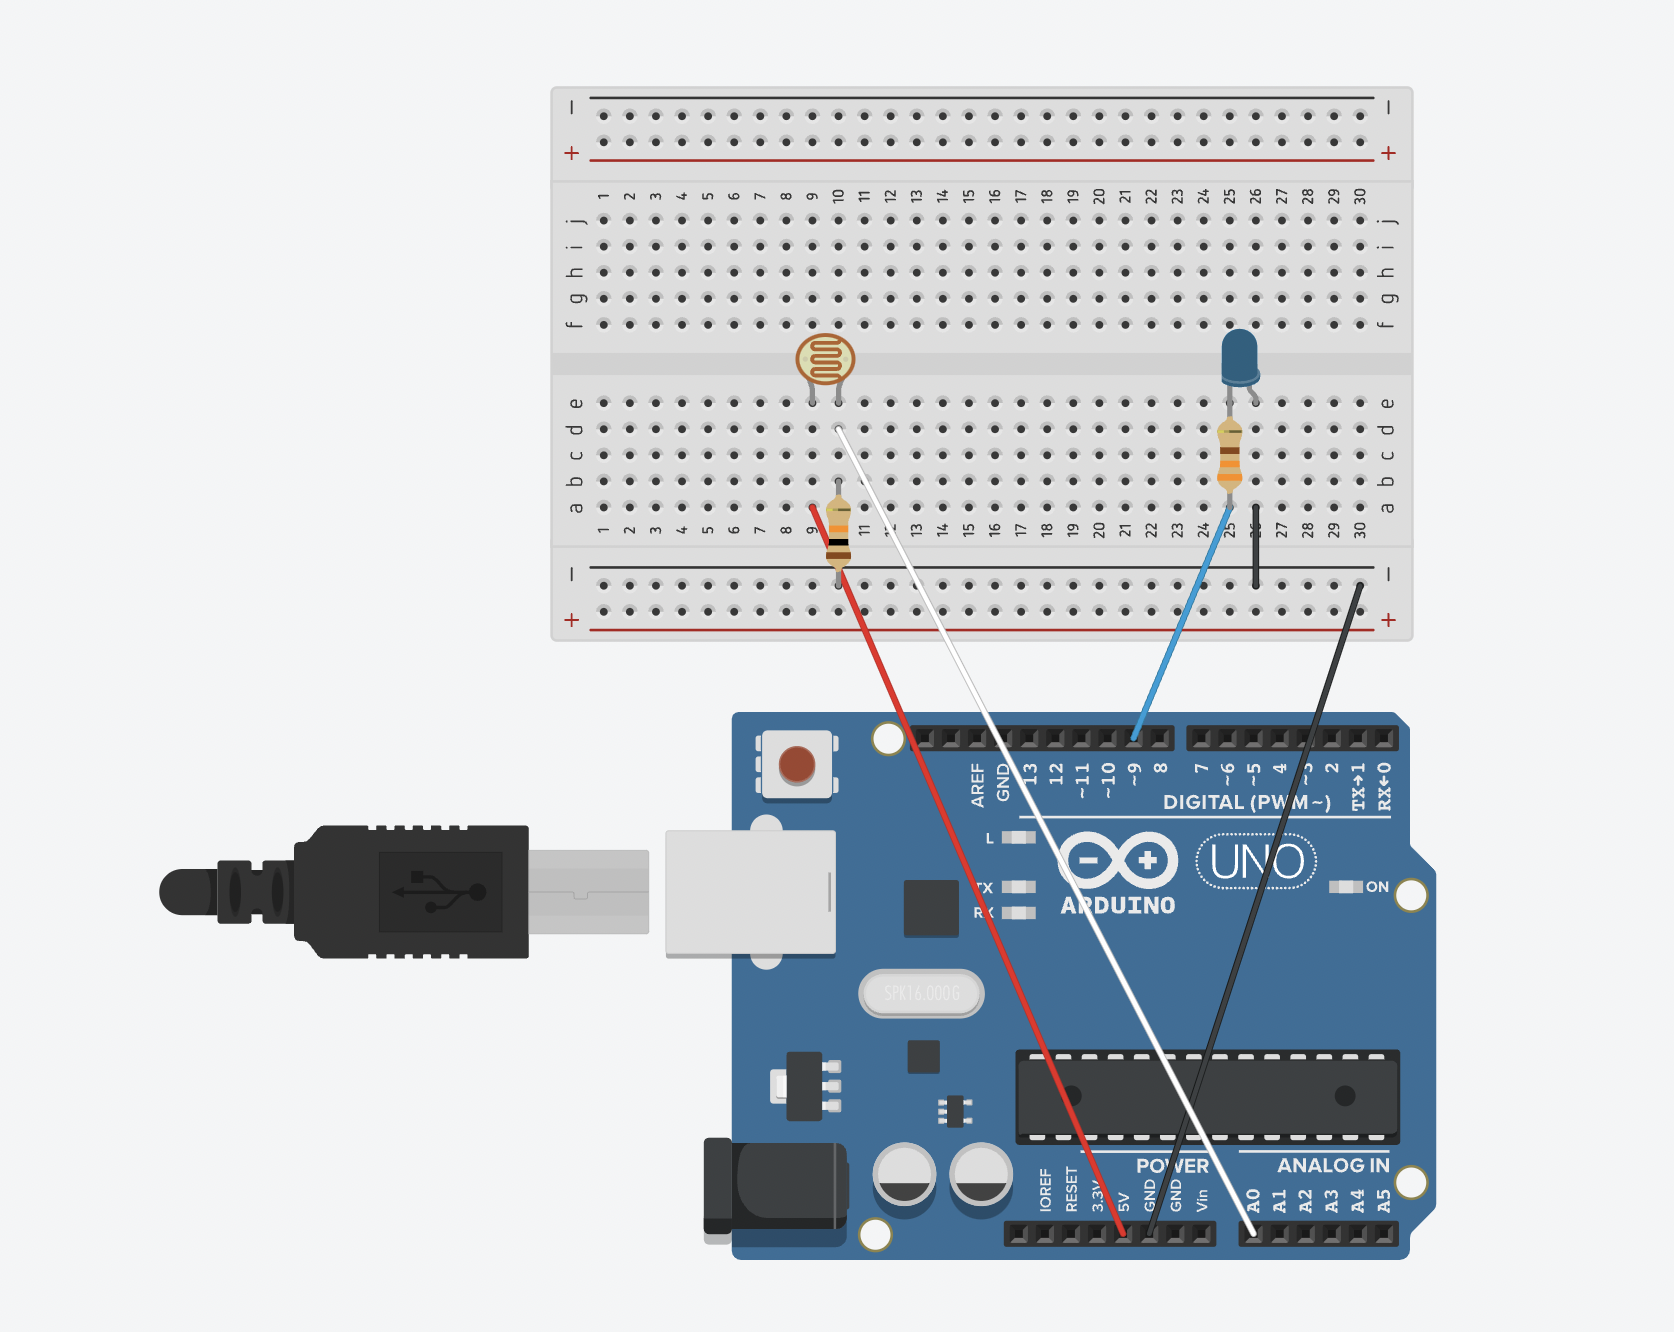
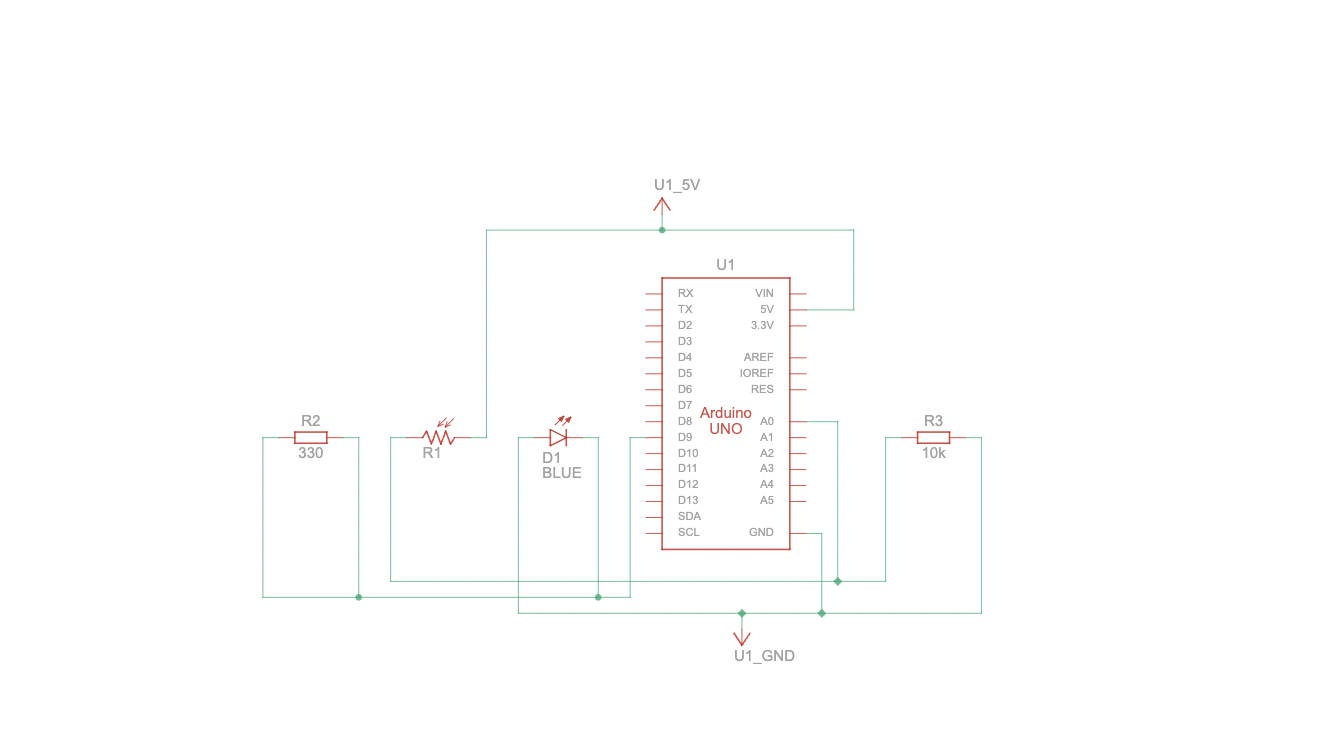
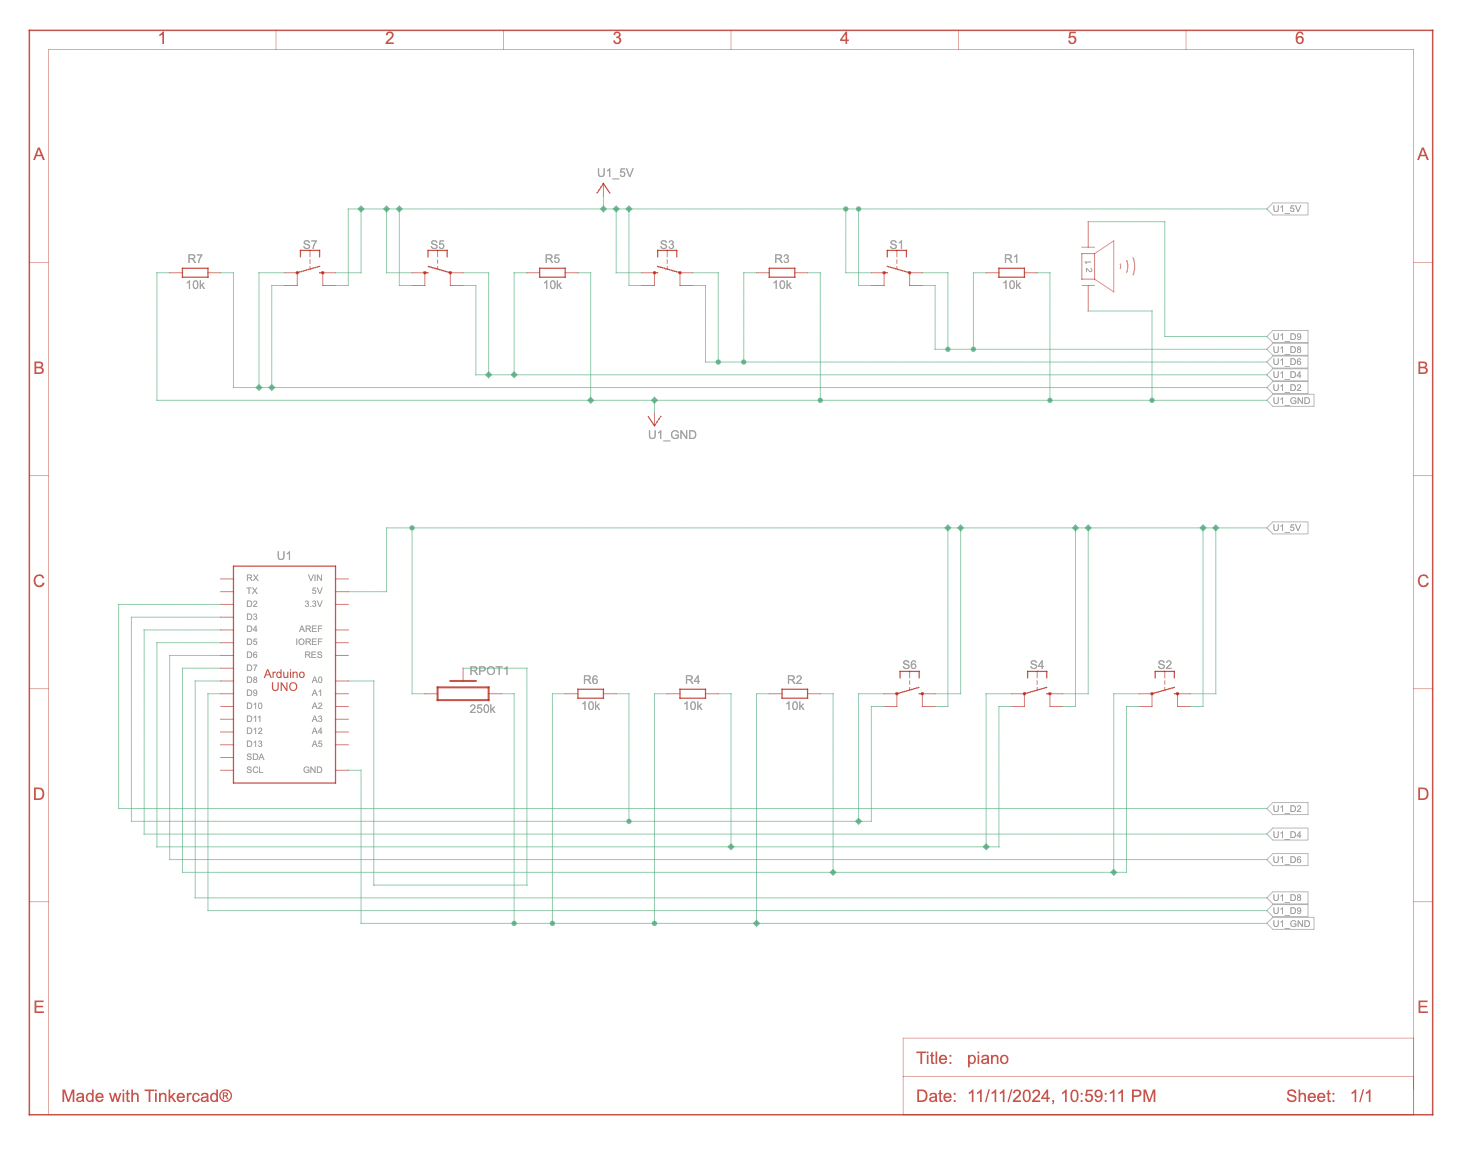
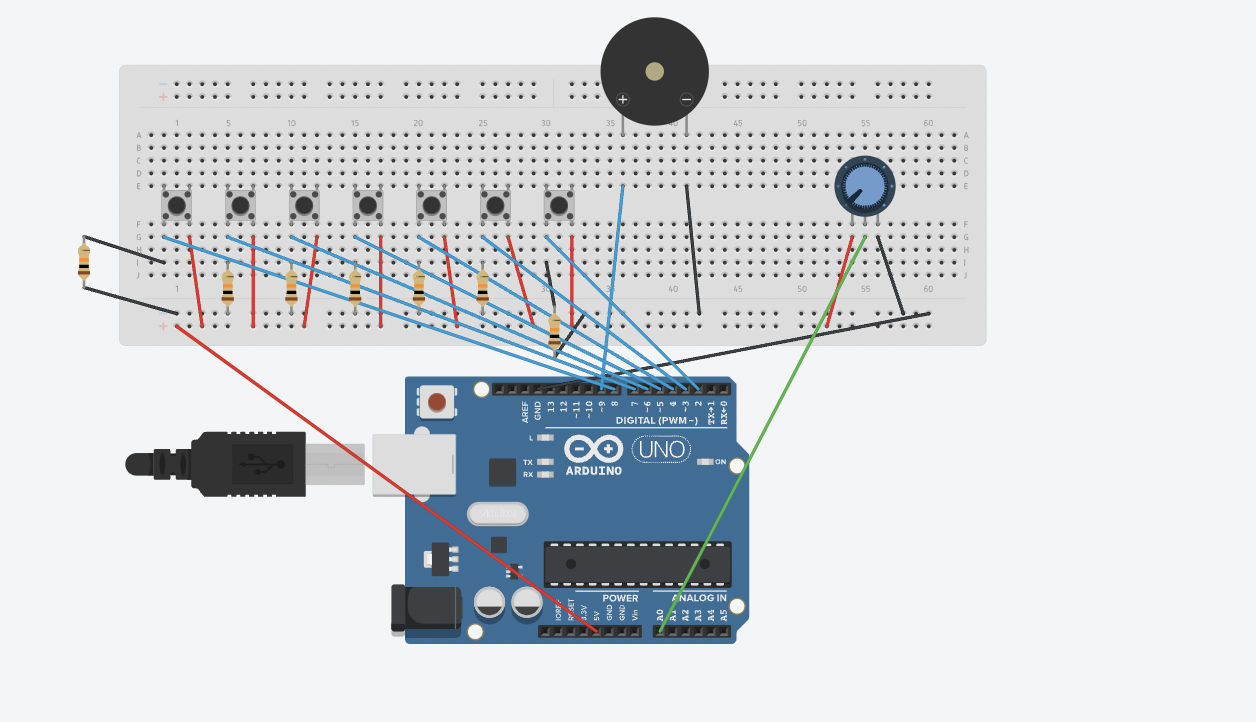
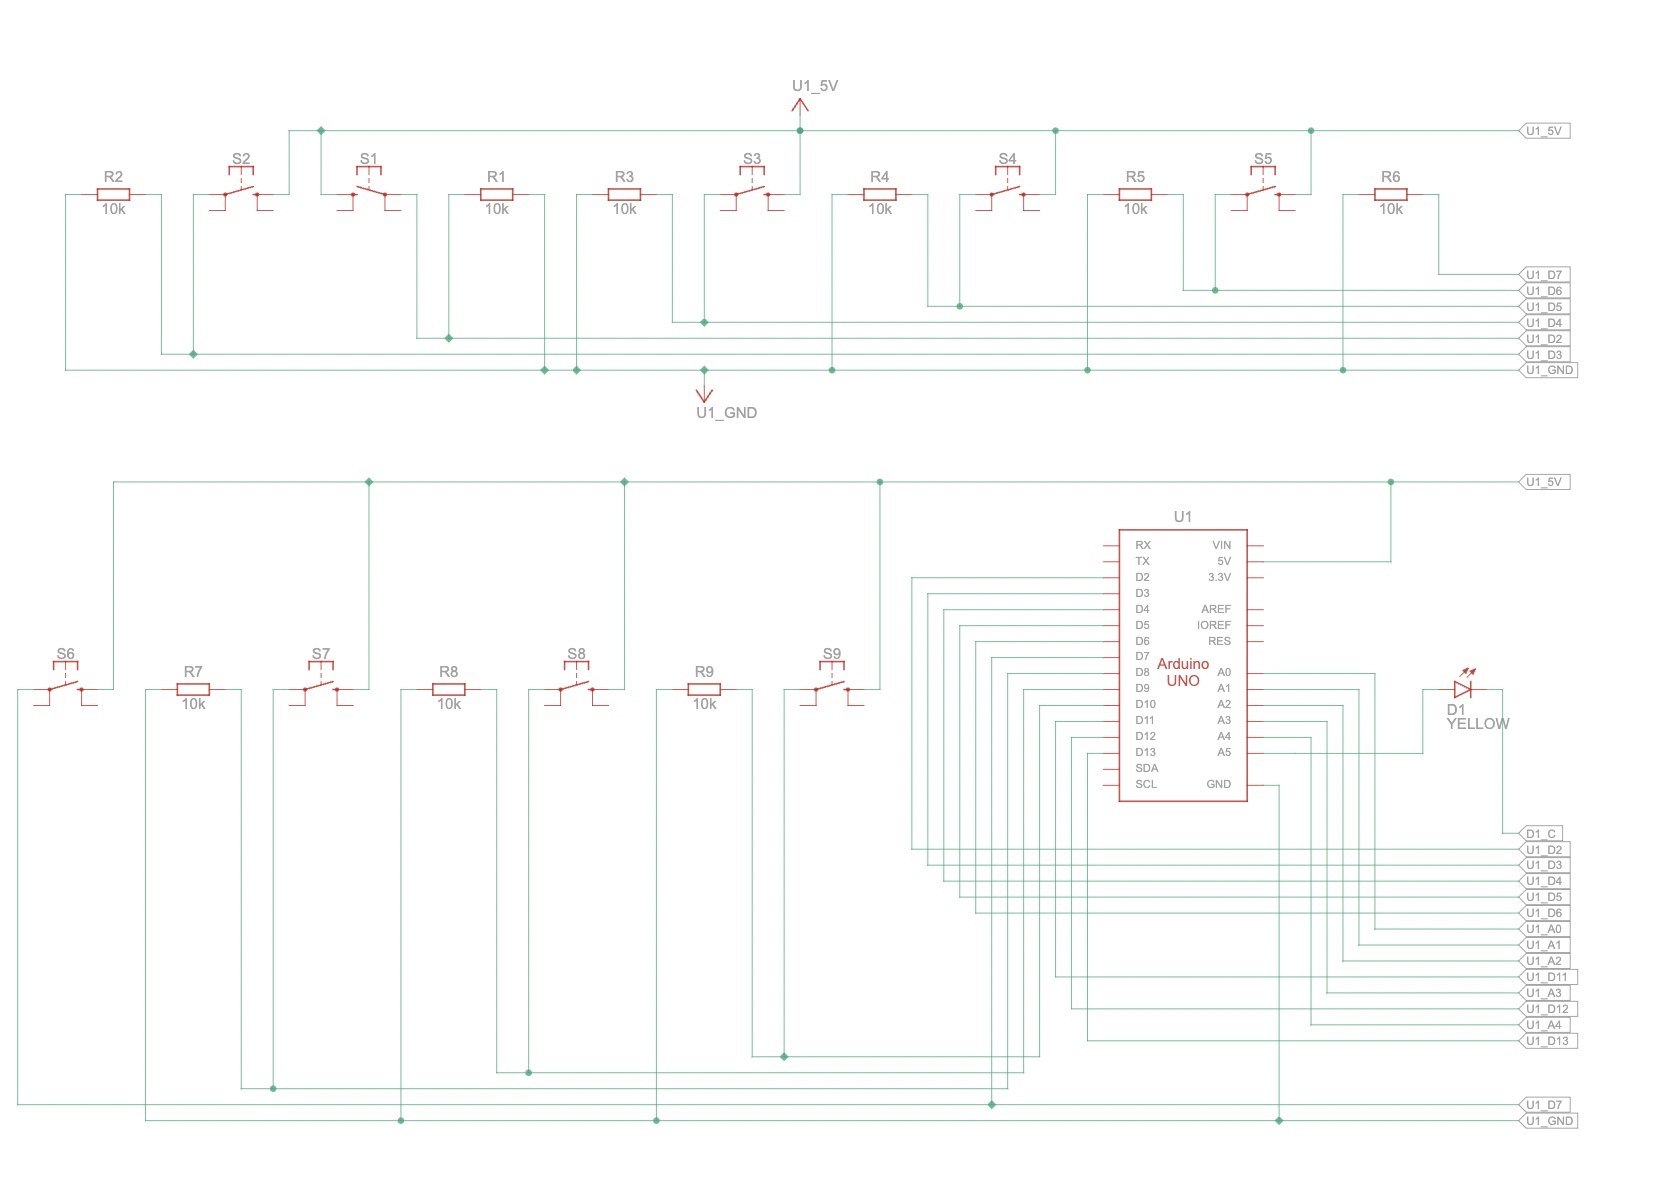
The interaction design of Melody Masters is simple and engaging. Users interact with physical buttons connected to an Arduino board. Each button corresponds to a different musical note, and pressing a button triggers a sound, and lights up the button, the sound is also visualized through animations on the screen using p5.js. The design focuses on making the experience intuitive, so users of all ages can easily play and create melodies. The interaction bridges the gap between touch, sound, and visuals, making it a multisensory experience.

The Arduino code is written to detect button presses and send corresponding signals to the computer via serial communication. Each button is assigned a unique musical note, and when pressed, the Arduino sends a specific code to indicate the note. The code also includes debouncing logic to ensure smooth and reliable input.

Arduino Code

The p5.js code takes input from the Arduino through serial communication and creates visual and audio feedback. The P5 code has the tutorial, game and free play logic. Each logic is different than the other and each component gives the user a different experience.

The Arduino and p5.js communicate via serial communication. When a button is pressed on the Arduino, it sends a unique character (like ‘C’ or ‘D’) over the serial port. The p5.js sketch reads this data, processes it, and triggers the appropriate sound and visual response. The communication ensures a real-time connection, creating an immediate response to user interactions, which makes the experience dynamic and engaging.

What I am proud of?
The way physical button presses translate into both sound and visuals feels intuitive and satisfying. It’s rewarding to see how users can engage with music in such an accessible way.

What can I improve?

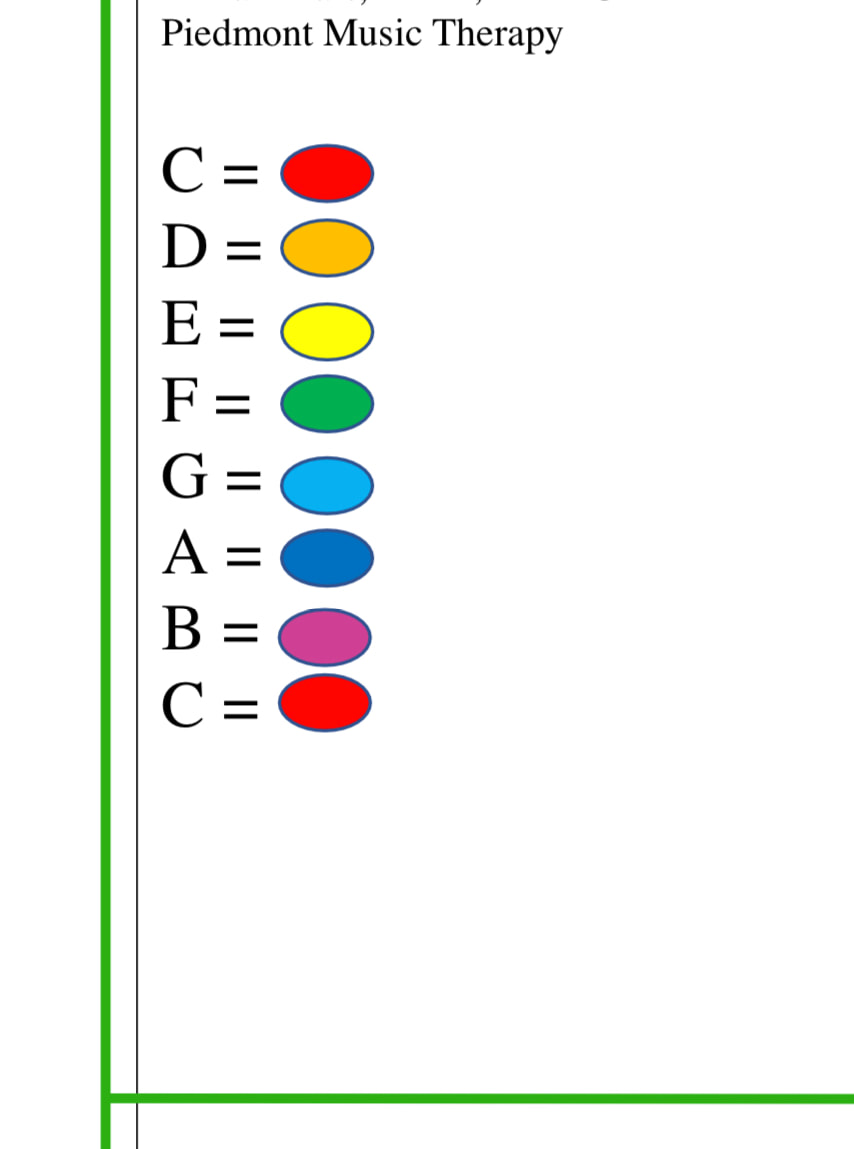
What I think I want to improve is that when the audio visualization is being drawn, I can change the colors of the visualization depending on what note is being played for example if it was an E it will become yellow and so on. I want to include this so that the aesthetics of the game matches the aesthetics of the board more.

IM Showcase Interactions

Final Project User Testing

Without clear instructions the user was confused between how the buttons and notes corresponded to each other, so I had to explain the game before the user tested it. I think everything will be fine when I combine the game and the tutorial and maybe if I add an instructions page if the user is still confused with the tutorial.

Everything in my experience is working well, the buttons are corresponding to the notes and sound, and if a wrong button is pressed 5 points are deducted and if you press the correct button corresponding to the note you get 10 points, I might want to add a library to save the highest score so far so it becomes competitive.

What I want to improve in my experience is the overall look, I want to laser cut the box that would hold the Arduino and I want to paint some of the buttons to match the music therapy note colors.

Final Project Progress

Finalized concept for the project

A music device that teaches kids how to read music notes. The way it works is that there will be a tutorial in the beginning that the user has to follow and then the user plays a game for about a minute and he/she should should collect as much points as he/she can, each correct note is +10 points and each wrong note is -5 points. The device is consisted of 9 buttons each button is allocated to a note starting from (E, F, G, A, B, C, D ,E, F).

I want to color code each button to correspond to the following chart:

Arduino Program

The Arduino code defines each button for each digital pin, and it defines a digital pin for the potentiometer. The potentiometer sends value to the P5 program to adjust the volume. It also sends the button index to the P5 so it can play the note corresponding to the button pressed.

P5 Program

The P5 program holds the sound frequencies for each note. It gets a signal from Arduino of which button is being pressed (digital pins) and it plays the note allocated to that button. It has the display of the music staff and the notes drawn. It displays one note at a time if you get the note wrong it will keep displaying the note until you get it correct and if you get it correct it moves to the next note.

Documentation of progress

Github

Final Project Idea

For my final project, I’m creating a music learning device to help kids read beginner music notes in a fun and interactive way. The device will have an LED button panel with nine buttons, each representing a specific musical note on the staff. These buttons will cover notes on both the lines and spaces, making it easy for kids to learn where each note is positioned.

I’ll start with a tutorial to introduce the notes, showing their names and positions on a staff while the matching LED button lights up. This way, kids can visually connect each note’s name with its place.

After the tutorial, there’s a gameplay mode to reinforce what they’ve learned. Notes will appear on a screen, and the player needs to press the corresponding LED button as fast as they can. They’ll earn points for correct answers and lose points for wrong ones, with the goal of getting as many points as possible in 90 seconds. This competitive element makes learning both challenging and enjoyable.

The device will use serial communication between an Arduino and p5.js. The Arduino will handle the LEDs and buttons, while p5.js will display notes on the screen and manage the game logic, like scoring and timing. This setup will create a smooth connection between what’s happening on screen and the physical buttons.

To make the learning even more immersive, there will be sounds for each note. A potentiometer will be included to allow the user to adjust the volume of the sound, giving them control over how loud or soft they want the feedback to be. When a button is pressed, the corresponding musical tone will play, helping kids connect the note visually.

Reading Response 8

In “Design Meets Disability,” the author talks about how design and disability come together in ways we don’t usually think about. He challenges the idea that things made for people with disabilities shouldn’t only be practical. Instead, they can be beautiful and a way for someone to express who they are. I found this really interesting, especially when the author compared eyeglasses, which are now a fashion accessory, with hearing aids, which are often hidden. It made me realize how much society’s views affect the way these tools are designed.

I really liked how the author said that designers should do more than just try to “fix” disabilities. They should make products that celebrate differences. It made me think about what good design really means. Shouldn’t it be about helping people feel empowered and giving them choices? For example, think about how wheelchairs have changed over time. Old wheelchairs were bulky and just focused on function. But now, there are wheelchairs that are lightweight, stylish, and customizable. They give people more than just mobility, they help them feel confident. This is exactly the kind of change the author is talking about.

Another example is prosthetic limbs. In the past, they were designed to blend in and look as “natural” as possible. But now, some prosthetics are colorful and artistic, or they look futuristic, like the bionic limbs. These designs are more than just tools, they let people show their personality and feel proud of what they’re wearing.

The book left me feeling hopeful about what could happen if more designers thought this way. Assistive devices could become something people actually want to use, not just something they need. Imagine a future where these devices are seen as an exciting part of someone’s personality, like how clothes or accessories are today.

Overall, I appreciated the author’s perspective. It added a lot to the conversation about inclusion and made me see how much potential there is in rethinking assistive design as something not just useful, but also appealing.

Assignment 9 – Serial Communication

Example 1 – Arduino to p5 communication

The potentiometer was used to control the horizontal axis of the ellipse.

Setup


Schematic

P5 code

let X = 0; // ellipse x position


function setup() {
  createCanvas(400, 400); 
}

function draw() {
  background(240); 

  fill('rgb(134,126,126)'); 
  ellipse(X, height/2, 80); 
}

function keyPressed() {
  if (key === " ") {
    setUpSerial(); // Start the serial connection on space bar press
  }
}

// Processes incoming data from Arduino
function readSerial(data) {
  if (data != null) {
    let fromArduino = split(trim(data), ","); // Split incoming data by commas

    if (fromArduino.length >= 1) {
      // Process the first value for X position
      let potValue = int(fromArduino[0]); // Convert string to integer
      X = map(potValue, 0, 1023, 50, width - 50); // Map potentiometer value to X position
      Y = height / 2; // Keep Y position constant
    }
  }
}

Arduino code

Github

Video

Example 2 – P5 to Arduino Communication

The horizontal position of the mouse detects the brightness of the LED.

Setup

Schematic

P5 code

let brightness = 0; // Brightness value to send to Arduino

function setup() {
  createCanvas(640, 480);
  textSize(18);
}

function draw() {
  background(255);

  if (!serialActive) {
    // If serial is not active display instruction
    text("Press Space Bar to select Serial Port", 20, 30);
  } else {
    // If serial is active, display connection status and brightness value
    text("Connected", 20, 30);
    text('Brightness = ' + str(brightness), 20, 50);
  }

  // Map the mouseX position (0 to width) to brightness (0 to 255)
  brightness = map(mouseX, 0, width, 0, 255);
  brightness = constrain(brightness, 0, 255); // Ensures brightness is within the range 0-255

  // Sends brightness value to Arduino
  sendToArduino(brightness);
}

function keyPressed() {
  if (key == " ") {
    // Start serial connection when the space bar is pressed
    setUpSerial();
  }
}


function readSerial(data) {
  if (data != null) {

  }
}
// We dont need this part of the code because we are not getting any value from the Arduino

// Send brightness value to Arduino
function sendToArduino(value) {
  if (serialActive) {
    let sendToArduino = int(value) + "\n"; // Convert brightness to an integer, add newline
    writeSerial(sendToArduino); // Send the value using the serial library
  }
}

Arduino Code

Github

Video

Example 3 – Bi-Directional Communication

Every time the ball bounces and LED blinks, and the wind is controlled by the light sensor

Setup

Schematic

P5 Code

let velocity;
let gravity;
let position;
let acceleration;
let wind;
let drag = 0.99;
let mass = 50;


let windValue = 0; // Wind value from Arduino (light sensor)
let serialConnected = false; // Tracks if the serial port is selected

function setup() {
  createCanvas(640, 360);
  textSize(18); 
  noFill();

  position = createVector(width / 2, 0);
  velocity = createVector(0, 0);
  acceleration = createVector(0, 0);
  gravity = createVector(0, 0.5 * mass);
  wind = createVector(0, 0);
}

function draw() {
  background(255);

  if (!serialConnected) {
    // Show instructions to connect serial port
    textAlign(CENTER, CENTER);
    fill(0); // Black text
    text("Press Space Bar to select Serial Port", width / 2, height / 2);
    return; // Stop loop until the serial port is selected
  } else if (!serialActive) {
    // Show connection status while waiting for serial to activate
    textAlign(CENTER, CENTER);
    fill(0);
    text("Connecting to Serial Port...", width / 2, height / 2);
    return; // Stop until the serial connection is active
  } else {
    // display wind value and start the simulation if connected
    textAlign(LEFT, TOP);
    fill(0);
    text("Connected", 20, 30);
    text('Wind Value: ' + windValue, 20, 50);
  }

  // Apply forces to the ball
  applyForce(wind);
  applyForce(gravity);

  // Update motion
  velocity.add(acceleration);
  velocity.mult(drag);
  position.add(velocity);
  acceleration.mult(0);

  // Draw the ball
  ellipse(position.x, position.y, mass, mass);

  // Check for bounce
  if (position.y > height - mass / 2) {
    velocity.y *= -0.9; 
    position.y = height - mass / 2; // Keep the ball on top of the floor 

    // Sends signal to Arduino about the bounce
    sendBounceSignal();
  }

  // Update wind force based on Arduino input
  wind.x = map(windValue, 0, 1023, -1, 1); // Map sensor value to wind range
}

function applyForce(force) {
  let f = p5.Vector.div(force, mass);// Force divided by mass gives acceleration
  acceleration.add(f);
}

// Send a bounce signal to Arduino
function sendBounceSignal() {
  if (serialActive) {
    let sendToArduino = "1\n"; // Signal Arduino with "1" for a bounce
    writeSerial(sendToArduino);
  }
}

// incoming serial data from Arduino
function readSerial(data) {
  if (data != null) {
    windValue = int(trim(data)); // store the wind value
  }
}

// Press space bar to initialize serial connection
function keyPressed() {
  if (key == " ") {
    setUpSerial(); // Initialize the serial connection
    serialConnected = true; // Mark the serial port as selected
  }
}

// Callback when serial port is successfully opened
function serialOpened() {
  serialActive = true; // Mark the connection as active
}

Arduino Code

Github

Video

Reading Response 7

A Brief Rant on the Future of Interaction Design

In A Brief Rant on the Future of Interaction Design, Bret Victor questions why so many modern interfaces are stuck in the world of touchscreens and flat gestures, like tapping and swiping. He’s frustrated by how much these designs ignore our hands’ full potential—hands that can feel, manipulate, and explore in so many ways. Victor argues that truly forward-thinking design would tap into all those physical abilities instead of confining us to “pictures under glass.”

I found myself agreeing with Victor. His critique of touchscreens as limiting felt spot-on, especially when he pointed out how little variety there is in most of our interactions with technology. Tapping a flat screen is easy, sure, but is it really the best we can do? I think he’s right that we’re missing out on richer, more engaging ways to interact with digital content, ways that could make technology feel more natural and even enjoyable.

What grabbed me most was Victor’s emphasis on designing for our full physical range. It made me think about how much more immersive technology could be if it didn’t just stop at the screen. Victor’s vision feels like a reminder to keep pushing for designs that feel human, not just efficient, and to reimagine what “interaction” could mean beyond the usual taps and swipes.

Assignment 8 – Piano

Concept
For this assignment, Fatima and I created a mini piano keyboard using Arduino with 7 notes (C, D, E, F, G, A, B). Each note is played using a button, and the pitch can be changed using the potentiometer. The switch allows the sound to shift higher or stay at the original pitch depending on its position.

Each button corresponds to a specific frequency for one note. When you press a button, the Arduino sends a signal to the buzzer to play that frequency. The blue switch works as a pitch modifier. This combination creates a mini keyboard where you can experiment with simple melodies and play around with tone changes.

Schematic

Digital Arduino

Demo Video

Reflection
To improve the project, we could’ve add more interactivity by including volume control, perhaps using a potentiometer. Another idea is to incorporate visual feedback, like an LED or an LCD display, to indicate which note or pitch is being played. These improvements would make the keyboard more versatile and closer to a real musical instrument.

Git hub

Reading Response 6

Physical Computing’s Greatest hits and misses

“Physical Computing’s Greatest Hits and Misses” dives into the ups and downs of integrating digital technology into physical spaces, and I found myself agreeing with the need to balance innovation with usability. One example that came to mind as a “hit” is the interactive installations in museums, like touch-sensitive displays or motion sensors that respond to visitors. These installations really enhance the experience, letting people interact with exhibits in ways that feel natural and fun. They show how physical computing can deepen engagement and create memorable experiences.

On the other hand, a “miss” for me is voice-activated assistants in public spaces, like Alexa in hotel rooms. While it’s a cool idea, it doesn’t always feel necessary, and privacy concerns can make people uncomfortable. Sometimes, it feels like technology is added just for the sake of being trendy, without actually improving the experience for the user.

Overall, I appreciated how the article doesn’t just celebrate successes but also reflects on what didn’t work, and why. It’s a good reminder for anyone working in this space (including me!) to think carefully about the purpose and impact of our designs. It’s not just about “what’s possible” but about making something genuinely useful or meaningful.

Making Interactive Art: Set the Stage, Then Shut Up and Listen

In Making Interactive Art: Set the Stage, Then Shut Up and Listen, the author emphasizes the importance of giving users freedom to explore interactive art without over-directing them. Instead of telling people exactly what to do, artists are encouraged to “set the stage” and then let go, allowing the audience to interpret and respond to the work in their own way. I found this approach both challenging and refreshing. The idea of “listening” to users without controlling the experience forces artists to think deeply about how a piece can evoke curiosity and provide a space for discovery.

One part that resonated with me was the focus on creating an environment where users feel empowered to participate. For instance, I’ve noticed that some of the most compelling interactive pieces in galleries are ones that give minimal instructions. People get to be more creative, exploring the piece however they like. These open-ended approaches make each interaction feel personal and unique.

Overall, this article challenges traditional thinking in art and interactivity, making a strong case for why artists should relinquish control and let audiences truly experience the work. As someone working in interactive media, it’s a powerful reminder that art is often most impactful when it becomes a two-way conversation rather than a one-sided display.

Assignment 7 – Sensor and Push Button

Concept

For this assignment I used two different LED lights one is switched on my a push button, and the other changes it’s brightness based on the lighting detected by the light sensor.

Code

int led = 11;

void setup(){
  Serial.begin(9600);
  pinMode(led,OUTPUT);
}

void loop(){
  int sensorValue = analogRead(A2);
  Serial.println(sensorValue);
  analogWrite(led,sensorValue/4);
  delay(50);
}

Github

Setup

The setup was drawn using Tinkercad

Schematic

The schematic was drawn using Tinkercad

Demonstration

Video