Flock Together: Gesture-Controlled Boids
Concept:
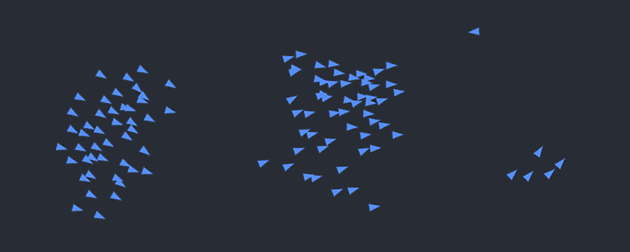
This interactive project brings the beautiful patterns of flocking behavior to life through a blend of digital and physical interactions. Drawing inspiration from Craig Reynolds’ classic Boids algorithm, the simulation creates an emergent collection of entities that move with collective “intelligence” (just like birds). What makes this implementation special is how it places control directly in your hands (literally).
Using hand tracking technology, you can shape the flock by pinching different fingers against your thumb: switch between triangles, circles, squares, and stars with your left hand, or adjust the flocking parameters with your right. The experience extends beyond the screen through an Arduino connection, where turning a physical knob changes the speed of the entire flock, and buttons let you add or remove boids in groups. The result is a meditative yet playful experience that bridges the digital and physical worlds, inviting you to explore how simple rules can create complex, beautiful patterns that respond intuitively to your gestures and touch.
Implementation Details:
I put together a fun web demo of Craig Reynolds’ Boids algorithm that you can actually mess with using your hands, your mouse, or even an Arduino knob. Behind the scenes there’s a Flock class full of little boids that follow separation, alignment, and cohesion rules you can tweak on the fly. You can choose triangles, circles, squares, or stars, and twist a physical potentiometer (via p5.webserial.js) to speed them up from half-speed to 5x, or hit “ADD” or “REMOVE” commands to add or remove 5 boids. In the browser, I use ML5.js’s HandPose model to spot pinch gestures, pinch with your left hand to swap shapes, pinch with your right to dial in the steering forces, and I run the video offscreen so everything stays buttery smooth. The canvas automatically resizes to fit your window, shows a chill gradient background that subtly reacts to your hardware tweaks, and even displays connection status and boid count. If hand tracking hiccups or the Arduino disconnects, it just auto-reconnects so the flock party never has to stop 🙂
Interaction Design:
The application uses ML5’s handpose detection to implement a natural gestural interface:
- Left Hand Controls Shape Selection:
- Index finger + thumb pinch: Triangle shape (shape 0)
- Middle finger + thumb pinch: Circle shape (shape 1)
- Ring finger + thumb pinch: Square shape (shape 2)
- Pinky finger + thumb pinch: Star shape (shape 3)
- Right Hand Controls Flocking Parameters:
- Middle finger + thumb pinch: Increases separation force (from 1.5 to 8.0)
- Ring finger + thumb pinch: Increases cohesion force (from 1.0 to 2.0)
- Pinky finger + thumb pinch: Increases alignment force (from 1.0 to 2.0)
The gesture system uses a distance threshold of 20 pixels between finger and thumb to trigger actions, making the interaction intuitive and responsive.
Physical Hardware Integration
The project incorporates an Arduino with physical controls:
- Potentiometer Input:
- Controls the movement speed of the boids (mapped from 0.5 to 5.0)
- Values from Arduino (0-1023) are normalized for smooth speed control
- Button Controls (inferred from serial messages):
- “ADD” command: Adds 5 new boids to the simulation
- “REMOVE” command: Removes 5 boids from the simulation
Serial Communcation:
The serial communication in this project connects the web application with an Arduino microcontroller using the p5.webserial.js library. In sketch.js, the app initializes a serial port (createSerial()) in the setupSerial() function and attempts to connect to previously used ports. When connected (indicated by the green indicator), the application receives two types of data: commands like “ADD” and “REMOVE” that control the boid population (adding or removing 5 boids at a time), and analog values from a potentiometer (0-1023) that control the speed of the boids. The potentiometer value is normalized (mapped to a range of 0.5-5) and applied to the flock’s movement speed via the flock.updateSpeed() method. Users can also manually connect to the Arduino by clicking on the screen if the connection indicator shows red. This bidirectional communication allows physical hardware to influence the digital flocking simulation in real-time.
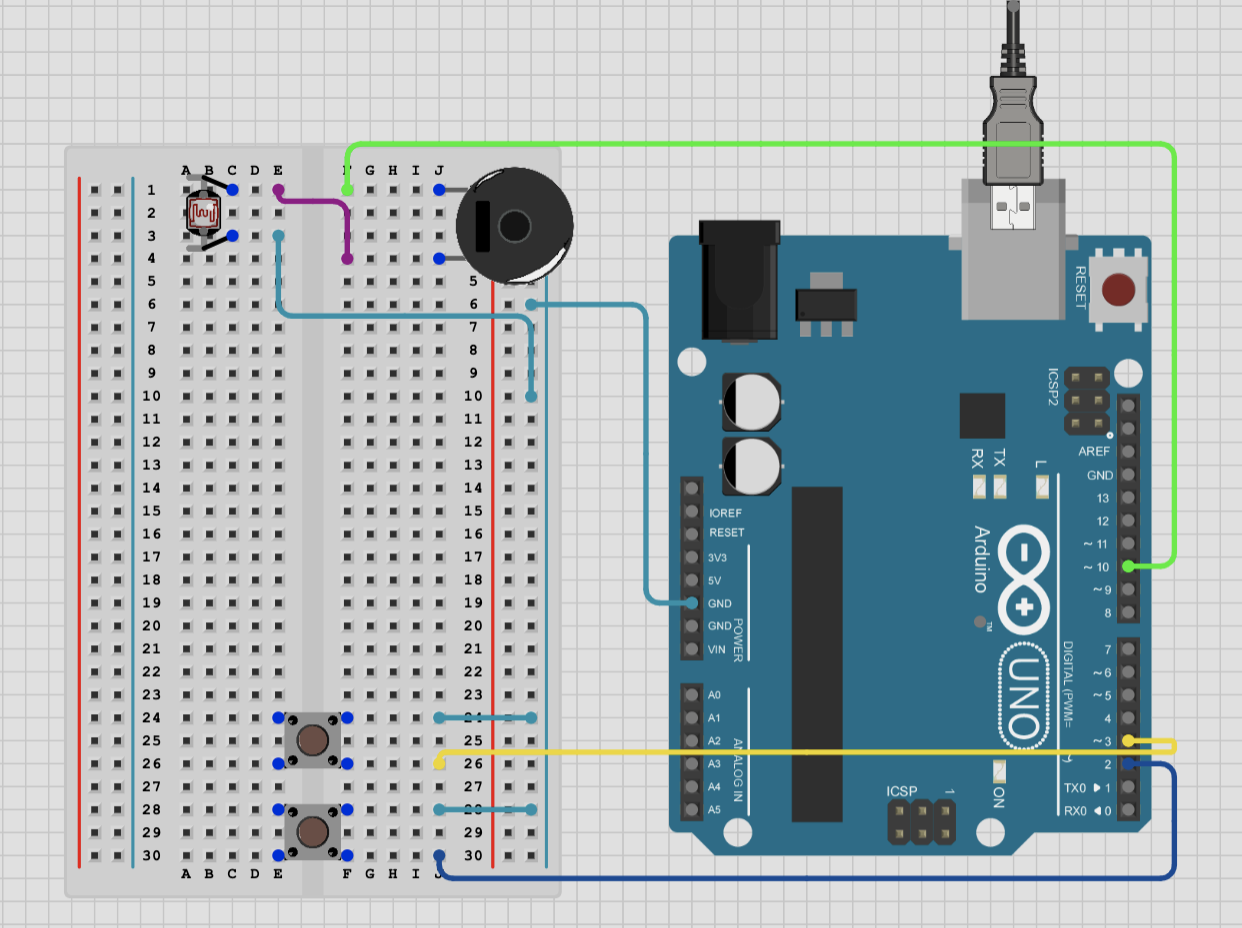
Schematic:

Arduino Code:
// Pin definitions
const int BUTTON_ADD_PIN = 2;     // Button to add boids
const int BUTTON_REMOVE_PIN = 3;  // Button to remove boids
const int POT_PIN = A0;           // Potentiometer for background color

// Variables to keep track of button states
int buttonAddState = HIGH;         // Current state of add button (assume pulled high)
int lastButtonAddState = HIGH;     // Previous state of add button
int buttonRemoveState = HIGH;      // Current state of remove button
int lastButtonRemoveState = HIGH;  // Previous state of remove button

// Variables for debouncing
unsigned long lastDebounceTime = 0;
const unsigned long debounceDelay = 50;  // Debounce time in milliseconds

// Variable to store pot value
int potValue = 0;
int lastPotValue = -1;  // Store last pot value to detect significant changes

void setup() {
  // Initialize serial communication at 9600 bps
  Serial.begin(9600);

  // Set button pins as inputs with pullup resistors
  pinMode(BUTTON_ADD_PIN, INPUT_PULLUP);
  pinMode(BUTTON_REMOVE_PIN, INPUT_PULLUP);

  // No need to set analog pin mode for potentiometer
}

void loop() {
  // Read button states (LOW when pressed, HIGH when released due to pullup)
  int readingAdd = digitalRead(BUTTON_ADD_PIN);
  int readingRemove = digitalRead(BUTTON_REMOVE_PIN);

  // Check if add button state changed
  if (readingAdd != lastButtonAddState) {
    lastDebounceTime = millis();
  }

  // Check if remove button state changed
  if (readingRemove != lastButtonRemoveState) {
    lastDebounceTime = millis();
  }

  // Wait for debounce time to pass
  if ((millis() - lastDebounceTime) > debounceDelay) {
    // Update button states if they've changed
    if (readingAdd != buttonAddState) {
      buttonAddState = readingAdd;

      // If button is pressed (LOW), send command to add boids
      if (buttonAddState == LOW) {
        Serial.println("ADD");
      }
    }

    if (readingRemove != buttonRemoveState) {
      buttonRemoveState = readingRemove;

      // If button is pressed (LOW), send command to remove boids
      if (buttonRemoveState == LOW) {
        Serial.println("REMOVE");
      }
    }
  }

  // Read potentiometer value (0-1023)
  potValue = analogRead(POT_PIN);

  // Only send pot value if it changed significantly (to reduce serial traffic)
  if (abs(potValue - lastPotValue) > 10) {
    Serial.println(potValue);
    lastPotValue = potValue;
  }

  // Update last button states
  lastButtonAddState = readingAdd;
  lastButtonRemoveState = readingRemove;

  // Small delay to stabilize readings
  delay(10);
}
p5 code:
sketch.js:
let handPose;                            // ml5 HandPose model
const baseWidth = 1440;                  // reference canvas width
const baseHeight = 900;                  // reference canvas height
const shape = 0;                         // initial shape type (0–triangle)
                                           // 0 - triangle, 1 - circle, 2 - square, 3 - stars

let flock;                               // Flock instance
let video;                               // video capture
let port;                                // serial port
let serialConnected = false;             // serial connection flag
let potentiometerValue = 0;              // analog input from Arduino

// draw a star shape at (x,y)
function star(x, y, radius1, radius2, npoints) {
    let angle = TWO_PI / npoints;
    let halfAngle = angle / 2.0;
    beginShape();
    for (let a = 0; a < TWO_PI; a += angle) {
        // outer vertex
        vertex(x + cos(a) * radius2, y + sin(a) * radius2);
        // inner vertex
        vertex(x + cos(a + halfAngle) * radius1, y + sin(a + halfAngle) * radius1);
    }
    endShape(CLOSE);
}

class Flock {
    constructor() {
        this.boids = [];
        this.numBoids = 100;
        this.shape = shape;
        this.speedMultiplier = 1;
        this.separationWeight = 1.5;
        this.cohesionWeight = 1.0;
        this.alignmentWeight = 1.0;

        // initialize boids at random positions
        for (let i = 0; i < this.numBoids; i++) {
            this.boids.push(new Boid(random(width), random(height), this.shape));
        }
    }

    run() {
        // update each boid's behavior and render
        for (let boid of this.boids) {
            boid.run(this.boids, this.separationWeight, this.cohesionWeight, this.alignmentWeight);
        }
    }

    updateShape(shape) {
        this.shape = shape;
        // apply new shape to all boids
        this.boids.forEach(boid => boid.shape = shape);
    }

    updateSpeed(multiplier) {
        // constrain speed multiplier and update maxSpeed
        this.speedMultiplier = constrain(multiplier, 0.5, 5);
        this.boids.forEach(boid => boid.maxSpeed = 3 * this.speedMultiplier);
    }

    updateSeparation(weight) {
        // adjust separation weight
        this.separationWeight = constrain(weight, 0.5, 8);
    }

    updateCohesion(weight) {
        // adjust cohesion weight
        this.cohesionWeight = constrain(weight, 0.5, 3);
    }

    updateAlignment(weight) {
        // adjust alignment weight
        this.alignmentWeight = constrain(weight, 0.5, 3);
    }

    addBoid(boid) {
        // add a new boid
        this.boids.push(boid);
    }

    removeRandomBoid() {
        // remove one random boid if any exist
        if (this.boids.length > 0) {
            this.boids.splice(floor(random(this.boids.length)), 1);
        }
    }
}

class Boid {
    constructor(x, y, shape) {
        this.position = createVector(x, y);       // current location
        this.velocity = createVector(random(-1, 1), random(-1, 1));
        this.acceleration = createVector(0, 0);
        this.shape = shape;                       // shape type
        this.maxSpeed = 3;                        // top speed
        this.maxForce = 0.05;                     // steering limit
        this.r = 5;                               // radius for drawing
    }

    run(boids, separationWeight, cohesionWeight, alignmentWeight) {
        // flocking behavior, movement, boundary wrap, and draw
        this.flock(boids, separationWeight, cohesionWeight, alignmentWeight);
        this.update();
        this.borders();
        this.render();
    }

    applyForce(force) {
        // accumulate steering force
        this.acceleration.add(force);
    }

    flock(boids, separationWeight, cohesionWeight, alignmentWeight) {
        // calculate each flocking component
        let alignment = this.align(boids).mult(alignmentWeight);
        let cohesion  = this.cohere(boids).mult(cohesionWeight);
        let separation = this.separate(boids).mult(separationWeight);

        this.applyForce(alignment);
        this.applyForce(cohesion);
        this.applyForce(separation);
    }

    update() {
        // apply acceleration, limit speed, move, reset accel
        this.velocity.add(this.acceleration);
        this.velocity.limit(this.maxSpeed);
        this.position.add(this.velocity);
        this.acceleration.mult(0);
    }

    render() {
        // draw boid with correct shape and rotation
        let theta = this.velocity.heading() + radians(90);
        push();
        translate(this.position.x, this.position.y);
        rotate(theta);
        noStroke();
        fill(127);

        if (this.shape === 1) {
            circle(0, 0, this.r * 2);
        } else if (this.shape === 2) {
            square(-this.r, -this.r, this.r * 2);
        } else if (this.shape === 3) {
            star(0, 0, this.r, this.r * 2.5, 5);
        } else {
            // default triangle
            beginShape();
            vertex(0, -this.r * 2);
            vertex(-this.r, this.r * 2);
            vertex(this.r, this.r * 2);
            endShape(CLOSE);
        }

        pop();
    }

    borders() {
        // wrap around edges
        if (this.position.x < -this.r) this.position.x = width + this.r;
        if (this.position.y < -this.r) this.position.y = height + this.r;
        if (this.position.x > width + this.r) this.position.x = -this.r;
        if (this.position.y > height + this.r) this.position.y = -this.r;
    }

    separate(boids) {
        // steer away from close neighbors
        let perception = 25;
        let steer = createVector();
        let total = 0;

        boids.forEach(other => {
            let d = p5.Vector.dist(this.position, other.position);
            if (other !== this && d < perception) {
                let diff = p5.Vector.sub(this.position, other.position).normalize().div(d);
                steer.add(diff);
                total++;
            }
        });

        if (total > 0) steer.div(total);
        if (steer.mag() > 0) {
            steer.setMag(this.maxSpeed).sub(this.velocity).limit(this.maxForce);
        }
        return steer;
    }

    align(boids) {
        // steer to match average heading
        let perception = 50;
        let sum = createVector();
        let total = 0;

        boids.forEach(other => {
            let d = p5.Vector.dist(this.position, other.position);
            if (other !== this && d < perception) {
                sum.add(other.velocity);
                total++;
            }
        });

        if (total > 0) {
            sum.div(total).setMag(this.maxSpeed).sub(this.velocity).limit(this.maxForce);
        }
        return sum;
    }

    cohere(boids) {
        // steer toward average position
        let perception = 50;
        let sum = createVector();
        let total = 0;

        boids.forEach(other => {
            let d = p5.Vector.dist(this.position, other.position);
            if (other !== this && d < perception) {
                sum.add(other.position);
                total++;
            }
        });

        if (total > 0) {
            sum.div(total).sub(this.position).setMag(this.maxSpeed).sub(this.velocity).limit(this.maxForce);
        }
        return sum;
    }
}

function preload() {
    handPose = ml5.handPose();             // load handpose model
}

function setup() {
    createCanvas(windowWidth, windowHeight);     // full-window canvas
    video = createCapture(VIDEO);                // start video
    video.size(640, 480);
    video.style('transform', 'scale(-1, 1)');    // mirror view
    video.hide();
    handPose.detectStart(video, handleHandDetection); // begin hand detection
    flock = new Flock();                         // init flock

    setupSerial();                               // init Arduino comms
}

function draw() {
    drawGradientBackground();                    // dynamic background
    flock.run();                                 // update and render boids

    // read and handle serial input
    if (port && port.available() > 0) {
        let data = port.readUntil("\n")?.trim();
        if (data === "REMOVE") {
            for (let i = 0; i < 5; i++) flock.removeRandomBoid();
        } else if (data === "ADD") {
            for (let i = 0; i < 5; i++) flock.addBoid(new Boid(random(width), random(height), flock.shape));
        } else {
            potentiometerValue = parseInt(data);
            let norm = map(potentiometerValue, 0, 1023, 0, 1);
            flock.updateSpeed(map(norm, 0, 1, 0.5, 5));
        }
    }

    // display connection status and stats
    fill(serialConnected ? color(0,255,0,100) : color(255,0,0,100));
    noStroke();
    ellipse(25, 25, 15);
    fill(255);
    textSize(12);
    text(serialConnected ? "Arduino connected" : "Arduino disconnected", 40, 30);
    text("Boids: " + flock.boids.length, 40, 50);
    text("Potentiometer: " + potentiometerValue, 40, 70);
}

function windowResized() {
    resizeCanvas(windowWidth, windowHeight);   // adapt canvas size
}

function mouseDragged() {
    // add boid at drag position
    flock.addBoid(new Boid(mouseX, mouseY, flock.shape));
}

function mousePressed() {
    // connect to Arduino on click
    if (!serialConnected) {
        port.open('Arduino', 9600);
        serialConnected = true;
    }
}

function setupSerial() {
    port = createSerial();                     // create serial instance
    let usedPorts = usedSerialPorts();         // recall last port
    if (usedPorts.length > 0) {
        port.open(usedPorts[0], 9600);
        serialConnected = true;
    }
}

function drawGradientBackground() {
    // vertical gradient based on potentiometer
    let norm = map(potentiometerValue, 0, 1023, 0, 1);
    let c1 = color(0, 0, 0);
    let c2 = color(50, 50, 100);
    for (let y = 0; y < height; y++) {
        stroke(lerpColor(c1, c2, map(y, 0, height, 0, 1)));
        line(0, y, width, y);
    }
}
handGestures.js:
function handleHandDetection(results) {
    detectedHands = results;
    if (detectedHands.length === 0) return;

    let leftHandData = null;
    let rightHandData = null;

    // Identify left/right hands (using handedness or X position fallback)
    detectedHands.forEach(hand => {
        if (hand.handedness === 'Left') {
            leftHandData = hand;
        } else if (hand.handedness === 'Right') {
            rightHandData = hand;
        } else if (hand.keypoints[0].x > video.width / 2) {
            leftHandData = hand;
        } else {
            rightHandData = hand;
        }
    });

    if (leftHandData) handleShapeSelection(leftHandData);
    if (rightHandData) handleFlockingParameters(rightHandData);
}

function handleShapeSelection(hand) {
    const kp = hand.keypoints;
    const d = (i) => dist(kp[i].x, kp[i].y, kp[4].x, kp[4].y);

    // Pinch gestures select shape
    if (d(8) < 20) {
        flock.updateShape(0); // index-thumb
    } else if (d(12) < 20) {
        flock.updateShape(1); // middle-thumb
    } else if (d(16) < 20) {
        flock.updateShape(2); // ring-thumb
    } else if (d(20) < 20) {
        flock.updateShape(3); // pinkie-thumb
    }
}

function handleFlockingParameters(hand) {
    const kp = hand.keypoints;
    const pinch = (i) => dist(kp[i].x, kp[i].y, kp[4].x, kp[4].y) < 20;

    // Gesture-controlled forces; reset when not pinched
    flock.updateSeparation(pinch(12) ? 8   : 1.5); // middle-thumb
    flock.updateCohesion  (pinch(16) ? 2.0 : 1.0); // ring-thumb
    flock.updateAlignment (pinch(20) ? 2.0 : 1.0); // pinkie-thumb
}
What I am proud of:
I’m particularly proud of creating a multi-modal interactive system that merges computer vision, physical computing, and algorithmic art into a cohesive experience. The hand gesture interface allows intuitive control over both the visual appearance (shapes) and behavioral parameters (separation, cohesion, alignment) of the flocking simulation, bringing the mathematical beauty of emergent systems to life through natural interactions. The integration of Arduino hardware extends the experience beyond the screen, creating a tangible connection with the digital entities. I’m especially pleased with how the interaction design supports both casual exploration and more intentional control, users can quickly grasp the basic functionality through simple pinch gestures while having access to nuanced parameter adjustments that reveal the underlying complexity of the flocking algorithm.
Future improvements:
Looking ahead, I see several exciting opportunities to enhance this project. Implementing machine learning to adapt flocking parameters based on user behavior could create a more personalized experience. Adding audio feedback that responds to the flock’s collective movement patterns would create a richer multi-sensory experience. The visual aesthetics could be expanded with procedurally generated textures and particle effects that respond to Arduino sensor data. From a technical perspective, optimizing the flocking algorithm with spatial partitioning would allow for significantly more boids without performance issues. Finally, developing a collaborative mode where multiple users could interact with the same flock through different input devices would transform this into a shared creative experience, opening up possibilities for installation art contexts where audience members collectively influence the behavior of the digital ecosystem.