Week 13: Final Project

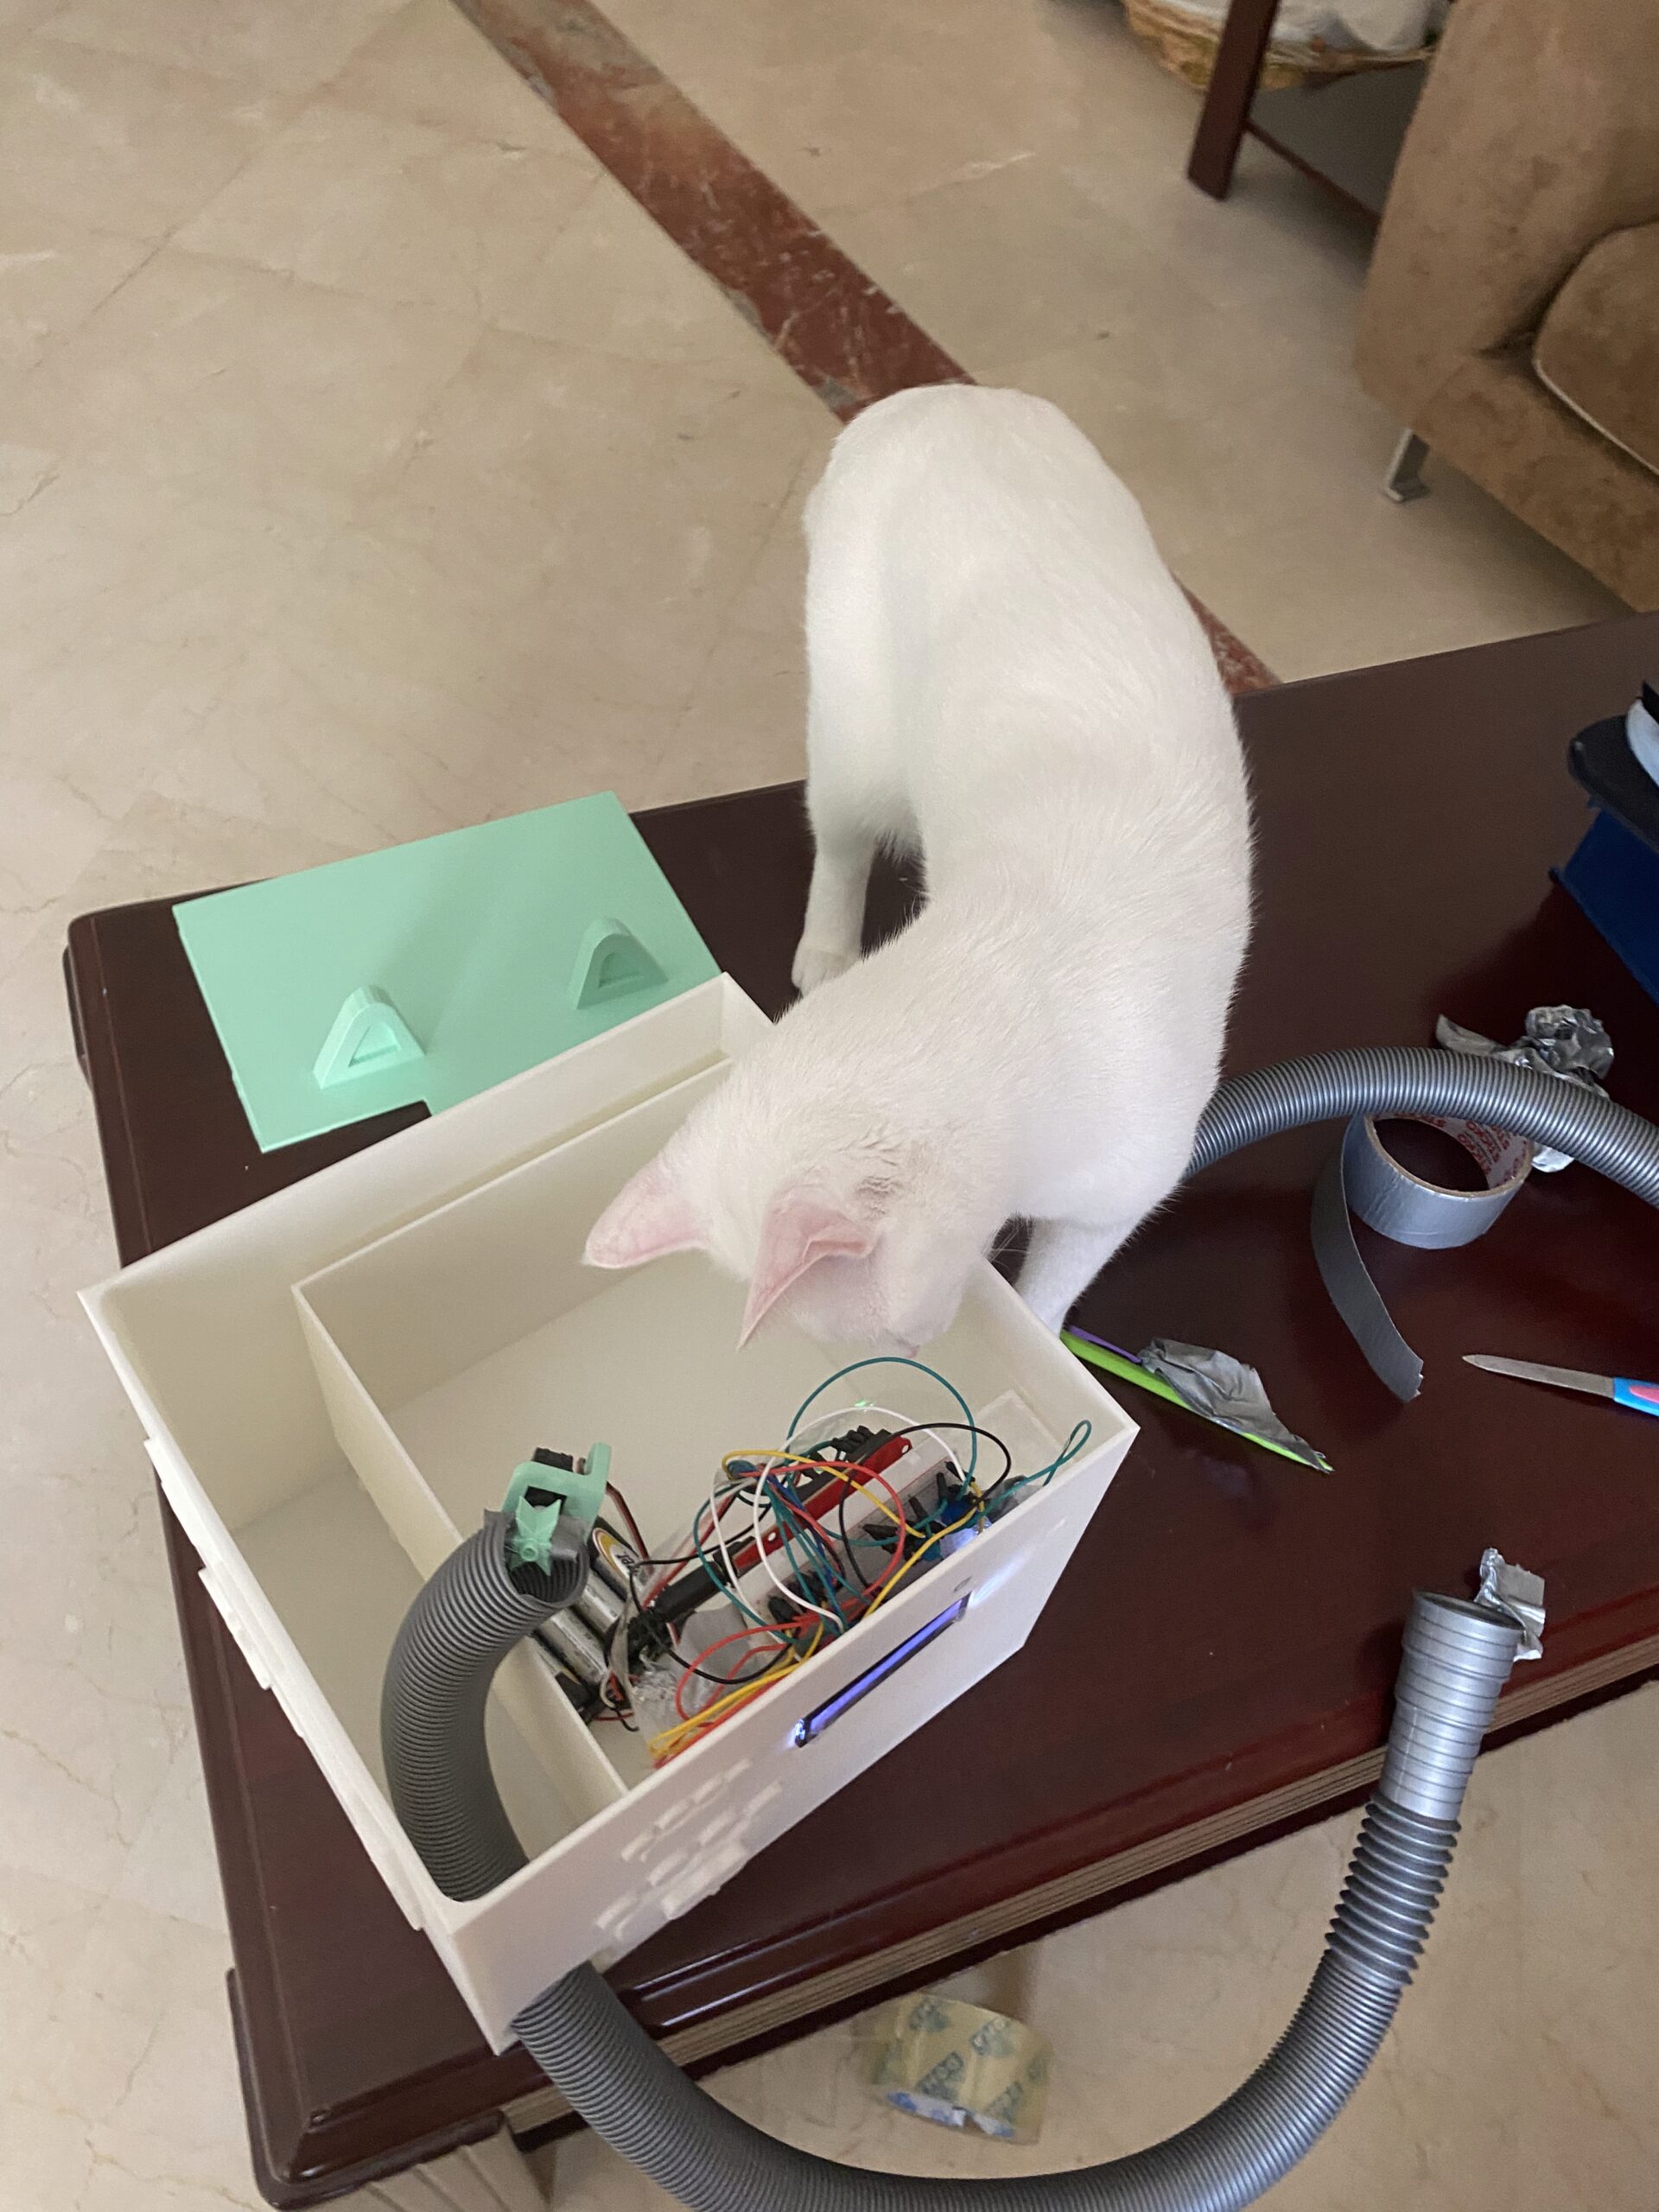
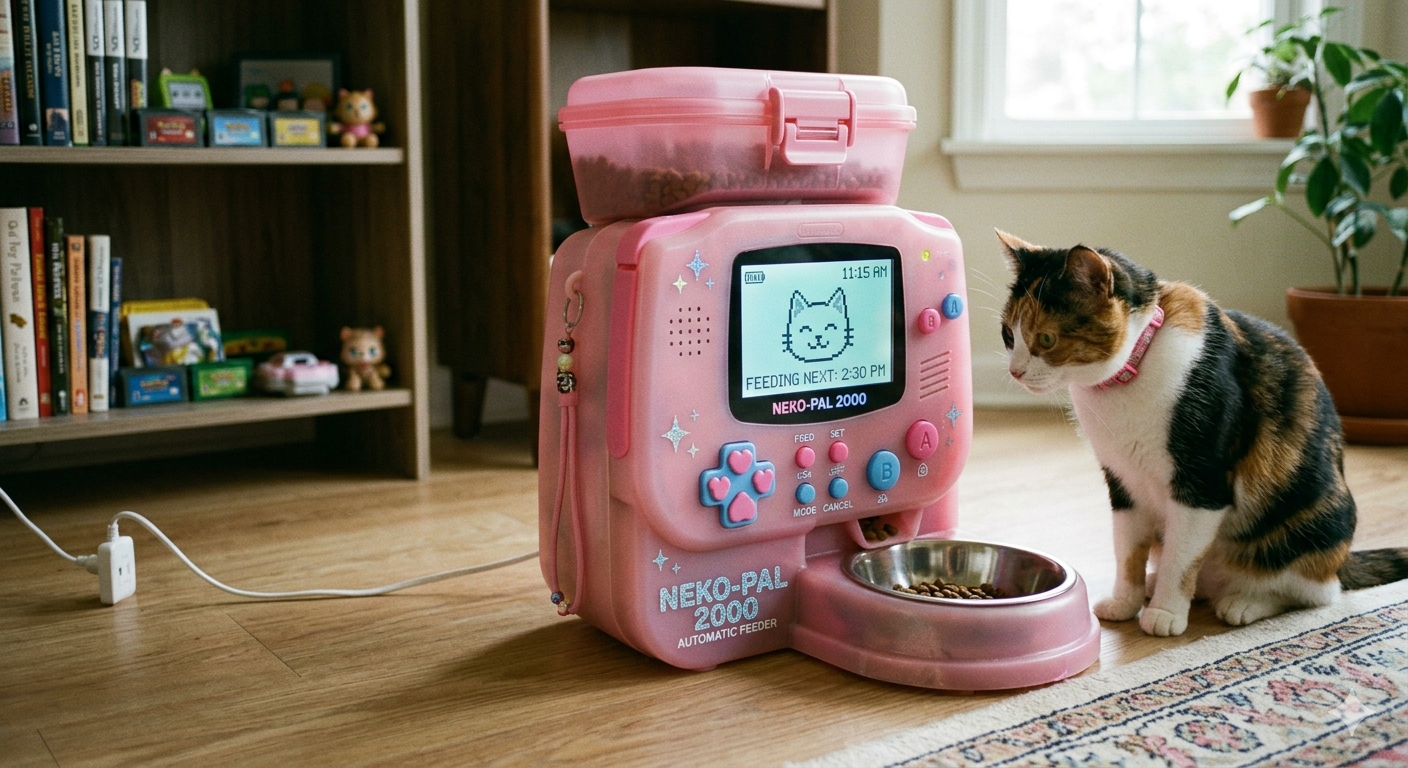
My concept is a cat feeder that uses a remote control to dispense cat food. I 3D printed the cat feeder as well as the gear attached to the servo.

This is the gear I also 3D printed to release the food attached to the servo motor:

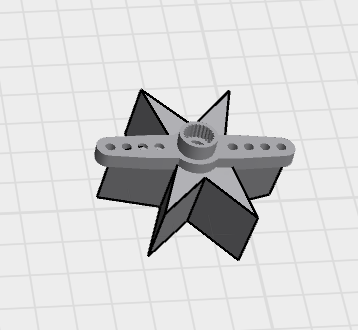
Video 1: This is a 360 video of the final product

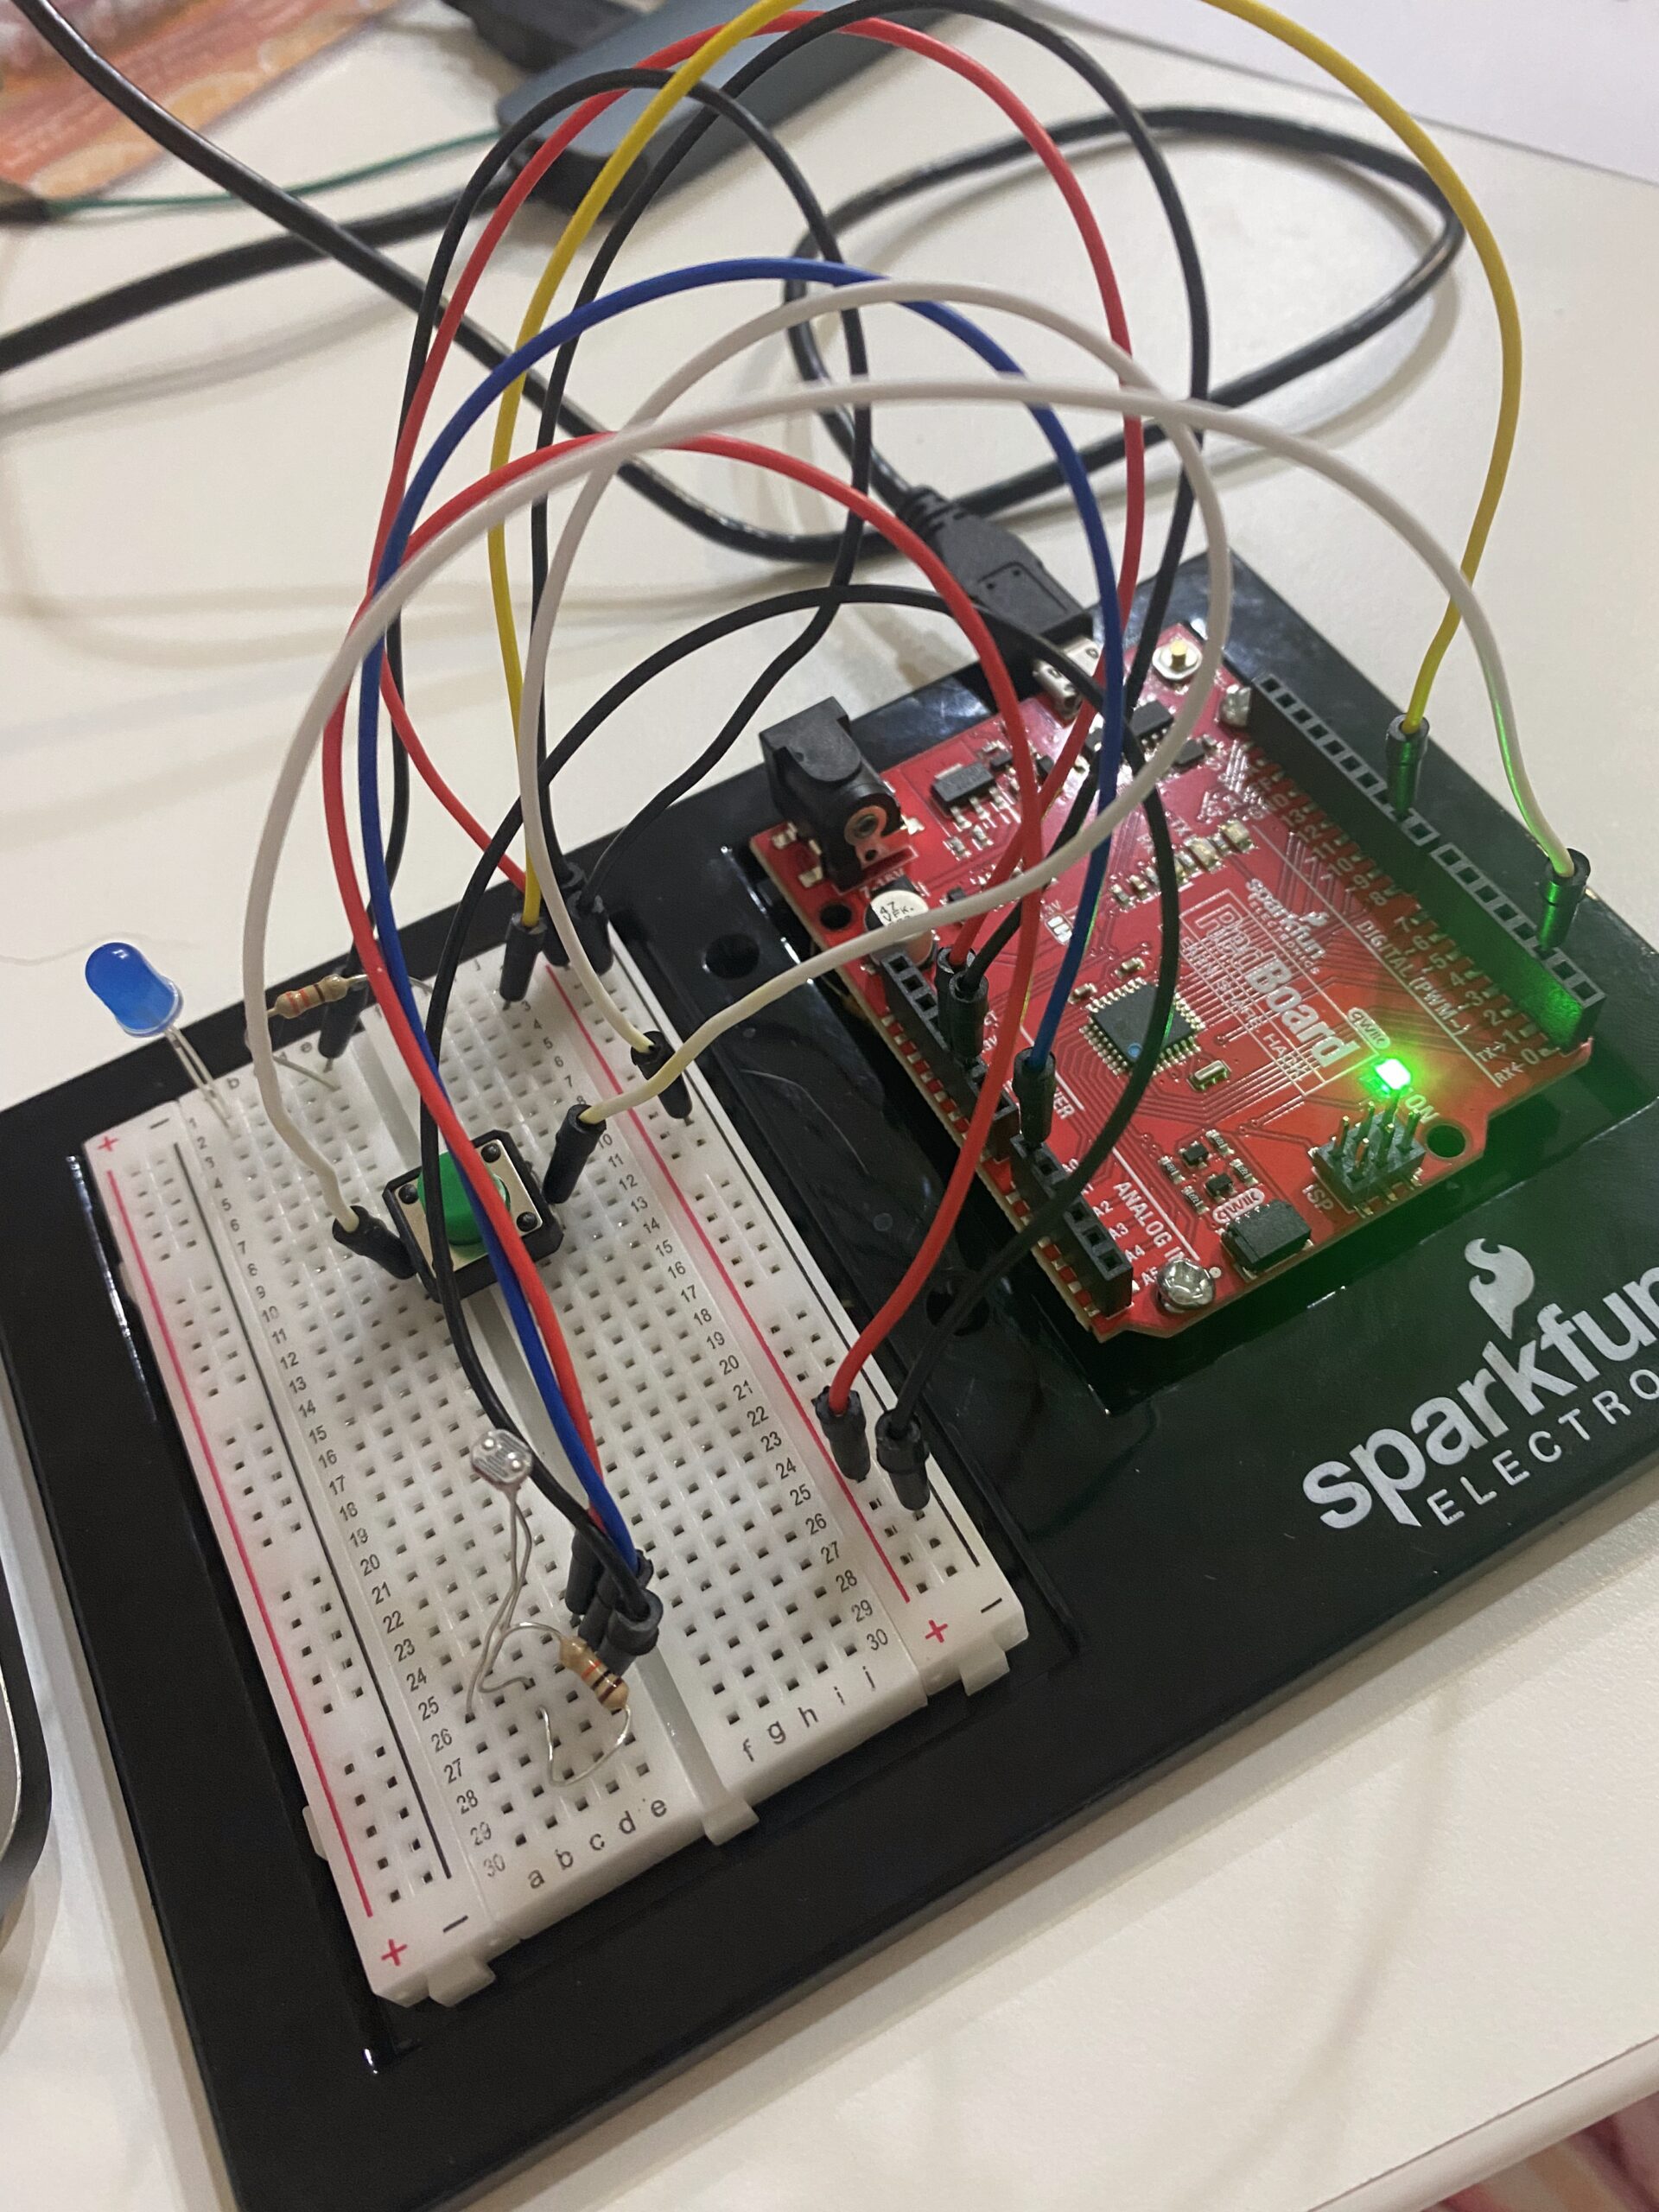
The implementation works using an IR remote sensor, servo, Arduino Uno, LCD display, and battery. It works by using an Arduino Uno to communicate with the IR sensor, which then controls the servo to rotate the gear and release the food. The battery allows it to operate away from the laptop, making it more portable and accessible for the cats while keeping my laptop safe.

The interaction design creates a cat feeding experience. The user can press the “OK” button on the IR remote to activate the feeder, and the Arduino Uno responds by rotating the servo motor to dispense food. The LCD display provides feedback by showing messages such as the time, dispensing status, and feeding information, making the system easier to understand and interact with. The portable battery-powered design allows the feeder to be placed anywhere, giving the cats easier access to food. The interaction is designed to be quick, convenient, and stress-free for both users and cats. I also designed the 3D model inspired by bows, cats, and cute aesthetics.

Full Arduino source code

#include <Servo.h>

#include <LiquidCrystal.h>

#include <IRremote.h>

Servo myServo;

LiquidCrystal lcd(4, 5, A1, A2, A3, A4); // the connections from LCD //Display to UNO board

const int SERVO_PIN = 6; //servo connection to UNO

const int BUTTON_PIN = 2; //button connection to UNO, it was used as a //test before adding IR sensor and Remote 

const int IR_PIN = 8; //IR sensor connection to UNO

const unsigned long IR_OK = 0xE31CFF00; // This is the signal the UNO receives when I click 'OK' on the remote. So, I saved it so UNO remembers it as use it to turn the sensor when clicked

//initialising variables; time, IR sensor cooling time, button, LCD //display 16*2

int currentHour = 23;

int currentMinute = 13;

int currentSecond = 30;

unsigned long lastMillis = 0;

unsigned long lastDisplay = 0;

unsigned long feedStart = 0;

unsigned long lastDebounce = 0;

unsigned long lastIR = 0;

const unsigned long DEBOUNCE_DELAY = 50;

const unsigned long IR_COOLDOWN = 300; // prevent repeat firing from held button

bool lastButtonState = HIGH;

bool stableButton = HIGH;

bool isFeeding = false;

void setup() {

Serial.begin(9600);

myServo.attach(SERVO_PIN);

pinMode(BUTTON_PIN, INPUT_PULLUP);

myServo.write(0);

lcd.begin(16, 2);

lcd.clear();

IrReceiver.begin(IR_PIN, DISABLE_LED_FEEDBACK);

}
//Time update

void updateTime() {

if (millis() - lastMillis >= 1000) {

lastMillis += 1000;

currentSecond++;

if (currentSecond >= 60) { currentSecond = 0; currentMinute++; }

if (currentMinute >= 60) { currentMinute = 0; currentHour++; }

if (currentHour >= 24) { currentHour = 0; }

}

}

//LCD display showing the time, specifically Doha Time, I manually //added it 
void showTime() {

lcd.setCursor(0, 0);

lcd.print("Doha Time ");

lcd.setCursor(0, 1);

if (currentHour < 10) lcd.print("0");

lcd.print(currentHour); lcd.print(":");

if (currentMinute < 10) lcd.print("0");

lcd.print(currentMinute); lcd.print(":");

if (currentSecond < 10) lcd.print("0");

lcd.print(currentSecond);

lcd.print(" ");

}
//LCD display showing that the food is releasing or loading food

void showFeeding() {

lcd.setCursor(0, 0);

lcd.print("** FOOD ** ");

lcd.setCursor(0, 1);

lcd.print("RELEASING! ");

}
//LCD display showing that the food is being released

void startFeeding() {

if (!isFeeding) {

isFeeding = true;

feedStart = millis();

myServo.write(180);

lcd.clear();

showFeeding();

Serial.println("FEEDING");

}

}
//LCD display showing that the food has stopped 
void stopFeeding() {

isFeeding = false;

myServo.write(0);

lcd.clear();

Serial.println("STOPPED");

}

// same with LCD and remote, but instead button, but when you release your finger from the button it immediately stops feeding 
void handleButton() {

bool reading = digitalRead(BUTTON_PIN);

if (reading != lastButtonState) {

lastDebounce = millis();

lastButtonState = reading;

}

if (millis() - lastDebounce >= DEBOUNCE_DELAY) {

if (reading != stableButton) {

stableButton = reading;

if (stableButton == LOW) startFeeding(); // press

if (stableButton == HIGH) stopFeeding(); // release

}

}

}
//The IR sensor when a button is clicked it shows its code on the //serial monitor that I could later saved to use to move the servo to //release the food when button 'OK' is clicked

void handleIR() {

if (IrReceiver.decode()) {

unsignedlong code = IrReceiver.decodedIRData.decodedRawData;

Serial.print("IR CODE: 0x");

Serial.println(code, HEX);

// Cooldown to prevent repeated triggers from one press

if (millis() - lastIR >= IR_COOLDOWN) {

if (code == IR_OK) {

if (!isFeeding) startFeeding(); // first OK = start

elsestopFeeding(); // second OK = stop

lastIR = millis();

}

}

IrReceiver.resume();

}

}

void loop() {

updateTime();

handleButton();

handleIR();

if (Serial.available()) {

String msg = Serial.readStringUntil('\n');

msg.trim();

if (msg == "DISPENSE") startFeeding();

if (msg == "STOP") stopFeeding();

}

if (isFeeding && millis() - feedStart >= 3000) {

stopFeeding();

}

if (!isFeeding && millis() - lastDisplay >= 1000) {

lastDisplay = millis();

showTime();

Serial.print("TIME:");

Serial.print(currentHour); Serial.print(":");

Serial.print(currentMinute); Serial.print(":");

Serial.println(currentSecond);

}

}

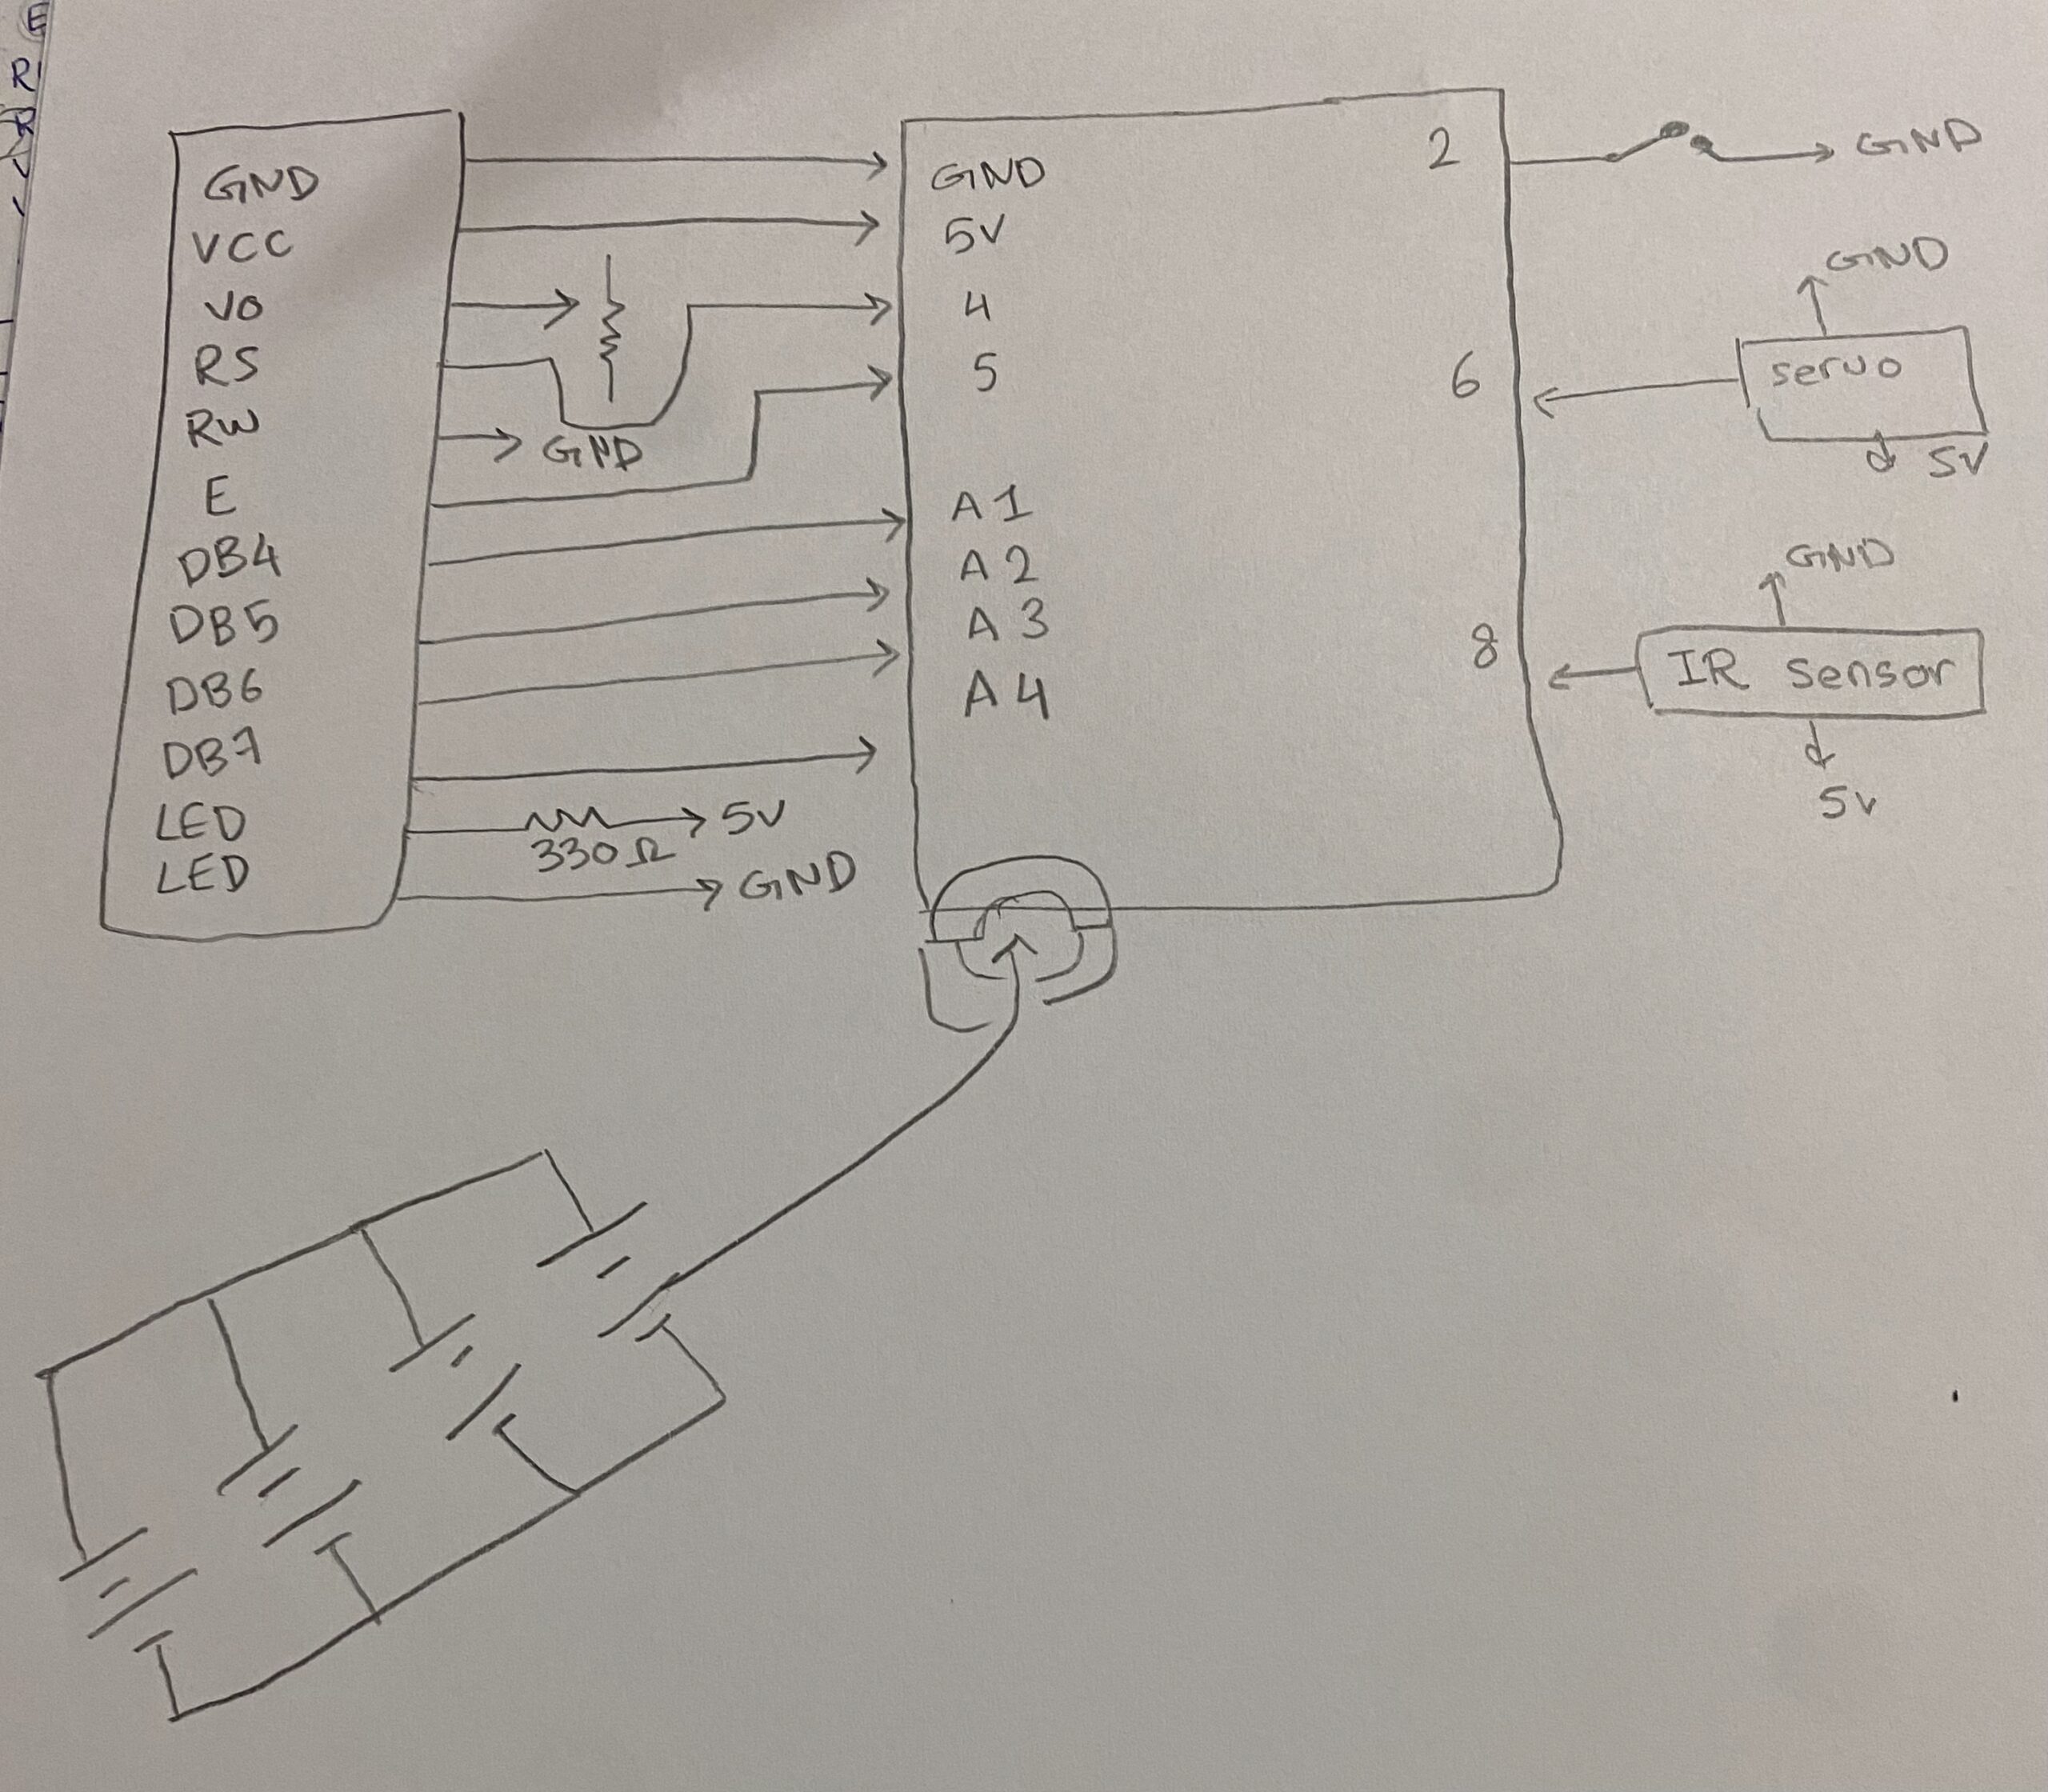
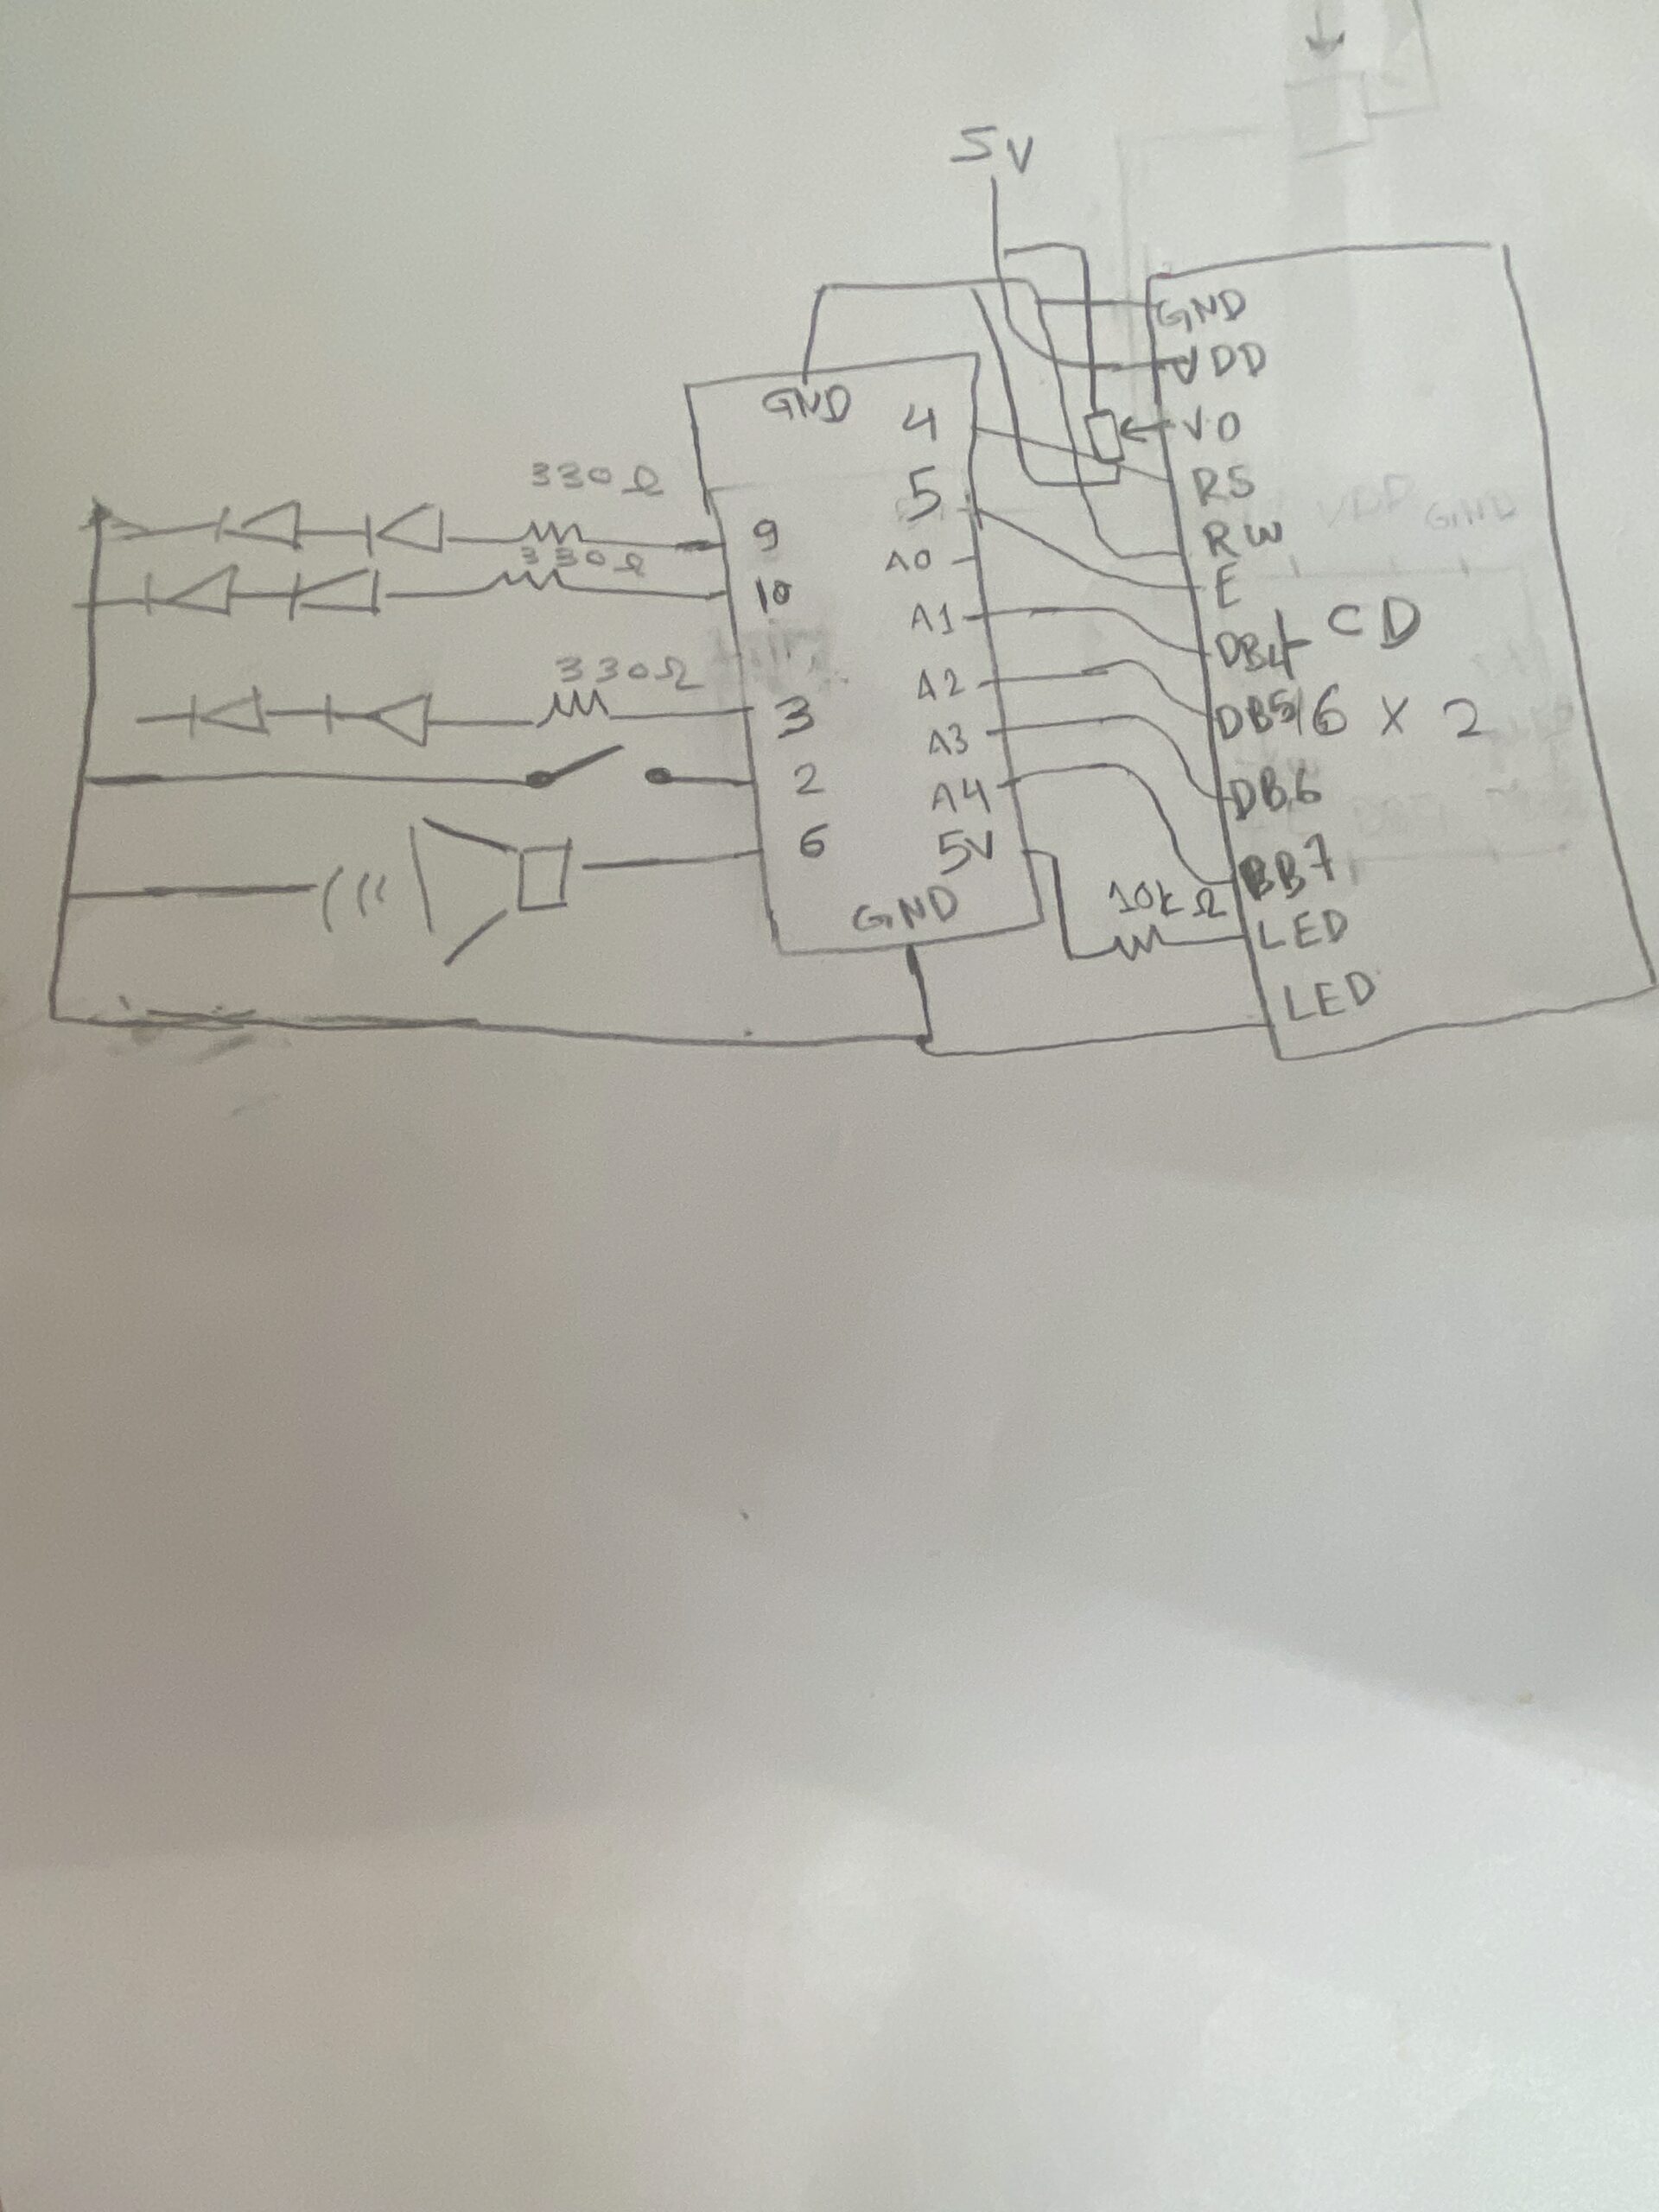
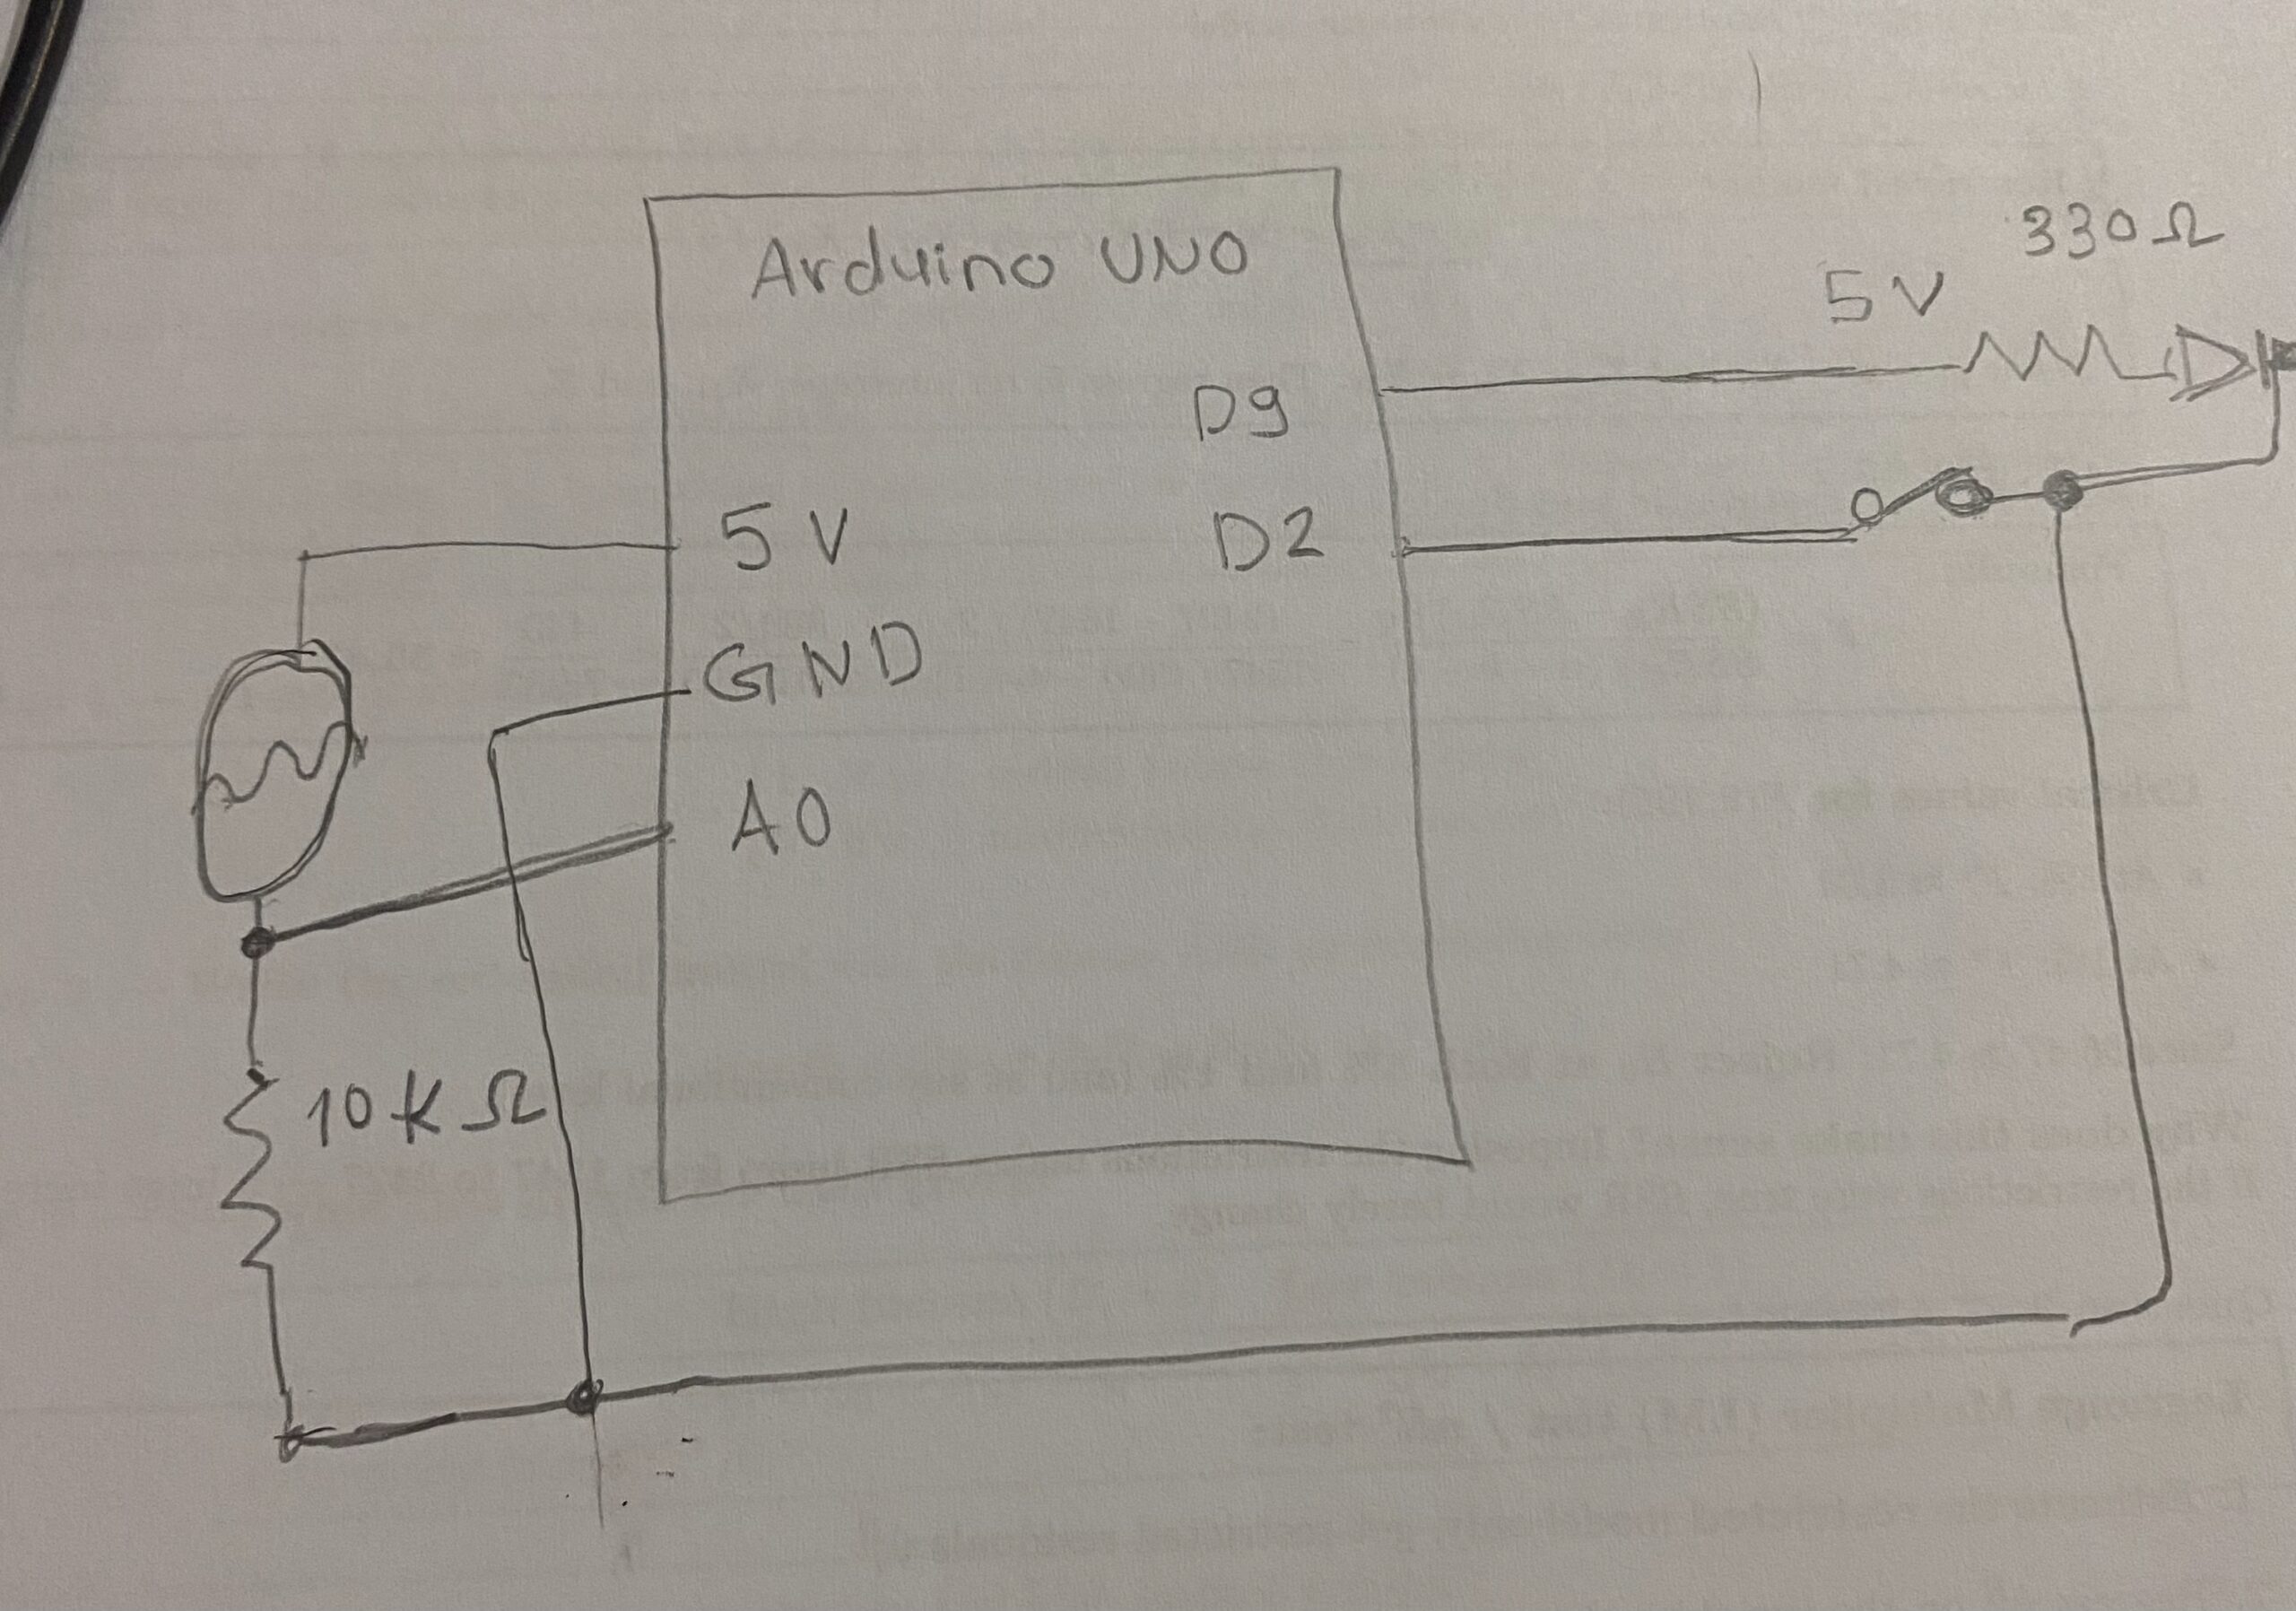
Image 1: Hand-drawn schematic

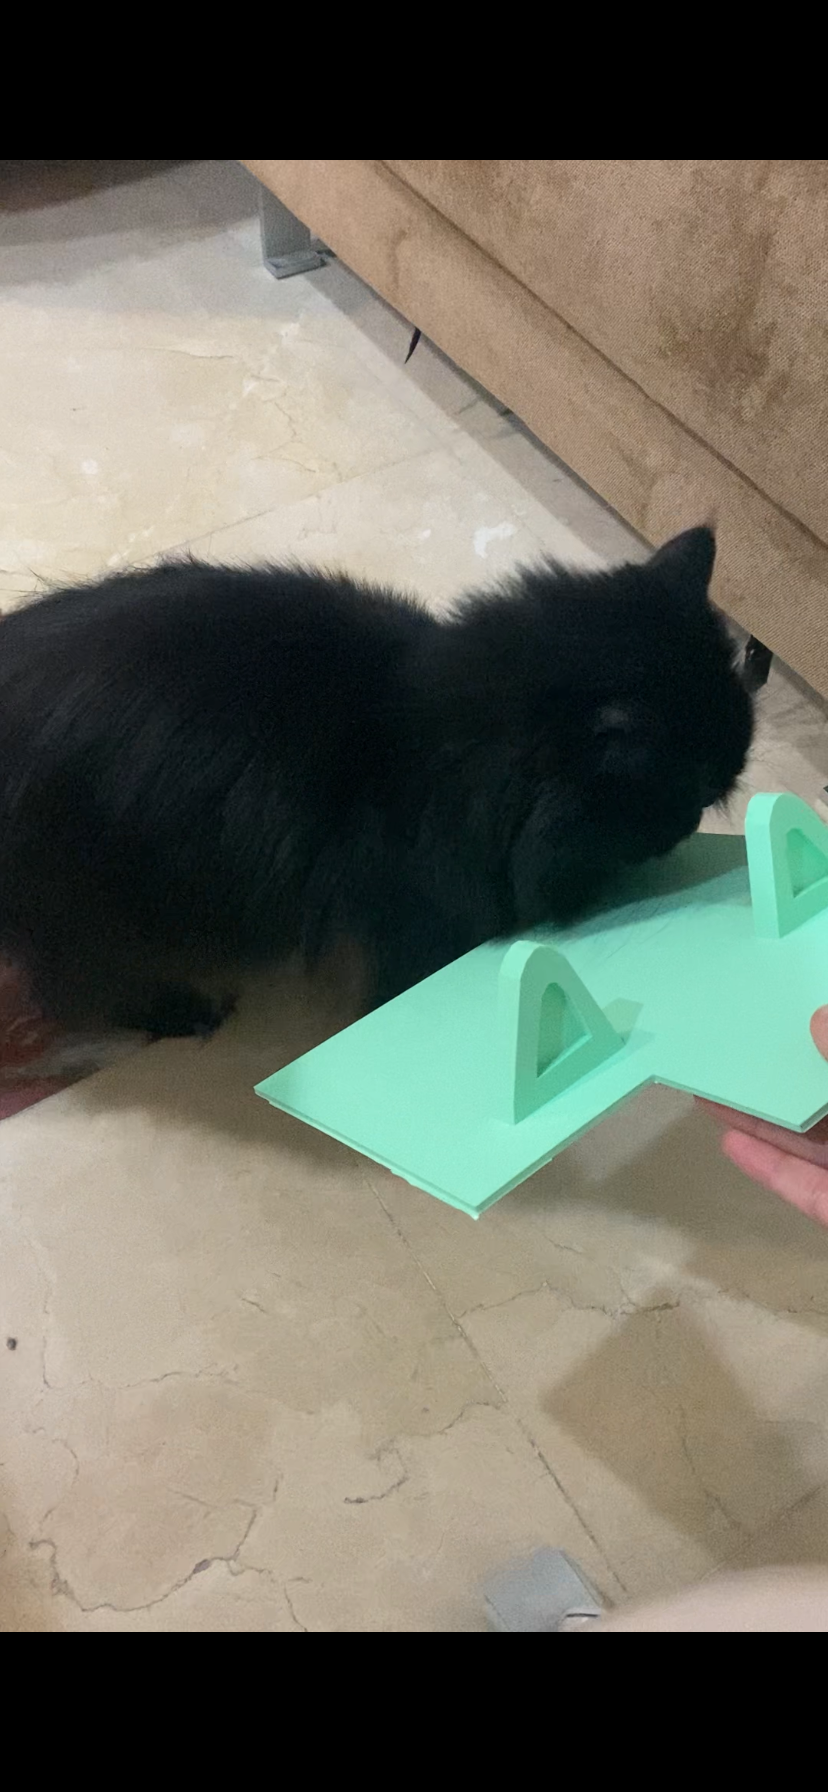
Demo with Oreo: They understood how it worked and whenever she wants food from it she meows at me and takes me to the cat feeder to give her the food.

Reminder from my user demo: Bella refused to interview

Week 13 – User Demo

  • My main users are cats; they seem very intrigued by the shape and the way the 3D-printed cat feeder works. They were able to figure out that they should go to it when the food gets released. I am not sure whether they fully understand the mapping between the controls and what happens in the experience, but they seemed very invested in the process of me wiring and testing everything before gluing it together.
  • The servo works well. I discovered that my LCD display pins might have been misaligned by one pin, which caused the vital parts—GND and power—to be connected incorrectly, and it took me a while to figure out what was wrong. However, I switched to an LCD display I had from an older kit.

    For the human users, it is quite clear: they have a remote with an “OK” button on it. It was obvious that this is what they needed to click to dispense the cat food. The cats also seemed to understand that it dispenses food, but they are not that excited about it.

I decided to interview my cats to see their understanding between their controls and their experience, and their overall experience.

Cat 1: Bella: Refused to interview with me


The demo with people user: My sister was able to figure out it used when she saw the remote by clicking the “OK” button to release the food from the cat feeder.

Cat 3: Oreo: Provided a demo


Week 12- Final Proposal

For my final project, I am inspired by early 2000s technology designs like the PSP, Game Boy Advance, Nintendo DS, and Tamagotchi.

Plan A: My idea is to create a simple Tamagotchi game that represents my cats, each with a specific feeding amount that is recognized by computer vision using p5.js. The automatic feeder would use an Arduino Uno, an LCD display, servos, and an ESP32-CAM.

Plan B: I will mainly rely on the buttons on the feeder/p5.js to interact with the feeder and the game.

There are two unknown parts: the 3D printing and the ESP32-CAM, which is why I came up with a backup plan.

I am also looking at 3D printing the feeder at a public library or a local maker lab. If I am unable to do so, I will recreate it using cardboard, which I will paint to fit this aesthetic.

These are AI-generated images of what I want to build. I chose to build this not only because it has a nice aesthetic and design, but also because it will be useful for my cats when we are away from home for a long time. If possible, I will also create versions for stray cats.

The P5.js:

It is a Tamagotchi-style game with buttons that control the feeder, including feeding time, the amount per cat, and other settings. The interface will visually represent each cat, showing their hunger levels, mood, and feeding history. It will also allow users to customize schedules, adjust portion sizes, and possibly receive alerts when a cat needs feeding. Additionally, the game can simulate interactions (such as animations or status changes) based on whether the cat has been fed, making it both functional and engaging.

The Arduino:

Its function is to control the physical components of the feeder. The servo motor will open and close the feeder based on input either from the camera (detecting which cat is present) or from commands sent by the p5.js system. The Arduino will process signals from the ESP32-CAM to identify the cat and match it with its assigned feeding amount. It will also control the LCD display to show real-time information such as feeding status, the detected cat, or errors. Overall, it acts as the bridge between the digital game and the physical feeding mechanism, ensuring accurate and timed food dispensing.

Week 12- Reading Response

The author feels that assistive devices enable people with the least possible attention. “The priority for design for disability has traditionally been to enable, while attracting as little attention as possible.” The author’s main argument is to highlight why assistive devices could be fashionable rather than discreet, and mentions eyeglasses as an example that could be applied to other assistive devices. But I disagree; not everyone wants to make their disability visible. Also, I don’t think the use of eyeglasses is the best example, because if it were the case, in my opinion, we would not have contact lenses. Also, people wear sunglasses, which lessens the stigma around medical eyeglasses, not to mention that an estimated 4 billion people worldwide wear glasses, many of which do so due to age, and as we grow older we will wear glasses. I would use the same argument with canes and walkers. We will all eventually age. I also disagree with the use of eyeglasses as a “fashion statement” because they sit right on my face; they should be comfortable and should suit my eye color and facial features due to their necessary placement, and not everyone can replace them with contacts. I think the same for hearing aids as for eyeglasses. But when it comes to prosthetics, I understand making them fashionable because we should make them as fashionable as clothing.

I believe I agree with the author that having options is a good idea, but with these options comes a problem: the cost increases, making people feel more left out than necessary. Imagine two elementary school students with hearing aids, eyeglasses, a wheelchair, etc. One has a colorful, cute, girly pink assistive device and the other has a simple black one. We do have the choice to accessorize, but imagine how it might feel to the student who could not afford to choose. Honestly, not everything needs to be designed to look great, fashionable, and trendy. This is where social media comes into play. In the TV era, mainly the early 2000s, people did what was affordable, convenient, and suitable for them when it came to clothing, children’s toys, etc. Social media is now constantly pushing ads, making people feel they are not enough. So my question is: should we stick to simplicity if it brings us happiness, regardless of what it is?


Week 11 – Assignment

I wanted to make a non-traditional music instrument that feels like a game the could be played around with for hours, although it is very simple. It contains different modes but not only does have audio feedbacks, but also visual feedback through the LCD Screen and LED lights. It reminds me of a very simplified and modest version of a music instrument attached to a pedal, which gives different music effects.  The LCD screen showing the hertz and bpm reminds me of a pedal.

Hand-Drawn Schematics


Simulator

Again, I used the simulator to make sure I wouldn’t accidentally burn any components. When building a circuit, I take it step by step: I test the LEDs first—everything works great—then I add the photoresistor to control them and test again. After that, I add the piezo and repeat the process until I reach the LCD. I build each part in the simulation first, then immediately try it on the physical board. Which helped me realize the wires order connecting to the LCD display were flipped.


Video

How the code works

This code implements a light-controlled theremin with three distinct musical modes on Arduino, using an LDR as the primary input. The core structure reads the analog light value, smooths it with a 20-sample circular buffer, and maps it to different musical parameters depending on the active mode, Theremin, Scale, or Pac-Man. Mode 0 -Theremin- produces continuous pitch with glide and vibrato, generates a pulsing heartbeat animation on the LCD, and sweeps the RGB LED through a color gradient based on frequency. Mode 1  quantizes the light reading to 15 discrete C major notes, displays rainbow colors per note, and shows VU meter bars on the LCD using custom characters. Mode 2  maps light intensity to game speed, runs a side scrolling Pac-Man game on the LCD with ghosts and dots, and plays the classic sound. The button handling supports short-press to cycle modes and long-press to enter/exit sleep mode, while the RGB LED fades smoothly between target colors using a step-based transition. The LCD uses custom character sets loaded on-demand and tracks dirty rows to minimize redraws. A sinus lookup table generates vibrato and LED pulsing, and the audio output on the piezo uses tone() with frequency modulation. The code is organized into modular functions for each mode, character loading, LED fading, and button debouncing, with global state variables tracking everything from heart rate BPM to ghost positions.

Future improvements and Reflection

In the future, I would like to turn this prototype into a PCB and add more components and sensors to transform it into a more realistic musical instrument.

I struggled mainly with connecting the LCD screen. After working for long hours, I started to lose focus and couldn’t fully debug what was going wrong. Eventually, I realized that the two breadboards were not connected to each other, which fixed part of the issue. However, I still faced problems—the display would turn on but only showed strange white boxes.

I then checked the V0 pin on the LCD and noticed it was connected to the potentiometer but not properly connected to ground and power. After correcting the wiring and adjusting the potentiometer, the display sometimes still showed weird shapes and white boxes. I removed the LCD to inspect it and realized the wiring was flipped, since I was using the original LCD from the Arduino starter kit. The characters appeared as numbers at first, and some were reversed.

After fixing the wiring orientation and connections, everything started working properly.

Week 11- Reading Response

A Brief Rant on the Future of Interaction Design

The author emphasizes that human capabilities are important when thinking about designing the future. I have to agree with this part, especially when he mentioned that humans have hundreds of degrees of freedom, which reminds me of my robotics class—our professor highlighted that robotics takes a lot from human nature, like the robotic 3 degrees of freedom (DOF) arm. So, when designing things, we can make use of human capabilities.

But this is not what the author meant; he wanted designs to make use of our already existing capabilities to interact with them. As he mentioned, a hammer’s grip is meant for a human hand. However, when it comes to the future of interactive design and technology, I have to disagree that interacting with it should require using my full human body, because not everyone is able-bodied. Technology has to be accessible to everyone—isn’t that why we have it? To provide access to more things in a more effective, optimized way?

Making mobile phone calls rather than using a phone booth, reading or listening to books and articles anywhere, anytime—before having interactive design at my fingertips, I would not be able to type on a computer; I would have to go to a bookstore and have a professional typewriter write this reading response out. Sometimes, it takes writing things out to realize how truly blessed we are to have these types of things right at our fingertips.

Then, we can adapt this technology to be used by everyone. I also want to mention that I agree that using the full immersive experience with the human body is much more entertaining and fun. So, it depends on the end-use product or idea. I do not think the author is biased, but I think the author should cover different cases where this is not necessary or makes things harder for some people. I do not think the author changed my mind, but it opened me up to more ideas and thoughts on how to truly design good products that try to include everyone. An example of an incredible inclusive interactive design is the Meta Quest 3 and 3S VR headset, which has an option to play while seated, adjust the distance between the eyes, and even add a glasses prescription. If you do not want to pay extra or share it with family members, it also has space to fit your own glasses.

I had a few questions throughout, but I eventually answered them myself by writing my thoughts out, such as: “Technology has to be accessible to everyone—isn’t that why we have it? To provide access to more things in a more effective, optimized way?” Another question I had was: isn’t a good designer someone who considers different cases to make the product or design as effective as possible?


A follow-up article

I thought the author might cover some of the questions and respond to thoughts similar to mine, but he did not. He seemed to express some dislike for “waving hands in the air” when it comes to manipulating things, because you cannot feel what you are manipulating. From an improvement point of view, I agree that this would be beneficial. However, I believe that if researchers were to receive funding for it, it would mainly come from the medical field, to help people with loss of sensation, such as from neuropathy, stroke, or spinal cord injury.

There are mainly two types of gloves; the type depends entirely on whether the goal is therapeutic improvement (relearning sensation) or sensory substitution (using technology to mimic touch), which I believe could later be used in games. It reminds me of audiobooks, which were initially made to assist people with hearing or reading difficulties in accessing information from books, but nowadays are used by a much larger audience—busy parents, people with demanding work schedules, kinesthetic learners, and many more.

A lot of the time, these types of research efforts end up helping a larger group of people than initially predicted. I believe that designers should make good use of what we have, while researchers should continue to expand on what we need and what we already know.


Week 10 – Assignment

Get information from at least one analog sensor and at least one digital sensor (switch), and use this information to control at least two LEDs, one in a digital fashion and the other in an analog fashion, in some creative way. Include a hand-drawn schematic in your documentation.

Hand-drawn schematic:

I decided to test my design and code in Tinkercad before implementing it into the actual Arduino board to ensure there is no issues with the connectivity or code to help with the debugging. I am glad that I did that because it seems that I made error and when running the simulation is short circulated and showed an image or animation of an explosion, when clicking the push button.

How this code is made:

I added constants for the pins, which represent fixed connections between the Arduino and the components. I also defined lightLimit and darkLimit to set the range where the LDR reading is mapped into LED brightness. In the loop, the LDR value is read and converted into a brightness level using map(), then constrained to stay within 0–255. This makes the LED respond smoothly to changes in light. When the button is pressed, a random jitter is added to the brightness to create a fluctuating effect. Otherwise, the LED follows the normal smooth brightness based on the sensor. The serial monitor is used to track the sensor values and output for debugging.

The part I am most proud of :

// jitter Button

if(buttonPressed){

// Multiply the jitter

// We pick a random number between negative base and positive base

// to create extreme fluctuations around the current brightness level.

int jitterAmount = random(-baseBrightness, 255);

int finalOutput = constrain(baseBrightness + jitterAmount, 0, 255);


analogWrite(ledPin, finalOutput);


// Very fast delay to make the jitter

delay(random(5, 30));

}else{

// Normal smooth operation

analogWrite(ledPin, baseBrightness);

delay(30);

}


Reflection and Future Improvements:

I also tried my project wiring, connections, and code on the Tinkercad before the physical board, because I was worried about burning my board. Overall, I liked my project and I think it has a lot potential and there is a lot I could add to it . I think I might use it for next week’s assignment musical instruments to make like an orchestra with LED lights. I think it will be a really fun experiment.


Week 9- Reading Response

I agree with all of the author’s points that everything has a time, place, and purpose, especially when it comes to design. Sometimes, we need something that balances utility, aesthetics, and practicality. The author highlights that “design is preferable depending on the occasion, the context, and above all, upon my mood.”

The author also emphasizes that in cases of emergency, when people are stressed, they tend to forget how to use things effectively. In this situation, functionality plays a bigger role, which supports his point that design depends on occasion and context. Context plays a major role in many things—it determines how different aspects are prioritized. For example, when designing an emergency exit door, should I focus on making it visually appealing, or ensure that it works effectively in an emergency and does not cause an accidental stampede due to a design flaw?

I do not think the author is biased at all; in fact, I find his ideas and explanations quite objective. My beliefs largely align with his. However, I also think that aesthetics sometimes fail to consider usability. In many cases, we need both. For example, in Qatar, some cities are inspired by European architecture, such as outdoor restaurants or cafés. However, since the weather is not suitable for outdoor seating most of the year, these spaces often go unused about 90% of the time. My question would be when would be a time where functionality is not need or not important in our daily lives?

Midterm project : Bakkar Ramadan Game

Concept:

Oy, “Hello” in the Nubian language , My concept is my favorite Ramadan series teaching students new lessons everyday in the holy month of Ramadan offering wisdom and importance of community as well ass offering awareness to children and adults since it the series was a great success in Egypt and The Arab World. It is also the first 100% created Egyptian cartoon series started in 1998. It also introduces the Nubian culture which on of the rich, unique, and strongly continuing cultures in Egypt.

Bakkar (TV Series 1998– ) - IMDb

So how does it work and what am I proud of:

Initializing all images and assets

let startImg, homeImg, bakkarImg, hassonaImg, mapImg, mapSceneImg;
let teacherImg, rashidaImg, friend1Img, shalabiImg, friend2Img, shalabi2Img;
let storeShelfImg, storeAsset1Img, storeAsset2Img, bagImg, shopSignImg;
let button;
let homeMapStartTime = 0;


Hassona is Bakkar friend guiding him through the game. I added Typetext message. HassonaStoreIdx and hassonaMapIdx starts at 0 and counts up to the full length of the map and home  scene text, making it appear letter-by-letter.

let homeTypeText = "حسونه: يا بكار يلا نجمع فلوس الزينة رمضان\nHassona: Yalla Bakar Lets collect the money for the Ramadan decorations";
let homeTypeIdx = 0;

const hassonaMapText = "حسونة: اضغط Space للتكلم مع أصحابنا والجيران!\nHassona: Press Space to Talk to our Friends and Neighbors!";
const hassonaStoreText = "حسونة: اسحب الأغراض للشنطة عشان تشتري!\nHassona: Click & Drag objects to the Bag to Buy!";
let hassonaMapIdx = 0;
let hassonaStoreIdx = 0;


This is the pinned message at the top giving instruction. I added a white speech box to make it more clear to see the message.

fullText.substring(0, idx) slices the full string to only show characters up to idx, creating the typewriter effect.

function drawHassonaBanner(fullText, idx) {
noStroke();

// Dark semi-transparent backing strip
fill(0, 150);
rect(0, 0, width, BANNER_H);

// Hassona avatar
image(hassonaImg, ICON_PAD, ICON_PAD, ICON_SIZE, ICON_SIZE);

// White speech box
fill(255);
rect(BOX_X, ICON_PAD, BOX_W, BANNER_H - ICON_PAD * 2, 8);

// Typewriter text inside box
fill(0);
textAlign(LEFT);
textSize(14);
text(fullText.substring(0, idx), BOX_X + 12, ICON_PAD + 18, BOX_W - 22, BANNER_H - ICON_PAD * 2 - 10);
}


This function draws the Hassona intro banner on the home screen. It waits 2 seconds after the scene starts. I used Chatgbt to learn more about how to use time countdown before it shows an image or an object as well as typer style of text banner. Also there is a debugMode to help with seeing where the collision boxes are I got it form Claude because I struggle to envision where everything goes.

function drawHomeTypewriter() {
if (millis() - homeMapStartTime < 2000) return;
image(hassonaImg, 10, 10, 100, 100);
fill(255); rect(120, 20, 650, 100, 10);
fill(0); textAlign(LEFT);
text(homeTypeText.substring(0, homeTypeIdx), 140, 50, 600);
if (frameCount % 2 === 0 && homeTypeIdx < homeTypeText.length) homeTypeIdx++;
}


Every frame, updateRashidaTrail saves Bakkar’s current position to a history array, trims it to TRAIL_DELAY frames long, then positions Rashida at the oldest saved position — making her follow Bakkar with a slight delay. drawRashida simply draws her sprite at that calculated position.

function updateRashidaTrail() {
posHistory.push({ x: x, y: y });
if (posHistory.length > TRAIL_DELAY + 1) posHistory.shift();
if (posHistory.length > 0) {
rashidaX = posHistory[0].x - RASHIDA_W * 0.5;
rashidaY = posHistory[0].y + (charH - RASHIDA_H) * 0.5;
}
}

function drawRashida() {
image(rashidaImg, rashidaX, rashidaY, RASHIDA_W, RASHIDA_H);
}


For the collision I used a fixed hitboxoffset  so when my character collides with an object it gets detected, and the it either stops the object from going through the object or transitions to the next scene

The moveCharacter function moves using arrows and it minus the amount of steps towards a specific direction like x or y in negative which the left side or positive side which to the right side. If moving horizontally doesn’t cause a collision, it applies the new X; if moving vertically doesn’t cause a collision, it applies the new Y. This way the player can slide along a wall instead of getting completely stuck when hitting it diagonally.

function checkCollision(cx, cy, ox, oy, ow, oh) {
return (
cx + hitboxOffsetX < ox + ow &&
cx + hitboxOffsetX + hitboxW > ox &&
cy + hitboxOffsetY < oy + oh &&
cy + hitboxOffsetY + hitboxH > oy
);
}

function collidesWithList(nx, ny, list) {
for (let obs of list) {
if (checkCollision(nx, ny, obs.x, obs.y, obs.w, obs.h)) return true;
}
return false;
}

function moveCharacter(obstacles) {
let nx = x, ny = y;
if (keyIsDown(LEFT_ARROW)) nx -= step;
if (keyIsDown(RIGHT_ARROW)) nx += step;
if (keyIsDown(UP_ARROW)) ny -= step;
if (keyIsDown(DOWN_ARROW)) ny += step;
nx = constrain(nx, 0, width - charW);
ny = constrain(ny, 0, height - charH);
if (!collidesWithList(nx, y, obstacles)) x = nx;
if (!collidesWithList(x, ny, obstacles)) y = ny;
}


In the store scene it shows the amount of money collected in the variable  moneyTotal and then we have an object bag with a specific x,y,w, and h to drop object in the bag.

function drawStoreScene() {
image(storeShelfImg, 0, 0, width, height);

image(bagImg, bagZone.x, bagZone.y, bagZone.w, bagZone.h);
fill(255); textAlign(CENTER); textSize(14);
text("Drop to Buy", bagZone.x + 90, bagZone.y + 30);

// Money HUD sits below the banner
fill(0, 180); rect(0, BANNER_H, width, 48);
fill(255, 215, 0); textSize(20); textAlign(CENTER);
text("Money: " + moneyTotal + " EGP", width / 2, BANNER_H + 33);


It loops through storeItems and draws each one that hasn’t been bought or placed yet, then if the player is currently dragging an item it draws it following the mouse. Finally it handles the error message, dialogue, back button, and draws the Hassona banner last so it always appears on top of everything else.

for (let itm of storeItems) {
if (!itm.inBag && !itm.placedOnMap) {
image(itm.img, itm.px, itm.py, 100, 100);
fill(255); textSize(18); text(itm.name, itm.px + 50, itm.py - 10);
}
}
if (dragging && scene === 'store_scene') {
image(storeItems[dragging.idx].img, mouseX - 50, mouseY - 50, 100, 100);
}
if (millis() < statusTimer) { fill(255, 0, 0); text(statusMessage, width / 2, height / 2); }

drawDialogueUI();

fill(255); textSize(18); text("Press 'B' to Return to Map", width / 2, height - 30);

// Hassona banner drawn last — always on top
drawHassonaBanner(hassonaStoreText, hassonaStoreIdx);
if (frameCount % 2 === 0 && hassonaStoreIdx < hassonaStoreText.length) hassonaStoreIdx++;
}


drawBakar draws the player , drawDoor draws a brown rectangle for the home door, drawStoreEntrance draws the shop sign image, and startGame switches to the home scene, hides the start button, records the start time, and resets Rashida’s position and trail history.

function drawBakar() { image(bakkarImg, x, y, charW, charH); }
function drawDoor() { fill(101, 67, 33); rect(doorX, doorY, doorW, doorH, 5); }
function drawStoreEntrance() {
image(shopSignImg, storeDoor.x, storeDoor.y, storeDoor.w, storeDoor.h);
}
function startGame() {
scene = "home_map";
button.hide();
homeMapStartTime = millis();
rashidaX = x - RASHIDA_W - 10;
rashidaY = y;
posHistory = [];
}


Draws a small semi-transparent dark badge in the top-right corner just below the Hassona banner, displaying the player’s current cash total in gold text.

function drawMoneyHUD() {
// In map_scene, cash badge sits just below the Hassona banner
fill(0, 180); rect(width - 190, BANNER_H + 8, 170, 40, 10);
fill(255, 215, 0); textSize(16); textAlign(CENTER);
text("Cash: " + moneyTotal, width - 105, BANNER_H + 30);
}


with each interaction with each store asset and their x,y positions, name, and image that was initialized in the beginning of the code.

function initStoreItems() {
storeItems = [
{ name: "Lantern", img: storeAsset1Img, cost: 10, shelfX: 100, shelfY: 300, px: 100, py: 300, inBag: false, placedOnMap: false, mapX: 0, mapY: 0 },
{ name: "Decor", img: storeAsset2Img, cost: 15, shelfX: 300, shelfY: 300, px: 300, py: 300, inBag: false, placedOnMap: false, mapX: 0, mapY: 0 }
];
}


I wrote the dialogue  with each interaction with each character  and their x,y positions, name, and image that was initialized in the beginning of the code.

function initNPCs() {
npcs = [
{ name: "Teacher", img: teacherImg, x: 100, y: 200, completed: false,
greet: "Bakar! Help with Ramadan decorations?",
opts: [{ text: "Yes! (Collect 10 EGP)", reward: 10, reply: "Good luck!" }] },

{ name: "Friend", img: friend1Img, x: 200, y: 600, completed: false,
greet: "Bakar! I saved some money for the decorations!",
opts: [{ text: "Thanks! (Collect 15 EGP)", reward: 15, reply: "Yalla habibi!" }] },

{ name: "Friend2", img: friend2Img, x: 380, y: 600, completed: false,
greet: "Hey Bakar! I have some money for decorations!",
opts: [{ text: "Thanks! (Collect 15 EGP)", reward: 15, reply: "Happy Ramadan!" }] },

{ name: "Shalabi", img: shalabi2Img, x: 560, y: 200, completed: false,
greet: "Bakar ya basha! Khawd el floos!",
opts: [{ text: "Shukran! (Collect 25 EGP)", reward: 25, reply: "Ramadan Kareem!" }] }
];
}

Sketch:

Areas I would like to improve:

I would to improve a lot of things like the quality of the pixelated, adding more assets to ramadan decoration, more interaction between Bakkar and the NPCs. I honestly, had an idea in mind to make an interactive immersive game, but due to circumstance it was a bit difficult to create it. There so much more things I think I could have added it to my project to make it more unique. I feel the most unique part of it is a simple introduction to Egyptian community and culture. I could also add the music effects from the music series. I also did not end the game because I want to work on improving it and make it into a true RBG game similar to starview valley and add different quests and games. Therefore, I would like to add more dialogues between the character to learn about them and there role and stories in the series.


Week 5: Midterm Progress

Concept:

My concept is based on my favorite Ramadan TV shows, “ظاظا و جرجير” (Zaza w Gargyer) and “بكار” (Bakar). These shows teach children Islamic and Egyptian morals and values in an indirect and engaging way. Bakar is especially important because it was one of the first cartoons to represent Egyptian culture and identity.

I want to create an adventure game where players can choose one of these cartoon characters and go on a journey inspired by the spirit of Ramadan. Throughout the game, players will stop to help others, learn from their mistakes, and make choices that reflect kindness, generosity, patience, and responsibility. The goal is to combine fun gameplay with meaningful lessons, just like the original shows.

Design:

I want my game to give this cozy relaxing feel that you could play anytime like on a portable console or at console. I want it to be as nostalgic as possible. I want it to be similar aesthetic to Stardew Valley. I am currently working on the characters sprite sheets.


Frightening / Challenging Aspects

The most frightening aspect for me is figuring out how to make the game simple, yet fun, while still being a meaningful learning experience. I’m unsure whether I should design it as a pixel-style platformer or a 2D narrative game.

I also want the game to accurately capture and translate the spirit of Ramadan, just like the original cartoons. Can I successfully express that spirit through a cozy, pixelated platform game that can be enjoyed by the entire family?

Risk Prevention

To reduce this risk, I would create a short sample or prototype of the game to test whether it truly fits the idea and essence I have in mind. Most importantly, I would evaluate how the characters and the setting turn out visually.

Then, I would ask people who are familiar with the original cartoons whether they can recognize the characters and understand what they represent in the pixelated version. If a high number of people are able to recognize them and connect them to the original spirit of the shows, I would feel more confident about moving forward with the project.