Final Project: Textile Pattern Machine

For my final project, I want to create a physically interactive pattern machine that uses Arduino controls to generate and transform digital patterns in p5. Instead of drawing directly on the screen, the user would control the structure of the pattern through physical input. I want the project to feel more like an artwork than a tool, where the physical controls shape a visual composition in real time. Right now, I am thinking of using potentiometers and buttons so the user can change things like the density of the pattern, the size of the shapes, the color palette, or the type of pattern being generated.

The Arduino side of the project would be responsible for reading the physical input, and the p5 side would process that input and turn it into the visual response on screen. For example, buttons could be used to switch between different pattern types or different color modes. For this project, I took inspiration from patterns I see in rugs, embroidery, traditional clothes, and decorative geometric designs. I am especially interested in the way these patterns use repetition, symmetry, borders, and structured color palettes to create a full composition. Because of that, I want to make something that feels artistic while still having a clear interaction system.

For the visual direction, I want the patterns to feel more designed than random. I am interested in geometric repetition, floral motifs, textile-like patterning, and decorative compositions that change in response to the user. I do not want it to just feel like shapes moving around on a screen. I want it to feel like the user is shaping a system that produces a full visual composition. Some of the references I collected have a central medallion structure, some are more grid-based and repeated like tiles, and others are softer and more floral. I am still deciding exactly how the final look will come together, but I know I want the visuals to feel cohesive, decorative, and intentional.

For inspiration, I am looking at rug patterns, embroidery, geometric ornament, floral textile designs, and repeated decorative motifs. What I am most drawn to in these references is the use of repetition, symmetry, borders, and controlled color palettes. I also want to look at p5 pattern and symmetry examples, repeated shape systems, and tutorials related to mapping Arduino input into visual parameters in p5. For the Arduino side, I will likely look back at the potentiometer and button examples, and for p5 I want to look at examples that use repetition, grid systems, tiling, and color palette switching.

Images:

This is an AI generated image that gives a more concrete example of my project:

References:

Week 11: Group Exercises (Maryam Alremeithi, Mhara Al Nuami)

Concept:
In this series of exercises, we explored how Arduino and p5.js can talk to each other through serial communication. Each exercise focused on a different direction of data flow. First, Arduino sent information to p5.js. Then we switched it so p5.js controlled something on the Arduino. Finally, we combined both directions to create a full bi‑directional system. Doing these three tasks helped us understand how physical sensors and digital visuals can work together to create interactive experiences.

For the first exercise, we made a sketch where a circle in p5 moves left and right based on a potentiometer connected to Arduino. The potentiometer is the only sensor being used here, and its value controls the horizontal position of the circle while the circle stays in the middle of the screen vertically. On the Arduino side, the potentiometer value is read and sent through serial communication. On the p5 side, that value is read from the serial port and used to control the x position of the circle.

For the second exercise, we made a sketch where p5 controls the brightness of an LED on Arduino. Instead of Arduino sending data to p5, p5 sends a value to Arduino. I used a slider in p5, and moving that slider changed the brightness of the LED. The slider sends a value through the serial port, and Arduino reads that value and uses analogWrite() to control the LED brightness. Since brightness needs a gradual range, the LED had to be connected to a PWM pin.

For the third exercise, we combined both directions into one interactive system. We used the gravity‑wind example from class and connected it to both Arduino and p5.js. The potentiometer controlled the wind force in the p5 sketch, so turning it left or right pushed the falling ball in that direction. At the same time, p5 sent a message back to Arduino every time the ball hit the bottom of the screen. This made the LED blink with each bounce, creating a small physical reaction that matched the animation. Seeing the LED flash at the exact moment the ball hit the ground made the connection between the screen and the hardware feel much stronger. This exercise showed how both sides can respond to each other in real time.

p5 Code:

P5 exercise 1: https://editor.p5js.org/MaryamAlremeithi/full/yCY7LOF5F
P5 exercise 2: https://editor.p5js.org/MaryamAlremeithi/full/34Nhzf7WZ
P5 exercise 3: https://editor.p5js.org/mharaalnuaimi/full/-E_JsjCiX

Arduino Github Link Exercise 1: Exercise 1
Arduino Github Link Exercise 2: Exercise 2
Arduino Github Link Exercise 3: Exercise 3

Setup:
Exercise 1:

Exercise 2:

Exercise 3:

Demonstration:
Exercise 1: exercise1
Exercise 2: exercise2
Exercise 3: exercise3

Schematic:
Exercise 1:

Exercise 2:

Exercise 3:

Process:
During these exercises, we followed the same steps for each project: wiring the components, writing the Arduino code, and then connecting everything to p5.js using WebSerial. For Exercise 1, we wired a potentiometer and tested the analog readings in the serial monitor before using them in p5. In Exercise 2, we focused on sending values from p5 to Arduino, so we tested the slider and made sure the LED responded smoothly. Exercise 3 was the most detailed because it used both directions of communication. We had to make sure the potentiometer values were clean, the wind force felt natural, and the LED blinked at the right moment. We also learned that adding a newline at the end of each serial message made the communication much more stable. Overall, the process helped us understand how to connect physical sensors with digital visuals step by step.

Code We Are Proud Of:

port.write("1");
setTimeout(() => port.write("0"), 100);


This is the part of the code we are most proud of because it shows the moment when p5.js talks back to Arduino. When the ball hits the bottom of the screen, p5 sends a “1” to turn the LED on and then sends a “0” to turn it off again. This creates a quick flash that matches the bounce.

Reflection and Areas of Improvement:

Working through these three exercises helped us understand how Arduino and p5.js can communicate in different ways. In Exercise 1, we learned how to read an analog value from Arduino and use it to control something in p5.js. In Exercise 2, we learned how p5.js can send values back to Arduino to control hardware like an LED. In Exercise 3, we combined both directions and created a full interactive loop where both sides respond to each other. This final exercise felt like the most complete example of how serial communication can be used in creative projects. If we continued building on these ideas, we could make more complex interactions such as small games, musical tools, or installations that react to multiple sensors. Overall, these exercises helped us build a strong understanding of serial communication and how physical and digital elements can work together.

If we were to improve these exercises, we would try adding more sensors or combining different types of inputs to make the interactions more interesting. For example, we could add buttons, sound sensors, or even an ultrasonic sensor to create more complex reactions in p5. We could also improve the visuals by adding animations or smoother movement to the ball. Another improvement would be organizing the code better by separating the serial functions from the physics code to make everything easier to read. These changes would help make the projects feel more polished and closer to real interactive installations.

References:
All the concepts we used in these exercises came from the Week 11.1 and Week 11.2 lecture slides. These slides explained how serial communication works, how to use WebSerial in p5.js, and how to send and receive data between Arduino and p5.

week 9: mood lamps

For this assignment, I tried to create two lighting options using one analog sensor, one digital sensor, and two LEDs. One option acts like a simple lamp that turns on and off, while the other acts more like a mood lamp whose brightness can be adjusted. I used the potentiometer as the analog input and the button as the digital input. I used the yellow LED as the on and off indicator for the system, and I used the blue LED as the mood light. I liked this idea because it was simple, but it still made the difference between digital and analog input and output very clear.

Week9

The way it works is that the button turns the system on and off, which the yellow LED shows. When the system is on, the blue LED changes brightness based on the potentiometer. That means the yellow LED works in a digital way, because it is either fully on or fully off, while the blue LED works in an analog way because its brightness changes gradually. In that sense, the project feels like choosing between two lighting options: a basic on and off lamp, and a second lamp that can be adjusted.

Arduino File on GitHub

For the code, I used one variable to store the button state, another to store the last button state, and a variable called systemOn to remember whether the lamp is on or off. I used INPUT_PULLUP for the button, so the button normally reads HIGH and becomes LOW when pressed. Then I used an if statement to check if the button had just been pressed, and if it had, I changed the system state. After that, I used analogRead() to get the potentiometer value, and map() to convert that value from 0 to 1023 into a brightness range of 0 to 255. That brightness value is then sent to the blue LED using analogWrite().

The part of the code I am most proud of is where the potentiometer reading gets turned into brightness for the blue LED, while the button still controls the overall on and off state of the lamp. I like this part because it made the project feel more intentional. The blue LED does not just turn on randomly. It only works when the system is on, and then its brightness changes based on the potentiometer. That made the whole lamp feel more organized and easier to understand.

if (buttonState == LOW && lastButtonState == HIGH) {
   if (systemOn == 0) {
     systemOn = 1;
   } else {
     systemOn = 0;
   }
   delay(200);  
 }
 lastButtonState = buttonState;
 

 int sensorValue = analogRead(A0);
 
 
 if (systemOn == 1) {
  
   digitalWrite(yellowLed, HIGH);
   int brightness = map(sensorValue, 0, 1023, 0, 255);
   analogWrite(blueLed, brightness);
 } else {
   digitalWrite(yellowLed, LOW);
   analogWrite(blueLed, 0);
 }

I am proud of this part because it brings the whole project together. The button controls the digital state of the system, and the potentiometer controls the analog brightness of the blue LED. I think this made the assignment much easier to understand in a practical way, because it clearly separated the role of the digital input and the analog input.

One thing I liked about this assignment is that it made the difference clear. The yellow LED is either fully on or fully off, while the blue LED can be dim, medium, or bright depending on the potentiometer. If I had more time, I would probably make the mood lamp more visually expressive, maybe by adding another color.


Week 10: two-player air piano

For this week’s assignment, I made a two-player musical instrument using Arduino. One person controls the pitch by moving their hand in front of the ultrasonic sensor, and the other person uses two buttons to trigger two different drum-like sounds. I liked this idea because it made the instrument feel more interactive, and it also made the difference between analog and digital input much clearer to me. For the demo, my sister acted as the second player so I could show how the instrument works with two people. While I controlled the ultrasonic sensor, she used the buttons to add the drum-like sounds.

video demo

Arduino File on GitHub

I used the ultrasonic sensor to control the pitch of the instrument. The closer the hand gets to the sensor, the higher the pitch becomes, and the farther the hand is, the lower the pitch becomes. The second player uses two buttons to trigger two different sounds. I did not use uploaded sound files for these. Instead, I created them directly in code by assigning different frequency values in hertz to the piezo speaker. One button produces a lower drum-like sound, and the other produces a higher and sharper drum-like sound.

The way the project works is that the ultrasonic sensor acts as the analog input because it gives a changing range of distance values, while the buttons act as digital inputs because they are either pressed or not pressed. The Arduino reads the distance from the ultrasonic sensor directly inside the loop() function and uses the map() function to convert that distance into pitch. At the same time, it also reads the two buttons and triggers the two drum-like sounds when they are pressed. All of that is sent to the piezo speaker, which acts as the output. I think this project made the difference between continuous input and on and off input much easier to understand because both were working in the same project.

For the circuit, the ultrasonic sensor is connected to 5V and GND, with the TRIG pin connected to pin 9 and the ECHO pin connected to pin 10. The two buttons are connected as digital inputs on pins 2 and 3, and they are also connected to ground. The piezo speaker is connected to pin 8 and ground, so it can play both the changing pitch and the two drum-like sounds. One problem I ran into was with the button wiring. At first, I connected both button wires to the top row of the breadboard, and the buttons did not work. I was confused because I thought the code was the issue, but later I realized the problem was actually the physical connection. Once I fixed the wiring and moved the ground connection to the correct place, the buttons started working properly.

The part of the code I am most proud of is the section where the ultrasonic sensor reading gets turned into pitch in real time. I like this part because it made the instrument feel much more alive and interactive. Instead of just choosing from fixed sounds, the player can move their hand and hear the pitch change immediately. That made the whole project feel closer to an actual instrument instead of just separate parts making sound.

if (blueButtonState == HIGH && redButtonState == HIGH) {
  
  // ultrasonic sensor
  digitalWrite(trigPin, LOW);
  delayMicroseconds(2);
  digitalWrite(trigPin, HIGH);
  delayMicroseconds(10);
  digitalWrite(trigPin, LOW);

  // echo time
  long duration = pulseIn(echoPin, HIGH);
  int distance = duration * 0.034 / 2;
  
  Serial.println(distance);

  if (distance > 5 && distance < 50) {
    int pitch = map(distance, 5, 50, 1500, 200);
    pitch = constrain(pitch, 200, 1500);
    tone(speakerPin, pitch);
  } else {
    noTone(speakerPin);
  }
}

I am proud of this part because it is what made the ultrasonic sensor actually useful in the project. The code triggers the sensor, measures how long the echo takes to return, and then converts that into distance. After that, the map() function changes the distance into a frequency range, so hand movement becomes sound. The constrain() function was also important because it kept the pitch within a usable range and stopped it from becoming too extreme. I think this was the part that made the project make the most sense.

If I had more time, I would improve the project by adding more sounds and making the instrument feel a little more musical overall instead of only experimental. I also think adding some visuals, like LEDs flashing when the buttons are pressed, would make it feel like a DJ game. Still, I think the final project worked well.

Reading Reflection:

This reading convincing in a lot of ways, but I also think the author pushes his argument too far at some points. I agreed with his main criticism that a lot of so-called future interaction design is not actually very futuristic if it still depends on flat glass screens and a very limited set of gestures. He compared digital interaction to the way we use ordinary objects with our hands, and that stood out to me because it made me think more about how much touch, grip, pressure, and movement matter in the way we understand and use things. I think this argument made even more sense to me, because it made me realize that interaction is not only visual. It is also physical, and a lot of current design does flatten that experience too much.

At the same time, I think the author is a little too extreme in the way he talks about current touchscreen technology. I understand why he sees it as limited, but I do not think that automatically makes it bad or meaningless. Touchscreens can still be practical, intuitive, and useful, even if they are not the most advanced or expressive form of interaction. So for me, the strongest part of the reading was not the idea that flat screens are a failure, but the idea that they should not be treated as the final version of interaction design. That is the part I agreed with most. I think the reading changed the way I think about future interfaces, but it also made me question how much the author’s argument depends on exaggerating the weakness of current technology in order to make his own point feel stronger.

Week 8: hair-clip switch

For this assignment, I made a physical switch out of a hair clip and foil. Since the assignment was about creating an unusual switch, I wanted to build one out of simple materials that could still work clearly as a circuit. I used the hair clip and foil as the two conductive parts, and when they touched, the circuit closed and the LED responded.

At first, I tried a few different ideas, like using a necklace or a headband as one of the conductive parts, but that did not work because of the wire length and the physical arrangement. After thinking through different options, I realized that a hair clip made more sense because it already has a natural opening and closing action. That made it easier to turn it into a working switch. I attached the hair clip to the end of the shirt, as shown in the video. Ideally, I wanted to place it on the head, but because the wires were too short, I decided to keep it in close proximity to the board instead. I used foil as the second conductive contact, so when the clip touched the foil, the circuit closed.

hairclip-switch

The way the project works is that one side of the switch is connected to the hair clip, and the other side is connected to the foil. These are wired to the Arduino so that when the two conductive parts touch, the circuit closes and the switch state changes. I used digitalRead() to read the switch, and I connected the output to an LED. At first, the LED only stayed on while the conductive parts were touching, but I changed the code so that one touch turned the LED on and the next touch turned it off. I liked that version more because it felt more intentional and more like a real switch.

One part I found difficult was the physical setup. The challenge was not only the code, but also making the conductive parts line up in a way that worked. I originally tried to use the RedBoard, but I ended up using my own Arduino Uno instead because I was more familiar with it from using it in high school. Since I had already worked with the Uno in the Arduino app before, it was easier for me to use the board I already understood.

Code I’m proud of:

void loop() {
  buttonState = digitalRead(switchPin);

  if (buttonState == LOW && lastButtonState == HIGH) {
    if (ledState == LOW) {
      ledState = HIGH;
    } else {
      ledState = LOW;
    }

    digitalWrite(ledPin, ledState);
    delay(200);
  }

  lastButtonState = buttonState;
}


This is the part of the code I am most proud of, because it instead of just lighting up while the conductive parts were touching into a toggle system. So, one touch turns the LED on, and the next touch turns it off. I like this part because it made the switch feel more complete.

I am happy with this project because it was a refresher for me in using Arduino, but in a creative way that made me think about the function of each LED, wire, resistor, and connection. The materials were simple, but the project still made me think about both the physical interaction and the code logic.


Reading Reflection:

One of the most important parts of Margaret Hamilton’s work was not just writing code, but understanding that people make mistakes and that systems should be built with that in mind. I think that idea interested me more than just the fact that she helped get humans to the moon. The reading made me feel like her work mattered not only because it was impressive, which it was, but because she was thinking in a more realistic way than the people around her. The fact that her concerns were dismissed because astronauts were expected to be too well-trained to make mistakes especially stood out to me, because that feels like a very unrealistic way of thinking. The reading is not only praising Hamilton, but also showing how software and careful planning were underestimated until they proved how necessary they were.

I do agree with Norman’s point, but not completely. I think attractive things can work better because people are usually more open, patient, and comfortable when something looks nice or appealing. If something looks good, people are often more willing to give it a chance instead of immediately getting frustrated by it. At the same time, I do not think attractive design automatically means good design. Something can look beautiful and still be confusing or badly made, and we can see that in our daily life. So for me, it’s not just that beauty matters, but that beauty and function should work together. I also think this depends a lot on context. In a calm situation, something attractive might make the experience better, but in a stressful situation I think clarity or practicality matters much more than appearance.

Midterm Project: Salama’s Nail Salon

For my midterm project, I made an interactive nail salon game in p5.js called Salama’s Nail Salon. The idea of the game is that a customer gives a short line that hints at the kind of color they want, and the player has to choose a nail polish color that matches it. I wanted it to feel simple and cute, but still have actual game logic behind it, so I used mood-based color matching instead of making it just about choosing any random color. Then, the player uses a hue slider to test different shades, and the game gives a result out of five stars depending on how close the chosen color is to the customer’s intended mood.

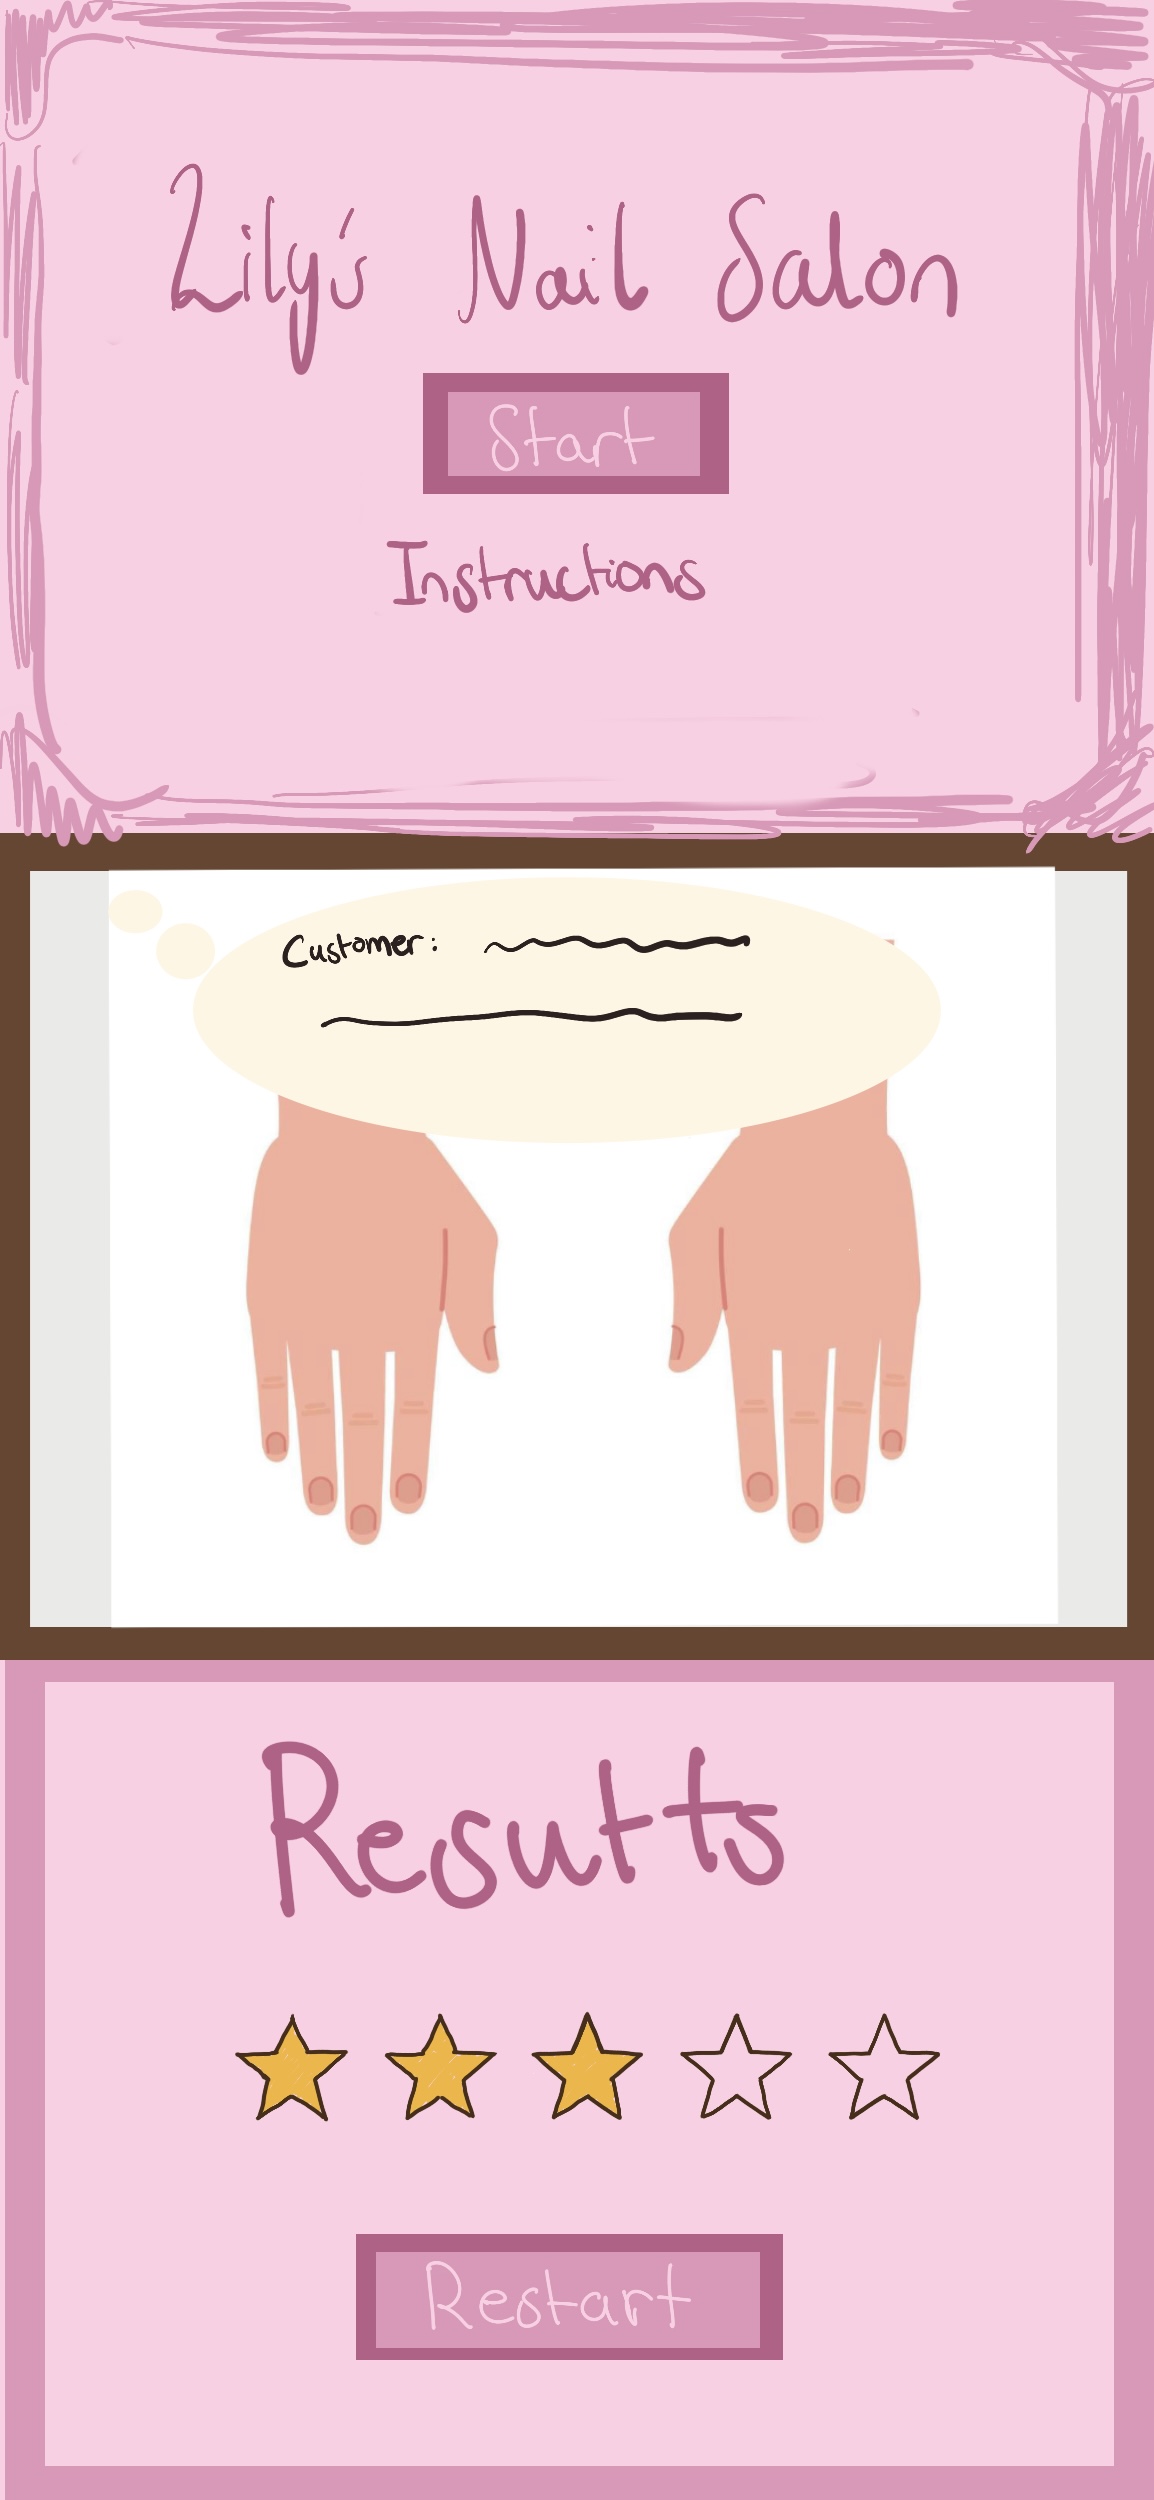
To build the project, I first split it into three main screens, which helped me organize the whole game better. I made a start screen with instructions, a playing screen where the customer gives their line and the player chooses a nail color, and a result screen that gives feedback and has a restart button in case the player would like to try again. Structuring the project this way made it much easier for me to understand the logic of the game and the logic of the code.

For the visuals, I used AI to produce my background image of a nail salon, and I added a font and soft pink buttons so the overall style fit a nail salon game. One part I spent a lot of time on was the nail itself. Instead of drawing the full finger, I used a finger image and drew a nail shape with the chosen color directly on top of it so the player could see the polish update on the actual nail. This took a lot of trial and error, because the shape had to be positioned and rounded carefully to fit inside the nail correctly. I also added a glossy highlight so it looked more like actual nail polish instead of just a flat shape.

I am especially proud of the result system, because the result compares the chosen color to the target color for the customer’s mood and then gives a star rating from one to five. At first, I was showing more technical feedback, like how far the player was from the target color, but when I made my sister Salama try the game, I realized that the results did not fit the tone of the game very well. Since the game is meant to feel playful and easy to understand, I changed the result screen so it gives simple reactions and color-based hints instead, and I think this made the game feel much more natural and kid-friendly. However, I did use AI to help with this part, and I explain exactly how I used it at the end of my blog.

function resultFeedback() {
  if (stars === 5) {
    resultTitle = "Perfect match!";
    resultHint = "The customer loved this color.";
  } else if (stars === 4) {
    resultTitle = "So close!";
    resultHint = colorHint(correctMood);
  } else if (stars === 3) {
    resultTitle = "Nice try!";
    resultHint = colorHint(correctMood);
  } else if (stars === 2) {
    resultTitle = "Not quite yet!";
    resultHint = colorHint(correctMood);
  } else {
    resultTitle = "Oops!";
    resultHint = "That color was far from what the customer wanted.";
  }
}

function colorHint(mood) {
  if (mood === "Happy") {
    return "The customer wanted a brighter, sunnier color.";
  } else if (mood === "Calm") {
    return "The customer wanted a softer, more bluish color.";
  } else if (mood === "Confident") {
    return "The customer wanted a bolder, more purple color.";
  } else if (mood === "Sad") {
    return "The customer wanted a deeper, darker color.";
  } else {
    return "Try a different shade next time.";
  }
}


Another part I am happy with is that I included multiple customer moods and randomized phrases, so the game does not feel exactly the same every time. I also used object-oriented programming by making a Customer class. Each round creates a customer object that stores the customer’s mood and phrase, and this helped me organize the dialogue part of the game more clearly. I used arrays of phrases for each mood and randomly selected one for each round. I also used buttons, a slider, text, images, shapes, and sound, so the final sketch combines a lot of the tools we have learned. Even though the game looks simple, there is a lot of structure behind it, and I’m really proud of how I organized it.

One challenge I ran into was figuring out how to make the game feel visually complete without making it too complicated. I originally was not sure how to show the nail color in a way that looked convincing, and I had to test many different values before the color shape finally fit the nail properly. Another challenge was deciding what kind of feedback to show on the result screen. I did not want it to feel too technical, so I had to rethink the wording and make it fit the tone of the game better. I also had to think a lot about spacing and layout so the nail image would not overlap with the hue spectrum and the controls. 

AI Use:

I used AI in two specific parts of this project. First, I used AI to generate the background image for the game. I explained that I wanted a background image for a nail salon game, described how I wanted it to look visually, and explained that it would be used across all of the screens in the game. I generated the AI background image when I was working on the midterm progress stage, and I decided to keep it because it matched the theme I wanted better than the images I found online. I chose to do this because I wanted a background that looked soft, cute, and clearly related to a nail salon.

The second place where I used AI was for the wording of the result screen. My original result feedback system was much more technical. In my code, the result was based on comparing the player’s chosen hue to the target hue for the customer’s mood. I used functions like hueDistance() to measure how close the chosen color was to the target color, starsFromDistance() to convert that distance into a star rating from one to five, and computeResult() to calculate the final result. Because the logic of the system was based on color distance, my first version of the result screen also showed that technical logic more directly. It included the star result, the predicted mood, and feedback about how far the chosen hue was from the target hue. From a coding perspective, that made sense to me because it matched how I had built the scoring system.

However, after I had my sister Salama test the game, I realized that this version of the result feedback did not fit the tone of the project very well. She did not really understand what the technical feedback meant in the context of a playful nail salon game, and it felt too logic-based for the kind of experience I wanted. Because of that, I used AI specifically to help me rethink how the result should be communicated to the player. AI helped me revise the wording and presentation of the result. I changed the result screen in the code by replacing the more technical feedback with the variables resultTitle and resultHint, and by adding the functions resultFeedback() and colorHint(mood) to generate simpler and more natural feedback for the player. Instead of showing technical information, the result screen now gives simpler reactions such as “Perfect match!” or “Nice try!” and follows them with clearer color-based hints, such as saying the customer wanted something brighter, softer, darker, or more bluish. So my logic for the result system stayed the same, but AI helped me change the way that result was expressed, so it made more sense to the player and matched the tone of the game better. I also then edited it and added phrases on my own, and kept fixing or changing the wording.

Resources:

 My font: https://fonts.google.com/specimen/Emilys+Candy?categoryFilters=Feeling:%2FExpressive%2FCute&preview.script=Latn 

My Background Sound: https://pixabay.com/music/beats-chill-lofi-music-background-358420/

Images used:

I used p5.js library and p5.sound library

I used the course slides to copy parts like input, fullscreen, and window resizing. I also used ideas from the class for structuring the game into different screens and organizing the game logic. 

I used AI to generate the background image, and to fix the results feedback.

My sister Salama was the main testing participant and also the inspiration for this game, which is why I felt it was fitting to call it Salama’s Nail Salon.

I also received major help from my brother with the coding logic of the game. I had it structured weirdly, and he helped me understand how to organize it.


Week 5: reading reflection

The reading mentioned that computer vision works best when the artist helps the computer by controlling things like lighting, background, and contrast. Before reading this, I mostly thought of computer vision as a coding problem, but the reading made it feel more like a design problem too, which I liked because it connects the technical side to the creative side of interactive art. It also made me think about my own project, because even simple interactions can fail if the setup is not clear enough for the user or the system.

The reading also made me think more critically about how easily tracking can become part of an experience without users really thinking about it. In interactive art, tracking can make the work feel more immersive, but it can also feel invasive depending on how it is used. I do not necessarily think computer vision is automatically bad in art, but I do think it raises questions about consent and comfort. It made me wonder how artists can make interactive work engaging while still being clear and respectful about what is being tracked.

Week 5: Midterm progress

For my midterm project, I want to make a nail salon game in p5.js. The idea is that customers come in, and the player has to design nails that match how they feel. I want it to be more than just picking random colors, so their mood is what makes the game more creative. I also want to include a mood-guessing game at the beginning. The customer will say a short line, and the player will guess their mood before starting the nail design. Then the player designs the nails based on that mood, and the game gives feedback at the end.

I want the design of the project to look cute, simple, and easy to understand, like a cozy nail studio. I plan to use soft colors and clear buttons so the user can move through the experience without getting confused. The project will start with an instructions screen, then move to the main nail salon screen where the customer says their line and the player guesses their mood, then the player designs the nails, and finally sees a result screen with feedback and a restart option.

For the visuals, I will use shapes for the nails, buttons, and decorations, and images for things like the background or customer. I also plan to include sound and text for the customer’s reaction/line so the project feels more interactive. This is a sketch of what I’m planning for my game.

I think the most challenging part will be organizing the project and the code, and making sure everything appears at the right time. Since the project has multiple stages, I need to keep the flow clear and make sure the user knows what to do next. Another challenge is the nail design interaction itself. I still need to decide the simplest and best way for the player to apply colors and decorations. I want it to be easy to use, but still feel fun and creative. I also still have not figured out how to decide whether the final design matches the customer’s mood at the end or not.

To reduce that risk, I will first make a simple version of the project with only the screen flow and text/colors. This will help me test if the structure works before I spend time on the final visuals. I will also make a reusable button class early so I can use it for mood choices, color choices, and the restart button. After that, I will test the nail design interaction with basic shapes first, like clicking a button to change the nail color, and I may also try a brush-like stroke animation.


Assignment 4: Reaction Times Experiment

For this assignment, I wanted to create something interactive but still simple enough to fully understand and explain. Instead of focusing on complex visuals, I decided to make a reaction time test, where the user presses the space bar as quickly as possible when the screen turns green. I liked this idea because the interaction itself generates the data, instead of relying on an external file.

The sketch starts with a short instruction screen. Once the user presses the space bar, the screen switches to a “wait” state for a random amount of time, and then turns green to signal the user to respond. The reaction time is recorded for each trial, and after a set number of trials, the sketch displays the results. I kept the visuals very minimal and focused more on clarity than decoration.

Embedded Sketch:


For the results, I used three images (a rabbit, a human, and a turtle) to represent fast, average, and slow reaction times. I also added a simple bar chart where each bar represents one trial. Faster reaction times result in shorter bars, while slower reaction times create taller bars. This helped make the differences between trials easier to see.

let barH = map(rt, 200, 2000, 20, 160);
   barH = constrain(barH, 20, 160);

   fill(255, 120, 170);
   rect(chartX + i * barW, chartY - barH, 45, barH);

I’m proud of this section of the code because it takes a the reaction time value and turns it into something visual. By using map(), I was able to convert reaction times into bar heights, which made the results much easier to interpret.

Most of the sketch was built using variables, arrays, conditional statements, functions, and simple state management. Using different states (intro, wait, go, and results) made the interaction much easier to organize. I also used millis() to measure reaction time, which I learned more from p5.js reference and looking at simple reaction-time examples online.

Overall, I’m happy with how this sketch turned out. It helped me understand how user input can be treated as data and then visualized in a clear way. The most challenging part was making sure the input behaved correctly in each state, especially preventing early presses from being counted. For future assignments, I would like to experiment with more detailed feedback per trial or different ways of visualizing reaction time beyond a bar chart.

Reading Reflection:

Norman’s reading made me realize that many everyday frustrations come from poor design rather than user error. He explains how objects often fail to clearly communicate how they should be used, which causes confusion even in simple situations like opening a door. This made me think about how important clarity and feedback are in interactive design.

Relating this to my own work, I realized that even small design choices in my sketches affect how intuitive they feel. If an interaction is not clear, users may not know what to do or may assume something is broken. Norman’s ideas encouraged me to think more carefully about how my sketches guide the user, and how simple visual cues or feedback can make interactions feel more natural and less frustrating.

Assignment 3: Dancing hearts

For this assignment, I decided to continue developing the heart theme from my previous sketch. In Assignment 2, I created a structured heart wallpaper where all the hearts moved together when pressed. This time, I wanted to test my abilities more and make the interaction feel more refined and independent rather than controlling everything at once.

Instead of using one shared movement variable, I used arrays and object-oriented programming to create a grid of Heart objects. Each heart now has its own properties, such as position, size, and animation phase. I used nested loops again to build the grid, but instead of shifting the entire grid together, each heart updates individually using its own update() function.

To create smoother movement, I used sin() and cos() to make the hearts pulse and slightly wiggle when the mouse hovers over them. The hearts remain structured in a grid, but when the mouse gets close, they move in a controlled sinusoidal motion. I also created the heart shape using beginShape() and bezierVertex() instead of ellipses and a triangle, which made the hearts look more developed and smooth.

The part of my code that I am most proud of is the section where the hearts move when hovered over:

if (this.isMouseNear()) this.x = this.baseX + sin(frameCount * 0.18 + this.phase) * this.wiggleAmount; this.y = this.baseY + cos(frameCount * 0.18 + this.phase) * this.wiggleAmount; }

This part controls the interactive movement. I learned that frameCount acts like time, and using sin() and cos() creates smooth back-and-forth motion instead of random movement. Adding phase also prevents all the hearts from moving in sync, which makes the animation feel more natural.


Overall, I’m happy with how this sketch developed from the previous one. It feels more structured and intentional, especially since each heart now behaves independently. The most challenging part was understanding how to separate update and display logic, and how to keep the original grid position while still allowing movement. For future improvements, I would like to experiment with how nearby hearts respond to interaction, and create a ripple effect instead of only affecting one/two hearts at a time.

Reading Reflection

In the reading, Crawford does not directly state that interactivity must include technology, but he clearly frames it within digital systems and computational design. Most of his examples revolve around computers, simulations, and structured input-response systems. While I understand his definition of interactivity as a “cyclic process of listening, thinking, and speaking,” I think his focus on digital media slightly narrows how we understand the concept.

Personally, I don’t think interactivity necessarily has to involve technology. I think something can be interactive simply by changing how we perceive or respond to it. For example, a physical artwork that shifts depending on where you stand, or a space that makes you question your perspective, still creates interaction, even without code. This reading made me question whether interactivity is really about technology, or if it is more about creating a meaningful exchange between a system and a participant, regardless of medium.