Week 14: Final Project Documentation

Source

The full source code, and accompanying documentation, is available at on Github.

Concept

This project is an interactive media piece that combines audio, visuals, and interactive elements to share the personal stories of students who faced repercussions for their politics. Using both digital and physical interfaces, users can explore these narratives at their own pace and in thier own manner.

My motivation behind choosing this cause was to highlight the similarity and elicit the empathy of the audience, as fellow international students.

How It Works

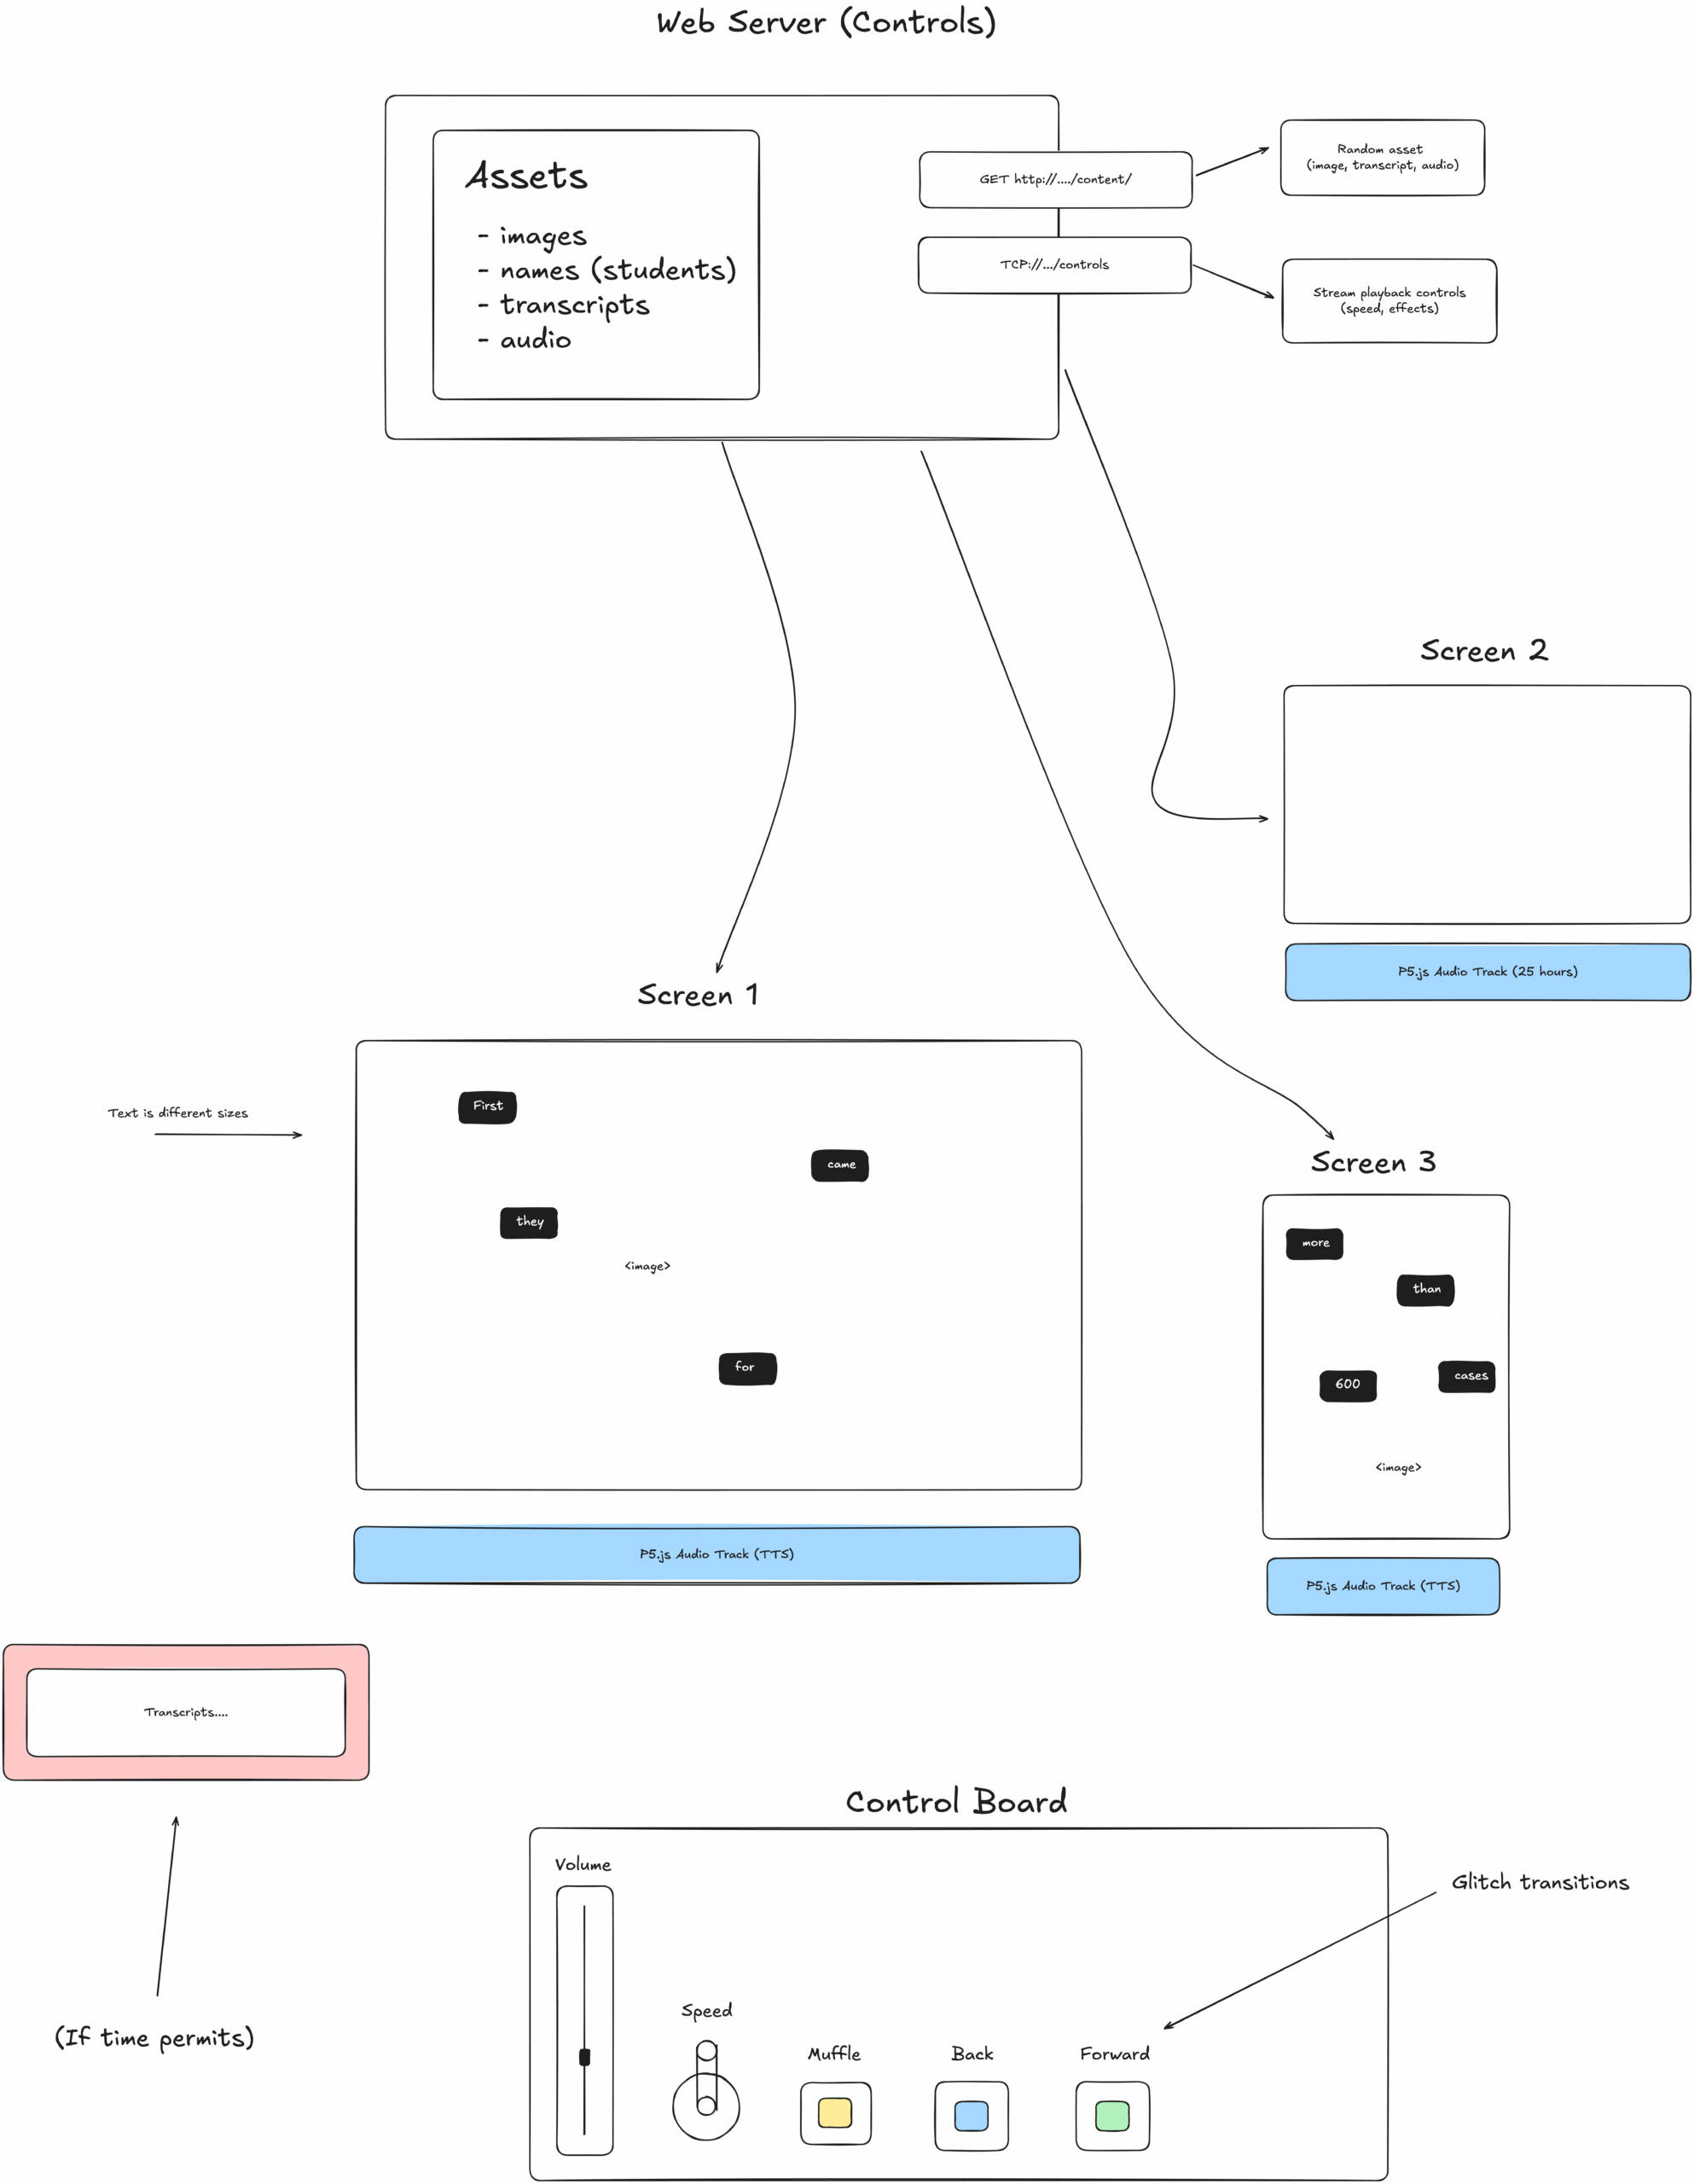
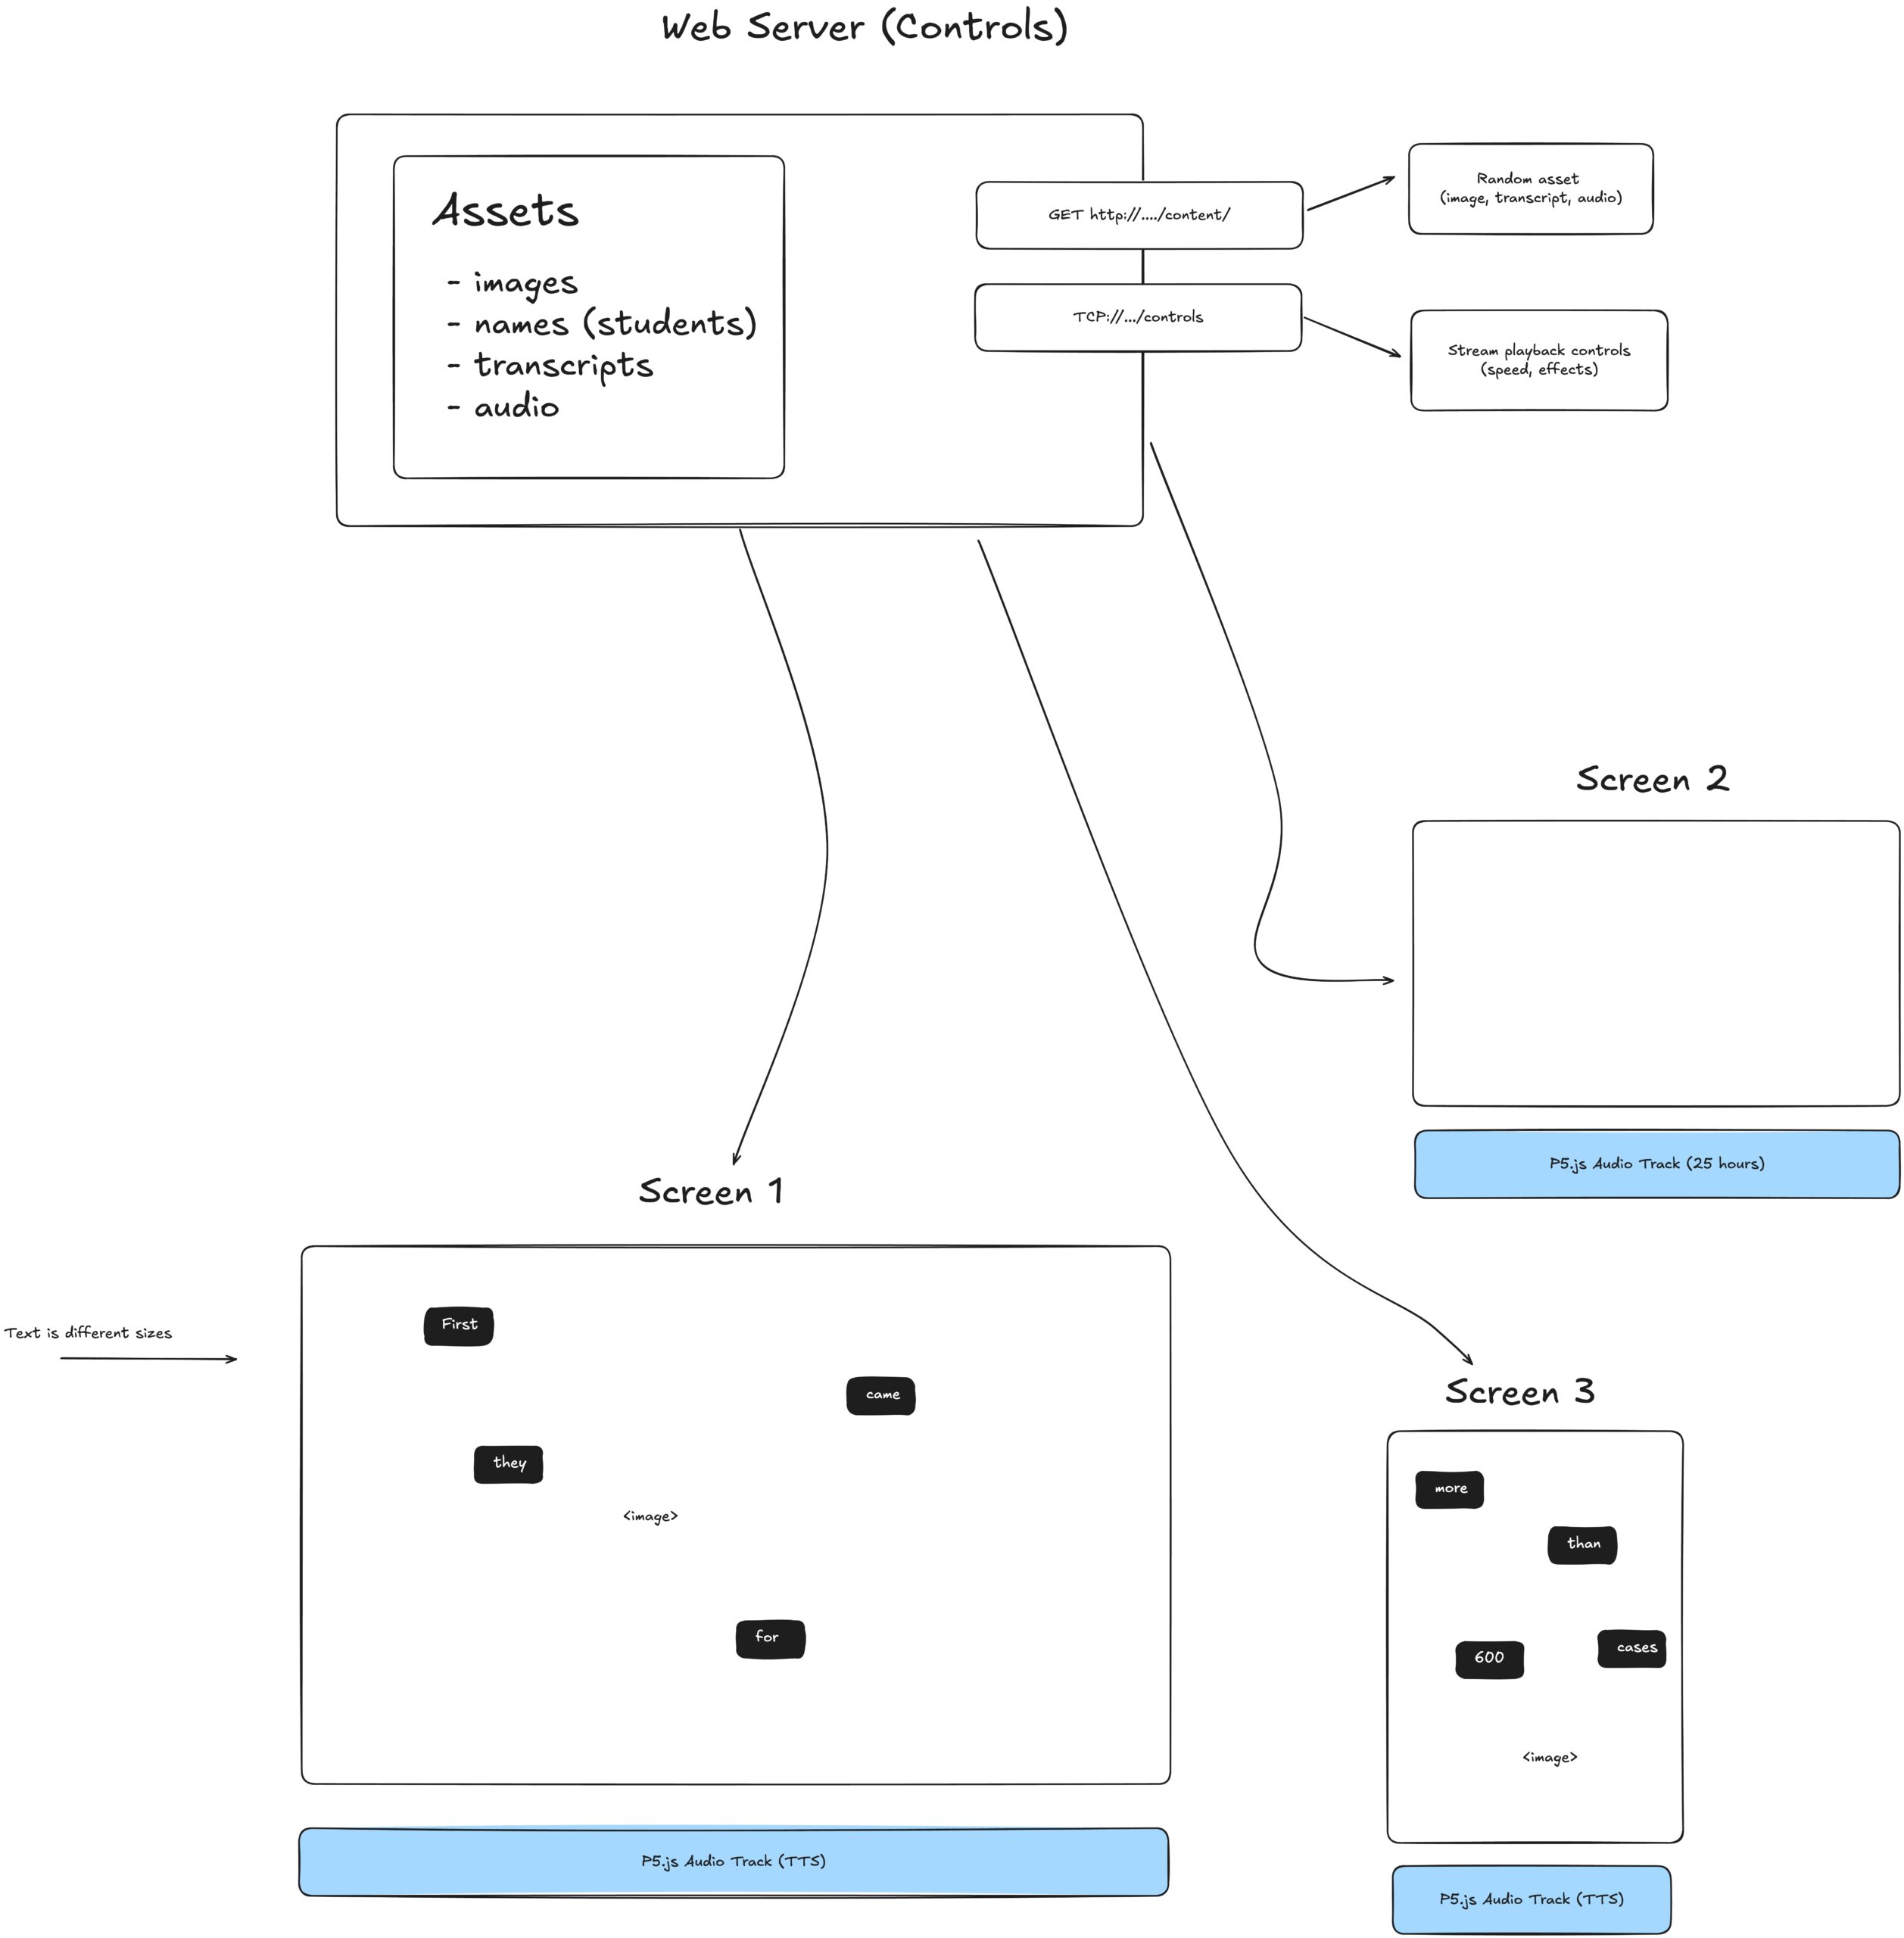
The implementation consists of three main components working together:

1. Client Interface: A browser-based application built with p5.js that handles the visualization, audio playback, and user interaction.
2. Server Backend: A FastAPI backend that serves content and manages WebSocket connections for real-time control.
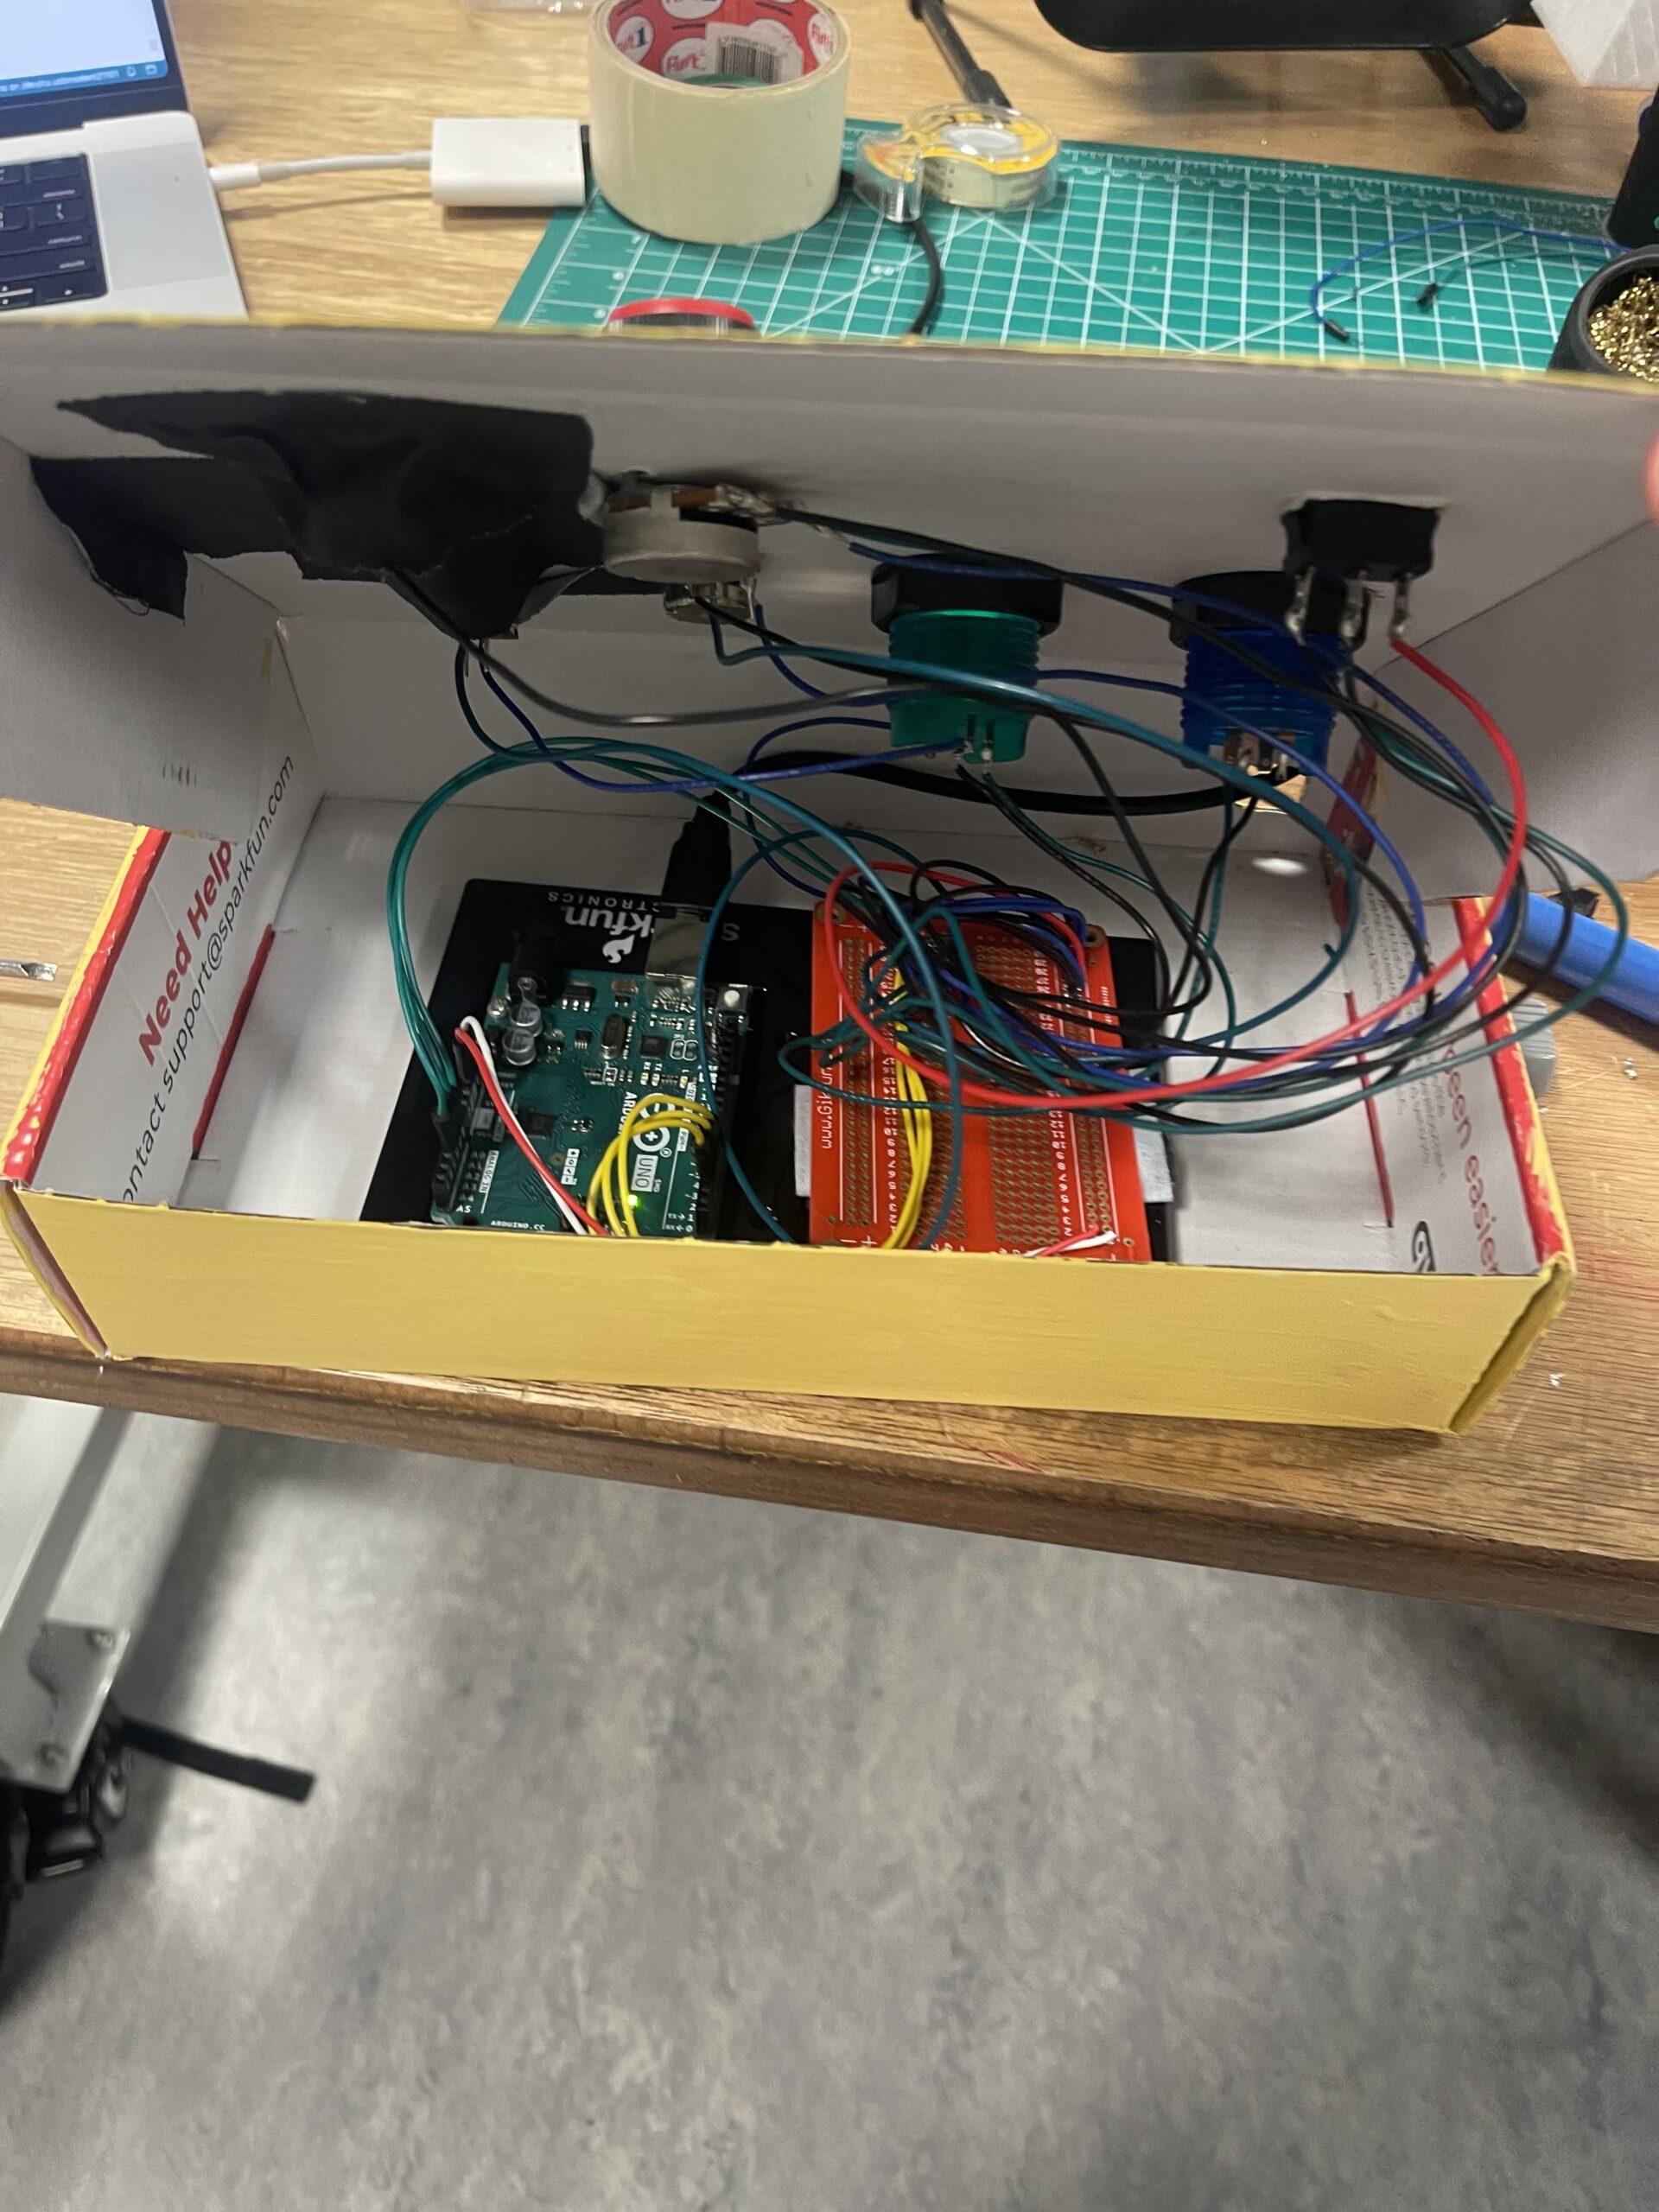
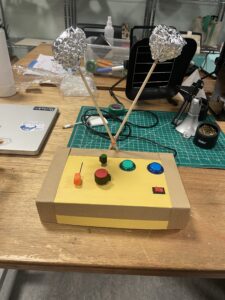
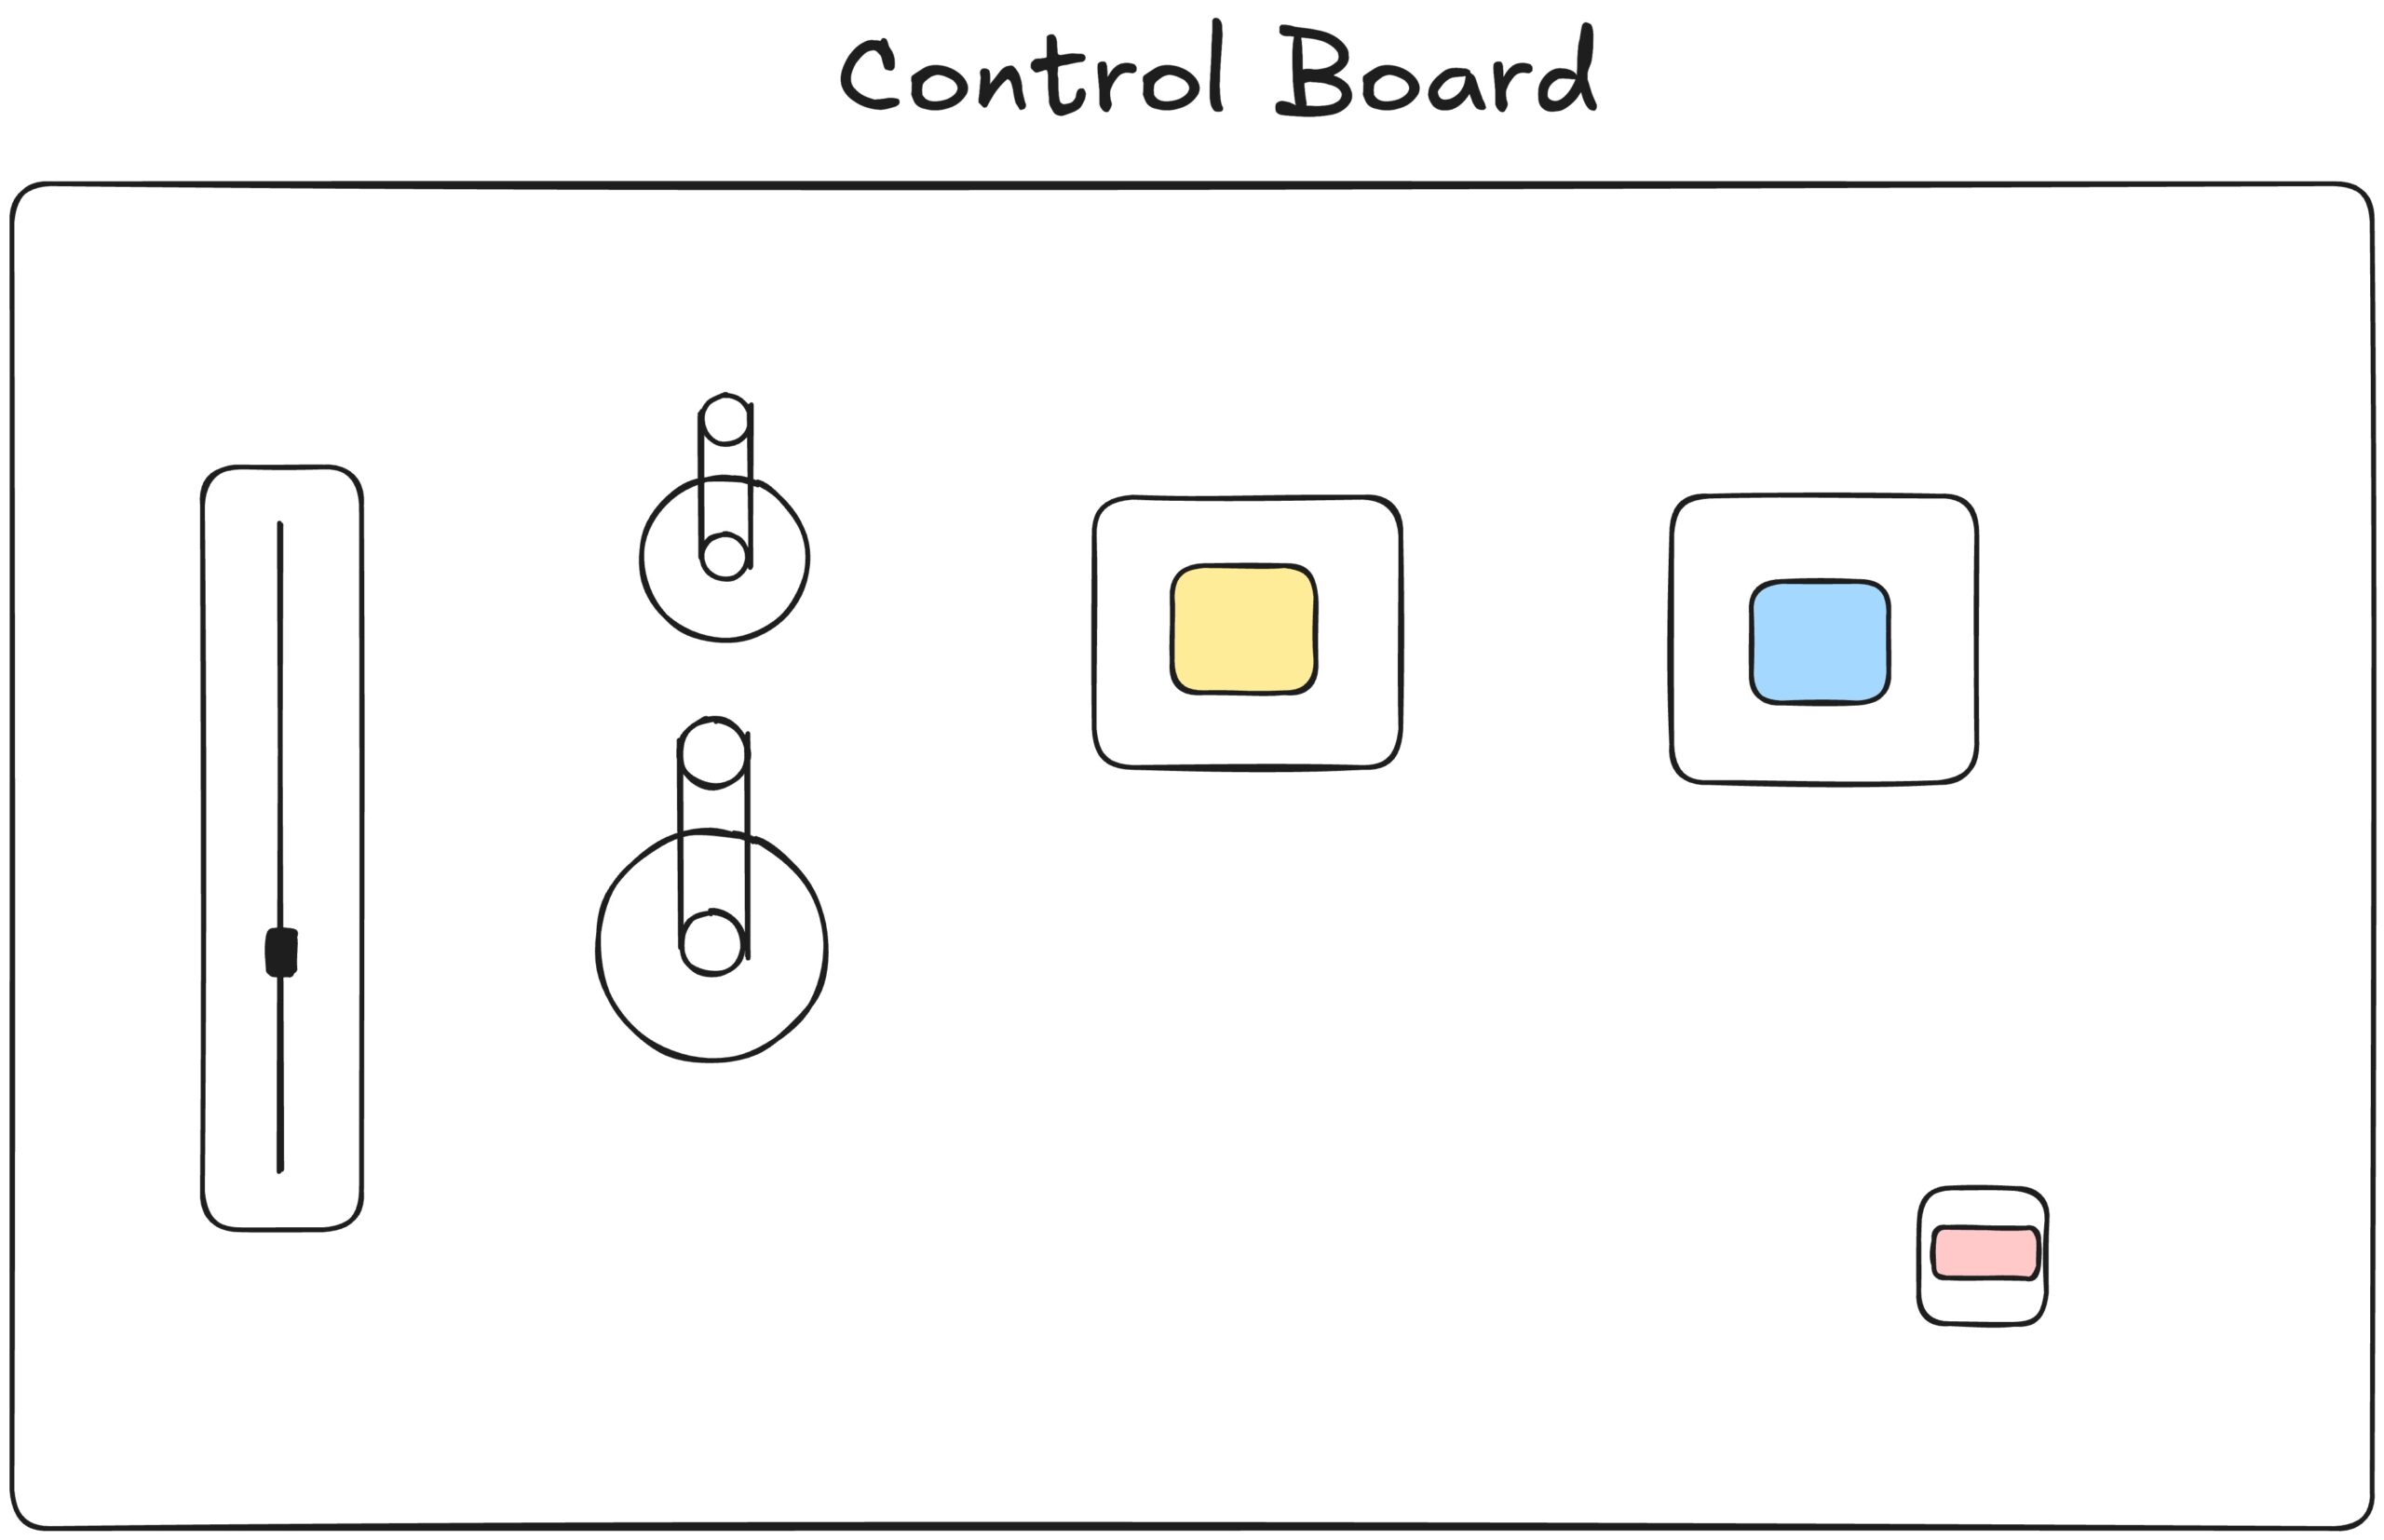
3. Physical Controls: An Arduino-based controller that provides tangible ways to interact with the digital content.

When a user accesses the application, they’re presented with a multimedia canvas that displays images related to a student’s story while playing their audio narrative. As the audio plays, transcribed text appears dynamically on screen, visualizing the spoken words. Users can control the experience either through on-screen interactions or using the physical Arduino controller.

Interaction Design

The interaction design prioritizes intuitive exploration and meaningful engagement:

Starting the Experience: Users simply click anywhere on the screen to begin
Content Navigation: Pressing buttons or clicking on screen transitions to the next story
Playback Controls:
– A physical switch pauses/resumes the audio
– Potentiometers adjust volume and playback speed
– On-screen interactions mirror these controls for users without the physical interface

The design deliberately minimizes explicit instructions, encouraging exploration and discovery. As found during user testing, providing just a small amount of context greatly improved the experience while still allowing for personal discovery. Users who spent more time interacting with the piece often discovered deeper layers of meaning as they engaged with multiple stories.

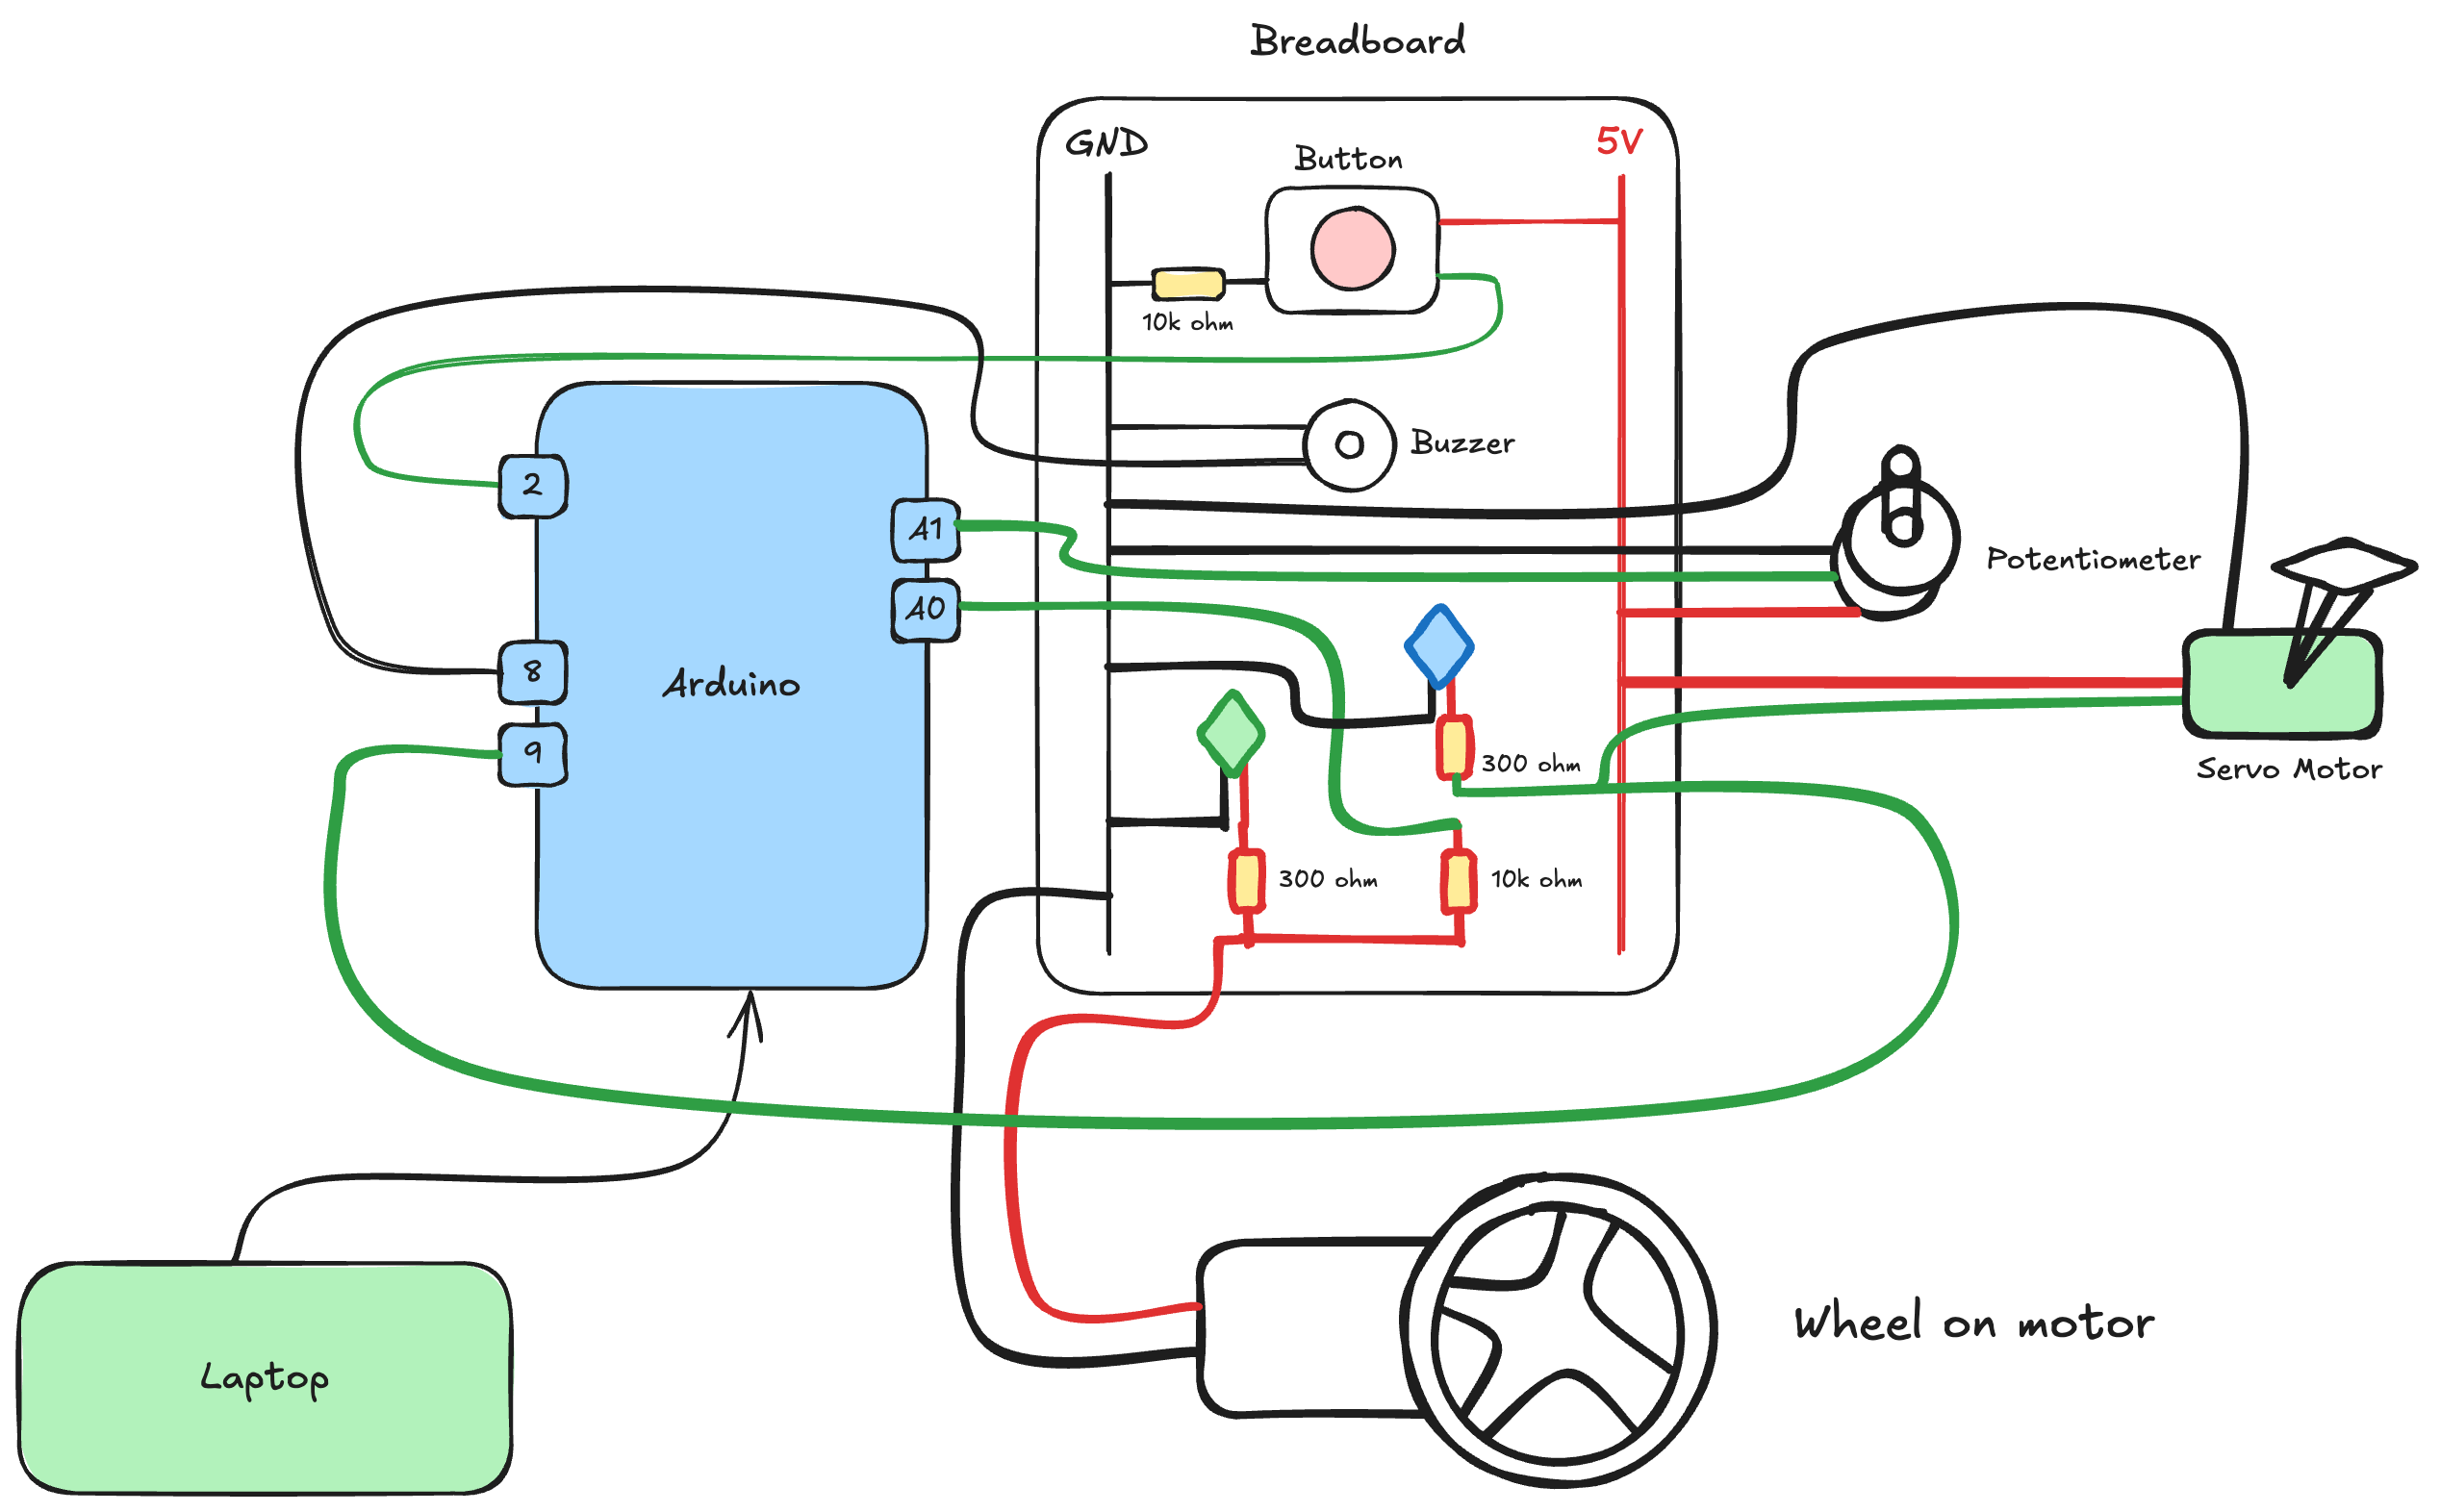
Arduino Implementation

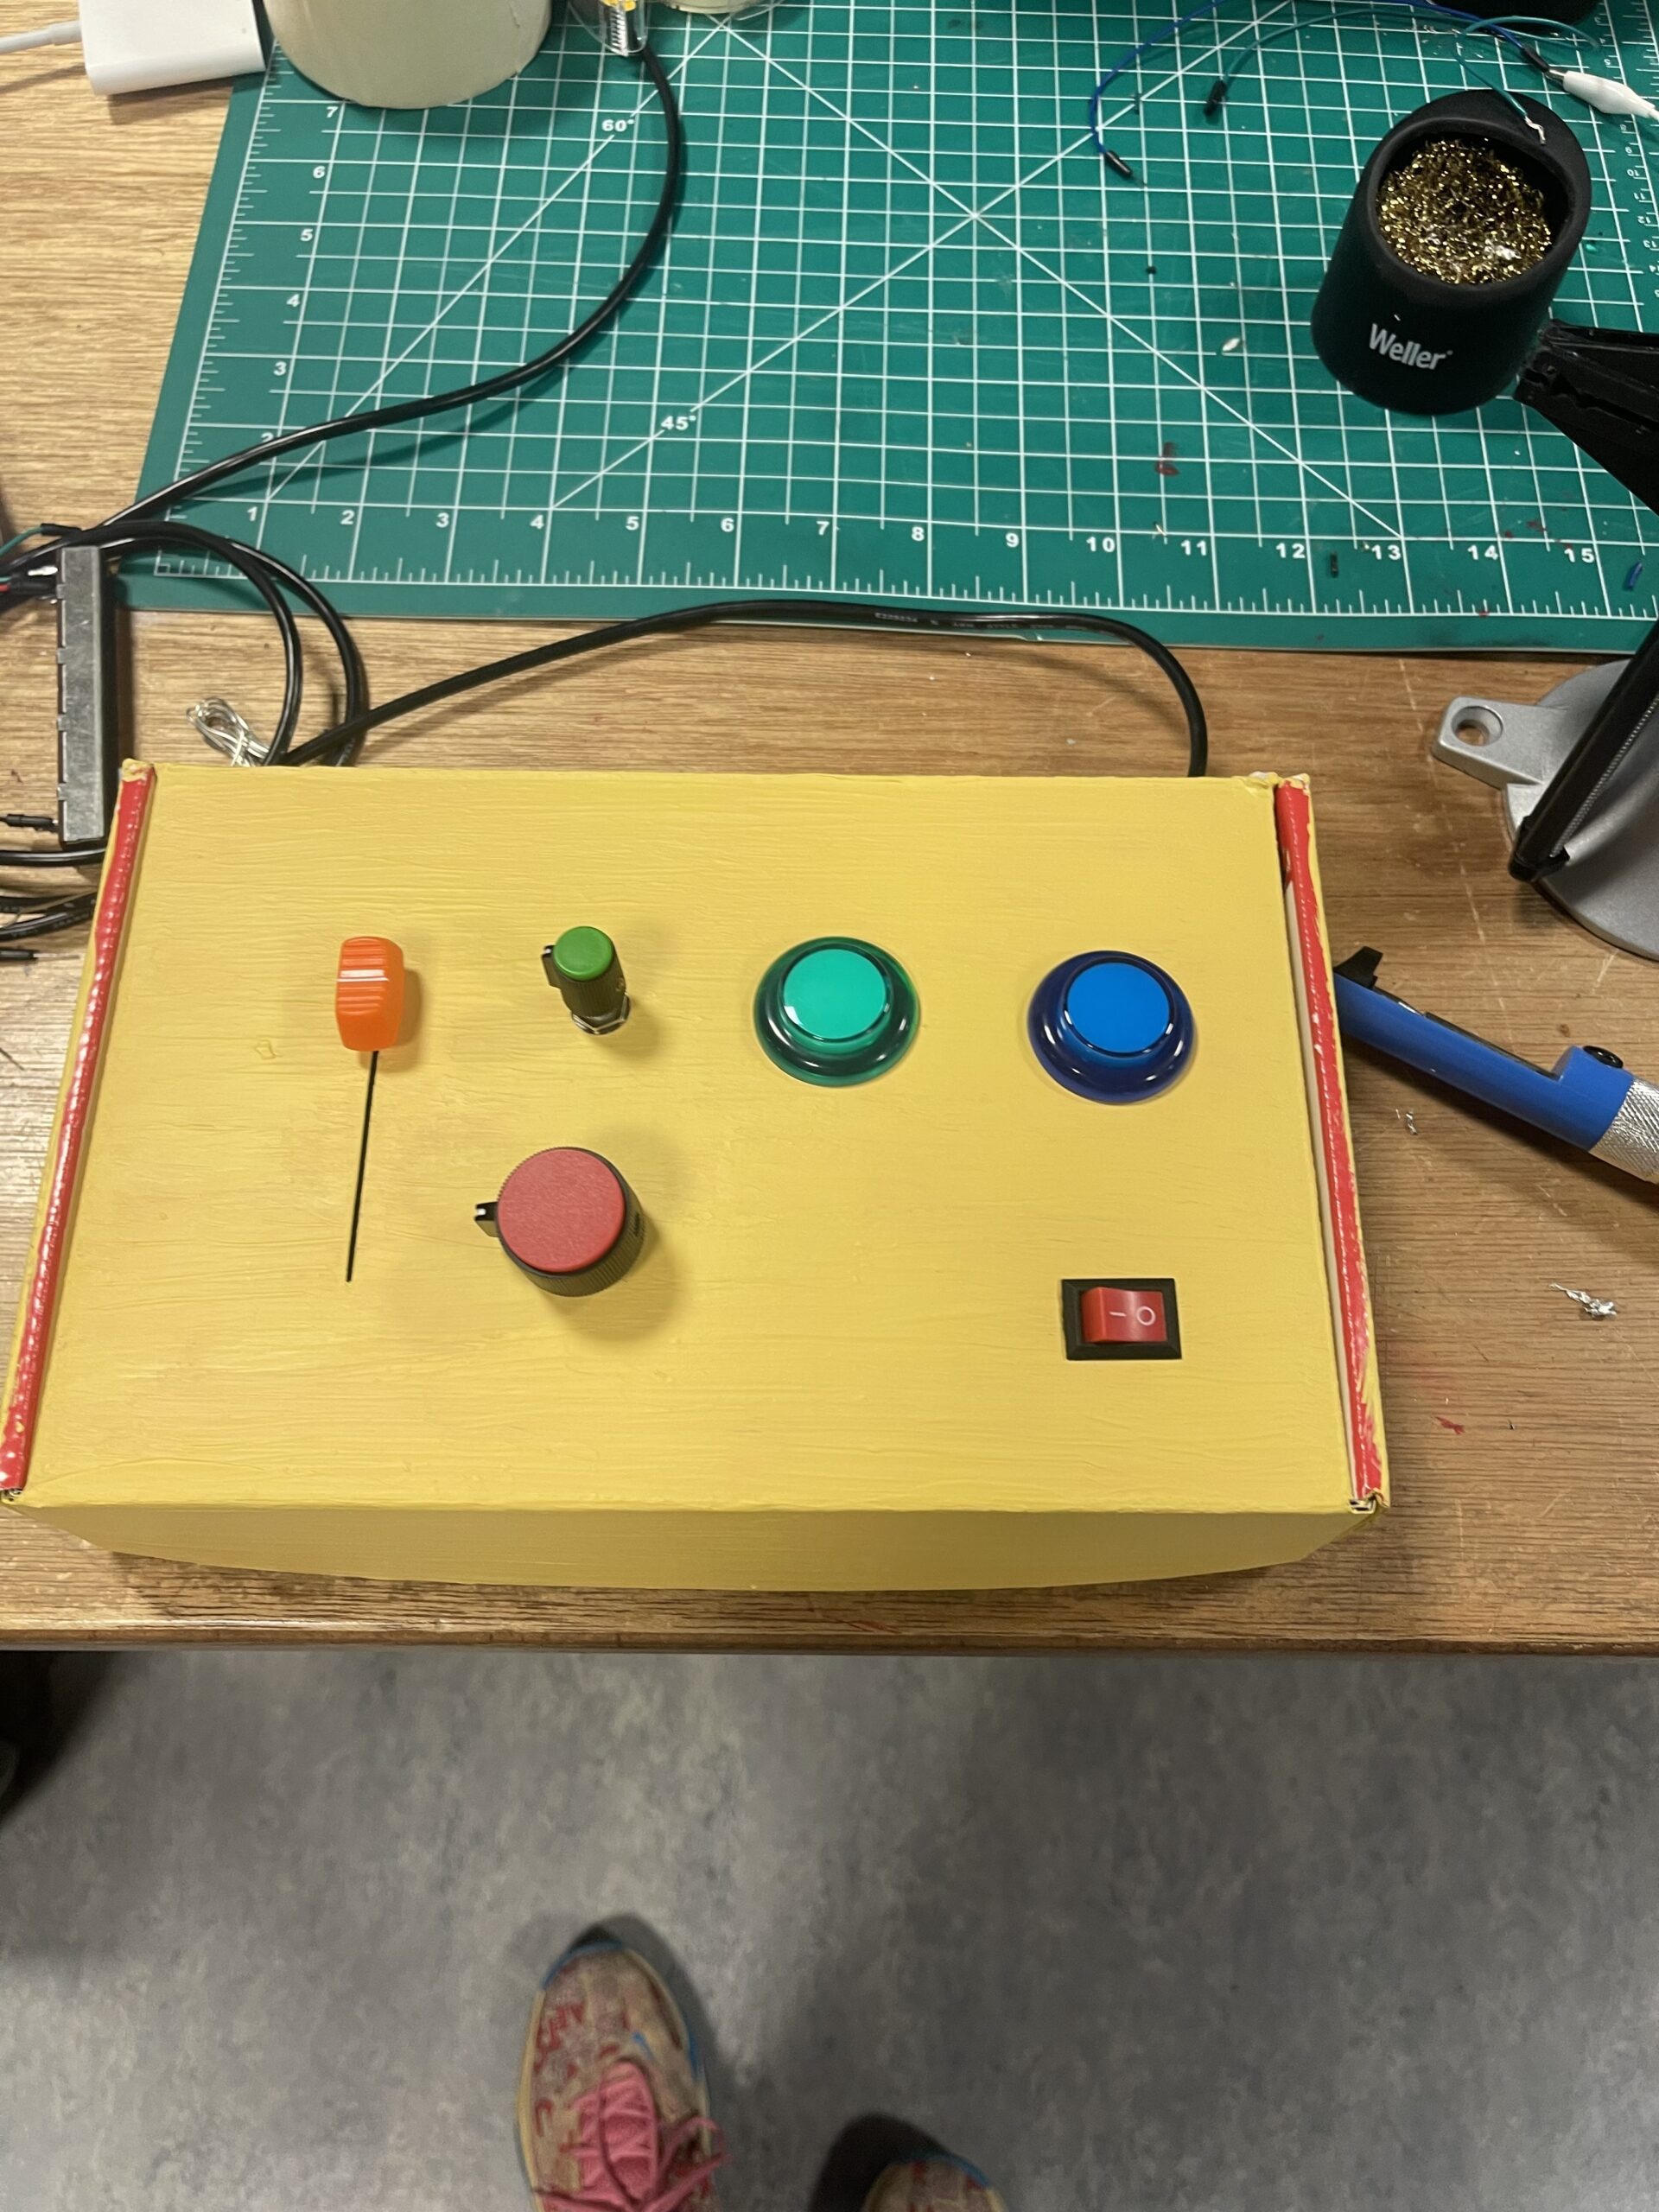
The Arduino controller serves as a physical interface to the digital content, creating a more tangible connection to the stories. The circuit includes:

– A toggle switch for pausing/resuming content
– Two push buttons for transitioning between stories
– Three potentiometers for adjusting various playback parameters

The Arduino code continuously monitors these inputs and sends structured data to the server whenever a change is detected. The Arduino communicates with the server over a serial connection, sending a compact binary structure containing the state of all controls.

Future Improvements

Based on user testing and reflection, several areas could be enhanced in future iterations:

1. Introductory Context: Adding a brief introduction screen would help orient users.
2. More Intuitive Transitions: Some users were initially uncertain about how to navigate between stories.
3. Additional Narratives: Expanding the collection of stories would create a more comprehensive experience.

Week 13: Work on Final Project

User Testing

For my project, I created an interactive media piece that tells the stories of students who faced consequences due to political protests. The user testing aimed to see how intuitive and engaging the experience was without any instructions.

I found that providing a small amount of context greatly improved the user experience. Users could scan a QR code to access additional multimedia content, which helped them engage more deeply. While some users were initially uncertain, a brief introduction to the controls and background information made them feel more comfortable exploring the project.

I also noticed that users who spent more time interacting with the piece took away more meaningful insights. They often stood and engaged with it for several minutes, discovering layers of meaning for them as they went along.

To improve the work in the future, I may decide to add an introduction screen with some helpful guidance, as well as provide a bit more context to what I was attempting to convey.


Week 12: Final Project Proposal

After a lot of deliberation and brainstorming, I am happy to report that I have solidified my final project concept. I will be producing an interactive piece of art that aims to tell the story of international students in the US who are being targeted by the current political situation.

My work will allow anyone to participate by scanning a QR code, which will direct them to my p5.js sketch which shuffles through images–coordinated real-time with text on screen transcribing details. The p5.js sketch will connect to a websocket running on my server, which provides control information for the piece.

Finally, a panel at the front of the installation will include controls, which allow viewers to adjust the playback of the art, including speed and effects. A diagram of the architecture is attached below.


Week 11: Final Brainstorming

For my final, I am considering producing an interactive art piece, that expresses some of the growing frustration I have with some of the politics going on back home in the US.

My project is somewhat inspired by what Kyle Adams did for the Lourve Abu Dhabi in the museum takeover day, where he had participants draw art on paper, scanned it, and visualized it all together with a projector. I would like to make something, similar, but more along the lines of a political dialogue, where viewers can write messages. I am also thinking of having them upload portraits, that will be converted to a consistent cartoon-like style for the demo.

The display will be primarily on a laptop or projector (brought by myself), where users can upload their portraits and scans using their phone to a central site. The display will also be interactive, with a control panel tied to the Arduino, which flips through different topical videos.

Week 11: Serial Communication

Before diving into the first task, we began by loading the sample Arduino and p5.js code from the previous class. We then read through each line to see how Arduino connects and communicates with p5. This served as a helpful foundation to jumpstart our workflow.

Task 1:

After reviewing the code and identifying the necessary components, we proceeded to build the circuit using a sliding potentiometer. Using analogRead from pin A0, we captured the potentiometer’s data and sent it to p5. The values ranged from 0 to 900, so we divided them by 2.25 to map them to the x-position on the canvas, ensuring smooth and accurate movement. A global variable ‘pos’ is updated and mapped into the x position of the ellipse.

Here is the p5.js code:

let pos = 0;
function setup() {
  createCanvas(400, 400);
}

function draw() {
  background(220);
  ellipse(pos,200,100,100);
}

function keyPressed() {
  if (key == " ") {
    setUpSerial(); // setting up connection between arduino and p5.js
  }
}

function readSerial(data) {

  if (data != null) {
    let fromArduino = trim(data) + "\n";
    pos = fromArduino/2.25; // to map 0 to 900 in the right range in p5.js (400 by 00) canvas
    writeSerial(sendToArduino);
  }
}

and the arduino code:

int sensor = A0;

void setup() {
  Serial.begin(9600);
  pinMode(LED_BUILTIN, OUTPUT);
  digitalWrite(led, HIGH);
  delay(200);
  digitalWrite(led, LOW);

  // starting the handshake
  while (Serial.available() <= 0) {
    digitalWrite(LED_BUILTIN, HIGH); // on/blink while waiting for serial data
    Serial.println("0"); // send a starting message
    delay(300);            // wait 1/3 second
    digitalWrite(LED_BUILTIN, LOW);
    delay(50);
  }
}

void loop() {
  digitalWrite(LED_BUILTIN, LOW);
  int sensor = analogRead(A0);
  Serial.println(sensor); // sending sensor information to p5.js
  
}

Here’s the video of it in action:

https://drive.google.com/file/d/1kT32H353kkMX_5HeKBphHf4Cxy-xhMF_/view?usp=sharing


Task 2:

We decided to create an input box where if the user inserted a number between 0-255 and pressed enter, it would then reflect the corresponding brightness onto the blue LED on the breadboard. It was a relatively simple implementation that required very minimal code changes.

Here’s the p5.js code:

let ledval = 0;
let input;

function setup() {
  createCanvas(400, 400);
  input = createInput('');
  input.position(120, 100);
}

function draw() {
  background(220);
}

function keyPressed() {
  if (key == " ") {
    setUpSerial(); // setting up connection
  }
}

  if (data != null) {
    let fromArduino = trim(data);
    let sendToArduino = input.value() + "\n";  
    writeSerial(sendToArduino);
  }
}

and the arduino code:

int led = 3;

void setup() {
  Serial.begin(9600);
  pinMode(LED_BUILTIN, OUTPUT);
  pinMode(led, OUTPUT);

  // Blink them so we can check the wiring
  digitalWrite(led, HIGH);
  delay(200);
  digitalWrite(led, LOW);

  // start the handshake
  while (Serial.available() <= 0) {
    digitalWrite(LED_BUILTIN, HIGH); // on/blink while waiting for serial data
    Serial.println("0,0"); // send a starting message
    delay(300);            // wait 1/3 second
    digitalWrite(LED_BUILTIN, LOW);
    delay(50);
  }
}

void loop() {
  // wait for data from p5 before doing something
  while (Serial.available()) {
    digitalWrite(LED_BUILTIN, HIGH); // led on while receiving data

    int ledVal = Serial.parseInt();
    if (Serial.read() == '\n') {
      analogWrite(led, ledVal);
      delay(5);
    }
  }
  digitalWrite(LED_BUILTIN, LOW);
  
}

and finally, the video of it in action:

https://drive.google.com/file/d/1eMi1d_3H6abYxtYwyEpybCnZB7-fTVXF/view?usp=sharing

Task 3:

For the last task, we needed to first open up and examine the given gravity wind code. We identified two key things we could alter that would complete the given task at hand: the “wind.x” variable and the “(position.y > height-mass/2)” IF statement. We could map the analog value we read in from pin A0 to the wind.x position to alter the ball’s position on the x axis and since the aforementioned IF statement indicates when the ball has touched the ground, we could simply sneak in a line that sets a boolean flag to true and sending this to arduino and performing a digitalWrite (replacing the previous analogWrite from the input()).

Here’s how we did it in p5.js:

let velocity;
let gravity;
let position;
let acceleration;
let wind;
let drag = 0.99;
let mass = 50;
let floor = false;

function setup() {
  createCanvas(640, 360);
  noFill();
  position = createVector(width/2, 0);
  velocity = createVector(0,0);
  acceleration = createVector(0,0);
  gravity = createVector(0, 0.5*mass);
  wind = createVector(0,0);
}

function draw() {
  background(255);
  applyForce(wind);
  applyForce(gravity);
  velocity.add(acceleration);
  velocity.mult(drag);
  position.add(velocity);
  acceleration.mult(0);
  ellipse(position.x,position.y,mass,mass);
  if (position.y > height-mass/2) {
      velocity.y *= -0.9;  // A little dampening when hitting the bottom
      position.y = height-mass/2;
      floor = true; // light up the LED!
    }
  
}

function applyForce(force){
  // Newton's 2nd law: F = M * A
  // or A = F / M
  let f = p5.Vector.div(force, mass);
  acceleration.add(f);
}

function keyPressed(){
  if (key == " ") {
    setUpSerial(); // setting up serial connection
  }
  
  if (keyCode==LEFT_ARROW){
    wind.x=-1;
  }
  if (keyCode==RIGHT_ARROW){
    wind.x=1;
  }
  if (key=='s'){ // changed from space to 's' since SPACEBAR is used to initiate serial connection pairing to arduino
    mass=random(15,80);
    position.y=-mass;
    velocity.mult(0);
  }
}

function readSerial(data) {
  if (data != null) {
    let fromArduino = trim(data);
    wind.x = map(fromArduino, 0, 912, -2, 2); // mapping sensor's analog value to ball's wind x axis value

    let sendToArduino = Number(floor) + "\n";
    
    writeSerial(sendToArduino);
    floor = false; // turning off blue LED
  }
}

*We used the Number() function to convert the boolean flag value to an integer value since initially we were encountering issues where it was not actually being send as a numeric value to turn on the LED in digitalWrite.

and the arduino code:

int sensor = A0;
int led = 3;

void setup() {
  Serial.begin(9600);
  pinMode(LED_BUILTIN, OUTPUT);
  pinMode(led, OUTPUT);

  // Blink them so we can check the wiring
  digitalWrite(led, HIGH);
  delay(200);
  digitalWrite(led, LOW);

  // start the handshake
  while (Serial.available() <= 0) {
    digitalWrite(LED_BUILTIN, HIGH); // on/blink while waiting for serial data
    Serial.println("0,0"); // send a starting message
    delay(300);            // wait 1/3 second
    digitalWrite(LED_BUILTIN, LOW);
    delay(50);
  }
}

void loop() {
  // wait for data from p5 before doing something
  while (Serial.available()) {
    digitalWrite(LED_BUILTIN, HIGH); // led on while receiving data

    int ledVal = Serial.parseInt();
    if (Serial.read() == '\n') {
      digitalWrite(led, ledVal);
      delay(5);
    }
  }
  digitalWrite(LED_BUILTIN, LOW);
  int sensor = analogRead(A0);
  Serial.println(sensor);
  
}

Finally, here’s the video of the final product (we have two to demonstrate both the analog and digital capacity):
1. https://drive.google.com/file/d/1TcwYwz7HcyUobzH0MwLQ3P1pbf2rw8BR/view?usp=sharing

2. https://drive.google.com/file/d/1Ydz9OjHuqt8VPypLTQhBYDtB-ShDBGmk/view?usp=sharing

VOILÁ!

Week 11: Reading Response

I really appreciated this reading, and the way that the author juxtaposes design with disability, and also underscores problems that are faced by those with disabilities due to, at times, arbitrary design constraints. For instance, the conversation about hearing was a bit shocking–especially how hearing aids could be significantly better for the people wearing them–if they could just be a bit larger.

This phenomena underscored a couple of problems to me… One of the first was that as a society, we potentially have stigmatized the need for hearing aids, and as such, smaller hearing aids are better. They should be subtle and not noticeable at all costs–including their primary purpose. At that point, hearing aids are prioritizing preferences of the broader society over the needs of the person who is hard of hearing.

As the article later explores how to “keep the design in design for disability,” I think that it’s crucial these engineering teams be comprised of diverse groups of people, who can provide additional perspectives and ensure that products are usable by a broader range of people. Moreover, I appreciate how it emphasizes that tools designed for those with disabilities are in no way less in need of design as products for those without disabilities.

Week 10: Instrument

Concept

Our musical instrument is based off a combination of a both a mechanical and digital noise machine–controlled with a surprisingly satisfying potentiometer that allows us to modify the beats per minute (BPM), and a button that changes the octave of our instrument. We had fun with the relationship between the buzzer and our mechanical servo which produces the other noise, where the two are inversely proportional! In other words,  as the BPM of the buzzer increases, the servo slows down! And vice versa.

Figuring out the right code combination was a bit tricky at first, as we first made the mistake of nesting both the servo trigger and the buzzer tone in the same beat conditional. This meant that we fundamentally could not separate the motor from the buzzer tones. To resolve this, we ended up using two triggers–a buzzer and a motor trigger–which both run independently.

The code below shows how we ended up resolving this problem. Once we implemented this fix, we were able to celebrate with our somewhat perplexing instrument, that requires the user to complement the buzzers various beeping with the servos mechanical changes.

// --- 3. Perform Actions based on Timers ---

// --- Action Group 1: Metronome Click (Buzzer) ---
if (currentMillis - previousBeatMillis >= beatInterval) {
  previousBeatMillis = currentMillis; // Store the time of this beat

  // Play the click sound
  tone(BUZZER_PIN, currentFreq, CLICK_DUR);

  // Print beat info
  Serial.print("Beat! BPM: ");
  Serial.print(currentBPM);
  Serial.print(" | Freq: ");
  Serial.print(currentFreq);
  Serial.print(" | Beat Interval: ");
  Serial.print(beatInterval);
  Serial.println("ms");
}

// --- Action Group 2: Servo Movement Trigger ---
if (currentMillis - previousServoMillis >= servoInterval) {
  previousServoMillis = currentMillis; // Store the time of this servo trigger

  // Determine Target Angle
  int targetAngle;
  if (servoMovingToEnd) {
    targetAngle = SERVO_POS_END;
  } else {
    targetAngle = SERVO_POS_START;
  }

  // Tell the servo to move (NON-BLOCKING)
  myServo.write(targetAngle);

  // Print servo info
  Serial.print("Servo Trigger! Target: ");
  Serial.print(targetAngle);
  Serial.print("deg | Servo Interval: ");
  Serial.print(servoInterval);
  Serial.println("ms");

  // Update state for the next servo trigger
  servoMovingToEnd = !servoMovingToEnd; // Flip the direction for next time
}


Week 10: Reading Response

I found the author’s in both articles quite intriguing–agreeing almost immediately as he went into his argument. There is undoubtably something about the way we interact with physical objects in the real world that is missing from our digital interfaces.

A great example of this for me is my handy-dandy pen and paper notebook. It’s a small notebook, perhaps 5 inches in diagonal length, which I have not been able to divorce myself from since I started using it over two years ago. For me, there’s something unique and unparalleled about writing things with a physical pen that’s–well–enjoyable! An when I take notes on a computer in a Google doc, or a text file, something just feels off to me! I often opt to take physical notes, then suffer the laborious task of transferring them to the digital world–all so I can retain my physical experience.

My note-taking tendencies made me immediately connect with the author’s argument. The interfaces we are currently considering for the future do seem quite dull, and underwhelming even! I want interfaces that I genuinely enjoy using, that provide sensory responses in my hands, and feel as ergonomic as the physical objects we interact with every day.

Week 9: Analog Inputs and Outputs

Concept

My piece this week was inspired by the recent Eid break we enjoyed. During the break, a couple of friends and I made the 5.5 hour road trip to Muscat, Oman, where we enjoyed a relaxing stay over a couple of nights. On the road trip itself, I took turns driving with a friend, who was a bit newer to driving than I was.

Navigating in the passenger seat really revealed the complexity of driving that had become a form of second-nature to me, after driving to high school almost every day since I turned 16 back in the US. Certain movements were inherently complex requiring a combination of precise motor muscle movements to be coordinated at the same time. For instance, turning in a roundabout is a hodgepodge of visual queues from oncoming traffic, a crescendoing breaking, mirror checks, precise wheel adjustments, and juggling the break and gas pedals with your feet. Once you’ve driven for a while, you begin to take for granted the muscle-memory you built up over years of experience.

This piece of art is a small encapsulation of some of those mechanisms–while reversing some of the expectations you may traditionally think of for automobiles. For instance, rather than turning a steering wheel, you turn the wheel wheel, powering on gas light. The potentiometer adjusts your servo motor (along with a blue light), which mimics the car’s wheel turns. Lastly, in case of emergency, you can always press the red button to sound the alarms and hopefully bail yourself out of trouble–honking the buzzer horn.

Week 9: Reading Response

Making Interactive Art: Set the Stage, Then Shut Up and Listen

I definitely agreed with most of what Tigoe had to say in his article. I think the idea that your art is a collaboration, and that it is often more powerful when you allow those who are observing your art to be the ones to interpret it–without your outside influence. In the case of Interactive Media (IM), it seems even more important that the art you design is intuitive from the get-go, in order to promote this natural discovery process from being inhibited by any obtuse design decisions.

The one place that I may disagree with Tigoe is in the last part of the article, where he says:

So if you’re thinking of an interactive artwork, don’t think of it like a finished painting or sculpture. Your audience completes the work through what they do when they see what you’ve made.

In my opinion, even “complete,” pieces of artwork, such as paintings or sculptures, are interpreted subjectively by the viewer–and that’s part of the process too. These interpretations are influenced by life experiences and emotions–love, grief, and joy–to name a few. That’s not something inherit to only IM or Film, but rather part of what makes art, well, art. In my opinion, art should always be first interpreted by the person viewing it, before hearing the inspiration behind it.

Physical Computing’s Greatest Hits (and misses)

As someone who is positively obsessed with music (my 2024 Spotify wrapped came in at 121,839 minutes or ~84 continuous days of listening), the projects that stood out to me the most are the music ones (e.g., floor pads and gloves). The idea of creating an instrument for your user to play builds on the idea of the prior article, where IM is about a collaboration between the person engaging with the art, and the artist. In that way, the viewer becomes an artist themselves–actively contributing their own preferences and talents into the piece. I find these types of work the most interesting, because of the empowering nature they promote.