Final Project Blog Post

Will be using this blog post to gradually write the blog post instead of all at once:

PROGRESS:

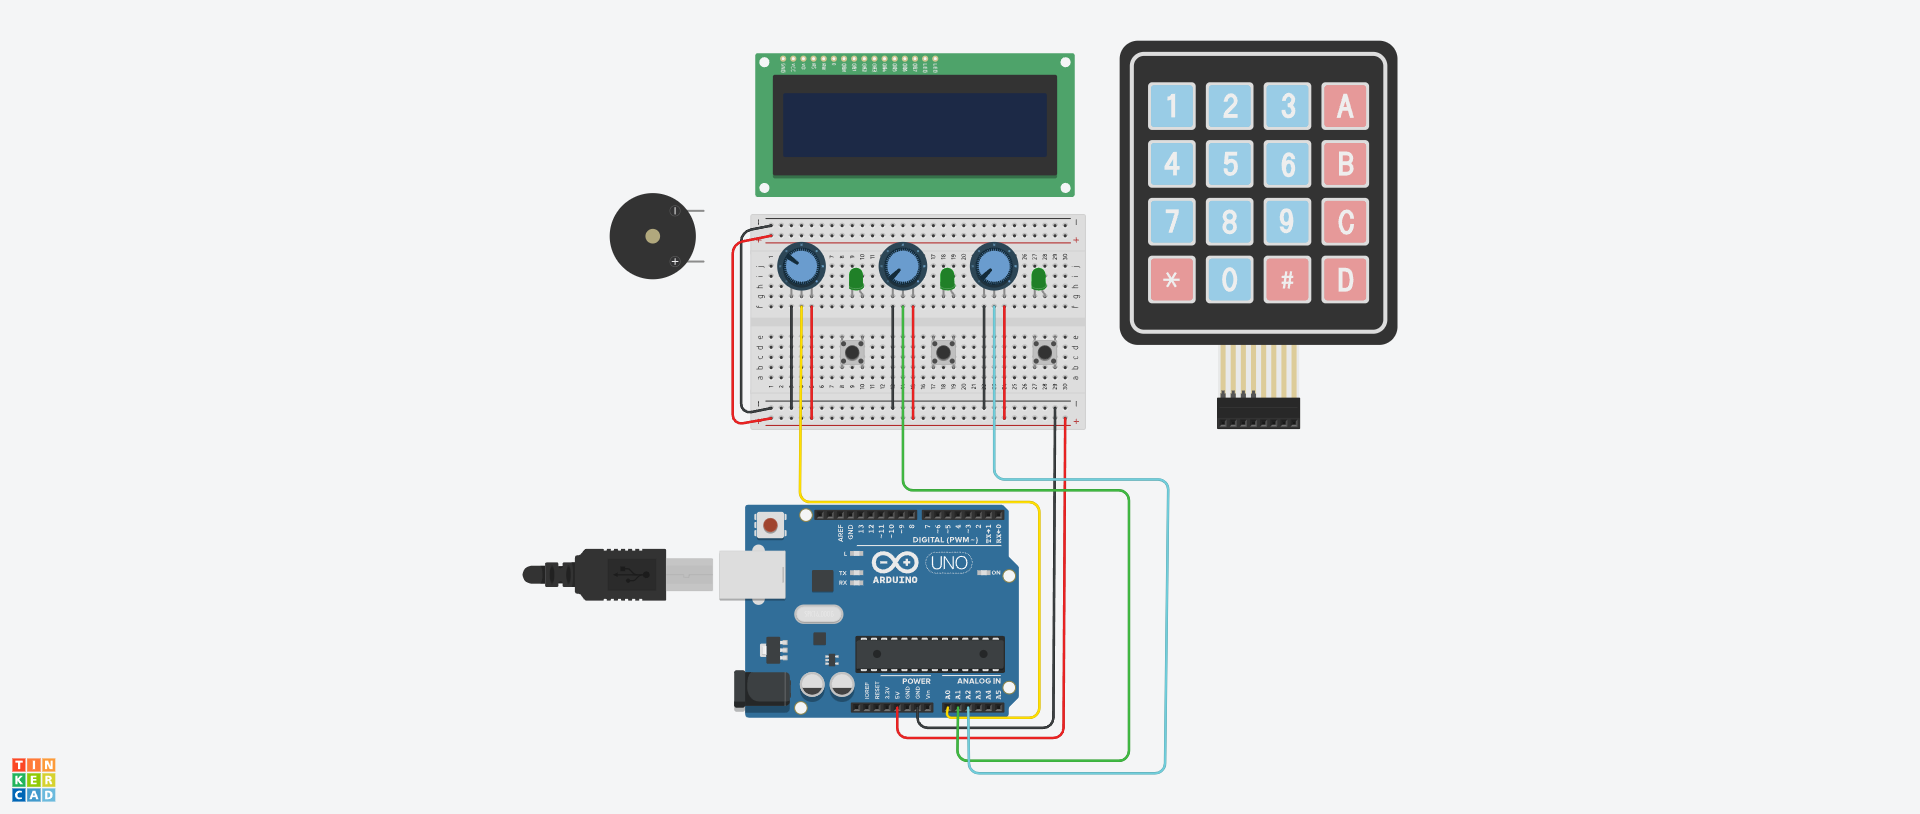
  1. Arduino wiring: DONE
  2. Arduino code: DONE
  3. UI
  4. p5 code communication

30/04/26

I tried connecting my accelerometer to my breadboard without soldering. I placed my headers into the breadboard, placed the accelerometer on top, and connected the female end of a jumper wire on top. I downloaded the relevant libraries and wrote the code from this page. Unfortunately, the Arduino showed no connection whatsoever (the code I had was designed to write in the serial “No ADXL345 sensor detected.” And indeed that was what my serial displayed for me. Now, I will be moving on to a different connectivity, building on the unusual switch and musical instrument assignments we made. This idea will still follow the same concept of composing music in an opera; if you compose incorrectly, a buzzer will sound, and the ballet dancers will fall. Instead of using an accelerometer to measure the x-y positions of the user’s hand, I will attach foils and wires to each finger on a glove. The connection between all the wire combinations will control a relevant aspect of the music, such as pitch, speed, note, and beats. This wiring idea was also heavily inspired by the emerging usage of TouchDesigner.

01/05/26

I decided to go on with my glove idea. I originally wanted to involve all 5 fingers, but then I realized that would complicate things. I stuck to using three. One would be in charge of playing the song, the second is in charge of speeding it up, the third is in charge of slowing it down. I tested out my wiring by also connecting an LED to the breadboard to ensure correct wiring, and it worked. I didn’t connect my buzzer today. And honestly, I don’t think I will until the very end because I got a new buzzer and the legs look extremely delicate and if I’m being honest I’m not the most patient or gentle with any electronic device so I don’t want to risk breaking yet another buzzer from the get go.


STIPEND USAGE:

  1. Accelerometer: 40 AED: https://www.amazon.ae/AOICRIE-GY-291-ADXL345-Acceleration-Transmission/dp/B09S633YTW/ref=sr_1_1?crid=15F0J7UIXQK35&dib=eyJ2IjoiMSJ9.gDQl-_42Yd4esBPagpxPgPQ1K0jRtEl1-iW409PI-IfKNZ2RDA0hRICe1Ca5CQO83N_NFecaKnxd0M0wb-MUX1e1_oV4-HaxCe8KarHRjisgkRf5YXzLzubvBosNxFh3jF1fxCOIuON14P6KvVqARPChru9DCNpV5LlMncvQg8Ro-_7YjQ8SDpSgTryUpC0bzRT_iYJgE7TdhPJPFwpEfobjkqCHFv6UofjnQWaQvz2MidmSXbQrPRS50HEMsv52y0cumuy0z_MNJD41on7dsMC64UjQqNZ6qDc8AXm-5ME.Jzj2a_U_k_AoU6BZxRHVxhwAFpV0Zcu0PJnDUZjpUM0&dib_tag=se&keywords=GY-291+3-Axis+Accelerometer+ADXL345&qid=1777274584&sprefix=gy-2913-axis+accelerometer+adxl345%2Caps%2C261&sr=8-1
  2. Jumper wires: 18 AED: https://amzn.eu/d/03P5tjOx

AI USAGE:

I used AI for this project thus far to discuss my ideas and discuss any problems which I may face while building the project.

Week 12.2 — Final Progress Update Megan

Music Producer Progress

For this stage of the project, I actually went from just having an idea to having something that works, and that honestly changed how I see everything. Before, it all sounded pretty simple in my head, but once I started actually connecting p5.js with Arduino and dealing with real inputs, I realized how much the interaction itself matters. It’s not just about making things work, it’s about how they feel when you use them.

Right now, the core system is already working. I can record audio directly in p5, save multiple recordings, select one and have it loop, and then change its pitch in real time using the potentiometer. The Arduino buttons are also working, and depending on the mode (piano or drums for now), they trigger different sounds. On top of that, the audio is being visualized as a waveform that reacts live, which already makes everything feel more alive. It’s still pretty raw visually, but it already feels like a mini music tool. I’ll include a video demo showing how it works so far, and also the schematic of the Arduino setup.

The hardest part by far was getting p5.js and Arduino to actually connect. At first, nothing worked. The port wouldn’t open, the sketch wouldn’t connect, and I kept getting errors even though the Arduino code itself was fine. I tried different approaches, switching between p5.serialport and web serial, closing and reopening ports, checking permissions, restarting my computer, and even simplifying everything just to test if anything would connect. It took a while, but once it finally worked, everything else became way easier. That was definitely the moment where the project clicked for me.

Another thing that was tricky was making the buttons have different meanings depending on the mode. It sounds simple, but structuring it cleanly took some thought. I ended up designing it so Arduino only sends raw data, and all the logic happens in p5. That separation made the system way more flexible and easier to expand.

One thing I’m actually really proud of is how the mode system works. Instead of having a lot of controls, I have one set of buttons that changes function depending on whether you’re in piano, drums, or later bass mode. It keeps everything simple but still powerful. I also really like the recording system. Each recording gets saved in an array, and you can select it, loop it, deselect it, and change its pitch whenever you want. The fact that the pitch isn’t fixed and is controlled live by the potentiometer makes it feel much more interactive. The waveform visualization using FFT is also something I like, because even though it’s simple, it already makes the connection between sound and visuals feel real.

There’s still a lot to improve though. I still need to add the bass sounds, design the interface better, and make everything feel more intentional visually. Right now it works, but it doesn’t fully feel like a finished experience. I also want to add a clearer instruction/tutorial section, fix some timing issues with the sounds (some feel slightly delayed), and clean up the audio files, especially for piano and drums. Another big thing is allowing instrument sounds to also be recorded and looped, not just the voice. And visually, I want each element (voice, beats, piano, bass) to look different and more meaningful.

Now that the technical foundation is working, I feel way more confident moving forward. Before, I was mostly worried about whether I could even connect everything and make it function. Now that I’ve solved that, I can actually focus on making it feel good to use. My next steps are refining the interaction, improving the visuals so they’re less generic, making the controls more intuitive, and adding more layering so the final compositions feel richer.

SCHEMATIC LINK

VIDEO OF HOW IT’S WORKING

Week 12 – Design meets Disability

A richer balance between problem solving and more playful explorarion could open up valuable new directions

I really liked this reading and it really brought me a lot of interesting idea about the design of things.

First of all, when the author writes about disability and design for it, I think that the trend in this sphere that he describes is really traceble right now. He talks about glasses that made the “disability” treatment a universal accessory. Nowadays a lot of people wear glasses with no lenses or with no vision correction, and glasses are seen as a part of style. When I told my family I want some nice-looking glasses (that I wear for vision correction), my parents told me that in their childhood you would get laughed at and mocked for wearing them. And now this is a trend. I have to say that not a long while passed since their teenage, so this is really interesting how the perspective changes over the years. Additional, maybe more subtle “disability” to an extent, is teethwear. People use different things to cure their teeth/jaw, and also, I know that in my parents’ childhood it also was something people would laught at you for. Now people wear grillz, tooth gems, fashion fake braces, and this again shows how something evolved from disability to fashion.

I believe that bringing fashion and style in things like that is really important. It allows people with disabilities like that not to stand out in a bad way, it allows them to not be scared and insecure of their peculiarities. Protheses that are shaped in some beautiful forms or that are looking cool are all around now: I saw so much very cool looking leg and arm protheses on social media. However, this is also important to not cross the line: some things should kind of distinguish people with real disabilities from people who wants to be fashioable in a way just for safety reasons. It is important to know who needs some help or accomodations, and who is totally alright.


As for design simplicity, I also agree a lot with the author. I feel like most designs of technology are pretty simple but not always very accessible, especially for people with some special needs. Beside Apple, I think a lot of tech companies and developers adopt this philosophy. PS4 and PS5 are really simply designed: sleek silouhette with minimal distractions. But, such minimalism can cause a lot of confusion, where’s the buttons, how to insert the disk, how to turn it on, and how to connect the controller. It is not intuitive to someone who sees it for the first time. But the design is very simple, though I wouldn’t say it’s super accessible or universal.

On the other hand, there are devices that are not very simple but very accessible. Headphones like ones from JBL which has some icons on every button on the right side earphone: super intuitive and useful. And even like that, it is probably not the most accessible piece for left-handed people.

I think a lot of thought is needed to make the design simple, intutitve, and accessible at the same time. Even if it turns out out not to be “all things to all people”, if it “some things for some people” it is successful already. However, I think it is also worth mentioning that simplicity is not always the best choice. I think that sometimes more burdened and robust, complex designs can be both accessible and exteremely good. In the world where everything simplifies and is minimalistic it’s really important to not forget that something more pompous can be simple and accessible too.

Final Project Proposal: Unlocking the Combination (Working Title)

Concept:

Something I adore doing for fun is solving escape rooms with friends. While my escape/loss ratio is good enough😉, I was inspired a lot by the locks I see in escape rooms. My favorite part of the escape rooms is when you solve the puzzles and go to the next room by unlocking the lock. Usually you find a string of numbers from a different puzzle and then twist the lock to unlock it. But I wanted to flip the concept, and try by twisting the dials, to find the combination and enter it in to “escape”. So that’s how my idea came about pretty much haha.

Implementation:


The project will be completely done in Tinkercad and will utilize a few old things that we’ve seen on class but also a few new things I wanted to try out.

The way how the game would work is, each Potentiometer will act as a lock you can twist around (from this point, I’ll refer to the Potentiometers as ‘locks’).

Each lock will have a value you have to get. Now on the LCD Display I’ll have the current value that the user is twisting displayed. Then once the user twists to the right value, the Piezo will make a beep. But for the value to be correct and locked in, the user needs to twist it, listen to the sound and press the button. If the value is correct, then the LED will light up and that same value will be displayed on the screen.

From what I’ve researched, the Potentiometer can have values from 0 to 1023. But on Tinkercad, there’s an array of values that can be inputted only with mouse input.

Those values are: 0, 20, 41, 61, 82, 102, 123, 143, 164, 184, 205, 225 and so on…

Each lock will have a different value from this array of integers. When the correct value is guessed (by virtue of the LED lighting up), it will be displayed on screen. Most likely I’d do something like:

Lock 1: *the value of Lock 1*, Lock 2: *the value of Lock 2* and Lock 3: *the value of Lock 3*

After all three values have been guessed, then the user will input them on the keypad. When all three values have been entered, then a victory sound will be played by the Piezo.

Challenging parts to the Project:

I would say the most challenging part of the project is definitely understanding how to use the LCD screen and also the Keypad. I’ve not tested or played with them before but I can mitigate this by looking up the reference sheet for each Arduino part. Alongside this, I can use videos that explain these parts so I can understand how they work, but mostly so I can see how to code for them is written.

I think overall this will be a fun project to go with and experiment with these new parts in Tinkercad. Hopefully something interesting as like a minigame can come off from it.

Week 12 Reading Response

Living in an age where everyone strives for superficial perfection (generally). With social media influencers, plastic surgery (which, don’t get me wrong, has its advantages, though when one transgresses and obsesses with plastic surgery to an unhealthy degree, it becomes a concern), and many medical procedures, striving for minimizing the appearance of a disability to conceal it.

It was a breath of fresh air to see a reading that is also bringing up elements of design for objects or utilities associated with disabilities. I remember when I myself was very young, and we would decorate and adorn the casts or bandages of classmates who had injured themselves, and was taken back to that era via this reading.

Particularly, the reading is highlighting a change from a “medical” to a “social model”, when it pertains to the design and one’s approach to disability. Two main points that the reading explores is how disabilities and design can be shaped by different perspectives in a increasingly complex world like our own, as well as how design can do more than just fix a patient, it can give them the confidence to be open about a particular disability, instead of concealing it.

Week 12 – Final project proposal

For my final project, I propose building Flash Match, an phyiscal Arduino-based reflex and memory game that combines elements of Simon Says with a reaction time challenge. The game uses four coloured LEDs (red, yellow, green and blue) and four corresponding push buttons as the core interface. Each round begins with a countdown, after which the Arduino displays a sequence of flashing LEDs that grows by one light every round. The player must press the matching button for each LED in the correct order and as quickly as possible. The reaction speed directly determines the points awarded per press, with faster responses earning higher scores. A wrong button press ends the game immediately, at which point the player’s total score is shown on a LCD display . Additional components include a buzzer for audio feedback.

The most challenging part about the game is figuring out how to use the LCD display in ardruino and making sure the game feedback is quick enough to give the user a good experience.

Week 12: Final Project Proposal

Concept

My concept is a top-down arcade driving game  where you play as a jeepney driver navigating a chaotic Manila street, racing to hit your daily peso quota before fuel runs out. The controller is a hand-built cardboard jeepney with three embedded sensors. 

What the programs do

Arduino continuously reads all three sensors and sends them as a single serial string to P5 every loop — ultrasonic distance (hand hover over headlights = brake), sound level (shout into exhaust = honk), and two buttons (pick up / drop off). It also listens for signals back from P5 to trigger the speaker for horn and engine sounds.

P5 receives the serial data each frame and runs the entire game — scrolling road, traffic spawning, passenger logic, collision detection, fare multiplier, fuel gauge, and HUD. All game logic lives in P5. Arduino is purely the input/output layer.

ROUGH SKETCH/IDEA

Challenging part and progress so far

Because the sound sensor isn’t something we’ve discussed in class, I wanted to play around and tested it. I also wanted to test having two buttons do different things so I did two buttons that are different colors open their respective LEDs. So far, I’ve tested the sound sensor (triggers LED on loud input). Tested both buttons (each lights a separate LED). All three confirmed working individually.

SOUND TEST | BUTTONS TEST

Digital Candle – Project Proposal

For my final project, I want to create a digital candle that responds to natural interaction. The idea is that the candle appears on screen, flickers like a real flame, and the user can blow toward a microphone sensor to turn it off. After a few seconds, the flame slowly comes back. I chose this idea because it is familiar and calming, and it uses a very natural gesture that people already understand.

Technically, I will use a microphone sensor connected to Arduino to detect blowing. The Arduino will send this data to p5.js, where the visuals are created. The flame will be drawn using simple shapes and animation, with small changes in size and movement to simulate flickering. When the system detects a strong breath, the flame will fade out smoothly. I may also add a soft ambient sound to make the experience feel more immersive.


Final Project

Mockups:

*Generated with CanvaAI for mockup and reference purposes only, unless otherwise stated.

Concept: As a final project, I have decided to make an infinite 2D driving game set in a desert. The player drives along an infinite stretch of highway, with tasks and layovers appearing intermittently. These objectives include passive tasks like birdwatching and buying cacti from shops on the highway, and eating at restaurants, to more complex tasks like taking up small gigs at each stop, such as cleaning dishes, cooking, and replacing car tires.

Players also have the option to customize the model, make, and color of their cars. The highway is divided into 2 lanes, with forward heading traffic in both. The player may occasionally find a slower car in front of them, and can switch lanes to overtake.

Design & Description: The style of the game is simple, with pixel art-style, simple movement and task-completion mechanics. The game’s graphics and core processing will take place on P5js, while an Arduino setup will feature a makeshift steering wheel and buttons for the controls.

Aspect Ratio: 16:9

Potentially Challenging Part: I anticipate that the most challenging part of this build would be the Arduino components, setting them up and connecting them correctly, and allowing for serial communication to occur properly between my laptop (which is not particularly known for its compatibility) and the Arduino Uno board.

Week 12 – Reading response

This reading relates to a class I am currently taking called disability in musical contexts where we talk about disabilities studies and this “medical model” where disabilities are treated as problems to be solved negatively affect individuals. They will most likely try to hide their disabilities. They will prefer a design of accommodation that speaks about their disabilites the least. But in this text, we realise that a good design can acutally make someone confident about that  impairment they have and I makes me wonder how a good design for something meant to disabled people can seep into mainstream media.

Take for instance the Apple AirPods. Apple has focused so much on their design and the product that they can be used as hearing aids for people with mild or little hearing loss, and in this case, you cannot distinguish who is using the airpods as support or just for entertainment. This is an example of good design that can boost the confidence of a person with hearing loss and it combines functionality and style.