Final Project Documentation

Final Project Documentation

Concept:

“Olive Tree Stories” is an interactive storytelling project inspired by the deep cultural roots of olive tree’s in Palestinian heritage. I wanted my project to be meaningful and leave a strong impact on the user, so i drew inspiration from my own culture. The installation uses a plastic olive tree with three symbolic leaves. Each leaf has a hidden touch sensor made of aluminum foil and sponge, which activates when pressed gently on a red mark. When the leaf is pressed, the corresponding olive lights up on the tree, and a short audio (poem or song) starts playing, followed by a visual enlargement of a related image on screen. I was looking for the overall experience to evoke the act of picking an olive and hearing a story passed down through generations. My main goal for this project is to preserve memory and heritage through touch, sound, and visuals.

Interaction Design:
– The user interacts with the leaves of an olive tree.
– Each leaf has a red marking –> made using two layers of aluminum separated by sponge.
– When red marking is pressed:
– A green olive lights up on the tree (via LED).
– One of two audio stories tied to that olive is randomly selected and begins playing.
– A corresponding visual (image) on screen zooms in smoothly.
– After the story ends:
– The screen returns to its main menu.
– The olive light turns off.

I wanted this natural interaction design to draw people in gently, as they literally touch a memory through the leaves of the olive tree.

Link to process photos + Link to extra designs made
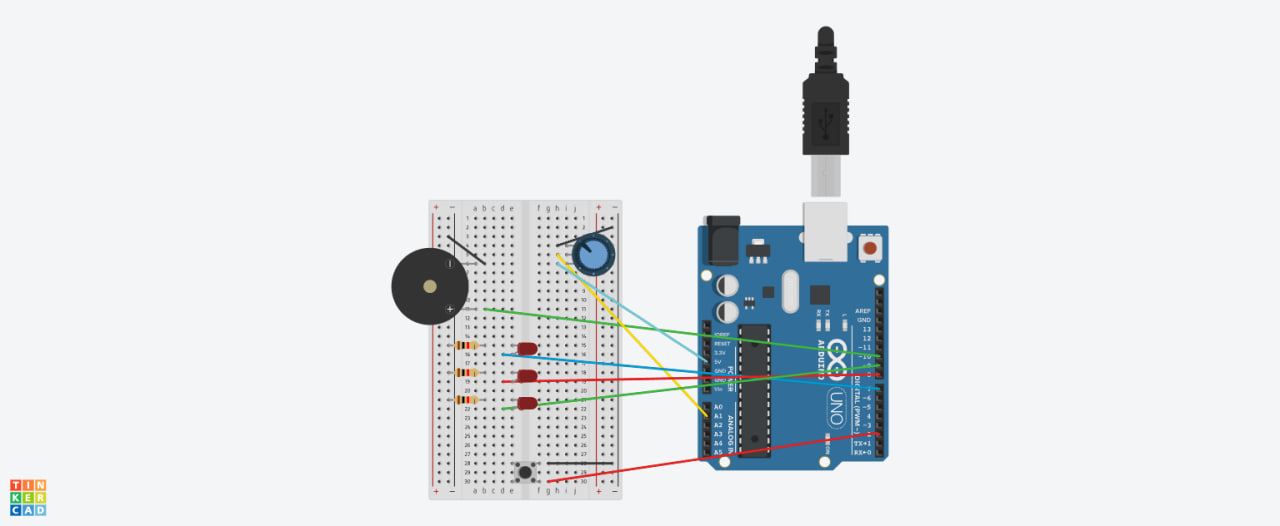
Arduino Code:

The Arduino reads input from 3 capacitive touch pins and lights up corresponding LEDs. It also sends a serial message (“1”, “2”, or “3”) to indicate which olive was touched.

#include <Adafruit_NeoPixel.h>

const int touchPin = 6;
const int touchLedPin = 3;

const int touchPin2 = 10;
const int touchLedPin2 = 11;

const int touchPin3 = 7;
const int touchLedPin3 = 12;

const int trigPin = 8;
const int echoPin = 9;

#define STRIP_PIN 5
#define NUMPIXELS 50
Adafruit_NeoPixel strip(NUMPIXELS, STRIP_PIN, NEO_GRB + NEO_KHZ800);

void setup() {
  pinMode(touchPin, INPUT_PULLUP);
  pinMode(touchLedPin, OUTPUT);

  pinMode(touchPin2, INPUT_PULLUP);
  pinMode(touchLedPin2, OUTPUT);

  pinMode(touchPin3, INPUT_PULLUP);
  pinMode(touchLedPin3, OUTPUT);

  pinMode(trigPin, OUTPUT);
  pinMode(echoPin, INPUT);

  strip.begin();
  strip.show();
  Serial.begin(9600);
}

void loop() {
  int touchState = digitalRead(touchPin);
  digitalWrite(touchLedPin, touchState == LOW ? HIGH : LOW);
  if (touchState == LOW) {
    Serial.println("1");
    delay(300);
  }

  int touchState2 = digitalRead(touchPin2);
  digitalWrite(touchLedPin2, touchState2 == LOW ? HIGH : LOW);
  if (touchState2 == LOW) {
    Serial.println("2");
    delay(300);
  }

  int touchState3 = digitalRead(touchPin3);
  digitalWrite(touchLedPin3, touchState3 == LOW ? HIGH : LOW);
  if (touchState3 == LOW) {
    Serial.println("3");
    delay(300);
  }

  digitalWrite(trigPin, LOW);
  delayMicroseconds(2);
  digitalWrite(trigPin, HIGH);
  delayMicroseconds(10);
  digitalWrite(trigPin, LOW);

  long duration = pulseIn(echoPin, HIGH, 30000);
  int distance = (duration == 0) ? 999 : duration * 0.034 / 2;

  if (distance < 100) {
    for (int i = 0; i < NUMPIXELS; i++) {
      strip.setPixelColor(i, strip.Color(60, 90, 30));
    }
  } else {
    for (int i = 0; i < NUMPIXELS; i++) {
      strip.setPixelColor(i, 0);
    }
  }

  strip.show();
  delay(50);
}

p5.js Code: 

– Loads 6 images and 5 audio files
– Maps each box to one audio
– Randomizes which box is triggered per olive
– Communicates with Arduino using Web Serial
– Displays interactive visuals with zoom animation and audio syncing

Arduino – p5.js Communication:
– Serial connection via Web Serial API
– Arduino sends “1”, “2”, or “3” when a sensor is triggered
– p5.js receives the value, randomly selects one of two mapped boxes, and plays audio/image
– Serial connection is opened through a “Connect to Arduino” button


Link to video demonstration 


Highlights / Proud Moments:

I was very proud of my use of leaves as soft sensors because I believe it adds a layer of tactile beauty while blending the installation with poetic significance. i also liked my use of the red markings on each leaf as they serve as subtle visual guide, naturally blending into the overall aesthetic of the tree while inviting interaction. When a user presses on a marked leaf, the seamless synchronisation between light and audio brings the experience to life, creating an emotionally resonant response. I knew that my goal was met when a lot of users commented and told me that they really appreciated the meaningful aspect of my project. Overall, I think that my project connects technology and tradition and turns a symbolic object into a responsive storytelling medium.

Challenges/Future Improvements: 

One of the main challenges I faced was my initial idea to make the olives themselves the touchpoint that triggered the audio.  I struggled to add a reliable sensor inside the small and spherical shape of the olives. However, to overcome this, I problem-solved by shifting the interaction to the leaves, which offered more surface area and flexibility. Also, I learned the importance of saving your code very often and debugging. Looking ahead, future improvements could include integrating haptic feedback into the olives, adding more stories with replay options, and even including narration subtitles for accessibility. Overall, I am extremely proud of how my project turned out and the responses it got from many users.

Week 11 – Reading Response

Week 11 – Reading Response

Design Meets Disability:

The reading discusses how simple, thoughtful design can be both functional and beautiful, even for products aimed at disability or accessibility. The Eames splint, which was originally designed for injured soldiers, is appreciated for its aesthetic and innovative qualities. It challenges the idea that medical products should prioritize function over form. Additionally, it critiques how overly complex designs  intended to be universally accessible, often end up being cognitively inaccessible, highlighting the importance of simplicity.

The text differentiates the idea of “universal design” with the idea of “good design,” claiming that accessibility usually comes from simplicity rather than complexity. It references greate designers like the Eameses and Naoto Fukasawa for creating objects where form and function are seamlessly integrated without overcomplicating the user experience. Overall, the author highlights that designing for disability should not lower design standards but rather inspire innovation and beauty. After reading the text, I began rethinking how design for disability is often approached today. 

Week 11 – Introduce Final Project

Week 11 – Introduce Final Project

For my final project, I want to create an interactive olive tree installation that combines Arduino sensing with storytelling in p5.js. The tree will rely on both motion sensing and touch sensing to engage users with visual and auditory responses. On Arduino, I will use a motion sensor, where the tree detects when a person approaches. When someone is nearby, parts of the tree, like the trunk or leaves, will light up using LEDs.

Each olive on the tree will have a touch sensor, when the user touches an olive, it will light up an LED and display a story, memory, or message through p5.js, either as text, visuals, or audio. In addition, I was thinking of including a special designated olive that allows the user to record their own short stories or messages. These recorded interactions will be stored and replayed for future visitors, so that it creates an archive of shared experiences connected to the tree.

Week 11 – Serial Communication

Week 11 – Serial Communication

Task 1:

Prompt: Make something that uses only one sensor on Arduino and makes the ellipse in p5 move on the horizontal axis, in the middle of the screen, and nothing on Arduino is controlled by p5.

Code P5:

let circleX;
function setup() {
    createCanvas(600, 600);
    noFill();
}
function draw() {
     background("rgb(248,238,249)");
  stroke("purple");
 ellipse(map(circleX, 0, 1023, 0, width), height / 2, 100, 100);
   
     if (!serialActive) {
    background("#CE41E6");
    stroke("#white");
    textSize(50);
    text("Press Space Bar to select Serial Port", 20, 30, width - 30, 200);
  }
}
function keyPressed() {
    if (key == " ")
        setUpSerial();
}
function readSerial(data) {
    if (data != null) //
        circleX = int(data);
}

Arduino Code:

int lightPin = A0;  
void setup() {
  Serial.begin(9600);       
  pinMode(lightPin, INPUT);  
}
void loop() {
  int sensorValue = analogRead(lightPin);  
  Serial.println(sensorValue);            
  delay(5);                             
}

Task 2:

Prompt: Make something that controls the LED brightness from p5

For this project, I decided to imitate the sun: as the mouse moves from left to right across the screen, the brightness level on the screen and the connected LED both increase.

Code P5:

let ledBrightness = 0;
function setup() {
  createCanvas(600, 400);
  textSize(20);
}
function draw() {
  background(240);
  if (!serialActive) {
    fill(0);
    text("Press SPACE to select serial port", 20, 30);
  } else {
    // Display mapped brightness
    fill(0);
    text("LED Brightness: " + ledBrightness, 20, 30);
    fill(255, 150, 0);
    ellipse(mouseX, height / 2, map(ledBrightness, 0, 255, 10, 100));
  }
  // Update brightness based on mouseX
  ledBrightness = int(map(constrain(mouseX, 0, width), 0, width, 0, 255));
  // Send brightness to Arduino
  if (serialActive) {
    writeSerial(ledBrightness + "\n");
  }
}
function keyPressed() {
  if (key == ' ') {
    setUpSerial(); 
  }
}

Arduino Code:

int ledPin = 9; 
void setup() {
  Serial.begin(9600);
  pinMode(ledPin, OUTPUT);
  while (Serial.available() <= 0) {
    delay(300);
  }
}
void loop() {
  while (Serial.available()) {
    int brightness = Serial.parseInt();
    if (Serial.read() == '\n') {
      brightness = constrain(brightness, 0, 255);
      analogWrite(ledPin, brightness);
    }
  }
}
Task 3:

Prompt: take the gravity wind example (https://editor.p5js.org/aaronsherwood/sketches/I7iQrNCul) and make it so every time the ball bounces one led lights up and then turns off, and you can control the wind from one analog sensor. 

I connected Arduino to p5.js so the potentiometer controls the wind of the bouncing ball, and whenever the ball hits the ground, the LED blinks. Everything talks to each other through serial communication.

Link to task 3 video 

Code P5:

let velocity;
let gravity;
let position;
let acceleration;
let wind;
let drag = 0.99;
let mass = 50;
let serial;
let connectBtn;
let ledTriggered = false;
function setup() {
  createCanvas(640, 360);
  noFill();
  position = createVector(width / 2, 0);
  velocity = createVector(0, 0);
  acceleration = createVector(0, 0);
  gravity = createVector(0, 0.5 * mass);
  wind = createVector(0, 0);
  // setup serial connection
  serial = createSerial();
  let previous = usedSerialPorts();
  if (previous.length > 0) {
    serial.open(previous[0], 9600);
  }
  connectBtn = createButton("Connect to Arduino");
  connectBtn.position(10, height + 10); // button position
  connectBtn.mousePressed(() => serial.open(9600));
}
function draw() {
  background(255);
  // check if we received any data
  let sensorData = serial.readUntil("\n");
  if (sensorData.length > 0) {
  // convert string to an integer after trimming spaces or newline
    let analogVal = int(sensorData.trim());
    let windForce = map(analogVal, 0, 1023, -1, 1);
    wind.x = windForce; // horizontal wind force
  }
  applyForce(wind);
  applyForce(gravity);
  velocity.add(acceleration);
  velocity.mult(drag);
  position.add(velocity);
  acceleration.mult(0);
  ellipse(position.x, position.y, mass, mass);
  if (position.y > height - mass / 2) {
    velocity.y *= -0.9; // A little dampening when hitting the bottom
    position.y = height - mass / 2;
    if (!ledTriggered) {
      serial.write("1\n");   // trigger arduino LED
      ledTriggered = true;
    }
  } else {
    ledTriggered = false;
  }
}
function applyForce(force) {
  // Newton's 2nd law: F = M * A
  // or A = F / M
  let f = p5.Vector.div(force, mass);
  acceleration.add(f);
}
function keyPressed() {
  if (key === ' ') {
    mass = random(15, 80);
    position.y = -mass;
    velocity.mult(0);
  }
}

Arduino Code:

int ledPin = 9;
void setup() {
  Serial.begin(9600);
  pinMode(ledPin, OUTPUT);
}
void loop() {
  // send sensor value to p5.js
  int sensor = analogRead(A0);
  Serial.println(sensor);
  delay(100);
  // check for '1' from p5 to trigger LED
  if (Serial.available()) {
    char c = Serial.read();
    if (c == '1') {
      digitalWrite(ledPin, HIGH);
      delay(100);
      digitalWrite(ledPin, LOW);
    }
  }
}

Week 10 – Reading Response 

Week 10 – Reading Response 


A Brief Rant on the Future of Interaction Design:

This text provides thoughtful critiques of current visions of future technology. The author speaks about reassessing our hands, not as tools for swiping but as instruments of manipulation. One of the points the author made that I found interesting was the contrast between tying shoelaces by touch and trying to do it with numb fingers. This made me reflect on how easily we accept one-dimensional interactions with our devices. However, that being said, the main idea of the text was not to be anti-technology, but rather call for better, more human design. 

After reading this, I reflected on how I think about interactive design. I came to a realization that I have become extremely compliant in accepting the current state of touchscreens and “smart” devices when in reality, they usually feel flat and disconnected from our full human range. It made me question things like why we aren’t advancing into interfaces that are more engaging with the entire body and not just a single fingertip.


Responses: A Brief Rant on the Future of Interaction Design: 

This is a brutally honest text that embraces criticism, clarifying the purpose of the original piece and not proposing the solution, but rather sparking the right kind of thinking. Something I found memorable in this text was the author’s defense of incomplete visions, where rather than pretending to know the future, he leans into uncertainty. This encourages thorough research into unfamiliar areas like tangible interfaces, haptics, and dynamic materials. To me, it served as a reminder that good design doesn’t necessarily come from certainty, but from curiosity and exploration. I appreciated the comparison he made to photography in 1900, black-and-white film was revolutionary then, however, we didn’t stop there. 

This text made me reflect on the fact that valuable critique doesn’t always solve problems directly, but sometimes, it can just help us ask better questions. Additionally, it emphasized how modern design usually overlooks the human body instead of embracing it. We see many instances where rather than crafting tools that align with our physical capabilities, we’re designing around them. Overall, we all need to push ourselves to question what type of future we’re shaping, and if we are ready to imagine something a lot more meaningful than a world controlled by simple swipes and glass screens.

Week 10 – Group Musical Instrument

Week 10 – Group Musical Instrument

Our Concept

For our musical instrument, we were inspired by DJ sets and how DJs interact with their equipment during live performances. We wanted to bring that experience into a smaller format, so we built a mini DJ controller using an Arduino board.

Our DJ set includes:

  • potentiometer to control the volume, just like DJs do when they’re mixing tracks

  • LEDs that react to the sound changes, creating a responsive visual effect

  • piezo buzzer that produces the sound itself

Set-up

Code

GitHub

Week 9 – Reading Response

Week 9 – Reading Response


Physical Computing’s Greatest Hits (and misses):

This text offers us a thoughtful overview of the recurring themes in physical computing projects. The text highlights that ideas in physical computing, even when they seem overused, can still offer immense and creative potential. The author states that even if a project concept has been done before, the nuances of how an individual implements it can still lead to meaningful experiences. The text also highlights the significance of human gestures in making an engaging interface.  Projects that use physical computing are less about the technology and more about the quality of the interaction it creates, even if it is a subtle hand-waving over a sensor.

The author also touches on how we can expand the idea of interaction and what physical computing can be. Examples such as interactive paintings (like the Scooby-Doo-inspired projects) and remote hugs, demonstrate how we can stretch the concept of interaction. These projects show that physical computing can be a tool not just for entertainment, but for communication, empathy, and even therapy. Lastly, the author mentions that the evolution of tools and technology is extremely crucial. Projects that once took weeks to develop are now able to be prototyped in hours because of advances in technology. This evolution emphasizes that there is a change in the speed of innovation, and it also allows for an easier and broader range of creators to engage in physical computing.

Making Interactive Art: Set the Stage, Then Shut Up and Listen: 

This text serves as a significant reminder that interactive art is not about control, but rather about conversation. The role of the artist changes from just being a storyteller to becoming a stage-setter, creating spaces and experiences that invite, not dictate, meaning. For the artist, this means that instead of pre-defining what every element “means,” they come up with something that encourages exploration, play, and personal response. So instead, we should attempt to build something and then step back, observe, and listen to how others engage with it. This brings up the idea of intentional design, where the artist leaves behind clues or emotional cues, then steps away and allows various unique interpretations to emerge.

Week 9 – Analog Input & Output

Week 9 – Analog Input & Output

For this assignment, I decided to expand on my previous assignment of the unusual switch. I was thinking about a way to expand on it in a practical and useful way. Since I already had a digital sensor, for the analog sensor, I decided to use the light sensor. I was thinking that this would be a beneficial addition to the idea of the shoes because it allows it to not only glow when they are put on, but also has a built in LED light that automatically adjusts its brightness based on the ambient light. The idea of this is that the LED light is brighter when it is dark, so that you can easily find the shoes, and it dims when it is brighter because you have a clearer vision. This idea came from the countless times I’ve woken up in the middle of the night or early in the morning and wished I had a light source that would guide me without stumbling around for a switch in the dark.

I started by gathering the materials I needed: 

  • Arduino
  • Breadboard
  • Wires
  • Resistor (330k, 10k)
  • LED (multi-colour, blue)
  • Cardboard
  • Aluminum
  • Sponge
  • Tape
  • Scissors

I started by cutting out a piece of cardboard in the shape of a shoe, then cut two smaller cardboard pieces to act as the soles. I wrapped each sole in aluminum foil and built a sandwich-like structure. 

→ Taped the first aluminum sole to the base of the shoe

→ Placed a sponge layer over it as a barrier

→ Placed the second foil-wrapped sole on top


The sponge was necessary as it acts like a spacer that keeps the two foil layers apart unless pressure is applied (someone steps on it). When someone steps on the shoe, the pressure compresses the sponge, which allows the two foil layers to touch and complete a circuit.

After that, I set up the arduino and breadboard by starting off with what we have done in class. First, I made sure that the LED is connected to a digital output pin (pin 13) instead of directly to 5V. Then I added a wire to the bottom foil and connected it to GND and added another wire to the top foil and connected it to Digital Pin 2. Lastly I updated my code, and made sure to print in order to test the output, (0 = foot pressed→LED ON, 1 = no contact → LED OFF). 

Then, I added the light sensor circuit, connected a voltage divider using 10k and 330k resistors. I connected this to analog pin A2 and added a blue LED on pin 9, which allows me to control its brightness using analogWrite(). I chose this colour because I was hoping it would provide a more calming feeling. Using the Serial Monitor, I was able to verify that the LDR readings worked correctly. In the dark, the LED brightness increased and when I turned on a flashlight on the sensor, the brightness decreased. In the video demonstration, you can see that the brightness numbers of the LED were high when it was darker, and once I put a flash light on top of it, the brightness numbers went down. This allowed me to double check it was working correctly, even if the change was not as drastic.  

Code highlight:

int brightness = map(lightLevel, 1023, 0, 0, 255);
analogWrite(ledAnalog, brightness);

This allows the LED to fade dynamically depending on the amount of light in the room. The darker it gets, the brighter the LED glows, which is useful for locating the shoes at night.


Challenges and Future Improvements:

One of the challenges I faced was ensuring that the foil switch is stable. At first, it was difficult to get consistent readings from the foil layers. The sponge helped, but I also experimented with the positioning and pressure to make sure it only activated when stepped on.  Also, at first I thought the LED brightness was not changing, however, using the Serial Monitor I was able to confirm that it was working, even if the brightness was subtle. For future improvements, I was thinking that I could even add a soft chime when the shoe is worn in the dark so that it can enhance the feedback and add a helpful alert. Additionally, I could also work on the aesthetic aspect of it a little more. Overall, I am very satisfied with the way the shoe turned out.

Link to photos of the process

Link to final video demonstration

Week 8 – Unusual Switch


Week 8 – Unusual Switch

For this assignment, I had a hard time coming up with an unusual switch that didn’t require the use of hands. Eventually, I started thinking about switches that would actually be useful, something that I would genuinely want to use. That’s when I came up with the idea of creating a switch connected to a “shoe” that lights up an LED when you step on it or put it on, and turns off when you take it off. This idea came from the countless times I’ve woken up in the middle of the night or early in the morning and wished I had a light source that would guide me without stumbling around for a switch in the dark.

I started by gathering the materials I needed: 

  • Arduino 
  • Breadboard 
  • Wires 
  • Resistor 
  • LED 
  • Cardboard 
  • Aluminum
  • Sponge 
  • Tape 
  • Scissors  

I started by cutting out a piece of cardboard in the shape of a shoe, then cut two smaller cardboard pieces to act as the soles. I wrapped each sole in aluminum foil and built a sandwich-like structure. → Taped the first aluminum sole to the base of the shoe

→ Placed a sponge layer over it as a barrier

→ Placed the second foil-wrapped sole on top


The sponge was necessary as it acts like a spacer that keeps the two foil layers apart unless pressure is applied (someone steps on it). When someone steps on the shoe, the pressure compresses the sponge, which allows the two foil layers to touch and complete a circuit.

After that, I set up the arduino and breadboard by starting off with what we have done in class. First, I made sure that the LED is connected to a digital output pin (pin 13) instead of directly to 5V. Then I added a wire to the bottom foil and connected it to GND and added another wire to the top foil and connected it to Digital Pin 2. Lastly I updated my code, and made sure to print in order to test the output, (0 = foot pressed→LED ON, 1 = no contact → LED OFF). 

Link to photos of the process

Link to final video demonstration


Reading Response:

“Attractive Things Work Better” – Don Norman
Norman argues that attractive designs aren’t just superficial, but they actually improve usability. He mentions that when users find something aesthetically pleasing, they are a lot more likely to feel positive, be more creative, and continue problem-solving. However, he counters this emotional response with the logical-functional approach to usability, signifying that a good product needs to incorporate both usability and aesthetics.

He notes the psychological perspective, where he mentions the connection between emotional design and better problem-solving. This supports the idea that positive emotions lead to better cognitive performance. Additionally, his perspective encourages a switch from function-first design to a more holistic perspective where aesthetics and usability are interdependent. This idea has a significant influence on product design, branding, and architecture, proposing that the way something looks may influence not simply preference, but also performance and satisfaction.

“Her Code Got Humans On The Moon — And Invented Software Itself” – Robert McMillan

This article highlights Margaret Hamilton, a pioneering software engineer with her work at NASA during the Apollo missions in the 1960s being necessary to landing humans on the moon. She was the main developer of on-board flight software for the Apollo program at MIT’s Instrumentation Laboratory. She not only created the term “software engineering”,  but also helped set it up as a well-respected discipline. One of her most memorable moments was during Apollo 11 because her code was able to prevent a mission abort due to an overload in the spacecraft’s computer system. Due to her team’s powerful software design, she was able to ensure mission success regardless of unexpected errors.

Hamilton’s story is extremely impactful because her exceptional contributions were taking place during a time when both women in STEM and the concept of “software” were still unexplored. Her work was able to set the basis of modern software engineering as well as challenge gender norms. She was an extremely innovative individual who introduced various new ideas including prioritising tasks within software, which assisted in managing the Apollo computer’s limited memory. While her work was initially under appreciated, it is now commemorated as being crucial to not only the space race but also the evolution of computing. Her story highlights the significance of resilience and acknowledging the “what ifs” in technology.

Midterm Project – Cat Rescue Game


Midterm Project – Cat Rescue Game

For my midterm project, I was very excited to create a game based on something that I love, cats! As I have grown up and lived in Abu Dhabi for half my life, I have noticed that there are a lot of stray cats. So with this in mind, I wanted to design a game where the player walks around a city, rescues stray cats, and takes them to a shelter. I was inspired by a photography project I completed last semester about the spirit of street cats in Abu Dhabi. I went around the city in Abu Dhabi and captured these cats’ lives and the environment they are in. (link to the photos). The game combines movement mechanics, object interactions, and a simple pet care system. The goal of the game is to rescue and rehome all the stray cats in order to win the game. I started this midterm project by drawing a rough sketch of how I wanted it to look like, and the various screens I wanted to implement. 

Link to sketch:

Midterm Sketch


Final Game:

Link to final game

Essentially, my game consists of three main screens, the start, game, and restart screen. I wanted a specific look for my background that I was not able to find online, so I decided to create my own. For both the start screen and the game background screen, I used Illustrator to make various shapes and used some images like trees or garbage bins. Then I converted these to PNG files so that I was able to upload them into p5.js and use them in my code. For the shelter, I used different shapes to make it look like a house. Additionally, I made the start screen display a box with on-screen text explaining how to play the game. Similarly, the restart screen also has a circle with on-screen text showing that you won, and a button to restart. For the interaction aspect of my project, I implemented a way for the player to control the girl using the arrow keys on the keyboard to move around. The stray cats are located at random locations in the city and if the girl touches a cat, it is rescued and sent to a shelter. I also used happy, chill background music that I found fitting to the game that starts once you press “Start Game”.

Overall I am extremely satisfied with the way that my final game turned out. Something I am particularly proud of is that instead of using pre-made designs from the internet, I designed my own backgrounds in Illustrator, which gives my game the unique quality I was seeking. Also, I am proud that I was able to successfully implement a collision detection system that ensures that once the player rescues a cat, it gets added to the shelter. I also liked the three-screen system (Start → Game → Restart) which provides the game with a clear structure. Lastly, I am extremely proud that I was able to draw inspiration from my real-life experiences in Abu Dhabi, which makes the game more unique and personal to me. I was able to connect my previous photography project and this game, linking different creative disciplines. I like that my game has an underlying story about spreading awareness about stray cats, which adds an emotional layer to my project.


Car class (which represents the girl’s movement):

class Car {
  constructor() {
    this.x = width / 2;
    this.y = height - 80;
    this.size = 50;
  }

  move() {
    if (keyIsDown(LEFT_ARROW)) this.x -= 5;
    if (keyIsDown(RIGHT_ARROW)) this.x += 5;
    if (keyIsDown(UP_ARROW)) this.y -= 5;
    if (keyIsDown(DOWN_ARROW)) this.y += 5;

    // Keep girl inside canvas
    this.x = constrain(this.x, 0, width - this.size);
    this.y = constrain(this.y, 0, height - this.size);
  }

  display() {
    image(carImage, this.x, this.y, 60, 100);
  }


Throughout developing this game, I faced a few challenges that required me to problem-solve. One of the issues was ensuring that the text box and circle were layered properly over the background so they remained visible. It took me some time to adjust their positioning and layering so that they were correctly visible on the screen. Another challenge I came across was making sure that the girl’s movement worked smoothly in all directions (up, down, left, and right). Debugging this movement system took some trial and error, but I was able to fix it. Additionally, I ran into smaller, frustrating issues, like file name errors, for example, a missing capital letter caused images not to load properly. Debugging these minor but important details taught me the importance of careful file management. However, I was able to overcome these challenges and successfully build a functioning game. 

If I had more time, there are a few features I would have liked to add to enhance the user experience. One idea was to expand on the rescue aspect, right now, when the cats reach the shelter, they are considered rescued. However, I would have liked to add an extra step where the player needs to care for the cats (feeding them, treating injuries, etc.) before they are fully rescued. Another improvement would be to introduce different difficulty levels (Easy, Medium, Hard) by adding obstacles that the player must overcome to rescue the cats. Also, smaller interactive details, like the cats meowing when clicked, would also add to the game. Even without these extra features, I am really happy with how my game turned out. This project challenged me to problem-solve, debug, and think creatively, and I’m proud of what I was able to accomplish.


Music citation:

Music track: Marshmallow by Lukrembo

Source: https://freetouse.com/music