Final Project – User Testing & Documentation

Creative Piano

This project explores how tangible physical interactions can be mapped to dynamic digital feedback using basic electronics and browser-based programming. The goal was to create an accessible, playful, and immersive musical instrument by combining capacitive touch sensing with 3D visuals and synchronized audio. Built using an Arduino Uno and a p5.js sketch, the outcome is an interactive interface where touching conductive pads triggers audiovisual responses on screen and plays musical notes through the browser.

Concept and Design

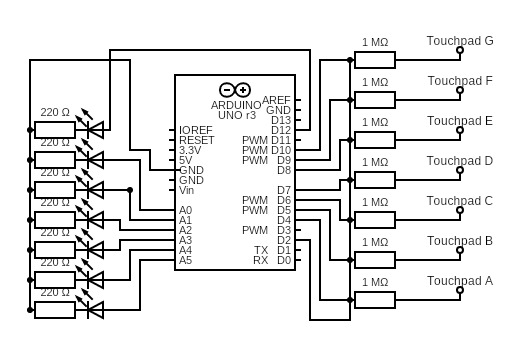
The project was inspired by the layout and playability of a traditional piano. Seven capacitive touchpads were arranged horizontally to simulate seven musical keys, each corresponding to a note from A to G. These touchpads were constructed from copper tape and wired to the Arduino using 1MΩ resistors and the CapacitiveSensor library, with digital pin D2 as the send pin and D4–D10 as receive pins. Touching a pad activates a signal sent via serial communication to a p5.js sketch running in the browser.

Visually, the p5.js interface features a WEBGL canvas with seven 3D cubes spaced evenly across a horizon-like scene. When a user touches one of the physical pads, the corresponding cube rotates, scales up, and releases a short burst of animated particles. Each key also triggers a distinct .mp3 file that plays the associated note. To complete the feedback loop, an LED mounted next to each pad lights up on activation, enhancing the physical response.

Implementation and Technical Challenges

The Arduino side of the system uses the CapacitiveSensor library for reliable touch detection. Serial data is transmitted using Serial.println() to send a numerical value (1 to 7) to the browser. These numbers are received in p5.js using the Web Serial API. Each value maps to a cube on the canvas, a sound file, and an LED output. Due to the limited number of digital pins on the Arduino Uno, analog pins A0–A5 were repurposed as digital outputs for controlling LEDs, alongside digital pin D12.

One major technical hurdle was encountered when attempting to load all sound files within a loop in p5.js using loadSound(). This approach caused the browser to silently fail to load the audio. The issue was resolved by loading each sound file individually, using separate loadSound() calls with explicit success and error handlers.

Another issue involved unstable serial communication, particularly when switching between the Arduino IDE and browser. Ensuring the serial monitor was closed before running the p5.js sketch, introducing delays in the Arduino setup() function, and adding robust error handling in the JavaScript code helped address this. Additionally, adding a 1MΩ pull-down resistor from pin D2 to GND improved signal reliability.

User Testing and Feedback

To evaluate the interface, I conducted informal user testing without providing any instructions. Users were able to understand the instrument’s function immediately due to its intuitive piano-like layout. Most could successfully trigger both audio and visuals without any guidance.

However, two issues emerged. First, the interface only featured seven keys, which users noticed as an incomplete octave. This design limitation was due to hardware constraints and the number of available input pins on the Arduino. Second, users reported a small but perceptible delay between touching the pad and hearing the sound, which slightly detracted from the interactive experience. Despite these drawbacks, users found the interface fun and engaging, and appreciated the multi-sensory feedback through visuals, sound, and lights.

Reflection

Overall, the project succeeded in creating a satisfying and creative interactive system that blends physical computing with browser-based media. The integration of touch, sound, and 3D visuals offered a cohesive and enjoyable user experience, demonstrating how simple hardware and software tools can be used to build meaningful interactions.

There are several areas for potential improvement. Adding an eighth key would allow users to play a full musical scale, which would greatly improve the musicality of the instrument. Reducing latency between touch and audio playback, possibly by optimizing serial reading or switching to a faster communication protocol, would also enhance responsiveness. Finally, some users have noted during the showcase that it would have been more interesting if piano keys could be pressed simultaneously. My personal vision for this project is making it gamified: when the cubes light up on the screen, inviting the user to plays corresponding keys to reproduce a certain song or melody.

Tools and Materials

  • Hardware: Arduino Uno, copper tape, 1MΩ resistors, jumper wires, 7 LEDs

  • Libraries: CapacitiveSensor (Arduino), p5.js (sound, WEBGL, serial)

  • Software: Arduino IDE, Chrome browser, p5.js Web Editor

  • Languages: C++ (Arduino), JavaScript (p5.js)

Conclusion

This project showcases how physical and digital systems can be seamlessly integrated to create interactive, expressive instruments. By leveraging capacitive sensing, serial communication, and browser technologies, the Capacitive Touch Musical Interface offers a compelling example of creative technology that invites play, experimentation, and multisensory engagement.

let port;
let reader;

let sounds = {};
let labels = ['A', 'B', 'C', 'D', 'E', 'F', 'G'];
let musicNotes = ['C', 'D', 'E', 'F', 'G', 'A', 'B'];
let allLoaded = false;

let cubeSizes = {};
let targetSizes = {};
let cubeRotations = {};
let targetRotations = {};
let flippedState = {};
let cubeYOffsets = {};
let targetYOffsets = {};
let particles = [];

let baseSize = 50;
let pulseSize = 100;
let jumpHeight = 40;

let sizeLerpSpeed = 0.2;
let rotationLerpSpeed = 0.15;
let positionLerpSpeed = 0.2;

let labelLayer;

function preload() {
  soundFormats('mp3');
  for (let label of labels) {
    sounds[label] = loadSound(`${label}.mp3`,
      () => console.log(` Loaded ${label}.mp3!`),
      err => console.error(`❌ Failed to load ${label}.mp3`, err)
    );
  }
}

function setup() {
  createCanvas(1000, 500, WEBGL);
  noStroke();

  labelLayer = createGraphics(width, height);
  labelLayer.textAlign(CENTER, CENTER);
  labelLayer.textSize(16);
  labelLayer.textFont('sans-serif');
  labelLayer.fill(20);

  for (let label of labels) {
    cubeSizes[label] = baseSize;
    targetSizes[label] = baseSize;
    cubeRotations[label] = 0;
    targetRotations[label] = 0;
    flippedState[label] = false;
    cubeYOffsets[label] = 0;
    targetYOffsets[label] = 0;
  }

  let connectButton = createButton("Connect to Arduino");
  connectButton.size(200, 40);
  connectButton.position((windowWidth - 200) / 2, height + 40);
  connectButton.class("connect-button");
  connectButton.mousePressed(connectToArduino);
}

function draw() {
  background(135, 206, 250);

  camera(0, -100, 600, 0, -100, 0, 0, 1, 0);

  push();
  translate(0, 100, 0);
  rotateX(HALF_PI);
  fill(220);
  plane(3000, 3000);
  pop();

  push();
  translate(0, 0, -1000);
  fill(135, 206, 250);
  plane(3000, 2000);
  pop();

  ambientLight(100);
  pointLight(255, 255, 255, 0, -300, 300);
  directionalLight(200, 200, 200, -0.5, -1, -0.3);

  let spacing = 120;
  let totalWidth = spacing * (labels.length - 1);
  let startX = -totalWidth / 2;

  for (let i = 0; i < labels.length; i++) {
    let label = labels[i];

    cubeSizes[label] = lerp(cubeSizes[label], targetSizes[label], sizeLerpSpeed);
    cubeRotations[label] = lerp(cubeRotations[label], targetRotations[label], rotationLerpSpeed);
    cubeYOffsets[label] = lerp(cubeYOffsets[label], targetYOffsets[label], positionLerpSpeed);

    let x = startX + i * spacing;
    let y = -baseSize / 2 + 100 - cubeYOffsets[label];

    push();
    translate(x, y, 0);
    rotateX(cubeRotations[label]);
    fill(0, 102, 204);
    specularMaterial(0, 102, 204);
    shininess(20);
    box(cubeSizes[label]);
    pop();
  }

  for (let i = particles.length - 1; i >= 0; i--) {
    particles[i].update();
    particles[i].display();
    if (particles[i].lifespan <= 0) particles.splice(i, 1);
  }

  labelLayer.clear();
  for (let i = 0; i < musicNotes.length; i++) {
    let spacing = 120;
    let totalWidth = spacing * (labels.length - 1);
    let x = -totalWidth / 2 + i * spacing;
    let screenX = width / 2 + x;
    let screenY = height / 2 + 130;
    labelLayer.text(musicNotes[i], screenX, screenY);
  }

  resetMatrix();
  image(labelLayer, 0, 0);
}

function triggerCube(label) {
  targetSizes[label] = pulseSize;
  targetYOffsets[label] = jumpHeight;
  setTimeout(() => {
    targetSizes[label] = baseSize;
    targetYOffsets[label] = 0;
  }, 150);
  flippedState[label] = !flippedState[label];
  targetRotations[label] = flippedState[label] ? PI : 0;

  let spacing = 120;
  let totalWidth = spacing * (labels.length - 1);
  let x = -totalWidth / 2 + labels.indexOf(label) * spacing;
  let y = 100 - baseSize;

  for (let i = 0; i < 15; i++) {
    particles.push(new Particle(x, y, 0));
  }
}

function keyPressed() {
  let keyUp = key.toUpperCase();
  if (sounds[keyUp]) {
    sounds[keyUp].play();
    triggerCube(keyUp);
  }
}

async function readSerial() {
  while (port.readable) {
    try {
      const decoder = new TextDecoderStream();
      const inputDone = port.readable.pipeTo(decoder.writable);
      const inputStream = decoder.readable;
      const reader = inputStream.getReader();

      while (true) {
        const { value, done } = await reader.read();
        if (done) {
          console.warn(" Serial stream ended. Trying to reconnect...");
          reader.releaseLock();
          break;
        }
        if (value) {
          const clean = value.trim().toUpperCase();
          console.log(" Received from Arduino:", clean);
          if (sounds[clean]) {
            sounds[clean].play();
            triggerCube(clean);
          }
        }
      }
    } catch (err) {
      console.error("❌ Serial read error:", err);
      break;
    }

    await new Promise(resolve => setTimeout(resolve, 1000));
  }

  console.log("❌ Serial not readable anymore.");
}

async function connectToArduino() {
  try {
    port = await navigator.serial.requestPort();
    await port.open({ baudRate: 9600 });
    readSerial();
    console.log("✅ Serial connected");
  } catch (err) {
    console.error("❌ Connection failed:", err);
  }
}

class Particle {
  constructor(x, y, z) {
    this.pos = createVector(x, y, z);
    this.vel = createVector(random(-1, 1), random(-3, -1), random(-0.5, 0.5));
    this.lifespan = 60;
  }

  update() {
    this.pos.add(this.vel);
    this.vel.y += 0.05;
    this.lifespan -= 2;
  }

  display() {
    push();
    translate(this.pos.x, this.pos.y, this.pos.z);
    fill(255, 150, 0, this.lifespan * 4);
    noStroke();
    sphere(5);
    pop();
  }
}

Arduino code:

#include <CapacitiveSensor.h>

// CapacitiveSensor(sendPin, receivePin)
CapacitiveSensor pads[7] = {
  CapacitiveSensor(2, 4),  // A
  CapacitiveSensor(2, 5),  // B
  CapacitiveSensor(2, 6),  // C
  CapacitiveSensor(2, 7),  // D
  CapacitiveSensor(2, 8),  // E
  CapacitiveSensor(2, 9),  // F
  CapacitiveSensor(2, 10)  // G
};

const char notes[7] = {'A', 'B', 'C', 'D', 'E', 'F', 'G'};
bool touched[7] = {false};

int ledPins[7] = {A0, A1, A2, A3, A4, A5, 12};  // LED output pins

long threshold = 100;  // Adjust after testing raw values

void setup() {
  delay(1000);  // Allow time for USB/Serial to stabilize
  Serial.begin(9600);

  for (int i = 0; i < 7; i++) {
    pads[i].set_CS_AutocaL_Millis(0xFFFFFFFF); // Disable autocalibration
    pinMode(ledPins[i], OUTPUT);
    digitalWrite(ledPins[i], LOW);
  }
}

void loop() {
  for (int i = 0; i < 7; i++) {
    long reading = pads[i].capacitiveSensor(10); // Reduced samples for speed
    bool isTouched = (reading > threshold);

    digitalWrite(ledPins[i], isTouched ? HIGH : LOW);

    if (isTouched && !touched[i]) {
      Serial.println(notes[i]);
      touched[i] = true;
    } else if (!isTouched && touched[i]) {
      touched[i] = false;
    }
  }

  // No delay(5); loop runs as fast as possible for lower latency
}


Week 12 – Finalised Concept

For my final project, I am building a 3D Music Interface that allows users to trigger both 3D visual animations and musical sounds through a physical touch-sensitive controller. The interface will be made out of cardboard and tinfoil touchpads connected to an Arduino. Each physical touch will trigger a corresponding 3D box animation in p5.js, along with a musical note generated directly in the browser using the p5.sound library. The goal is to create a playful, intuitive instrument that connects physical gestures to both sound and visual expression immediately and reliably.

Arduino Program Design

The Arduino will act as the input device, reading signals from multiple touch-sensitive pads made of tinfoil and cardboard.

  • Inputs:

    • Each touchpad will be connected to a digital input pin.

    • When the user touches a pad, it will register a HIGH signal on that pin.

  • Processing:

    • The Arduino continuously checks the state of each touchpad inside the loop() function.

    • When a touch is detected, the Arduino sends a unique identifier through Serial communication.

    • Each touchpad is mapped to a different number (e.g., 0, 1, 2, 3, up to 7).

  • Outputs:

    • The Arduino only sends data to p5.js. It does not control any external outputs like LEDs or motors.

  • Communication with p5.js:

    • Sends a single-digit number (0–7) each time a pad is touched.

    • No information is received from p5.js back to Arduino because the communication is one-way (Arduino → p5).

Example behavior:

  • Touchpad 0 is touched → Arduino sends 0 over Serial.

  • Touchpad 1 is touched → Arduino sends 1 over Serial.

    …and so on for each pad.

    The Arduino sketch will look something like this (early draft structure):

    void setup() {
      Serial.begin(9600);
      pinMode(touchPin1, INPUT);
      pinMode(touchPin2, INPUT);
      ...
    }
    
    void loop() {
      if (digitalRead(touchPin1) == HIGH) {
        Serial.println(0);
      }
      if (digitalRead(touchPin2) == HIGH) {
        Serial.println(1);
      }
      ...
    }
    

p5.js Program Design

The p5.js program will be responsible for receiving data from Arduino and producing both sound and visual feedback based on the input.

  • Receiving data:

    • p5.js listens to the Serial port using the serialEvent() function.

    • Each time it receives a number from Arduino (0–7), it triggers two actions:

      1. Visual: Activates a specific 3D box animation (e.g., spin, color change, movement).

      2. Audio: Plays a specific musical note using the p5.sound library.

  • Processing:

    • The incoming serial value is matched to the corresponding element in an array of 3D boxes.

    • A corresponding musical note (e.g., C2, D2, E2, F2…) is also mapped and played.

  • Outputs:

    • On the screen: Real-time 3D animations using WEBGL (such as spinning boxes).

    • In the browser: Sound output through the computer speakers using p5.sound.

  • Communication with Arduino:

    • p5.js only receives data from Arduino.

    • No messages are sent back

Example behavior:

  • Receive 0 → Box 0 spins and note C2 plays

  • Receive 1 → Box 1 spins and note D2 plays

  • Receive 2 → Box 2 spins and note E2 plays

    Early pseudocode for handling serial data:

function serialEvent() {
  let inData = Number(serial.read());
  if (inData >= 0 && inData < boxes.length) {
    boxes[inData].play(); // Spin box
    playNote(inData); // Play corresponding sound
  }
}

Next Steps

  1. Build a basic cardboard and tinfoil prototype for the touch-sensitive interface

  2. Test Arduino with simple touch sensor code, confirming that touchpads reliably trigger digital input signals

  3. Set up p5.serialport and confirm that Arduino can send and p5.js can receive serial data properly
  4. Prepare an initial sound mapping using the p5.sound library

  5. Create a rough version of the 3D visualizations (boxes spinning in response to input)

Week 11 – Final Project Idea

For my final project, I am creating a 3D physical music interface that uses Arduino and p5.js to produce both sound and visual feedback in real time. The interface will be built from cardboard and tinfoil touchpads connected to an Arduino. Each physical input will trigger 3D animations on screen and simultaneously play musical notes or sound effects through p5.js’s sound library.

The goal is to design an experience where physical gestures directly generate both visual creativity and musical expression, offering a playful and intuitive interaction. Touching different areas results in unique audiovisual combinations, allowing users to “perform” across both sound and visual mediums.

Inspired by projects like Browser Synth, Interactive Soundboard with p5.js, and Visual Music Keyboards (examples attached), my final project will explore how homemade interfaces can connect physical creativity to browser-based multimedia environments.

Implementation:

  • Arduino: Detecting touch interactions

  • p5.js:

    • Processing serial input from Arduino

    • Triggering real-time 3D graphics (WEBGL)

    • Playing sound using the p5.sound library

Vision:

For this project, my vision is to create an intuitive and playful instrument that connects physical touch to both sound and visual expression. I want the final product to feel immediate and responsive so that when a user touches different parts of the physical interface (buttons/controllers), they should instantly hear a corresponding musical note and see a visual reaction on the screen. My goal is to ensure that the interaction feels clear and easy to discover, even for someone using it for the first time, while also offering enough variety for users to improvise and experiment with the music instrument. Consistency and reliability are also important: every touch should reliably trigger a specific, predictable response without delay.

Introducing p5.js - Building a Generative AI Music Visualizer with  JavaScript and React Codédex | Build an Interactive Soundboard with p5.js
Build a Web Audio Synthesizer in the Browser with p5js

Week 11 – HW


Task 1: Horizontal Movement of Ellipse 

In this setup, I connected a photoresistor to analog pin A0 of the Arduino. The changing light levels (e.g., when I moved my hand closer or farther) were read via analog input and sent to p5.js over serial communication. In p5.js, the light level was mapped to a horizontal position (X-axis) of an ellipse on screen.

As a result, the ellipse smoothly moved left to right based on how much light was detected by the sensor. The Arduino was a pure input device in this task, with no output components involved.

// Arduino Code for Photocell -> Horizontal Ellipse
const int photoPin = A0;

void setup() {
  Serial.begin(9600);
}

void loop() {
  int lightLevel = analogRead(photoPin);
  Serial.println(lightLevel);
  delay(50);  // small delay for stability
}
//Javascript:

let serial;
let latestData = "0";

function setup() {
  createCanvas(400, 400);

  serial = new p5.SerialPort();
  serial.open("/dev/tty.usbmodem13301"); 
  serial.on("data", () => {
    latestData = serial.readLine().trim();
  });
}

function draw() {
  background(220);
  let x = map(Number(latestData), 0, 1023, 0, width);
  ellipse(x, height/2, 50, 50);
}

Task 2: LED Brightness Controller

This task reverses the direction of interaction from Task 1. A slider on the p5.js canvas sends values (0–255) to Arduino via serial. The Arduino reads these values and writes them to a PWM pin controlling an LED, adjusting brightness in real-time.

As a result, once the slider was adjusted, the LED smoothly brightened or dimmed, creating a tangible link between screen-based and physical interaction.

// Arduino Code for LED brightness control
const int ledPin = 9;

void setup() {
  pinMode(ledPin, OUTPUT);
  Serial.begin(9600);
}

void loop() {
  if (Serial.available()) {
    int brightness = Serial.parseInt();
    analogWrite(ledPin, brightness);
  }
}
//Javascript

let serial;
let slider;

function setup() {
  createCanvas(400, 200);
  slider = createSlider(0, 255, 127);
  slider.position(20, 20);

  serial = new p5.SerialPort();
  serial.open("/dev/tty.usbmodem13301"); 
}

function draw() {
  background(255);
  let val = slider.value();
  text("Brightness: " + val, 20, 70);
  serial.write(val + "\n");
}

Task 3: Bouncing Ball 

For this task, I modified the Gravity + Wind example from p5.js. A photocell connected to Arduino reads ambient light and sends it to p5.js to control the “wind” vector pushing up on the ball. Simultaneously, when the ball hits the bottom of the canvas, p5.js sends a “BOUNCE” signal back to Arduino, briefly lighting up an LED.


In the end, the ball was bouncing realistically, with its movement affected by how much I covered the photocell. Each bounce triggered a short LED flash, adding physical feedback to a digital interaction.

// Alternate: if p5 sends a "bounce" message, flash LED
const int ledPin = 9;
const int photoPin = A0;

void setup() {
  pinMode(ledPin, OUTPUT);
  Serial.begin(9600);
}

void loop() {
  int light = analogRead(photoPin);
  Serial.println(light);
  delay(10);

  if (Serial.available()) {
    String command = Serial.readStringUntil('\n');
    if (command == "BOUNCE") {
      digitalWrite(ledPin, HIGH);
      delay(100);
      digitalWrite(ledPin, LOW);
    }
  }
}
//Javascript

let serial;
let position, velocity, acceleration;
let gravity, wind;
let drag = 0.99;
let mass = 50;
let photoresistorValue = 0;

function setup() {
  createCanvas(640, 360);
  position = createVector(width / 2, 0);
  velocity = createVector(0, 0);
  acceleration = createVector(0, 0);
  gravity = createVector(0, 0.5 * mass);
  wind = createVector(0, 0);

  serial = new p5.SerialPort();
  serial.open("/dev/tty.usbmodem13301"); 

  serial.on("data", () => {
    let data = serial.readLine().trim();
    if (!data) return;
    photoresistorValue = int(data);
  });
}

function draw() {
  background(255);
  
  wind.y = map(photoresistorValue, 0, 1023, -2, 0);  // More wind when covered

  applyForce(gravity);
  applyForce(wind);
  
  velocity.add(acceleration);
  velocity.mult(drag);
  position.add(velocity);
  acceleration.mult(0);

  // Bounce
  if (position.y > height) {
    position.y = height;
    velocity.y *= -1;
    serial.write("BOUNCE\n"); // Trigger LED
  }

  ellipse(position.x, position.y, 50, 50);
}

function applyForce(force) {
  let f = p5.Vector.div(force, mass);
  acceleration.add(f);
}

Reflection:

This set of projects helped me understand both unidirectional and bidirectional interactions between hardware and software. The exercises showed how to turn real-world stimuli into digital visuals and vice versa, laying the groundwork for interactive installations, responsive art, or assistive interfaces, which is a great practice for the final project.

Reading Assignment

Reading Design Meets Disability made me rethink how design often treats disability as something to minimize or fix, rather than as an opportunity for creative expression. Pullin’s argument that assistive technologies like hearing aids or prosthetics can be expressive and personal, not just functional has really stuck with me. It challenged the default idea in my head that good design is neutral or invisible, and instead made me see how thoughtful design can actually expand what’s possible for people with disabilities.

This reminded me of Sophie de Oliveira Barata’s work, which we studied in my Communication and Technology class. Through the Alternative Limb Project, she creates prosthetics that are more than medical devices but rather artistic statements. Some are realistic, others are completely imaginative, with embedded lights or sculptural elements. Her work makes it clear that prosthetics can reflect someone’s identity and creativity, not just their physical needs. It’s a powerful example of how design can shift the narrative from limitation to self-expression.

Both Pullin’s book and Sophie’s work pushed me to question what we mean by “inclusive” or “accessible” design. It made me realize that good design goes beyond functionality by also giving people choices, visibility, and agency. I’m beginning to see inclusive design not as a constraint, but as a more thoughtful and exciting way to approach creative work.

the alternative limb project creates surreal and unreal prosthesis


Week 10 (Musical Instrument & Reading)

With YEVA SYNTH V1.0, I wanted to create a device that felt fun to play with, responded instantly to human input, and was built from the ground up using just an Arduino Uno, a few buttons, LEDs, and some imagination.

After sketching a few interface ideas, I settled on a layout using two buttons to trigger different sound effects, a potentiometer to switch between modes, and two small LCD screens—one for control feedback and one for visual flair. The FX selector (an analog potentiometer) lets the user scroll between different sound modes like “Laser,” “Melody,” “Wobble,” “Echo,” and more. Pressing a button instantly triggers the selected effect through a piezo buzzer. One LCD shows the current FX name, while the second displays an animated visualizer that bounces in response to sound activity. The LEDs tied to the Arduino’s analog pins light up during sound playback, giving a simple but satisfying burst of light that makes the synth feel alive.

Building it was both straightforward and occasionally frustrating. Wiring two LCDs in parallel required careful pin management to avoid conflicts, and the Arduino Uno’s limited number of usable pins meant I had to repurpose analog pins as digital outputs. The buzzer was a challenge at first because some FX didn’t make any audible sound until I discovered I had to hardcode appropriate pitch and modulation values and remove interrupt logic that was prematurely cutting playback short.

One major success was making the sound effects interruptible and responsive. Early versions of the code would lock the device into one sound effect until it finished, but I rewrote the logic to allow button spamming so users can mash buttons and get immediate feedback, making the instrument feel more playful.

Of course, there are limitations. The piezo buzzer is not exactly a high-fidelity speaker, and while it’s great for beeps and bleeps, it can’t produce anything resembling full-range audio. I also wanted the visualizer to respond to actual audio signal amplitude, but without analog audio input or FFT analysis, I had to simulate that based on pitch values and FX activity. That said, the effect is convincing enough to match the synth’s character. Another improvement would be to allow the synth to send commands to a computer so that real sound files could be played through the laptop’s speakers instead of the buzzer. I’ve already prototyped this using a Python script listening over serial.

#include <LiquidCrystal.h>

LiquidCrystal lcd1(12, 11, 5, 4, 3, 2);
LiquidCrystal lcd2(8, 7, 6, A4, A3, A2);

// Pins
const int fxSelector = A5;
const int button1 = 9;
const int button2 = 10;
const int buzzerPin = 13;
const int led1 = A0;
const int led2 = A1;

// FX Setup
int pitch = 440;  // A4
int mod   = 50;
int fxIndex = 0;
const int NUM_FX = 8;

String fxNames[NUM_FX] = {"Laser", "Melody", "Alarm", "Jump", "Sweep", "Wobble", "Echo", "Random"};

void setup() {
  lcd1.begin(16, 2);
  lcd2.begin(16, 2);
  pinMode(button1, INPUT_PULLUP);
  pinMode(button2, INPUT_PULLUP);
  pinMode(buzzerPin, OUTPUT);
  pinMode(led1, OUTPUT);
  pinMode(led2, OUTPUT);

  Serial.begin(9600); // Debug

  lcd1.setCursor(0, 0);
  lcd1.print("YEVA SYNTH V1.0");
  lcd2.setCursor(0, 0);
  lcd2.print("MAKE SOME NOISE");
  delay(1500);
  lcd1.clear();
  lcd2.clear();

  randomSeed(analogRead(A3));
}

void loop() {
  fxIndex = map(analogRead(fxSelector), 0, 1023, 0, NUM_FX - 1);

  lcd1.setCursor(0, 0);
  lcd1.print("FX: ");
  lcd1.print(fxNames[fxIndex]);
  lcd1.print("        ");

  lcd1.setCursor(0, 1);
  lcd1.print("Pitch:");
  lcd1.print(pitch);
  lcd1.print(" M:");
  lcd1.print(mod);
  lcd1.print("  ");

  if (buttonPressed(button1)) {
    triggerFX(fxIndex);
  }

  if (buttonPressed(button2)) {
    triggerAltFX();
  }

  drawVisualizer(0);
}

bool buttonPressed(int pin) {
  if (digitalRead(pin) == LOW) {
    delay(10); // debounce
    return digitalRead(pin) == LOW;
  }
  return false;
}

void showFXIcon(int index) {
  lcd2.setCursor(0, 0);
  lcd2.print("FX: ");
  switch (index) {
    case 0: lcd2.print(">>>>"); break;
    case 1: lcd2.print("♫♫");   break;
    case 2: lcd2.print("!!");   break;
    case 3: lcd2.print(" ↑");   break;
    case 4: lcd2.print("/\\");   break;
    case 5: lcd2.print("~");  break;
    case 6: lcd2.print("<>");   break;
    case 7: lcd2.print("??");   break;
  }
}

void drawVisualizer(int level) {
  lcd2.setCursor(0, 1);
  int bars = map(level, 0, 1023, 0, 16);
  for (int i = 0; i < 16; i++) {
    if (i < bars) lcd2.write(byte(255));
    else lcd2.print(" ");
  }
}

void triggerFX(int index) {
  lcd2.clear();
  showFXIcon(index);
  digitalWrite(led1, HIGH);
  Serial.println("Triggering FX: " + fxNames[index]);

  if (index == 7) {
    int randFX = random(0, NUM_FX - 1);
    triggerFX(randFX);
    return;
  }

  switch (index) {
    case 0: // Laser
      for (int i = 1000; i > 200; i -= (10 + mod / 20)) {
        tone(buzzerPin, i);
        drawVisualizer(i);
        delay(10);
      }
      break;

    case 1: { // Melody
      int notes[] = {262, 294, 330, 392, 440, 494, 523};
      for (int i = 0; i < 7; i++) {
        digitalWrite(led2, HIGH);
        tone(buzzerPin, notes[i] + mod);
        drawVisualizer(notes[i]);
        delay(200);
        digitalWrite(led2, LOW);
        delay(50);
      }
      break;
    }

    case 2: // Alarm
      for (int i = 0; i < 5; i++) {
        tone(buzzerPin, 400 + mod);
        drawVisualizer(600);
        delay(150);
        noTone(buzzerPin);
        delay(100);
      }
      break;

    case 3: // Jump
      tone(buzzerPin, pitch + 200);
      drawVisualizer(800);
      delay(150);
      break;

    case 4: // Sweep
      for (int i = pitch - mod; i <= pitch + mod; i += 5) {
        tone(buzzerPin, i);
        drawVisualizer(i);
        delay(5);
      }
      for (int i = pitch + mod; i >= pitch - mod; i -= 5) {
        tone(buzzerPin, i);
        drawVisualizer(i);
        delay(5);
      }
      break;

    case 5: // Wobble
      for (int i = 0; i < 15; i++) {
        int wob = (i % 2 == 0) ? pitch + mod : pitch - mod;
        tone(buzzerPin, wob);
        drawVisualizer(wob);
        delay(80);
      }
      break;

    case 6: // Echo
      int echoDelay = 200;
      for (int i = 0; i < 5; i++) {
        int toneFreq = pitch - i * 20;
        tone(buzzerPin, toneFreq);
        drawVisualizer(toneFreq);
        delay(echoDelay);
        noTone(buzzerPin);
        delay(echoDelay / 2);
        echoDelay -= 30;
      }
      break;
  }

  noTone(buzzerPin);
  digitalWrite(led1, LOW);
  drawVisualizer(0);
}

void triggerAltFX() {
  lcd2.clear();
  lcd2.setCursor(0, 0);
  lcd2.print("FX: BLIP");

  for (int i = 0; i < 3; i++) {
    tone(buzzerPin, 600 + mod);
    digitalWrite(led2, HIGH);
    drawVisualizer(600);
    delay(100);
    noTone(buzzerPin);
    digitalWrite(led2, LOW);
    delay(100);
  }

  drawVisualizer(0);
}

Reading response

A Brief Rant on the Future of Interaction Design by Bret Victor made me rethink how we use technology today. He argues that all these futuristic concept videos we see where everything is controlled by touchscreens or voice commands are actually super boring. Not because they’re unrealistic, but because they’re unimaginative. We’re just slightly upgrading what already exists instead of rethinking how we interact with tech in the first place.

Victor’s main point is that our current interfaces like the iPad might feel revolutionary now, but they’re still pretty limited. Everything is flat, behind glass, and designed for a single finger. It works, sure, but it’s kind of like if all literature was written at a Dr. Seuss level: accessible, but not exactly fulfilling for a fully grown adult. He’s asking, “why aren’t we building tools that take advantage of the full range of human abilities—our hands, our spatial awareness, our sense of touch?”

What I found really interesting is that he’s not anti-technology. He actually says the iPad is good for now, kind of like how black-and-white film was great in the early 1900s, but eventually color took over because people realized something was missing. He’s trying to get people, especially researchers and funders, to realize what might be missing in today’s tech and explore new directions, like dynamic tactile interfaces or haptic environments.

He also talks about how voice and gesture controls aren’t the answer either. Voice is fine for simple commands, but it doesn’t help if you want to build something or deeply explore a system. Same with waving your hands in the air. It’s cool in theory, but weird and disorienting in practice, especially without any physical feedback. His whole point is that we learn and create best when we can physically engage with things.

One thing that really stuck with me is this quote he includes from a neuroscientist about how important our fingers are for brain development. Like, if kids grow up only using touchscreens and never really using their hands, they miss out on a whole layer of understanding (physically and conceptually). That spoke to me. It’s not just about functionality, it’s about how tech shapes the way we think and grow.

So yeah, it’s not a rant in the sense of being angry for no reason. It’s more like a wake-up call. He’s saying, “We can do better. We should do better.” And honestly, I agree.

Week 9 – Production

Initial Idea

The goal of this project was to explore the interaction between analog and digital sensors and how they can be used to control outputs creatively. Specifically, the task was to use at least one analog sensor and one digital sensor to control two LEDs, one through digital means (on/off) and the other through analog means (brightness control). The initial idea was to keep the components simple but effective: a push-button as a digital switch and a potentiometer as an analog input, controlling a red and green LED, respectively.

Video demonstration

Execution

The red LED was connected in series with a 330-ohm resistor and controlled by a push-button, which toggled it on or off based on the button state. The green LED was also connected with a 330-ohm resistor and its brightness was adjusted using a 10k potentiometer wired to an analog input pin. The analog value was read from the potentiometer and mapped to a PWM value to vary the green LED’s brightness.

Here is a diagram:


const int potPin = A0;
const int buttonPin = 2;
const int ledDigital = 10;
const int ledAnalog = 9;

bool ledState = false;

void setup() {
  pinMode(buttonPin, INPUT_PULLUP); // button active LOW
  pinMode(ledDigital, OUTPUT);
  pinMode(ledAnalog, OUTPUT);
}

void loop() {
  // Read potentiometer value
  int potValue = analogRead(potPin); // 0 - 1023

  // Map it to PWM range
  int brightness = map(potValue, 0, 1023, 0, 255);
  analogWrite(ledAnalog, brightness);

  // Read button
  if (digitalRead(buttonPin) == LOW) {
    delay(200); // debounce
    ledState = !ledState;
    digitalWrite(ledDigital, ledState);
  }

  delay(50); // loop delay
}


Highlights 

  • The logic worked exactly as planned: the button cleanly toggled the red LED, and the potentiometer provided smooth brightness control for the green LED.

  • The circuit was clean, and the schematic clearly represents the wiring and design intent.

  • I’m proud of how the components were chosen and integrated in a way that’s both simple and pedagogically effective, perfect for demonstrating basic input/output handling on Arduino.

What Could Be Improved

  • Debouncing the push-button in code could be refined further to prevent unintended toggles.

  • A creative twist (e.g., combining analog and digital inputs for more complex LED behaviors or using a different type of analog sensor like an LDR) could elevate the interactivity.

  • Next time, I might also add a small OLED screen or serial output for live feedback on sensor values for better debugging and visualization.

Week 9 Reading Response

Reading Tom Igoe’s “Physical Computing’s Greatest Hits (and Misses)” honestly made me feel a lot more relaxed about project ideas. At first, it seemed like a list of all the things people have already done too many times, like gloves that make music, video mirrors, or floors that light up when you step on them. But then Igoe flips that idea. He basically says it’s okay to revisit these themes because what makes them interesting isn’t the concept itself, but how you approach it. That felt very refreshing. It reminded me that originality doesn’t mean starting from nothing every time. It can come from how you add your own twist to something familiar.

What I also appreciated was how much these themes connect to actions we already do in real life, like tapping, dancing, waving, tilting, or even yelling. It’s amazing how intuitive some of these interactions are, and how physical computing works with that. You don’t have to explain much when someone naturally knows how to interact with your piece.

In “Making Interactive Art: Set the Stage, Then Shut Up and Listen”, Igoe talks more about the role of the artist or designer in this kind of work. The main idea that stood out to me was that we shouldn’t try to control how people respond or tell them exactly what to think. Interactive work is more like setting up a space or a situation and then letting people figure it out on their own. I liked the comparison to a theater director. You can give actors tools and a setting, but the emotional part of the performance has to come from them. The same thing goes for interactive art. It only works when people bring something of themselves to it.

Both readings helped shift the way I think about making interactive projects. It’s not just about cool tech or trying to be the most unique. It’s really about creating something that invites people to participate and explore. Ideally, they leave with their own story or feeling from it, not just the one I imagined in advance.

Week 8 – Creative switch

Ideation

For this project, I created an unusual switch that does not require the use of hands. The switch is activated when two animal-shaped toys from Kinder Surprise make a “kiss.” I used copper foil to conduct electricity, enabling the switch to complete or break a circuit when the toys touch or separate.

Concept and Design

The switch mechanism is based on the principle of completing a circuit when conductive surfaces meet. The copper foil serves as a conductive material, allowing current to flow when the toys touch, thereby activating a response in the circuit.

I initially created a simple circuit where an LED lights up when the toys make contact. Later, I expanded the project by incorporating a second LED to indicate different states:

  • When the toys “kiss,” a green LED turns on.
  • When they are apart, a red LED shines instead.

Circuit 1: Basic Contact Switch

-> When the toys make contact, the circuit closes, and an LED turns on.

Circuit structure

Video demonstration

Code:

const int toyInputPin = 2;    // Pin connected to copper tape
const int ledPin = 13;        // LED output pin

void setup() {
  pinMode(toyInputPin, INPUT_PULLUP);  // Enable internal pull-up
  pinMode(ledPin, OUTPUT);
}

void loop() {
  int contactState = digitalRead(toyInputPin);

  if (contactState == LOW) {
    // Toys are touching — circuit is closed
    digitalWrite(ledPin, HIGH);
  } else {
    // Toys are apart — open circuit
    digitalWrite(ledPin, LOW);
  }

  delay(10); // Small debounce
}

Circuit 2: Dual LED Indicator

    • The red LED is on by default.
    • When the toys touch, the red LED turns off, and a green LED lights up.

Circuit structure

Video demonstration

Code:

const int toyInputPin = 2;    // Copper tape contact pin
const int ledB = 13;          // LED that turns ON when toys touch
const int ledA = 12;          // LED that is ON by default, turns OFF when toys touch

void setup() {
  pinMode(toyInputPin, INPUT_PULLUP);
  pinMode(ledB, OUTPUT);
  pinMode(ledA, OUTPUT);
}

void loop() {
  int contactState = digitalRead(toyInputPin);

  if (contactState == LOW) {
    // Toys are touching
    digitalWrite(ledB, HIGH);  // Turn ON contact LED
    digitalWrite(ledA, LOW);   // Turn OFF default LED
  } else {
    // Toys not touching
    digitalWrite(ledB, LOW);   // Turn OFF contact LED
    digitalWrite(ledA, HIGH);  // Turn ON default LED
  }

  delay(10); // Debounce
}

Challenges and Learnings

  1. Initially, the copper foil contacts were not always reliable. Adjusting the positioning of the conductive material improved accuracy.
  2. The switch was sensitive to small movements, causing flickering. A small delay (10ms) in the code helped stabilize readings.

Future Improvements

Would be interesting to integrate a buzzer that plays a sound when the toys kiss.

Week 8 Reading

Reading Norman’s Emotion & Design: Attractive Things Work Better made me think about how much our emotions influence not only our experience with products but also our perception of their effectiveness. I have always been drawn to minimalist and aesthetically pleasing designs, but I never consciously considered that the way something looks could actually change how well it functions in my mind. Norman’s argument that attractive things put us in a positive emotional state, which then makes us more creative and tolerant of problems, really resonated with me. It reminds me of how I feel when I use a well-designed app: if the interface is clean and straightforward, I naturally assume it’s easier to use, even before I’ve tested its features. When choosing basic necessity goods at the store, I tend to lean towards those with an aesthetically appealing package.  It also made me reflect on branding strategies I’ve worked on in the past, where visual identity is not just about aesthetics but about making the user feel like they resonate with the brand’s values enough to engage more deeply.

Similarly, Her Code Got Humans on the Moon was a fascinating look at Margaret Hamilton’s contributions to the Apollo program, and it left me thinking about the intersection of creativity and logic in problem-solving. Her story challenged the way I usually imagine coding (often as monotonous and technical) by showing how she had to anticipate every possible mistake and failure scenario. I was especially struck by how she fought for software engineering to be recognized as a legitimate discipline. It made me wonder how many fields today are still in that stage, where groundbreaking work is being done but isn’t yet fully acknowledged. In a way, it reminds me of digital community-building and brand storytelling, which are the areas I work in that are often undervalued despite their fundamental importance.

Both readings reinforced something I’ve been thinking about a lot: creativity isn’t just for traditional “creative” roles. Whether in design, engineering, or strategy, thinking outside the box is what pushes boundaries and leads us to creating great things.

Midterm project – Whack a Mole

For my midterm project, I decided to create my own version of the classic Whack-A-Mole game. The goal was to design an interactive experience where players could test their reflexes by clicking on moles as they randomly appeared on the screen. It was inspired by both traditional arcade versions and mobile games, where I wanted to reach a balance between simple navigation and entertainment.

One of the aspects I’m particularly proud of is the way I structured the game logic. I tried to keep my code modular by organizing key components into functions. This not only made the development process more efficient but also allowed me to tweak game parameters easily. Another feature I really enjoyed implementing was the randomization of mole appearances that ensures that no two games feel exactly the same. The timing and positioning algorithms took some hard work, but I’m happy with how smooth the flow of the game turned out.

How it works: Moles pop up from different holes at random intervals, and the player must click on them to score points. Each mole stays visible for a short duration before disappearing, which requires quick reactions from the player. As the game progresses, the frequency of mole appearances increases, adding a greater challenge over time. To add an element of risk, I implemented a bomb mechanic, meaning that if a player accidentally clicks on a bomb instead of a mole, the game ends immediately. This twist keeps players alert and encourages more precise clicking. The game runs in a continuous loop with constant updates on the screen that track the player’s score. Each successful mole hit adds points, while avoiding bombs becomes crucial for “survival”.

Challenges: One of the biggest issues was making sure the game felt responsive without being overwhelming. Initially, the moles appeared and disappeared too quickly which made it nearly impossible to hit them in time. I had to experiment with different timing settings to find the right balance. Another tricky aspect was collision detection, where I had to make sure that clicks were registered correctly when a mole is hit and not on empty spots or bombs. Debugging this issue took some time, but through testing and refining my hitbox logic, I was able to get it working.

Implementation: The game is built with JavaScript and p5.js, which handle the graphics and interactions. I used free images and sound effects from online stocks to make the game more engaging.  The Game class manages the core mechanics which includes the following:

  • Hole and Object Management – moles and bombs are placed randomly to keep the game unpredictable
  • Scoring System – players earn points for hitting moles, while bombs immediately end the game
  • Difficulty Scaling – as the game progresses, moles appear and disappear faster, making it more challenging
  • Sound Effects and Graphics – Background music, whacking sounds, and animations add to an immersive experienceCode snippets:>>Managing moles and bombs
    if (mouseIsPressed) {
      if (dist(mouseX, mouseY, hole.x, hole.y) < hole.d) {
        mouseIsPressed = false;
        punched = true;
        sounds.whak.play();
        setTimeout(() => {
          punched = false;
        }, 200);
        if (hole.type == "mole") {
          hole.type = "hole";
          game.score += 1;
          game.timer += 30;
        } else {
          sounds.bomb.play();
          gameOver();
        }
      }
    }
    

    >>Registering the mouse clicks

    if (frameCount % (game.difficulty - game.score) == 0) {
      let hole = random(game.holes);
      if (hole.type == "mole") {
        hole.type = "hole";
      } else {
        hole.type = "mole";
      }
      if (random(1) < 0.1) {
        hole.type = "bomb";
        setTimeout(() => {
          hole.type = "hole";
        }, 1000);
      }
    }
    

    >>Game Over logic

    function gameOver() {
      sounds.gameover.play();
      setTimeout(() => {
        sounds.back.stop();
        image(imgs.blast.img, mouseX, mouseY, 250, 250);
        background(20, 100);
        textSize(64);
        text("Game Over", width / 2, height / 2);
        textSize(16);
        text("click anywhere to restart!", width / 2, height - 50);
        textSize(46);
        text(game.score, width / 2, 35);
        state = "gameOver";
      }, 100);
      noLoop();
    }


    Improvements: Looking forward, there are definitely some areas that I’d like to improve. One feature I would like to add is a progressive difficulty system, where players are challenged at different levels of difficulty. Right now, the game is fun but could benefit from more depth. On top of that, I’d like to upgrade the user interface by adding a “start” and “home” screen, score tracker, and possibly a leaderboard.

    let imgs = {};
    let sounds = {};
    let punched = false;
    let state = "start";
    
    function preload() {
      backImg = loadImage("assets/back.png");
      font = loadFont("assets/Sigmar-Regular.ttf");
      imgs.blast = { img: loadImage("assets/blast.png"), xoff: 0, yoff: 0 };
      imgs.bomb = { img: loadImage("assets/bomb.png"), xoff: 0, yoff: 0 };
      imgs.hammer = { img: loadImage("assets/hammer.png"), xoff: 0, yoff: 0 };
      imgs.hole = { img: loadImage("assets/hole.png"), xoff: 0, yoff: 30 };
      imgs.mole = { img: loadImage("assets/mole.png"), xoff: 0, yoff: 0 };
    
      sounds.bomb = loadSound("sounds/Bomb hit.mp3");
      sounds.back = loadSound("sounds/Game main theme.mp3");
      sounds.gameover = loadSound("sounds/game-over.mp3");
      sounds.whak = loadSound("sounds/Whacking a mole.mp3");
    }
    
    function setup() {
      createCanvas(600, 600);
      imageMode(CENTER);
      textFont(font);
      game = new Game();
      textAlign(CENTER, CENTER);
    }
    
    function draw() {
      image(backImg, width / 2, height / 2, width, height);
      switch (state) {
        case "start":
          sounds.back.stop();
    
          textSize(68);
          fill(255);
          text("WhACK!\na MOLE!", width / 2, height / 2 - 120);
          textSize(16);
          text("press anywhere to start!", width / 2, height - 30);
    
          textSize(26);
          let img = [imgs.hole, imgs.mole, imgs.bomb];
          image(
            img[floor(frameCount / 60) % 3].img,
            width / 2 + img[floor(frameCount / 60) % 3].xoff,
            height / 2 + 150 + img[floor(frameCount / 60) % 3].yoff
          );
          if (mouseIsPressed) {
            mouseIsPressed = false;
            sounds.whak.play();
            state = "game";
          }
          break;
        case "game":
          game.show();
          if (!sounds.back.isPlaying()) sounds.back.play();
          break;
      }
      if (mouseX != 0 && mouseY != 0) {
        push();
        translate(mouseX, mouseY + 10);
        if (punched) {
          rotate(-PI / 2);
        }
        scale(map(game.holes.length, 4, 20, 1, 0.25));
        image(imgs.hammer.img, 0, 0, 150, 150);
        pop();
      }
    }
    
    function mousePressed() {
      if (state == "gameOver") {
        state = "start";
        game = new Game();
        mouseIsPressed = false;
        loop();
      }
    }
    function gameOver() {
      sounds.gameover.play();
      setTimeout(() => {
        sounds.back.stop();
        image(imgs.blast.img, mouseX, mouseY, 250, 250);
        background(20, 100);
        textSize(64);
        text("Game Over", width / 2, height / 2);
        textSize(16);
        text("click anywhere to restart!", width / 2, height - 50);
        textSize(46);
        text(game.score, width / 2, 35);
        state = "gameOver";
      }, 100);
    
      noLoop();
    }
    
    class Game {
      constructor() {
        this.x = 10;
        this.y = height / 2 - 80;
        this.w = width - 20;
        this.h = height / 2 + 70;
    
        this.holesNum = 4;
        this.holes = [];
        this.difficulty = 60;
        this.score = 0;
        this.timer = 4800;
      }
      show() {
        //timer
        if (this.timer > 4800) this.timer = 4800;
        this.timer -= 1.5;
        fill(20, 100);
        rect(10, 5, width - 20, 10);
        fill(255);
        rect(10, 5, map(this.timer, 0, 4800, 0, width - 20), 10);
        if (this.timer < 0) {
          mouseX = width / 2;
          mouseY = height / 2;
          gameOver();
        }
    
        //score
        fill(255);
        textSize(46);
        if (punched) textSize(54);
        text(this.score, width / 2, 35);
    
        if (this.holesNum != this.holes.length) {
          this.holes = this.findHolePositions(1);
        }
        for (let i = 0; i < this.holes.length; i++) {
          push();
          translate(this.holes[i].x, this.holes[i].y);
          scale(this.holes[i].d / 250);
          let img;
          switch (this.holes[i].type) {
            case "hole":
              img = imgs.hole;
              //nothing
              break;
            case "mole":
              img = imgs.mole;
              break;
            case "bomb":
              img = imgs.bomb;
              break;
          }
    
          if (this.holes[i].type == "mole" || this.holes[i].type == "bomb") {
            //check mouse click on mole
            if (mouseIsPressed) {
              if (
                dist(mouseX, mouseY, this.holes[i].x, this.holes[i].y) <
                this.holes[i].d
              ) {
                mouseIsPressed = false;
                punched = true;
                sounds.whak.play();
                setTimeout(() => {
                  punched = false;
                }, 200);
                if (this.holes[i].type == "mole") {
                  this.holes[i].type = "hole";
                  this.score += 1;
                  this.timer += 30;
                } else {
                  sounds.bomb.play();
                  gameOver();
                }
              }
            }
          }
          image(img.img, img.xoff, img.yoff);
          pop();
        }
        if (this.difficulty - this.score < 20) {
          this.difficulty += 30;
          this.holesNum += 1;
        }
    
        if (frameCount % (this.difficulty - this.score) == 0) {
          let hole = random(this.holes);
          if (hole.type == "mole") {
            hole.type = "hole";
          } else {
            hole.type = "mole";
          }
          if (random(1) < 0.1) {
            hole.type = "bomb";
            setTimeout(() => {
              hole.type = "hole";
            }, 1000);
          }
        }
      }
    
      findHolePositions(n, d = 200) {
        let arr = [];
    
        for (let i = 0; i < this.holesNum; i++) {
          let x = random(this.x + d / 2, this.x + this.w - d / 2);
          let y = random(this.y + d / 2, this.y + this.h - d / 2);
          arr.push({ x: x, y: y, d: d, type: "hole" });
        }
        //no hole should overlap
        for (let i = 0; i < arr.length; i++) {
          for (let j = 0; j < arr.length; j++) {
            if (i != j) {
              let d_ = dist(arr[i].x, arr[i].y, arr[j].x, arr[j].y);
              if (d_ < d) {
                n += 1;
                if (n > 50) {
                  n = 0;
                  d *= 0.9;
                  return this.findHolePositions(n, d);
                }
                return this.findHolePositions(n, d);
              }
            }
          }
        }
        return arr;
      }
    }
    

    The Visuals: