Concept
ExpressNotes is an interactive audiovisual art experience that blends music and generative visuals to foster expressive play. The project allows users to press buttons on a physical interface (Arduino with pushbuttons) to play piano notes, while dynamic visuals are generated on-screen in real-time. Each note corresponds to a unique visual form and color, turning a simple musical interaction into a creative multimedia composition. The project invites users to explore the relationship between sound and visuals, while also giving them the ability to control the visual environment through canvas color selection and a volume knob for audio modulation.
Implementation Overview
The system is composed of three core components: the Arduino microcontroller, which handles hardware input; the P5.js interface, which handles real-time visuals and audio playback; and a communication bridge between the two using the Web Serial API. The user first lands on a welcome screen featuring a soft background image and the title ExpressNotes, along with instructions and canvas customization. Upon connecting to the Arduino, users select either a black or white canvas before launching into the live performance mode. From there, pressing a button triggers both a piano note and a visual form, while a potentiometer allows for fine volume control of all audio feedback.
Interaction Design
The project emphasizes minimalism and clarity in its interaction model. The welcome screen gently guides users to make creative choices from the start by allowing them to select a canvas color, helping them set the tone for their audiovisual artwork. Once the canvas is active, each button press corresponds to a distinct musical note and is visually reflected through shape, color, and animation. Users can reset the artwork with a “Clear Canvas” button or return to the welcome screen with an “Exit to Intro” button. Additionally, users can press the ‘C’ key on their keyboard to instantly clear the screen. These layered controls enhance the sense of flow and control throughout the interaction.
Arduino Code Description
The Arduino handles seven pushbuttons and a potentiometer. Each button is mapped to a musical note—A through G—and each time a button is pressed, the Arduino sends a serial message like note:C to the connected computer. The potentiometer is used to adjust volume dynamically. Its analog value is read on every loop and sent as a message like volume:873. To avoid repeated messages while a button is held down, the code tracks the previous state of each button to only send data when a new press is detected. The complete Arduino sketch is included below:
const int potPin = A0;
const int buttonPins[] = {2, 3, 4, 5, 6, 7, 8}; // Buttons for A, B, C, D, E, F, G
const char* notes[] = {"A", "B", "C", "D", "E", "F", "G"};
bool buttonStates[7] = {false, false, false, false, false, false, false};

void setup() {
  Serial.begin(57600);
  for (int i = 0; i < 7; i++) {
    pinMode(buttonPins[i], INPUT_PULLUP);
  }
}

void loop() {
  int volume = analogRead(potPin);
  Serial.print("volume:");
  Serial.println(volume);

  for (int i = 0; i < 7; i++) {
    bool isPressed = digitalRead(buttonPins[i]) == LOW;
    if (isPressed && !buttonStates[i]) {
      Serial.print("note:");
      Serial.println(notes[i]);
    }
    buttonStates[i] = isPressed;
  }

  delay(100);
}
P5.JS Code :
let port;
let connectBtn;
let soundA, soundB, soundC, soundD, soundE, soundF, soundG;
let volume = 0.5;
let bgImage;
let isConnected = false;
let showIntro = false;
let canvasColor = 0; // 0 for black, 255 for white
let colorChoiceMade = false;
let blackBtn, whiteBtn, clearBtn, exitBtn;
let firstDraw = true;

function preload() {
  soundFormats('wav');
  soundA = loadSound('A.wav');
  soundB = loadSound('B.wav');
  soundC = loadSound('C.wav');
  soundD = loadSound('D.wav');
  soundE = loadSound('E.wav');
  soundF = loadSound('F.wav');
  soundG = loadSound('A.wav'); // Adjust if different from A
  bgImage = loadImage('background.jpg');
}

function setup() {
  createCanvas(windowWidth, windowHeight);
  background(0);
  textAlign(CENTER, CENTER);
  port = createSerial();

  connectBtn = createButton("Connect to Arduino");
  connectBtn.position(width / 2 - 100, height / 2);
  connectBtn.style('font-size', '20px');
  connectBtn.style('padding', '15px 30px');
  connectBtn.mousePressed(connectToArduino);
}

function draw() {
  if (firstDraw) {
    background(0);
    firstDraw = false;
  }

  if (!isConnected) {
    fill(255);
    textSize(32);
    text("ExpressNotes", width / 2, height / 2 - 100);
    return;
  }

  if (isConnected && !showIntro) {
    showIntro = true;
  }

  if (showIntro && !colorChoiceMade) {
    displayIntro();
    return;
  }

  // Only handle serial data, don't clear the canvas
  let str = port.readUntil("\n");
  if (str.length > 0) {
    handleSerial(str.trim());
  }
}

function connectToArduino() {
  if (!port.opened()) {
    let used = usedSerialPorts();
    if (used.length > 0) {
      port.open(used[0], 57600);
    } else {
      port.open('Arduino', 57600);
    }
    isConnected = true;
    connectBtn.hide();
  }
}

function displayIntro() {
  tint(255, 100);
  image(bgImage, 0, 0, width, height);
  noTint();

  fill(0, 0, 0, 200);
  rect(width / 4, height / 4, width / 2, height / 2, 20);

  fill(255);
  textSize(32);
  text("ExpressNotes", width / 2, height / 4 + 50);
  textSize(16);
  text(
    "Welcome to ExpressNotes!\n\nThis interactive application lets you create\nvisual art while playing musical notes.\n\nChoose your canvas\nand start creating!",
    width / 2,
    height / 2 - 40
  );

  // Create canvas color selection buttons
  if (!blackBtn && !whiteBtn) {
    blackBtn = createButton("Black Canvas");
    blackBtn.position(width / 2 - 150, height / 2 + 80);
    blackBtn.mousePressed(() => chooseCanvasColor(0));

    whiteBtn = createButton("White Canvas");
    whiteBtn.position(width / 2 + 50, height / 2 + 80);
    whiteBtn.mousePressed(() => chooseCanvasColor(255));
  }
}

function chooseCanvasColor(colorValue) {
  canvasColor = colorValue;
  colorChoiceMade = true;
  if (blackBtn) blackBtn.remove();
  if (whiteBtn) whiteBtn.remove();
  background(canvasColor); // Only clear when changing colors

  // Show the Clear and Exit buttons after canvas selection
  showCanvasControls();
}

function showCanvasControls() {
  clearBtn = createButton("Clear Canvas");
  clearBtn.position(10, 10);
  clearBtn.mousePressed(clearCanvas);

  exitBtn = createButton("Exit to Intro");
  exitBtn.position(10, 50);
  exitBtn.mousePressed(exitToIntro);
}

function clearCanvas() {
  background(canvasColor); // Clear canvas with current background color
}

function exitToIntro() {
  background(0);
  showIntro = false;
  colorChoiceMade = false;
  clearBtn.remove();
  exitBtn.remove();
  blackBtn = null;
  whiteBtn = null;
  // Reset the intro page
  showIntro = true;
  displayIntro();
}

function handleSerial(data) {
  if (data.startsWith("note:")) {
    let note = data.substring(5);
    playNote(note);
    showVisual(note);
  } else if (data.startsWith("volume:")) {
    let val = parseInt(data.substring(7));
    volume = map(val, 0, 1023, 0, 1);
    setVolume(volume);
  }
}

function playNote(note) {
  if (note === "A") soundA.play();
  else if (note === "B") soundB.play();
  else if (note === "C") soundC.play();
  else if (note === "D") soundD.play();
  else if (note === "E") soundE.play();
  else if (note === "F") soundF.play();
  else if (note === "G") soundG.play();
}

function setVolume(vol) {
  [soundA, soundB, soundC, soundD, soundE, soundF, soundG].forEach(s => s.setVolume(vol));
}

function showVisual(note) {
  push(); // Save current drawing state
  if (note === "A") {
    fill(0, 0, 255, 150);
    noStroke();
    ellipse(random(width), random(height), 50);
  } else if (note === "B") {
    fill(255, 215, 0, 150);
    noStroke();
    triangle(random(width), random(height), random(width), random(height), random(width), random(height));
  } else if (note === "C") {
    fill(255, 0, 0, 150);
    noStroke();
    rect(random(width), random(height), 60, 60);
  } else if (note === "D") {
    stroke(0, 255, 255);
    noFill();
    line(random(width), 0, random(width), height);
  } else if (note === "E") {
    fill(0, 255, 0, 150);
    noStroke();
    ellipse(random(width), random(height), 80);
  } else if (note === "F") {
    fill(255, 105, 180, 150);
    noStroke();
    rect(random(width), random(height), 30, 90);
  } else if (note === "G") {
    stroke(255, 255, 0);
    noFill();
    line(0, random(height), width, random(height));
  }
  pop(); // Restore original drawing state
}

function windowResized() {
  resizeCanvas(windowWidth, windowHeight);
  if (!isConnected) {
    connectBtn.position(width / 2 - 100, height / 2);
  }
}


function keyPressed() {
  if (key === 'c' || key === 'C') {
    background(canvasColor); // Clear canvas with current background color
  }
}
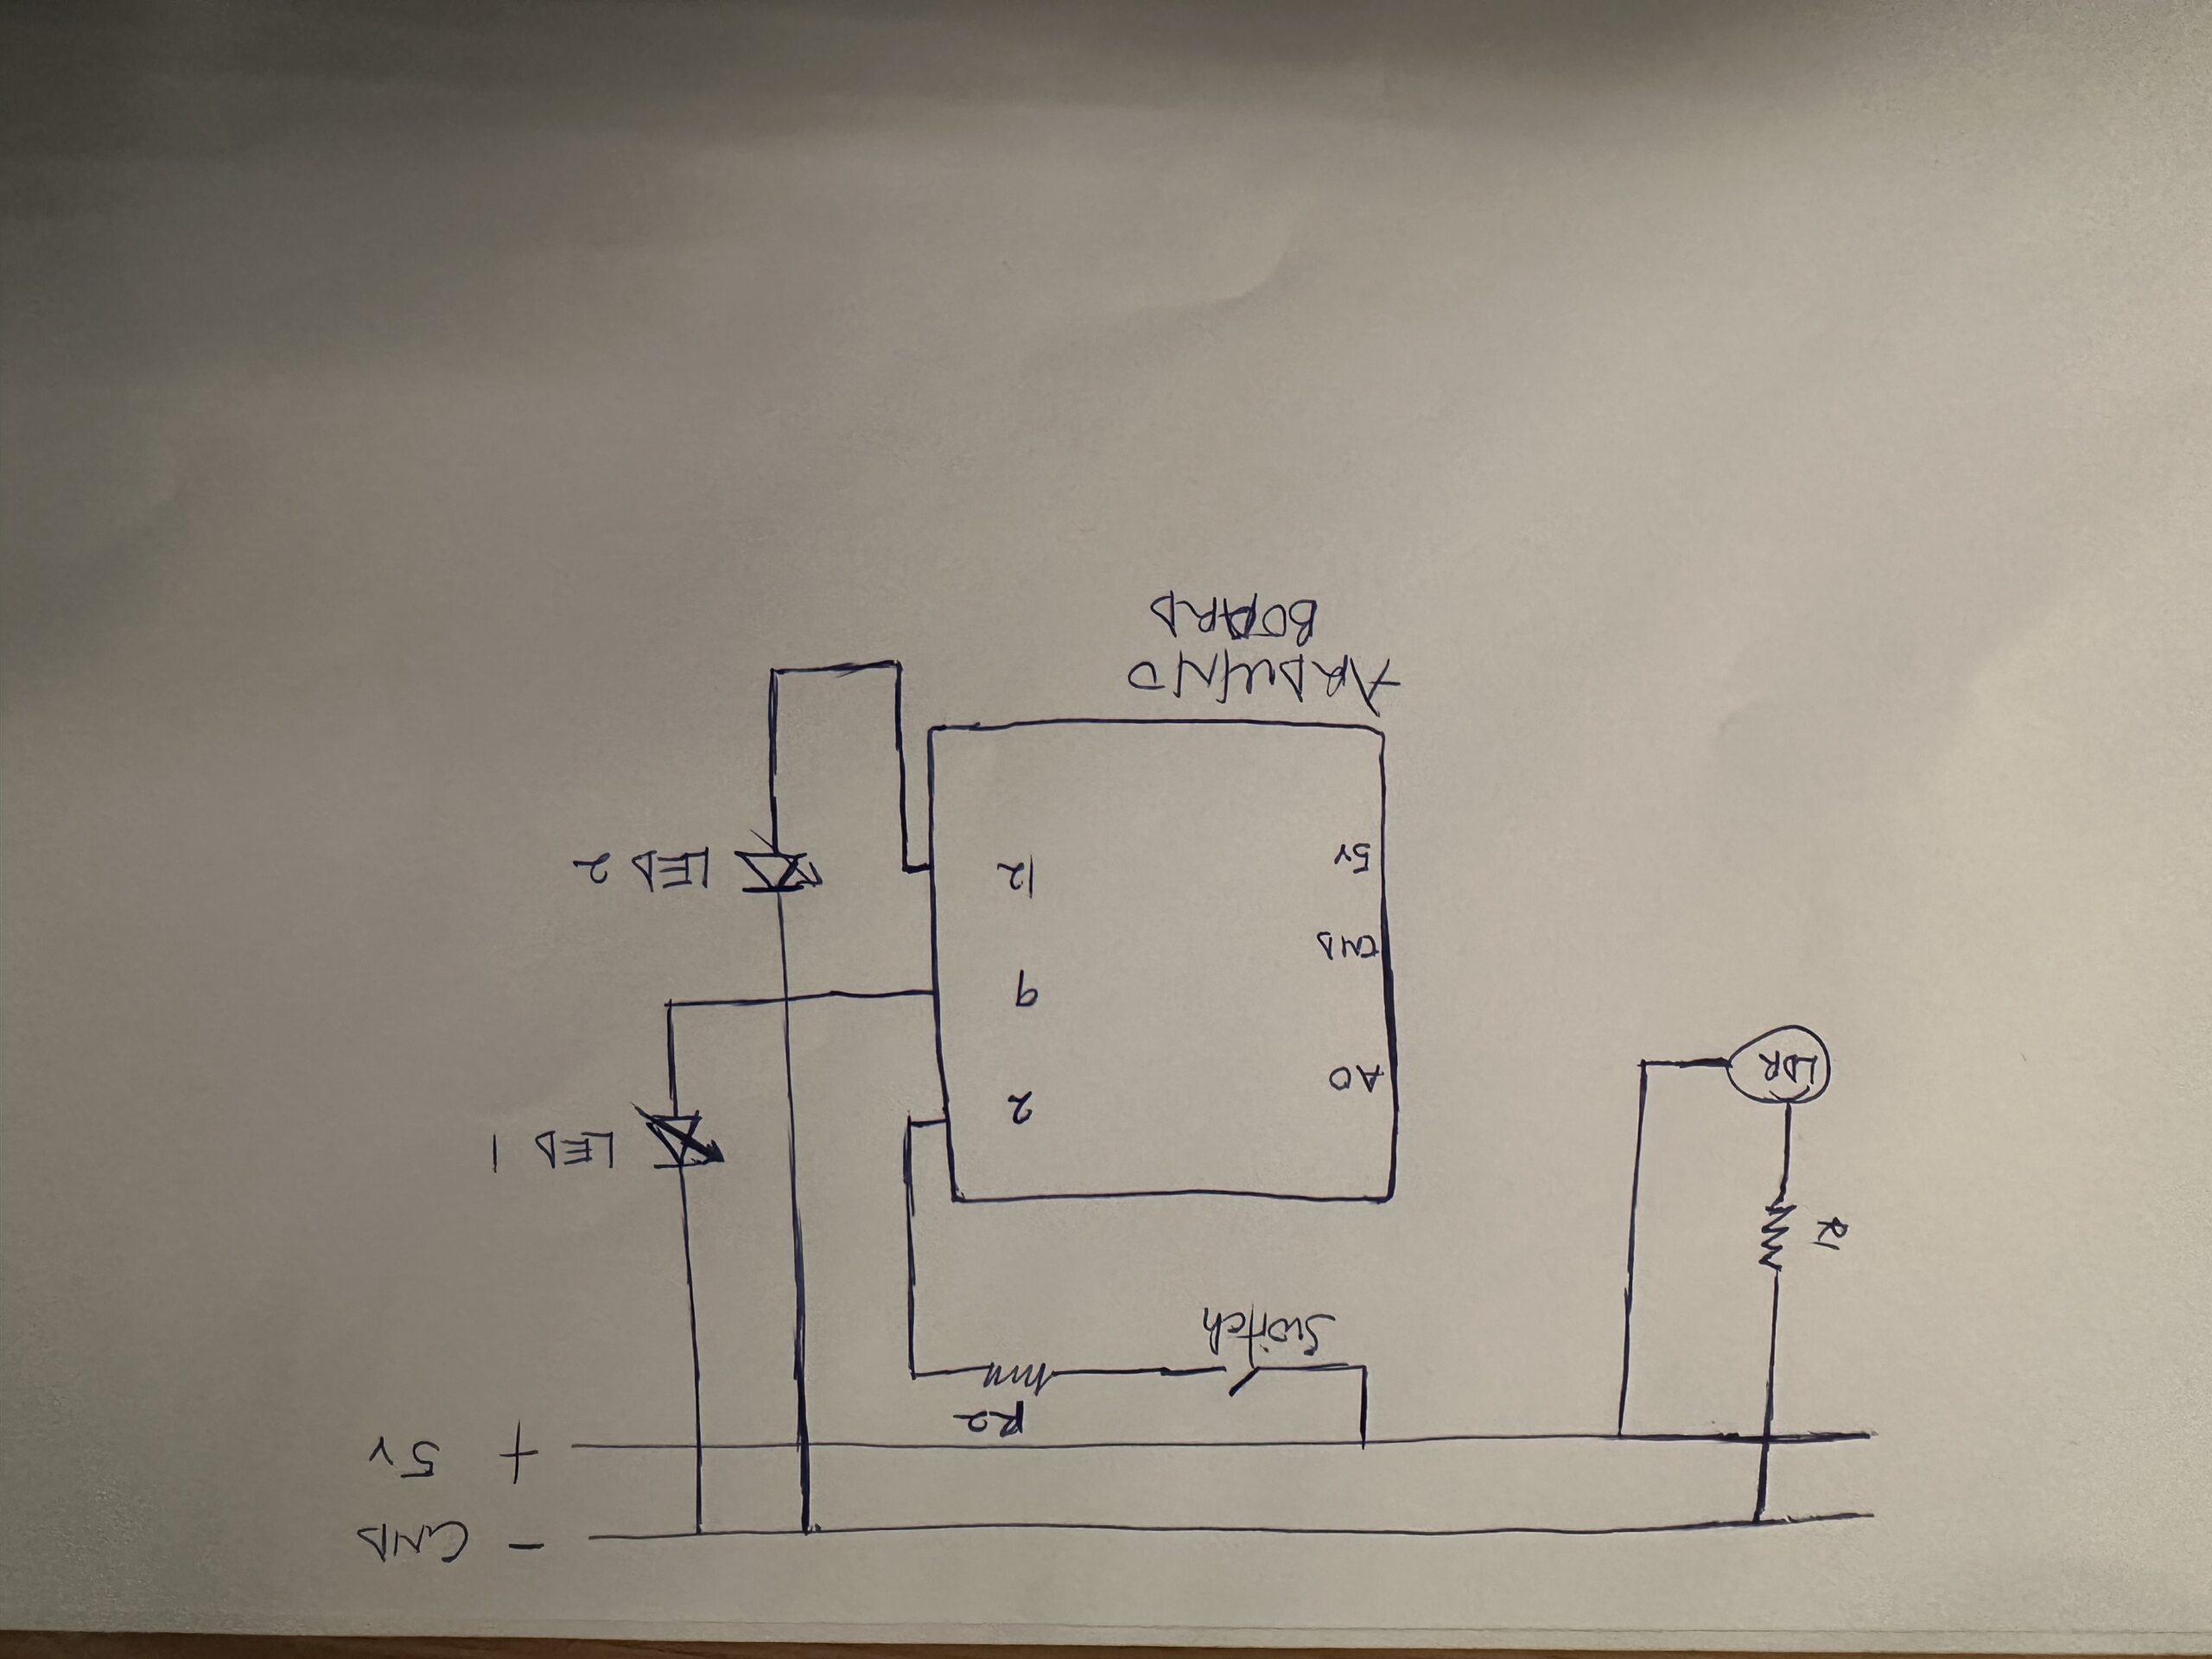
Circuit Schematic
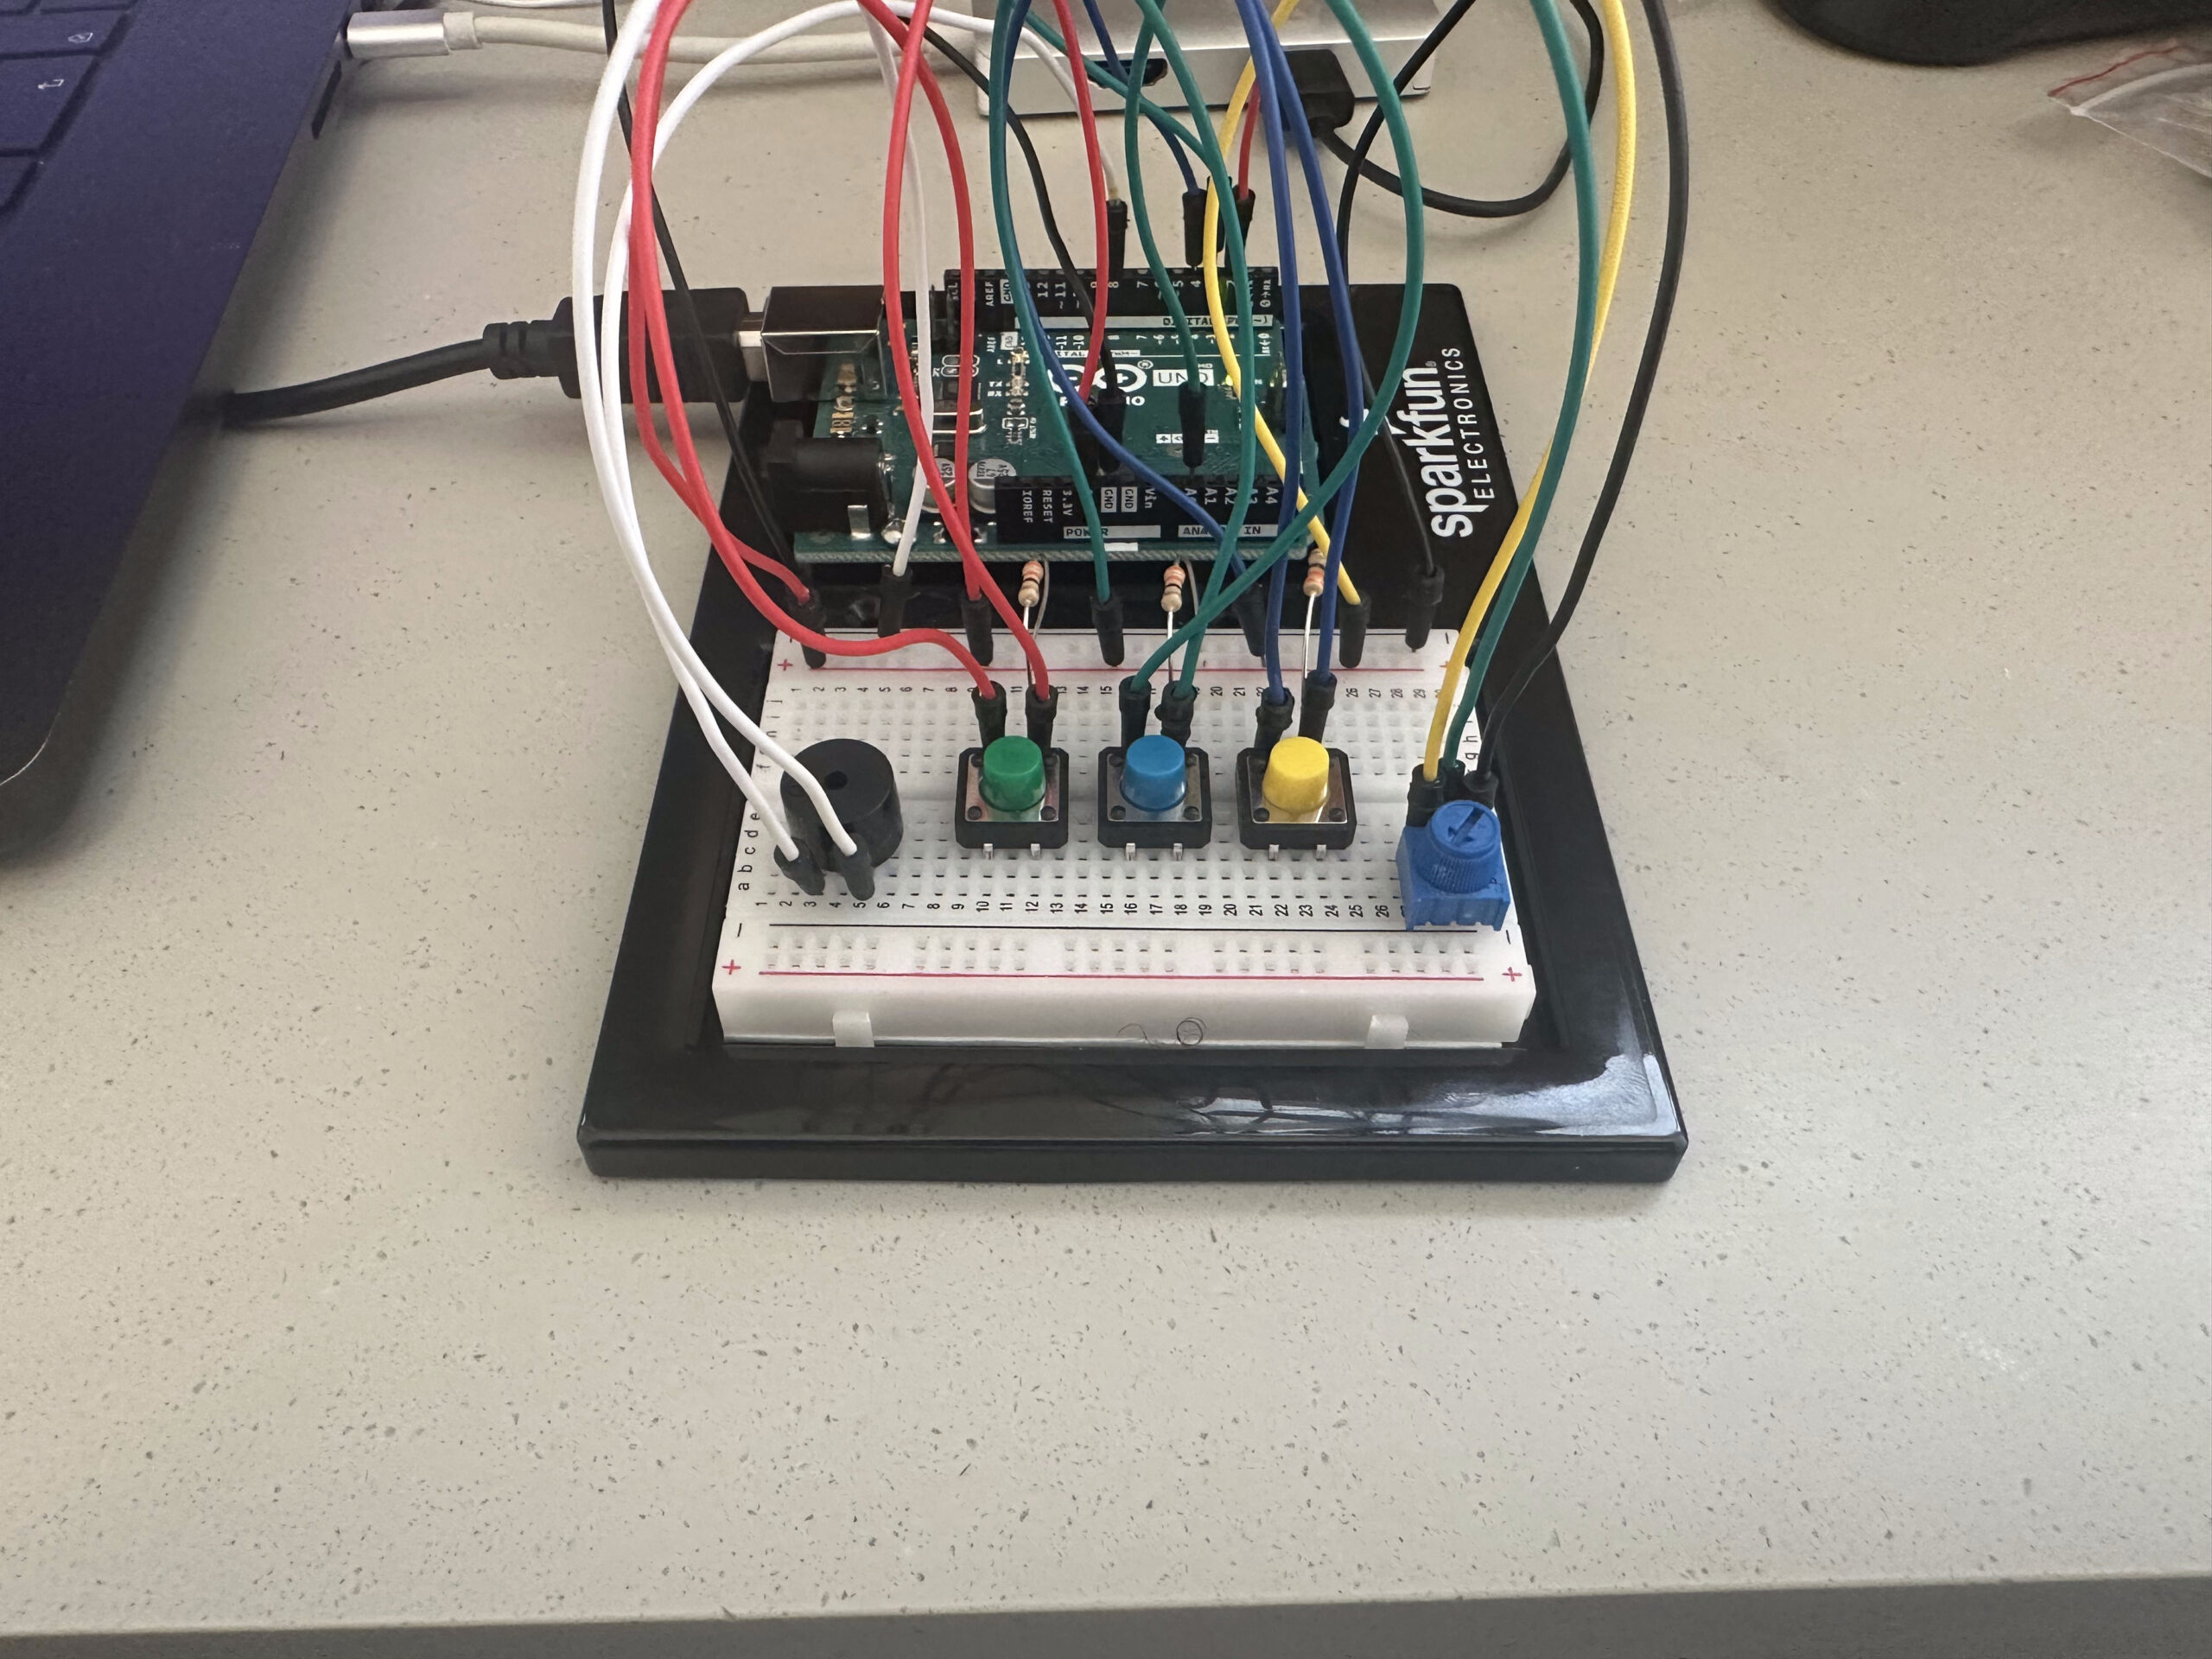
The circuit includes seven pushbuttons connected to Arduino digital pins 2 through 8, with internal pull-up resistors enabled. Each button connects one leg to ground and the other to a digital pin. A potentiometer is connected with its middle pin going to A0 on the Arduino, while the outer pins go to 5V and GND. A small speaker or piezo buzzer is powered separately and connected to the P5.js interface for audio playback.
P5.js Code Description
The P5.js sketch handles all audio-visual feedback and interaction. Upon launching, the user is greeted with a title screen and two buttons to choose between a black or white canvas. Once the selection is made, the sketch draws continuously without clearing the background, allowing visuals from each button press to layer and evolve over time. Each button triggers a different note (using .wav files preloaded into the project) and spawns a unique visual form—such as colored circles, triangles, rectangles, and lines—with transparency effects for layering. Volume is dynamically updated from the serial input and mapped to the 0–1 range for sound control. The code uses the p5.webserial library to read serial messages from the Arduino, interpret them, and respond accordingly.
Communication Between Arduino and P5.js
Communication is established using the Web Serial API integrated into P5.js via the p5.webserial library. The Arduino sends simple serial strings indicating either the current volume or the note pressed. The P5.js sketch listens for these messages using port.readUntil("\n"), parses them, and then calls appropriate functions to play sounds or update the interface. For example, a message like note:E will trigger the playNote("E") function and then create the matching shape with showVisual("E"). This streamlined, human-readable message protocol keeps the interaction fluid and easy to debug.
Project Highlights
One of the most rewarding aspects of ExpressNotes is the tight integration between sound, visuals, and user interaction. The use of simple hardware elements to trigger complex audiovisual responses creates an accessible yet expressive digital instrument. The welcome screen and canvas selection elevate the experience beyond just utility and into a more artistic, curated space. The project has also succeeded in demonstrating how hardware and software can communicate fluidly in the browser using modern tools like Web Serial, eliminating the need for extra software installations or complex drivers.
Future Improvements
For future iterations, several enhancements could expand the expressive range of the project. First, including different instrument samples or letting users upload their own would personalize the sound experience. Second, adding real-time animation or particle effects tied to note velocity or duration could create richer visual compositions. Additionally, saving and exporting the canvas as an image or even a short video clip would let users archive and share their creations. Improving responsiveness by removing the delay in the Arduino loop and supporting multiple simultaneous button presses are also key technical upgrades to consider.
Link to video demo : https://drive.google.com/drive/folders/1so48ZlyaFx0JvT3NU65Ju6wzncWNYsBa