Week 4 – ask the magic ball for your future


Overview

Honestly I have no idea where this idea came from. I’ve been scrolling a lot on Pinterest, and I saw a lot of these kinds of images, and also my mom just found recently our old Magic 8 Ball, so I thought why not combine the two?

I just wanted to create something fun as well. I have been having some pretty bad days, and making this not super serious helped a lot with my mood, and I really enjoyed coming up with all the responses for the Magic Ball. I also made some of my friends try it out once it was ready and they also really enjoyed it.
Process


Originally, I really wanted to make it look very cool, and make it 3D, but I saw that I can only draw a sphere in a WebGL mode, so I just stayed with circles and a triangle. I had to resize them a lot so that the text won’t be tiny, it is not that big like this either, but much better than originally.

I ALSO wanted it to have some magical background, BUT the preload function was not working here either. I have no idea what I did wrong, but it just wouldn’t work at all, so in the end I just stayed with this background.

The Code + a LOT of problems

Now, even though the code is short, I had the most amount of problems with it so far. The first thing I did, even before writing a CSV file was to draw the main object, so the Magic ball. This was really easy and I had some fun even by adding some shade to it:

function draw() {
  background(220);

  //the structure of the ball, drawing a bunch of circles, a triangle and the shadow to make it look fancier 
  fill('grey')
  noStroke();
  ellipse(300, 530, 500, 120);
  fill('black');
  circle(width / 2, height / 2, 500)
  fill('white');
  circle(width / 2, height /2, 400)
  fill('black');
  circle(width/2, height/2, 300);
  fill('white');
  triangle(300, 420, 200, 220, 400, 220);

After creating this, I strated on the actually challenging part of the code. This is how the start of the code looks like now:

let question; //inputfield
let submitQuestion; //button
let responses = []; //csv of possible responses
let currentResponse = ""; //store current response on the screen

//async_await, the code waits until the full CSV file is fully loaded, and only then continues and creates the canvas and everything below
async function setup() {

//try and catch, because I had SO many errors with loading the CSV, and could not figure out where it went wrong
  try {
    responses = await loadStrings('responses.csv');
  console.log('Loaded responses:', responses);
  } catch (error) {
    console.error('could not load', error);
  }
  
  createCanvas(600, 600);

Well it didn’t look like this always. After the drawings, I created a CSV file in p5.js for all the responses, and when I was done I made a preload function before setup, so I could preload that CSV. BUT. For some reason, I have no idea why, the text just wouldn’t appear. I tried to figure it out with a console.log, and it turns out that it was for some reason returning an empty array. I tried everything to make it work, I quadruple checked the came of the file, that my browser was allowing it to read it, I changed the loadStrings function to loadTable, but it just didn’t work. So, after some meditation to calm myself down, I asked ChatGPT, what I should do. It suggested to try the things I already tried, but it also mentioned the try and catch as well. I did learn some C# back in high school, and I remembered it slightly, but I decided to search it up just in case and try it out after. Previously, when I was searching for answers among the p5.js references, I also found the async_await function, so I combined the two together, AND IT WORKED. I was so happy, I didn’t dare touch it anymore.

The reason why I know it worked after, and only after that is because while I was waiting for the Javascript fairy to solve my problem, I made a little question field and a button for submission. Since the Magic Ball needs a question for it to answer, and for the user to be able to actually interact with it, I made this, directly below the previous code:

 //Create an input field to ask a question
  question = createInput('');
  question.attribute('placeholder', 'Ask a question from the Magic Ball!');
  question.position(170, 5);
  question.size(150, 30);

  submitQuestion = createButton('GOO!');
  submitQuestion.position(330, 5);
  submitQuestion.size(50, 36);
  
  //when the button is pressed it calls the giveAnswer function
  submitQuestion.mousePressed(giveResponse);
}

// if checks if there is any user input, and if there is it goes through the CSV file and choses a random response
function giveResponse(){
  let userQuestion = question.value().trim();

  if (userQuestion.length > 0) {
  currentResponse = random(responses);
  } 
}

The giveResponse function works with a simple if. I am not exactly sure of this is the most elegant way to do this, but it worked so I accepted it. As the last step to give my text a few attributes I added this in the draw function:

  //the reponses in the triangle
  fill('black');
  textStyle(BOLDITALIC);
  textAlign(CENTER, CENTER);
  textSize(12);
  text(currentResponse, 220, 230, 160, 120);
}

The piece if code I am the most proud of, however remains that little try and catch part, just because of the absolute misery it gave me.

And finally, here is the full code:

let question; //inputfield
let submitQuestion; //button
let responses = []; //csv of possible responses
let currentResponse = ""; //store current response on the screen

//async_await, the code waits until the full CSV file is fully loaded, and only then continues and creates the canvas and everything below
async function setup() {

//try and catch, because I had SO many errors with loading the CSV, and could not figure out where it went wrong
  try {
    responses = await loadStrings('responses.csv');
  console.log('Loaded responses:', responses);
  } catch (error) {
    console.error('could not load', error);
  }
  
  createCanvas(600, 600);
 
  //Create an input field to ask a question
  question = createInput('');
  question.attribute('placeholder', 'Ask a question from the Magic Ball!');
  question.position(170, 5);
  question.size(150, 30);

  submitQuestion = createButton('GOO!');
  submitQuestion.position(330, 5);
  submitQuestion.size(50, 36);
  
  //when the button is pressed it calls the giveAnswer function
  submitQuestion.mousePressed(giveResponse);
}

// if checks if there is any user input, and if there is it goes through the CSV file and choses a random response
function giveResponse(){
  let userQuestion = question.value().trim();

  if (userQuestion.length > 0) {
  currentResponse = random(responses);
  } 
}

function draw() {
  background(220);

  //the structure of the ball, drawing a bunch of circles, a triangle and the shadow to make it look fancier 
  fill('grey')
  noStroke();
  ellipse(300, 530, 500, 120);
  fill('black');
  circle(width / 2, height / 2, 500)
  fill('white');
  circle(width / 2, height /2, 400)
  fill('black');
  circle(width/2, height/2, 300);
  fill('white');
  triangle(300, 420, 200, 220, 400, 220);

  //the reponses in the triangle
  fill('black');
  textStyle(BOLDITALIC);
  textAlign(CENTER, CENTER);
  textSize(12);
  text(currentResponse, 220, 230, 160, 120);
}


For the future

I feel like I learnt a lot from this assignment, for some reason even more than from any previous one. I feel like I know a little more about how I have more ways to start a certain problem, but also that I am able to ask AI for help without asking it to solve it for me. Even though it was hard, I am proud to have finished it. In the future, I would love to make a more refined ball as well, but non of the images were loading in the preload function, so I ended up drawing it myself.

Resources

I took these as base for the responses:
https://magic-8ball.com/magic-8-ball-answers/

Creating the button and the question field:
https://p5js.org/reference/p5/createInput

https://editor.p5js.org/Samizdat/sketches/eUsieMk6j

The async_await function, after the preload() was not working:

https://p5js.org/reference/p5/setup/

https://p5js.org/reference/p5/async_await/

Text style:

https://p5js.org/reference/p5/textStyle/

Some help to debug the problem:

I asked ChatGPT to help me figure out what the problem was, after the preload() function kept returning my array as empty, and it suggested the try and catch solution, so I did some research on that:

https://www.w3schools.com/js/js_errors.asp

https://www.geeksforgeeks.org/javascript/javascript-errors-throw-and-try-to-catch/

The final code was written by me, the AI only helped in terms of suggetsing me this solution.


Week 4 – The Psychopathology of Everyday Things


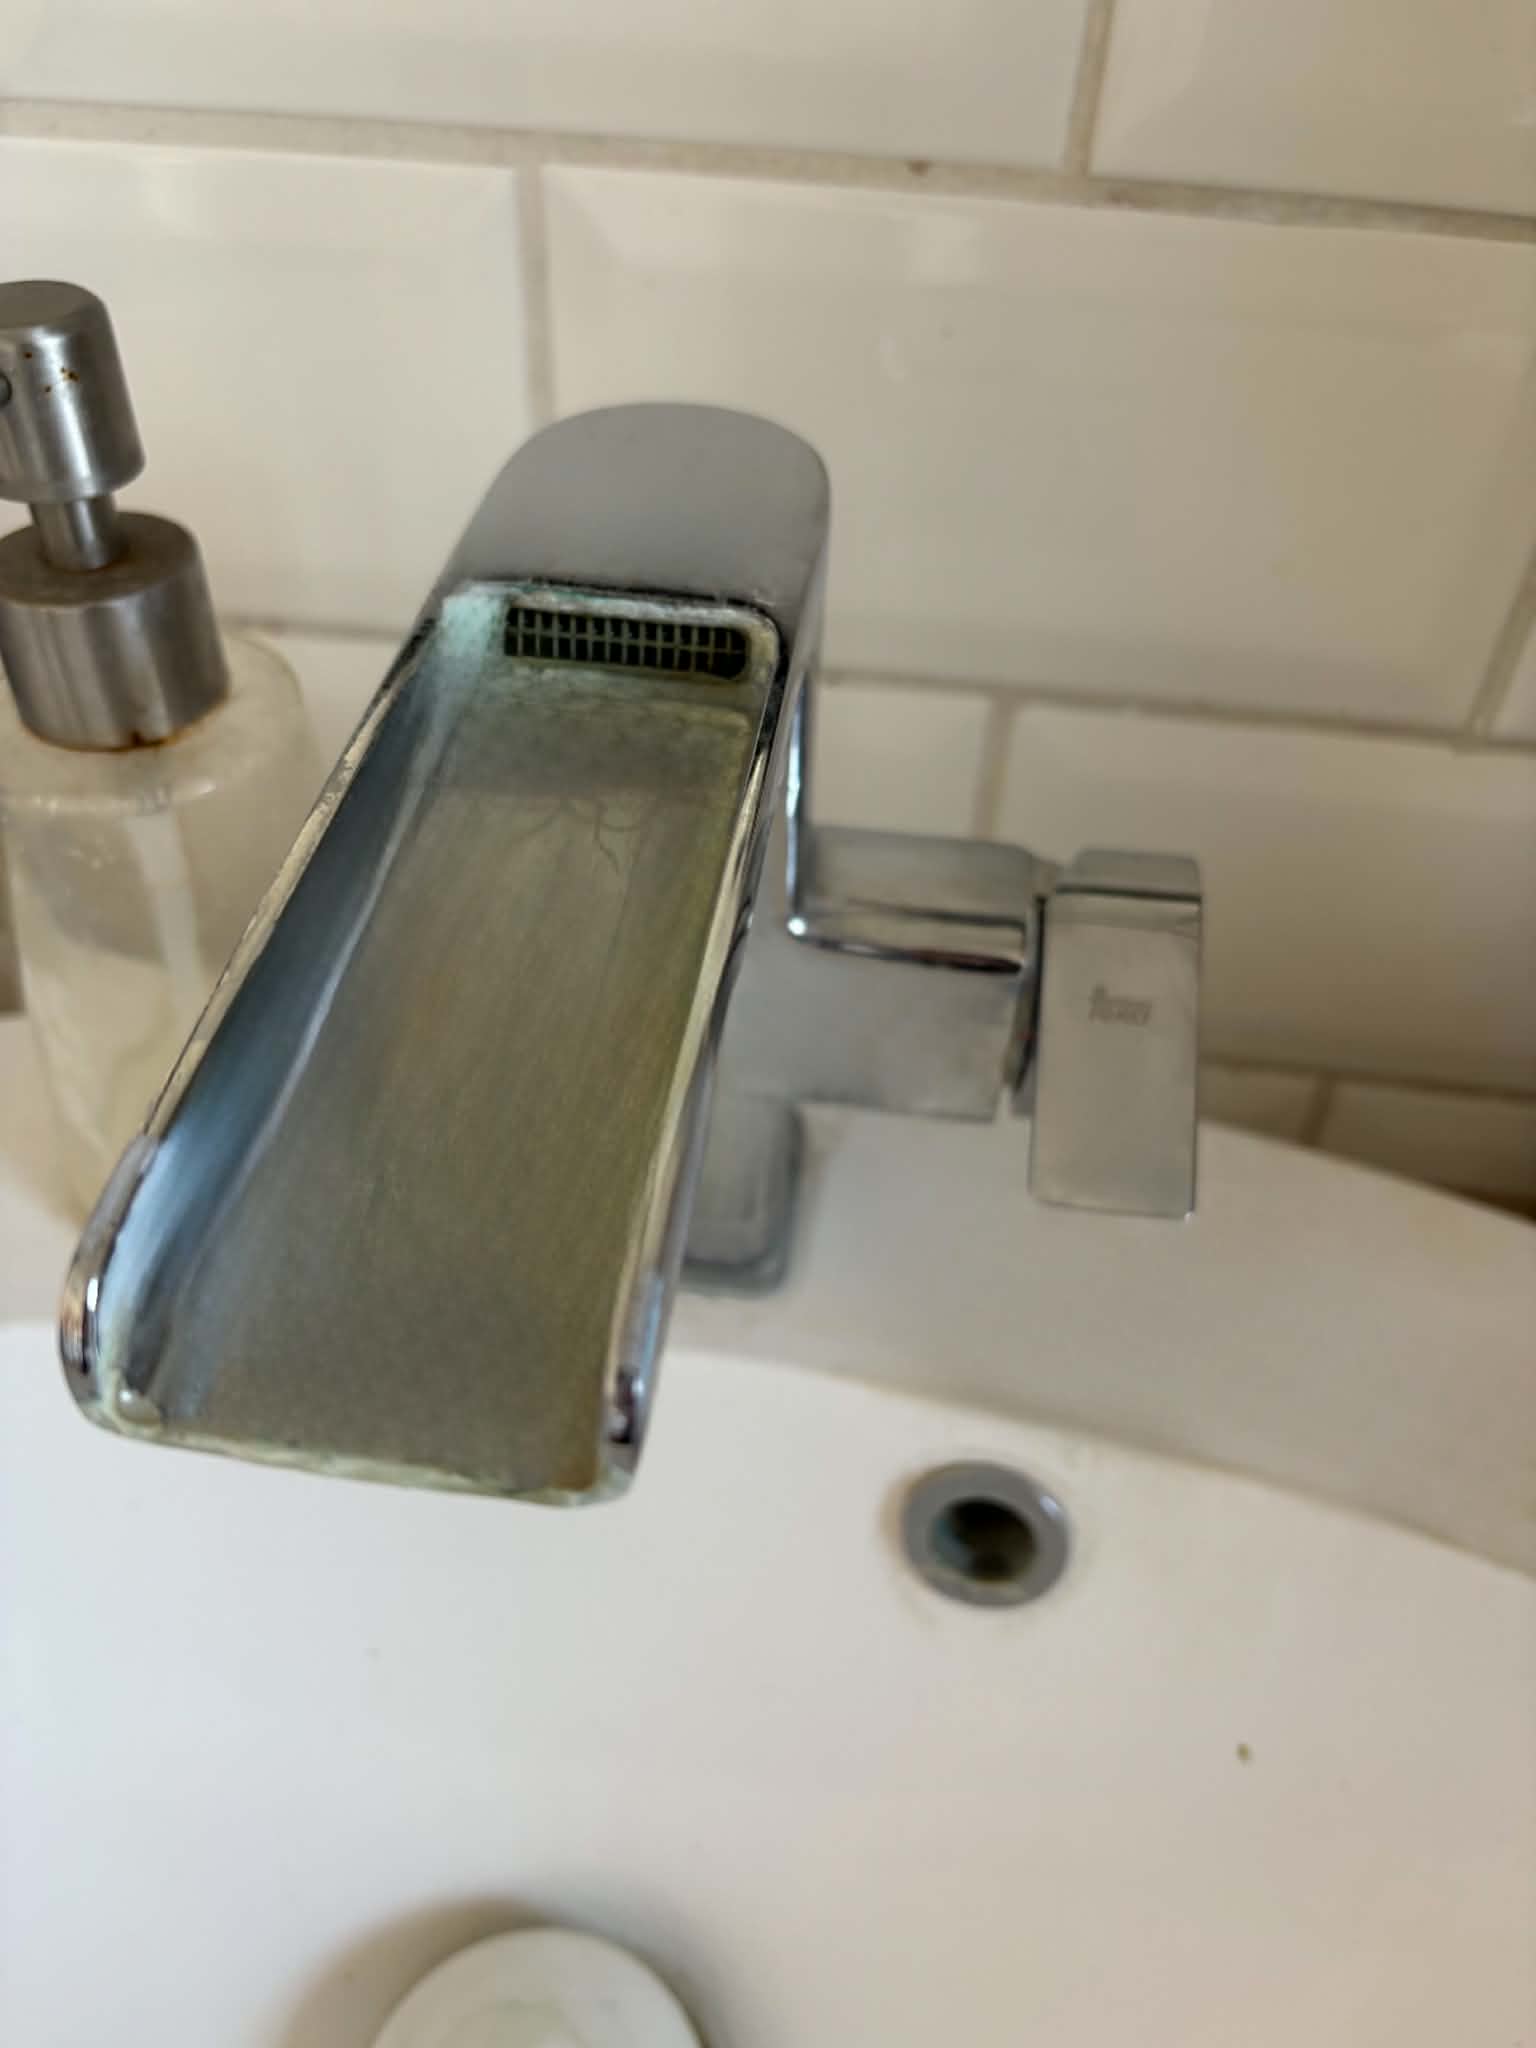
To start with, the reading, especially the examples of the sink in the hotel and the pull-push doors, made me think of a personal example, actually. We have a sink at home in the bathroom, and whoever visits us for the first time, they are always so confused by it, because you have to turn the faucet to the side, not up, to turn it on. (Figure 1) Now, it is on the side and not the top, but other than that nothing really indicates how it should be used. My family and I only know it because we have been living there for years, and I always get surprised when someone asks for help with it, but now that I think of it, it really lacks a good signifier.

Figure 1 – Our sink has the tap on the right side, which confuses a lot of people how to use it. You have to turn it to the side to turn it on. (Photo by my Mom)

For something else that really bothers me with products other than the things mentioned is probably when they overexplain something relatively easy-to-understand function, at the cost of describing something that ACTUALLY needs some description. In the past, whenever I tried to connect a wireless device to my phone or laptop I always had to look it up online how to actually connect it, because each of them has different methods to do so. The reason why I always have to go online is that in the instruction manual, they were too busy talking about how the button with the “plus” signal increases volume and how the one with the “minus” decreases. I understand that this also needs to be said in case someone is having their first time, but I feel like some designers are literally feeding all the information to me. These instruction manuals sometimes make me feel so stupid, and sometimes I think I am the actual designer and maker of the product and know everything about it. I have rarely come across a digital product that gives me proper infomration about the actualy usage of the product and doesn’t talk about the designer, their family and how this is the best product in the world for at least three pages.

To maybe make it more HCD I feel like all these informations could be put to a way more visible place. For example,  I sometimes see products that have a little instruction manual on the box itself, so even before buying it I can see and decide if a product like this what I actually need. I knwo that today, everything can be just looked up on the internet, but I don’t think that should replace proper documentation on the product itself.

For IM, I feel like whenever I had to design a website for example, the most common feedback was that “So what do I do now?”.  On the web, especially, where you can do SO many things, click your right, left mouse buttons, go up, down, enter, I feel like designing a UI that is either explained how it is dedicated to use, or it can be easily figured out by the user while using. It is easier to lose interest in a website that you can find hundreds of in 5 seconds on the very same device you already have, than a product that you had to spend a lot of money for, waited for delivery, and now finally is in your hands. I feel like for this reason, designing a website, a game or anything like that is even more important to take into consideration the role of affordances and signifiers, as the author mentions. They need to comunicate what can be done (like, if I click my right mouse button, will anything happen, or am I just wasting my time) and how that can be done. I think a good example of that was the menu for the restaurants. Using symbols can help, as they are not bound by language, colours (as usually red indicates wrong and green correct) or anything that can be understood by a large amount of people.

Week 3 – OOP Generative Art


Overview and Concept

For this OOP project, since I have never done this before, I just wanted to test if I understand the class, the constructor, the array, and how to push new items into an array, and so I decided to create some “atoms” that bounce around in the canvas.

They are called atoms, because my original concept that I wanted to make was atoms, that are red and are following a certain path on the screen but it got lost in translation, and started to look more like confetti, so I decided to leave it for that day.

I have astigmatism, which just means that especially in the dark light sources seem a little weird (the photo demonstrates it better) and weirdly, I got inspired by that on Saturday, when I was with a friend out at night. I think the balls in the end were just much easier to make than those lights that I usually see, but it just clicked something in my brain. So I moved on from my initial idea and started to work on something else.

Understanding Astigmatism – J.HYDE

The concept that I used in the end was kind of a mixture of the two: I made some ellipses that are going around but not on a predetermined route but randomly, and from my astigmatism came the idea to make them almost vibrating and very very colourful.

The Code

(click on the canvas as many times as you want)

So the code was very hard to do, and I was struggling a lot with it not working. To start with, I created the basics, I made an array to store my atoms in, and then in the draw function I made a for loop to loop that array and its elements. In the for loop, there are three other functions that I am going to explain later in the class.

let atoms = []; //setting the array

function setup() {
  createCanvas(400, 400);
}

function draw() {
  background('black');
  
//for loop goes throught the array, checks the index of each element and displays all of them
  for (let i = 0; i < atoms.length; i++){
    
//called function from class, updates their position
  atoms[i].atomMotion();
    
//called function from class, determining how the atoms look like
  atoms[i].display();

//called function from class, recognising the borders of the screen
  atoms[i].checkEdge();
  }
}

After this, I made a mouseClicked function to add elements to my array. I tried to explain what it does inside of the code.

//when mouse is clicked a new atom will appear at the point of click, in the this.x and this.y the coordinates of the click get saved for that specific new atom as the mouseX and mouseY coordinated were given for the new one, and then the new atom gets pushed into the array with a new index (i)
function mouseClicked(){
  atoms.push(new Atom(mouseX, mouseY));
}

And then I created the Atom class. I wanted to make it fun, so I added randomisation to quite a few attributes of the atoms, such as their diameter and how fast they will be moving around the screen. I decided to name their attributes only x and y because any other name just confused me, since these are referring to where the mouse was clicked and so where the atom formed.

class Atom{
  //x and y are defined as the coordinates of center of the atom, the mouse position at the time of the click, and so each atoms gets assigned that value at the start
constructor(x, y){
  this.x = x;
  this.y = y;
  
//each atom gets assigned a random diameter
  this.diameter = random(10, 80);
  
//each atom gets assigned a random speed 
  this.velocityX = random(-4, 4);
  this.velocityY = random(-4, 4);

 }

After this was the hardest part of the whole code, but also what I am most proud of because I wanted them to not move out of the canvas, so I had to make them bounce back from the walls. To do this I needed some videos explaining to me the “science behind it”, for example, how to change the atoms’ motion once they detect the sides of the canvas: in the end I ended up multiplied their current velocity with -1 to reverse them back once they detected the edge. I also had to understand HOW it can detect the edge, but once I saw a video about it I understood and made my own code.

Basically what I did, is I divided the (randomly) assigned diameter of each atom to get the radius of each. The this.x and this.y are the midpoints of the atoms, so I checked if their leftmost and top points (so the midpoint minus the radius) are < 0, so past the canvas’ borders. (this is the example of the left side’s code)

if (this.x - radius < 0) { 
   this.x = radius,
   this.velocityX *= -1;
 }

The second part of the if statement snaps the atoms back to the canvas in case they moved too fast and went a few pixels out of frame by putting their midpoint back at where they used to be. This was what took me a very long time, because sometimes they would just glitch into the wall. And lastly came the switching direction.

The else if statements do the exact same thing, with the only difference that they check the rightmost and the bottom parts, that is why here the radius is plus not minus.

Here is the full code of the bouncing:

checkEdge(){
    let radius = this.diameter / 2;
  //first it checks the LEFT side, if the leftmost edge of the ball (center minus its radius) reaches x = 0, so the left side of the screen, it snaps it back, and then reverses the direction 
  if (this.x - radius < 0) { 
    this.x = radius,
    this.velocityX *= -1;
  } 
//first else if checks the RIGHT side the same way
  else if (this.x + radius > width) { 
    this.x = width - radius;
    this.velocityX *= -1;
    console.log('this works');
  }

//second if checks the TOP of the screen the same way
  if (this.y - radius < 0) { 
    this.y = radius;
    this.velocityY *= -1;
   } 
//second else if checks the BOTTOM of the screen the same way 
  else if (this.y + radius > height) { 
    this.y = height - radius;
    this.velocityY *= -1;
    console.log('this works too');
   }
}

After this was relatively easy to finish the code. I am lying though a little, because I finished this earlier than I did the previous checkEdge part. But regardless, this part I was able to relatively quickly. Most of hówhat I did is explained in the code itself.

But just to add on a litte, I love playing with the random function, so I also decided to make the colours and oppacity of the atoms randomised, and so they no longer look like atoms but confetti. However, at this point I had too many functions and variables connected to and named atom that I didn’t dare change anything.

//this function updtaes the atoms' position after the click has happened, and the new atom is added to the array, its temporary position, so the one saved into the this.x and this.y parameters gets added to a randomised velocity value give above
  atomMotion(){
    this.x = this.x + this.velocityX;
    this.y = this.y + this.velocityY;
  }

//defines how the atoms actually look on the screen, and updates it every time
  display(){
    noStroke();
    
    //fills in the circles, but the colours and the transparency is randomised
    fill(random(0, 255), random(0, 255), random(0, 255), random(90, 200));
    
    //actually drawing the ellipse or circle

    ellipse(this.x, this.y, this.diameter, this.diameter);
  }
}

And lastly here is the full code in one:

let atoms = []; //setting the array

function setup() {
  createCanvas(400, 400);
}

function draw() {
  background('black');
  
//for loop goes throught the array, checks the index of each element and displays all of them
  for (let i = 0; i < atoms.length; i++){
    
//called function from class, updates their position
  atoms[i].move();
    
//called function from class, determining how the atoms look like
  atoms[i].show();

//called function from class, recognising the borders of the screen
  atoms[i].checkEdge();
  }
}

//when mouse is clicked a new atom will appear at the point of click, in the this.x and this.y the coordinates of the click get saved for that specific new atom as the mouseX and mouseY coordinated were given for the new one, and then the new atom gets pushed into the array with a new index (i)

function mouseClicked(){
  atoms.push(new Atom(mouseX, mouseY));
}


class Atom{
  //x and y are defined as the coordinates of center of the atom, the mouse position at the time of the click, and so each atoms gets assigned that value at the start
  
constructor(x, y){
  this.x = x;
  this.y = y;
  
//each atom gets assigned a random diameter
  this.diameter = random(10, 80);
  
//each atom gets assigned a random speed 
  this.velocityX = random(-4, 4);
  this.velocityY = random(-4, 4);

 }
  
checkEdge(){
    let radius = this.diameter / 2;
  //first if checks the LEft side, if the leftmost edge if the ball (center minus its radius) reaches x = 0, so the left side of the screen, it snaps it back, and then reverses the direction 
  if (this.x - radius < 0) { 
    this.x = radius,
    this.velocityX *= -1;
  } 
//first else if checks the RIGHT side the same way
  else if (this.x + radius > width) { 
    this.x = width - radius;
    this.velocityX *= -1;
    console.log('this works');
  }

//second if checks the TOP of the screen the same way
  if (this.y - radius < 0) { 
    this.y = radius;
    this.velocityY *= -1;
   } 
//second else if checks the BOTTOM of the screen the same way
 
  else if (this.y + radius > height) { 
    this.y = height - radius;
    this.velocityY *= -1;
    console.log('this works too');
   }
}

//this function updtaes the atoms' position after the click has happened, and the new atom is added to the array, its temporary position, so the one saved into the this.x and this.y parameters gets added to a randomised velocity value give above
  move (){
    this.x = this.x + this.velocityX;
    this.y = this.y + this.velocityY;
  }

//defines how the atoms actually look on the screen, and updates it every time
  show (){
    noStroke();
    
    //fills in the circles, but the colours and the transparency is randomised
    fill(random(0, 255), random(0, 255), random(0, 255), random(90, 200));
    
    //actually drawing the ellipse or circle
    ellipse(this.x, this.y, this.diameter, this.diameter);
  }
}

Problems

Problems I ran into in the code was mainy with the bouncing: in the beginning it wouldn’t work, then it worked but only on two sides, then only on three and all atoms disappeared on the bottom, but in the end I did manage to make it all work. It also glitched sometimes into the wall.

I think I have already mentioned this, but the main problems I ran into were that I needed to catch up on the elements of a class, of OOP as a whole, and I didn’t realise this until AFTER I started working on the code, so I had to pause and watch some tutorials and explaining videos.


References:

I got the main idea from this video:

These two helped to understand the bouncing technique more:

Helped to understand how to push an object into array:

https://stackoverflow.com/questions/40250139/how-can-i-push-an-object-into-an-array


Week 3 – The Art of Interactive Design Reflection


I really enjoyed reading the article, because I really like the style, and for most it really opened up my eyes. I think I mostly agree with what it is saying about the features of interactivity, that it has to “listen, think, and speak”, although it made me think of the question, whether this makes AI interactive or not. AI has all three of these features, but I personally wouldn’t put it into the same category as an interactive website, for example. I recognise, that it is a two-way communication, like one between two humans, but it feels like a midpoint between a human interaction and a website. I think, and I might be wrong because I am not entirely educated in this, but a website has more limitations than an AI in regard to their “speaking” or response to the interaction, but a human one is far more natural, AI is just statistically choosing the next best word. The article just made me think of interactivity as a scale, where I was trying to place AI according to my best knowledge.

This ended in me thinking of maybe randomness as a feature of a strong interactive system. The article/chapter mentions 3 (listening, thinking and speaking) but I think randomness, or randomisation in an interactive system makes it interesting to keep using it. For example, I could be talking to my friends every day, and we would have a different conversation each time, and so I have the urge to keep talking to them. Maybe randomness is not even the best word to use here. Responsiveness represents my point better, because randomness can become repetitive in cases of a website. For example I made my self-portrait have chnaging clothes to the click of my mouse, but the colours were chosen from a previously set array of colours. It was random yes, but after a while it just repeated the same colours and it became boring quickly. So I would say then, the fact that a system is able to store previous information and “speak” in regard to that, is another feature of a strong interactive system. I also have to agree that design should accomodate interactivity, and a strong interactive system has a design that is able to support that interactivity.

Just because of my nationality, I have to say that I really enjoyed when he mentioned Hungarian. I actually laughed when I saw it, because I really didn’t expect it, but it felt good to know that my language is being used as an example. I even had to send a picture of it to my family.

As for concrete ideas for my sketches, I can’t really say any examples, however I know that I want to move on from simple mouse clicks and try out something that might be more complicated or requires more research beforehand. I know that when last semester I was in CommLab and making my final assignment I was able to store some informations on the website with cookies. I am not sure how, if even this is possible here, but if it is I wouls love to experiment with it.


Week 2 – Generative Art


Overview

To be honest, I was really worried about this assignment because I remember when I was studying C# I struggled a lot, especially with the for loop. I went over the practice exercises that we did during the week a lot and also looked at the books uploaded to search for some inspiration. I didn’t even start the code until I saw the Casey Reas video and went through the given books to look over for some inspiration, because I felt a little lost regarding what I am expected to do. But in the end, of course, I managed to make something that I actually quite like and am proud of.


Process

First Inspo

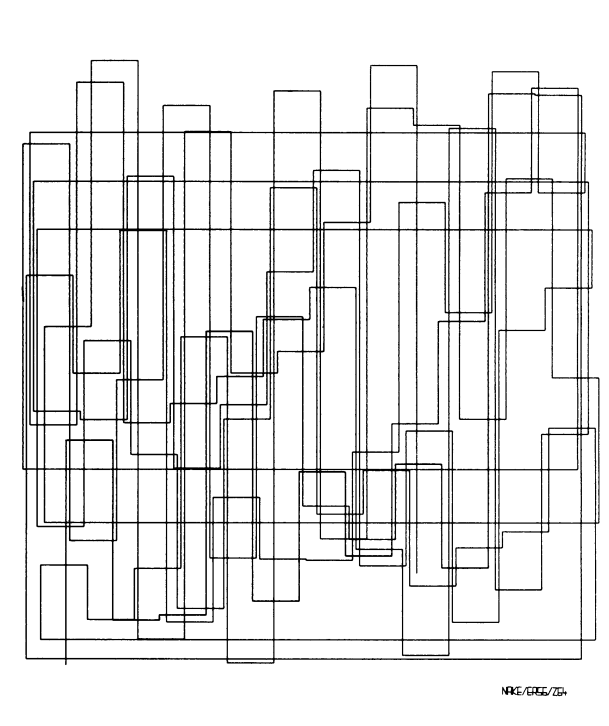
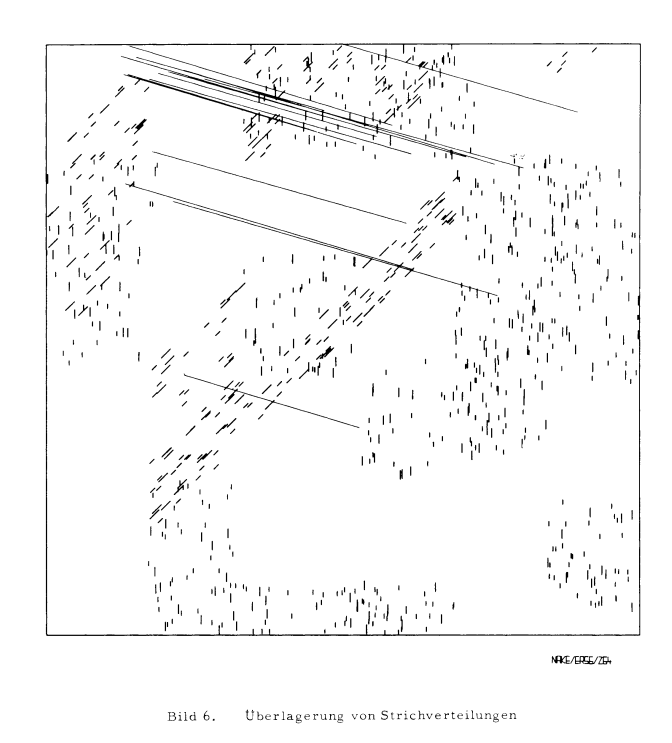
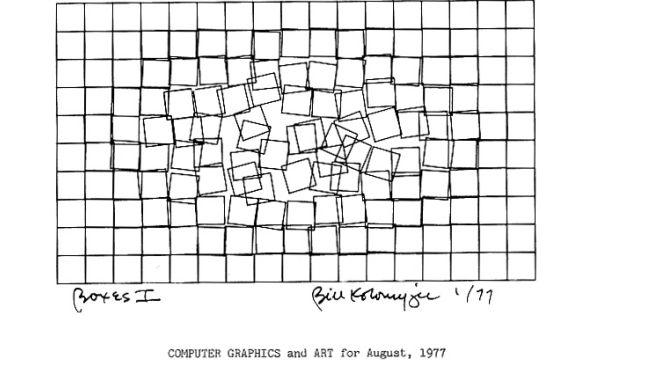
At first I wanted to make it just a grid of rectangles as seen in the image, which was my first inspiration photo that I picked out, and when a user would click somewhere, those rectangles would move to a random spot. I started working on that code, but I found it a little too complex for me right now, so I decided to look for another inspiration image. From the very beginning, this image of rectangles has stood out to me a lot, and I found this one with just a lot of random lines across the screen, and I thought, “What if I combined the two?”

Inspiration images for the final

I was very sure at this point that I wanted to work with lines and rectangles, but also, that I wanted to incorporate colours in some way. At first I had the idea of filling in the rectangles each time with a different colour, but when I tried it out it basically filled in the whole screen, so later I decided on just colouring the strokes. I also decided on that, because halfway through the code I realised that lines can’t have a fill, only a stroke.

It was also a very small fragment of the job, but I really loved picking out the colours that appear.

The Code

let colourPalette = ["#4B0082", "#FFF0F5", "#ADD8E6", "#808000", "#DB7093", "#FFFAFA", "#F0E68C", "#DAA520", "#FF1493", "#8B0000"]; //the array containing

function setup() {
  createCanvas(500, 500);
}

function draw() {
  background("grey");
  frameRate(2); //how many frames are drawn per second


let numLines = random(30); //randomising how many lines are drawn on each frame
let num = 0; //how many I start with

  
while (num < numLines) {
  //randomising where each line starts and where they end
  let firstPointX = random(width); 
  let firstPointY = random(height);
  let secondPointX = random(width);
  let secondPointY = random(height);

  //drawing the line itself
  stroke(random(colourPalette)); //chooses a random colour for the lines each time from the array
  line(firstPointX, firstPointY, secondPointX, secondPointY);
  num++; //increase the num variable so the loop eventually stops
  }
console.log('hellooo');

let numRects = random(15); //giving how many rectangles I wanted to draw
  
for (let num2 = 0; num2 < 15; num2++){ //same structure but with a for loop nos so I can see both kindsat the same time
  let xCoord = random(width);
  let yCoord = random(height);
  let widthRect = random(width);
  let heightRect = random(height);
  noFill();
  rect(xCoord, yCoord, widthRect, heightRect);
}
  console.log ('went through');
  
}

The code is not too long or complicated, but it still took me a little to figure out. I am particularly proud of the way I realised that I can change the framerate of the code so I can control how many images get generated each second. At the start it was going very fast, but now I really like the pacing of it. I also feel proud of just the fact that I managed to incorporate both a while and a for loop, just so I am able to practice both a little. Like in the previous code, I also tried to make everything quite organised, and give the variables names that I would be able to recognise later.

I really enjoyed experimenting with the random variable. I used it for the colours and the drawing of the shapes, and honestly I didn’t expect it to work so well. There are also some console.log’s because in some previous codes I was practicing on they came in very handy.


Reflection and Ideas

As a reflection, I actually feel really proud of this exercise, not necessarily because I managed to write a long and complicated code but because I was finally able to understand the for and while loops. I had a really bad CS teacher back in high school, and I didn’t really learn anything from him, which made me really stressed to start this course. I thought I would be again just very confused about these loops, but I actually understand both of them now. I also quite like how the end result looks.

For the future, I think I will try to challenge myself a little more with both the code and the creative part. For this I had to use some reference images, but I would love to just think of something on my own.

References

For the colours:

https://www.w3schools.com/cssref/css_colors.php


Week 2 – Casey Reas Video Reflection


Casey Reas’ talk made me think about questions about authorship when chance and randomness are the producers of the final output. If a program “fips a coin” to generate an image, who truly owns the reuslting work? While generative experiments like the Commodore 64 maze patterns or the Simulation of the Conception Vehicles (as Reas called them) rely heavily on the randomness of the program, I think the code itselfreflectst human control. The artist still defines the rules, boundary conditions and the parameters of the system, and the only thing being done by the computer is listening to these inputs and actually generating an image. I think, an optimal balance lies in using randomness not to replace artiistic intent but to introduce unexpected images  or variations within the parameters designed by a human. Reas also mentions at the beginning of the video that they created a program for a show where they can “tailor and customise how much they want to leave it to chance,” and I think that this is a very good example of balance.  I would also love to include random elements in my work, especially with colours. I would love to give my work the chance to be randomly colourful, rather than me deciding on specific colours or objects.

On the other hand, I also think that it is very easy to lose control and authorship over these works and flip the balance. In my opinion, authorship includes the artist being able to express their emotions and desires through the art piece itself. If we leave the final output for a program, despite us owning the code, the product might not resonate with the artist and deliver the wrong message. I thought of this while watching the example of the Fractal Invaders. Until then, I felt really confident in myself, that it is completely okay to use a computer program for drawings. That, though, made me really wonder where the line could be. If I really let my program create something random, the chance that it will create something I don’t want to or can’t resonate with grows a lot and statistically will happen. Do I still own that even if I don’t resonate with it? I do, in my opinion. But do I want to? I think the balance is probably between letting the program execute my vision, but maybe not over and over again.

Week 1 – Self-Portrait


Overview

Following the sessions on Week 1, our first assignment was to create a self-portrait using p5.js. Last semester I took Communications Lab, so I was familiar with the website, but I haven’t gone into such depts before, and for this assignment I decided to create my self-portrait with a little additional information about me, which is that I don’t like the rain.

I really wanted to use as many of the available 2D shapes as possible, such as the arc, the ellipse, the circle, the line, and the rectangle, along with some of the other resources like mouseX, mouseY, the mouseIsPressed, or constrain. I have tried to create myself a little challenge but also not put too much pressure on myself to put absolutely everything into this first assignment.


Process

For this assignment I decided to create an entirely new project and make my portrait out of scratch. I was sure that I wanted to add some basic interaction, just for a little practice and to make it more fun. I made the biggest components first, my head, my body, and my hair, and then moved on to the smaller details like my bangs, my eyes, nose, mouth, and my glasses. For all of these elements, I relied heavily on the p5.js references, but didn’t use any other external sources. I also decided after my body was fully made to put something in the background as well, just to make it a little less plain, and then came the idea that I will use my interaction here and show how much I don’t like standing in the rain. As a last touch, I also added some shading, just to play a little with the layers as well, and to add a little depth to it.

The Code

function setup() {
  createCanvas(400, 600);
}

function draw() {
  background("lightblue");

//Sun
  fill("yellow");
  circle(50, 50, 60);
  
fill("black");
textFont('Courier New');
text('click and see what happens', 110, 60);
  
noStroke();


//Hair Shadow
  fill(127, 80);
  rect(104, 203, 200, 210,); 


//Hair
  fill("yellow");
  rect(100, 200, 200, 210,);

//Body Shadow on BG
  fill(120, 120);
  triangle(209, 300, 110, 600, 300, 600);
  
//Body
  fill("brown");
  triangle(200, 300, 110, 600, 300, 600);

//Shadow on Body 
  fill(127, 70);
  noStroke();
  ellipse(200, 400, 60, 30);
  
//Head
  fill("#F7D4C4");
  circle(200, 300, 200);
  
//Glasses
  noFill();
  stroke(0);
  strokeWeight(2);
  rect(145, 283, 45, 35, 5);
  rect(205, 283, 45, 35, 5);
  line(190, 300, 205, 300);

//Eyes
  fill(255);
  stroke(-2);
  circle(170, 300, 30);

  let px = constrain(mouseX, 165, 175);
  let py = constrain(mouseY, 295, 308);

  fill (0);
  circle(px, py, 10);

  fill(255);
  stroke(0);
  circle(225, 300, 30);
  
  let px2 = constrain(mouseX, 222, 230);
  let py2 = constrain(mouseY, 295, 310);
  
  fill (0);
  circle(px2, py2, 10);
  
//Nose
  stroke(1);
  strokeWeight(2);
  line(197, 315, 197, 330);

//Bangs shadow
  noStroke();
  fill(127,30);
  arc(100, 205, 200, 200, 0, HALF_PI);
  arc(300, 205, 200, 200, HALF_PI, PI);
  
//Bangs
  noStroke();
  fill("yellow");
  arc(100, 200, 200, 200, 0, HALF_PI);
  arc(300, 200, 200, 200, HALF_PI, PI);


//Mouth
  noFill();
  stroke(255, 0, 0);
  strokeWeight(4);
  arc(200, 340, 60, 40, 0, PI);
  
//Hand shadow
  noStroke();
  fill(127, 127);
  rect(164, 473, 20, 50);
  rect(229, 473, 20, 50);
  
//Hands
  fill("#F7D4C4");
  rect(160, 470, 20, 50);
  rect(225, 470, 20, 50);


  if(mouseIsPressed){
  background(220);
  noStroke();

//Clouds
  fill(255);
  circle(60,50,40);
  circle(85,50,50);
  circle(108,50,40);
  circle(210,120,60);
  circle(245,120,70);
  circle(280,120,60);

//Rain
    stroke("blue");
    strokeWeight(3);
    line(70, 90, 80, 120);
    line(90, 110, 100, 140);
    line(100, 90, 120, 150);
 
 noStroke();  

//Hair Shadow
  fill(127, 80);
  rect(104, 203, 200, 210,); 
    
//Hair
  fill("yellow");
  rect(100, 200, 200, 210,);

//Body Shadow on BG
  fill(120, 120);
  triangle(209, 300, 110, 600, 300, 600);
    
//Body
  fill("brown");
  triangle(200, 300, 110, 600, 300, 600);

//Shadow on Body 
  fill(127, 70);
  noStroke();
  ellipse(200, 400, 60, 30);
    
    
//Head
  fill("#F7D4C4");
  circle(200, 300, 200);

//Glasses
  noFill();
  stroke(0);
  strokeWeight(2);
  rect(145, 283, 45, 35, 5);
  rect(205, 283, 45, 35, 5);
  line(190, 300, 205, 300);

//Nose
  stroke(1);
  strokeWeight(2);
  line(197, 315, 197, 330);

//Bangs shadow
  noStroke();
  fill(127,30);
  arc(100, 205, 200, 200, 0, HALF_PI);
  arc(300, 205, 200, 200, HALF_PI, PI);

//Bangs
  noStroke();
  fill("yellow")
  arc(100, 200, 200, 200, 0, HALF_PI);
  arc(300, 200, 200, 200, HALF_PI, PI);

//Eyes
  fill(255);
  stroke(0);
  circle(170, 300, 30);

  fill (0);
  circle(170, 300, 10);

  fill(255);
  stroke(0);
  circle(225, 300, 30);
  
  fill (0);
  circle(225, 300, 10);

//Mouth
  noFill();
  stroke(255, 0, 0);
  strokeWeight(4);
  arc(200, 365, 60, 40, PI, TWO_PI);

//Hand shadow
  noStroke();
  fill(127, 127);
  rect(164, 473, 20, 50);
  rect(229, 473, 20, 50);

//Hands
  noStroke();
  fill("#F7D4C4");
  rect(160, 470, 20, 50);
  rect(225, 470, 20, 50);

  }
  

}


I can be a rather messy person in real life, and to compensate that I try to keep my online life a little more organised. I tried my best to divide all parts of the code, make it clear what piece of code is which part of the portrait and that made it a lot easier to later go back to it and adjust or correct certain things. It came in very handy for example when I was adding the shadows, especially the bangs, because it was a lot easier to find the “Glasses” and the “Bangs” chunks, between which I wanted to place my shadow.

Something that took a little more time but made me very happy to see it work were the moving eyes. I used the constrain calculation, which I had to try multiple times to work. I had to understand which parameter constrains which side, but after I figured that out, I was able to constrain my “pupil” to stay in the “eye” but still move.

//Eyes
  fill(255);
  stroke(-2);
  circle(170, 300, 30);

  let px = constrain(mouseX, 165, 175);
  let py = constrain(mouseY, 295, 308);

  fill (0);
  circle(px, py, 10);

  fill(255);
  stroke(0);
  circle(225, 300, 30);
  
  let px2 = constrain(mouseX, 222, 230);
  let py2 = constrain(mouseY, 295, 310);
  
  fill (0);
  circle(px2, py2, 10);


Reflection and Ideas

As a reflection, I had a lot of ideas for this project that I couldn’t do in the end. For example, I originally wanted my bangs to move as if it were the wind messing them up (which is another very important part of my everyday life), but I found it a little too difficult. I would love to explore more libraries in the future to find out about new techniques that could have also made the process of making this portrait easier or just different. Another thing I would also love to learn is how to make the movements smoother. I really love the eyes, however I would prefer them to move smoother than they do right now. But despite knowing that there is a lot of room for improvement, for this first project, my goal was not to go overboard but rather to explore the basics of p5.js, so overall I am happy with the results.