Week 3 – Flower Garden

My project is an interactive generative artwork featuring a digital garden where flowers bloom and fade over time while butterflies move toward them. The user can interact by clicking anywhere on the canvas to plant new flowers.

My inspiration came from teamLab Phenomena in Abu Dhabi I visited, where there was an immersive environment allowing people to draw butterflies, snakes, and other animals that then came to life in a shared space. That experience brought me back to childhood memories of imagination, and I wanted to capture a similar feeling through code. In future versions, I plan to expand this project by adding sound elements for the atmosphere to be richer and more immersive. I also hope to introduce more types of creatures and possibly explore touch or motion-based interaction.

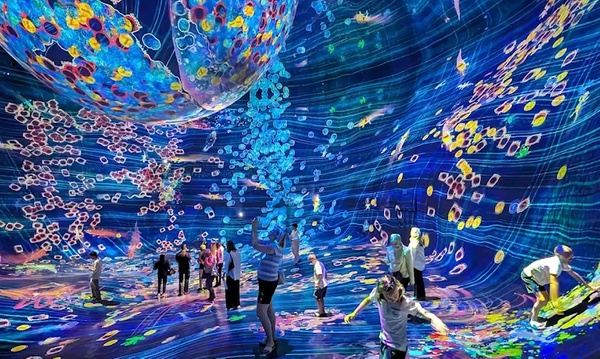
Inside teamLab Phenomena Abu Dhabi | Condé Nast Traveller Middle East

Explore TeamLab Phenomena General Admission for Adults and Youths - Pt Tourism | Groupon

The program begins in the setup() function, which creates the canvas and spawns an initial set of flowers and butterflies in random positions across the screen. The draw() loop serves as the heartbeat of the sketch. It first draws a smooth vertical gradient sky using the lerpColor() function, transitioning from soft blue at the top to gentle green near the bottom. Then, it updates all active flowers, allowing each one to grow and eventually fade as time passes. Meanwhile, the butterflies search for nearby flowers, moving toward them. The sketch also displays basic information such as the number of flowers and user instructions on planting new ones.

// Arrays to store objects
let flowers = [];
let butterflies = [];

function setup() {
  createCanvas(700, 600);
  
  // start flowers
  for (let i = 0; i < 8; i++) {
    flowers.push(new Flower(random(width), random(height)));
  }
  
  // start butterflies
  for (let i = 0; i < 6; i++) {
    butterflies.push(new Butterfly(random(width), random(height)));
  }
}


function draw() {
  // Draw gradient sky background
  for (let y = 0; y < height; y++) {
    let c = lerpColor(color(135, 206, 235), color(180, 220, 160), y / height);
    stroke(c);
    line(0, y, width, y);
  }
  
  // Update and draw flowers
  for (let i = flowers.length - 1; i >= 0; i--) {
    flowers[i].grow();
    flowers[i].display();
    
    // Remove old flowers
    if (flowers[i].age > flowers[i].lifespan) {
      flowers.splice(i, 1);
    }
  }
  
  // Update and draw butterflies
  for (let butterfly of butterflies) {
    butterfly.moveTowardFlowers();
    butterfly.display();
  }
  
  // Instructions
  fill(255, 200);
  noStroke();
  fill(60);
  textSize(14);
  text("Click to plant flowers", 20, 30);
  text(`Flowers: ${flowers.length}`, 20, 45);
}

// mouse interaction

function mousePressed() {
  flowers.push(new Flower(mouseX, mouseY));
}

// flower class

class Flower {
  constructor(x, y) {
    // Position
    this.x = x;
    this.y = y;
    
    // Size (starts small, grows)
    this.size = 0;
    this.maxSize = random(30, 60);
    
    // colors (random pastels)
    this.petalColor = color(random(200, 255), random(100, 200), random(200, 255));
    this.centerColor = color(random(200, 255), random(180, 220), random(50, 100));
    
    // Life
    this.age = 0;
    this.lifespan = random(600, 1000);
    
    // Look
    this.petalCount = floor(random(5, 9));
    this.angle = random(TWO_PI);
  }
  
  // make flower grow each frame
  grow() {
    this.age++;
    if (this.size < this.maxSize) {
      this.size += 0.5;
    }
    this.angle += 0.005; // Slow rotation
  }
  
  // draw the flower
  display() {
    push();
    translate(this.x, this.y);
    rotate(this.angle);
    
    // Fade out when old
    let alpha = 255;
    if (this.age > this.lifespan * 0.7) {
      alpha = map(this.age, this.lifespan * 0.7, this.lifespan, 255, 0);
    }
    
    // draw petals
    fill(red(this.petalColor), green(this.petalColor), blue(this.petalColor), alpha);
    noStroke();
    for (let i = 0; i < this.petalCount; i++) {
      let angle = (TWO_PI / this.petalCount) * i;
      let px = cos(angle) * this.size * 0.4;
      let py = sin(angle) * this.size * 0.4;
      push();
      translate(px, py);
      rotate(angle);
      ellipse(0, 0, this.size * 0.6, this.size * 0.3);
      pop();
    }
    
    // draw center
    fill(red(this.centerColor), green(this.centerColor), blue(this.centerColor), alpha);
    ellipse(0, 0, this.size * 0.4);
    pop();
  }
}

// butterfly class

class Butterfly {
  constructor(x, y) {
    // Position
    this.x = x;
    this.y = y;
    
    // movement
    this.vx = random(-1, 1);
    this.vy = random(-1, 1);
    this.speed = 1.5;
    
    // wings
    this.wingAngle = 0;
    this.wingSize = random(15, 25);
    
    // colors (random)
    this.wingColor = color(random(150, 255), random(100, 200), random(150, 255));
  }
  
  // move toward nearest flower
  moveTowardFlowers() {
    // Find closest flower
    let closestFlower = null;
    let closestDist = 999999;
    
    for (let flower of flowers) {
      let d = dist(this.x, this.y, flower.x, flower.y);
      if (d < closestDist && flower.size > 20) {
        closestDist = d;
        closestFlower = flower;
      }
    }
    
    // move toward it if close enough
    if (closestFlower && closestDist < 200) {
      let dx = closestFlower.x - this.x;
      let dy = closestFlower.y - this.y;
      this.vx += dx * 0.0002;
      this.vy += dy * 0.0002;
    }
    
    // randomness
    this.vx += random(-0.1, 0.1);
    this.vy += random(-0.1, 0.1);
    
    // limit speed
    let currentSpeed = sqrt(this.vx * this.vx + this.vy * this.vy);
    if (currentSpeed > this.speed) {
      this.vx = (this.vx / currentSpeed) * this.speed;
      this.vy = (this.vy / currentSpeed) * this.speed;
    }
    
    // update position
    this.x += this.vx;
    this.y += this.vy;
    
    // wrap around edges
    if (this.x < 0) this.x = width;
    if (this.x > width) this.x = 0;
    if (this.y < 0) this.y = height;
    if (this.y > height) this.y = 0;
    
    // flap wings
    this.wingAngle += 0.2;
  }
  
  // draw the butterfly
  display() {
    push();
    translate(this.x, this.y);
    
    // point in direction of movement
    let angle = atan2(this.vy, this.vx);
    rotate(angle);
    
    // wing flapping (0 to 1)
    let flap = sin(this.wingAngle) * 0.5 + 0.5;
    let wingHeight = this.wingSize * (0.5 + flap * 0.5);
    
    // wings
    fill(this.wingColor);
    noStroke();
    ellipse(-5, -wingHeight, 12, wingHeight * 1.5);
    ellipse(-5, wingHeight, 12, wingHeight * 1.5);
    
    // body
    fill(40);
    ellipse(0, 0, 8, 15);
    
    pop();
  }
}


Every flower is represented by an instance of the Flower class. Each flower starts small and increases in size frame by frame until it reaches its maximum. Colors are chosen randomly from pastel ranges to keep the palette gentle. Each flower contains several petals arranged uniformly in a circle and slowly rotates over time. The petals fade as the flower ages. The Butterfly class handles behavior for each butterfly’s movement, which combines randomness with directed motion toward flowers.

One of the challenges I encountered was controlling butterfly motion. At first, they moved too chaotically. By adjusting acceleration toward flowers and capping their speed, I achieved a more graceful flying style. I also experimented with the fading  for flowers to make the transition from bright color to transparency appear gradual and organic.

Visually, the project is calm and immersive as I wanted it to be. The background gradient,  flower and butterflies all work together to create an environment that feels alive yet peaceful.

Week 3 Reading Reflection – Megan

After reading this chapter I realized that a strongly interactive system is really like having a good conversation. Both sides have to listen think and speak well for it to feel alive. If one side fails it just becomes boring or frustrating. So for a system to be truly interactive it has to respond to the user in a way that feels meaningful not just random or automatic. I liked how Crawford explains that interaction is not the same as reaction like with a fridge or a movie you can only watch but you don’t actually talk to it. That made me think about my p5 sketches because sometimes I make things move or change when the mouse touches them but it feels kind of one-sided. I realized that to make them more interactive I could have the objects respond in different ways depending on how you interact with them like changing speed direction color or even start a little animation that is unique for each action. I also liked thinking about giving each object its own “voice” like the dice in my project could react differently to the same input so it feels more alive and less predictable. I want to experiment more with letting the user affect not just the movement but the behavior and appearance over time so it feels like the sketch is listening and thinking a little bit before it reacts. Overall reading this made me want to make my sketches feel more like a real conversation between me and the code rather than just me controlling it.

Week 3 – Kamila Dautkhan

Concept 

Overall, I wanted to create something that’s between technical and visual. I was inspired by simple motion studies and minimalist generative art, where small variations in movement and size can create an interesting composition. I didn’t really want the artwork to feel chaotic or overly complex. Instead, I wanted to focus on clarity, repetition and subtle variation. My main idea was to treat each block as its own “entity.” When you look at it you can see that all the blocks follow the same basic rules but they move slightly differently since I wanted to create something chaotic rather than static.

Highlight of the Code

I’m especially proud of this part because it is how the blocks are created and stored using a class and an array:

blocks.push(new Block(random(width), random(height)));

I am proud of it because it represents the core idea of the project. It basically generates multiple objects from the same structure while still allowing each one to behave differently.

Reflection

This project helped me better understand how code structure directly affects the visual outcome. I learned that even very simple rules can produce very interesting results if they are applied consistently. I also became more confident using classes and arrays because it felt quite confusing at first but using them actually made the code much easier to manage.

If I were to continue developing this sketch, I would like to experiment with interaction like having the blocks respond to the mouse or to each other. I’m also very interested in exploring color systems more and maybe using gradients in my future works!


Week 2 – Creative Reading Megan

Casey Reas Eyeo talk on chance operations

How are you planning to incorporate random elements into your work? Where do you feel is the optimum balance between total randomness and complete control?

Before answering this questions, I wanted to implement by myself the concepts the video was talking about. Randomness. One quote by Casey Reas really stayed with me: “change it by a little so that movement creates chaos in an ordered way.” And I think that perfectly represents what I was trying to do in my work. The things I changed to create this element of randomness were data, small pieces of data that might seem insignificant at first, but machines are built based on that, so even the smallest thousandth can make a difference.

This brings me to another quote from the video, about Dadaism: “Dada wished to replace the logical nonsense of the men of today with an illogical nonsense.” To what point is something considered logical? Computers are supposed to be based on pure logic. And yet, artists find ways to turn that logic into illogical sense. And yet, it still has meaning. It’s like deconstructing the logic embedded in the machine with the purpose of illogically creating something that has meaning behind it. Or the other way around, creating something without meaning by using the logic of the computer. Either way, I feel this can be applied to the artworks shown in the video.

A quote by Gerhard Richter captures this idea very well: “Above all, it’s never a blind chance; it’s a chance that is always planned but also always surprising.” These artists construct from chance as a base. It’s about bringing in disorder that has been curated with intention, in a way that even surprises the artist themselves. I think that finding this balance between total randomness and complete control is about using logic and repetition, patterns and algorithms that allow you to repeat a process, while the outcome is completely different, but the essence of it remains present.

Something that really caught my attention in the video was the idea of the million random digitized values and the 1,000 normal deviates. It honestly amazed me to think about the power, the expectation, and the importance that randomness has in our lives when we understand that art imitates or simulates the real world, and the real world is chaotic and not curated by anyone, but rather filled with randomness. Without a doubt, this video and this work opened my eyes and helped me understand even better the importance of chaos within order, and order within chaos.

Week 2 – Zere – Creative Reading Response

  Casey Reas’s talk made me look at the concept of randomness differently. In my prior opinion, randomness was something that took away the “magic” of art, as it took away the artist’s control over what their piece will look like. Yet, Reas’s speech gave a new perspective of randomness, as in, that it can be used with intentionality, utilizing logical rules given and created by the artist, therefore giving them a sense of control over their work. Generative art is exactly that in my opinion. I think that the “magic” of art in this case is the artist designing the structure, giving the rules, setting the limits on variations etc. Artists in this case, I think, showcase that code can be used as an art medium much like chalk, acrylic paint, colored pencils and various other types of mediums. If looked from the perspective that computers and generative tools were created by humans for humans, the same as paint and canvas, generative art is art. An artist can control the limits of the “random” decision made by the computer, and it can be exciting. Art is meant to be exciting, at least in my perspective of it. I am not saying it is meant to reach a deep part of your soul every time, but one of the reasons many people create art is for that sense of excitement it brings you. 

       Generative art is unique because of its randomness. One of the things that kept appearing in my head is chance operations in dance. I have taken Intro to Modern Dance last semester, and our professor introduced us to Merce Cunnigham’s work. His idea was to have a set of moves, number each of them, then randomly select the numbers and therefore build a unique dance each time. I feel like this is one of the examples of how I would like to utilize random elements in my work – having a set of elements that I adhere particular meaning to, then randomizing their order to see how many new and unique combinations I can get. In my opinion this is also an example of balancing randomness and control – you give an algorithm/ a machine a set of elements/variables that matter to you as an artist, but leave the combinational part up to the machine.

Week 2 – Reading Reflection – Kamila Dautkhan

This video really put into words something I’ve been figuring out with my own work. It’s not “randomness” itself that I find interesting, but what happens when you give a system a little bit of freedom to play with the code itself. I really like when my work starts with something simple and then escalates into something complex and interesting ! Also, I really liked the idea of the artist as a gardener, not a painter.

At the same time, the video’s question about “true randomness” and convergence really caught my attention. If you let systems run long enough, they tend to eventually form some sort of patterns. And it is exactly the kind of thing I enjoy the most: you start very broadly and then some kind of order appears.  And that is exactly what I want to see in my own generative pieces. I don’t want pure static, and I don’t want something completely predictable. I want that middle ground where you can still recognize my own aesthetic in the codes I wrote. This video helped me realize that I’m not just making art with controlled chaos, I’m actually designing a system’s tendencies and then letting the computer show me just how far they can be pushed.


there are no perfect circles in nature

This assignment was non less than an endeavor in its own. All I had in mind was circles when I started. I thought of them as colliding an getting bigger or something like that. The hardest part was to come up with something which uses loops. Not from the coding end but from the creative one. The it suddenly hit me; draw in itself if a big while TRUE loop. Honestly I still didn’t know what to do about it, but at least I had starting point.
I wanted to add an interactive side to it as well, so the first thing I did was created pointer for the pointer, so that it has visible interactions. I borrowed the monitor frame from my self portrait to add somewhat character to the framing.

The moment I had two circles bouncing off each other. I noticed the the repeating motion. To observe it in detail I wanted to add the trail into it. I had some what trouble doing that because of the monitor underneath, the trail was hidden under it. I asked chatgpt about it. It made me realize that I don;t want my monitor to be draw again and again. So I just put it up in the setup. no I could see their movement.

The most interesting part about it was they never collided if left undisturbed. Because of the movement variables I set. But if it is disturbed by the mouse the kinda stuck in the loop. This discovery is what I am most proud of, I am not sure which part of the code represents it. It randomly reminded me of how it is necessary to go off road to meet people or places that quite possible create the biggest impact in our lives.
I used the https://p5js.org/reference/p5/text/ to write the text. It represents a vague idea I conclude from above about living

lastly the part of code I think is highlight is as follows

x += 1
  if (x % 220 == 0){
  c1 = random(0,255)
  c2 = random(0,255)
  c3 = random(0,255)
  fill(c1,c2,c3)
  
}

I like this because this where I manipulated the draw loop code to change the circle colors

The Sketch

What I can add to this is. I feel like this is very sketchy. To represent the, I would want to make more calm and smooth

Assignment 1: Self Portrait

Concept:

For the very first assignment in Intro to Interactive media, I was able to make a 2D portrait of my own face which also included parts of my identity such as lifted eyebrows, bigger eyes and writing some parts about my identity such as being a polyglot from Thailand for the very first time using coding as I previously don’t have any previous experience in coding.

Below is my finished portrait:

Screenshot

http://<iframe src=”https://editor.p5js.org/po2127/full/E8eNn1n2a”></iframe>

How it’s made:

This portrait was made using p5.js functions using 2D shapes and different functions such as Fill, Elipse, Stroke, Strokeweight, noStroke, Circle, Arc and line, these basic functions help me have a good foundation of what I need to make a realistic face and to explore and add different more specific features such as eyebrows etc.

When I started it was pretty difficult as it took me quite a while to watch the 3 videos available on YouTube and the link provided to get a good basic grasp of the functions of this platform because I haven’t coded much before and which code I need to do to make the shape of each facial features compatible with the body.

Screenshot

I designed my face to be more of starting with face frame using fill and elipse with no stroke, then eye using ellipse, and the eyehole using fill and circle, then eyebrow using arc, and nose lines and more specifically far apart because my nose is more big, lip, hair and ear using arc and neck using lines and shirt using text and stroke.

Later on adjusting more specific details such as arc of lips and eyebrows to make it fit well with how I look and my body proportions or look like me was also another hard step.

As highlighted code I’m proud of:

The part I am proud of is I was trying to add different parts of my identity to my shirt such as giving purple theme and writing some things that really resonate with me and are part of my identity on the shirt and to be able to write design of NYU shirt on the portrait.

Screenshot

Reflection:

I enjoyed creating my  self portrait, alsthought hroguhout the journey I had some difficulties especially at positioning the shapes and getting used to how the gird works, I was able to get through and I think the main thing I struggled was when to apply the noStroke function and finding the right strokeWeight for specific places such as lips etc.

I think in the future what could have been better is after I get better and more used to program I can add some side effects such as animations, and different gimics into the portrait.  But overall, I think as the first work it was already pretty fun and I feel proud to create my first very own portrait.


User Testing

In the user testing most of the user figured out the idea without the need for me to explain; however, there were some pitfalls were the users were  a bit confused:

    • When the two users start to play at the same time and they start to fire they sometimes missed the effects happening and failed to get that the fire portals to the other screen.
    • The hardware setup I had during testing was not finished so some users failed to get which buttons correspond to which direction.
    • Button coloring: Some user recommended having the Fire button in different color so they know it’s supposed to perform a different action than movement.
    • Some users asked about the keyboard controls even though they suspected it’s either gonna be the arrows or WASD. Also the firing button ‘V’ wasn’t clear except for gamers.

What worked really well was the communication between p5 and the neoPixel screen. Once the users got the hang of the game they enjoyed the game so much and the animation of getting hit. They also liked the separation of colors between the player: Yellow and Blue including the fires color coming out of both of them. Some were impressed by the gameplay and how the pixels smoothly switch between the two screens.

To fix the earlier issues I would have a clear instructions page on the game startup that would clarify the controls on both sides and explain scoring system. I would also the core idea of the game to even get the users excited to try it out.

Week 14 – FINAL PROJECT

A Walk Through Time: Final Project Documentation

Concept

The idea behind A Walk Through Time is to let the viewer control the flow of time with simple hand gestures. When the viewer waves their hand on one side, time moves forward. When they wave on the other side, time reverses. When no one interacts, time pauses. The system changes both the physical world and the digital world at the same time.

The physical clock hand moves using a stepper motor. A growing plant moves up and down using a DC motor and a telescoping cylinder system. On the screen, a surreal p5.js world shows time moving with colors, waves, particles, and a glowing abstract clock. Everything stays in sync and reacts at the same moment. The goal was to create one experience where movement, gesture, and time feel connected.

Project Interaction 

Interaction description:

  • The viewer stands in front of the clock and plant
  • Two ultrasonic sensors wait for hand gestures
  • Waving on the right makes the clock tick forward and the plant rise
  • Waving on the left makes the clock tick backward and the plant collapse
  • When the viewer steps away, both the clock and plant pause
  • The p5.js visuals shift to match the state: forward, backward, or paused

How the Implementation Works

The system uses two Arduinos, two motors, two sensors, and a p5.js sketch.

Main Arduino

  • Reads the left and right ultrasonic sensors
  • Decides the time state: FORWARD, BACKWARD, or PAUSED
  • Moves the stepper motor to tick the physical clock
  • Sends the state through serial as a single character (F, B, or P)
  • Sends the same data to the second Arduino

Second Arduino

  • Receives F, B, P
  • Moves the DC motor to pull or release fishing wire
  • This grows or collapses a three-layer telescoping plant

p5.js

  • Reads the same serial data from the main Arduino
  • Updates the surreal background
  • Moves particles, waves, arrows, and an abstract glowing clock
  • Lets the viewer see time flowing

Interaction Design

The interaction is very simple. The viewer uses hand gestures to control time.

Right sensor → Time Forward
Left sensor → Time Backward
Both or none → Pause

All outputs reinforce this state:

    • The physical clock hand moves
    • The plant grows or collapses
    • The digital world changes color and motion

Arduino Code

Below are the Arduino codes:

#include <Stepper.h>

const int stepsPerRevolution = 2048;
const int ticksPerRevolution = 12;
const int stepsPerTick = stepsPerRevolution / ticksPerRevolution;

Stepper clockStepper(stepsPerRevolution, 8, 10, 9, 11);

enum TimeState { PAUSED, FORWARD, BACKWARD };
TimeState timeState = PAUSED;
TimeState lastSentState = PAUSED;

const int TRIG_RIGHT = 4;
const int ECHO_RIGHT = 5;
const int TRIG_LEFT  = 6;
const int ECHO_LEFT  = 7;

const int DETECT_THRESHOLD_CM = 40;

unsigned long lastTickTime = 0;
const unsigned long tickInterval = 1000;

long readDistanceCM(int trigPin, int echoPin) {
  digitalWrite(trigPin, LOW);
  delayMicroseconds(2);
  digitalWrite(trigPin, HIGH);
  delayMicroseconds(10);
  digitalWrite(trigPin, LOW);
  long duration = pulseIn(echoPin, HIGH, 20000);
  if (duration == 0) return -1;
  return duration / 29 / 2;
}

void sendStateIfChanged() {
  if (timeState == lastSentState) return;
  lastSentState = timeState;
  char c = 'P';
  if (timeState == FORWARD) c = 'F';
  else if (timeState == BACKWARD) c = 'B';
  Serial.write(c);
}

void setup() {
  clockStepper.setSpeed(10);
  pinMode(TRIG_LEFT, OUTPUT);
  pinMode(ECHO_LEFT, INPUT);
  pinMode(TRIG_RIGHT, OUTPUT);
  pinMode(ECHO_RIGHT, INPUT);
  Serial.begin(9600);
}

void loop() {
  unsigned long now = millis();

  long distLeft  = readDistanceCM(TRIG_LEFT,  ECHO_LEFT);
  long distRight = readDistanceCM(TRIG_RIGHT, ECHO_RIGHT);

  bool leftDetected  = (distLeft  > 0 && distLeft  < DETECT_THRESHOLD_CM);
  bool rightDetected = (distRight > 0 && distRight < DETECT_THRESHOLD_CM);

  if (leftDetected && !rightDetected) timeState = BACKWARD;
  else if (!leftDetected && rightDetected) timeState = FORWARD;
  else timeState = PAUSED;

  if (now - lastTickTime >= tickInterval) {
    lastTickTime += tickInterval;
    if (timeState == FORWARD) clockStepper.step(-stepsPerTick);
    else if (timeState == BACKWARD) clockStepper.step(stepsPerTick);
  }

  sendStateIfChanged();
}

const int ENA = 6;
const int IN1 = 5;
const int IN2 = 4;

enum TimeState { PAUSED, FORWARD, BACKWARD };
TimeState state = PAUSED;

byte motorSpeed = 80;

unsigned long lastChangeTime = 0;
const unsigned long maxRunTime = 10000; // 10 seconds

void setup() {
  pinMode(ENA, OUTPUT);
  pinMode(IN1, OUTPUT);
  pinMode(IN2, OUTPUT);
  Serial.begin(9600);
  lastChangeTime = millis();
}

void applyMotorState(TimeState s, byte speed) {
  if (s == PAUSED) {
    digitalWrite(IN1, LOW);
    digitalWrite(IN2, LOW);
    analogWrite(ENA, 0);
  } else if (s == FORWARD) {
    digitalWrite(IN1, HIGH);
    digitalWrite(IN2, LOW);
    analogWrite(ENA, speed);
  } else if (s == BACKWARD) {
    digitalWrite(IN1, LOW);
    digitalWrite(IN2, HIGH);
    analogWrite(ENA, speed);
  }
}

void setState(TimeState newState) {
  if (newState != state) {
    state = newState;
    lastChangeTime = millis();
  }
}

void loop() {
  if (Serial.available() > 0) {
    char c = Serial.read();
    if (c == 'F') setState(FORWARD);
    else if (c == 'B') setState(BACKWARD);
    else if (c == 'P') setState(PAUSED);
  }

  unsigned long now = millis();

  if (state != PAUSED && (now - lastChangeTime >= maxRunTime)) {
    setState(PAUSED);
  }

  applyMotorState(state, motorSpeed);
}

Circuit Schematic

(Diagram made with https://www.circuit-diagram.org/)

breakdown of schematic:

Main Arduino

  • Ultrasonic Sensor Left
    • TRIG to pin 6
    • ECHO to pin 7
    • VCC to 5V
    • GND to GND
  • Ultrasonic Sensor Right
    • TRIG to pin 4
    • ECHO to pin 5
    • VCC to 5V
    • GND to GND
  • Stepper Motor (with driver)
    • IN1 → pin 8
    • IN2 → pin 9
    • IN3 → pin 10
    • IN4 → pin 11
    • VCC → 5V
    • GND → GND
  • Serial Out
    • TX (pin 1) → RX of second Arduino

Second Arduino (DC Motor Controller)

  • DC Motor Driver
    • IN1 → pin 5
    • IN2 → pin 4
    • ENA (PWM) → pin 6
    • Motor output → DC motor
    • Vmotor → 5V
    • GND → common ground with Arduin
  • Serial In
    • RX (pin 0) → TX of main Arduino

p5.js Code

  • Reads the serial state from Arduino
  • Updates the scene
  • Changes background colors
  • Moves particles and waves
  • Animates the digital clock
  • Shows arrows for direction


Communication Between Arduino and p5.js

Arduino → p5.js

Sends one character:

  • 'F' — forward
  • 'B' — backward
  • 'P' — paused

p5.js reads this using the Web Serial API.
When p5.js sees the character, it updates the digital world.

What I Am Proud Of

I am proud of how everything stays in sync.
The telescoping plant mechanism was hard to build, but it works well and gives life to the piece.
The gesture-based control also feels natural, and most users understand the idea at once.

How This Was Made

The clock was laser cut and screwed into a cardboard cylinder. I used an ice cream stick for the hand, which was connected using a skewer to the stepper motor. The boxes for the ultrasonic sensors were laser cut, and I got the design from boxes.py. For the fast forward and rewind icons, I designed them in Illustrator and then laser cut them. I got the idea for the telescoping cylinder from a YouTube short (https://www.youtube.com/shorts/99a4RUlUTm0), and I made a much simpler version that I 3D printed. I used another cardboard cylinder that I cut open to place the plant in and attach the DC motor and wheel at the top. I used acrylic paint, with help from an art major friend, to paint a background scene with the plant and sky.

The p5.js code was written through many tests and changes to connect smoothly with the Arduino using Web Serial. The designs for the scene, the clock visuals, and the interaction layout were made in small steps until everything felt right. The writeup was also done in simple clear language to explain the full system. All media was either created by me, painted by a friend, laser cut from my designs, or made using free online tools.

Areas for Future Improvement

The clock could be painted with a wooden-style finish to look more complete. I also still want to explore the original rotary sensor idea. The plan was to let the user manually rewind the clock by hand, and the system would detect this and move backward. I tested this with gears connecting the rotary sensor to the stepper motor, but the motor was too weak or the gears did not line up. I want to try again with stronger parts.

Finally, while the p5.js visuals look good and support the project, I feel there may be more ways to integrate the digital space with the physical movement. This is something I want to improve in the future.