This reading was very insightful. I always viewed medical devices through a lens of pure function, so this focus on design and identity was a new perspective for me. I found the glasses example to be the most compelling. They successfully shed any stigma by embracing fashion. People now wear them as a style choice. This proves that a device for the body does not need to be invisible to be accepted. The conflict between discretion and technology is a difficult one. The hearing aid case shows how the goal of hiding the device can actually limit its performance. I believe the author is correct. The problem is not the user’s desire to hide, but a lack of well-designed alternatives that people would feel confident displaying. I also agree that the “one fits all” model is flawed. The book shows that preferences vary greatly, even among people with the same disability. Some may want a realistic prosthetic, while others prefer a sleek tool or even an artistic statement. A single design cannot meet all these needs. The concepts of “appliances” and “platforms” were new to me. A simple, focused appliance like the iPod shuffle can be more inclusive and delightful than a complex platform trying to do everything. I was also struck by the note on dementia. Learning that it can involve a heightened artistic sense makes thoughtful design even more critical. Beautiful, intuitive objects can significantly improve a person’s daily experience. In my opinion, the core idea is to invite different kinds of creators into this field. Fashion designers and artists can bring new values. They can help create devices that feel like a part of a person’s identity, not just a tool they have to use.
Category: Spring 2024 – Aaron (Section 001)
Week 10 Reading Reflection
Reading Bret Victor’s “A Brief Rant on the Future of Interaction Design” made me think differently about how I use technology. The idea that a tool has “two sides”—one that fits the person and one that fits the solution—really stuck with me. It made me realize that most of the digital tools I use today, like phones or tablets, seem to fit the solution well but not necessarily the person. They make things efficient, but they don’t always feel natural or engaging to use. It made me question whether convenience has come at the cost of a deeper, more human form of interaction.
The part about the hands also made me pause. Victor reminds us that our hands aren’t just for manipulation—they’re for feeling. That distinction hit home because I often forget how much information comes through touch. When I’m drawing, typing, or even cooking, my hands constantly sense texture, pressure, and movement. But when I’m on a screen, all that disappears. His point that “touch does the driving and vision helps from the backseat” made me see how backwards our relationship with technology has become. I depend entirely on my eyes, while my hands just tap glass.
I connected most with his frustration about “pictures under glass.” It made me realize how passive I’ve become when using digital devices—how I only swipe, scroll, or pinch, instead of actually making or feeling something. It reminded me how satisfying it is to sketch on paper or build something physical, where every motion feels responsive. Victor’s ideas made me want to look for tools and experiences that let my hands do more than just point. It’s a call to design and use technology that reconnects me to my body, not one that distances me from it.
Reflection
When I read “A Brief Rant on the Future of Interaction Design” by Bret Victor and its follow-up article, I began to think differently about how technology shapes the way we interact with the world. Victor argues that designers often focus too much on screens and touch gestures, forgetting that humans are physical beings with hands meant to explore, build, and create. He believes that the future of design should go beyond flat screens and should instead give people tools that let them use their bodies, senses, and creativity more naturally.
This idea really connected with me because, as someone interested in computer science and interactive media, I often think about how to make technology feel more human. I realized that many modern interfaces such as phones, tablets, laptops imit our movements and creativity, even though they feel advanced. Victor’s point made me reflect on my own projects and how I can design in ways that allow people to move, touch, and engage with technology more freely.
The second article deepened this idea by exploring how designers and engineers are beginning to create more physical and immersive experiences. It reminded me that innovation isn’t just about new technology but about how it connects with human experience. Reading both pieces made me want to think more carefully about how design can make people feel present and creative, not just efficient.
Week 10 — Reading Response
Reading 1
I don’t completely agree with the author’s criticism that modern technologies like touchscreens and digital interfaces make interaction feel “glassy” and disconnected. While it’s true that they remove some tactile feedback, I think their purpose isn’t to replace physical touch but to make life more efficient and accessible. For example, instead of physically going to a post office to send a letter, I can send an email or message in seconds. This doesn’t make the experience meaningless it just reflects how technology has evolved to save us time and effort. These interfaces have also allowed people with disabilities to communicate, work, and interact in ways that might not have been possible with traditional physical tools. In that sense, “pictures under glass” might actually expand human capability rather than limit it.
However, I understand the author’s point about how important our sense of touch is and that certain interactions lose something when they become purely digital. For example, learning to play a real piano or sculpting clay engages the hands in ways that a touchscreen keyboard or 3D modeling app never could. I think the balance lies in knowing where tactile interaction matters and where digital convenience should take over. For creative or learning experiences, keeping physical feedback is valuable it builds skill, emotion, and memory. But for communication, organization, and quick access to information, digital tools are the smarter choice. So rather than rejecting “pictures under glass,” I think the future of interaction should combine both worlds using technology to simplify life without losing the richness of real, physical touch.
Reading 2
After reading Bret Victor’s responses, I actually liked his explanation a lot more because it helped me understand his real point. At first, I thought he wanted us to go “old school” and reject technology completely, like he was against modern progress. That’s why I used the example of sending an email instead of going to the mailbox because I thought he didn’t appreciate how technology saves time and makes life easier. But after reading his clarification, I realized he’s not saying we should stop using touchscreens or digital tools; he’s saying we should build on them and make them better. I especially liked his comparison of the iPad to black-and-white film before color came along that made so much sense. He wants us to advance technology even further, but in a way that brings back the richness of physical touch and real interaction. I still think that won’t be possible for everything, because the future is definitely digital, but if we can find ways to blend technology with physical sensations, that would be amazing it would make our interactions more natural, creative, and human.
Analog Sensor
Concept
For this project, I used one analog sensor and one digital sensor (switch) to control two LED lights.
The analog sensor I used was a photoresistor (light sensor). It changes how much electricity passes through it depending on how bright the light in the room is. The Arduino reads this change and adjusts the brightness of one LED when it’s dark, the LED gets brighter, and when it’s bright, the LED becomes dimmer.
For the digital sensor, I used a pushbutton connected to a digital pin. When I press the button, it turns the second LED on or off.
To make it different from what we did in class, I added a “night light” feature. When the photoresistor detects that the room is very dark, the button-controlled LED automatically turns on, like a small night light. When the light comes back, the button goes back to working normally.
This made my project more interactive and closer to how real sensors are used in everyday devices.
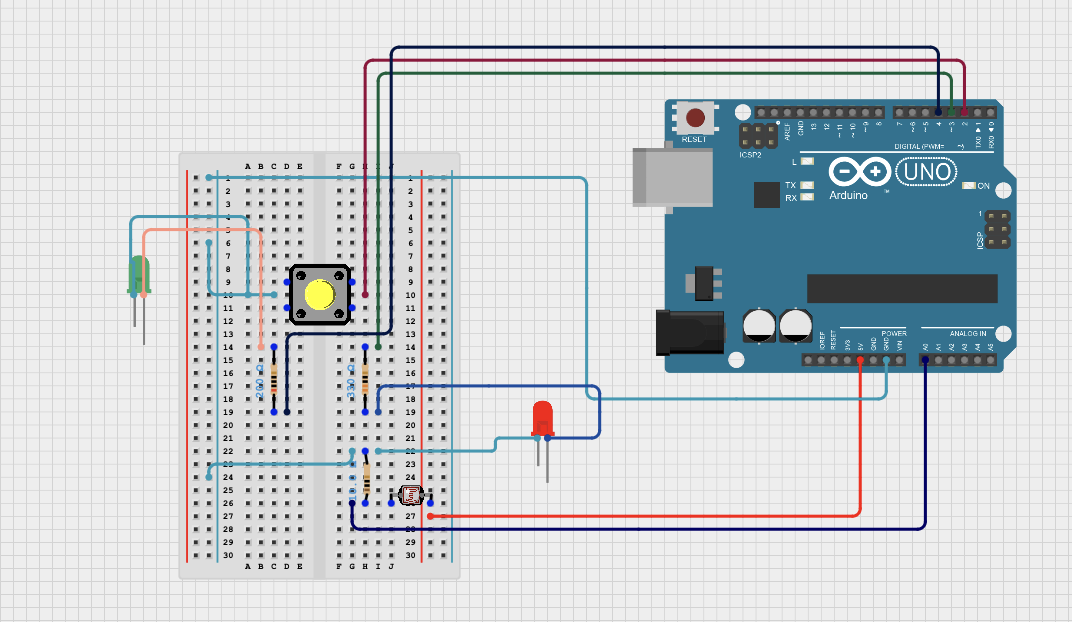
Schematic of my circuit
It shows the Arduino connected to:
-
A photoresistor and 10 kΩ resistor forming a voltage divider to read light levels.
-
A pushbutton connected to a digital pin.
-
Two LEDs , one controlled by the light sensor and the other controlled by the button
Final Results
When I tested the circuit:
-
The first LED smoothly changed its brightness depending on how much light the photoresistor sensed.
-
The second LED turned on and off with the button as expected.
-
When the room got dark, the second LED automatically turned on, working like a night light.
It was a simple but satisfying project, and the extra feature made it stand out from the class example.
Video: video-url
Arduino Code
Part of Cold I am proud of
void loop() {
// --- Read photoresistor ---
int lightValue = analogRead(lightPin); // 0–1023
int brightness = map(lightValue, 0, 1023, 255, 0);
analogWrite(ledAnalog, brightness);
// --- Button toggle ---
if (digitalRead(buttonPin) == LOW) {
ledState = !ledState;
delay(200);
}
// --- Night light feature ---
if (lightValue < 300) { // If it's dark, auto turn on LED
digitalWrite(ledDigital, HIGH);
} else {
digitalWrite(ledDigital, ledState ? HIGH : LOW);
}
// --- Print readings ---
Serial.print("Light: ");
Serial.print(lightValue);
Serial.print(" | Brightness: ");
Serial.print(brightness);
Serial.print(" | LED State: ");
Serial.println(ledState ? "ON" : "OFF");
delay(200);
}
Github url: Github
Challenges and Further Improvements
While I was able to make both the analog and digital sensors work, I struggled a bit with arranging all the wires and resistors neatly on the breadboard. It took a few tries to get everything connected correctly.
I also had to test different threshold numbers for the night light feature to decide when the LED should automatically turn on. Once I found the right value, it worked well.
For my next project, I want to try using other kinds of sensors, like sound or temperature sensors, and make the circuit respond in new ways. I’ll also practice reading the code line by line to understand how each part works better before adding new features.
Week 9 – Reading Reflection
Physical Computing’s Greatest Hits (and Misses)
Reading Physical Computing’s Greatest Hits (and Misses) really made me reflect on the role of human presence and movement in interactive design. The article explores recurring motifs in physical computing, such as theremin-style sensors, body-as-cursor interfaces, tilty tables, and mechanical pixels, and evaluates which ideas succeed and which fall short. What struck me most was the idea that interaction alone is not meaningful unless it is framed with intention or context. I found this insight particularly relevant because gestures, motion, and bodily engagement only carry meaning when integrated into a space or narrative. The article also emphasizes that even commonly used ideas can be made fresh through variation and creativity.
The discussion of emotionally responsive projects, like “remote hugs”, also inspired me to think about the potential of physical computing to create connection and presence. It made me consider designing experiences where participants’ actions are not only triggers for a response but also carriers of meaning, emotion, or narrative. I found myself imagining interactive installations or performance spaces where movement, gesture, and proximity could communicate emotion or tell a story, giving participants a sense of agency and contribution. Overall, the article reinforced the importance of centering human input and intention over technical complexity. It motivated me to experiment more boldly with interactive media, blending technology, space, and human engagement in ways that feel purposeful, immersive, and emotionally resonant.
Making Interactive Art: Set the Stage, Then Shut Up and Listen
When I was reading Making Interactive Art: Set the Stage, Then Shut Up and Listen I noticed a perspective of the audience or participant as a a co-creator, and the creator’s role is to design opportunities for exploration and discovery. The article encouraged setting the stage, providing affordances, and then stepping back to let participants engage on their own terms. This concept resonated deeply with me because I often feel the need to over-explain or control how people interact with my work, whether in interactive media projects, installations, or themed environments. Learning to trust participants’ curiosity and creativity is both challenging and exciting, and it made me rethink how I approach design: sometimes the most compelling experiences arise when the creator resists guiding every step and instead observes how others explore, interpret, and respond.
I also liked the idea of “listening” to participant interaction. Observing how people engage, adapt, or even misuse an interactive installation can reveal insights the creator never intended, and these discoveries can guide future iterations. This connects to my interests in performance and immersive storytelling because, in both cases, the audience’s reactions shape the experience. It also made me reflect on how I design spaces and experiences outside of class projects, including themed parties or interactive setups, where I can experiment with encouraging participation rather than prescribing behavior. The article inspired me to embrace unpredictability, co-creation, and emergent experiences, reminding me that interaction is not just about technology or novelty, it is about creating a dynamic relationship between the participant, the space, and the narrative. Now, I want to apply this mindset to my projects, designing experiences where participants’ actions carry weight and meaning, and where discovery becomes a central part of engagement.
Week 8 – Unusual Switch
For my project, I created an Arduino switch that activates through physical contact, specifically, a hug. Instead of using hands, I built a simple “hug switch” using two pieces of aluminum foil connected to the Arduino. One piece was taped onto my sleeve, and the other onto a plush toy sitting on my chair. When I hugged the toy, the foil pieces touched and completed the circuit, turning on an LED on the breadboard.
This setup used digitalRead() to detect when the circuit closed, lighting up the LED as a visual indicator. It’s a very basic circuit, just two foil pads, a resistor, and an LED; but it demonstrated how the human body can act as a conductor to trigger digital inputs. I liked how small physical gestures could translate into electronic signals. The process reminded me how interaction design can make technology feel more human, even with something as simple as a hug that lights up a tiny LED.
Schematic Diagram
Week 8 – Unusual Switch
For this recent assignment I decided to build a breath-activated switch.
How It Works
The concept is straightforward. I took a flexible tube and placed a small metal ball inside it. At one end of the tube, I positioned two disconnected wires from my circuit. When I blow into the open end of the tube, the force of my breath pushes the metal ball along the tube until it makes contact with both wires simultaneously.
This contact completes the circuit, and—voila!—a connected blue LED lights up to signal that the switch is “on.” When I stop blowing, the ball rolls back, the circuit breaks, and the light turns off. It’s a hands-free switch that’s both fun and functional.
The Build and Components
As you can see in the photo, the setup is quite simple. Here’s what I used:
-
An Arduino as a power source.
-
A breadboard for easy prototyping.
-
One blue LED.
-
Resistors to protect the LED.
-
Jumper wires to connect everything.
-
A flexible plastic tube.
-
A small metal ball.
The circuit itself is a basic LED setup connected to the development board. The magic is all in the custom-built switch. The tube, the ball, and the carefully placed wires are what make this an “unusual” solution that perfectly met the project’s requirements.
This was a fantastic exercise in creative problem-solving and a great way to apply basic circuit principles in a new and interesting way. It proves that with a little ingenuity, you don’t always need a traditional button or switch to make things work.
Video Demo
Week 8 – Unusual Switch
Concept
For my project, I used the HC-SR04 ultrasonic sensor, which measures distance by sending out a sound wave and timing how long it takes for the echo to bounce back. I used it to detect how close a person’s body is to the sensor. When the person is far (but not too far), a yellow LED lights up. When they get close, a red LED turns on instead. I chose these two colors to mimic a childhood game where the closer you got to a hidden object, the ‘warmer’ you were, so red represents ‘hot,’ and yellow means ‘warm.’
Here’s my wiring and a video of my circuit in action 🙂
https://drive.google.com/drive/folders/1kgAL550ryRCarylolh-Xjpr2KqJABRaU?usp=drive_link
and here’s my GitHub repository
Code I’m Proud Of
long readDistance() {
//low for clean start
digitalWrite(trigPin, LOW);
delayMicroseconds(2);
digitalWrite(trigPin, HIGH);
delayMicroseconds(10);
digitalWrite(trigPin, LOW);
long duration = pulseIn(echoPin, HIGH);
//convert to cm
//sound speed ≈ 343 m/s → 0.034 cm/µs.
//div 2 cause roundtrip
return duration * 0.034 / 2;
}
The part of my code I’m most proud of is the readDistance() function. Through it, I learned how the ultrasonic sensor actually works, sending a pulse, waiting for the echo, and then calculating distance using the speed of sound. I followed a YouTube tutorial to understand the basics, and then used ChatGPT to help debug the issues I ran into. I even got to use some of my physics knowledge to convert time into distance, which made it extra fun since it reminded me of things I had learned before.
Further Improvements
Sometimes the sensor glitches a bit, and I suspect it’s because of my wiring. The HC-SR04 usually needs female-to-male jumper wires to connect properly to the Arduino, but I had to improvise with what I had. Using the Serial Monitor really helped me check if the sensor readings were accurate, but I’d like to clean up my circuit and test again to make it more stable. With proper connections, I think the readings would be much smoother and more consistent.
Another improvement I’d like to try is turning this setup into a Morse code interpreter. Instead of just showing colors for ‘close’ and ‘far,’ I could make the distance readings represent dots and dashes, and then have an LCD screen display the translated message. It would make the project more interactive and add a creative twist while still keeping the hands-free concept. I think it’d be really satisfying to build something that turns simple movements into an actual form of communication.
MIDTERM – Bad Trip
Welcome to my midterm project, Neo-Euphoria Visions, an interactive audiovisual artwork created with p5.js. This project is an exploration into surreal, psychedelic self-portraiture, heavily inspired by the distinct visual language and emotional tone of the HBO series Euphoria. It uses your webcam to pull you into a hallucinatory world that reacts to your presence, blurring the lines between the viewer and the viewed.
The experience is a multi-layered trip. It begins with a simple invitation before slowly transforming your reality. Your image is recast in a cold, UV-and-pink color palette while a motion trail ghosts your every move. A glowing aura emanates from your silhouette, and hand-doodled stars twinkle into existence around you. The piece is designed to be both beautiful and unsettling, contrasting the cold, trippy visuals with organic, hot-red tears that bleed from your eyes. With a dynamic soundtrack and automated visual shifts, the goal is to create a mesmerizing, ever-changing, and deeply personal digital hallucination.
Live Sketch
You can experience Neo-Euphoria Visions live in your browser by clicking the link below.
Screenshots
How It Works & What I’m Proud Of
This project is built on a foundation of p5.js, but its soul lies in the integration of two powerful libraries: ml5.js for computer vision and GLSL for high-performance graphics shaders. The entire visual output, from the colors to the background effects, is rendered in a single, complex fragment shader that runs on the GPU. This was a critical technical decision that allows for multiple layers of real-time effects without the performance lag that would come from CPU-based pixel manipulation.
The core mechanic involves layering several computer vision and graphical processes. First, ml5.js BodyPix creates a segmentation mask of the user, which is fed into the shader. This mask allows me to separate the scene into three distinct layers: the background, a glowing “aura” directly behind the user, and the user themselves. The shader then applies different artistic effects to each layer. Simultaneously, ml5.js FaceApi tracks facial landmarks to determine the precise location of the user’s eyes. This data is used by a custom Tear class in p5.js, which draws organic, flowing tears on a transparent overlay canvas, making them appear attached to the face. I’m particularly proud of the logic that makes the tears “follow” the eyes smoothly by interpolating their position between frames, which prevents the jittery tracking that can often occur.
JavaScript
// A snippet from the Tear class showing the smooth position update
updatePosition(newX, newY) {
if (this.path.length === 0) return;
let head = this.path[0];
// Use lerp to smoothly move the tear's origin towards the new eye position.
// This prevents jittering if the face detection is noisy.
let targetPos = createVector(newX, newY);
let smoothedPos = p5.Vector.lerp(head, targetPos, 0.3);
let delta = p5.Vector.sub(smoothedPos, head);
for (let p of this.path) {
p.add(delta);
}
}
One of the best technical decisions was implementing a temporal smoothing feedback loop for the BodyPix mask. The raw mask from the model can be noisy and flicker between frames, creating harsh, blocky edges. By blending each new mask with the previous frame’s mask, the silhouette becomes much more stable and organic, which was essential for the “glowing aura” effect to work properly. Finally, the automated, timed switching between three distinct color palettes gives the project a life of its own, making the experience unpredictable and unique for every viewing.
Glsl
// A snippet from the fragment shader showing the palette switching logic
void main() {
// ...
vec3 personPalette_phase;
vec3 auraPalette_phase;
if (u_activePalette == 1) { // Palette 1: Haze & Fire
personPalette_phase = vec3(0.0, 0.1, 0.2); // UV
auraPalette_phase = vec3(0.1, 0.15, 0.20); // Yellow/Orange
} else if (u_activePalette == 2) { // Palette 2: Electric Pink/Cyan
personPalette_phase = vec3(0.6, 0.7, 0.8); // Deep UV
auraPalette_phase = vec3(0.5, 0.6, 0.7); // Pink/Cyan
} else { // Palette 3: Cold UV
personPalette_phase = vec3(0.5, 0.6, 0.7); // Deepest UV
auraPalette_phase = vec3(0.8, 0.9, 1.0); // Electric Blue/Violet
}
// ...
}
(A second screenshot showing a different palette, perhaps “Haze & Fire,” to illustrate the variety.)
[Screenshot showing the warmer “Haze & Fire” palette in action.]
Problems and Areas for Improvement
The single biggest challenge I encountered during development was a series of stability issues related to the ml5.js library. I initially ran into persistent “… is not a function” errors, which, after extensive debugging, I discovered were caused by a major version update (v1.0.0) that had deprecated the FaceApi model I was using. The solution was to lock the project to a specific older version (v0.12.2) in the index.html file. This was a crucial lesson in the importance of managing dependencies in web development.
Even after fixing the versioning, I faced a “race condition” where both FaceApi and BodyPix would try to initialize at the same time, causing one or both to fail silently. This resulted in features like the aura and glitch-zoom not working at all. I resolved this by re-architecting the setup process to “chain” the initializations: BodyPix only begins loading after FaceApi has confirmed it is ready. This made the entire application dramatically more reliable. For future improvements, I would love to make the background effects more diverse and audio-reactive. Having the stars pulse or the colors shift in time with the bass of the music would add another layer of immersion. I could also explore using hand-tracking via HandPose to allow the user to “paint” or interact with the stars in the background, making the experience even more creative and personal.