
My Sketch
My concept
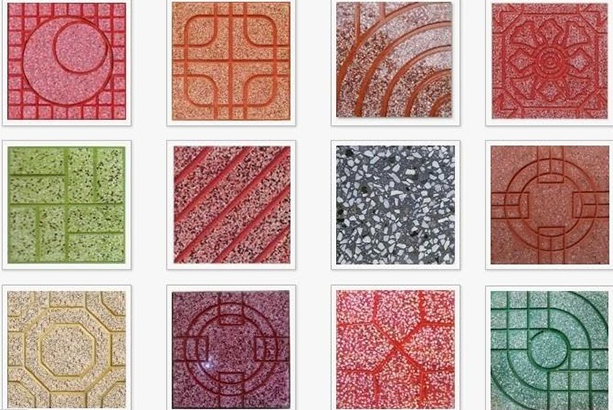
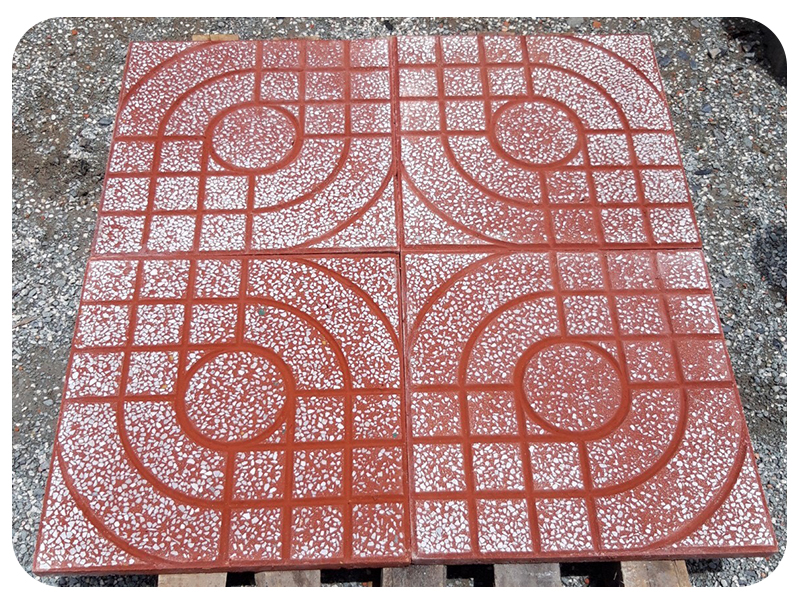
When I first heard that the artwork can use loops to create a pattern, my mind jumps straight to the iconic terrazzo tiles that are used on the sidewalks of the streets in Hanoi, my home city. These tiles come in different patterns, and every Vietnamese, including myself, strangely finds nostalgia in these tiles because it is what we grew up with. Vietnam’s terrazzo tiles have a much deeper history than I could ever imagined: In the early 1990s, a project was set out to get rid of the bumpy concrete pavements. Inspired by the European, particularly Venice’s floral tiles, tile designers and suppliers decided to simplify them into designs of geometrical shapes. There are so many designs, each iconic in their own way, and I decided that for this assignment I wanted to draw one of these patterns on p5.
My highlight code
for (let col = 0; col < numOfTiles; col++) {
    for (let row = 0; row < numOfTiles; row++) {

      push();
      if ((col%2==1 && row%2==0)||(col%2==0 && row%2==1)) {
        translate((col+1)*tileSize, row*tileSize);
        scale(-1, 1);
      } else {
        translate(col * tileSize, row * tileSize);
      }
      drawTile(numOfTiles);
      pop();
    }
  }
I draw each individual tile in the function drawTile() then in the main draw() function, I call drawTile() for a total of 16 times to create the 4×4 grid as shown above. I was especially proud of this section of code because instead of having to manually call drawTile() 16 times, I used a nested for loop to optimize the process! Within each iteration, I use a conditional statement to check whether I should flip the tile (basically creating a mirrored version of it) based on its position in the grid. The next section, “How this was made,” goes into detail of the algorithm and why I used certain functions. It also links to the tutorials and reference pages I used.
How this was made
This assignment was way harder than I had initially expected! I first explored on a default 400×400 canvas, where I created one single tile. I have also embed the sketch for it here, as this was a crucial step in my process. I tried to be as accurate as possible, while also challenging myself to use the different p5 primitives. While I could have just drawn the indented lines, I decided to challenge my approach and draw the shapes and blocks instead. I primarily used squares and arcs to create the geometric shapes.
Sketch for 1 single tile (hardcoded on 400×400 canvas):
One of the things I was being super cautious about was with the numbers and math. Symmetry is an important feature, so I had to make actual calculations with the coordinates to ensure everything aligns. I used nested for loops to create the small squares in the top-left and bottom-right, and also gave them some border-radius (this is different from the actual tiles).
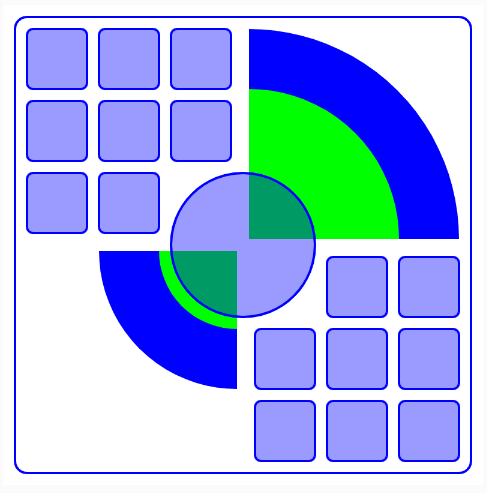
Then, for the curves in the top-right and bottom-left, I used arcs that are one quarter, make them transparent in the middle (noFill) and gave them a big stroke to create the curves.
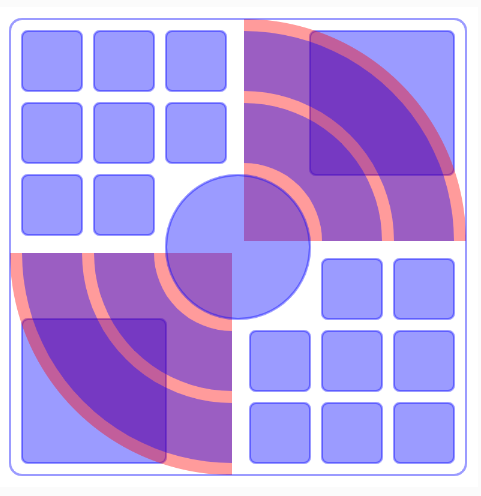
For the curved triangle in the corners, they are actually squares, but an arc sits on top of each square, basically hiding half of it and giving it a curve hypotenuse. Overall, since the single tile is mirrored over y=-x, it was not difficult, I just had to be careful with the placement and order of the primitives.
However, the real challenge really came when I wanted to put multiple tiles together to make a pattern. When I was drawing the single tile, I was hard-coding the coordinates for a 400×400 canvas. Therefore, I won’t be able to resize or place them next to each other easily. Then, I had to create a duplicate file of my single tile, and manually change the values to be responsive to the width and height of the canvas (it was a tedious process but the code wasn’t extremely long because I had used for loops to avoid redundancy). You can find the sketch for the responsive tile here. The hard-coded and responsive tile looks exactly the same on a 400×400 canvas, but they are massively different in the numbers and variables I used to draw them.
Once I have made the single tile responsive to the canvas dimensions, the next thing on the checklist is to put several of them together to create a pattern. I put all the primitives in a function drawTile(), then in draw(), I call drawTile() when I need to draw a tile. Notice that the pattern is created with the tiles and its flipped version (symmetry at y=-x and y=x). In order to create the flipped variations, I used scale(-1,1) to flip the tile over the y-axis. I watched The Coding Train’s “How to use scale() in p5.js” tutorial and also referenced the corresponding p5 reference. I also notice a pattern with the tiles that are to be flipped. If we do a 4×4 grid of the tiles, and have columns and rows numbered from 0-3, the flipped tiles would either:
– have even-numbered row + odd-numbered column; or
– have odd-numbered row + even-numbered column
I used an if statement here, evaluating odd/evenness using modulus 2. If it is one of the 2 scenarios above, I call scale(-1,1) before I call drawTile().
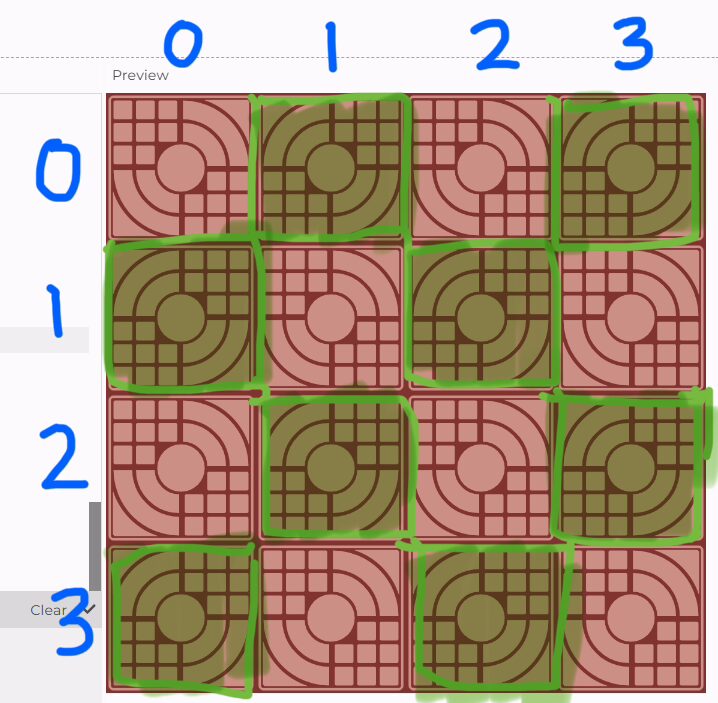
In order to place the tiles at the correct spots on the grid, I used the translate() function which allows me to set a new origin of (x,y) instead of the default (0,0). I watched this tutorial and looked at the p5 reference page for this function. One thing I noticed in the Youtube tutorial is that you have to use push() and pop() before and after translate(). While I haven’t fully understood how these 2 functions work, it appears that they sort of “resets” the origin to (0,0) after every tile is drawn, otherwise the next time I call translate(), it would be relative to the (x,y) arguments I last passed. I used nested for loops to create the 4×4 grid, then calls drawTile() after translating the origin.
Reflection
This tile is one of the more complicated designs but what made it especially so difficult is the diagonal symmetry. I took a lot more time than I had initially expected, but ultimately in the end, I think the pattern turned out really nice.
I basically had to do 3 steps: a tile on 400×400 canvas, making the coordinates relative & dynamic to the canvas dimensions, and printing the pattern. I feel like my current approach is definitely over-complicated and takes more time and effort than it needs to be. However, my experience with p5 is quite limited, so I tried my best with the knowledge and resources I have.
Also, if I had more time, I would want to play around with the colors. Maybe I can make the pattern changes color every couple seconds or when the end-user clicks on the canvas. I think that would add a very cool layer of interactivity to this otherwise static pattern.
Resources I Used
https://www.youtube.com/watch?v=pkHZTWOoTLM&t=56s
https://p5js.org/reference/p5/scale/
https://www.youtube.com/watch?v=maTfm84mLbo
https://p5js.org/reference/p5/translate/
[photo] https://topmatstore.vn/gach-terrazzo-p4501.html
[photo] https://gachngoihanoi.com/gach-via-he-terrazzo/gach-via-he-terrazzo-mat-nai-do-post239.html
all other screenshots and figures are my own
No Artificial Intelligence was used in the making of this sketch or its documentation.