Learning Tinkercad, I built a Harry Potter theme song musical instrument that uses both digital and analog sensors to play the iconic melody. The PIR motion sensor (digital) detects when someone is nearby to trigger the song, while the potentiometer (analog) allows dynamic control over the playback speed and pitch variation, creating an interactive magical experience.
Check the Tinkercad here: https://www.tinkercad.com/things/7rPWu9K1P2T/editel?returnTo=%2Fdashboard&sharecode=CMCKEgjwUaqW1OCp9xhFPli3PX6svXP-iPPxgq9R69U
Digital Circuit
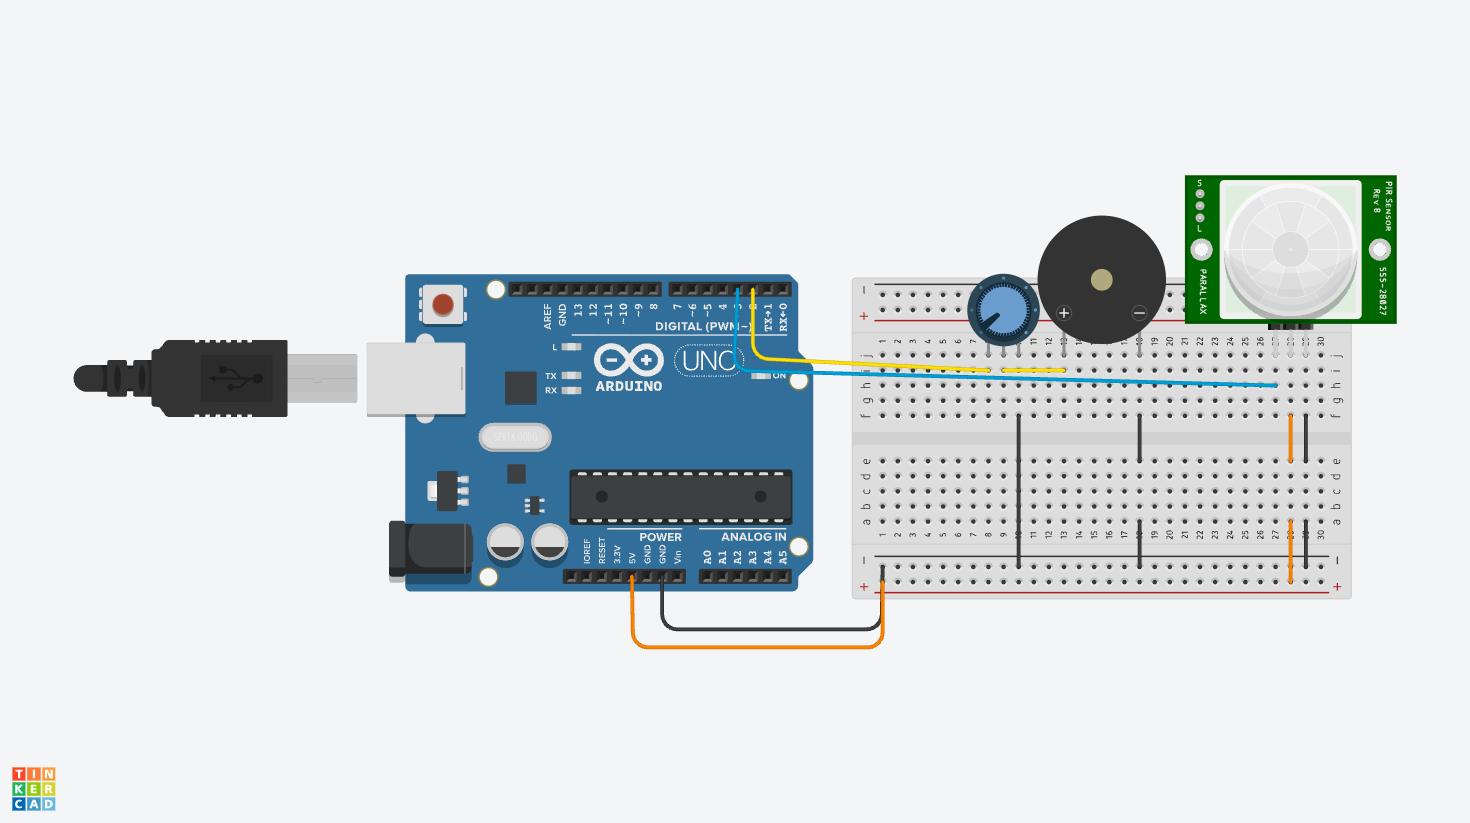
The circuit is built on a breadboard connected to an Arduino Uno. The design features: PIR Motion Sensor connected to Digital Pin 2 – detects motion to trigger song playback, Potentiometer connected to Analog Pin A0 – adjusts playback tempo/pitch modulation, Piezo Buzzer connected to Digital Pin 8 – outputs the Harry Potter theme frequencies, Power connections from 5V and GND to the breadboard power rails
The PIR sensor acts as a motion detector-when someone waves their hand over it, the circuit recognizes movement and initiates playback of the Harry Potter theme. The potentiometer serves as a control dial; turning it varies the speed at which notes are played or adjusts the pitch offset, giving the player expressive control over the melody.
PIR detection → Read potentiometer value → Play frequencies on buzzer.
Highlighted Code Snippet (Proud of This!)
// PIR sensor triggers playback
if (pirSensor == HIGH) {
  int tempo = map(potValue, 0, 1023, 200, 600);  // Potentiometer controls speed

  for (int i = 0; i < melodyLength; i++) {
    int notePitch = melody[i] + pitchOffset;  // Add potentiometer-based pitch variation
    tone(buzzer, notePitch, tempo);
    delay(tempo);
  }
}
The map() function elegantly connects the analog potentiometer reading to playback tempo, so rotating the dial smoothly speeds up or slows down the song. This creates a responsive, instrument-like feel rather than fixed playback.
int pirSensor = 2;
int potentiometer = A0;
int buzzer = 8;

// Harry Potter theme frequencies (simplified)
int melody[] = {294, 330, 392, 440, 494, 523, 587, 659};
int melodyLength = 8;

void setup() {
  pinMode(pirSensor, INPUT);
  pinMode(buzzer, OUTPUT);
  Serial.begin(9600);
}

void loop() {
  int motionDetected = digitalRead(pirSensor);
  int potValue = analogRead(potentiometer);

  if (motionDetected == HIGH) {
    int tempo = map(potValue, 0, 1023, 150, 500);
    int pitchOffset = map(potValue, 0, 1023, -50, 50);

    for (int i = 0; i < melodyLength; i++) {
      int notePitch = melody[i] + pitchOffset;
      tone(buzzer, notePitch, tempo);
      delay(tempo + 50);
    }
    noTone(buzzer);
  }
}
Reflection
This project taught me how digital and analog sensors complement each other. The PIR sensor provides binary input (motion yes/no), while the potentiometer gives continuous analog data for fine-tuning. I was initially unsure if the PIR sensor would register properly in simulation, but discovered that sensor sensitivity is crucial – sometimes you need to calibrate which digital pin captures the signal. The biggest challenge was mapping the potentiometer smoothly to tempo without the song becoming too fast or choppy. Using Arduino’s map() function solved this.
Screen Recording 2026-05-01 at 12.13.31