Week_10_Assignment

Concept

The requirement of creating a musical instrument with electrical components made me think of the Theremin, but I didn’t want to copy the logic comletely. So I dicided to use the ultrasonic distance sensor to imitate the change by hand movement. I also wanted to make the instrument a beat generater, because beats can be manipulated in their pitch, tempo and even rhythm pattern. This allows much more variation. So the ultimate design concept was to have the ultrasonic distance sensor acts as a pitch controller, where the player can move thir hand away or closer to the sensor to control pitch, the potentialmeter controls the tempo, and the toggle switch allows alternation between rythm patterns. I was responsible for the code while Mariam was responsible for the wiring and schematics.

Video Demo

Video was made by Mariam Barakat

Schematics
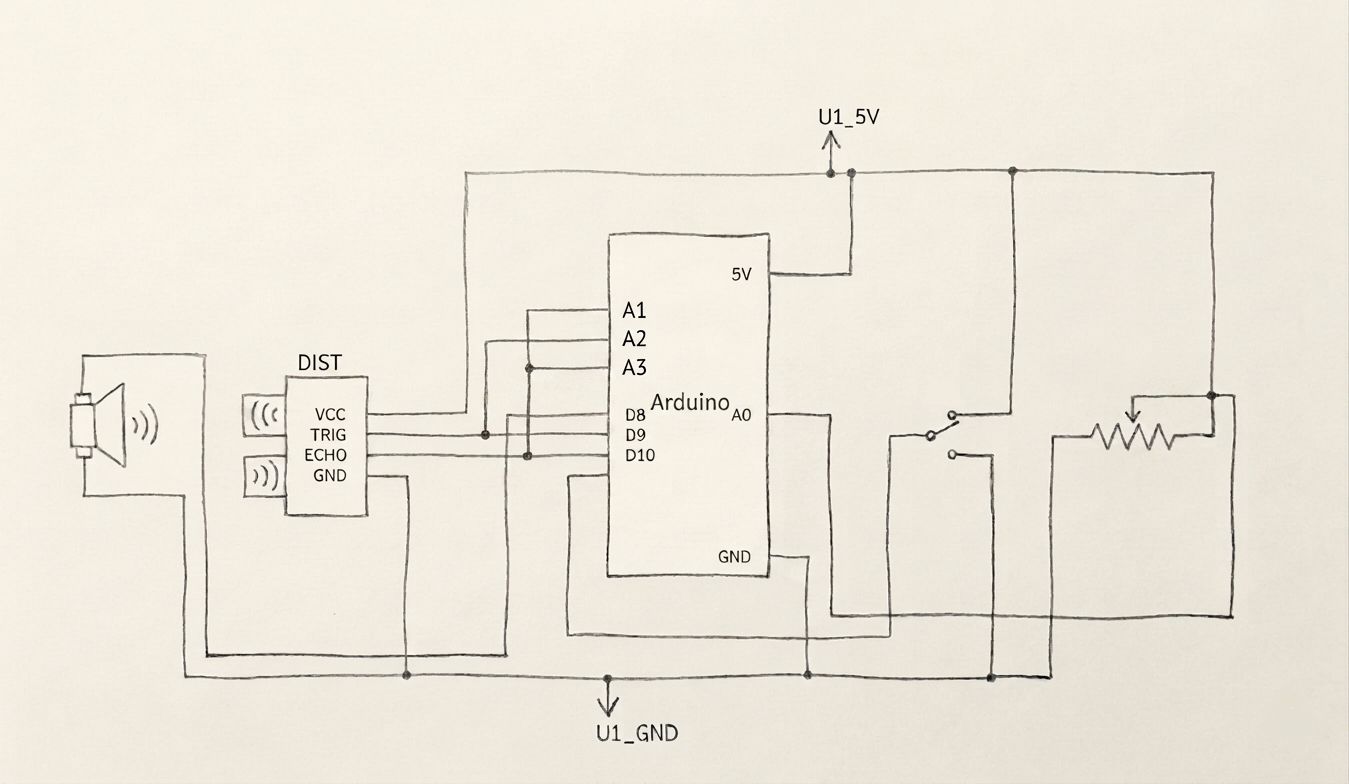
Schematics also made by Mariam Barakat

Code Snippet

https://github.com/JingyiChen-jc12771/Intro-to-IM/blob/e15f6f3478d8937ba91372ab2eed7e34a691b2b8/Week_10_assignment/Week_10_assignment.ino

int scale[]={NOTE_C4, NOTE_D4, NOTE_E4, NOTE_G4, NOTE_A4, 
  NOTE_C5, NOTE_D5, NOTE_E5, NOTE_G5, NOTE_A5};

The code shown above is the note array. It is used so not every single sound in the range of the distance to pitch mapping is used. This removes the more irritating pitches and leaves the actual notes, just to make the instrument sound better.

long duration,cm;
int switchState = digitalRead(switchPin);
//measuring chunk for the ultrasonic distance sensor
digitalWrite(distPin,LOW);
delayMicroseconds(2);
digitalWrite(distPin, HIGH);
delayMicroseconds(10);
digitalWrite(distPin, LOW);
//records the time between output of ultrasound and echo. 10000 sets a limit in case there is not close enought object, it prevents the program from stopping completely by setting cm to 0.
duration=pulseIn(echoPin,HIGH,10000);
//uses the convertion function to convert the time to distance
cm = microsecondsToCentimeters(duration);
//if the distance of object is further than 50cm away treat it as 50cm, this limits the range of distance.
if(cm==0||cm>50){cm=50;}
//map the distance to the array of notes, 2 is the reliable begining measurement of the sensor
int noteIndex = map(cm, 2, 50, 0, numNotes - 1);
int currentNote=scale[noteIndex];
//the function to convert time to distance, 10000 time would result in 0cm
long microsecondsToCentimeters(long microseconds) {
  return microseconds / 29 / 2;
}

This is the chunk where the distance sensor is activated and does its measuring, and the measurements are mapped to the note array. The code for initiating ultrasound release and receiving echos are referenced from a tutorial for 4 pin ultrasonic sensors on the Arduino project hub and the Arduino IDE Ping example for 3 pin ultrasonic sensors. The code tells the sensor to be quiet for 2 microseconds, emit ultrasound for 10 microseconds, and then stops so the echo can be listened for. Then the time it took for the echo to get back is assigned to the duration variable, which is converted to distance in cm used the function i found in the Arduino Ping example. The distancer is then mapped to the indexes of the note array, so distance would corresopond to note.

if (currentMillis - startMillis >= tempo) {
    startMillis = currentMillis; 
    beatStep++;
    //the beat generation
    //switch controls two states, one where the beats play at a steady tone
    if(switchState==HIGH){
      tone(buzzerPin,currentNote,50);
      //In the other state the beat is deeper at even beats and lighter at odd beats
    }else{if(beatStep%2==0){
      tone(buzzerPin,100,50);
    }else{
      tone(buzzerPin,currentNote,50);
    }
  }
}

This code snippet is the part that times the beats and controls the button alternation between the two rythm styles. The timer uses the same logic as the timer we have done in p5. Time passed is recorded in millis. the time the last beat was played was assigned to “startMillis”, and current time is “currentMillis”. When time interval between the two millis exceed the tempo, the next beat is played.

One of the switch state plays a steady tone, where the beat is played at the pitch defined by the redings of the distance sensor all the time. The other state plays an alternating pattern.  if(beatStep%2==0) results in even beats playing at a hard coded 100Hz, and odd beats at the distance influenced pitch. This can also be modified. The even beat can be made half the frequency, double the frequency, or pitch desired.

Reflection

The biggest challenge was with the timer. Initially we tried to use delay as we did in all our previou codes and the whole unit would freeze and not work at all. Thinking back to our P5 experience we figured using a background timer of millis would allow the unit to keep running between beats. The end result was good and the beats flowed smoothly. Something we could have done better might be to expand the array so the pitches are not that limited. Something else that would have been fun but a bit less feasible is adding more push buttons, and make the pitch or overall style change when the button is pushed, like a groove box. But that would work better if the output was not limited to a piezo speaker. That would allowe a wider variety of sounds and might even create some DJ effects.
 

Week 10 — Musical Instrument

Mariam B and Jenny

1. Repository

Repository

2. Overview

This project is an interactive electronic musical instrument. An ultrasonic distance sensor acts as a pitch controller — the player moves their hand closer or further away to select notes from a pentatonic scale. A potentiometer controls the tempo of the beat. A toggle switch changes between two musical modes: a steady melodic mode where every beat plays the note selected by the player’s hand, and a drum-style alternating mode where deep and light tones trade off rhythmically. All sound is produced through a piezo buzzer.

3. Concept

The concept was inspired by the Theremin — a classical electronic instrument played without physical contact, where the performer’s hand position in the air controls the pitch of the sound. Rather than pressing discrete keys to trigger notes, the player sculpts sound by moving their hand through the air above the ultrasonic sensor. This creates a continuous, expressive range of input that feels intuitive and physical at the same time. The toggle switch gives the instrument two distinct personalities — one melodic and one percussive — while the potentiometer lets the player set the energy of the performance by controlling how fast the beat moves.

    • Note on AI assistance: The wiring configuration for this project was determined with the help of Google Gemini. The circuit concept was described to Gemini and it provided wiring instructions for the components.
4. Process and Methods
    • The ultrasonic distance sensor fires a 10-microsecond pulse and measures how long the echo takes to return. A helper function microsecondsToCentimeters() converts that time into a distance in centimeters. The distance is then mapped to an index in the scale[] array using map(), so each position of the hand corresponds to a specific note.
    • The scale[] array uses note definitions from a pitches.h file and is limited to a two-octave pentatonic scale — C, D, E, G, A across octaves 4 and 5. This removes dissonant half-steps so the instrument always sounds in key regardless of where the hand is placed.
    • The potentiometer is read using analogRead and mapped to a time interval between 150 and 800 milliseconds, which controls how frequently the beat fires.
    • A non-blocking timer using millis() handles beat timing instead of delay(). This keeps the Arduino continuously reading the sensors between beats so the instrument feels responsive and live. A beatStep counter increments on every beat and is used by the alternating mode to separate even and odd beats.
    • The toggle switch selects between the two musical modes and uses INPUT_PULLUP so no external resistor is needed.
5. Technical Details
    • The pitches.h file defines note names as frequency constants, allowing the scale array to be written in readable musical notation rather than raw numbers:
// ── MUSICAL SCALE ──
// A two-octave pentatonic scale (C, D, E, G, A across octaves 4 and 5)
int scale[] = {NOTE_C4, NOTE_D4, NOTE_E4, NOTE_G4, NOTE_A4,
               NOTE_C5, NOTE_D5, NOTE_E5, NOTE_G5, NOTE_A5};
int numNotes = 10;
    • unsigned long is used for the timer variables because the millis() counter grows very quickly and would overflow a standard int (maximum 32,767) after only about 32 seconds:
unsigned long startMillis = 0;
unsigned long currentMillis = millis();
    • The distance sensor trigger sequence follows the standard HC-SR04 pattern — a brief LOW to clear the pin, a 10-microsecond HIGH pulse to fire the sensor, then LOW again to listen:
// ── ULTRASONIC SENSOR TRIGGER SEQUENCE ──
// Pull the trigger pin LOW briefly to ensure a clean starting state
digitalWrite(distPin, LOW);
delayMicroseconds(2);
// Send a 10-microsecond HIGH pulse to fire the ultrasonic burst
digitalWrite(distPin, HIGH);
delayMicroseconds(10);
// Pull LOW again — the sensor is now listening for the echo
digitalWrite(distPin, LOW);

// Measure how long the echo takes to return, in microseconds.
// The 10000 timeout prevents the program from freezing if no object is close enough to reflect the pulse — it returns 0 instead.
duration = pulseIn(echoPin, HIGH, 10000);
    • The distance is mapped starting from 2cm rather than 0 because the HC-SR04 has a physical blind spot below approximately 2 centimetres where readings are unreliable. The upper limit of 50cm keeps the performance zone compact and ergonomic:
int noteIndex = map(cm, 2, 50, 0, numNotes - 1);
    • The alternating drum mode uses the modulo operator on beatStep to separate even and odd beats, assigning a fixed deep tone of 100Hz to even beats as a kick drum and the hand-controlled note to odd beats as a snare:
if (beatStep % 2 == 0) {
  tone(buzzerPin, 100, 50);
} else {
  tone(buzzerPin, currentNote, 50);
}
6. Reflection

This project pushed us to think about musical interaction as much as electronics. The biggest technical challenge was replacing delay() with the millis() timer — understanding why the Arduino had to keep running between beats, rather than pausing, took some time but made the instrument feel genuinely alive and responsive in a way that a delay-based version couldn’t. The decision to use a pentatonic scale rather than mapping the full chromatic range was the single biggest improvement to how the instrument sounds; removing the dissonant notes made even accidental hand movements musical. The Theremin inspiration also shaped how the wiring was approached — describing the concept to Gemini and using its wiring instructions as a reference helped bridge the gap between the interaction idea and the physical circuit. If we were to extend this, we could add a second switch to select between different scales, a visual indicator showing the active mode, and potentially an LCD display to show the current tempo and note being played.

7. Resources

Week 10 — Reading Response

Victor’s “Pictures Under Glass” critique is most compelling not as a takedown of touchscreens specifically, but as a diagnosis of a failure of imagination — the industry confused accessible with good, and then mistook good for visionary. The tool definition he anchors everything to (amplifying human capabilities, not just addressing needs) is doing a lot of work, and it mostly earns it. The sandwich analogy is a little theatrical, but the underlying point lands: we have genuinely extraordinary hands, and sliding a finger on flat glass uses almost none of what makes them extraordinary. The shoelace example is sharper — close your eyes and you can still do it, which is exactly what good tool design should exploit, not eliminate.

What’s interesting is that Victor isn’t really against touchscreens. He’s against treating them as a destination rather than a waypoint. The Kodak analogy in the responses piece clarifies this well: color film wasn’t inevitable, it required people deciding that black-and-white was missing something and doing the research. His concern is that without the rant — without the explicit articulation that something is missing — nobody funds the research. That’s a reasonable fear, and it gives the piece a purpose beyond the polemic.

The responses page is where the argument gets more nuanced and also more interesting. The voice section is the strongest part: his distinction between oracle tasks (ask and receive) and understanding tasks (explore and manipulate) cuts to something real about how knowledge works. You can’t skim a possibility space with your voice. You can’t point at a region of a graph with a command. That’s not a limitation of NLP, it’s a limitation of the modality for that kind of cognition. The explorable explanations he gestures at are a better argument for his position than anything in the rant itself.

The weakest section is the brain interfaces response, which slides from a reasonable point about body-computer mismatch into a somewhat alarmist vision of immobile humans that feels grafted on. And the “my child uses the iPad” rebuttal — channeling all interaction through a single finger is like restricting all literature to Dr. Seuss — is rhetorically satisfying but probably too cute. Accessibility and expressive richness aren’t actually as opposed as the analogy implies; the question is whether you optimize one at the permanent expense of the other. Victor would say yes, that’s exactly what we’re doing. That’s the argument worth sitting with, and it’s one the responses page never quite resolves — which, to his credit, he seems to know.

Week 10 – Musical Instrument

Concept

For this week’s assignment, we decided to create a make-shift piano using the DIY aluminum foil compression button we used in previous assignments. The piano only plays one song; each time you press one of the piano “keys,” the next note in the sequence plays.

For the analog input, we used a potentiometer to control the pitch/frequency of the notes.

Demo:

Implementation:

We created 3 foil switches, taping one side of each switch to GND and the other to a digital pin. Then, we connected the buzzer and potentiometer.

For the code, we used sound files from the same Github repo we used in class. I used the notes for the song “It’s a Small World.”

On every loop iteration, it reads the state of all three buttons and checks if any of them just transitioned from unpressed to pressed, if a button was HIGH last loop and is LOW now, that counts as a single press.

void loop(){
//...

bool justPressed = (state_yellow == LOW && prev_yellow == HIGH) 
                      || (state_blue == LOW && prev_blue == HIGH) 
                      || (state_red == LOW && prev_red == HIGH);

//...
}

When a press is detected, it looks up the current note’s frequency and duration from two parallel arrays, scales the frequency up or down based on the potentiometer reading, plays it through the buzzer, waits for it to finish, then advances to the next note in the melody. The previous button states are saved at the end of every loop so the next iteration can do the same comparison, ensuring each physical press only ever triggers one note no matter how long you hold it down.

Initially, I had the code so that the note plays every time the button is pressed; however, this was causing the entire melody to continuously play as long as the button is pressed. So, we had to come up with a different way to ensure a note is only played when the button changes from unpressed to pressed.

Due to the way the foils are made, it does appear that only one note is playing when the button is pressed. Sometimes when I press the foil button, the foil may touch from one side by accident, or the wires may move which closes and opens the circuit without my intent. Therefore, the device appears to still be playing multiple notes at once but it eventually pauses.

We had to figure out a way to change the pitch of the notes without completely changing what the note was. Since there is a trend among the notes where if you want to move from a note from higher pitch to a lower or vice versa, the note’s pitch value/frequency would need to either be divided by 2 or multiplied by 2.

For example: standard Do sound = C4; a lower pitch would be C3. The difference between the pitch of the two is that C4 is double C3

For that we mapped the potentiometer’s input values (0, 1023) to (50, 200) and divided by 100, this allows us to shift between notes and their pitches smoothly using the potentiometer.

We multiplied this factor to the original note that would have been played and set the tone to include the multiplied value as the frequency in the tone statement.

void loop(){ 
float pitchMultiplier = map(pot_value, 0, 1023, 50, 200) / 100.0;
}

Reflection:

Reflecting on the issue of the foils touching and playing more notes than I want them to, I thought of a way to fix them using cloth pins. I can attach two foils to the inside of the end you use to open the pin, so when you are opening the pin, the foils touch and it counts as a “press.” I imagine this method to function more smoothly than the sponge compression I built for this assignment because the cloth pin is stable and forces the foils away from each other after every press.

Week 10 Assignment – Partner work Mhara & Mariam

Concept:

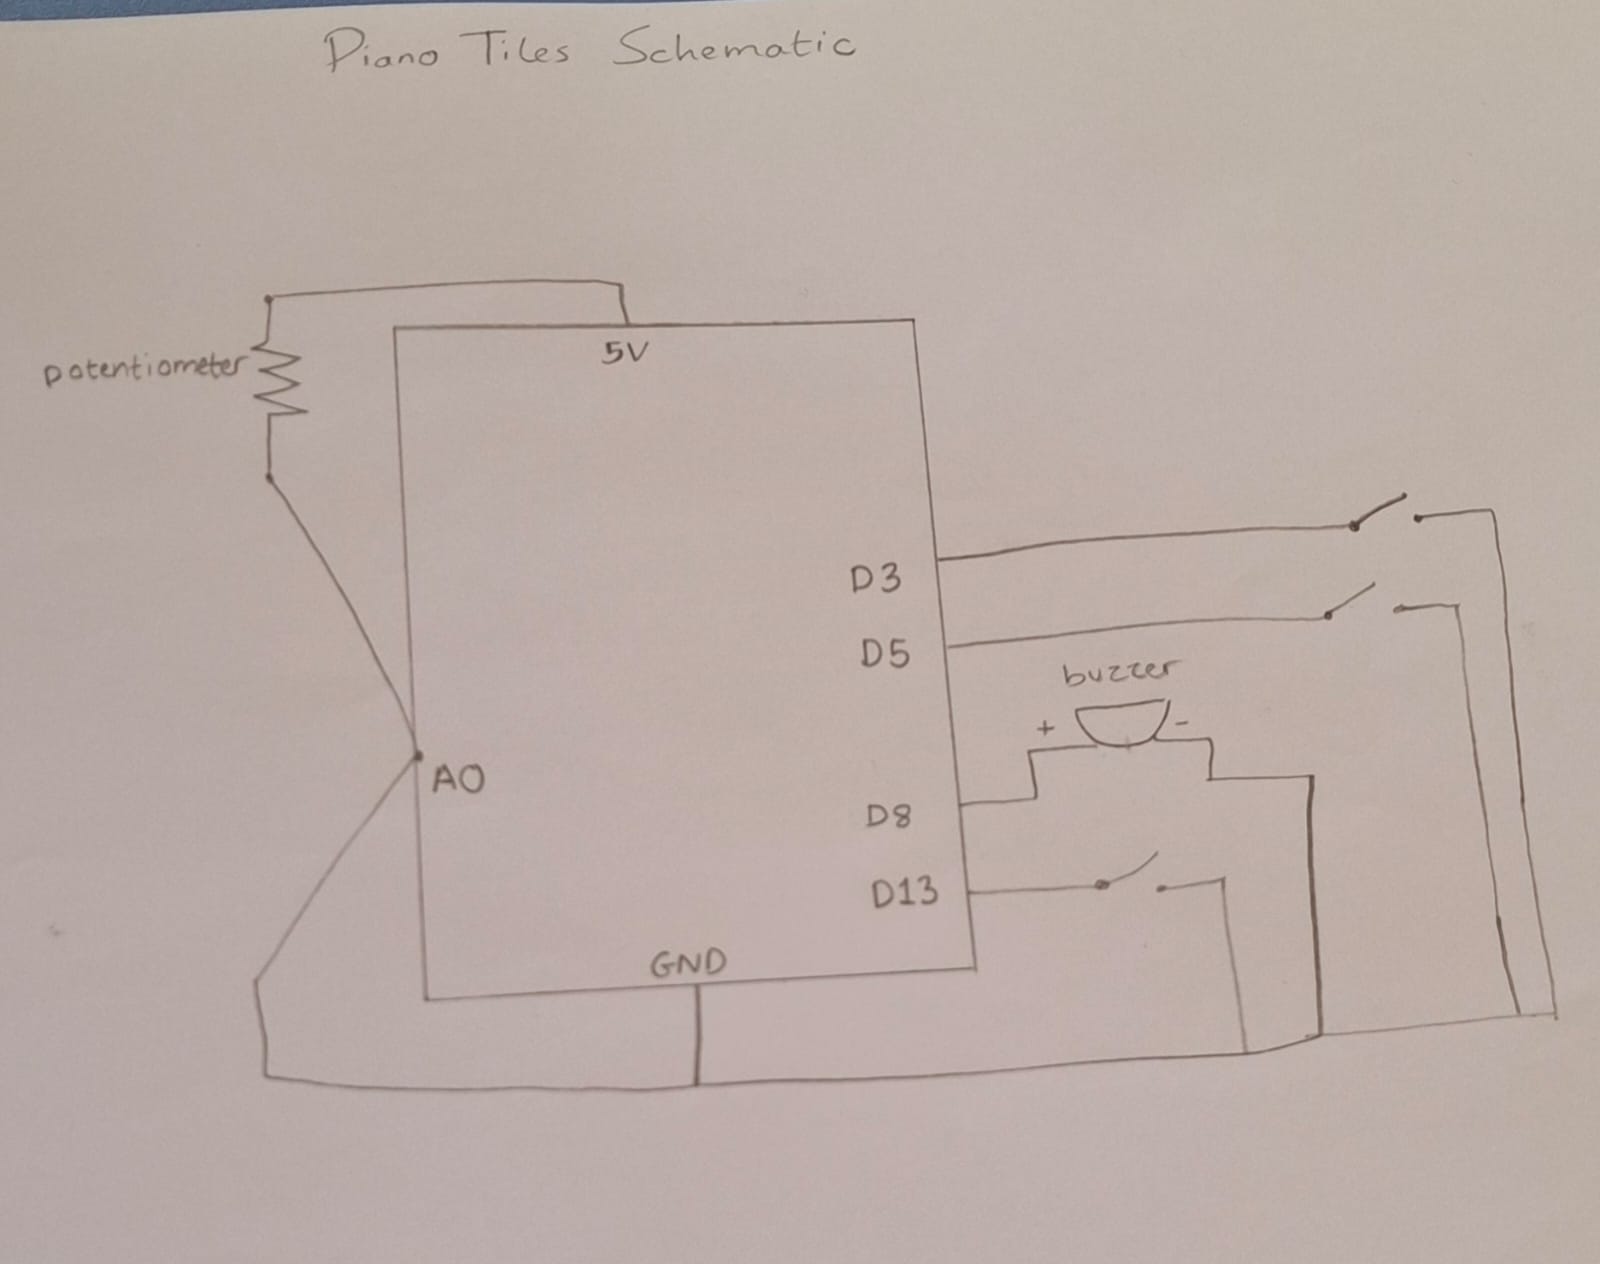
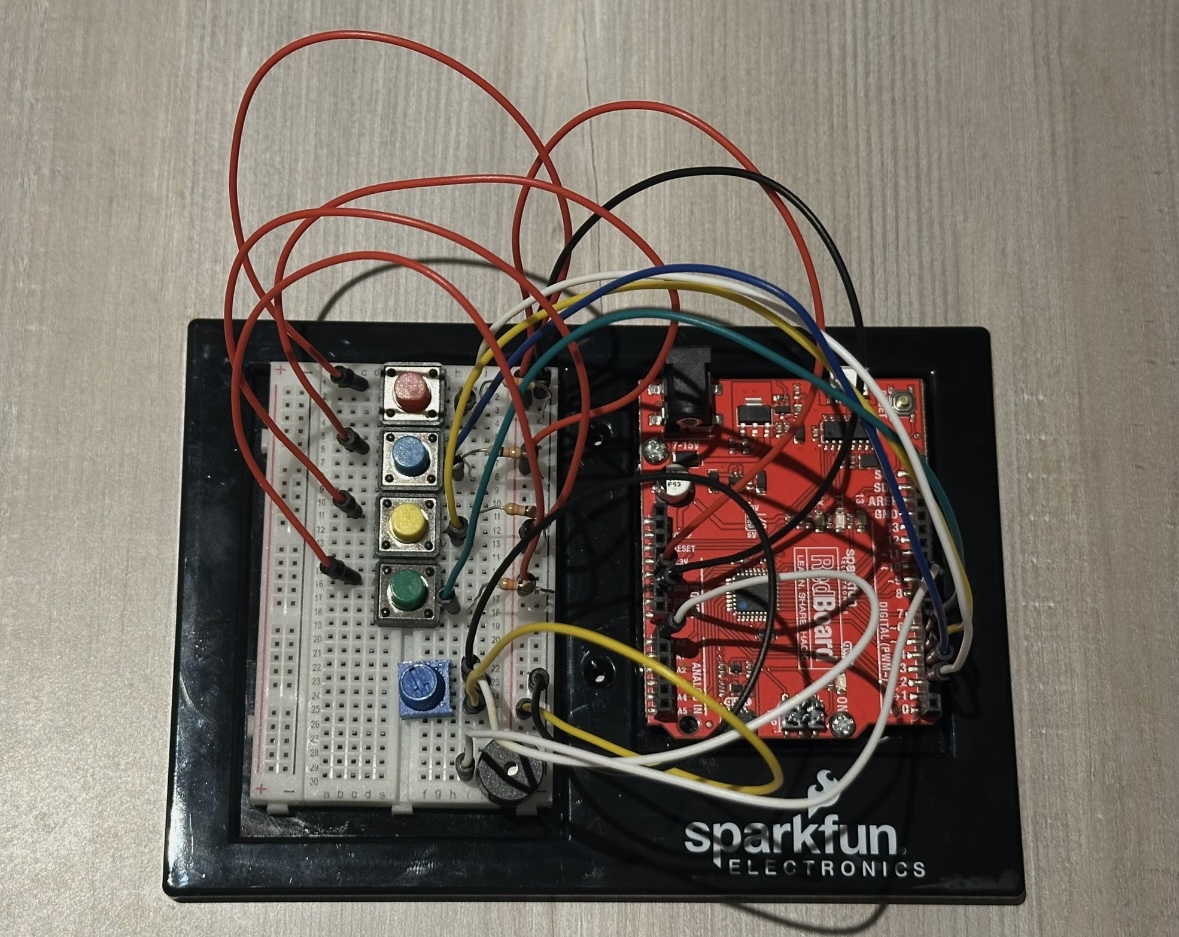
In this assignment, we had to create a musical instrument using digital and analog sensors. We used push buttons as our digital sensors and a potentiometer as our analog sensor. We then decided to create a mini piano-like device that plays the four basic piano notes C, D, E, and F, and allows the user to adjust the pitch of these notes. In this project, there are four push buttons, each assigned to one note that only plays when the button is pressed, and a potentiometer that changes the pitch of the notes when it is turned.

Code:

Arduino File on GitHub

Setup:

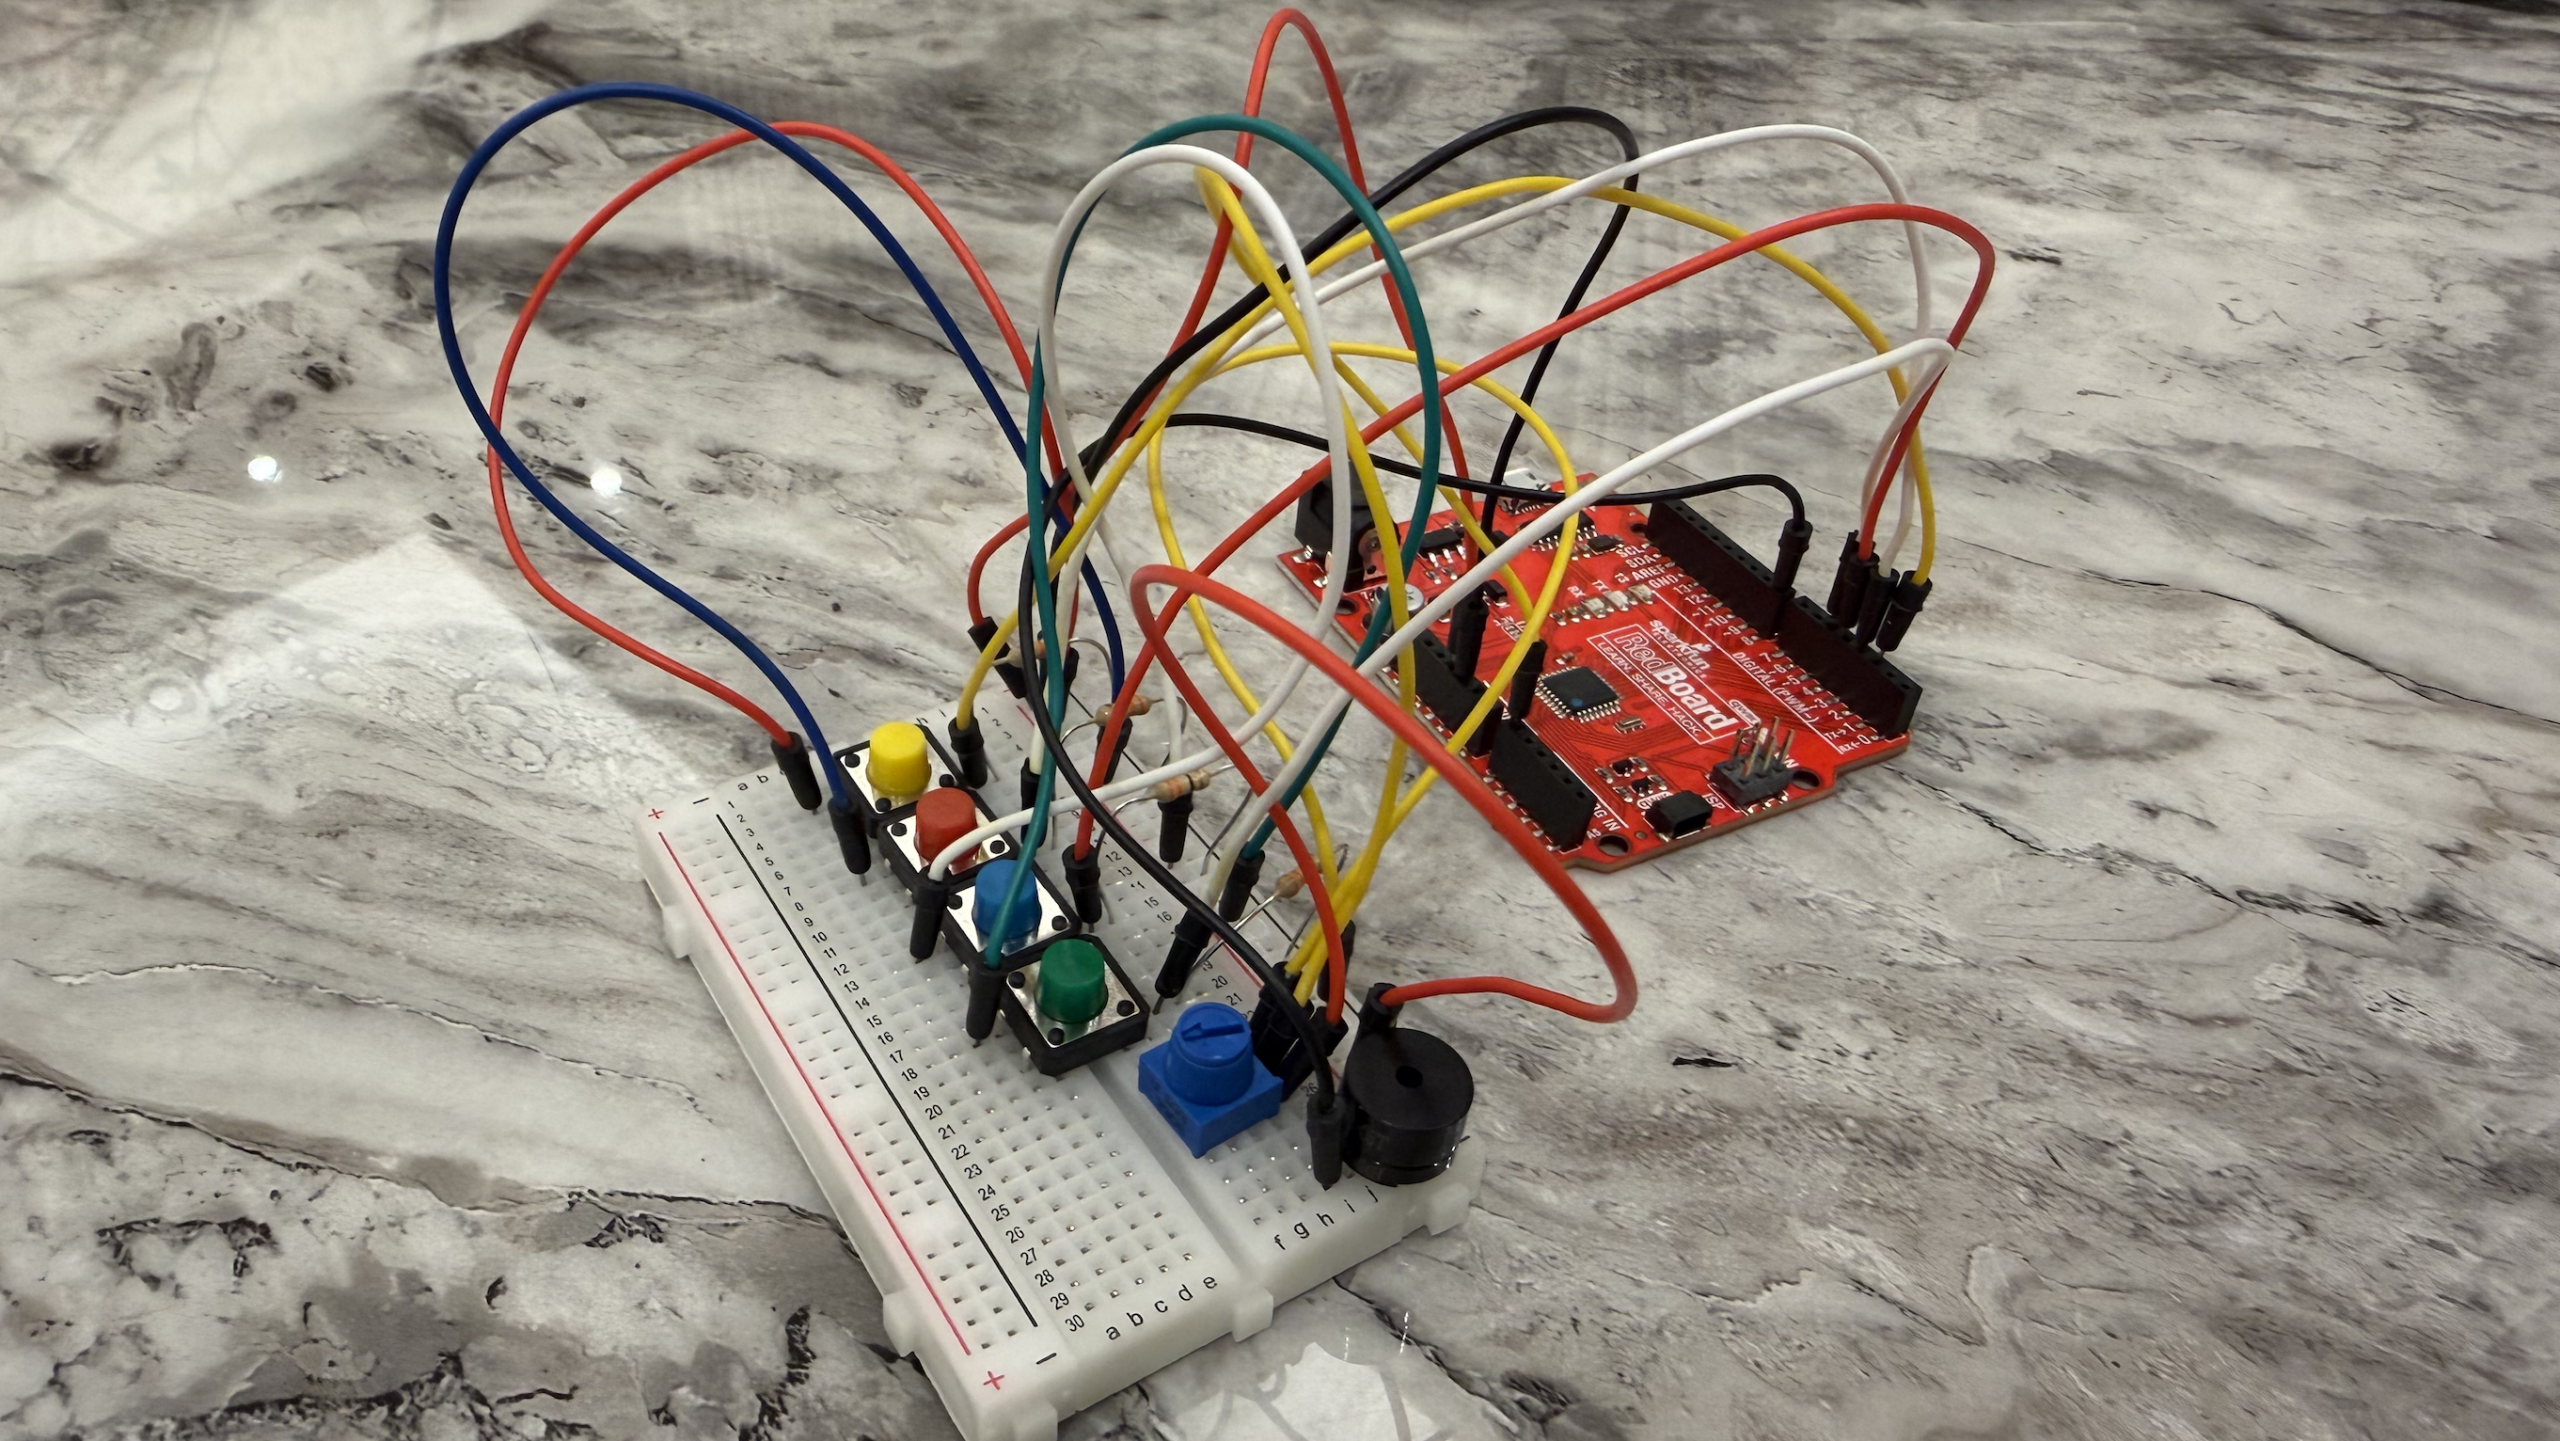
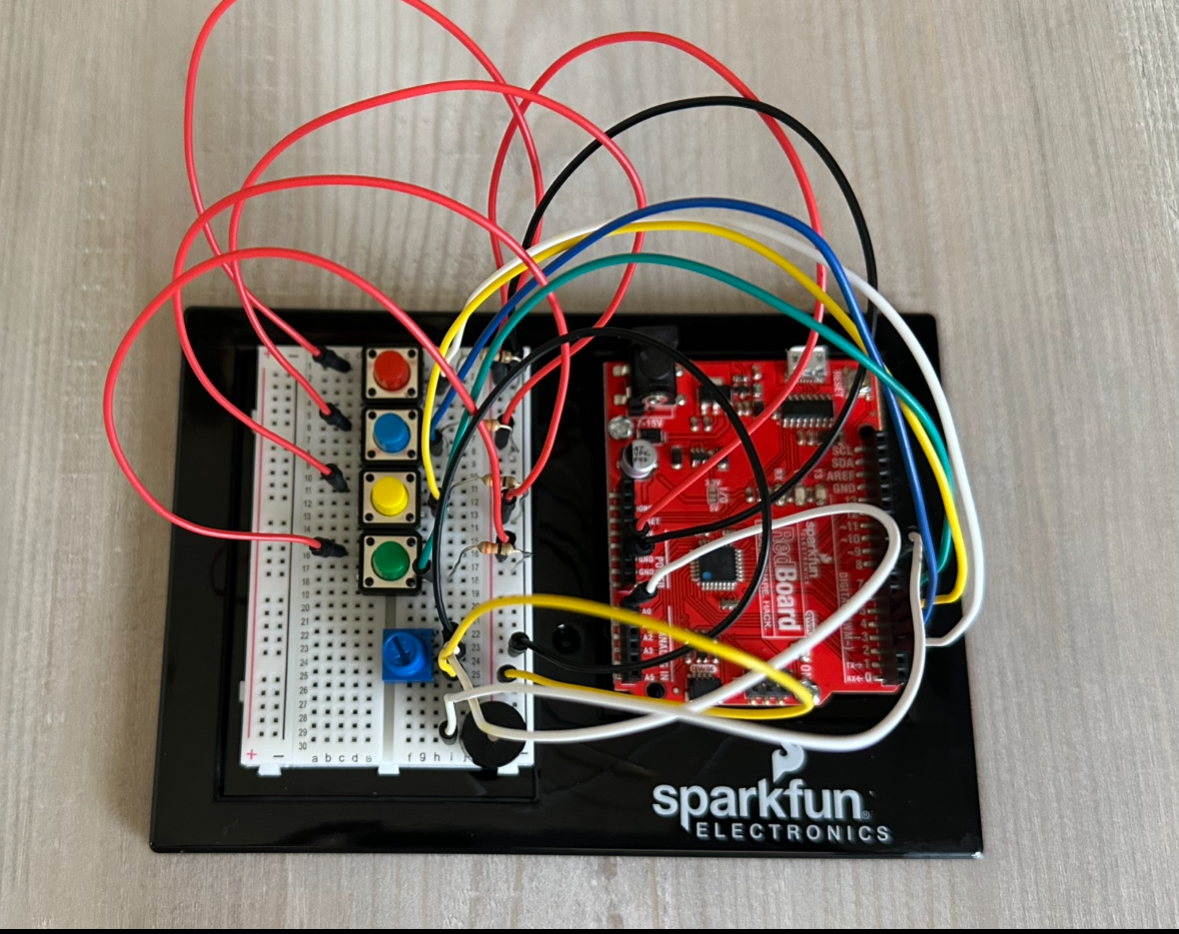
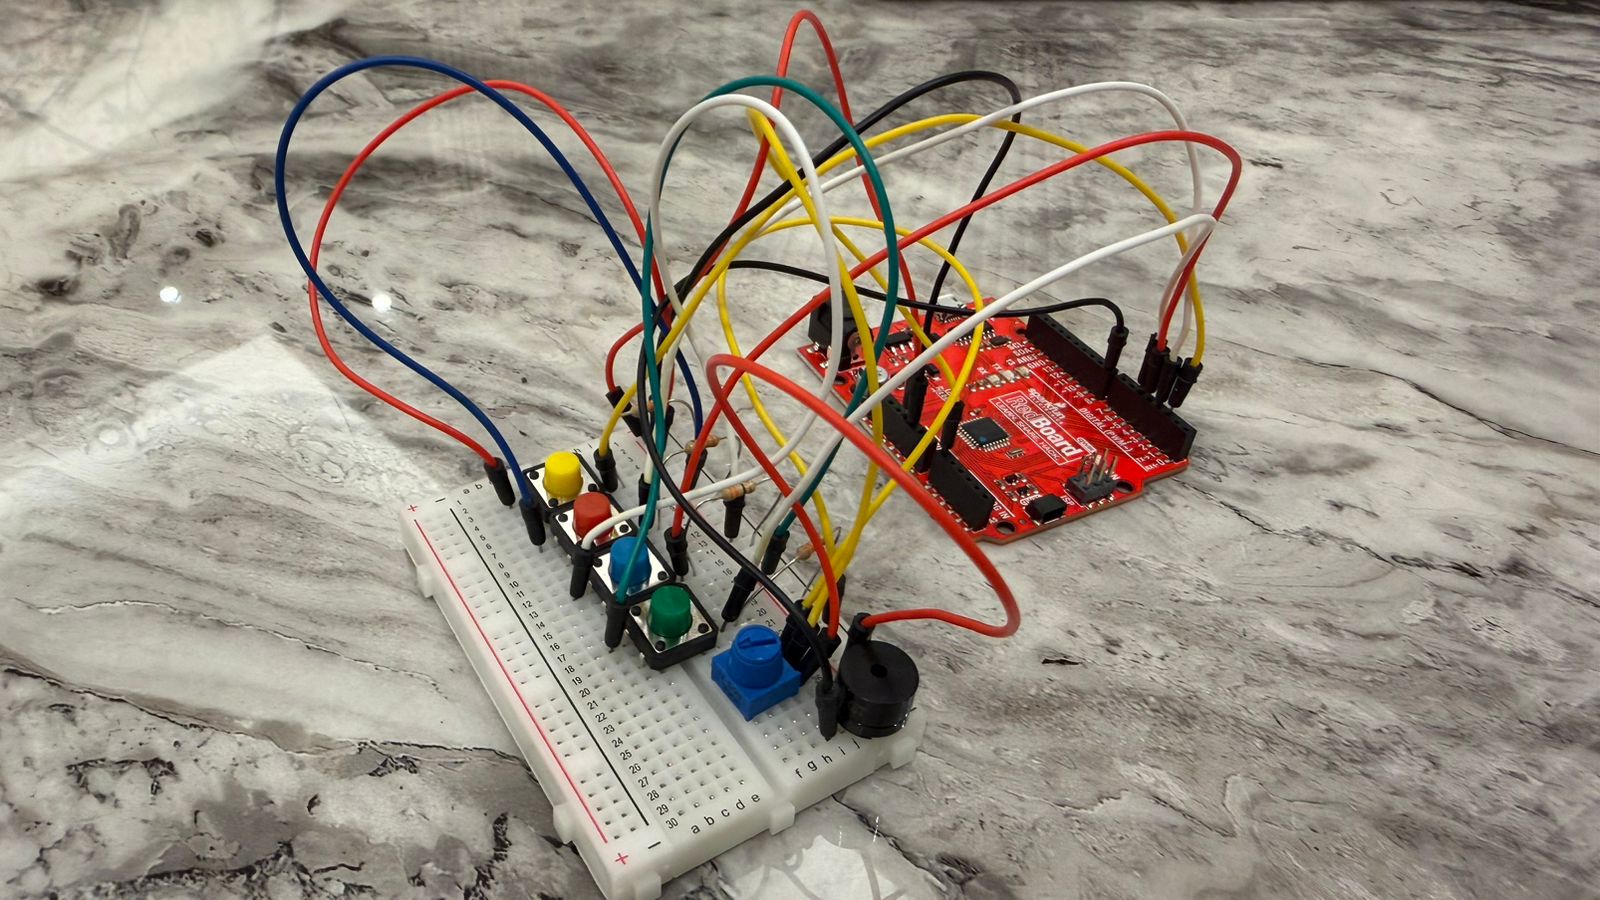
Mariam’s Setup

Mhara’s Setup


Demonstration:

Mhara’s video demo:

Mariam’s video demo:


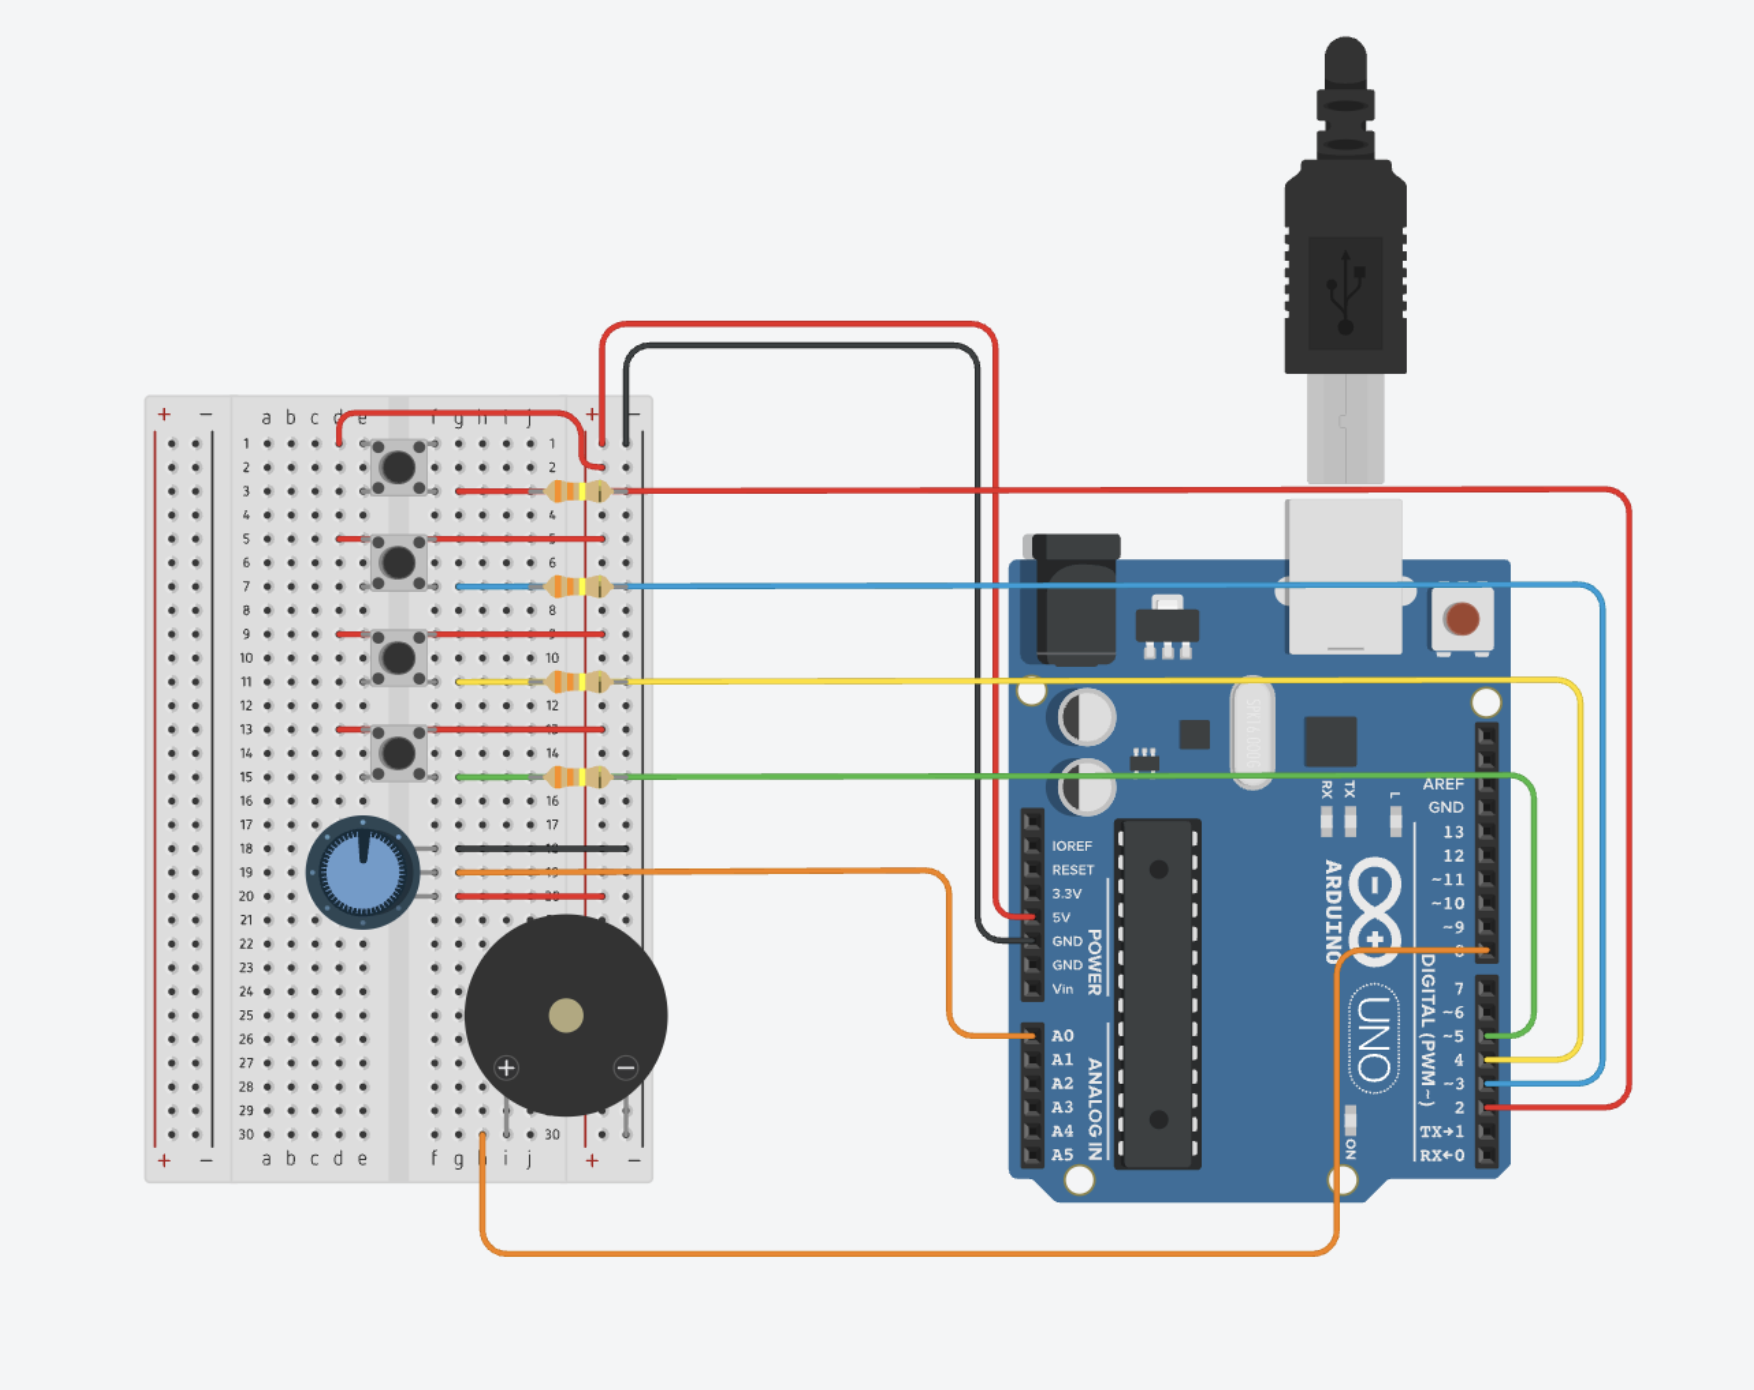
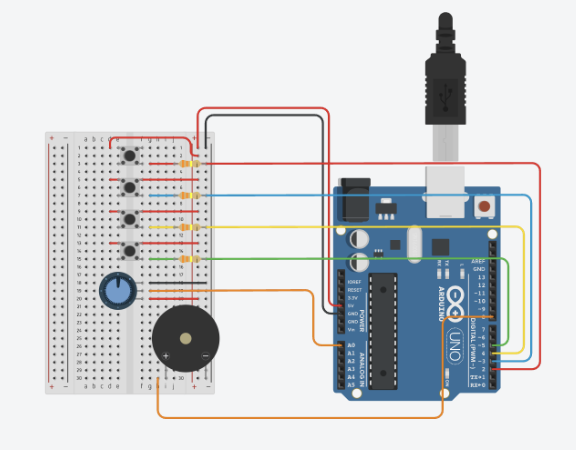
Digital Circuit:

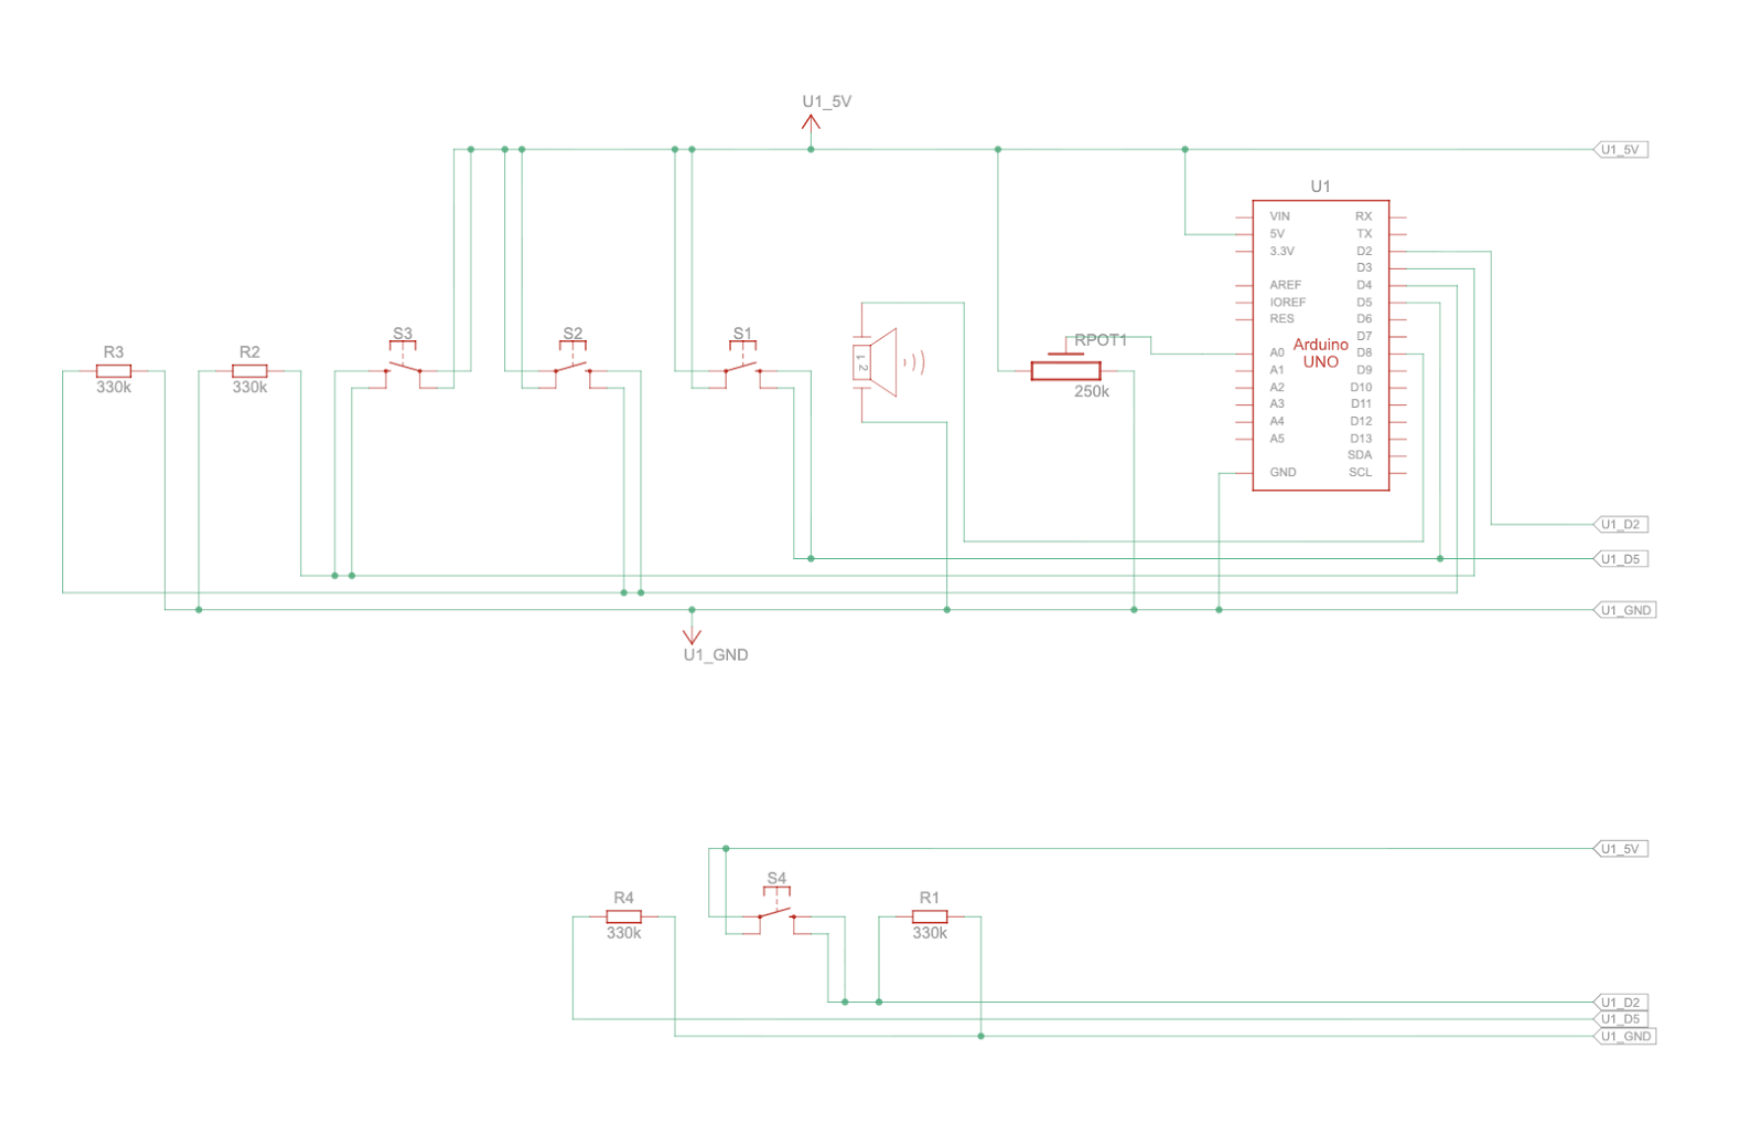
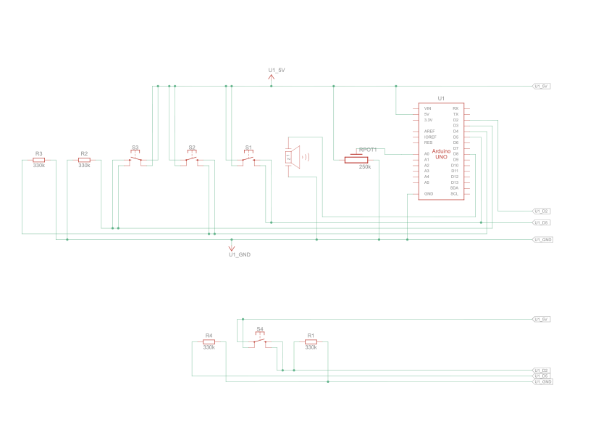
Schematic:

Process:

In the process of this assignment, we decided to combine four buttons (digital) with one potentiometer (analog) to control a piezo buzzer. Each button plays a different note, and the potentiometer slightly adjusts the pitch so the sound changes depending on how much it’s turned. We worked together on the idea and the wiring, but we divided the coding so each of us focused on one part. Mariam handled the digital part (the buttons and the notes), and Mhara worked on the analog part (the potentiometer and the pitch control). After both parts were working separately, we combined them into one full sketch of code.

We then tested the circuit in Tinkercad to make sure all the wiring and logic of the code were correct. This helped us confirm that the buttons were reading properly and that the potentiometer was giving smooth values. Running it in Tinkercad also made it easier to fix small mistakes before trying it on the physical Arduino board.

At first, the audio wasn’t changing when the potentiometer was turned because the mapping was happening after the tone was already being played, so we rearranged the order of the code and that finally made the pitch respond. After that, the sound became too noisy and robotic, so we added a small adjustment range (90 – 105) to each note to make the pitch change smoother and less harsh.


Code Snippets:

While building the project, there were a couple of code snippets that stood out to us because they played an important role in making the instrument work the way we wanted it to. 

tone(buzzerPin, noteC * map(sensorValue, 0, 1023, 90, 105) / 100);

This was the part we were most proud of because it solved the “robotic” and “noisy” sound problem. Instead of letting the potentiometer completely change the note, we used a small adjustment (90-150) to bend the pitch smoothly. And this showed how the digital and analog inputs can work together in one line of code. 


Another part of the code is :

pitch = map(sensorValue, 0, 1023, 200, 2000);

This line shows how the analog input (the potentiometer) controls the sound. It takes the raw value from 0-1023 and maps it into a pitch range that the buzzer can actually play. This was important because the potentiometer originally wasn’t affecting the sound at all, and fixing the order of the code made this line finally work the way we wanted it to. 

Areas of Improvement and Reflection:

After completing this assignment, we were able to learn and explore different sensors and sounds. It was easy and smooth to work as a pair, as each person focused on one part and then we combined our work together. As for areas of improvement, we could make the sound of the notes smoother and more musical, since it still sounds slightly robotic, or add more notes to make it closer to a real piano. Another idea is to implement other sensors, such as an ultrasonic sensor, to play different notes or even melodies based on motion or distance. Working with audio and sensors is a fun part of Arduino, and it allows us to create many different ideas for various purposes. Overall, we are satisfied with our final outcome and the entire process of this project.


References:

Looked back at Week 10 slides about sound to recap what we learned.

Reviewed specific code concepts using the Arduino documentation:

https://docs.arduino.cc/language-reference/en/functions/math/map/ 

  • How we used it: We used this to convert the potentiometer’s range into a smaller pitch-adjustment range that works smoothly with the buzzer.

https://docs.arduino.cc/language-reference/en/functions/advanced-io/tone/ 

  • How we used it: We used this page to understand how the tone() function works and how to send different frequencies to the buzzer. 

https://docs.arduino.cc/built-in-examples/digital/toneMelody/ 

  • How we used it: We looked at this example to understand how notes from pitches.h are used and how tone() can be combined with different frequencies to create musical sounds.

Ai usage:  Used ChatGPT to help navigate and resolve a major issue where the tones sounded too robotic and noisy. From this, we learned that using the map() function with a smaller range for each note helps create smoother, more controlled pitch changes.

Week 10: Musical Instrument

Concept:

In this assignment, we had to create a musical instrument using digital and analog sensors. We used push buttons as our digital sensors and a potentiometer as our analog sensor. We then decided to create a mini piano-like device that plays the four basic piano notes C, D, E, and F, and allows the user to adjust the pitch of these notes. In this project, there are four push buttons, each assigned to one note that only plays when the button is pressed, and a potentiometer that changes the pitch of the notes when it is turned.

Code:

Arduino File on GitHub

Setup:

MariamMhara

Demonstration:

Mariam

Mhara

Digital Circuit:

Schematic:

Process:

In the process of this assignment, we decided to combine four buttons (digital) with one potentiometer (analog) to control a piezo buzzer. Each button plays a different note, and the potentiometer slightly adjusts the pitch so the sound changes depending on how much it’s turned. We worked together on the idea and the wiring, but we divided the coding so each of us focused on one part. Mariam handled the digital part (the buttons and the notes), and Mhara worked on the analog part (the potentiometer and the pitch control). After both parts were working separately, we combined them into one full sketch of code.

We then tested the circuit in Tinkercad to make sure all the wiring and logic of the code were correct. This helped us confirm that the buttons were reading properly and that the potentiometer was giving smooth values. Running it in Tinkercad also made it easier to fix small mistakes before trying it on the physical Arduino board.

At first, the audio wasn’t changing when the potentiometer was turned because the mapping was happening after the tone was already being played, so we rearranged the order of the code and that finally made the pitch respond. After that, the sound became too noisy and robotic, so we added a small adjustment range (90 – 105) to each note to make the pitch change smoother and less harsh.

Code Snippets:

While building the project, there were a couple of code snippets that stood out to us because they played an important role in making the instrument work the way we wanted it to. 

tone(buzzerPin, noteC * map(sensorValue, 0, 1023, 90, 105) / 100);

This was the part we were most proud of because it solved the “robotic” and “noisy” sound problem. Instead of letting the potentiometer completely change the note, we used a small adjustment (90-150) to bend the pitch smoothly. And this showed how the digital and analog inputs can work together in one line of code. 

Another part of the code is :

pitch = map(sensorValue, 0, 1023, 200, 2000);

This line shows how the analog input (the potentiometer) controls the sound. It takes the raw value from 0-1023 and maps it into a pitch range that the buzzer can actually play. This was important because the potentiometer originally wasn’t affecting the sound at all, and fixing the order of the code made this line finally work the way we wanted it to. 

Areas of Improvement and Reflection:

After completing this assignment, we were able to learn and explore different sensors and sounds. It was easy and smooth to work as a pair, as each person focused on one part and then we combined our work together. As for areas of improvement, we could make the sound of the notes smoother and more musical, since it still sounds slightly robotic, or add more notes to make it closer to a real piano. Another idea is to implement other sensors, such as an ultrasonic sensor, to play different notes or even melodies based on motion or distance. Working with audio and sensors is a fun part of Arduino, and it allows us to create many different ideas for various purposes. Overall, we are satisfied with our final outcome and the entire process of this project.

References:

Looked back at Week 10 slides about sound to recap what we learned.

Reviewed specific code concepts using the Arduino documentation:

https://docs.arduino.cc/language-reference/en/functions/math/map/ 

  • How we used it: We used this to convert the potentiometer’s range into a smaller pitch-adjustment range that works smoothly with the buzzer.

https://docs.arduino.cc/language-reference/en/functions/advanced-io/tone/ 

  • How we used it: We used this page to understand how the tone() function works and how to send different frequencies to the buzzer. 

https://docs.arduino.cc/built-in-examples/digital/toneMelody/ 

  • How we used it: We looked at this example to understand how notes from pitches.h are used and how tone() can be combined with different frequencies to create musical sounds.

Used ChatGPT to help navigate and resolve a major issue where the tones sounded too robotic and noisy. From this, we learned that using the map() function with a smaller range for each note helps create smoother, more controlled pitch changes.

Reading Reflection – Week 10

In A Brief Rant on the Future of Interaction Design, it honestly feels like Bret Victor is calling everyone out for settling. He’s basically saying that what we think is “advanced” interaction is actually kind of limited, and the line about an interface being “less expressive than a sandwich” made it sound funny at first but also a bit embarrassing once you think about it. Like our hands can do so much in real life, but then we go to screens and everything becomes flat, just tapping and swiping on what he calls “pictures under glass.” It made me realize how normal that feels even though it’s actually such a reduced version of interaction.

Then in Responses to A Brief Rant on the Future of Interaction Design, it feels more grounded because people are basically asking, okay but what now? And he admits that “the solution isn’t known,” which I actually liked because it didn’t feel like he was pretending to have everything figured out. It made the whole thing feel less like complaining and more like pushing people to think further instead of just accepting what already works. When he says things like the iPad is “good! For now!” it kind of shows that he’s not rejecting current tech, just refusing to treat it like the final version.

Putting both together, it feels less like he’s saying everything is wrong and more like we got comfortable too fast. The idea that “the future is a choice” stuck with me because it makes it feel like if interaction stays limited, it’s not by accident, it’s because people stopped questioning it.

Week 10: two-player air piano

For this week’s assignment, I made a two-player musical instrument using Arduino. One person controls the pitch by moving their hand in front of the ultrasonic sensor, and the other person uses two buttons to trigger two different drum-like sounds. I liked this idea because it made the instrument feel more interactive, and it also made the difference between analog and digital input much clearer to me. For the demo, my sister acted as the second player so I could show how the instrument works with two people. While I controlled the ultrasonic sensor, she used the buttons to add the drum-like sounds.

video demo

Arduino File on GitHub

I used the ultrasonic sensor to control the pitch of the instrument. The closer the hand gets to the sensor, the higher the pitch becomes, and the farther the hand is, the lower the pitch becomes. The second player uses two buttons to trigger two different sounds. I did not use uploaded sound files for these. Instead, I created them directly in code by assigning different frequency values in hertz to the piezo speaker. One button produces a lower drum-like sound, and the other produces a higher and sharper drum-like sound.

The way the project works is that the ultrasonic sensor acts as the analog input because it gives a changing range of distance values, while the buttons act as digital inputs because they are either pressed or not pressed. The Arduino reads the distance from the ultrasonic sensor directly inside the loop() function and uses the map() function to convert that distance into pitch. At the same time, it also reads the two buttons and triggers the two drum-like sounds when they are pressed. All of that is sent to the piezo speaker, which acts as the output. I think this project made the difference between continuous input and on and off input much easier to understand because both were working in the same project.

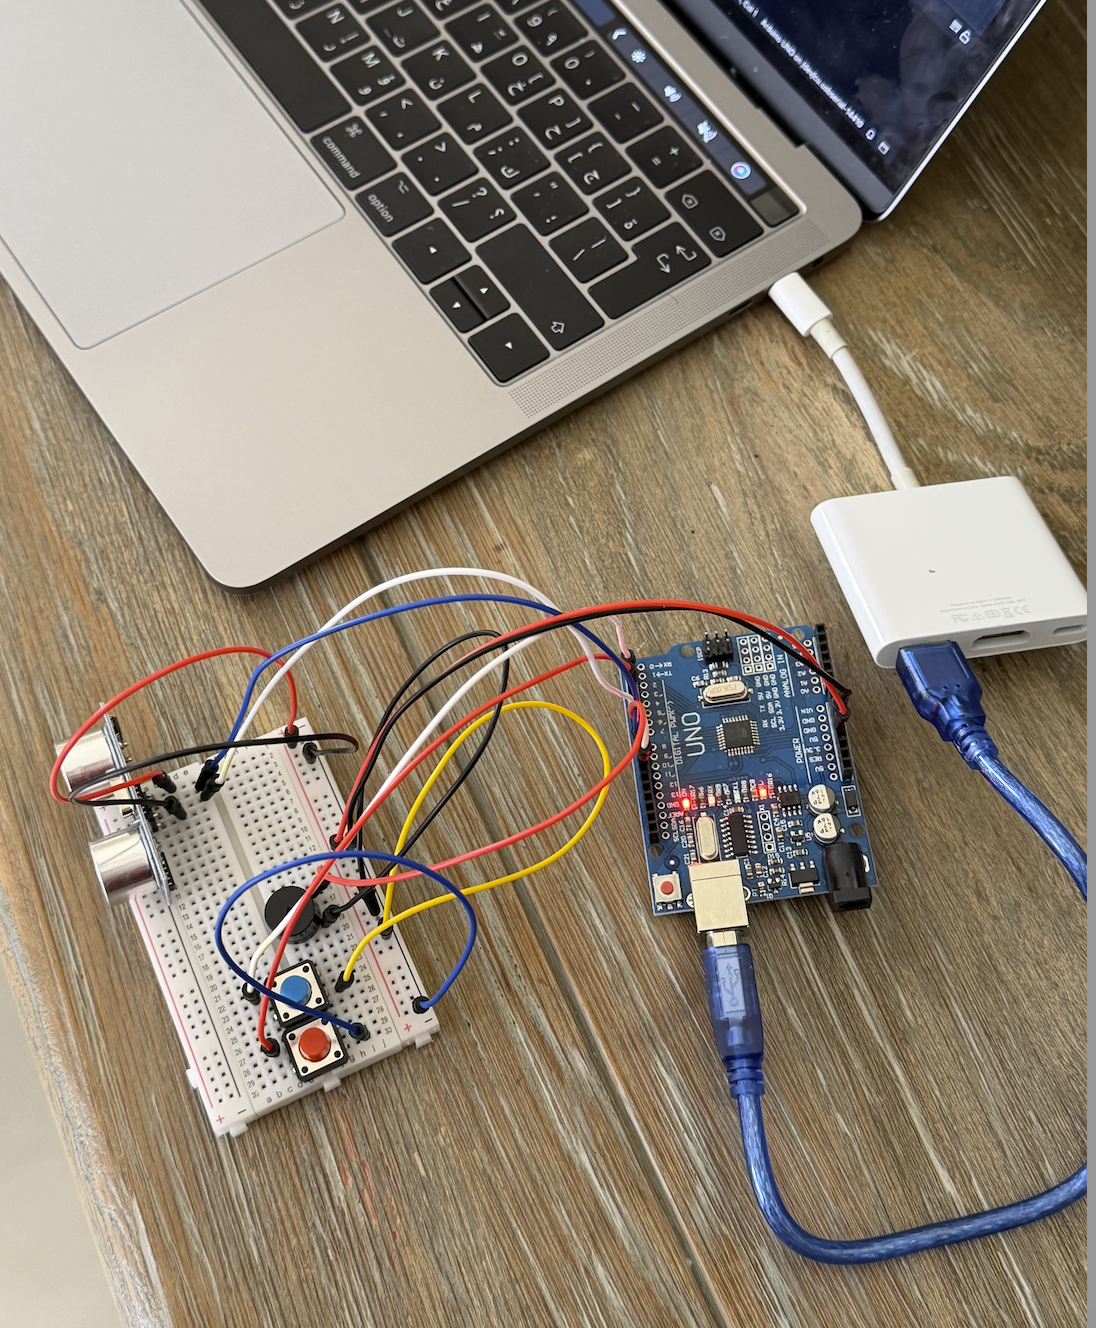
For the circuit, the ultrasonic sensor is connected to 5V and GND, with the TRIG pin connected to pin 9 and the ECHO pin connected to pin 10. The two buttons are connected as digital inputs on pins 2 and 3, and they are also connected to ground. The piezo speaker is connected to pin 8 and ground, so it can play both the changing pitch and the two drum-like sounds. One problem I ran into was with the button wiring. At first, I connected both button wires to the top row of the breadboard, and the buttons did not work. I was confused because I thought the code was the issue, but later I realized the problem was actually the physical connection. Once I fixed the wiring and moved the ground connection to the correct place, the buttons started working properly.

The part of the code I am most proud of is the section where the ultrasonic sensor reading gets turned into pitch in real time. I like this part because it made the instrument feel much more alive and interactive. Instead of just choosing from fixed sounds, the player can move their hand and hear the pitch change immediately. That made the whole project feel closer to an actual instrument instead of just separate parts making sound.

if (blueButtonState == HIGH && redButtonState == HIGH) {
  
  // ultrasonic sensor
  digitalWrite(trigPin, LOW);
  delayMicroseconds(2);
  digitalWrite(trigPin, HIGH);
  delayMicroseconds(10);
  digitalWrite(trigPin, LOW);

  // echo time
  long duration = pulseIn(echoPin, HIGH);
  int distance = duration * 0.034 / 2;
  
  Serial.println(distance);

  if (distance > 5 && distance < 50) {
    int pitch = map(distance, 5, 50, 1500, 200);
    pitch = constrain(pitch, 200, 1500);
    tone(speakerPin, pitch);
  } else {
    noTone(speakerPin);
  }
}

I am proud of this part because it is what made the ultrasonic sensor actually useful in the project. The code triggers the sensor, measures how long the echo takes to return, and then converts that into distance. After that, the map() function changes the distance into a frequency range, so hand movement becomes sound. The constrain() function was also important because it kept the pitch within a usable range and stopped it from becoming too extreme. I think this was the part that made the project make the most sense.

If I had more time, I would improve the project by adding more sounds and making the instrument feel a little more musical overall instead of only experimental. I also think adding some visuals, like LEDs flashing when the buttons are pressed, would make it feel like a DJ game. Still, I think the final project worked well.

Reading Reflection:

This reading convincing in a lot of ways, but I also think the author pushes his argument too far at some points. I agreed with his main criticism that a lot of so-called future interaction design is not actually very futuristic if it still depends on flat glass screens and a very limited set of gestures. He compared digital interaction to the way we use ordinary objects with our hands, and that stood out to me because it made me think more about how much touch, grip, pressure, and movement matter in the way we understand and use things. I think this argument made even more sense to me, because it made me realize that interaction is not only visual. It is also physical, and a lot of current design does flatten that experience too much.

At the same time, I think the author is a little too extreme in the way he talks about current touchscreen technology. I understand why he sees it as limited, but I do not think that automatically makes it bad or meaningless. Touchscreens can still be practical, intuitive, and useful, even if they are not the most advanced or expressive form of interaction. So for me, the strongest part of the reading was not the idea that flat screens are a failure, but the idea that they should not be treated as the final version of interaction design. That is the part I agreed with most. I think the reading changed the way I think about future interfaces, but it also made me question how much the author’s argument depends on exaggerating the weakness of current technology in order to make his own point feel stronger.

Week10 Reading

The first thing that came to my mind after reading both was how accepting were re off the the new tech thrown at us. not objecting the the pace of development but the the limited interaction capabilities do have an effect on us. I never though about touch screens as described the author “Pictures Under Glass”. It made me realize how much interaction is reduced to simple swipes and taps which negligble to what our hands do everyday . It made me rethink whether convenience has come at the cost of richness in interaction.

I felt a bit conflicted about the lack of concrete direction. While I understand that the goal is to inspire research rather than propose a fixed solution, it still leaves a gap between critique and application. Still, the reading succeeds in making me more critical of existing designs and more aware that the “future” of interaction is not inevitable, but something we actively choose to shape.

Lastly the comparison of what humans can do and what technology can do was meaningful debate beacuse of the way it focus on everyday tasks which are often deemed small

Keyboard Piano

Concept

For this production assignment,  was working with Zaid. We came up  with a simple design of making a piano using the keyboard and the buzzer. the idea was to assign notes to each key and have the input form it. We also added the lcd to see which note is  being played, and the a potentiometer to control the contrast of the lcd.

Code

https://github.com/MuhammadArhumSraw/IntrotoIM-MuhammadArhumAzeem

The are two files for this assignment labelled as week9file1 and week9file2. The python file is reading input form the keyboard and while the other is Arduino logic. The part I am most proud of is the serial communication at 9600.

try:
    arduino = serial.Serial('COM5', 9600, timeout=1)
void setup() {
  Serial.begin(9600)


At the moment its a single click piano. I can;t handle multiple keys Pressed at once. This can a be a future improvement.

Demo