Repository
Repository
Exercise 1
1. Overview
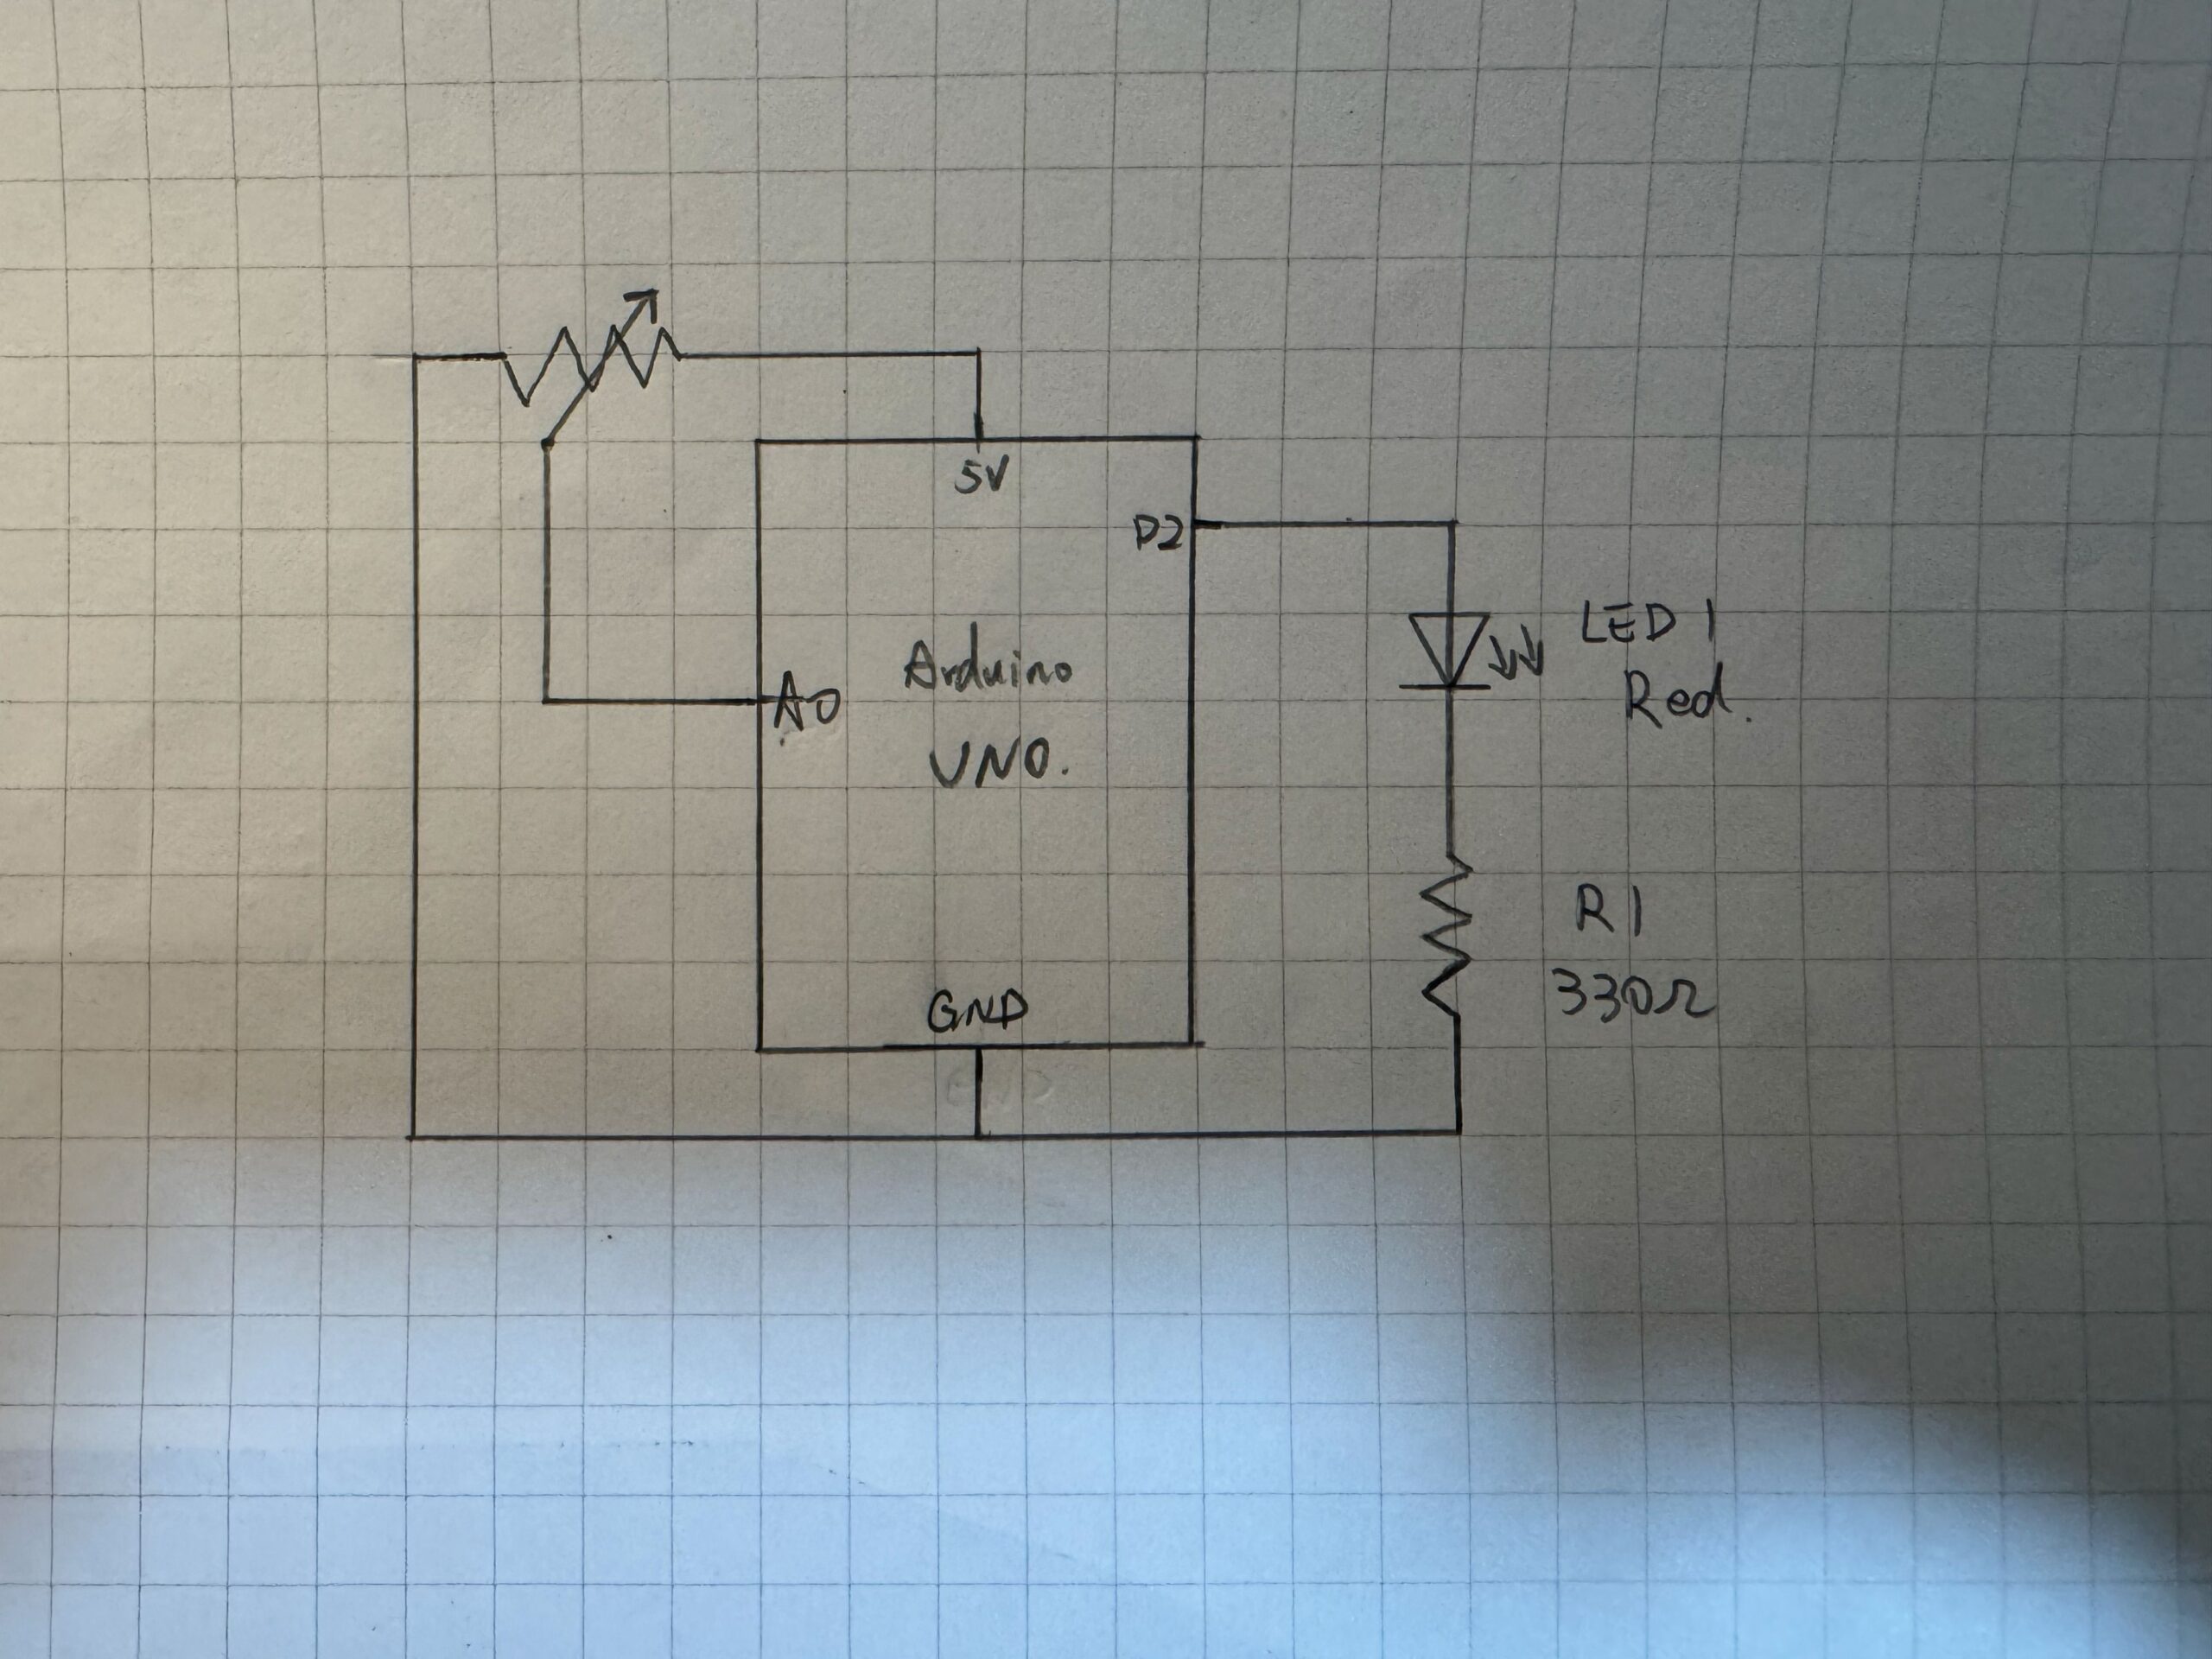
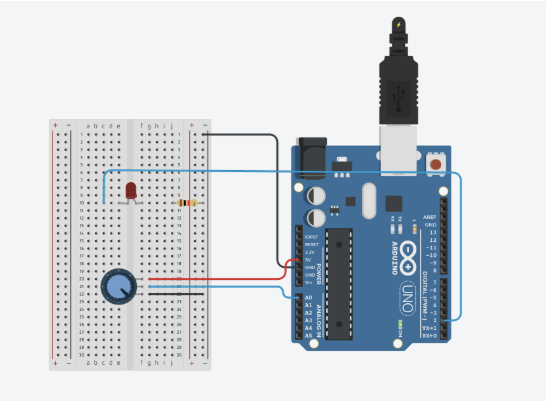
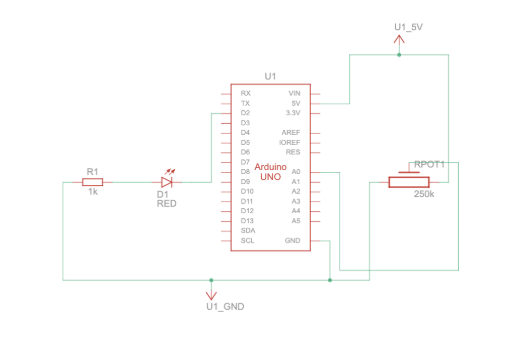
In this exercise, we explored serial communication between Arduino and p5.js. The main objective was to use a single sensor on Arduino and translate its input into visual movement in p5 — specifically controlling an ellipse moving horizontally across the screen. A potentiometer connected to pin A1 served as the analog input, and no data was sent back from p5 to Arduino, making this a one-directional communication exercise.
2. Concept
The core idea was to establish the simplest possible link between a physical input and a digital visual. By turning a potentiometer, the user directly moves an ellipse across a canvas in the browser in real time. This introduced us to the fundamental pipeline of physical interaction: sensor reads a value, Arduino maps and sends it, p5 receives and translates it into something visible on screen. The simplicity of the setup made it easy to trace the data flow end-to-end and understand what was happening at each stage.
3. Process and Methods
-
- We began by following the example demonstrated in class and gradually adapted it to better understand the data flow. On the Arduino side, the potentiometer on pin A1 returns a raw analog value between 0 and 1023. We mapped this to a smaller range of 0–255 using map() before sending it through Serial.println(). This made the value easier to work with on the p5 side without losing meaningful range.
- For p5.js, we used the p5.webserial library following the structure introduced in class. The serial connection is opened manually through a button, which triggers the browser’s port picker dialog. Inside draw(), port.readUntil(“\n”) reads each incoming line, trim() strips the newline character, and int() converts the string into a usable number. That number is then mapped to the canvas width using map(), which drives the ellipse’s horizontal position. The ellipse stays fixed on the vertical centre of the canvas at all times.
4. Technical Details
-
- The Arduino maps the raw potentiometer value before sending it to reduce the range to something the p5 side can easily stretch across the canvas:
// ── READ SENSOR ──
// analogRead returns 0–1023 based on the voltage at A1.
// At 0V (GND side) → 0. At 5V → 1023.
int potentiometer = analogRead(A1);

// ── MAP TO SMALLER RANGE ──
// Compress 0–1023 to 0–255 so p5 can easily map it onto the canvas width.
int mappedPotValue = map(potentiometer, 0, 1023, 0, 255);

// ── SEND TO p5 ──
// Serial.println() sends the number as a string followed by a newline character '\n'.
// p5 uses that newline to know where one value ends and the next begins.
Serial.println(mappedPotValue);
-
- On the p5 side, the incoming string is cleaned and converted before being mapped to a screen position:
let str = port.readUntil("\n");

if (str.length > 0) {
  // trim() removes the trailing '\n' (and any spaces).
  // int() converts the cleaned string into a number.
  let val = int(trim(str));

  // ── MAP VALUE TO CANVAS ──
  // Arduino sends 0–255. We stretch that range across
  // the full canvas width so the ellipse covers the
  // entire screen as the pot is turned.
  x = map(val, 0, 255, 0, width);
}
-
- This two-step mapping — first on Arduino from 0-1023 to 0-255, then in p5 from 0-255 to 0-canvas width — demonstrates how data can be progressively transformed as it passes between systems.
5. Reflection
This exercise gave us a concrete understanding of how physical input can directly influence digital visuals in real time. The most valuable part was seeing the full pipeline in action: turning the potentiometer caused an immediate, visible response on screen, which made the abstract idea of serial communication feel tangible. It also highlighted the importance of consistent data formatting — the newline character that Serial.println() appends is what makes port.readUntil(“\n”) work reliably on the p5 side. If we were to continue developing this, we would explore using different sensors such as FSR or ultrasonic distance sensors, add smoothing to reduce noise, and expand the visuals to control more than one element.
Exercise 2
1. Overview
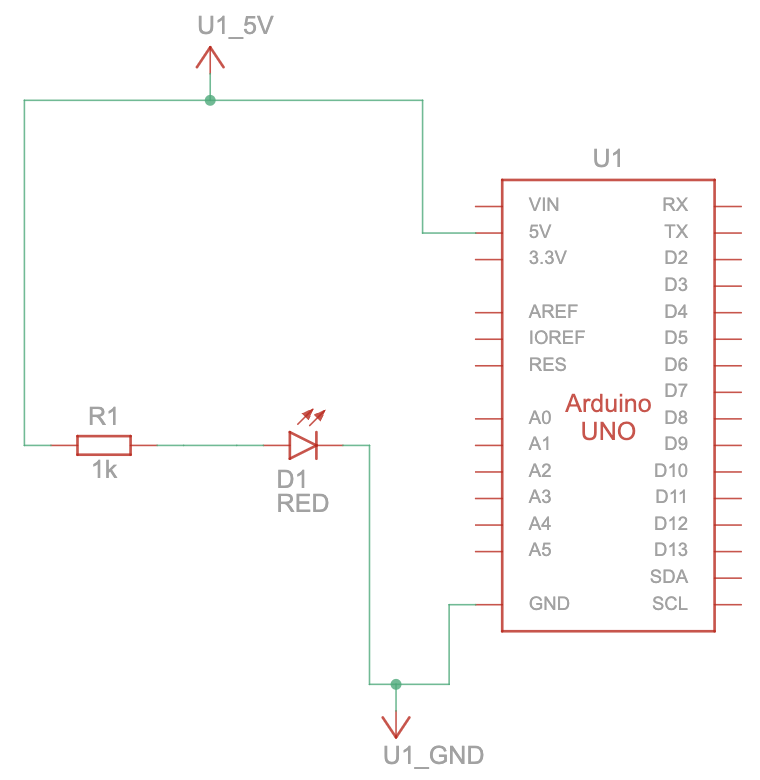
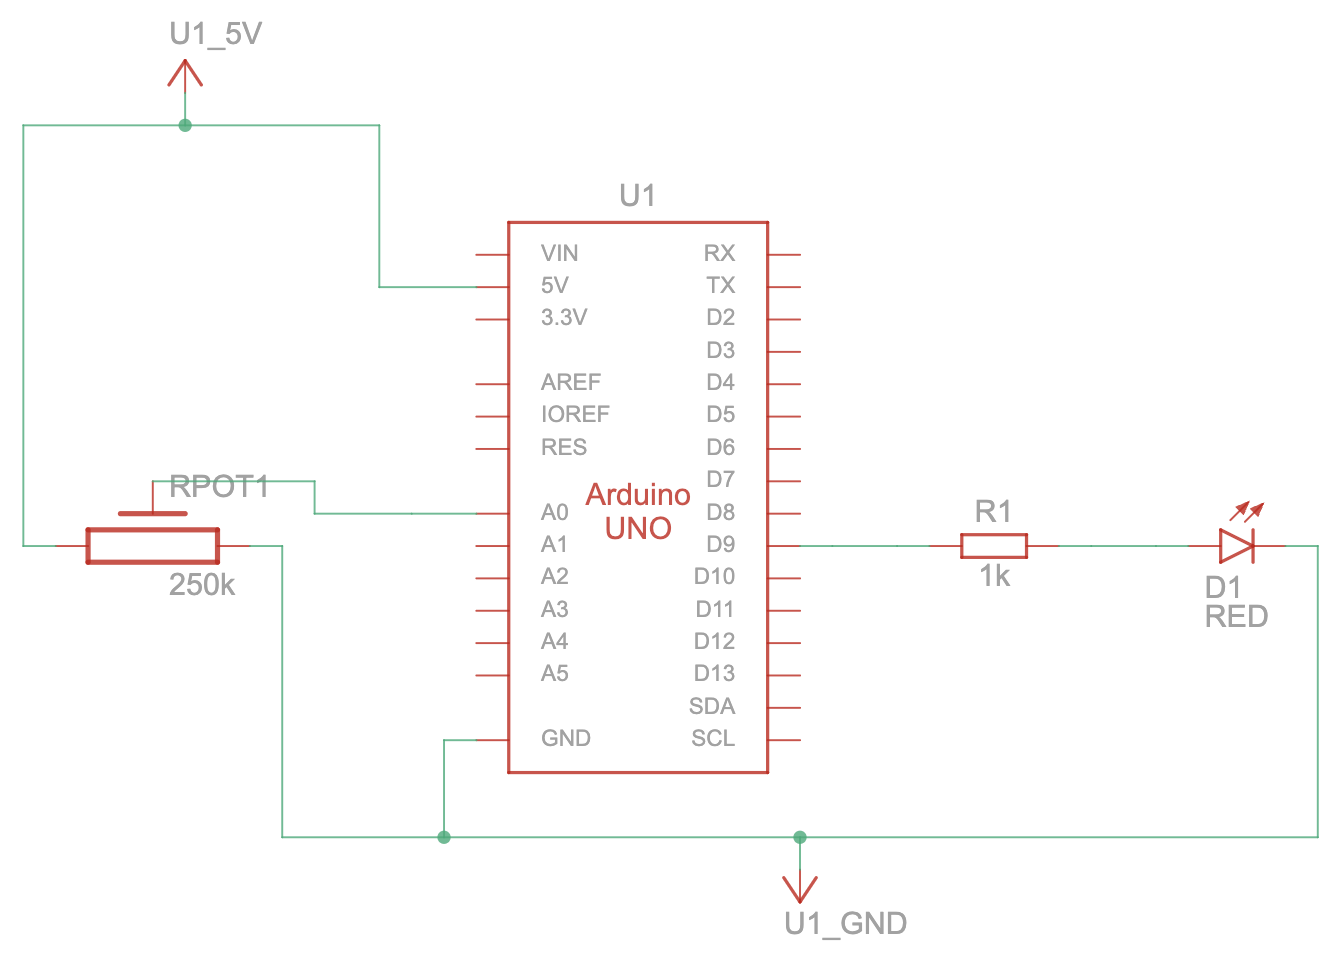
In this exercise, we reversed the direction of communication — from p5.js to Arduino. The objective was to control the brightness of a physical LED using mouse movement in the browser. p5 continuously sends a brightness value based on the mouse’s horizontal position, and Arduino uses that value to dim or brighten the LED through PWM. No data is sent back from Arduino to p5.
2. Concept
Where Exercise 1 used hardware to control software, this exercise flipped that relationship. The browser became the controller and the LED became the output. Moving the mouse across the screen is a familiar, intuitive gesture, and seeing that gesture reflected immediately in a physical light made the connection between the two systems feel direct and satisfying. This exercise also introduced us to the handshake pattern, which is necessary when Arduino needs to wait for p5 to be ready before the communication loop can begin.
3. Process and Methods
-
- We kept the overall structure close to what was demonstrated in class and simplified the communication to a single value per message. On the p5 side, mouseX is mapped to a range of 0–255 using map() and constrained with constrain() to prevent out-of-range values. This number is sent to Arduino as a string followed by a newline character using port.write().
- On the Arduino side, the sketch begins with a handshake loop that repeatedly sends “0” and blinks the built-in LED until p5 responds. Once connected, Serial.parseInt() reads the incoming integer from the serial buffer. After confirming the message ends with ‘\n’, analogWrite() applies the value to the LED on pin 5. Because analogWrite() requires a PWM-capable pin, the LED must be connected to one of the pins marked with a tilde (~) on the Arduino board — in our case, pin 5.
4. Technical Details
-
- The p5 sketch maps mouse position to brightness and sends it continuously while the port is open:
// ── CALCULATE BRIGHTNESS ──
// Map the mouse's horizontal position across the canvas
// to a brightness value in the range 0–255.
// This matches the range that analogWrite() accepts on Arduino.
let brightness = int(map(mouseX, 0, width, 0, 255));

// ── CONSTRAIN ──
// Clamp the value so it never exceeds 0–255,
// even if the mouse moves outside the canvas.
brightness = constrain(brightness, 0, 255);
// ── SEND TO ARDUINO ──
// Only write if the port is open (i.e., user has connected).
// We append '\n' so Arduino's Serial.read() can detect
// the end of the message after parseInt() runs.
if (port.opened()) {
  port.write(brightness + "\n");
}
-
- Arduino reads the value and applies it to the LED:
// ── READ BRIGHTNESS ──
// parseInt() reads digits from the buffer and returns them as an integer.
// It stops at any non-digit character (including the newline).
int brightness = Serial.parseInt();

// ── CONFIRM COMPLETE MESSAGE ──
// After parseInt(), the next character should be '\n'.
// This confirms we received a full message and not a partial one, preventing corrupted values.
if (Serial.read() == '\n') {

  // ── SET LED BRIGHTNESS ──
  // analogWrite(pin, 0–255) uses PWM to control brightness.
  // 0 = fully off, 255 = fully on, values in between = dimmed.
  analogWrite(ledPin, brightness);
}
-
- The ‘\n’ check after parseInt() is important — it confirms that a complete message was received before acting on the value, which prevents the LED from responding to corrupted or partial data.
5. Reflection
This exercise made the communication feel more interactive than Exercise 01, because the browser was no longer just a display — it was actively sending instructions to hardware. The main issue we encountered was that the LED did not dim smoothly at first. After checking the wiring, we found the LED was connected to a non-PWM pin, which meant analogWrite() had no effect. Moving it to pin 5 resolved this immediately. This was a useful reminder that the physical wiring must match the assumptions in the code. If we were to continue, we would replace mouse control with a more interesting interaction such as key presses or dragging, add multiple LEDs with independent brightness values, and eventually expand into bi-directional communication.
Exercise 3
1. Overview
This exercise brought together everything from the previous two by implementing full bi-directional communication between Arduino and p5.js. A joystick connected to Arduino controls the wind force in a physics simulation, while p5 sends a signal back to Arduino to light up an LED every time the ball bounces. Data flows in both directions simultaneously.
2. Concept
The gravity and wind sketch provided a compelling context for bi-directional communication because it has two clearly distinct interactions that naturally map to each side: the joystick controls something in the simulation, and something in the simulation triggers a response on the hardware. Rather than the user controlling a parameter directly, the LED reacts to an event — a bounce — which made the physical and digital feel genuinely connected rather than just linked. Replacing keyboard input with a physical joystick also made the experience more immersive, since it gave the user a tangible way to influence the simulation.
3. Process and Methods
-
- We started from the gravity and wind example provided in class and kept the simulation structure mostly unchanged. The main modifications were replacing keyboard-based wind control with joystick input, and adding bounce detection that communicates back to Arduino.
- On the Arduino side, the joystick’s horizontal axis is read from pin A0 using analogRead() and sent to p5 via Serial.println() after every incoming message. On the p5 side, the value is read with port.readUntil(“\n”), trimmed, converted to an integer, and mapped from 0-1023 to a wind force range of -1 to 1. This value is applied to the wind vector each frame, so tilting the joystick left or right pushes the ball accordingly.
- For the return signal, we added bounce detection inside draw(). Each frame, a variable bounced is initialised to 0. If the ball hits the floor with a downward velocity greater than 2, it is counted as a real bounce and bounced is set to 1. This value is sent back to Arduino using port.write(). Arduino reads it with Serial.parseInt() and calls digitalWrite() to turn the LED on or off.
4. Technical Details
-
- The bounce detection uses a velocity threshold to distinguish real impacts from the small residual movements that occur when the ball settles on the ground:
  // ── BOUNCE DETECTION ──
  let bounced = 0;                    // assume no bounce this frame
  let floorY = height - mass / 2;    // y where ball touches the floor

  if (position.y > floorY) {
    position.y = floorY;   // prevent ball from going below floor

    // ── VELOCITY THRESHOLD ──
    // Only count as a real bounce if the ball hits with enough
    // downward speed (> 2). This filters out the tiny movements when the ball is nearly at rest
    // Would otherwise cause the LED to flicker continuously.
    if (velocity.y > 2) {
      velocity.y *= -0.9;   // reverse and reduce (energy loss on impact)
      bounced = 1;           // signal a real bounce to Arduino
    } else {
      velocity.y = 0;        // ball has come to rest — stop it completely
    }
  }

  // ── SEND BOUNCE STATE TO ARDUINO ──
  // Sends 1 if a real bounce happened this frame, 0 otherwise.
  // Arduino uses this to briefly light the LED on each bounce.
  // '\n' is appended so Arduino can confirm end of message.
  if (port.opened()) {
    port.write(bounced + "\n");
  }
}
-
- On the Arduino side, the received state is applied directly to the LED:
// ── READ LED STATE FROM p5 ──
// p5 sends '1' when a bounce is detected, '0' otherwise.
// parseInt() extracts the integer from the incoming string.
int ledState = Serial.parseInt();

// ── CONFIRM COMPLETE MESSAGE ──
// Check for the newline that p5 appends with port.write().
// This prevents acting on partial or corrupted values.
if (Serial.read() == '\n') {

  // ── CONTROL LED ──
  // ledState is 1 (HIGH) when p5 detects a bounce → LED on.
  // ledState is 0 (LOW) otherwise → LED off.
  digitalWrite(ledPin, ledState);
}
-
- The joystick read and send happens inside the same while (Serial.available()) block, directly after the LED state is processed. This keeps the two directions of communication tightly coupled within each communication cycle.
5. Reflection
This was the most technically demanding exercise of the three, and also the most rewarding. The biggest challenge was the LED flickering continuously when the ball came to rest on the ground. Even though the ball appeared stationary, the physics simulation kept generating tiny downward movements due to gravity, which the system kept interpreting as bounces. Introducing the velocity threshold velocity.y > 2 solved this cleanly and also taught us something broader: physics simulations produce continuous, noisy output, and meaningful events often need an explicit threshold or condition to be extracted from that noise. If we were to continue, we would add a dead zone to the joystick centre to reduce drift, use both joystick axes for more complex motion, and add more LEDs to represent different simulation events.
6. Resources