
- Concept Description
For my Arduino final project, I made a smart temperature and humidity monitor with a buzzer alarm. This project uses a DHT11 sensor to read the room temperature and humidity. The numbers are shown on a small OLED screen, so the user can clearly see the current condition of the room. When the temperature goes above 32°C, the buzzer will start making sound as a warning. When the temperature goes back below 32°C, the buzzer will stop.
This project is designed for simple everyday use. It could be used in a dorm room, bedroom, classroom, or small workspace. The user does not need to press any buttons or change any settings. They only need to plug in the device, and then it starts working by itself. I wanted the interaction to feel simple and automatic, because the user can understand the information just by looking at the screen and hearing the alarm.
- System Diagram & Component Layout
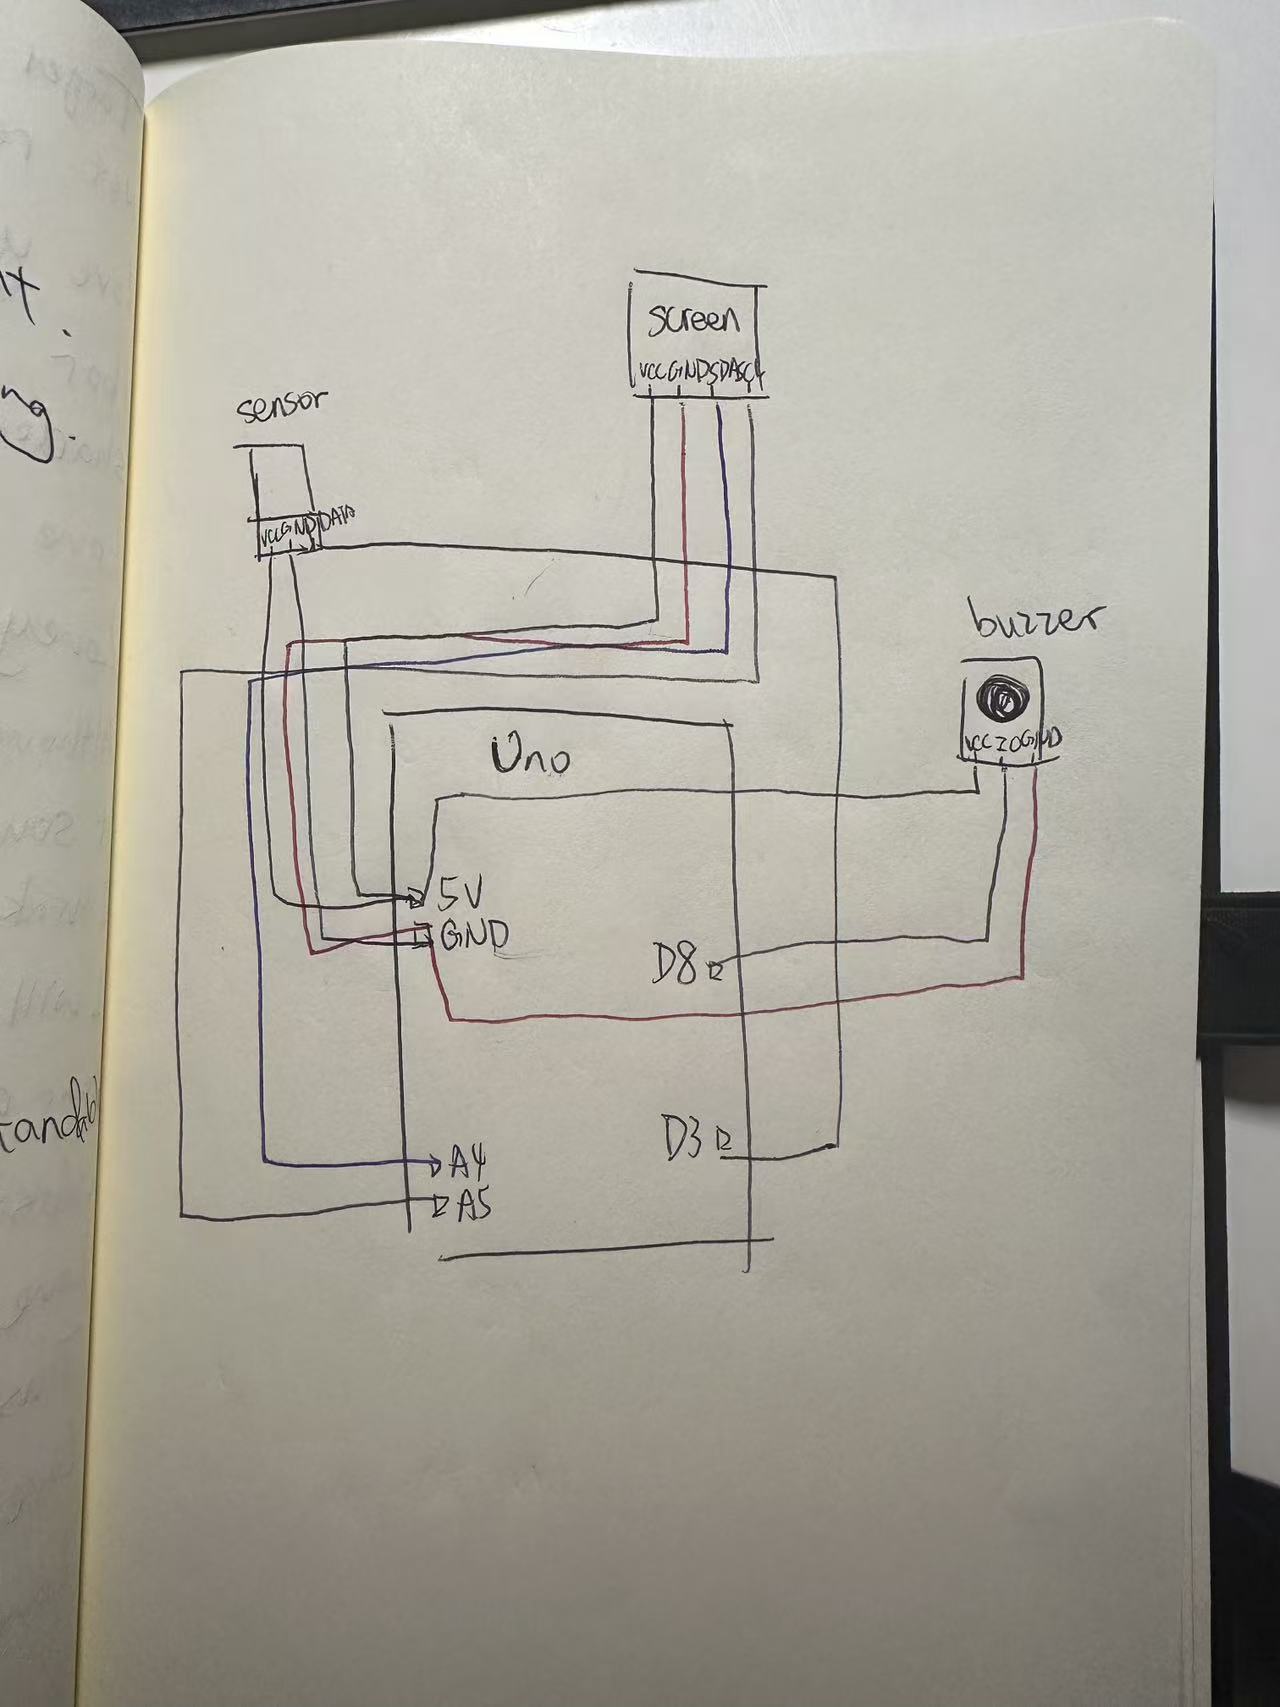
This project uses four main parts: an Arduino UNO board, a DHT11 temperature and humidity sensor, a 128×64 OLED display, and an active buzzer. The Arduino is the main controller. The DHT11 sensor collects temperature and humidity data. The OLED screen shows the data. The buzzer gives sound feedback when the temperature is too high.
3. Vimeo Video
4. How it works
The way this project works is not very complicated. The Arduino keeps reading data from the DHT11 sensor. If the sensor gives a valid temperature and humidity value, the Arduino saves the data and sends it to the OLED screen. The screen then refreshes and shows the newest temperature and humidity numbers.
The program also checks the temperature in every loop. I set the warning temperature to 32°C. If the temperature is below 32°C, the buzzer stays off. If the temperature is higher than 32°C, the Arduino turns on the buzzer. When the temperature drops again, the buzzer turns off automatically.
I had to fix the code several times. One problem was that the buzzer kept making sound even when the temperature was not high enough. Another problem was that the OLED screen stopped showing after a few seconds. I changed the code so the buzzer can turn on and off correctly, and I also added settings to make the OLED screen more stable.
I learned how to build this project from different resources. I watched YouTube videos to understand how the DHT11 sensor and OLED screen work. I also used online courses from the store where I bought my Arduino kit. The store also gave me a beginner Arduino book, and I used that book to understand the basic wiring, pins, and code structure. These resources helped me a lot because I am still learning Arduino and physical computing. I wrote the code in the first place, however, I founf it a bit messy, so I put them in to AI to oragnize and be more clear. Since I wrote some code about the sensor, however it is conflicted to the screen. And I tried to fix it by asking GPT.
#include <Wire.h>
#include <Adafruit_GFX.h>
#include <Adafruit_SSD1306.h>
#include <DHT.h>

#define SCREEN_WIDTH 128
#define SCREEN_HEIGHT 64

#define DHTPIN     3
#define DHTTYPE    DHT11
#define BEEP       8

Adafruit_SSD1306 display(SCREEN_WIDTH, SCREEN_HEIGHT, &Wire, -1);
DHT dht(DHTPIN, DHTTYPE);

float temp = 25.0;
float humi = 50.0;

void setup() {
  Serial.begin(9600);

  Wire.begin();
  Wire.setClock(100000);   // Slower I2C speed, more stable for OLED

  dht.begin();

  pinMode(BEEP, OUTPUT);

  // Active-LOW buzzer: HIGH = OFF, LOW = ON
  digitalWrite(BEEP, HIGH);

  // Start OLED
  if (!display.begin(SSD1306_SWITCHCAPVCC, 0x3C)) {
    Serial.println("OLED failed to start");
    while (true); // Stop here if screen is not found
  }

  display.clearDisplay();
  display.setTextSize(1);
  display.setTextColor(SSD1306_WHITE);
  display.setCursor(5, 10);
  display.println("System Starting...");
  display.display();

  delay(1000);
}

void loop() {
  // Keep OLED awake
  display.ssd1306_command(SSD1306_DISPLAYON);

  float t = dht.readTemperature(); // Celsius
  float h = dht.readHumidity();

  if (!isnan(t)) {
    temp = t;
  }

  if (!isnan(h)) {
    humi = h;
  }

  Serial.print("Temp: ");
  Serial.print(temp);
  Serial.print(" C   Humi: ");
  Serial.print(humi);
  Serial.println(" %");

  display.clearDisplay();

  display.setTextSize(1);
  display.setTextColor(SSD1306_WHITE);

  display.setCursor(5, 5);
  display.println("DHT11 Monitor");

  display.setCursor(5, 25);
  display.print("Temp: ");
  display.print(temp, 1);
  display.println(" C");

  display.setCursor(5, 45);
  display.print("Humi: ");
  display.print(humi, 1);
  display.println(" %");

  display.display();

  // Temperature warning
  if (temp >= 32.0) {
    digitalWrite(BEEP, LOW);    // buzzer ON
  } else {
    digitalWrite(BEEP, HIGH);   // buzzer OFF
  }

  delay(2000);
}
5. Reflection
At the beginning, this project was much harder than I expected. The OLED screen did not show anything at first. After searching on Google, I learned that I needed to download the correct libraries, like Adafruit SSD1306 and Adafruit GFX. After installing them and changing the code, the screen finally worked.
Then I had problems with the DHT11 sensor. At first, I thought the sensor was broken because it could not read temperature or humidity. I watched YouTube videos, took photos of my circuit, and asked AI for help. Later, I found a test code on a Chinese website to check the sensor. After uploading it, I found out the sensor was not broken. The real problem was my code. I had written the wrong sensor type, so Arduino could not read it correctly.
The buzzer also did not work well at first. The breadboard connection was unstable, so I changed many wires before it worked. Most of my code came from the Arduino tutorial book from the kit, and I also learned from YouTube videos and online courses from the store where I bought the Arduino. When I got stuck, I asked AI to help me find the problem. This project taught me that Arduino work needs patience, testing, and debugging step by step.