
I always wanted make the rgb light at my study space be as per what I am doing. They had different settings in terms of blinking, intensity and hue. But adjusting them every time and keeping track of those setting was troublesome and would rather kill the mood then set it. My final project is inspired by this. Having deck to control the ambience of the room with one click. This is main idea. Other than the lights added vinyl record as well to give more character to this. They behave as per the mood choice. Adding music to each mode was the plan but during the set I noticed the record make kinda eerie sounds which feel more immersive then the songs. On the down side I had to turn them off for focus mode because it felt counter intuitive.
To take user’s input from Arduino to P5 i but a distance sensor and if the user hold their hand in front of it for more 3 sec everything pauses. This was a fun addition as it give some sense of gesture control. While testing it was to put the hand in the excat distance range so I put an LED which generally flickers but stops flickering if the hand is in the range
This is my first user testing video with my brother. This actually pointed out that how hard it will be for the user to put the hand in the range. I guess it was easy when I was testing it myself because I exactly new the points. This led to the addition of the distance smoothing
https://drive.google.com/file/d/16gIRB_NWMZ8BK_nEDwCJMTRAQSwjMLZl/view?usp=sharing
Here are my favorite modes in dark:
Party
Focus
Rain
Eerie
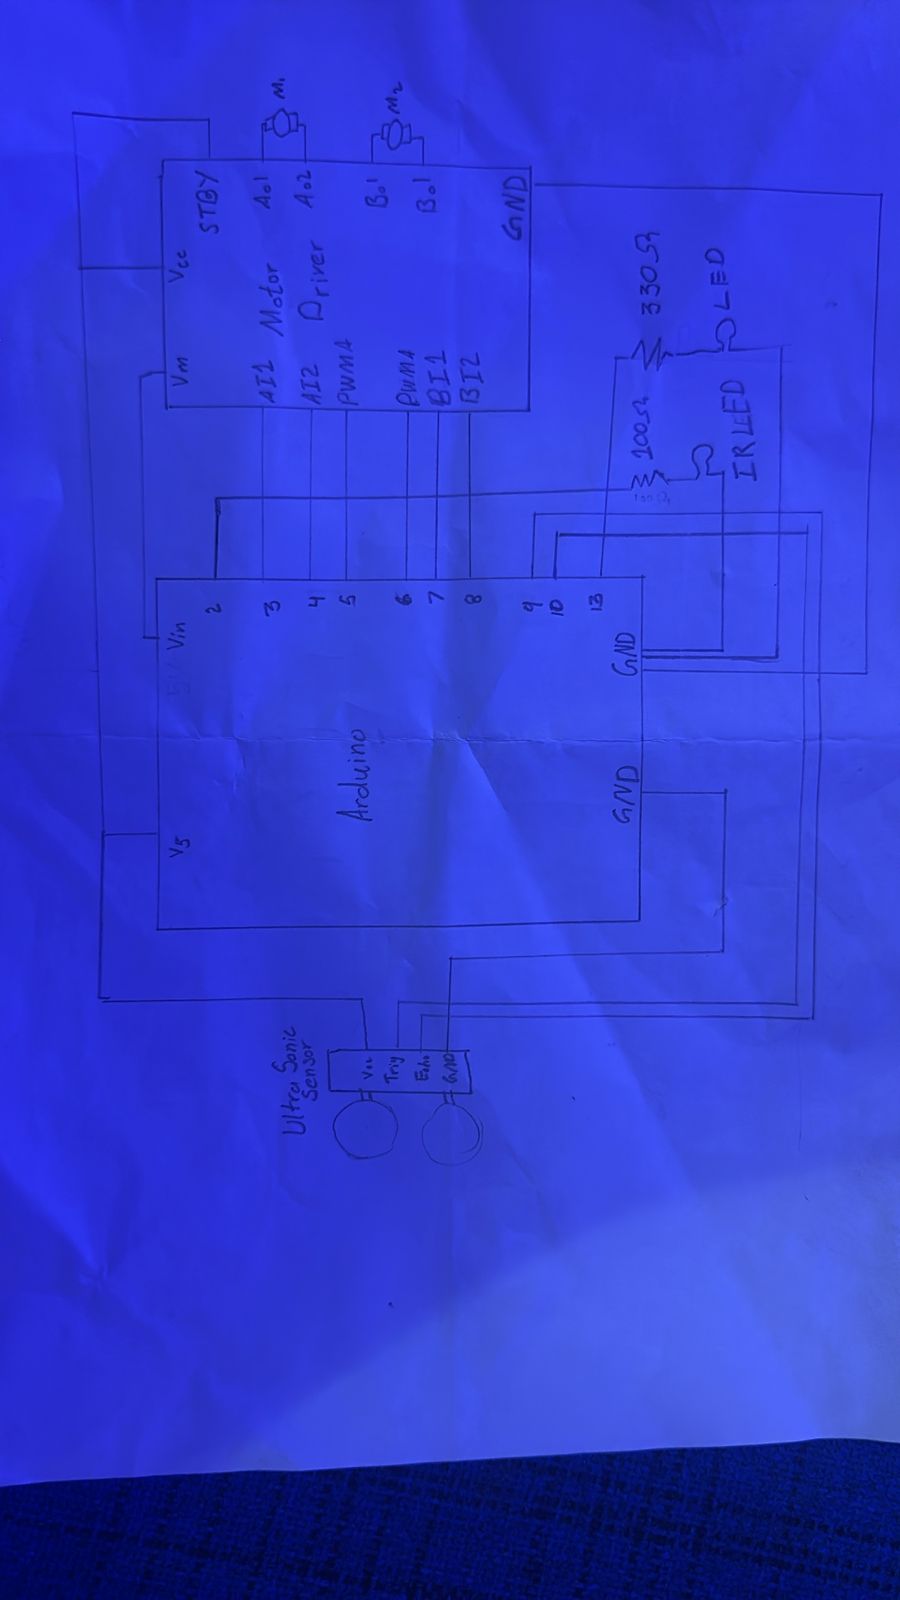
Schematic
Code:
There are basically 3 things happening inside this. First is that each mode is mapped to a loop of predefined movements for motors. Arduino gets the signal from the serial communication and it run that mode. I used a mapping of modes as well. Along side running the motors it also sends IR signal to the lights to change mode accordingly. I got the mapping of the IR signal earlier from the IR receiver .Second part the the distance measurement to control the gestures, as the distance sensor is right next the vinly it some fluctuates a lot so I added a distance smoothing function. This is the part I am most proud of
int getSmoothedDistance() {
  distBuffer[distIndex] = getDistance();
  distIndex = (distIndex + 1) % SMOOTH_SAMPLES;

  long sum = 0;
  for (int i = 0; i < SMOOTH_SAMPLES; i++) {
    sum += distBuffer[i];
  }

  return sum / SMOOTH_SAMPLES;
}
Lastly, it keep track of the user’s hand in the distance range and indicates it by turning on the LED and pauses the motors if the light is on for 3 sec.
P5
It start by a start screen which has connect to Arduino button on top and a start button. Start button makes if full screen and displays the mood options, The Connect to Arduino button stays there in case user forgot to connect earlier. Each mode has its relevant animation which when clicked. User can easily change modes by click the back button on top left and choosing the new mode. Even thou all the animations feel very relavent to me the one I am most proud of the eerie one. As it is very simple and subtle but catches the mood fully
eerie() {
  background(random(20));

  for (let i = 0; i < 5; i++) {
    stroke(255, random(100));
    line(random(width), random(height), random(width), random(height));
  }
}

sonder() {
  background(10);

  if (random(1) < 0.08) {
    this.sonderDots.push({
      x: random(width),
      y: random(height),
      life: 255
    });
  }

  for (let i = this.sonderDots.length - 1; i >= 0; i--) {
    let d = this.sonderDots[i];

    fill(255, d.life);
    noStroke();
    circle(d.x, d.y, 4);

    d.life -= 2;

    if (d.life <= 0) {
      this.sonderDots.splice(i, 1);
    }
  }
}
After is the communication between Arduino and P5 is relatively is simple but the signal interpretation was a bit challenging. This is the part where it gets managed
handleArduinoMessage(msg) {
  console.log("Arduino:", msg);

  // NEXT MODE trigger
  if (msg === "NEXT_MODE") {
    this.nextMode();
    return;
  }

  // PAUSE
  if (msg === "PAUSE_TOGGLED") {
    console.log("Pause toggled");
    return;
  }

  // sync
  if (msg.startsWith("MODE:")) {

    let m = int(msg.substring(5)); // after "MODE:"

    let modes = [
      "chill", "focus", "party",
      "rain", "wind", "eerie",
      "sonder", "hireath", "glitch"
    ];

    let newMode = modes[m];

    if (this.state === "ambience") {

      // to avoid rushing
      if (!this.currentAmbience || this.currentAmbience.type !== newMode) {
        this.currentAmbience = new Ambience(newMode);
        console.log("UI synced to:", newMode);
      }

    }
  }
}

  nextMode() {
    if (this.state !== "ambience") return;

    let modes = [
      "chill","focus","party",
      "rain","wind","eerie",
      "sonder","hireath","glitch"
    ];

    let index = modes.indexOf(this.currentAmbience.type);
    index = (index + 1) % modes.length;

    this.startAmbience(modes[index]);
  }
}
Other than log messages coming form Arduino to P5, their are basically two commands. From P5 to Arduino, it commands to spin the vinyls and blink the lights according to the mode. From Arduino to P5 is the pause everything when user put their hand.
Overall I am happy about the outcome, I like how am able to use it in daily life. I am most proud the whole vibe it creates in each modes as the lights, the animation and the screeching sound from vinyls, everything fall into place making a collective vibe.
Other than this I am really happy about using the Arduino to make something. Because before this the only physical out come of code I created was my laptop heating up.
Ai Usage
I used Chatgpt to help me with the animations and distance smoothing in general. Other than that before working on the project it helped learn about the who to use IR receiver and transmitter. That’s when I made all the mappings. This is how I used AI for the most part. Other than this it helped tidy up and organize the code as I struggled with App class in P5
Challenge
The biggest Issue faced was with the IR transmitter as the it was giving out corrupted signals and was very very sensitive to direction. I needs to be pointed direct at the light and had two light but I wanted to use only one transmitter. These issues were resolved by using 100ohm resistor instead of 330ohm. I found out that even thou it still can work at higher resistance, It became almost useless.
For future I think there is a lot of room for improvement in this. The ambience control by light is and vinyls is very limited. This dies set a good blueprint. One major improvement I am planning on adding is being able to run the Arduino from a touch screen so I can place at a corner and use it in real life, rather than running it every time