Reading reflection and thoughts

One thought is that this article changes the role of the artist. Usually, we think the artist’s job is to express a clear message. But in this reading, the artist is more like a designer of experience. The artist builds the situation, and the audience helps finish the work through their actions.

Another idea is that interactive art is not fully complete until people engage with it. This makes the artwork feel alive and open, not fixed like a painting with one meaning. I think this is interesting because it gives more power to the audience.

I also thought about the phrase “set the stage, then shut up.” It sounds strong, but the meaning is important. The artist should guide people through space, objects, and hints, but should not explain too much. Too much explanation can limit people’s feelings and reactions.

The article also made me think that misunderstanding is not always failure. If people use the work in unexpected ways, that can still be part of the conversation. Their confusion or surprise may reveal something important about the design.

Another idea is that interactive art needs good affordance. If you want people to touch something, the object should invite touch. If you do not want touch, it should not look touchable. So meaning is not only in words, but also in design, placement, and behavior.

I also thought this reading connects interactive art to performance. The audience is not just watching; they are acting. This makes the artwork closer to theatre or rehearsal, where meaning is discovered through action, not just given in advance.

Reading Response #? (feat. not one, but TWO articles from Tom Igoe)

Physical Computing’s Greatest Hits (and Misses)

Reading this was humbling, to say the least. I expected to find a list with cool projects I could maybe borrow and try to make for myself, but what I got instead was more like a map of every “original” idea a beginner is likely to have. Theremins, gloves, floor pads, things you yell at, fields of grass, the endless lure of blinking LEDs, mirrors that are digital to easily wow every person with a limited understanding of technology (and even those who have more than a limited understanding of technology), things to hug. Everything has already been charted out and accounted for. I do like that the author mentions that some students, upon realizing their idea has been done before, just give up. which he thinks is exactly the wrong reaction. His take is that these themes keep coming back because they leave room for genuine variation, and the interesting part is never the concept itself but what a particular person does with it.

Something that stuck with me was how unflinching he is about each theme’s weaknesses. A theremin is fun, yeah, but congrats on waving your hand, I guess. What does it mean? What now? Video mirrors are beautiful and also happen to offer almost zero structured interaction (hah, screen savers). Meditation helpers can’t read minds. Remote hugs don’t actually feel like hugs. He isn’t dunking on any of these ideas, but is rather saying that the baseline, easy version of each one is surface-level, and real design work is whatever comes AFTER you’ve built that surface and started asking harder questions.

That reframing is how my thought process usually works. Rather than creating something and wondering only if it works, I also like to ask myself if the gesture I’m asking for is actually worth asking for. Why use a button instead of a pull, or a wave or a shout? What does this action feel like in my body, and does it match what I want the piece to be about? Ultimately, despite us all learning the same coding language and basics of Arduino, we all end up with different projects because of how we individually come up with ideas. As long as you know the basics, you can bend the rules after as much as you want.

Making Interactive Art: Set the Stage, Then Shut Up and Listen

This reading opens up with a pretty blunt rule, “Don’t interpret your own work,” and then spends the rest of it explaining why this rule exists. To Igoe, interactive art isn’t something you deliver to an audience, but rather, is a conversation you’re starting with them. If you stand next to your piece telling people what each element represents and how they should feel about it, you’ve already pre-written their experience, and at that point, there’s no reason for them to actually engage with what you made. (For this reason, I like to read museum labels for paintings AFTER I’ve engaged with the piece, so I can experience it twice. I found that it doesn’t usually work the other way… thank you, anchoring bias!)

The analogy that made this click was directing an actor. You can’t tell a performer what to feel and expect anything real to come out. Rather, you arrange the space, place the props, suggest intentions, and let them figure out the emotions themselves. An interactive piece works the same way: put a handle on what you want touched, make unapproachable things unapproachable, drop hints towards what you want discovered, and then (with all due respect), back off. The catch, though, is you need to genuinely trust the audience, and trust that what you built is legible enough to speak for itself (scary!) for it to work. Igoe’s point is also that these reactions are also data, not failures to argue with.

An interactive piece is never really “done”. The object you build is just a stage, and the audience finishes the work every time they walk up to it, slightly different each time. That’s a pretty different mental model from traditional art, and I suspect it’s one of those things that doesn’t fully sink in until you’ve actually watched strangers misuse something you made.

And…

Back-to-back, these two readings feel like they have similar arguments made from two angles. The first is about what to make, while the second is how to present what you made. Both converge on a single idea, that you kind of… aren’t the point (sorry). The gesture is the point, and the person performing it is the point. We’re really putting the interaction (between our performer and the gestures in between to communicate with the work) in interactive media. Hahaha. Sorry.

Week 10 – Production and Reading Reflection Megan

Production: LED Lights Memory Game

Concept

The concept of my project was to create a memory-based LED game inspired by the small game we watched in class. In that example, a light would turn on and the first person to press the button on their side would win. I found that idea very engaging, so I wanted to build something similar but with a stronger focus on memory and sequence. While looking for ideas, I came across the concept of a “Simon Says” style memory game, which immediately reminded me of a toy I used to play with as a child, similar to a Pop It memory game with lights and patterns. This connection made the idea more personal and interesting to develop, so I decided to create a game where the Arduino generates a sequence of LED lights and the player must repeat it correctly using buttons.

Process

To build this project, I started by learning the basic components separately. I watched several tutorials by Paul McWhorter, which helped me understand more things on how LEDs and buttons can work, as well as how to structure Arduino code using functions, loops, and conditionals. I also explored the Arduino documentation to better understand how different functions work and how Arduino programming compares to tools like p5.js. The good thing is that both use similar logical structures, which made it easier for me to understand the code. I programmed the Arduino to generate a random sequence, display it using LEDs, and then check the user’s input through buttons. I also added a startup LED test to verify that the circuit was working correctly before the game begins.

// LED MEMORY GAME


// PIN SETUP

// LED pins
int redLED = 12;
int yellowLED = 9;
int greenLED = 6;
int blueLED = 3;

// Button pins
int redButton = 11;
int yellowButton = 8;
int greenButton = 5;
int blueButton = 2;


// GAME VARIABLES
int sequence[10];   // stores up to 10 steps
int level = 0;      // current level


// ==============================
// SETUP 
// ==============================
void setup() {

  // Set LED pins as OUTPUT
  pinMode(redLED, OUTPUT);
  pinMode(yellowLED, OUTPUT);
  pinMode(greenLED, OUTPUT);
  pinMode(blueLED, OUTPUT);

  // Set button pins as INPUT (with internal pull-up)
  pinMode(redButton, INPUT_PULLUP);
  pinMode(yellowButton, INPUT_PULLUP);
  pinMode(greenButton, INPUT_PULLUP);
  pinMode(blueButton, INPUT_PULLUP);

  // Start random generator
  randomSeed(analogRead(0));


  // ==============================
  // STARTUP LED TEST
  // ==============================

  // Turn on each LED one by one
  digitalWrite(redLED, HIGH);
  delay(300);
  digitalWrite(redLED, LOW);

  digitalWrite(yellowLED, HIGH);
  delay(300);
  digitalWrite(yellowLED, LOW);

  digitalWrite(greenLED, HIGH);
  delay(300);
  digitalWrite(greenLED, LOW);

  digitalWrite(blueLED, HIGH);
  delay(300);
  digitalWrite(blueLED, LOW);

  delay(500); // small pause before game starts
}


// ==============================
// MAIN LOOP 
// ==============================
void loop() {

  addStep();        // add new random color
  showSequence();   // show LED sequence

  bool correct = checkPlayer(); // check user input

  if (correct == false) {
    gameOver();     // if wrong → game over
    resetGame();    // restart
  }

  delay(1000);
}


// ==============================
// FUNCTIONS
// ==============================


// Add a new random step
void addStep() {
  sequence[level] = random(0, 4);
  level++;
}


// Show the sequence using LEDs
void showSequence() {

  for (int i = 0; i < level; i++) {

    turnOnLED(sequence[i]);
    delay(500);

    turnOffAll();
    delay(250);
  }
}


// Turn on the correct LED
void turnOnLED(int number) {

  if (number == 0) digitalWrite(redLED, HIGH);
  if (number == 1) digitalWrite(yellowLED, HIGH);
  if (number == 2) digitalWrite(greenLED, HIGH);
  if (number == 3) digitalWrite(blueLED, HIGH);
}


// Turn off all LEDs
void turnOffAll() {

  digitalWrite(redLED, LOW);
  digitalWrite(yellowLED, LOW);
  digitalWrite(greenLED, LOW);
  digitalWrite(blueLED, LOW);
}


// Check player input
bool checkPlayer() {

  for (int i = 0; i < level; i++) {

    int buttonPressed = waitForButton();

    // Show feedback
    turnOnLED(buttonPressed);
    delay(300);
    turnOffAll();

    // Check correctness
    if (buttonPressed != sequence[i]) {
      return false;
    }
  }

  return true;
}


// Wait for button press
int waitForButton() {

  while (true) {

    if (digitalRead(redButton) == LOW) {
      delay(200); // debounce
      return 0;
    }

    if (digitalRead(yellowButton) == LOW) {
      delay(200);
      return 1;
    }

    if (digitalRead(greenButton) == LOW) {
      delay(200);
      return 2;
    }

    if (digitalRead(blueButton) == LOW) {
      delay(200);
      return 3;
    }
  }
}


// Game over animation
void gameOver() {

  for (int i = 0; i < 3; i++) {

    digitalWrite(redLED, HIGH);
    digitalWrite(yellowLED, HIGH);
    digitalWrite(greenLED, HIGH);
    digitalWrite(blueLED, HIGH);

    delay(300);

    turnOffAll();

    delay(300);
  }
}


// Reset game
void resetGame() {
  level = 0;
}

Difficulties

One of the main difficulties I encountered was related to the physical design of the circuit, especially the buttons. It was challenging to make the buttons clearly visible and easy to press during gameplay. At times, the wires made the setup look cluttered and slightly uncomfortable to use. To improve this, I adjusted the layout of the breadboard and repositioned it to the left side instead of the right, which made the buttons more accessible. However, I still believe the design could be improved. A possible solution would be to use shorter wires, since the ones included in the kit are relatively long and make the circuit less organized.

Thing that I’m Proud Of

One aspect of the project that I am particularly proud of is the feedback system when the player loses. I programmed all the LEDs to blink simultaneously several times, creating a clear and satisfying visual indication that the game is over. This small detail enhances the user experience and makes the game feel more complete and interactive.

Reflection Overall

Overall, I found this project very enjoyable and rewarding. It allowed me to combine creativity with technical skills and to better understand how hardware and software interact. I especially liked how I could take a simple idea and gradually build it into a functional game. If I were to improve this project in the future, I would like to add sound effects, such as tones that play when each LED lights up, to make the experience more immersive. Although I have not yet implemented this feature, it is something I would like to explore next. This project helped me gain confidence in working with Arduino and problem-solving in both coding and physical design.

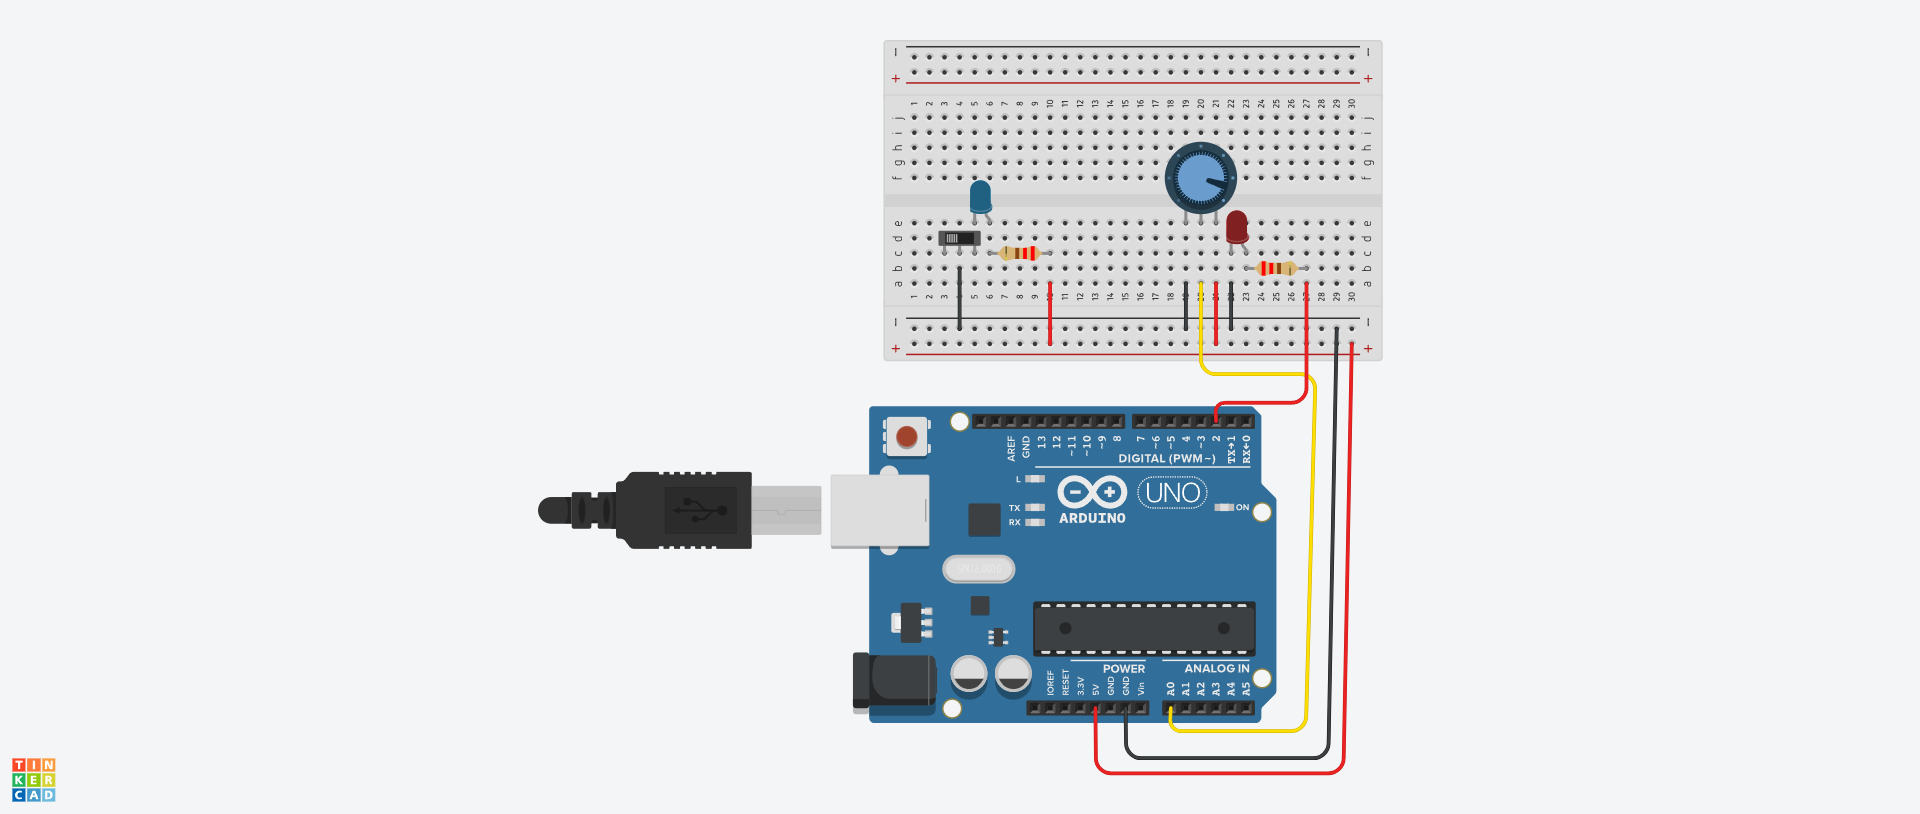
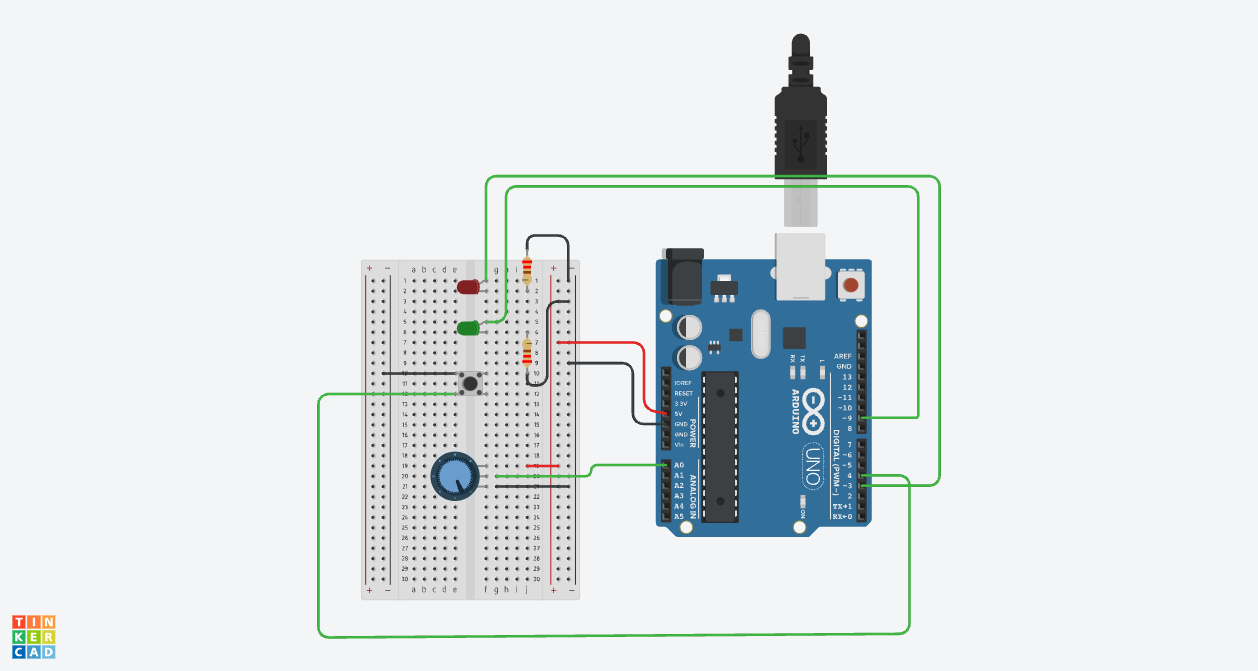
PHOTO OF PHYSICAL CIRCUIT
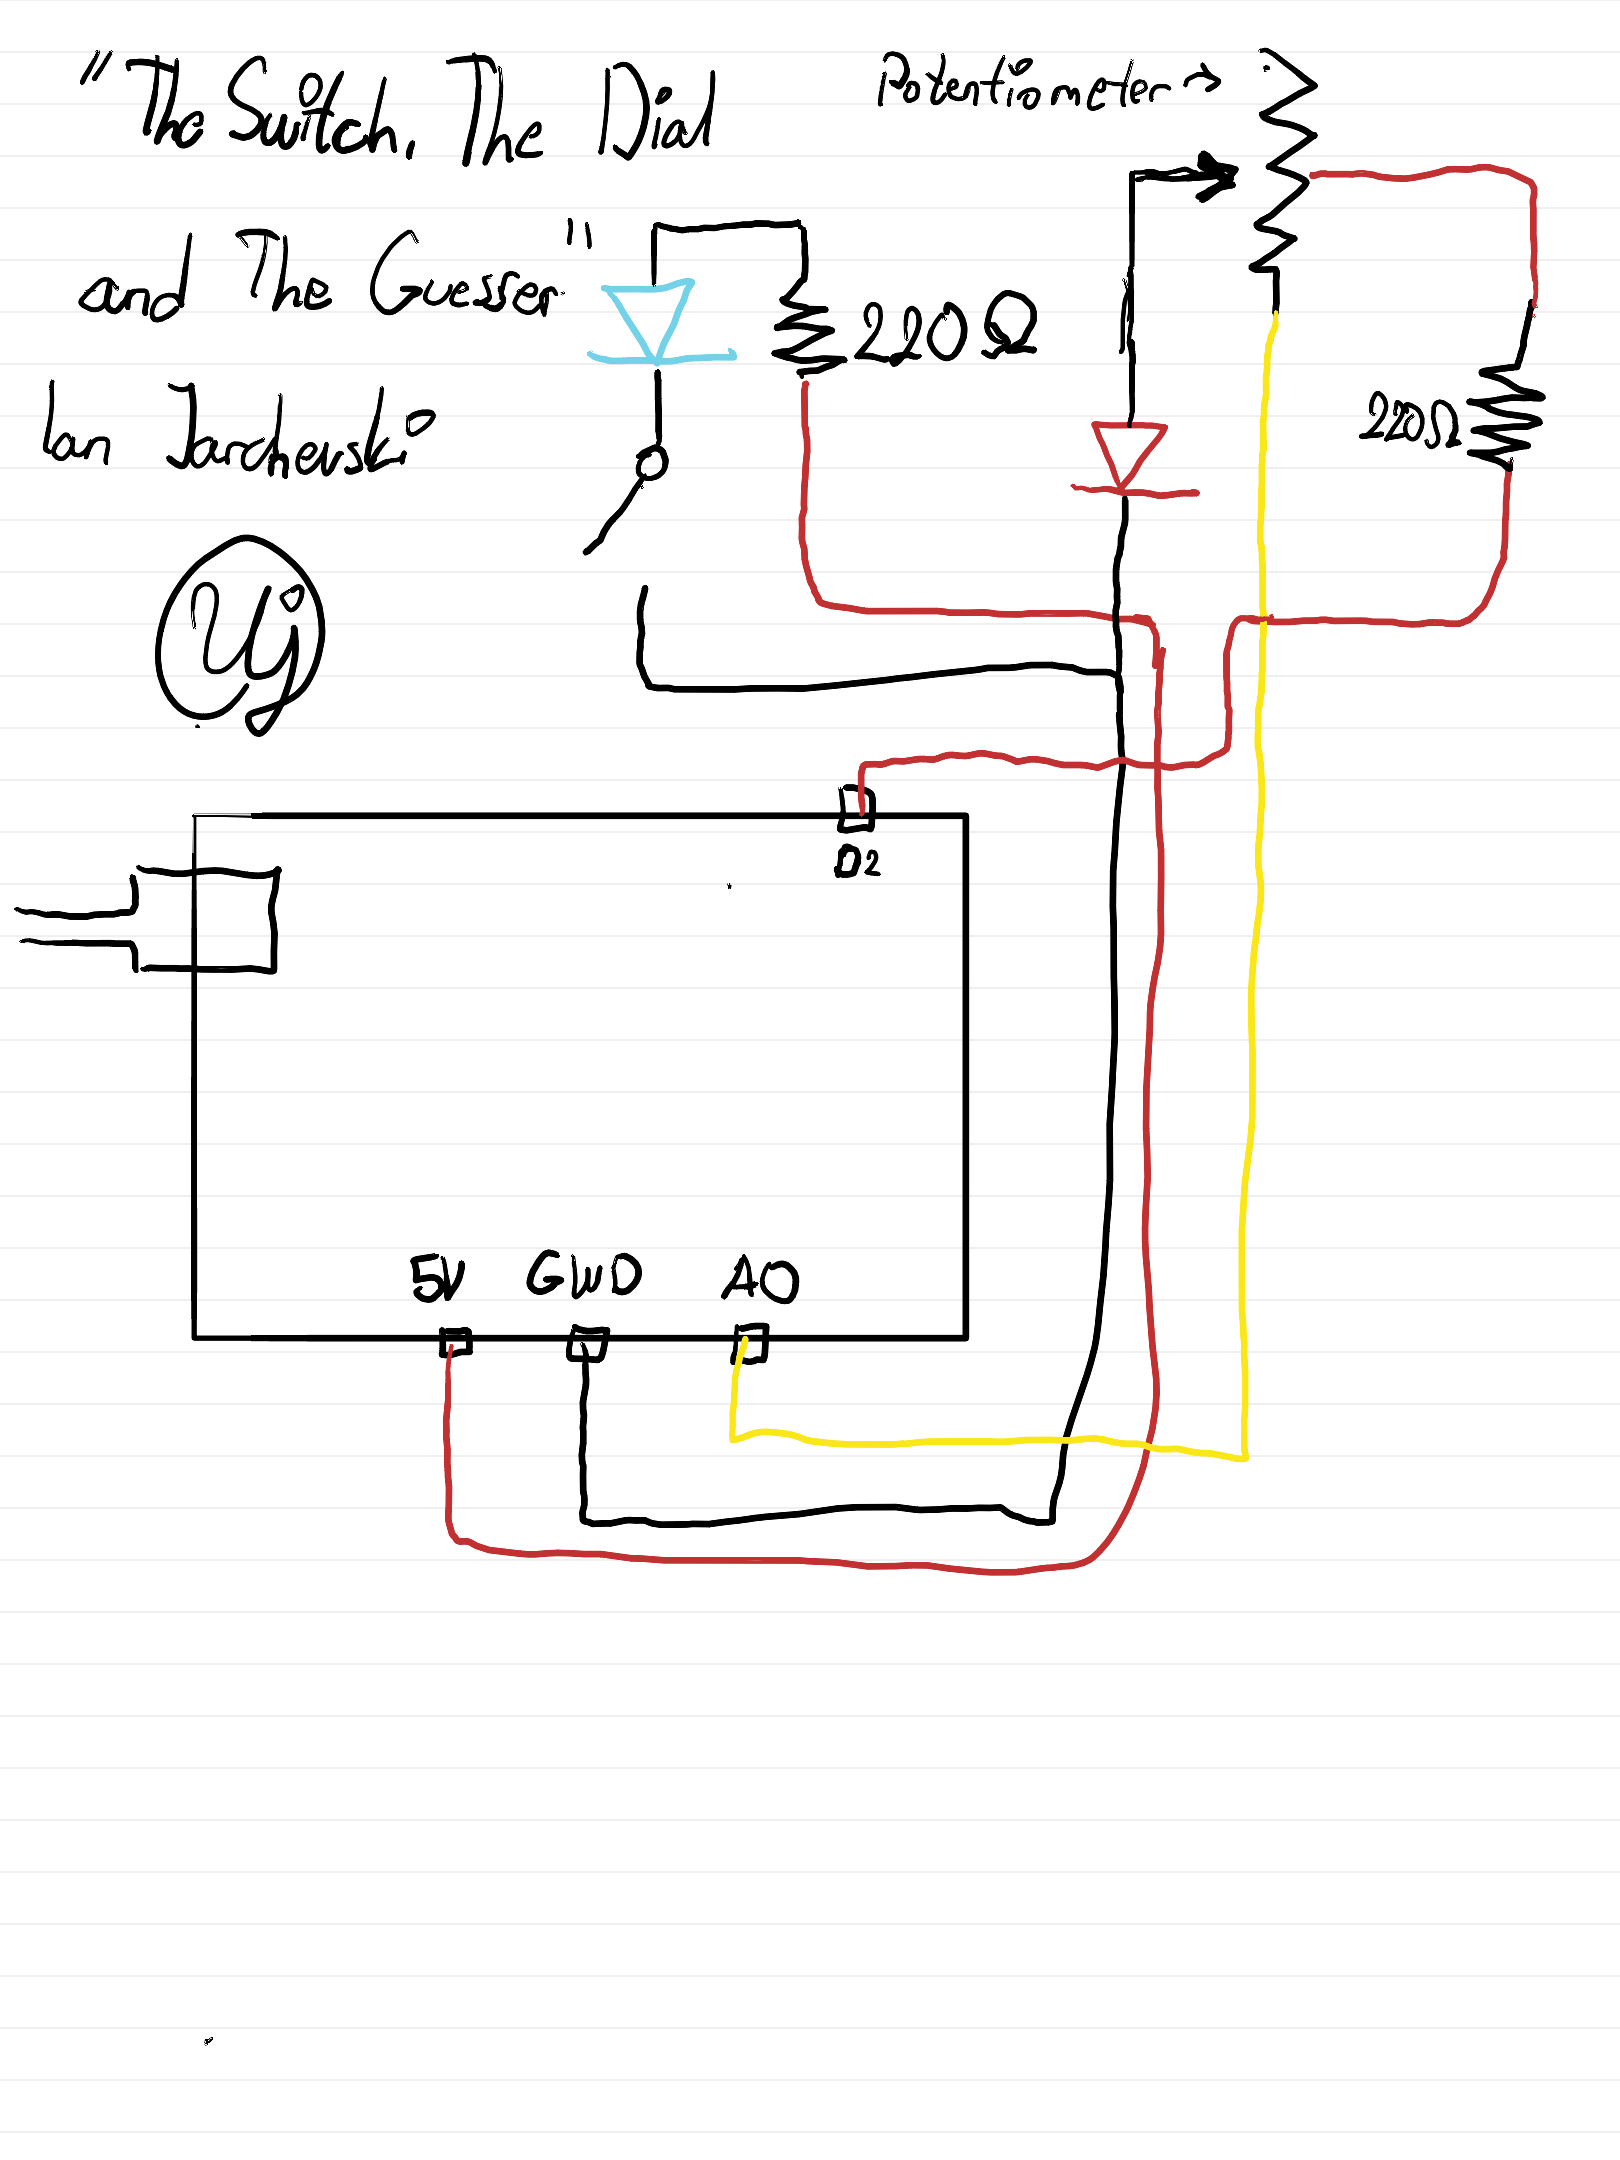
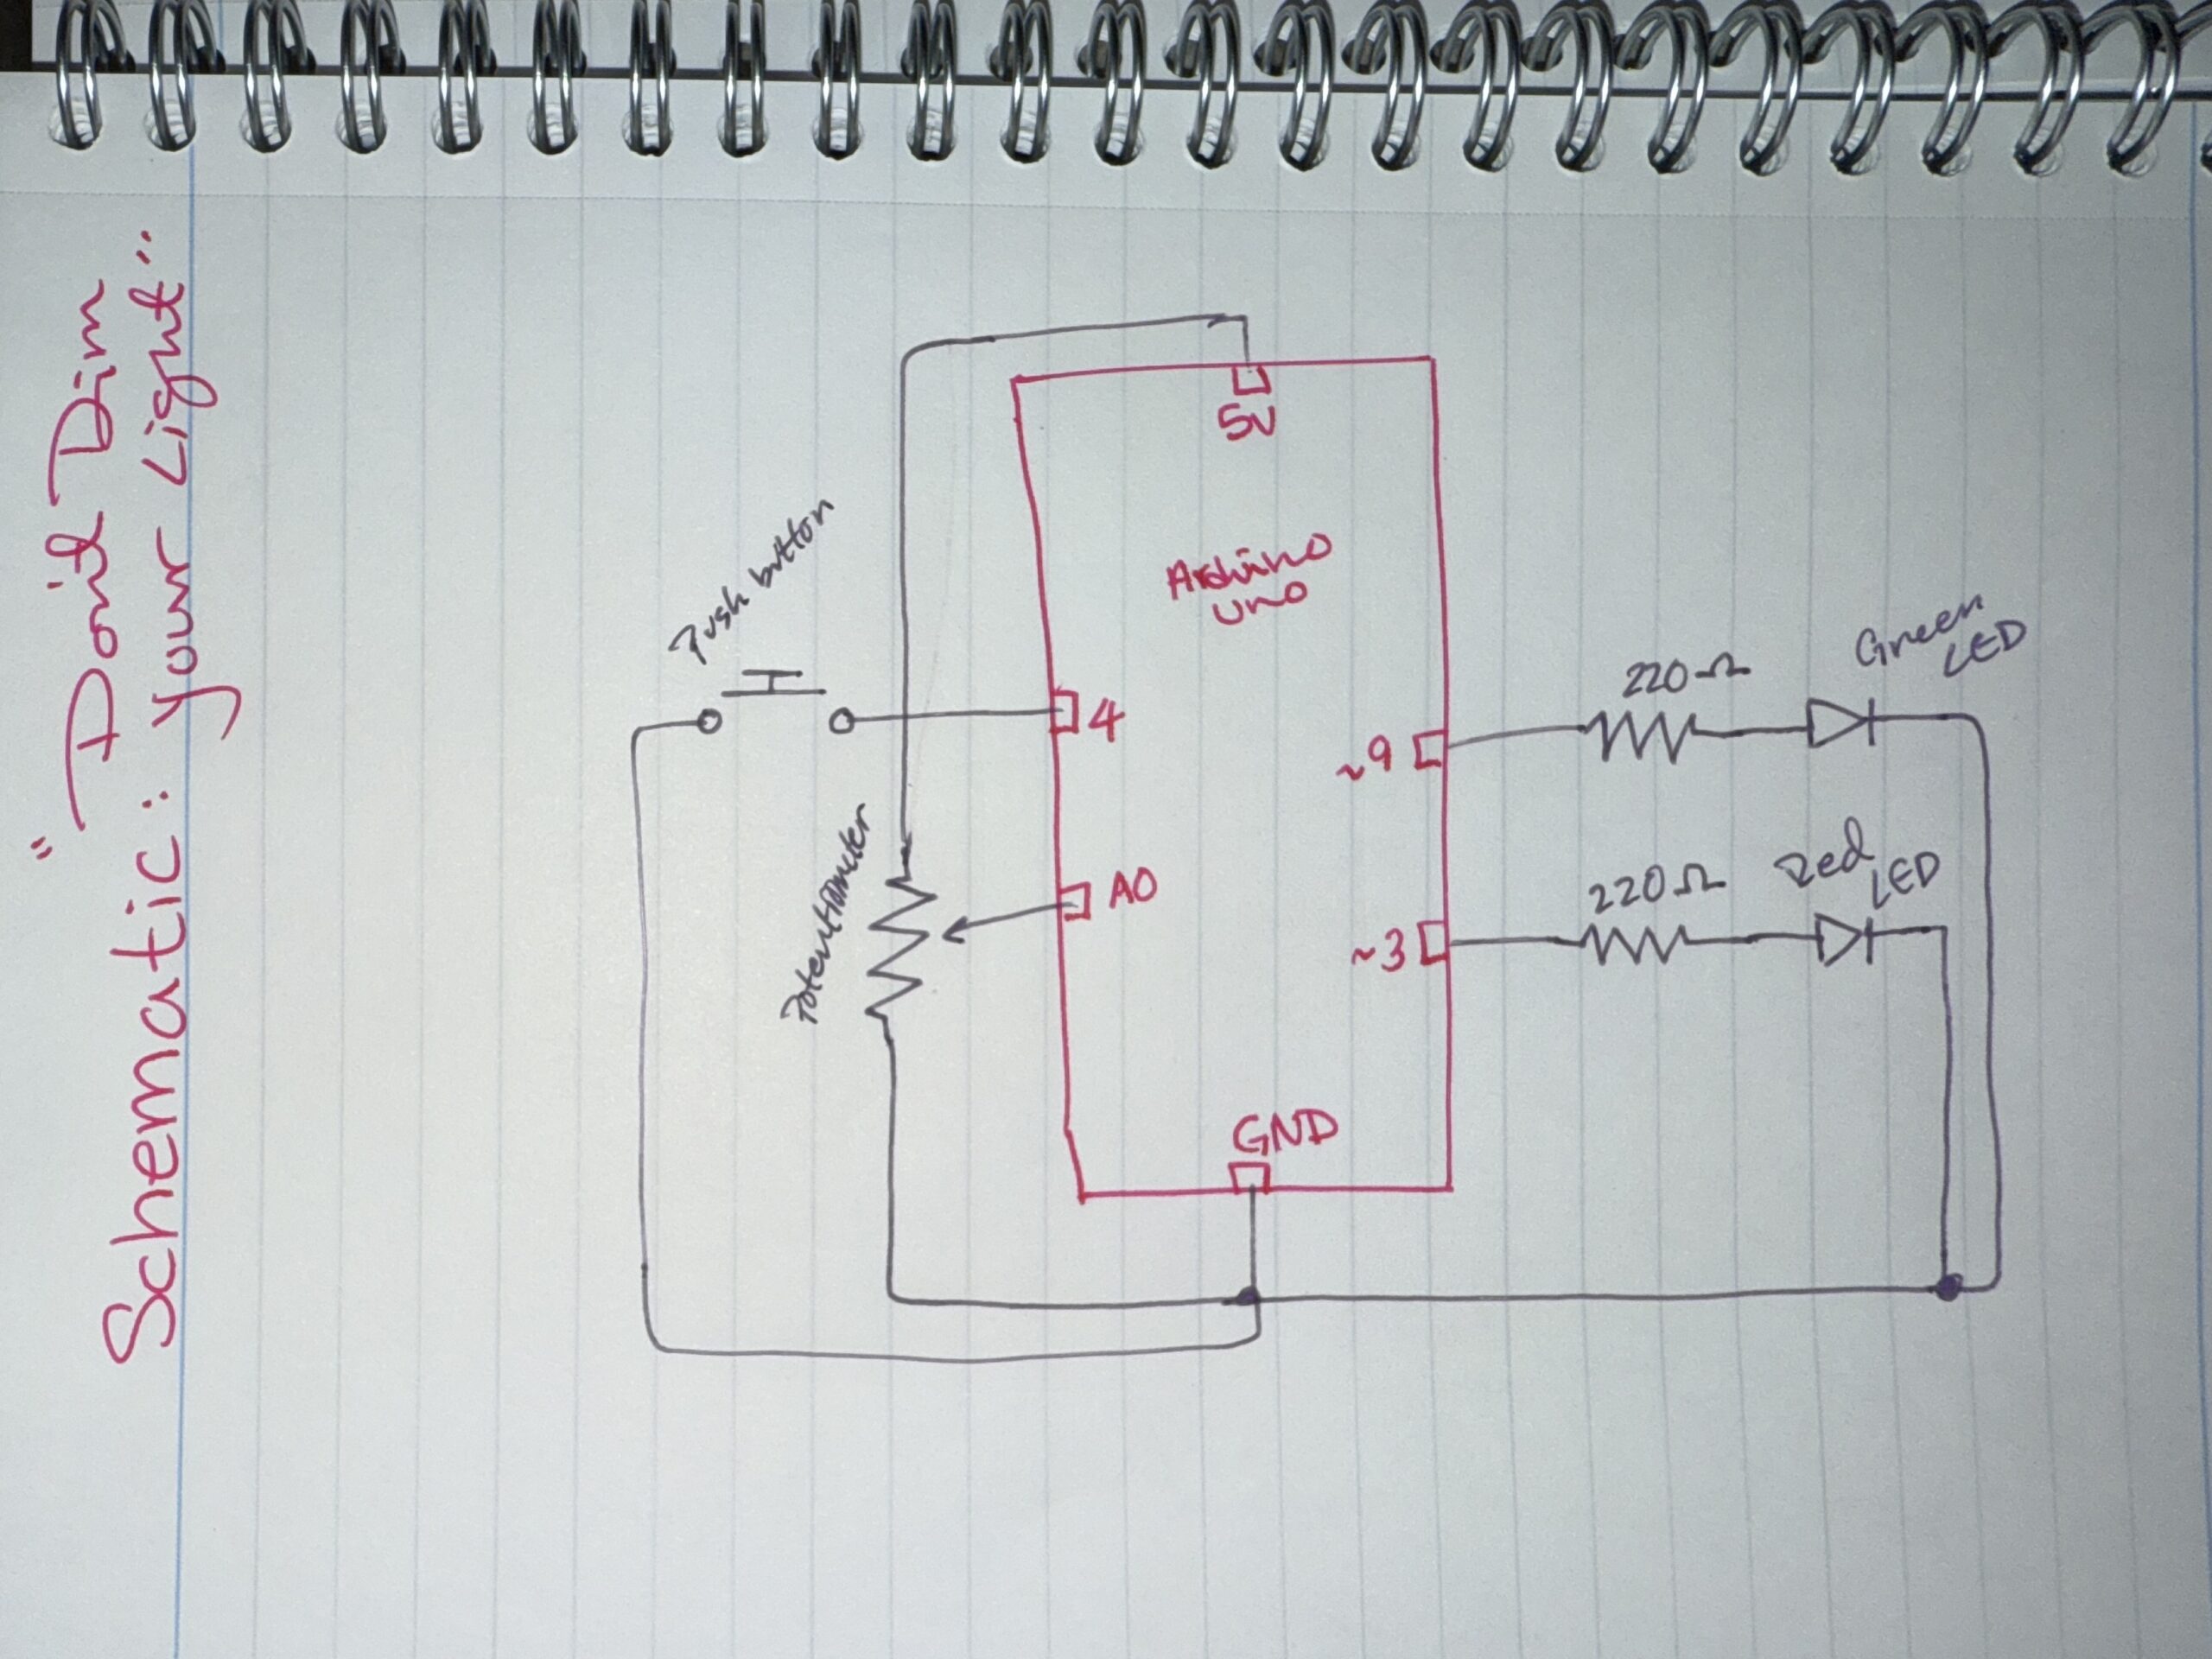
PHOTO OF SCHEMATIC

Reading Reflections

Making Interactive Art

Reading this text me rethink what art even is, especially interactive art, because I feel like I’ve always thought of art as something where the artist is trying to say something very specific, and the audience is supposed to understand that meaning. But here it’s kind of the opposite. It’s saying that if you control too much, if you explain too much, you’re actually limiting the experience. And I find that really interesting but also a bit uncomfortable, because it means you’re giving up control over your own work. Like, you create something, but then people might completely misunderstand it, or interact with it in a way you didn’t expect, and that’s supposed to be part of it. I think what stood out to me the most is this idea that the artwork is not the final product, but more like the beginning of a conversation, and the audience kind of finishes it. At the same time, I feel a bit conflicted, because I wonder if that means the artist’s intention doesn’t matter as much anymore, or if it just becomes too vague. But I do like the idea that interaction is more real when it’s not forced, when people figure things out on their own. It makes the experience more personal instead of just following instructions. So I think the main thing I take from this is that good interactive art is not about telling people what to think, but about creating a space where they can think for themselves, even if that means losing some control over what your work becomes.

Physical Computing’s Greatest Hits (and misses)

This article made me realize something that I hadn’t really thought about before, which is how much creativity is not about doing something completely new, but about how you reinterpret things that already exist. At first, I kind of agreed with that instinct of “if it’s already been done, it’s not original,” but reading this made me see that that idea is actually very limiting. The author shows how the same types of projects keep coming back, like gloves or sensors or interactive spaces, but what changes is how people give meaning to them. And I think that’s the part that stood out to me the most, because it’s not really about the technology itself, it’s about the interaction and what it makes people feel or do. At the same time, I also feel a bit conflicted, because some of these projects sound very repetitive or even a bit shallow, like things that look cool but don’t really have depth. So it made me question where the line is between something that is genuinely creative and something that is just visually interesting. I think overall the article is kind of saying that originality doesn’t come from the idea itself, but from the intention behind it, but I’m not sure if I fully agree, because I still feel like at some point things can become too repetitive. But I do like the idea that you shouldn’t immediately discard something just because it’s been done before, because that mindset probably stops a lot of good ideas before they even start.


Week 9: Reading Response

Emotion and Design: Attractive Things Work Better

The reading starts off with the author’s personal teapot collection and notes their unique qualities: one is functionally absurd, one is ugly yet charming, and one is elegantly engineered for the stages of tea brewing. He uses these very objects to back up his claim that usability need not to be in conflict, and that in fact, things that feel good to use and look at actually perform better in our minds because of the emotional state they put us in, and a beautiful product can help a user work through minor problems that the ugly (but functional) counterpart might not. I do agree with his point on prioritizing usability alone can lead to designs that work but feel sterile, and this reminds me of the function over aesthetics mindset that reinforced in architecture, where function almost overshadows how spaces feel for the consumer. However, while I think his argument fits everyday products well, I don’t think it mirrors the same way with how architecture operates under far greater constraints like structure, material, and safety, where poor functional decisions have serious consequences and it is, from what I can see, a context in which aesthetics can’t come first, though an architectural structure can be beautiful, it ultimately has to serve its purpose of being a safe and functional space to the user.

Her Code Got Humans on the Moon

The article follows mathematician Margaret Hamilton who took a programming job at MIT as something temporary while her husband finished law school, and ended up accidentally building the foundation of software engineering while helping land humans on the moon. There came a situation when her daughter crashed the simulator by triggering a program that no astronaut was ever supposed to activate mid flight and although she flagged it as a real issue and wanted to a kind of debugging code to prevent it, NASA pushed back and claimed that astronauts were too well trained for that. Months later, it happened. I think that kind of overconfidence in human perfection is something a lot of institutions fall into, and it actually reminded me of the Titanic. The ship was considered so structurally sound that the people in charge genuinely claimed it as the “unsinkable”, and that certainty is what made them careless about the lifeboats, the speed, and the warnings. I think both cases show the same thing, which is that when you convince yourself something will never happen, you stop preparing for it, and that is exactly when it does. I truly respected Hamilton for making sure, she stayed prepared and her team was ready to fix it when it did go wrong.

Assignment 10: The Switch, The Dial and The Guesser

“Turning on the light is easy if you know where the switch is” – Colin Wilson

Concept:

Finally we have reached the Arduino era of the class. So to start out, we were tasked to make a analog switch and a digital switch to turn on two LEDs in a digital and analog fashion. But as well, to add a bit of spice to it. Now being honest it took me some time to get my footing with Arduino as this is my first time using and tinkering with it. But I’ve managed to make something at least a bit fun. I’ve been fond of escape rooms and locks, and I thought, what if I make it so depending on where you twist the lock, the LED will shine.

Sketch:

Digital Circuit:

How it’s made:

In terms of designing, the Blue LED is a simple circuit, featuring a resistor set at 220 olms, and wires connecting it to the Ground and Power. The key thing added is a simple switch that the user can interact with to turn the LED on or off.

However the Red LED has instead a potentiometer. I chose it as it’s use as a dial is going to be key to solving what random value the LED is in. Basically, I have a random function that generates a random value between the lowest and highest value of the potentiometer. Then we read the current value of the potentiometer which uses the function analogRead(). And finally we use a simple if else statement to check if the value is the same, and if so the LED will shine. I’ve added a buffer just so it’s not too difficult to guess.

Highlighted bit of Code I’m proud of:

Outside of the regular struggles with making the digital design, I struggled figuring it out why the random value wasn’t truly random. It was confusing as I assumed somehow it was reading the value of the potentiometer and using that variable as a constant. But that wasn’t the case, so I was a bit dumbfounded as the result variable in the code below isn’t tied to anything.

I did a bit of googling and found out that if I use the random function then it will give me a random number. But, it will repeat everytime, practically serving as a constant, and that wasn’t helpful everytime I would start the simulation. So apparently, you are supposed to add a seed to a code to make it unique and it must be on a unconnected pin as it picks up different static which determines the randomness. Really interesting honestly, but a pain to figure that quirk out.

randomSeed(analogRead(A0));
result = random(0, 1022);

Reflection

Overall I’m pleased with my tinkering for now. I feel like just making the digital design on tinkercad was an experience in itself but also trying to find some sort of creative spin for the LEDs. I think potentially I could add more to it, but I’m fine this being a simple game and hopefully as the weeks go, we can try out different things.

Full Code:

int inputPin = 0;
int outputPin = 2;
int result = 0;

void setup(){
  
  Serial.begin(9600);
  
  randomSeed(analogRead(A0));
  result = random(0, 1022);
  
  pinMode(outputPin, OUTPUT);
  
}
  
void loop(){
 
  int potentialVal = analogRead(0);
  Serial.println(potentialVal);
  Serial.println(result);

  if (potentialVal >= result - 20 && potentialVal <= result + 20){
    digitalWrite(outputPin, HIGH);
  }
  else{
  	digitalWrite(outputPin, LOW);
  }
  
}


Week 10 – Creative Reading Response

Physical Computing’s Greatest hits and misses

I really enjoyed going through the different themes of physical computing in this article. I felt that I got a lot of inspiration and ideas about possible project ideas, and the explanations provided for each concept really simplified how implementing this idea in practice would look like. Looking through these examples felt like when I would look through past student’s projects on this WordPress. And I’ve also felt that everytime I see an idea that’s been done, it feels like I can’t do that idea anymore either. However, as the author pointed it out, it’s always nice to re-imagine ideas in new contexts, think of new interactions, and as a lot of us did for our midterm projects, link it back to our identity and cultures.

Some themes especially stuck out to me from this article, and I hope to be able to implement them in some way in my work in the future. First, Floor Pads! I love it when a coding project goes way beyond the screen or the usual hardware of wires and buttons. Especially when something is more prominent and unusual, it definitely captures more attention. And something like Floor Pads where there’s movement and a lot of viewer interaction involved can be especially fun. Likewise, Body-as-cursor and Hand-as-cursor are two other themes that stuck out to me for similar reasons. Finally, Things You Yell At was another fun theme, and something I’ve seen a lot at previous IM Showcases. I feel like another common aspect among these themes is that there is no learning curve to understand how it works, you kind of just experiment with it till you get it, usually it’s pretty straightforward.

Making Interactive Art: Set the Stage, Then Shut Up and Listen

This article made some great points, throughout this class, we’ve spoken a lot about interactive art, what makes it interactive and how to guide users through these interactions. I really appreciated the points it made about allowing your viewers to experiment with the art, rather than force them into the interactions you’ve planned out, allowing them to discover it themselves can be more fun. As the author states, an important part of interactive art is to listen. I think it can be eye-opening to see how viewers look at your art. Especially as most artists spend hours and hours just looking at their work, editing every little detail, and creating everything from scratch, it can be hard to zoom out and see the bigger picture and experience the art through fresh eyes. Hence why it’s important to see how others interact with your work, take it as feedback, maybe just by watching how others interact, you can get new ideas and make edits to your work.

Arduino/Tinkercad (1)

Don’t Dim Your Light

Concept:
I wanted to work with LED lights and experiment with different objects to create a dimming effect. I was also inspired by lights and spotlights in general -ever since I was a kid but I also remember Professor Mang mentioning how lights work and function which made me think about it more because I always wondered the same thing too. For this project, I focused on creating a light setup that explores control and brightness through the use of a potentiometer (dial) and a push button. The user gets to decide when the light turns on and how bright it becomes. The idea connects back to choosing when to let your own light shine instead of dimming yourself for others.

Image: Link

Hand-drawn schematic:

How this was made:

Setup: I started off by putting my resistors and LEDs on the breadboard and choosing the amount and colors of each which I used one red LED and one green LED with 220Ω resistors for both so I could protect the current and flow. After the LEDs were set and connected to Pins 3 and 9 so I could control their brightness, I focused on connected the push buttons and connecting the potentiometer to A0 and the push button to Pin 4. I also watched this video a while ago when we were first introduced to Tinkercad which I found was actually helpful: Tinkercad Circuit Diagram.

Code: While I was doing that, I also focused on the code, which surprisingly was the easiest part. I learned how to use analogRead() to read the potentiometer values and understand the overall idea of how to use the kit. I found out that the potentiometer gives values from 0 to around 1023, but the LED brightness only goes from 0–255 which is why I divided the value by 4 so the brightness would match correctly. For the [INPUT_PULLUP] code, I looked at this example (https://www.tinkercad.com/things/gfxVutEZ1QQ-inputpullup-example), which helped me learn and understand how to use the push button with the code. It made things easier because I didn’t need an extra resistor for the button since the code uses the Arduino’s built-in pull-up resistor.

full code

// C++ code
//
void setup()
{
  pinMode(3, OUTPUT); //the button pin for Red LED
  pinMode(9, OUTPUT); //the button pin for Green LED
  pinMode(4, INPUT_PULLUP); //the pushbutton to make it easy to wire
}

void loop() //for when the button is pressed
{
  int dialValue = analogRead(A0); //to read the dial
  int brightness = dialValue /4; //make the green light match

  if(digitalRead(4) == LOW) {
  analogWrite(9,brightness); //light brightness -green
  analogWrite(3,brightness); //light brightness -red
  } else {
    digitalWrite(3, LOW); //button will be off if not pressed
    digitalWrite(9, LOW); //button will be off if not pressed
  }

  delay(10); //Wait for 10 millisecond(s)
}


The hardest part out of all this was definitely the schematic. For some reason as a visual person I found this so confusing. I think because I’m used to thinking first, during, and after, the schematic required me to think and “brain dump” during the process, which is something I don’t usually do which is why I referred back to some Zoom call recordings and Collin’s Lab: Schematics. I also used an image of “cheat codes” to help me with the symbols since they’re different from the actual circuit.

Overall, I did look at some research before experimenting by myself because its our first time doing this I didn’t want to mess anything up so I practiced, did some tutorials, looked over examples before I did my final work. I watched videos about each part I wanted to work with, like the buttons (Pushbutton Digital Input With Arduino in Tinkercad) and also the potentiometer (TinkerCad Potentiometer with LED).

Reflection:

Making the schematic was honestly the hardest part because it forced me to understand the circuit as a system instead of just colored wires connected together. At first I found it really confusing but I actually started to like writing schematics because they helped me understand Arduino better and made me understand my own project more clearly. For future improvements, I would like to make the LEDs react differently instead of both doing the same thing? so maybe one LED could fade in while a few others fade out, or I could add sound so the project feels more interactive and creates more of a sensory experience.

Reading Reflection Week 10: Reboot it and Mute it

Tom Igoe really presents some interesting messages surrounding about our own projects. Firstly, a core message of not being discouraged if an idea has “been done before”. I like a lot of his submissions that he showed off and how we require the limitations part of our projects (and also the feedback that Mang presents for us 😊). I can see this in this in light of my own work in content creation for YouTube.

Much of the time I struggle with determining an idea for a video, especially in the niche community that I’m in where most ideas have already been “made before”. But sometimes I like taking a different approach and look at an idea from a different prism. It helps me build on the ideas that the original creator has made, and of course providing credit, whilst injecting my own spin on the idea and creating a different product in the end. Our imagination isn’t a limitation, the critical thinking we don’t do is.

And his next message is around not interpreting our own work. Honestly, after visiting multiple art galleries and even being an usher for Abu Dhabi Art Exhibition 2025 for an Interactive Media artist, I can definitely agree with this.

For some context, I was a volunteer for the Abu Dhabi Art Exhibition 2025, held at the Manarat Al Saadiyat Gallery, with my task being to usher people to an exhibition hosted by reImagined Art. Now, even though the person there only gave me the responsibility to usher people, I also decided to talk to the guests about the artworks and give them a bit of background.

The artworks mainly revolved around the Ethirium blockchain and represented it in different forms (I’ll upload some pictures below 😉). And as guests were coming in, they were astounded by some artworks. I didn’t want to intrude into their experience of the artworks and wanted to give them time to sink in.

Later, some would come up to me and ask for me to explain to them what the artwork meant. I gave them a decent rundown but also was a bit ambivilous as most aren’t tech savy to know about blockchain (I mean they hear crypto or bitcoin and everyone goes “ahh”). Still I can say that they definitely felt astounded as to how something like a ledger for records can be art.

And I think with this, I let more so the guests the agency to interpret the work, rather than letting me being the post it note describing it in detail. So definitely we should be a bit ambivilous in what we say about our work and let others experience it. That in of itself is the crux of imagination, seeing our world from a different prism of thought.

Reading Response (week 10? originally for week 9)

Physical computing here is not really about using random sensors just because they look “cool” but TIGOE explains that physical computing allow us to create meaningful interactions. Just this idea of giving computers or devices a body to sense everything around and then be able to respond is fascinating, like the waving hand example where you can make music just from the movement of your hands, I wonder if I can try to create something like this using tinkercad. I honestly started thinking more about design and structure, specially focusing on how things were made and how important it is to design something where the action feels natural but at the same time connects to the purpose of the project.

I really liked reading about how artists do not need to explain everything to the audience because the creation and space should allow people experience it for themselves. This is also my favorite part about interactive media because it’s about feelings, experiences, perspective, and understanding. In my Understanding IM class I actually created a lot of different art projects related to specific modules which is why I love learning about IM through the artist perspective and the participants. At the same time while its better to just create the experience, I do tend to want to explain to people everything just because I really want them to understand, but even after my midterms I realize that there is no need for all that because sometimes the discovery is part of the experience.

Both readings connect a lot to working with Arduino and Tinkercad because they remind me that the goal is not just building a circuit that works, because I should look at the experience side of it. So when I use sensors, LEDs, buttons, or sounds, I always like asking myself why and how because this way I can remove myself from just being an artist and creator to the participant.

Week 9 – Reading Response

Her Code Got Humans On The Moon

This reading changed how I think about the Moon landing. I used to focus on rockets and hardware. The text shows software played a central role. At first, NASA did not even include software in the plan or budget. Later, engineers understood software controlled critical operations during the mission. What stood out most was Hamilton’s thinking about human error. NASA assumed astronauts would not make mistakes. Hamilton assumed the opposite. She designed systems to handle failure. During the Apollo 11 landing, the computer became overloaded and produced errors. Her software focused on the highest priority tasks and allowed the landing to continue.

This idea still applies to programming today. Systems must handle incorrect inputs and unexpected actions. At the same time, the reading focuses strongly on Hamilton. The project involved hundreds of engineers. Her role was critical, but the mission depended on teamwork.

Attractive Things Work Better

This reading made me think about how design affects behavior. The author explains that positive emotions improve thinking. People become more flexible and open to solutions. Negative emotions narrow attention and reduce creativity. I see this in daily use of apps and devices. When a design looks clean and organized, I spend more time using it. I feel more patient with small issues. The reading explains this effect. People tolerate minor problems when they feel comfortable. The teapot example shows how people choose based on context. Some designs look appealing but are less practical. People still use them depending on mood.

At the same time, the idea has limits. I think design must also focus on clarity. For example emergency tools use simple and direct layouts. Users need fast understanding, not only visual appeal. Both readings focus on human behavior. Hamilton accounts for human error in systems. Norman explains how emotion shapes interaction with design. Together, they show that good design must consider how people think and act.