
Yup, I was watching “Minions: Rise of Gru” over the weekend in order to find some inspiration for this week’s project, and I sure found the basis of my project when I watched this:

Concept
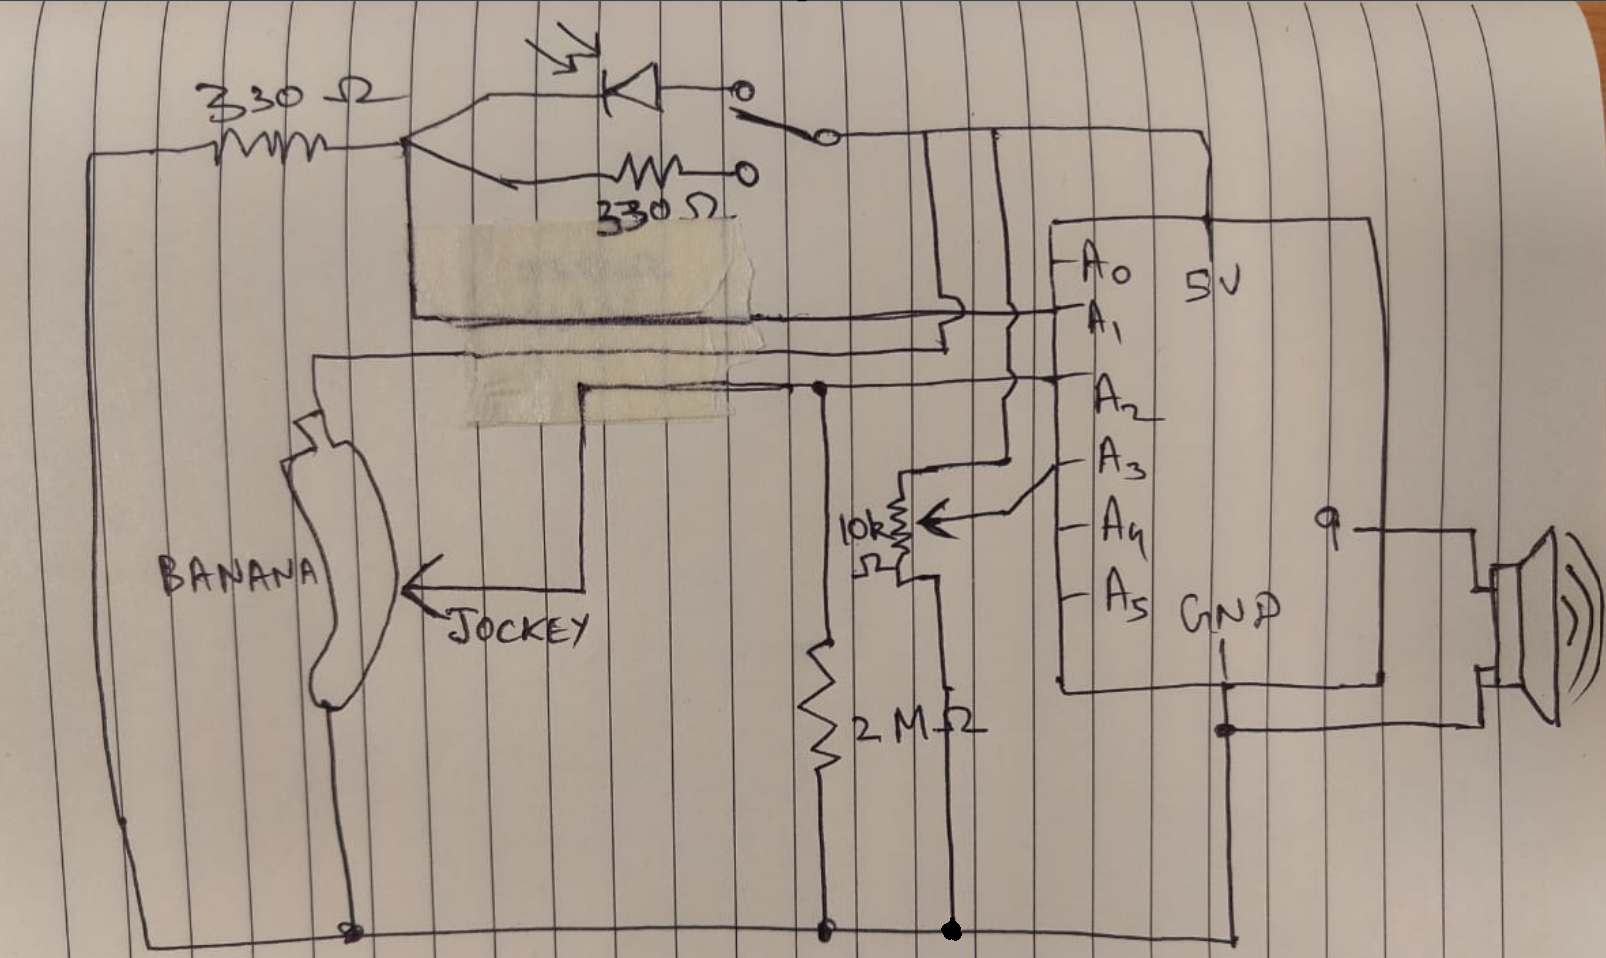
I decided on using a wheatstone bridge setup with two variable resistors (one photoresistor, and ‘the’ banana), and find the absolute difference between the two values and emit different sounds. I also decided to use a potentiometer to determine the pitch of the notes.
Apart from that, the user also has an option to not use the photoresistor at all by toggling the fixed 330 Ohm resistor in its place.
Material Required
- Arduino Board
- Jumper Wires
- Breadboard
- Potentiometer
- 10k Ohm Resistors
- 330 Ohm Resistors
- SEN-09088 Photocell
- Potentiometer
- Banana
Schematic
Demonstration Video
Code
This Arduino code reads the voltage difference between V1 and V2, maps it to a frequency for the speaker, and uses a potentiometer to shift the octave.
// Pin configuration
const int v1Pin = A1;       // V1 of Wheatstone bridge
const int v2Pin = A2;       // V2 of Wheatstone bridge
const int potPin = A3;      // Potentiometer for octave control
const int speakerPin = 9;   // Speaker pin

// Variables for calibration and tuning
float baseFrequency = 220.0;  // Base frequency in Hz for a low A note
float maxVoltageDifference = 5.0;  // Maximum expected voltage difference (adjust as necessary)
int maxOctaveShift = 7;       // Maximum number of octaves to shift

void setup() {
  Serial.begin(9600);
  pinMode(v1Pin, INPUT);
  pinMode(v2Pin, INPUT);
  pinMode(potPin, INPUT);
  pinMode(speakerPin, OUTPUT);
}

void loop() {
  // Read voltage difference across V1 and V2
  float v1 = analogRead(v1Pin) * (5.0 / 1023.0);
  float v2 = analogRead(v2Pin) * (5.0 / 1023.0);
  float voltageDifference = abs(v1 - v2);

  // Map voltage difference to a frequency
  float noteFrequency = map(voltageDifference * 100, 0, maxVoltageDifference * 100, baseFrequency, baseFrequency * 2);

  // Read potentiometer and map to octave shift
  int potValue = analogRead(potPin);
  int octaveShift = map(potValue, 0, 1023, 0, maxOctaveShift);

  // Apply octave shift to the frequency
  noteFrequency *= pow(2, octaveShift);

  // Output the frequency to the speaker
  tone(speakerPin, noteFrequency);

  // Debugging output
  Serial.print("Voltage Difference: ");
  Serial.print(voltageDifference);
  Serial.print(" V, Frequency: ");
  Serial.print(noteFrequency);
  Serial.println(" Hz");

  delay(50);  // Delay for bouncing error
}
Conclusion and Reflection
Constructing this banana-powered musical instrument was a fun and an instructive process combining artistic design with technological principles. By using a Wheatstone bridge, I was quite free to play around on how I wanted to shape my music instrument.
Challenges Faced
1. Stabilizing the Output:
One major challenge was stabilizing the audio output, as random values were being read when the pencil jockey wasn’t in contact with the banana. This caused unwanted noises and a “wobbling” effect. To overcome this, I decided that I needed a pulldown resistor (here I used 2 Mega Ohms) to avoid reading noise in the Analog Pin A2
2. Mapping Voltage to Frequency Accurately:
Mapping the voltage difference to frequencies that sound musical took some experimentation. Adjusting the base frequency and range, as well as the octave shift, required fine-tuning to achieve the desired range of notes without distorting the sound.