
Have you ever played the Google Chrome Dinosaur Game while waiting for your internet connection to be restored? It’s a simple game that can become addicting as you try to beat your high score. But what if you could take it to the next level by automating the game with an Arduino circuit?
Inspiration
I was inspired to automate the Chrome Dinosaur Game after seeing similar projects on YouTube and other online platforms. I was fascinated by the idea of using an Arduino circuit to control a physical object in response to the game. It was a great opportunity to practice my programming and electronics skills while having fun.
Concept
The concept of my project was to automate the game using a light sensor and a servo motor. The light sensor detects changes in pixel brightness on the screen when obstacles like cacti show up. When an obstacle is detected, the servo motor presses the spacebar key on the laptop to make the dinosaur jump over the obstacle. A push button was added to the circuit to start and stop the entire automation process. Additionally, I added a red LED to indicate the circuit is on and a blue LED to track the progress of the game.
Implementation
To implement my project, I used an Arduino Uno board, a light-dependent resistor (LDR) as my light sensor, a push button, a red LED, a blue LED, and a servo motor.
The push button provides input digitally to turn on or off the circuit. As soon as the circuit is turned on, the red led starts glowing. digitalWrite is used for this operation. The light sensor which is stuck to the laptop screen at an appropriate position to detect obstacles in the path of the chrome dinosaur game, starts reading light intensity values. As soon as an obstacle passes by the light sensor detects a value above (because my browser is in dark mode) the set threshold (which it ideally should be), it sends a signal to the servo to rotate a specific angle in order to hit press the spacebar. This causes the running dino to jump and cross over the obstacle. The blue light glows more brighter with each passing jump symbolising the progress through the game.
This is the code for the said implementation.
//Dinosaur Chrome Automation - Analog and Digital IO

//Include Servo Library
#include <Servo.h>

// initializing global variables
int servoPin = 9;
int pos1 = 40;
int pos2 = 110;
int dt = 100;
int count = 0;
int lightInt = 0;
int pushbuttonPin = 13;
int pushbuttonState = 0;
int redLED = 12;
int blueLED = 6;
int blueBr = 0;
int lSPin = A2;
int val;
int thres = 110;
int a;

bool switchONOFF = false;
bool flag = true;
bool switchFlag = true;

Servo myServo;

void setup()
{
  Serial.begin(9600);

  //  setting up servos
  myServo.attach(servoPin);
  myServo.write(pos2);

  //  setting pinModes
  pinMode(lSPin, INPUT);
  pinMode(pushbuttonPin, INPUT);
  pinMode(redLED, OUTPUT);
  pinMode(blueLED, OUTPUT);
}

//controls the movement of the servo
void spaceBarServo() {
  delay(dt );
  myServo.write(pos1);
  delay(dt);
  myServo.write(pos2);
  delay(dt);
}

void loop() {
  // checks for when the button is pressed
  pushbuttonState = digitalRead(pushbuttonPin);
  //  filters out only button clicks and removes button being continuously pressed
  if (pushbuttonState == 1 && switchFlag) {
    //    states of switch on or off
    if (count % 2 == 0) {
      switchONOFF = true;;
    }
    else {
      switchONOFF = false ;
    }
    count++;
    switchFlag = false;
  }
  else if (pushbuttonState == 0) {
    switchFlag = true;
  }

  if (switchONOFF == true)
  {
    //    denotes that the ciruit is ON and listening to obstacles
    digitalWrite(redLED, HIGH);

    //reads the light sensor value
    val = analogRead(lSPin);
    //    debugging output on screen
    Serial.println(val);
    //    checking for if the light sensor value crossed the threshold - denoting obstacle detected on screen
    if (val > thres and flag) {

      // incrementing the brightness of the blue led
      if (blueBr + 2 < 255) {
        blueBr += 2;
      }
      // calling the servo function to hit the spacebar
      spaceBarServo();
      // turning on the blue LED with the specific intensity
      analogWrite(blueLED , blueBr);
      //      flag is used to avoid multiple increments on one jump above the threshold
      flag = false;
    }
    else if (val < thres) {
      flag = true;
    }
  }
  else {
    //    resetting everything if the light is turned off
    blueBr = 0;
    analogWrite(blueLED , blueBr);
    digitalWrite(redLED, LOW);

  }

}
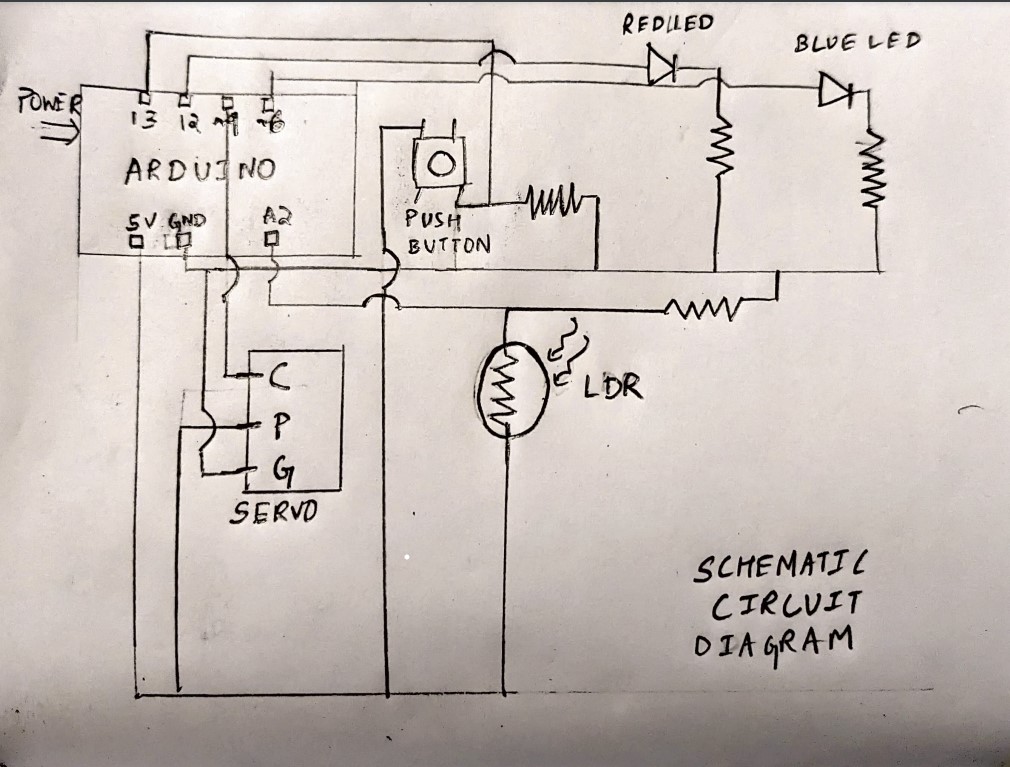
Schematic Diagram
Challenges
One of the biggest challenges I faced during this project was getting the light sensor to accurately detect the obstacles. I had to experiment with different threshold values to make sure the sensor was triggered at the right time. It took a lot of trial and error to adjust the sensor and threshold values to my ambient conditions. Switching off a light in the room caused some noticeable changes in its behavior.
Additionally, I had to ensure the servo motor was placed in the perfect place so that it was firmly pressing the spacebar key at the right time while making sure that it didn’t damage it.
A very weird challenge that I hadn’t ever expected to encounter was the inconvenience of working on the computer as soon as I struck the servo and the light sensor on my laptop. It took a lot of time to navigate around this but finally I was able to get the work done.
Reflections
This project was a great learning experience for me. I learned a lot about programming and electronics, and it was fun to see my circuit in action. I was also surprised at how well my circuit worked in the end. The thing that I would like to improve on would be to make cleaner circuits so as to prevent bugs in my future works.