
Concept of project:
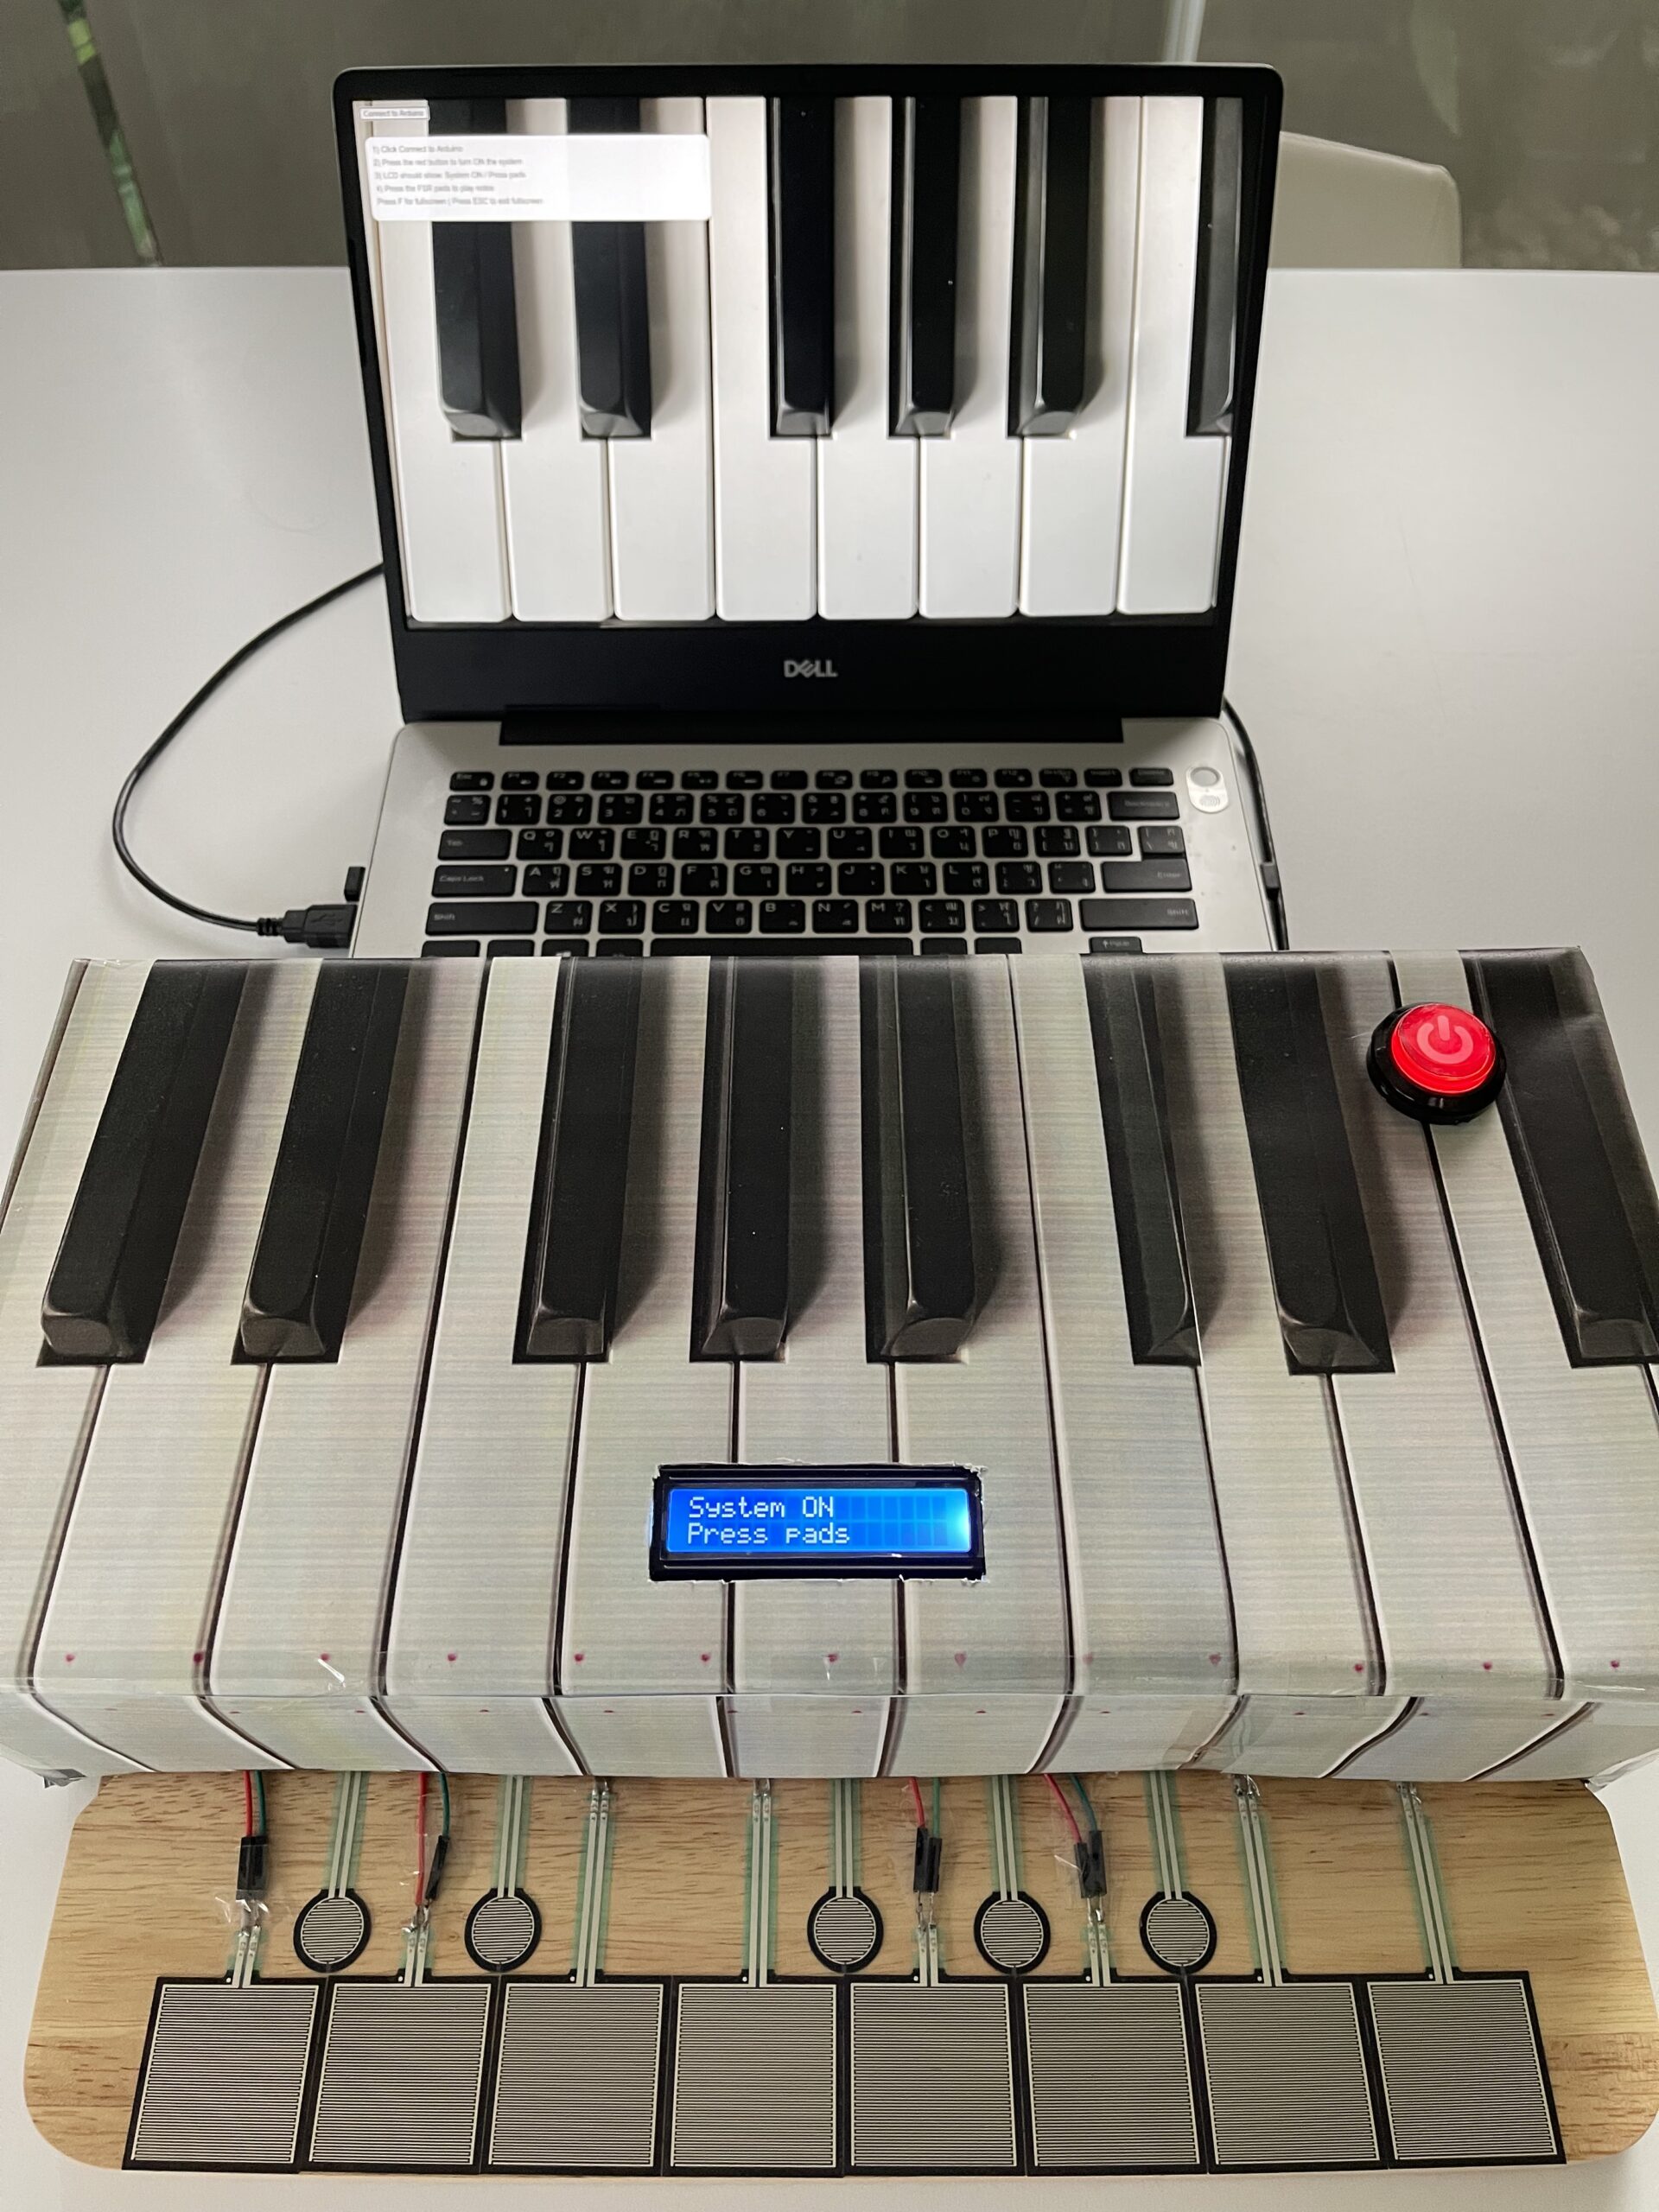
This project explores how physical pressure can be translated into sound and visual feedback through an interactive system. I created a simple piano-like device using force-sensitive resistors (FSR), where users can press pads to generate different notes while also seeing corresponding visuals on the screen.
Rather than using traditional keys, the system relies on pressure-based input, making the interaction feel more experimental and expressive. I also included an arcade button to control when the system starts, giving users a clear entry point before interacting with the instrument.
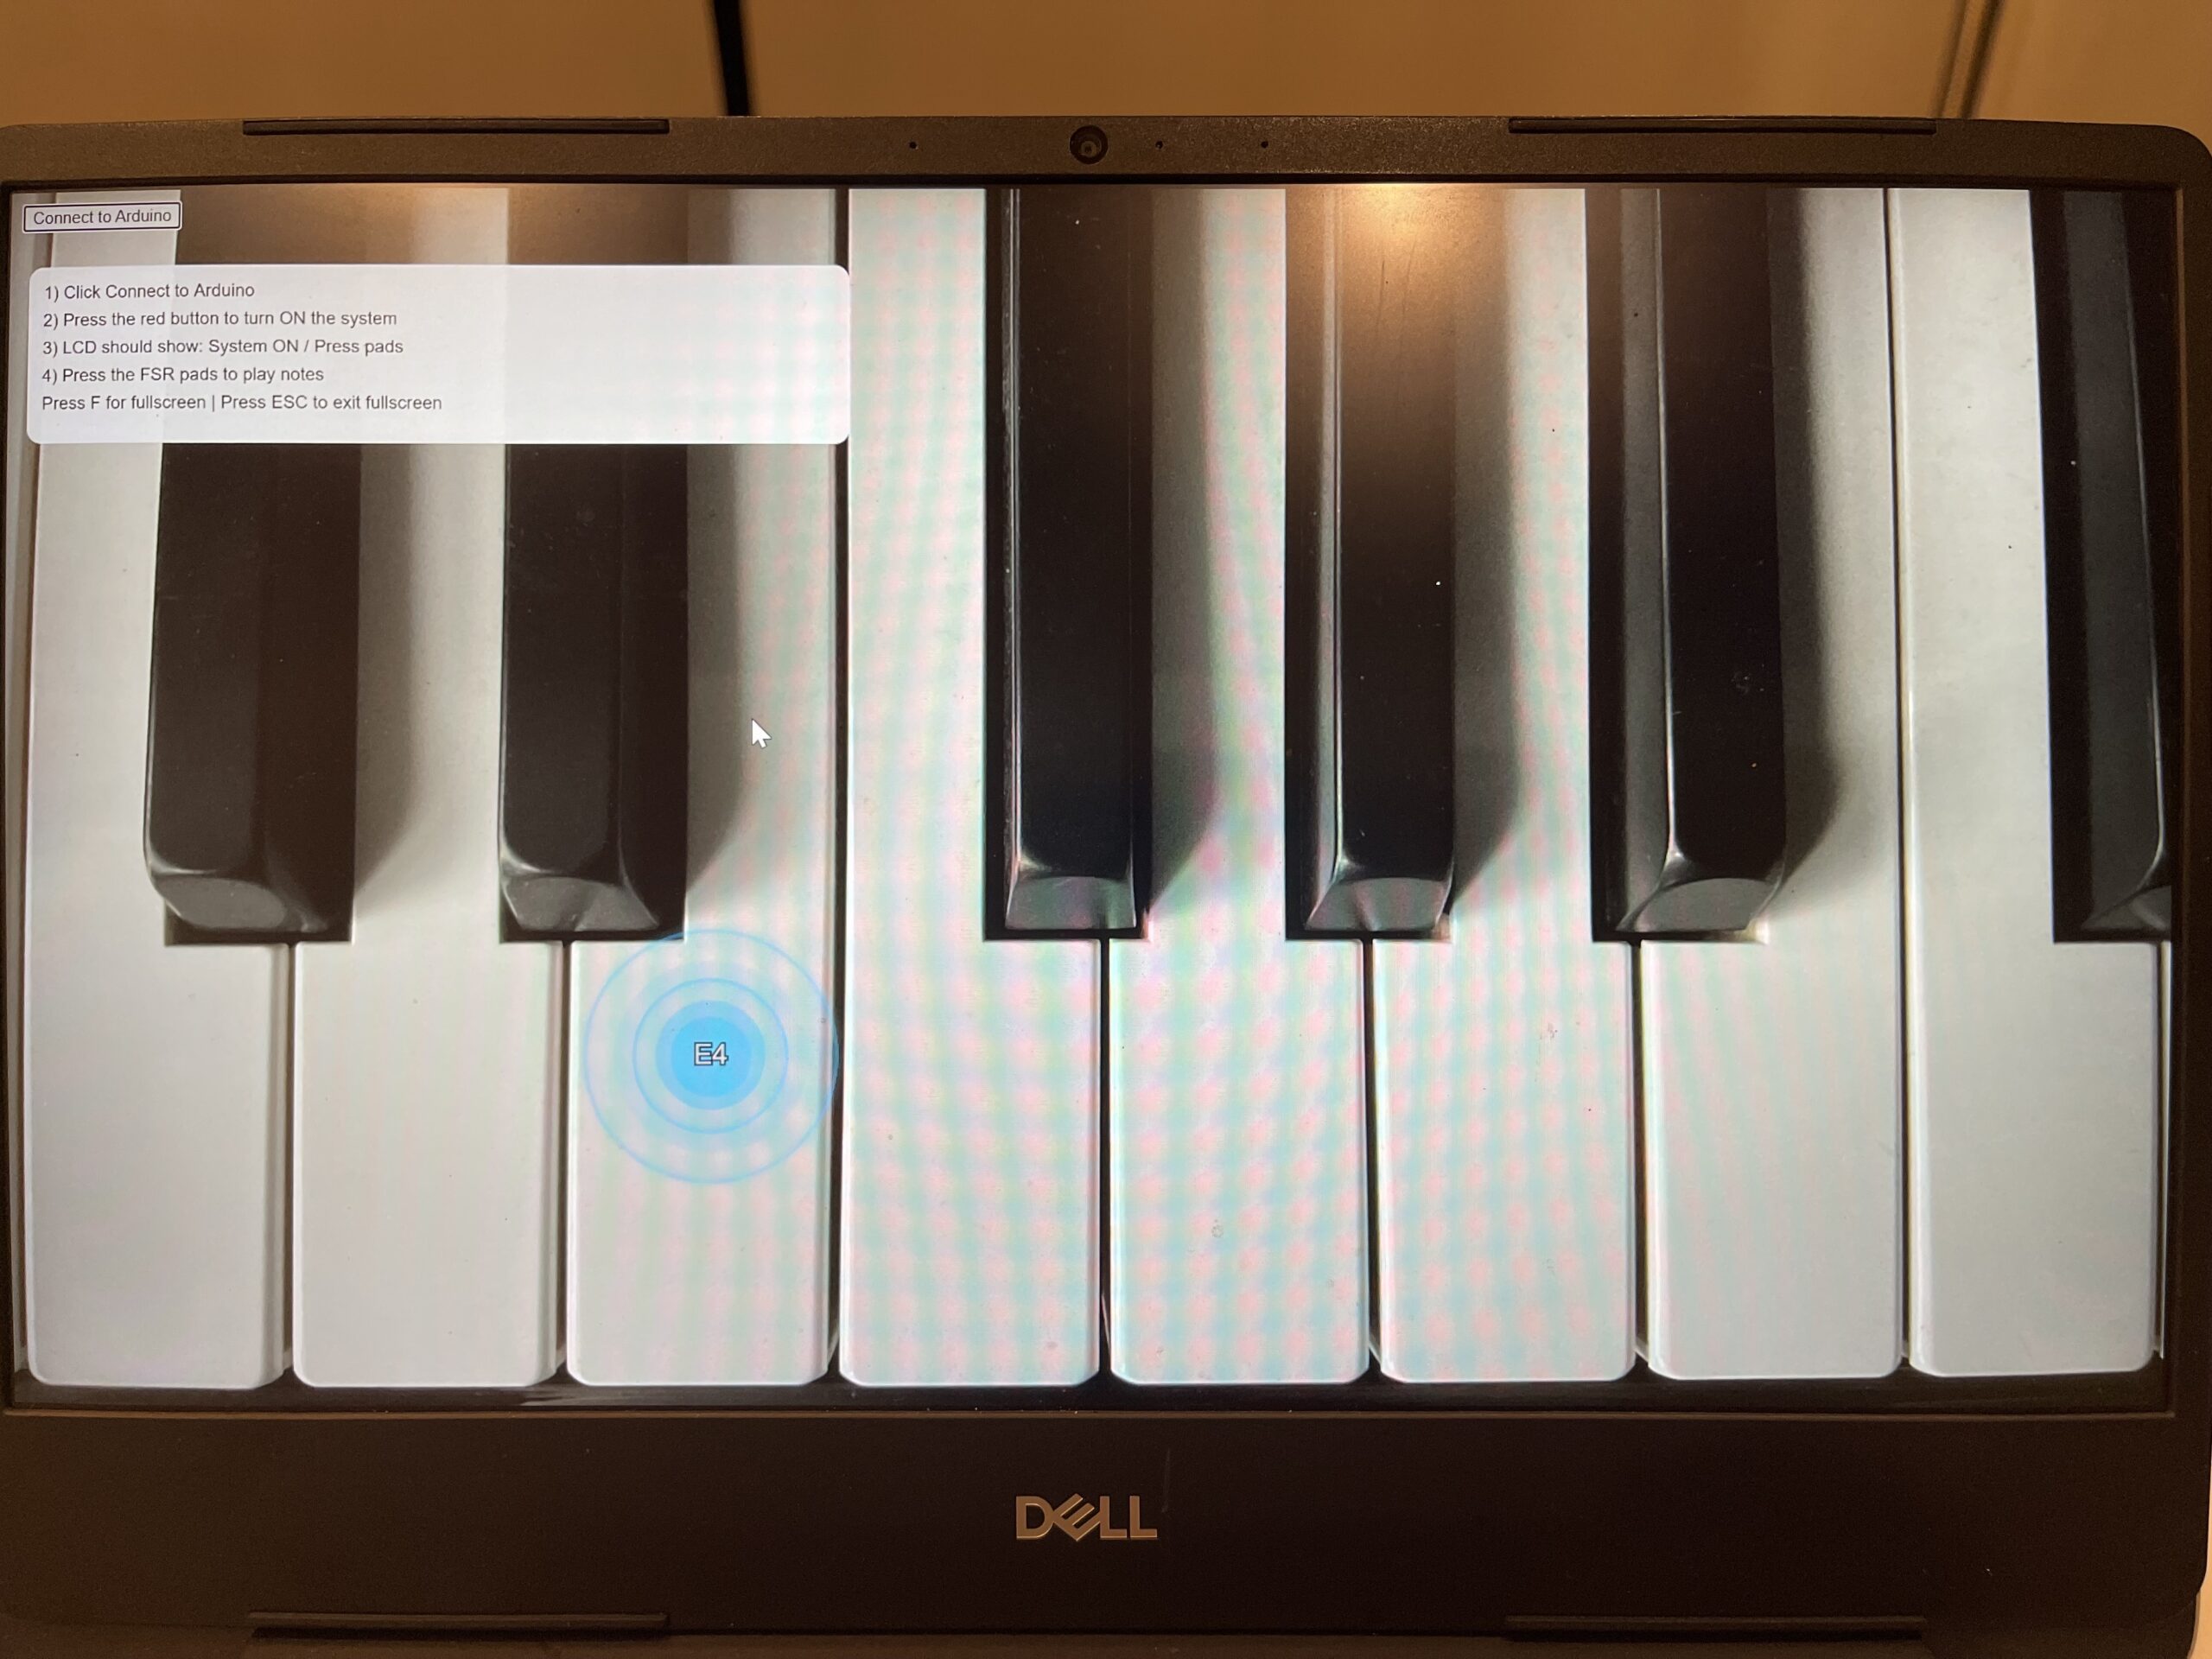
To connect the physical and digital aspects, I used p5.js to generate real-time visuals that respond to each input. When a pad is pressed, it triggers both sound and visual feedback simultaneously, creating a more engaging and responsive experience.
Overall, the project focuses on how simple physical input can be transformed into a combined audio-visual interaction that feels intuitive while still allowing room for exploration.
Pictures of Project:
https://youtu.be/PZ8KxiPyQQQ?si=CkNlTvbEHZVMZ3Hm
Schematic:

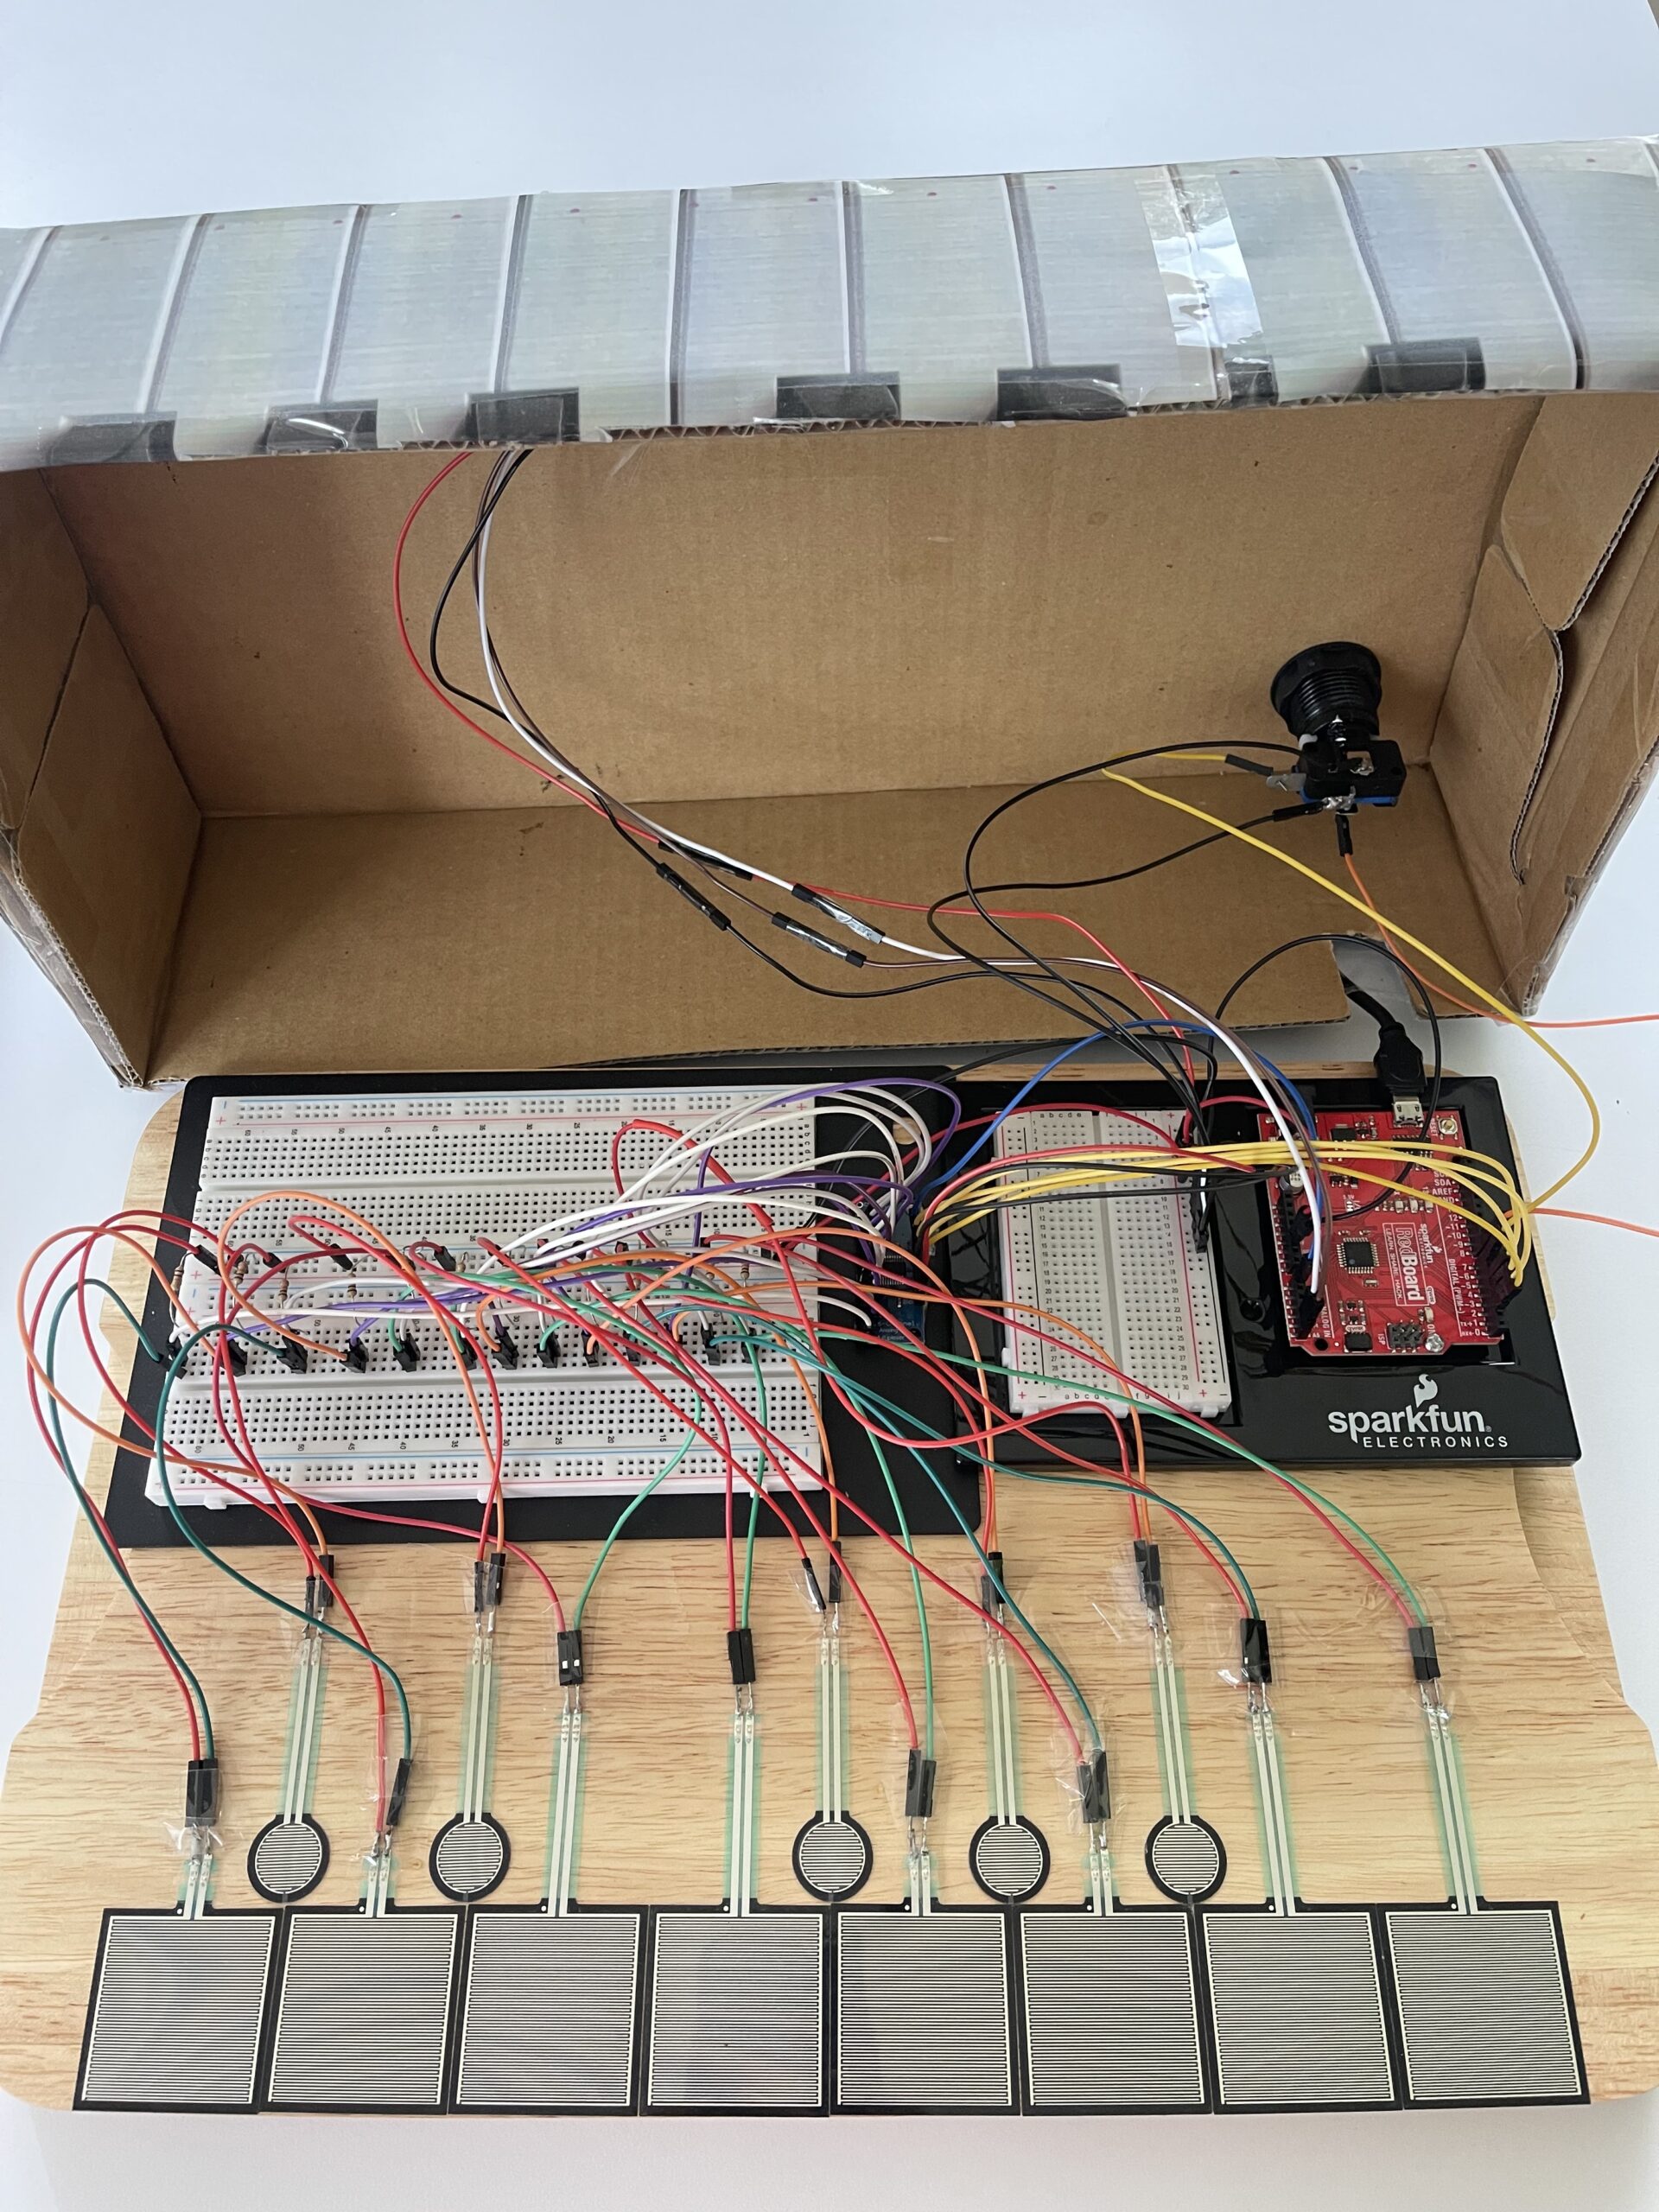
Wiring inside the cardboard box:
VDO of user testing(without giving any instruction):
https://youtu.be/GeI6QWZyzsk?si=tPqhPQI3fib59SSb
Interaction Design:
The interaction starts when the user presses the red arcade button. This turns the system ON, which is also shown on the LCD screen. The LCD then guides the user by displaying “Press pads”.
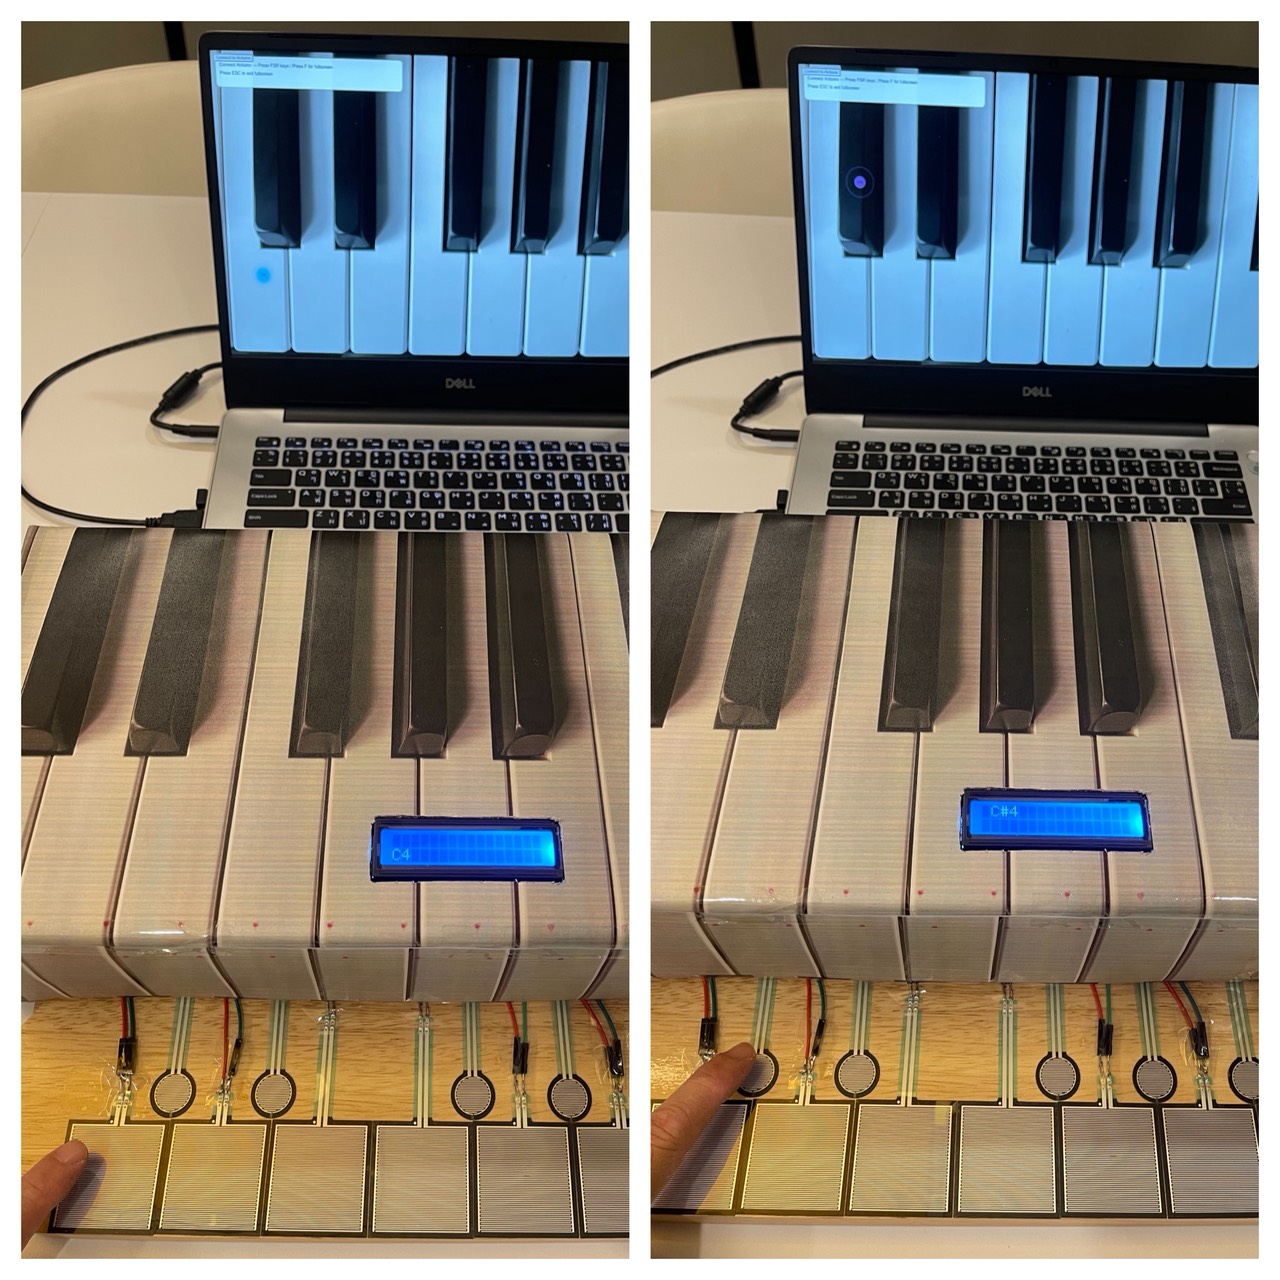
After that, the user can press any of the pressure sensors (FSR). Each sensor corresponds to a musical note (C4, D4, etc.). When a pad is pressed, the system sends the signal to p5.js, which plays a sound and shows a visual effect on the screen.
If no interaction happens for a few seconds, the system resets back to the default state, which helps new users understand what to do next.
Arduino code:
The Arduino is responsible for reading input from multiple FSR sensors using a CD74HC4067 multiplexer. This allows me to read many sensors using only one analog pin.
Each FSR is connected using a voltage divider with a resistor to produce stable analog values. The Arduino checks whether the value is above a threshold to determine if a pad is being pressed.
When a pad is pressed, the Arduino sends the index of the key through Serial communication to p5.js. It also receives note names back from p5.js and displays them on the I2C LCD screen.
The arcade button is used to control whether the system is ON or OFF, and the LED inside the button provides visual feedback.
Codes snippets:
(1) Multiplexer reading
// Select channel on multiplexer
digitalWrite(S0, bitRead(channel, 0));
digitalWrite(S1, bitRead(channel, 1));
digitalWrite(S2, bitRead(channel, 2));
digitalWrite(S3, bitRead(channel, 3));

int sensorValue = analogRead(SIG);
This part selects which FSR is being read through the multiplexer and reads its analog value.
(2) Threshold logic
if (sensorValue > threshold) {
  Serial.println(channel);
}
This checks if a pad is being pressed and sends the index to p5.js.
(3) LCD display
lcd.setCursor(0, 0);
lcd.print("System ON");
lcd.setCursor(0, 1);
lcd.print("Press pads");
The LCD provides instructions to guide the user.
Arduino and p5.js GitHub:
p5.js code:
The p5.js program receives data from Arduino using serial communication. When it receives a key index, it maps it to a specific note and plays the corresponding sound using an oscillator.
At the same time, a visual effect is generated at the position of the key. The visual consists of expanding circles with glow effects and fading animation.
I also added instructions on the screen to guide the user, especially for first-time interaction. The canvas is responsive and can switch to full screen mode for a better experience.
Codes snippets:
(1) Serial receive
let str = port.readUntil("\n");

if (str.length > 0) {
  let keyIndex = int(trim(str));
}
p5.js reads incoming data from Arduino.
(2) Trigger sound
osc.freq(note.freq);
env.triggerAttack(osc);
This plays the sound when a pad is pressed.
(3) Visual effect
balls.push({
  x: sx,
  y: sy,
  size: 28,
  alpha: 255
});
This creates the visual feedback on screen.
Communication between Arduino and p5.js:
The communication between Arduino and p5.js is done through Serial communication.
Arduino sends:
– Key index (0–12) when a pad is pressed
– -1 when the key is released
p5.js sends:
– The note name (e.g. C4, D#4) back to Arduino
This allows Arduino to display the correct note on the LCD screen while p5.js handles sound and visuals.
What I am proud of:
One part I am particularly proud of is how the physical and digital systems are connected together. The interaction feels responsive, and the combination of sound, visuals, and LCD feedback creates a complete experience.
I am also proud of the user guidance system using the LCD and on-screen instructions, which helps users understand what to do without needing verbal explanation.
Finally, I think the visual effects in p5.js improved the overall experience, making the interaction more engaging.
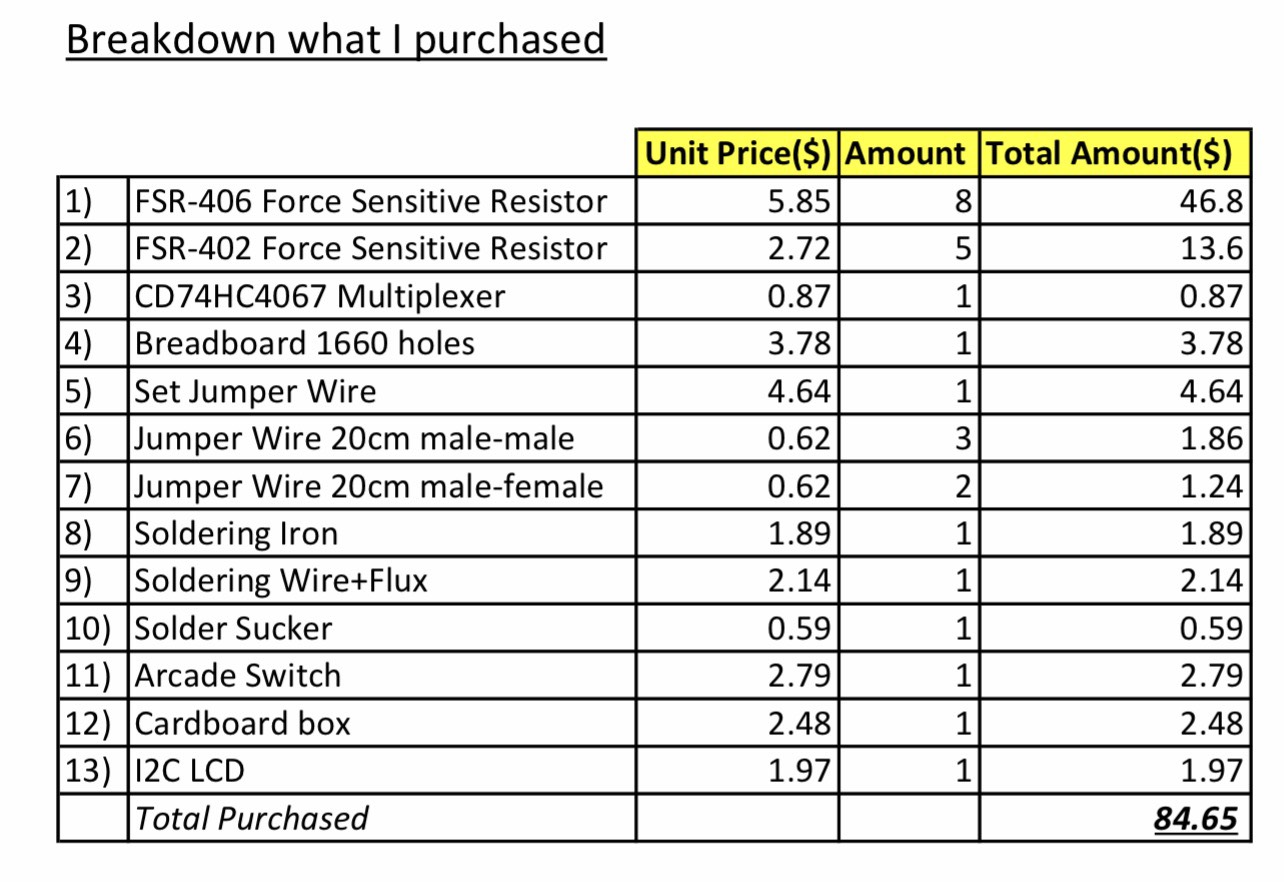
Breakdown cost:
Resources and References:
I used online resources such as YouTube tutorials to understand how to use the I2C LCD and arcade button wiring. I also referred to Arduino and p5.js documentation for serial communication and sound generation.
Some tutorials were used as references and then adapted to fit my project.
p5.js Sound Library (official reference)
https://p5js.org/reference/#/libraries/p5.sound
Basic FSR (Force Sensitive Resistor) guide
https://learn.adafruit.com/force-sensitive-resistor-fsr
Multiplexer(CD74HC4067)
https://learn.sparkfun.com/tutorials/multiplexer-breakout-hookup-guide
Multiplexer(CD74HC4067)
https://youtu.be/XAOo8DEbvck?si=oO7VKZ046IhJgHwh
Sounds
https://youtu.be/b_MMGJiUcbM?si=z7di2mc-pPGQBt1R
Triangle wave
https://kjh.ypj.mybluehost.me/glossary/triangular-wave/
I2C LCD
https://youtu.be/4o9VM7Nl9Os?si=hwz3Y6-QvSkRbGje
https://youtu.be/-jiHul1kQh4?si=WqZlRTMM3psv217o
https://youtube.com/watch?v=QIdERbxDVuM&feature=shared
Arcade button
https://youtu.be/Pkm8nRCSsIY?si=sFWSKIZpOXYXWQXT
AI assisting:
AI tools were used mainly to assist with debugging and improving code structure, especially for serial communication between Arduino and p5.js.
However, the overall design, concept, wiring, and implementation decisions were developed and tested by myself. I also modified and adapted any suggestions to fit my own project requirements.
Challenges:
One challenge was reading multiple FSR sensors reliably. Using a multiplexer required careful wiring and debugging to ensure each channel worked correctly.
Another challenge was the communication between Arduino and p5.js. At first, the data was inconsistent, but after adjusting the threshold and improving the logic, it became stable.
I also faced challenges in user experience, since users were initially confused about what to do. This led me to add instructions on the LCD and on the screen.
Future Improvements:
In the future, I would improve the design of the pads to be closer in size and spacing to a real piano keyboard, since some users mentioned that the pads felt too large.
I would also improve the visual system by making it more noticeable or adding more variation, so users might pay more attention to the screen.
Additional future improvement would focus on the hardware setup. The current prototype uses many exposed wires and breadboards, which can be messy and less stable. In the future, I would organize the wiring more cleanly and integrate the components into a more compact and durable enclosure.
Another improvement would be making the system wireless or more compact, instead of relying on a wired connection to a laptop.