
Concept
The “Air Piano” is a musical instrument controlled using the distance from a sensor. I have always been fascinated by the distance sensors, using reflection of sound waves to calculate the distance of an object. I used the the HC-S04 sensor to detect the distance in this work as input for the instrument. I was inspired by the tone knob in electrical guitars which was discussed in class so I integrated it into my work. A potentiometer serves as my tone knob and its input is used to switch among 3 sound modes: Piano mode, Sci-Fi mode and Bass Mode. There are also different colored LEDS to show the user which mode is on. Red – Piano, Green – SciFi and Blue – Bass mode. The mode determines the scale of frequency produced by the buzzer. The coding behind this project was to map the distance of an object from the sensor to a value from 0 to 7 (8 values) and these values each correspond to a specific note.
Sketch
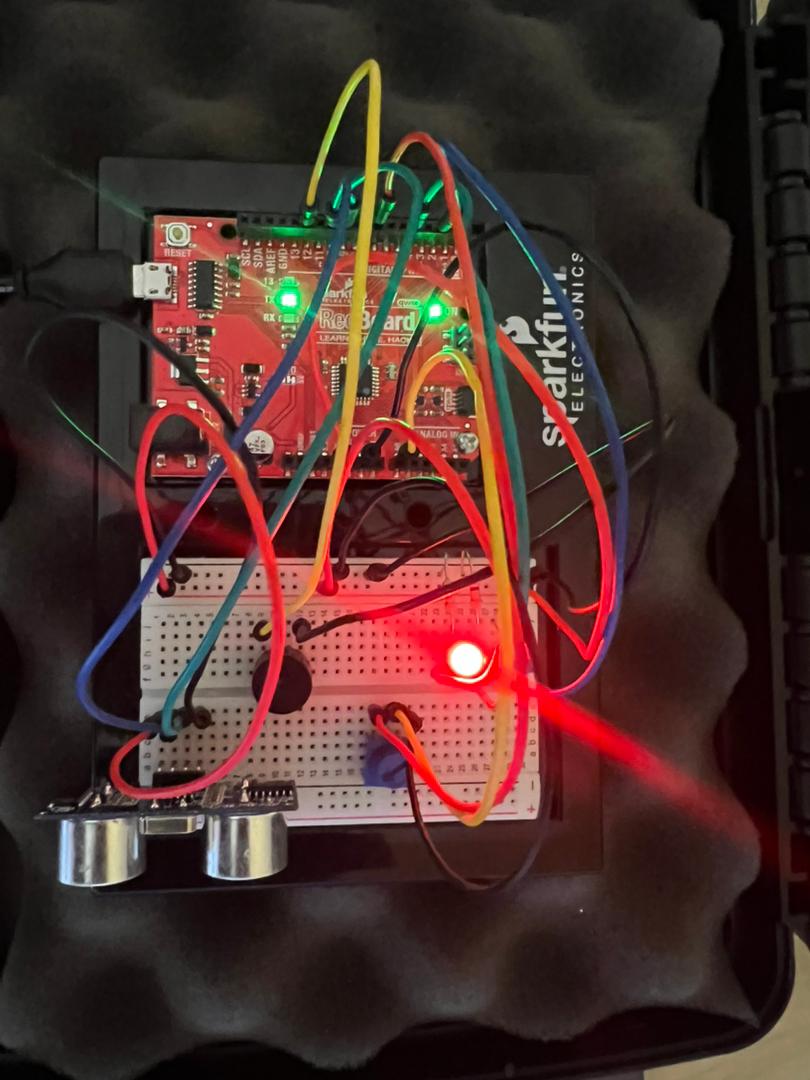
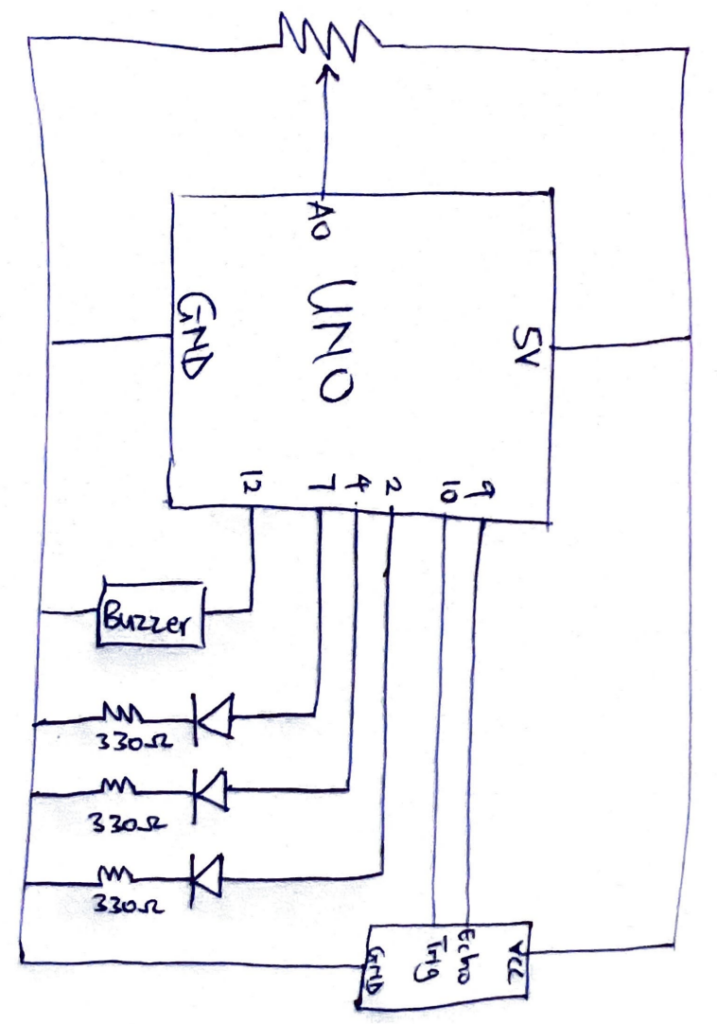 Image
Image

Code
// A0 - Potentiometer
// 2 - Blue
// 4 - Green
// 7 - Red
// 12 - Buzzer

const int trigPin = 10;
const int echoPin = 9;

// Mode 1 - Piano Scale
int mode1[8] = {262, 294, 330, 349, 392, 440, 494, 523};

// Mode 2 - Sci-Fi
int mode2[8] = {600, 750, 900, 1100, 1400, 1800, 2300, 3000};

// Mode 3 - Higher Bass / Bright Low Mode
int mode3[8] = {350, 420, 500, 600, 720, 850, 1000, 1200};

float duration;
int distance;

void setup() {
  pinMode(trigPin, OUTPUT);
  pinMode(echoPin, INPUT);
  pinMode(2, OUTPUT);
  pinMode(4, OUTPUT);
  pinMode(7, OUTPUT);
  pinMode(12, OUTPUT);

  Serial.begin(9600);
  digitalWrite(2, HIGH);
  digitalWrite(4, HIGH);
  digitalWrite(7, HIGH);
  delay(1000);

  digitalWrite(2, LOW);
  digitalWrite(4, LOW);
  digitalWrite(7, LOW);
}

void loop() {
  digitalWrite(trigPin, LOW);
  delayMicroseconds(2);
  digitalWrite(trigPin, HIGH);
  delayMicroseconds(10);
  digitalWrite(trigPin, LOW);
  int mode;

  int pm = analogRead(A0);

  duration = pulseIn(echoPin, HIGH);
  distance = (duration*0.0343)/2;

  Serial.print("Distance: ");
  Serial.println(distance);
  delay(100);

  if (pm >= 700) {
    mode = 0;
    digitalWrite(7, HIGH);
    digitalWrite(2, LOW);
    digitalWrite(4, LOW);
  } else if (pm >= 350) {
    mode = 1;
    digitalWrite(4, HIGH);
    digitalWrite(7, LOW);
    digitalWrite(2, LOW);
  } else {
    mode = 2;
    digitalWrite(2, HIGH);
    digitalWrite(4, LOW);
    digitalWrite(7, LOW);
  }

  if (distance >= 0 && distance <= 40) {

    int noteIndex = map(distance, 0, 40, 0, 7);
    int freq;

    if (mode == 0) freq = mode1[noteIndex];
    if (mode == 1) freq = mode2[noteIndex];
    if (mode == 2) freq = mode3[noteIndex];

    tone(12, freq);
  }
  else {
    noTone(12);
  }

  //delay(50);
}
How it was made
This work was made by first drawing the sketch of the circuit. The inputs are the resistance value of the potentiometer and the distance from the distance sensor. I had to watch a video and use the ardruino website to figure out how to configure the distance sensor. The output of the circuit are 3 LEDs and a buzzer. The LEDs where connected to digital pins, a resistor and ground. The buzzer was connected to a digital pin and ground. In the coding of the instrument, I used ChatGPT to generate an array of frequencies corresponding to the modes. I connected all the wires and components according to the sketch.
Reflection
Being someone with no knowledge in music, I thought this work will be very difficult for me but after I figured out the input and output of the program, it went quite smoothly. To improve the project, a more sensitive distance sensor can be used to improve the readings of the sensor and more modes with different frequencies can be added to create more musical effects.