My Concept:
In this assignment, I attempted to make a self-portrait using only 2D shapes such as circles, rectangles, lines, and arcs. To start, before beginning the assignment or the course itself, I had little to no knowledge of coding, so this was definitely something outside of my comfort zone and a bit challenging. I mainly wanted the portrait to be an almost realistic vision of what I usually look like, so that was what I went for for the portrait. With that being said, I “styled” certain features with a lot of attention to small details that I think I could’ve gone without (which was time-consuming for me, but I thought the portrait wouldn’t be realistic enough without them). I kept the portrait basic with only the face and shoulders showing, and nothing in the background.
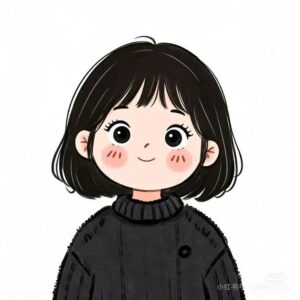
Here is the finished result:
The Process:
The first thing I started with was the face. This was probably the easiest task I did for the portrait; I just inserted an ellipse and changed its color using the RGB hex.
I then moved on to the eyes. I was using a series of arcs to create the round shape I wanted. It was difficult at first since I was dealing with radians, and I noticed the unit circle in p5 is actually in reverse. I kind of gave up midway through with it and switched over to degrees, which was easier for me. But I realized I can’t always rely on degrees, so I switched back to radians, got the hang of it, and the second (right) eye became much easier to make. I added my usual glasses and gave myself some eyebrows as well.
The nose was particularly interesting to make. I initially made the little bulb (circle) of the nose in the center and built everything else around it. I put in the lines of the nose bridge, the surrounding area near the nostrils using arcs, and finally the nostrils themselves. Since the nostrils I could draw were small, I opted for points rather than an arc, since their sketch would be small. I chose this specific structure of the nose to make the sketch as realistic as possible instead of drawing a few lines or a triangle on the side.
The real challenge for me was drawing the lips and hair.
The lips: Since I was going for a realistic look, I faced a challenge building the upper lip. For reference, I always begin on the left side of the face for all my features. The first thing I did was draw a straight line that led to almost the center of the face, then I created a small arc connected to it in order to resemble a cupid’s bow. The real challenge was recreating this on the right side of the face with the correct dimensions. It was a huge trial-and-error process, where I constantly adjusted the x and y coordinates to recreate the arc’s dimensions as it connected to the line. Once I figured it out, I added a large arc to seal off the upper lip, and I added another larger arc at the bottom for the bottom lip.
The hair: I realize now that there could have definitely been an easier way to draw the hair, but I started it off on a challenging note. I decided to draw singular curls using arcs and just alternating the arcs and their patterns on the whole head. That was unfortunately extremely time-consuming, and I could’ve gone on an easier path. That’s when I realized I could use large circles, put them around the head, and fill them. This made the process much quicker.
Code Highlight:
I am particularly proud of the way the lips turned out as I managed to recreate the same angles and dimensions on both the right and left side of the mouth.
//lips
  //upper lip

  line(175, 240, 192, 235);
  arc(193, 236, 10, 2, -PI, 0);
  arc(203, 236, 10, 2, -PI, 0);
  line(205, 235, 222, 240);

  arc(198.6, 240, 47, 12, 0, PI);

  //lower lip
  arc(198.7, 241, 47, 30, 0, PI);
Reflection:
It was pretty fun to experiment with code, as I had minimal experience with coding before this. There are definitely things I did that made the task much harder when there was a much simpler alternative (such as using circles for the hair, or I could have just built the mouth using 2 arcs).
Overall, I am pretty satisfied with the outcome, especially considering the trial-and-error and effort it took. If there’s one thing I would take away from this assignment, it is to always look for a simpler, less time-consuming way to do things. In the future, I would like to be able to add some interactive element to my work, or even make it more abstract, to get out of my comfort zone and create something different than what I would usually create.
Here is the final code:
function setup() {
  createCanvas(400, 400);
}

function draw() {
  background(180, 130, 190);

  print(mouseX, mouseY);

  //neck
  stroke(0, 0, 0);
  strokeWeight(1);
  fill(241, 223, 210);
  rect(155, 288, 90, 66);

  //shirt
  //actual shirt
  fill('rgb(210,5,5)');
  stroke(218, 13, 13);
  rect(20, 350, 360, 70, 30, 30, 30, 30);
   //collar
  fill(218, 13, 13);
  stroke('rgb(185,6,6)');
  strokeWeight(20);
  arc(200, 344, 90, 10, 0, PI);
  //collar lines
  stroke('rgb(164,7,7)');
  strokeWeight(1);
  line(200, 340, 200, 359);
  line(208, 340, 208, 357);
  line(216, 339, 216, 359);
  line(223, 339, 224, 357);
  line(229, 339, 230, 355);
  line(234, 339, 238, 355);
  line(240, 337, 243, 353);
  line(244, 336, 250, 353);
  line(247, 335, 253, 349);
  line(249, 335, 255, 342);
  line(191, 339, 191, 358);
  line(184, 339, 183, 358);
  line(175, 339, 175, 357);
  line(168, 338, 166, 356);
  line(161, 337, 159, 351);
  //face and skin
  stroke(1);
  strokeWeight(1);
  fill('rgb(241,223,210)');
  ellipse(200, 180, 200, 240);


// left eyes successful radians attempt 1
  fill('white');
  arc(150, 150, 50, 30, -HALF_PI, 0);
  arc(150, 150, 50, 30, -PI, -HALF_PI);
  arc(150, 150, 50, 30, 0, PI);

  //left eye color
  fill(140, 155, 100);
  circle(150, 150, 25);
   fill('black');
  circle(150, 150, 15);


// right eyes successful radians attempt
  fill('white');
  arc(250, 150, 50, 30, -PI, 0);
  arc(250, 150, 50, 30, 0, PI);

  //right eye color
  fill(140, 155, 100);
  circle(250, 150, 25);
   fill('black');
  circle(250, 150, 15);


  // eyes attempt radians
    //left eyes shape

  //fill('white');
  //arc(150, 150, 50, 30, 0, 2);

  //left eyes shape degrees
  //angleMode (DEGREES);
  //fill('white');
  //arc(150, 150, 50, 30, -90, 0);
  //arc(150, 150, 50, 30, -180, -90);
  //arc(150, 150, 50, 30, 0, 90);
  //arc(150, 150, 50, 30, 90, 180);

  //left eye color
  //fill(140, 155, 100);
  //circle(150, 150, 25);

  //right eye shape
  //angleMode (DEGREES);
  //fill('white');
  //arc(250, 150, 50, 30, -90, 0);
  //arc(250, 150, 50, 30, -180, -90);
  //arc(250, 150, 50, 30, 0, 90);
  //arc(250, 150, 50, 30, 90, 180);

  //right eye color
  //fill(140, 155, 100);
  //circle(250, 150, 25);

//nose
  stroke('rgb(72,54,24)');
  strokeWeight(1);
  noFill();
  circle(200, 210, 17);
  arc(195, 217, 12, 6, HALF_PI, PI);
  arc(205, 217, 12, 6, 0, HALF_PI);

  line(195, 198, 192, 166);
  line(205, 198, 208, 166);

 //nostril left
  strokeWeight(1);
  arc(193, 217, 4, 2, HALF_PI, PI);
  arc(188,207, 6, 16, HALF_PI, PI + HALF_PI);

 //nostril right
  arc(207, 217, 4, 2, 0, HALF_PI);
  arc(212, 207, 6, 16, -HALF_PI, HALF_PI);

//lips
  //upper lip

  line(175, 240, 192, 235);
  arc(193, 236, 10, 2, -PI, 0);
  arc(203, 236, 10, 2, -PI, 0);
  line(205, 235, 222, 240);

  arc(198.6, 240, 47, 12, 0, PI);

  //lower lip
  arc(198.7, 241, 47, 30, 0, PI);

//eyebrows
  //left eyebrow
  fill('rgb(96,37,37)');
  noStroke();
  rect(132, 120, 42, 6, 0, 3, 0, 0);
  triangle(132, 120, 132, 126, 126, 126);

  //right eyebrow
  rect(226, 120, 42, 6, 3, 0, 0, 0);
  triangle(268, 120, 268, 126, 274, 126);

//eyelashes
  //left eye
  stroke(1);
  line(127, 144, 120, 138);
  line(128, 141,123, 133);
  line(130, 140, 128, 132);
  line(137, 136, 135, 130);
  line(144, 136, 142, 129);
  line(148, 134, 150, 128);
  line(155, 134, 156, 127);
  line(158, 136, 162, 128);
  line(162, 137, 168, 126);
  line(167, 139, 171, 130);
  line(170, 140, 176, 134);

  //right eye
  line(227, 143, 223, 137);
  line(230, 140, 226, 133);
  line(232, 139, 230, 130);
  line(235, 137, 234, 128);
  line(239, 136, 238, 128);
  line(242, 136, 242, 127);
  line(246, 134, 247, 127);
  line(251, 134, 252, 127);
  line(256, 134, 257, 127);
  line(259, 136, 263, 128);
  line(263, 136, 267, 129);
  line(266, 137, 272, 130);
  line(268, 140, 274, 134);
  line(271, 142, 277, 137);

//glasses
  noFill();
  strokeWeight(2.7);
  //left lens
  rect(119, 124, 60, 47, 5, 10, 10, 10);
  //right lens
  rect(221, 124, 60, 47, 10, 5, 10, 10);
  //bridge
  rect(179, 139, 42, 1);


//hair
  fill(96, 37, 37);
  stroke('rgb(96,37,37)');
  strokeWeight(5);
  // arc(199, 77, 60, 10, PI + HALF_PI, HALF_PI);
  // arc(199, 90, 67, 17, PI + HALF_PI, HALF_PI);
  // arc(200, 65, 60, 10, PI + HALF_PI, HALF_PI);
  // arc(200, 78, 67, 17, PI + HALF_PI, HALF_PI);
  arc(240, 70, 69, 19, PI + HALF_PI, HALF_PI);
  arc(262, 88, 69, 19, HALF_PI, PI + HALF_PI);
  arc(240, 109, 69, 19, PI + HALF_PI, HALF_PI);
  arc(262, 109, 69, 19, HALF_PI, PI + HALF_PI);
  arc(227, 65, 60, 10, PI + HALF_PI, HALF_PI);
  arc(227, 95, 67, 17, PI + HALF_PI, HALF_PI);
  arc(243, 72, 60, 10, PI + HALF_PI, HALF_PI);
  arc(229, 70, 67, 17, PI + HALF_PI, HALF_PI);
  arc(290, 102, 60, 20, PI + HALF_PI, HALF_PI);
  arc(247, 81, 67, 17, PI + HALF_PI, HALF_PI);
  arc(290, 84, 60, 20, PI + HALF_PI, HALF_PI);
  arc(276, 91, 67, 17, PI + HALF_PI, HALF_PI);
  arc(278, 114, 60, 25, PI + HALF_PI, HALF_PI);
  arc(260, 95, 67, 17, PI + HALF_PI, HALF_PI);
  arc(267, 67, 60, 10, PI + HALF_PI, HALF_PI);
  arc(279, 69, 67, 17, PI + HALF_PI, HALF_PI);
  arc(272, 113, 60, 10, PI + HALF_PI, HALF_PI);
  arc(284, 126, 67, 17, PI + HALF_PI, HALF_PI);
  // arc(288, 130, 69, 19, HALF_PI, PI + HALF_PI);
  arc(286, 149, 69, 19, PI + HALF_PI, HALF_PI);
  // arc(291, 147, 69, 19, HALF_PI, PI + HALF_PI);   arc(287, 146, 69, 19, HALF_PI, PI + HALF_PI);
  arc(290, 169, 69, 19, PI + HALF_PI, HALF_PI);
  arc(311, 186, 69, 19, HALF_PI, PI + HALF_PI);
  arc(287, 202, 69, 19, PI + HALF_PI, HALF_PI);
  arc(312, 219, 69, 19, HALF_PI, PI + HALF_PI);
  arc(282, 236, 69, 19, PI + HALF_PI, HALF_PI);
  arc(307, 253, 69, 19, HALF_PI, PI + HALF_PI);
  arc(277, 270, 69, 19, PI + HALF_PI, HALF_PI);
  // hair second part copy paste
  arc(303, 183, 69, 19, PI + HALF_PI, HALF_PI);
  arc(320, 203, 69, 19, HALF_PI, PI + HALF_PI);
  arc(288, 168, 69, 19, PI + HALF_PI, HALF_PI);
  arc(307, 253, 69, 19, HALF_PI, PI + HALF_PI);

  //circle hair
  circle(260, 109, 27);
  circle(290, 142, 27);
  circle(307, 136, 27);
  circle(274, 88, 27);
  circle(306, 93, 27);
  circle(308, 112, 27);
  circle(263, 67, 27);
  circle(244, 67, 27);
  circle(283, 65, 27);
  circle(302, 182, 27);
  circle(304, 164, 27);
  circle(318, 159, 27);
  circle(313, 133, 27);
  circle(319,109, 29);
  circle(311, 76, 32);
  circle(314,88, 32);
  circle(322, 124, 27);
  circle(325, 97, 27);
  circle(322, 141, 27);
  circle(328, 156, 27);
  circle(332, 141, 27);
  circle(332, 114, 27);
  circle(333, 168, 27);
  circle(335, 187, 27);
  circle(328, 203, 27);
  circle(320, 222, 60);
  circle(322, 242, 60);
  circle(271, 127, 27);
  circle(286, 161, 27);
  circle(211, 65, 20);
  circle(222, 61, 20);
  circle(287, 195, 20);
  circle(285, 205, 20);
  circle(281, 232, 20);
  circle(328, 266, 27);
  circle(339, 272, 27);
  circle(336, 285, 30);
  circle(338, 308, 30);
  circle(340, 326, 30);
  circle(310, 290, 60);
  circle(285, 249, 30);
  circle(283, 267, 27);
  circle(286, 295, 27);
  circle(329, 150, 60);
  circle(343, 183, 60);
  circle(343, 217, 50);
  circle(347, 248, 40);
  circle(354, 270, 50);
  circle(361,232, 40);
  circle(358, 207, 40);
  circle(354, 295, 50);
  circle(351, 316, 40);
  circle(350, 330, 50);
  circle(314, 344, 50);
  circle(286, 325, 50);
  circle(272, 292, 35);
  circle(271, 261, 25);
  circle(223, 77, 27);
  circle(283, 79, 20);
  circle(270, 104, 20);
  circle(224, 91, 20);
  circle(194, 58, 20);
  circle(168, 78, 40);
  circle(177, 56, 20);
  circle(189, 70, 15);
  circle(143, 87, 30);
  circle(124, 101, 30);
  circle(108, 118, 30);
  circle(98, 136, 30);
  circle(107, 136, 30);
  circle(97, 154, 30);
  circle(93, 164, 30);
  circle(98, 178, 30);
  circle(95, 192, 30);
  circle(96, 208, 30);
  circle(105, 185, 30);
  circle(103, 160, 30);
  circle(106, 209, 30);
  circle(104, 225, 30);
  circle(111, 240, 30);
  circle(107, 194, 30);
  circle(114, 251, 30);
  circle(108, 267, 30);
  circle(115, 270, 30);
  circle(139, 97, 30);
  circle(119, 112, 30);
  circle(125, 270, 30);
  circle(121, 288, 50);
  circle(135, 309, 40);
  circle(140, 330, 40);
  circle(139, 350, 40);
  circle(70, 184, 65);
  circle(77, 123, 65);
  circle(72, 233, 65);
  circle(72, 277, 65);
  circle(76, 321, 65);
  circle(109, 314, 65);
  circle(106, 340, 70);
  circle(100, 83, 40);
  circle(129, 69, 30);
  circle(151, 59, 30);


}