
When I heard the sound of the button in class on Thursday, the intro of this song INSTANTLY popped in my head (first 10-15 seconds, becomes a repeating riff):
Hence, you can imagine where I’m going with this.
Concept:
This felt very self-indulgent, but I’m a piano/keyboard and electric guitar/bass player, hence I wanted to make something I could actually play by pressing things, like the instruments. While I didn’t originally have any intention for analog sensors, I thought I could use the potentiometer to control the “piano” sounds and make them vibrate a bit. I also wanted to be able to play the intro to this song with the notes, and also have an option to listen to it through the instrument (when I’m too lazy to play myself… haha). Usually I have more to say for the concept, but this time, I felt very monkey-brained, especially since I still get confused with arduino: I hear sound, I associate to something else, I make based on this, ta-daa!
Circuit Demonstrations (please ignore the fact that there’s no cursor, I recorded these on my iPad):
Song Button:
Individual Buttons:
Process:
This took me quite a while to do manually, but let’s go step-by-step.
ONE: Find the notes of the song (or part of the song) you want.
While I would have liked to do this with my piano, I 1) don’t have my piano with me and 2) don’t have enough time, so I went online and searched for a sheet music of the intro part of the song.

I found this on musescore, and found out how many notes were there (8 notes: C6, B♭5, A5, G5, F5, E5, D5 and D♭5). From there, I then wrote down the order in which each note came, and how long each note was.
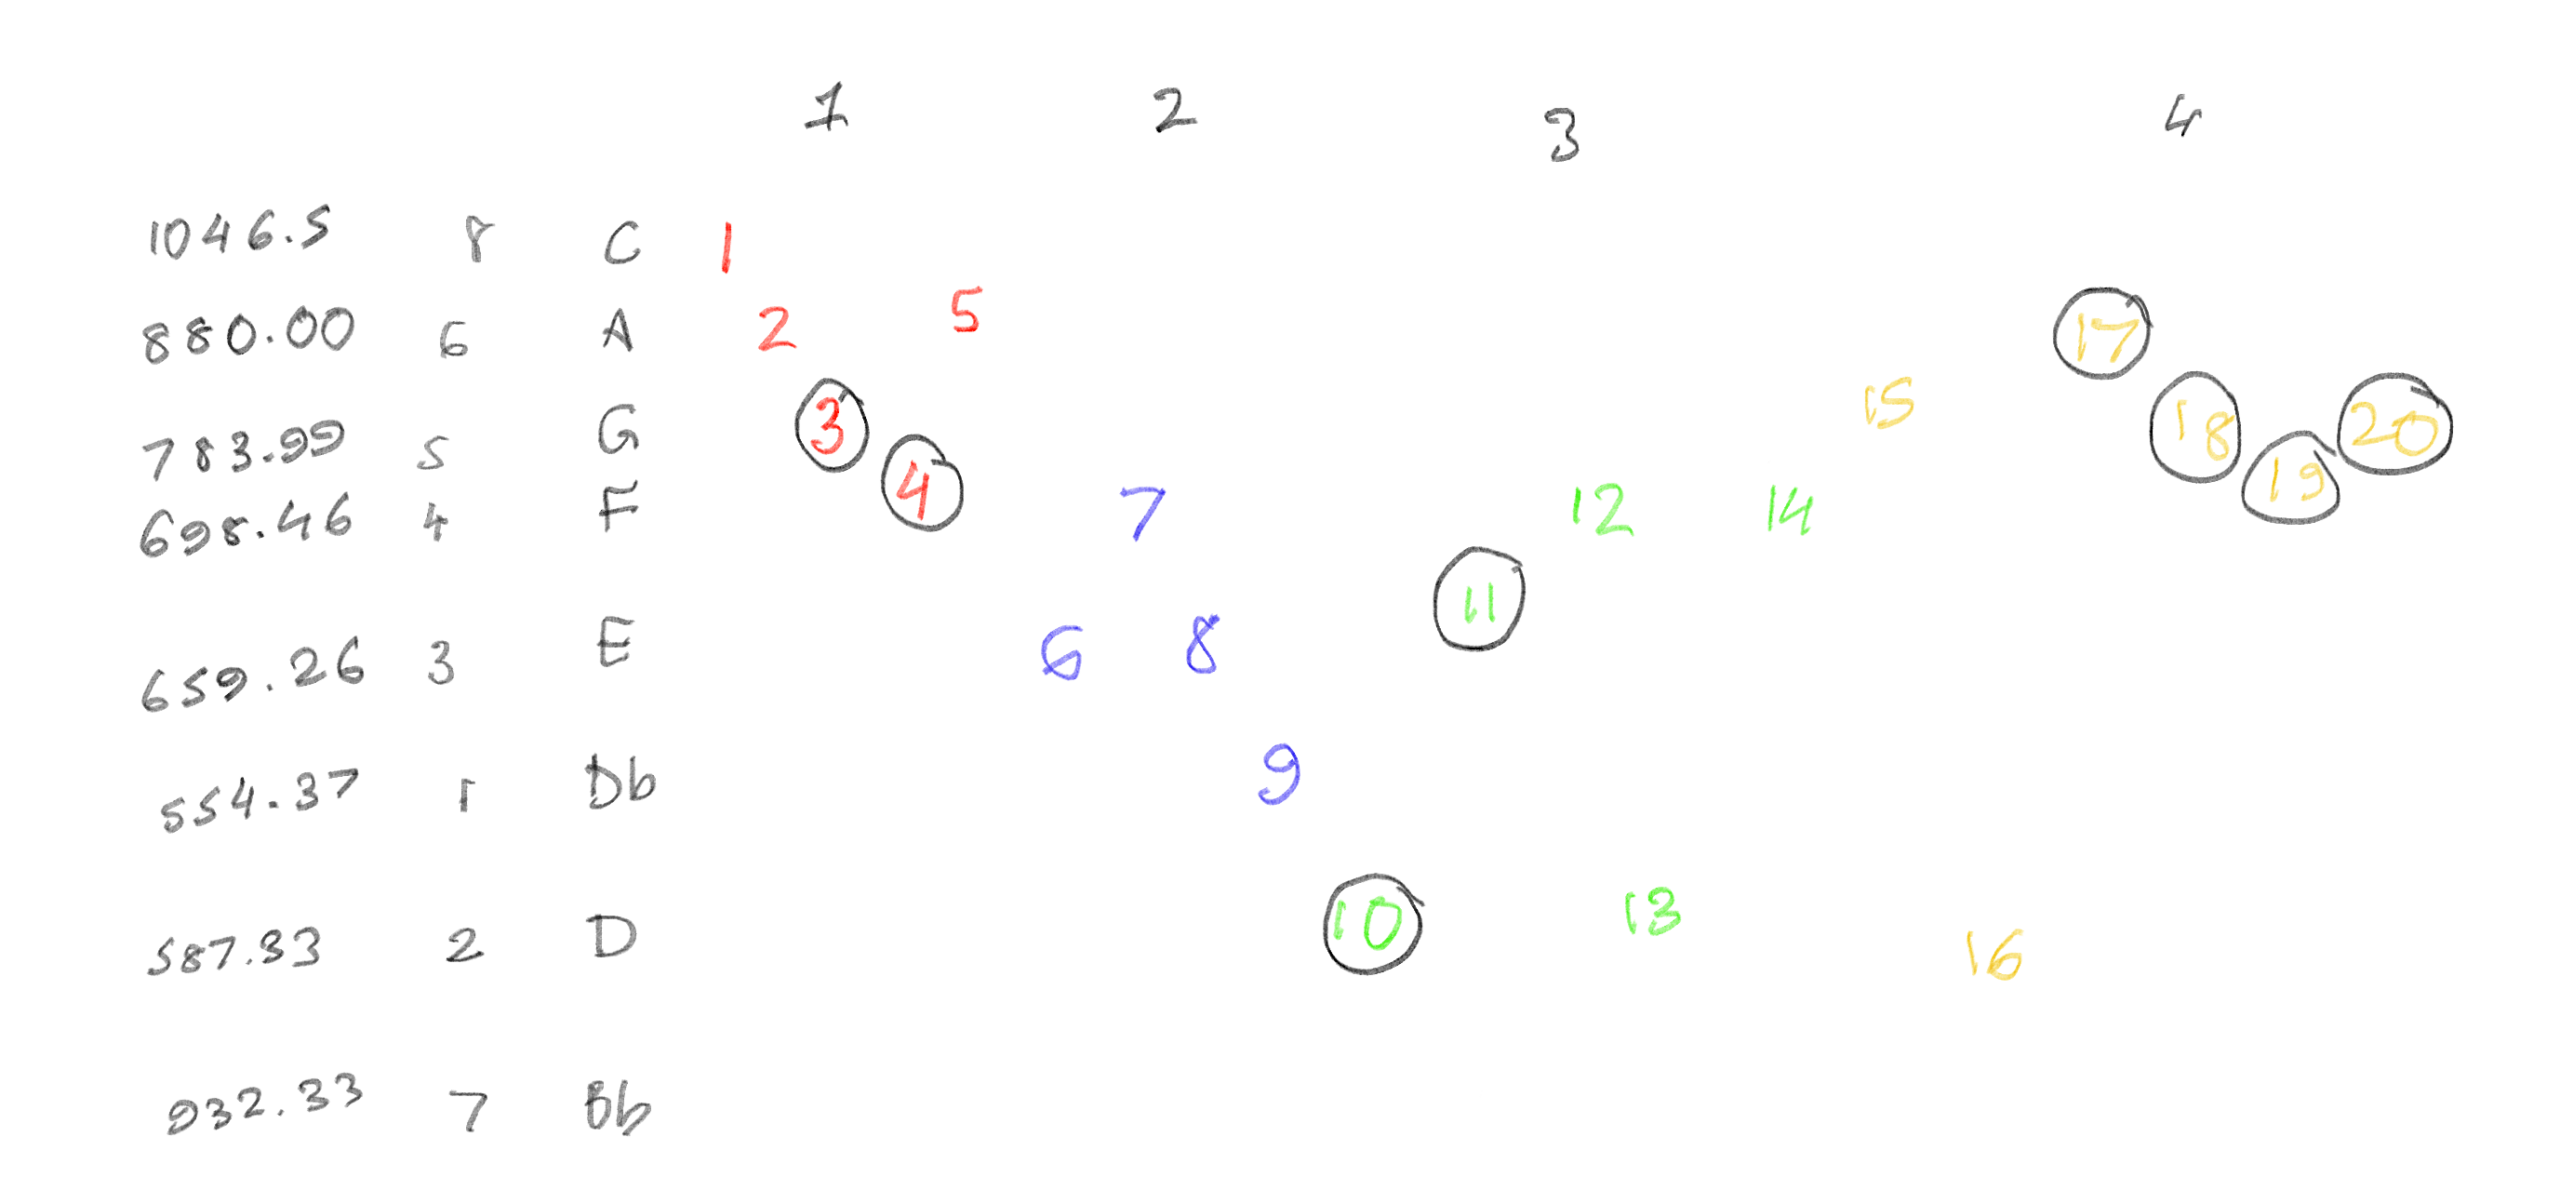
I split each bar by color, and circled all the notes which were quavers (1/2 shorter than the un-circled notes). Then, using this chart, I also marked each frequency. After figuring this out, I then started creating the circuit.
TWO: … make the circuit.
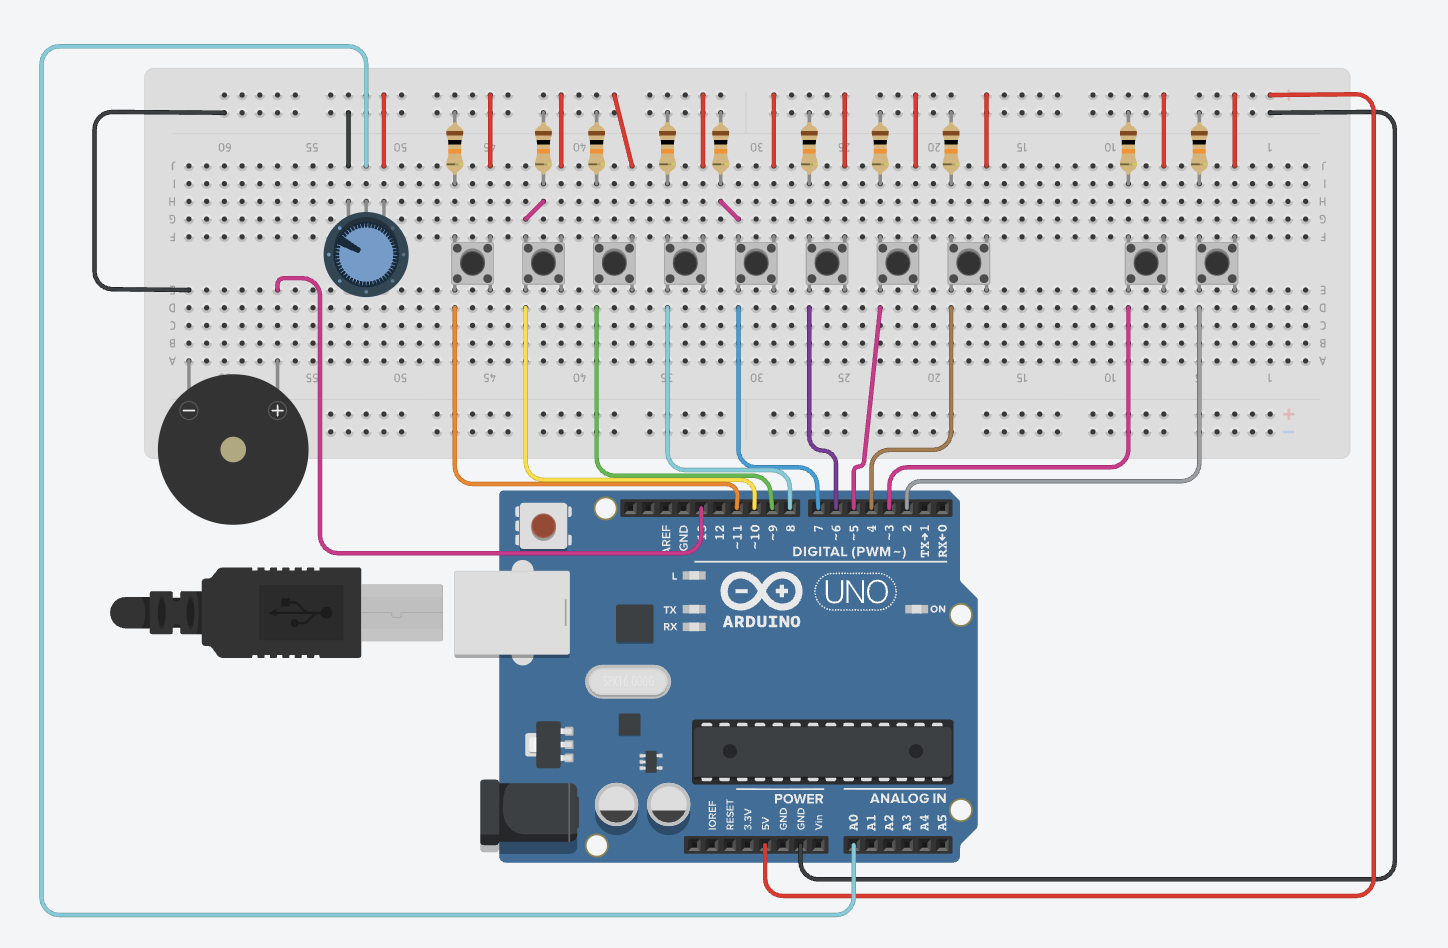
Making the circuit was pretty straightforward. I did opt for a larger breadboard than I usually do (just to fit all the keys), and one thing that did frustrate me was the spacing of the ground and voltage dots on the board (DIAGONAL WIRES???). I had to play around with the spacing of the buttons quite a lot, but otherwise, everything fit well.
THREE: Spend a few hours coding. And coding. And coding a bit more. Oh, wait, you missed a comma- I’ll break my code down lines-by-lines, mainly the parts that make this the instrument (or else I’ll end up breaking everything down).
I defined each frequency I calculated as the note to prevent me from having to type each decimal again and again. I used speedMultiplier because later on in the code, I messed up the speed at which to play the notes (so just temporarily ignore that). StaccatoMultiplier was so I could reduce the length of the note, as the original song has the sound very short and crisp for most notes. I then assigned all of the hardware attached to the Arduino.
#define C6 1046.5
#define B5 932.33
#define A5 880
#define G5 783.99
#define F5 698.46
#define E5 659.26
#define D5 587.33
#define DF5 554.37

float speedMultiplier = 0.9;
float staccatoMultiplier = 0.6;

const int buttons[8]      = {4, 5, 6, 7, 8, 9, 10, 11};
const int baseNotes[8]    = {C6, B5, A5, G5, F5, E5, D5, DF5};
const int PIEZO           = 13;
const int POT             = A0;
const int BTN_PLAY_INTRO  = 3;
const int BTN_STOP_INTRO  = 2;
I coded the song for the second last button (on the circuit). (I was really proud of this part) I had to write down the order of notes first, and then pick out durations for each note in ms. (400 is crotchets, 200 is quavers).
const int introNotes[] = {
  C6, A5, G5, F5, A5,
  E5, F5, E5, DF5,
  D5, E5, F5, D5, F5,
  G5, B5, A5, G5, F5, G5,
  C6, A5, G5, F5, A5,
  E5, F5, E5, DF5,
  D5, E5, F5, D5, F5,
  G5, B5, A5, G5, F5, G5
};

const int introDurations[] = {
  400, 400, 200, 200, 400,
  400, 400, 400, 400,
  200, 200, 400, 400, 400,
  400, 400, 200, 200, 200, 200,
  400, 400, 200, 200, 400,
  400, 400, 400, 400,
  200, 200, 400, 400, 400,
  400, 400, 200, 200, 200, 200
};

const int INTRO_LEN = 40; // total of 40 notes
int introTimings[40]; // array to store when each note starts
int totalIntroTime = 0;
bool playingIntro = false; // to make sure it doesn't play without pressing button
unsigned long introStartTime = 0;
For setup(), I made sure that the speaker was silent at startup. When I was originally coding, every time I would run the simulation, my ears would blast at the random sounds coming, and I needed to remove that. runningTime was when the song would start playing, and to calculate when to play each note after this, the code would calculate such that:
void setup() {
  noTone(PIEZO);
  for (int i = 0; i < 8; i++)
    pinMode(buttons[i], INPUT);
  pinMode(PIEZO, OUTPUT);
  pinMode(BTN_PLAY_INTRO, INPUT);
  pinMode(BTN_STOP_INTRO, INPUT);

  int runningTime = 0;
  for (int i = 0; i < INTRO_LEN; i++) { // for each of the 40 notes
    introTimings[i] = runningTime; // remember when THIS note starts
    runningTime += (int)(introDurations[i] * speedMultiplier); // because I needed to fix the speed LOL
  }
  totalIntroTime = runningTime;
}
I noticed I was having an issue where when I would play each note in the song, I would have a note in between which didn’t fit. To fix this, I used this:
int currentNote = -1; // start with no note
      for (int i = 0; i < INTRO_LEN; i++) {
        if (elapsed >= introTimings[i] && elapsed < (introTimings[i] + (int)(introDurations[i] * speedMultiplier * staccatoMultiplier))) {
          currentNote = i;
          break;
        }
      }

      if (currentNote == -1) {
        noTone(PIEZO); // silence if no note matches current time
      } else {
        tone(PIEZO, (int)introNotes[currentNote]);
      }
The loop would find a note that matches the current time for the next note, and if no note matches the time window for the specific note, it would continue not playing (remains -1) and make it silent until the next note.
Then, here, I edited the vibrato of the note with it (how shaky or pure the note is). This code has that, and also code to stop the song from playing if you play any other note on the piano. The vibrato is only heard on the individual button notes, not the programmed song.
// stopping the music

for (int i = 0; i < 8; i++) {
      if (digitalRead(buttons[i]) == HIGH) {
        playingIntro = false;
        noTone(PIEZO);
        break;
      }
    }
  }
// individual button mode (no music)

if (!playingIntro) { //only not intro
    float vibratoHz = map(analogRead(POT), 0, 1023, 1, 20);
    float vibratoDepth = 20;

// calculate vibrato as a sine wave
    unsigned long now = millis(); // current time
    float offset = sin(2.0 * 3.14159 * vibratoHz * now / 1000.0) * vibratoDepth;
    // oscillate between -20 and +20, not too much
    bool anyPressed = false; // any piano note pressed
    for (int i = 0; i < 8; i++) { // look through which button is pressed
      if (digitalRead(buttons[i]) == HIGH) {
        int finalFreq = (int)(baseNotes[i] + offset); // play the note with vibrato
        tone(PIEZO, finalFreq);
        anyPressed = true;
        break;
      }
    }
    if (!anyPressed) noTone(PIEZO);
  }
}
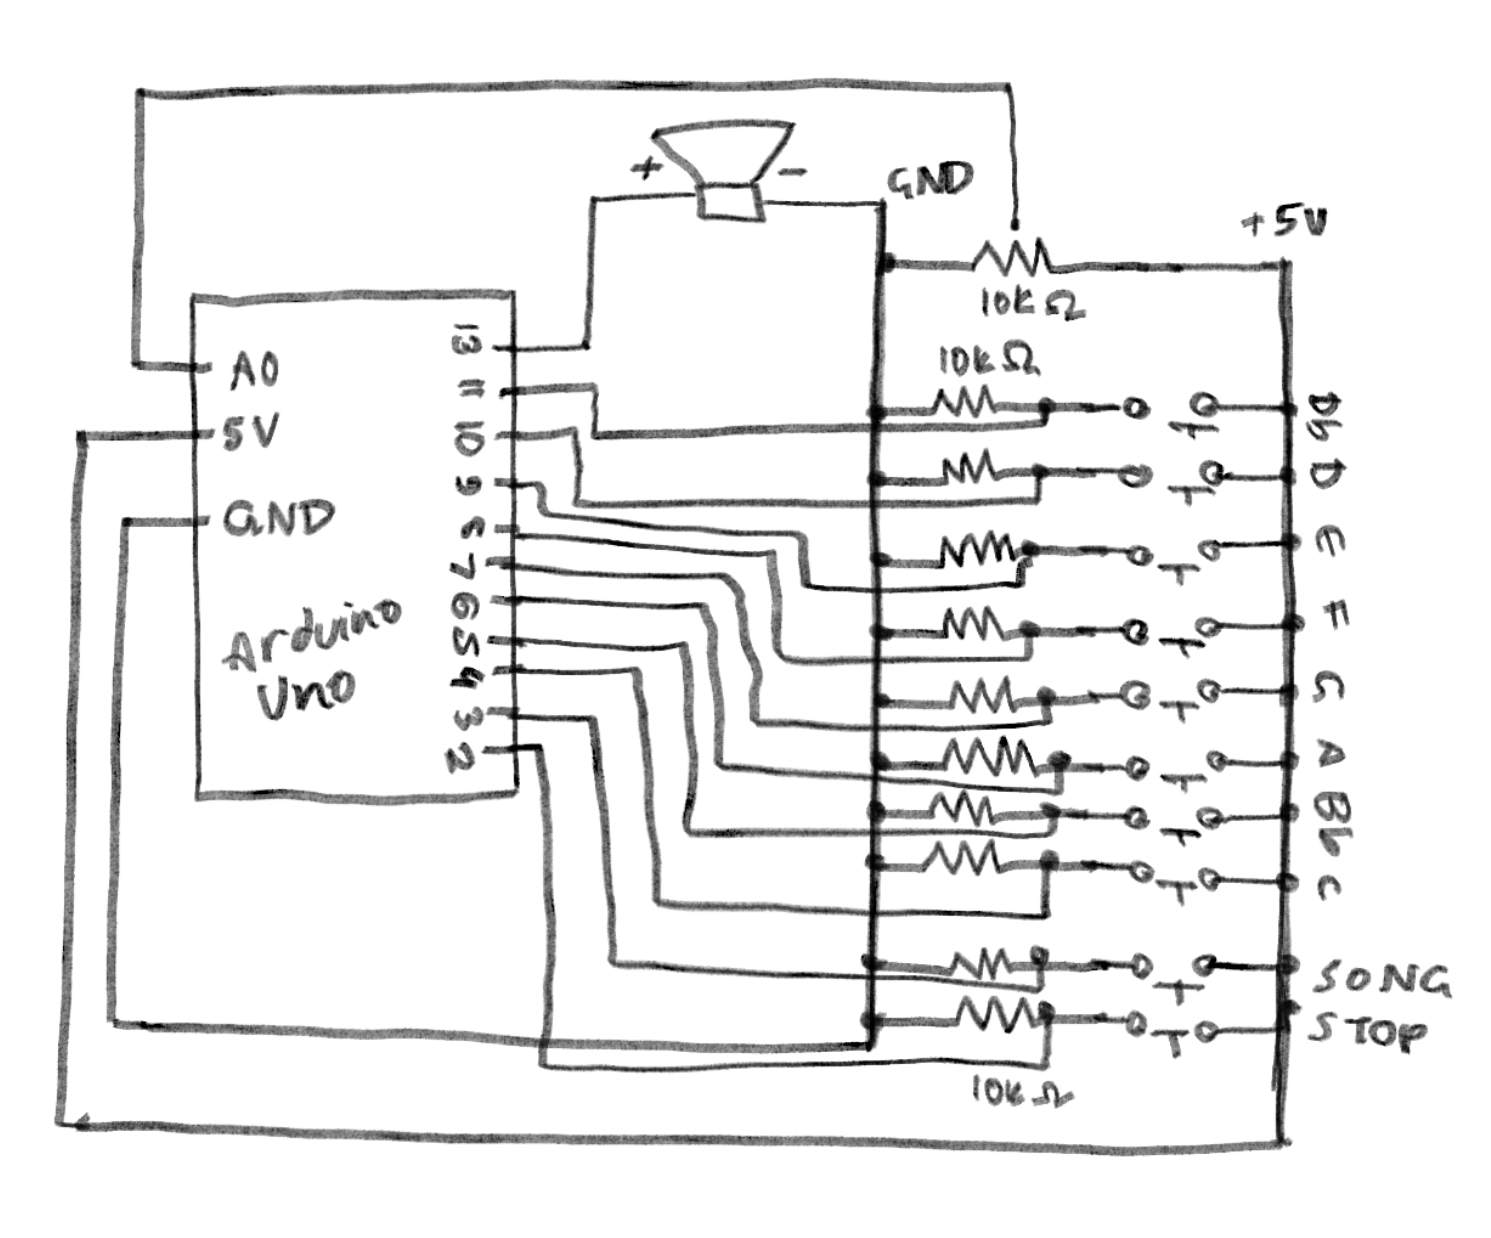
Schematic:
 Reflections:
I’m glad it came out well. I was worried I’d mess this up and wouldn’t be able to hear the sound, especially with all the fumbles in between such as loud sounds that weren’t coded, or bad timing of the notes. I’m also glad that not only the song worked, but so did the notes! I didn’t expect the vibrato to actually work out so you can actually hear it clearly. I had a lot of fun making this. ദ്ദി(。•̀ ,<)~✩‧₊
I do feel like I could have added more things for it to come out the way I would further envision it. I wanted to put LEDs to light up every time you press a button (but was worried about breadboard space), those LED displays to show something while the song played (but didn’t want to venture there just yet), and include a way for people to add on the rest of the song’s instruments, like the drums and guitar (but didn’t know how to do it on TinkerCad). Hopefully I can implement these in my final project! 🙂