
Concept
I wanted to create something we haven’t done yet with potentiometer and multiple LEDs. I thought that it would be cool if I manage to create a circuit that will control multiple LEDs through one input that was mainly used for only one LED. This circuit takes the analog input from potentiometer, and depending on its value chooses which LED to light up, so when you spin it they all light up one by one. If you press a button, all LED light up. This circuit reminded me of DJ-board with these switches and button you can press anytime, so by tinkering with this some nice sequence of lights can be created.
How this was made
To make this circuit, I googled how potentiometer works and what values it can output, and then I reffered to Week 9 tutorials on TinkerCad for references on how to connect buttons and potentiometer, and to remind myself on how this works in code.
// C++ code
//
int sensorValue = 0;
int buttonState = 0;

void setup()
{
  pinMode(A0, INPUT);
  pinMode(2, INPUT);
  pinMode(13, OUTPUT);
  pinMode(12, OUTPUT);
  pinMode(11, OUTPUT);
  pinMode(10, OUTPUT);
}

void loop()
{
  sensorValue = analogRead(A0);
  buttonState = digitalRead(2);


  if (buttonState == HIGH) {
    digitalWrite(12, HIGH);
    digitalWrite(11, HIGH);
    digitalWrite(13, HIGH);
    digitalWrite(10, HIGH);
  } else {
    if (sensorValue >= 0 && sensorValue < 256) {
      digitalWrite(12, LOW);
      digitalWrite(11, LOW);
      digitalWrite(10, LOW);
      digitalWrite(13, HIGH);
    }

    else if (sensorValue >= 256 && sensorValue < 512) {
      digitalWrite(13, LOW);
      digitalWrite(11, LOW);
      digitalWrite(10, LOW);
      digitalWrite(12, HIGH);
    }
    else if (sensorValue >= 512 && sensorValue < 768) {
      digitalWrite(12, LOW);
      digitalWrite(13, LOW);
      digitalWrite(10, LOW);
      digitalWrite(11, HIGH);
    }
    else {
      digitalWrite(12, LOW);
      digitalWrite(11, LOW);
      digitalWrite(13, LOW);
      digitalWrite(10, HIGH);
    }
  }
}
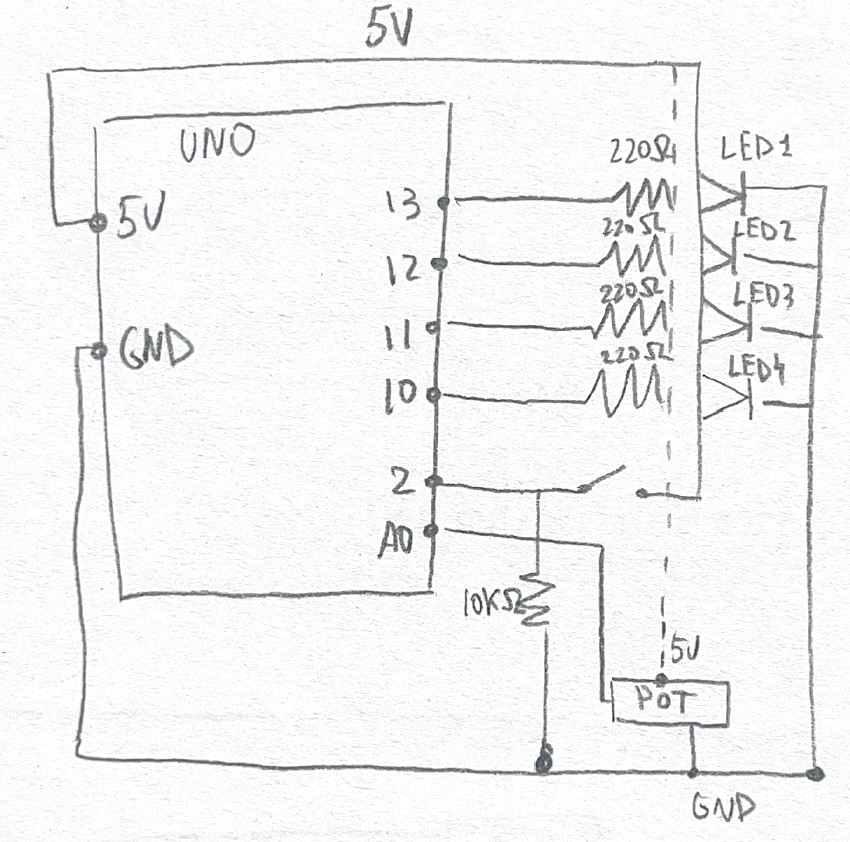
To control 4 LEDs with potentiometer, I wrote a sequence of if-else blocks that light up certain LED depending on the value the potentiometer outputs, and turns off all the other LEDs. These if-else blocks are wrapped into a bigger if-else: if the button is not pressed, these blocks execute, otherwise — all LEDs switch up.
My schematics look the following way:

And here’s the simulation and how it works on physical Arduino:
Reflection
I’m really happy of how it turned out and that I was able to do both online and real version of this small task. It was a bit hard to assenble it all on the Arduino because all the parts are really small, but it works so I’m happy. For further improvement, I wonder if there is a more efficient way with less wires to assemble this project because right now it looks a bit messy.